VOLKSWAGEN GOLF 1993 1H / 3.G Owners Manual
Manufacturer: VOLKSWAGEN, Model Year: 1993, Model line: GOLF, Model: VOLKSWAGEN GOLF 1993 1H / 3.GPages: 156, PDF Size: 6.36 MB
Page 111 of 156
Downloaded from www.Manualslib.com manuals search engine GENERAL MAINTENANCE
Winter tyres
winter conditions win ter tyres w ill dis
- n ctly improve the vehicle's handling even
th e case of four
wheel drive ve hicles. This
ap plies In particular to veh icles that are
eq uipped with wide/high -speed tyres (Code
e
tters H or V in the tyre designation on the
: r e wall). Because of their construction
,lIdth, rubber mixture, tread formation etc) :n se tyres provide less traction on ice and
sn ow.
h
en fitting winter tyres note the follow
n g:
• Onl y radial ply winter tyres may
be fitted.
h e factory recommended tyre sizes are given on page 139.
•
To obtain the best possible handling ch aracteristics, wint er tyres must be fitted o n all fou r wheels.
• The pressures for
winter tyres must be
0.2 bar higher than with summer tyres
s e e Technical Data on page 142.
•
Winter tyres are no longe r fully effec tive
h en the tread has worn down to a depth
o f 4 mm.
The following speed limits are valid for winter tyres:
Code letter
Q max. 160 km/h
Code letter T max. 190 km/h
Code letter H ma
x. 210 km/h
In Germany, vehicles w hich can exceed this
speed must have an appropriate sticker in the driver's field of view. Suitable stickers
are available from Volkswagen dealers.
Please note regulations to this effect
in your
cou ntry .
• All-weath er t yres
can also be used in
stead of winter ty res .
• If you have a flat tyre the remarks on
using the spare wheel on page 114 should
be noted .
•
Do not leave winter tyres fitted for an un
necessary long period because w hen the
roads are free of
snow and ice the handling with summer tyres is better.
r:lil:.-. For environmental reasons (!Jtf summer tyres should be fitted again as soon as possible because normally they are quieterin running, tyre wear is reduced and the fuel consumption is lower_
Snow chains
Snow chains can be used on all tyre sizes
listed on page 139. The chains may only be fitted on the front wheels -this applies also to the syncro.
The use of sno w chains on the temporary
spare wheel is not permitted for technical
reasons. Further details are given on page
114 .
Only use thin chains w hich do not stand
clea r
more than 15 mm (including ten
sioner).
When using snow chains wheel trim plates
and trim rings must be ta ken off . For sa fety
reasons the w heel bolts must then be fitted with caps w hich are available from Volks
wagen dealers.
When driving over roads whic h are free of snow you must remo ve the chains. On such
road s they are detrimental to vehic le handl
ing, damage
the tyres and wear out Quickly .
In Germany , the maximum permissible
speed w ith snow chains is 50 m/h
109
Page 112 of 156
Downloaded from www.Manualslib.com manuals search engine GENERAL MAINTENANCE
Driving abroad
If the vehicle IS to be taken abroad, the following must also be borne in mind:
• If the
ve hicle has a petrol engine and catalytic converter, one must ensure that
u nleaded petrol will be available dur ing the
jo urney -see page 92. The automobi le
clubs offer information about the unleaded
filling station network.
• Although there are more than
10 000 Volkswagen dealers all over the world to
service Vol k swagen vehicles there are countries in which only a limited amount of service is avai lab le or none at all.
• In certain countries it is also possib le
that your vehicle model is not sold so that
certain spare parts will not
be available or
that the Volkswagen personnel are not fam
iliar with the repair procedure should any
thing go wrong.
The Volkswagen
Sa les Centres in Germany
or the Importer concerned will be only too
pleased to give advice on the necessary
technical preparation of the vehicle, on the
maintenance required and on th e rep air poss ibilities.
The addresses are given in the v
ehicle
wall et.
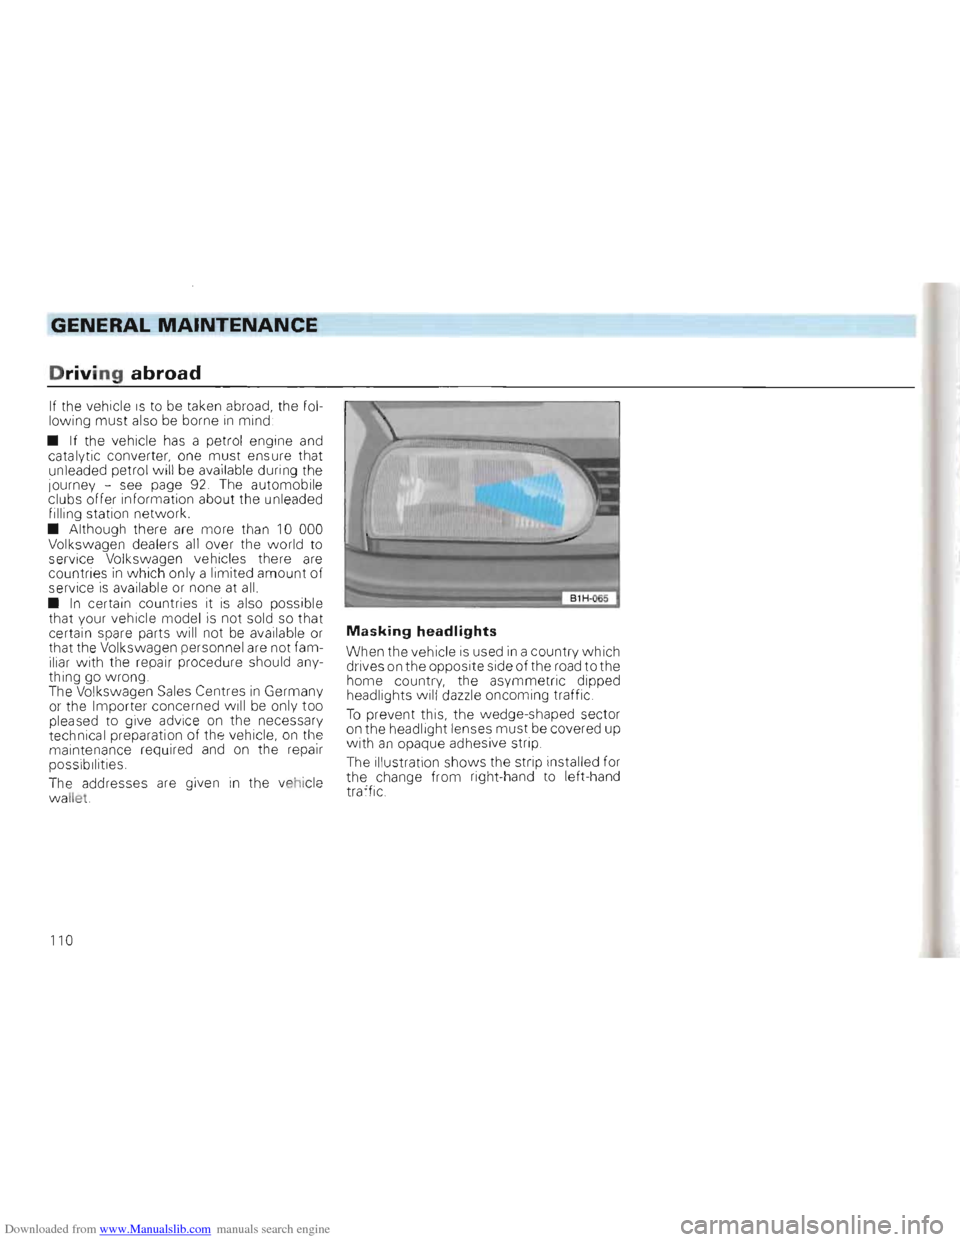
Masking headlights
When the vehicle is used in a country which
drives on the opposite side of the road tothe home country, the asymmetr ic dipped
headlights wil l dazzle oncoming traffic .
To prevent this, the wedge-shaped sector on the head light le nses must be covered up
w it h an opaque adhesive strip.
The illust ration shows the strip insta
lled for
the change from right-hand to left-hand
traff
ic.
110
Page 113 of 156
Downloaded from www.Manualslib.com manuals search engine GENERAL MAINTENANCE
Mobile telephones and
Accessories, mods. and renewal of parts two-way radio s
-h e Golf is built in accordance with the "n ost modern principles of safety technol'Jgy and offers therefore a high degree of ac,lYe and passive safety. To ensure that this remains so the vehicle as supp lied by the ;actory may not be modifi ed without careful
h ought. The following points must be noted if the vehicle is to be subsequently
( tted with accessories, technically modi
' ied or have parts renewed later on:
• Alway s consu lt a Volkswagen dealer before purchasing accessories and before an y modifications are carried out becau se ~hrough cl ose cooperation with us the
V o lkswagen Organisation is particularly
c ompetent in such matters.
Attention In your own interests we recommend that only genuine accessories or only expressly ap~roved Volkswagen accessories I and Genuine Volkswagen Parts are used on your Golf. The reliability, safety and suitability of these accessories and these parts has been specially determined for the Golf
.) No! available in all E xport markets.
• Despite continuous market observation we cannot assess or accept responsibility for other products even though in some cases approval has been given by a legally appointed test centre or an official permit has been given.
• Approved Vo lk swagen accessories and
Genuine Vol kswa gen Parts can be obtained
from Volkswag en dealers who will of
course carry out th e fitting correctly.
• Addition a
lly connected electric con
sumers e.g. c old box, h orns, fans etc. must
correspo nd to the electromagnetic com
patibilit y
as pel' D I VDE 40 839 . Oth erwise
functional defects can occur in the vehicle.
• If tech nical m od ifications are to be made, ou r gu idelines must be observed . Thi s is to ensure that no damage occurs to
the vehicle, the traff ic and op erating safety
i s retained and tha t th e modification s are permissible. Volk swage n dealers will also
c a rry out th is wor k co rr e ctly or will reco m
mend a special ist worksh op
Mobile telephones or two-way radios must not be operated inside the vehicle without a separate external aerial.
The use of mob ile telephones and two-way radios can result in extremely high elec tro
magnetic fields generated in the vehicle in
terior (resonance effect). In suc h cases ma lfunctions of the vehicle electro nics cannot be ru led out.
Attention Mobile telephones and two-way radios operated inside the vehicle without a separate external aerial can be injurious to health due to the extremely high electromagnetic fields generated!
Furtherm ore, optimal r ange is only achieved with an external aerial.
Note
The operating instru ctions of the
mobile telephone or two-way radio must be adhered to!
111
Page 114 of 156
Downloaded from www.Manualslib.com manuals search engine DO-lT-YOURSELF
First aid kit, warning triangle
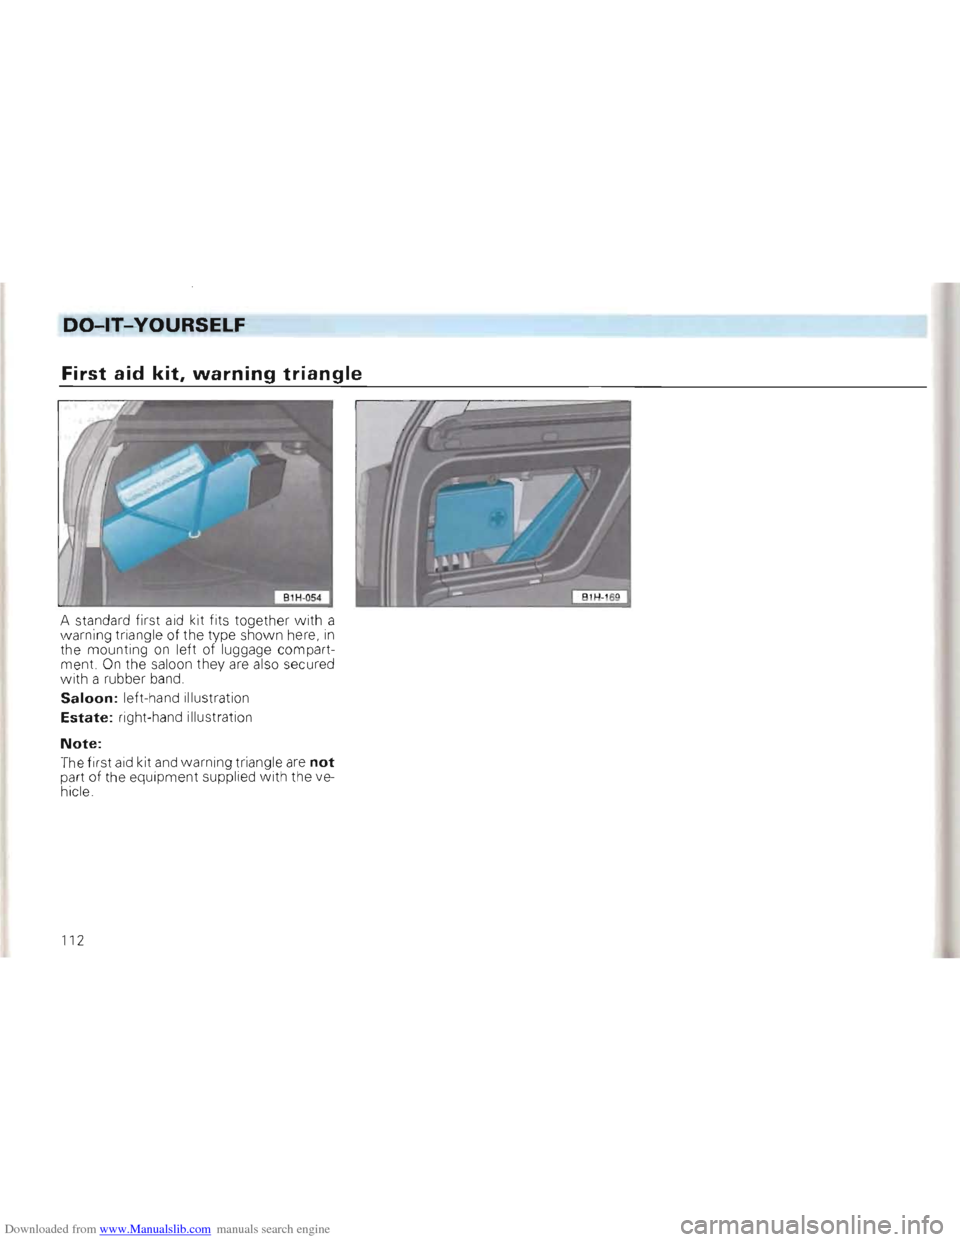
A standard first aid kit fits together with a
warning triangle of the type shown here, in
the mounting on left of luggage compart
ment. On the sa loon they are also secured
with a rubber band.
Saloon: left-hand illustration
Estate: right-hand illustration
Note:
The first aid kit and w arning triangle are not
part of th e equipment supplied w ith th e ve
hicl e .
112
Page 115 of 156
Downloaded from www.Manualslib.com manuals search engine DO-lT-YOURSELF
Storage of vehicle tools, spare wheel and
ball coupling* of trailer bracket
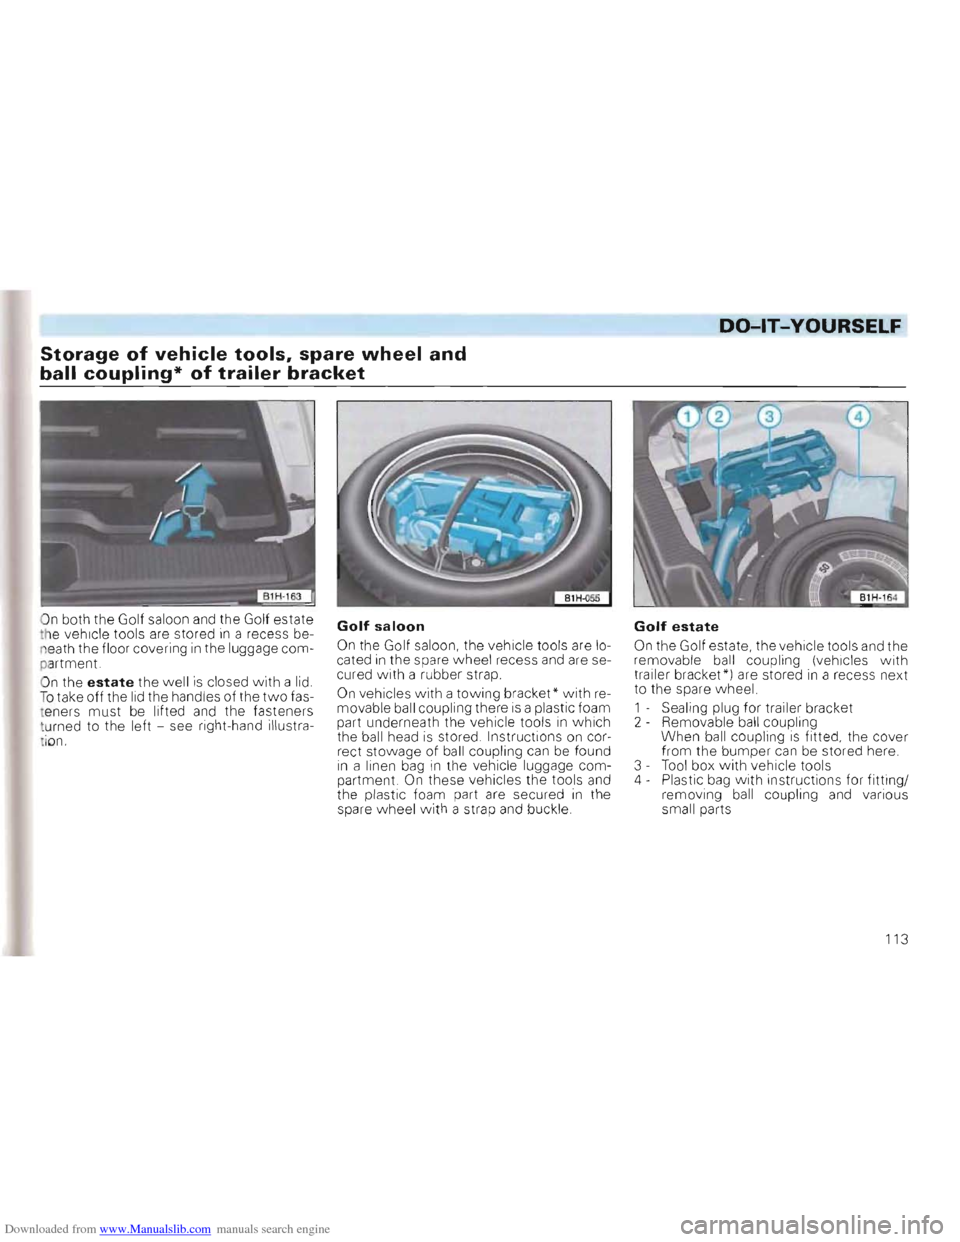
On both the Golf saloon and the Golf estate
t h e vehicle tools are stored in a rece ss be
n e ath the floor covering in the luggage com
p a rtment.
O n the
estate the w ell is closed with a lid. To take off the lid the handles of the two fas
t ener s must be lifted and the fasteners
t u rned to the left -see right-hand illustra
i
on.
Golf saloon
On the Golf saloon, the vehicle tools are lo
cated in the spare wheel recess and are se
cured with a rubber strap.
On vehicles with a to wing bracket* with removable ball coupling there is a plastic foam
part underneath the vehicle tools in w hich
the ball head is stored . Instructions on cor
rect stowage of ball coupling can be found in a linen bag in the vehicle luggage com
partment. On these vehicles the tools and the plastic foam part are secured in the
spare wheel with a stra p and buckle .
Golf estate
On the Golf estate, the vehicle tools and the
remo vable ball coupling (vehicles with trailer bracket*) are stored in a recess next
to the spare w heel.
1 - Sealing plug for trailer bracket
2 - Remo vable ball coupling
When ball coupling
is fitted , the cover
from the bumper can be stored here.
3 -Tool box with vehicle tools
4 - Plastic bag with instructions for fitting/
removing ball coupling and various
small parts
113
Page 116 of 156
Downloaded from www.Manualslib.com manuals search engine -----------------------DO-lT-YOURSELF
Vehicle tools Spare wheel
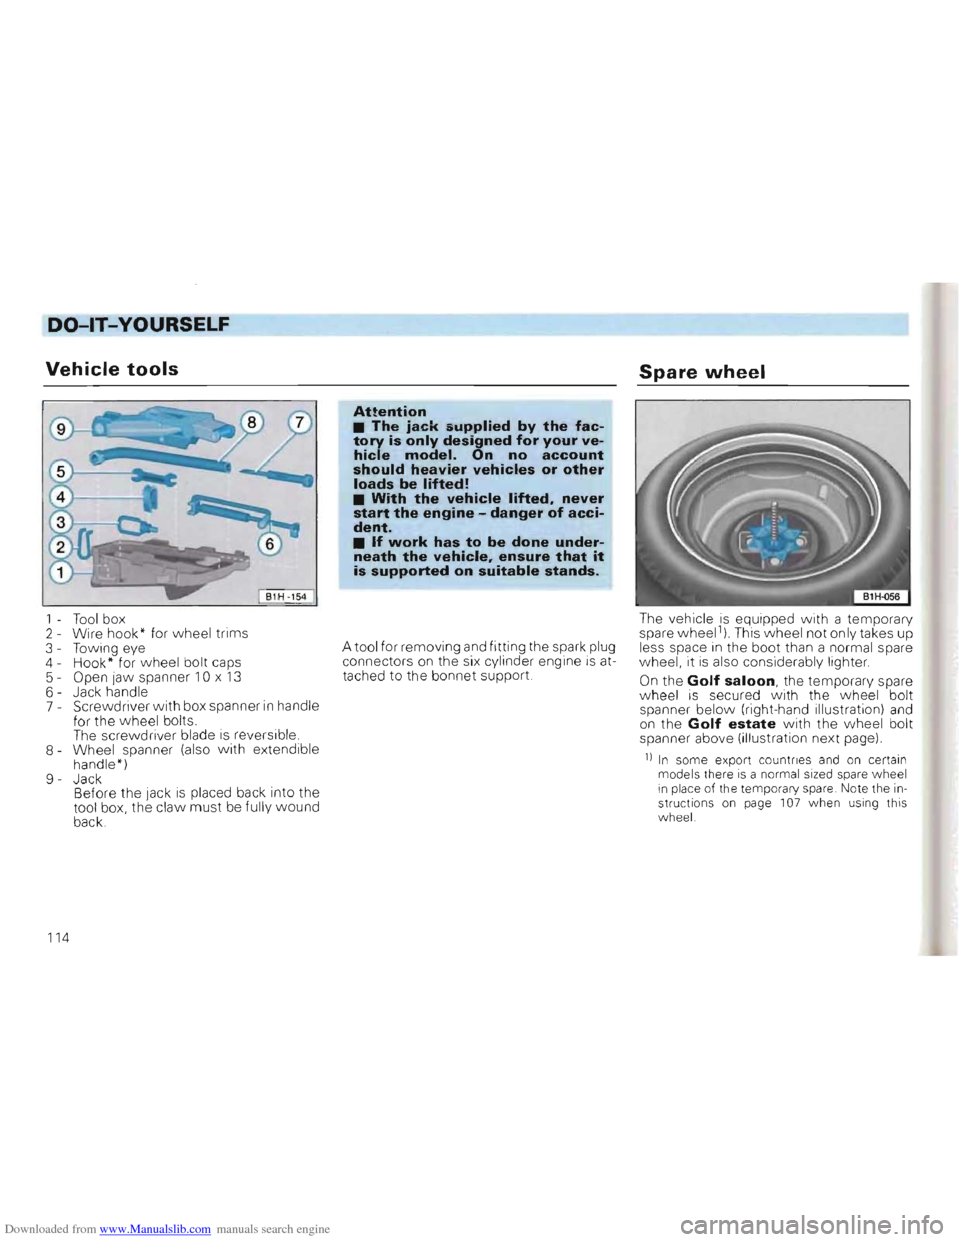
1 - Too l box
2 - Wire hook" for wheel trim s
3 - Towing eye
4 - Hook* for w heel bolt caps
5 - Open
Jaw spanner 10 x 13 6 -Jack handle
7 -Screwdriver with box spanner in handle
for the wheel bolts.
The scre
wdriver blade is reversible.
8 Wheel spanner (a lso with extendible
handle ")
9 Jack
Bef ore the
Jack is place d back into the
tool box, the claw must be fully wound
back.
Attention • The jack supplied by the factory is only designed for your vehicle model. On no account should heavier vehicles or other loads be lifted! • With the vehicle lifted. never start the engine -danger of accident. • If work has to be done underneath the vehicle. ensure that it is supported on suitable stands.
A tool for removing and fitting the spark plug
co nne ctors on the six cy linder engine is attac hed to the bonnet support. The
vehicle is
equippe d with a temporary spare wheel1
) This wheel not only takes up
less space in the boot than a norm al spare
w heel , it is a l
so considerabl y lighter .
On the Golf saloon, the temporary spare wheel is secured with the wheel bolt spanner below (right-hand illustration) and on the Golf estate with the vvheel bolt
spanner above (illustration next page).
11 In some export countries and on certain mod els there is a norma l sized spare wheel in place of the temporary spare. Note the in
structio ns o n page 107 when USing this
w heel.
114
Page 117 of 156
Downloaded from www.Manualslib.com manuals search engine DO-lT-YOURSELF
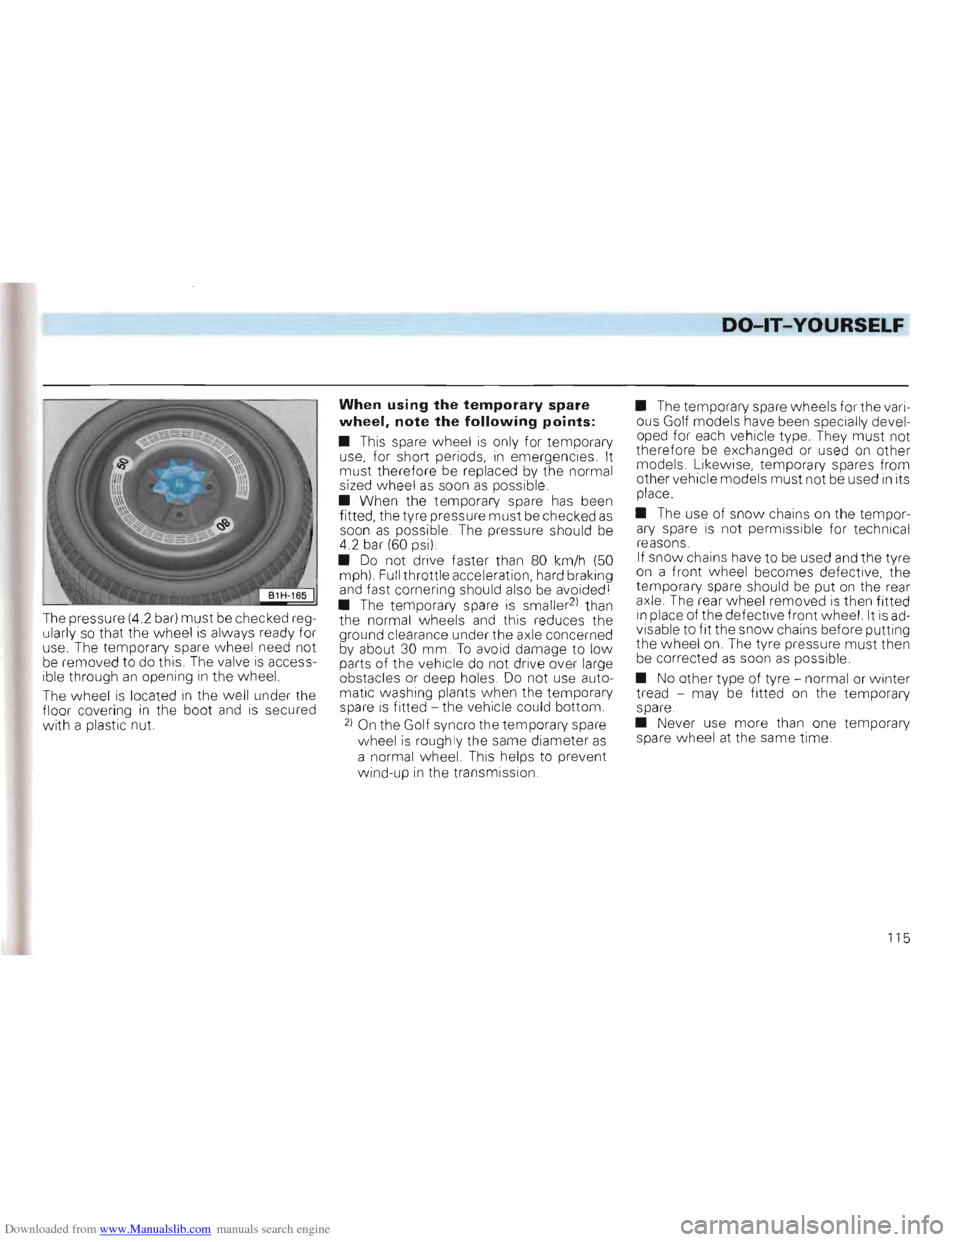
The pressure (4.2 bar) must be checked reg
u larly so that the wheel is always ready for
use. The temporary spare w heel need not
be removed to do this. The valve is access
ible through an opening in the wheel.
The w heel
is located in the well under the
floor covering in the boot and is secured
with a plastic nut
When using the temporary spare
wheel. note the following points:
• This spare wheel is only for temporary
use, for short periods, in emergencies. It
must therefore be replaced by the normal
sized wheel as soon as possible .
• When the temporary spare
has been
fitted , the tyre pressure must be checked as soon as possible. The pressure should be
4.2 bar (60 psi) .
•
Do not drive faster than 80 km/h (50 mph). Full throttle acceleration, hard braking and fast cornering should also be avoided I
• The temporary spare is smaller2
) than
the normal w heels and this reduces the
ground clearance under the axle concerned
by about 30 mm.
To avoid damage to low
parts of the vehicle do not drive over large
obstacles or deep holes. Do not use auto
matic washing plants when the temporary
spare
is fitted -the vehicle could bottom.
2) On the Golf syncro the temporary spare
vvheel is roughly the same diameter as a normal wheel. This helps to prevent
wind-up in the transmission . •
The temporary spare
wheels for the vari
ous Golf models have been specially devel
oped for each vehicle type. They must not
therefore be exchanged or used on other
models. Likewise, temporary spares from
other vehicle models must not
be used in its
place
• The use of
snow chains on the temporary spare is not permissible for technical
reasons. If snow chains have to be used
and the tyre on a front wheel becomes defective, the
temporary spare should be put on the rear
axle. The rear wheel removed is then fitted in place of the defecti ve front wheel. It is advisable to fit the snow chains before putting
the wheel on. The tyre pressure must then be corrected as soon as possible .
•
No other type of tyre - normal or winter
tread -may be fitted on the temporary
spare.
• Never use more than one temporary
spare wheel
at the same time.
115
Page 118 of 156
Downloaded from www.Manualslib.com manuals search engine DO-lT-YOURSELF
Changing wheels
Park the vehicle as far as possible away
from the traffic flow. If necessary switch on
emergency warning lights
and place the
warning triangle in position -note legal reQuirements,
• A
ll veh icles occupa nts shou ld leave the
vehicle and move to a safe area (e,g, behind
the barrier),
• App ly handbrake firml
y, If the car is on a
slope, block one of the wheels on the oppo
site side with a stone or some similar ob
ject.
•
Take too ls and spare wheel out of lug
gage compartment.
• Remove wheel bolt caps:
- Remove wheel bolt caps
with hook (from
vehicle tools),
- Remove wheel trim with the
wheel
spanner and the wire hook (from vehicle
tools) ,
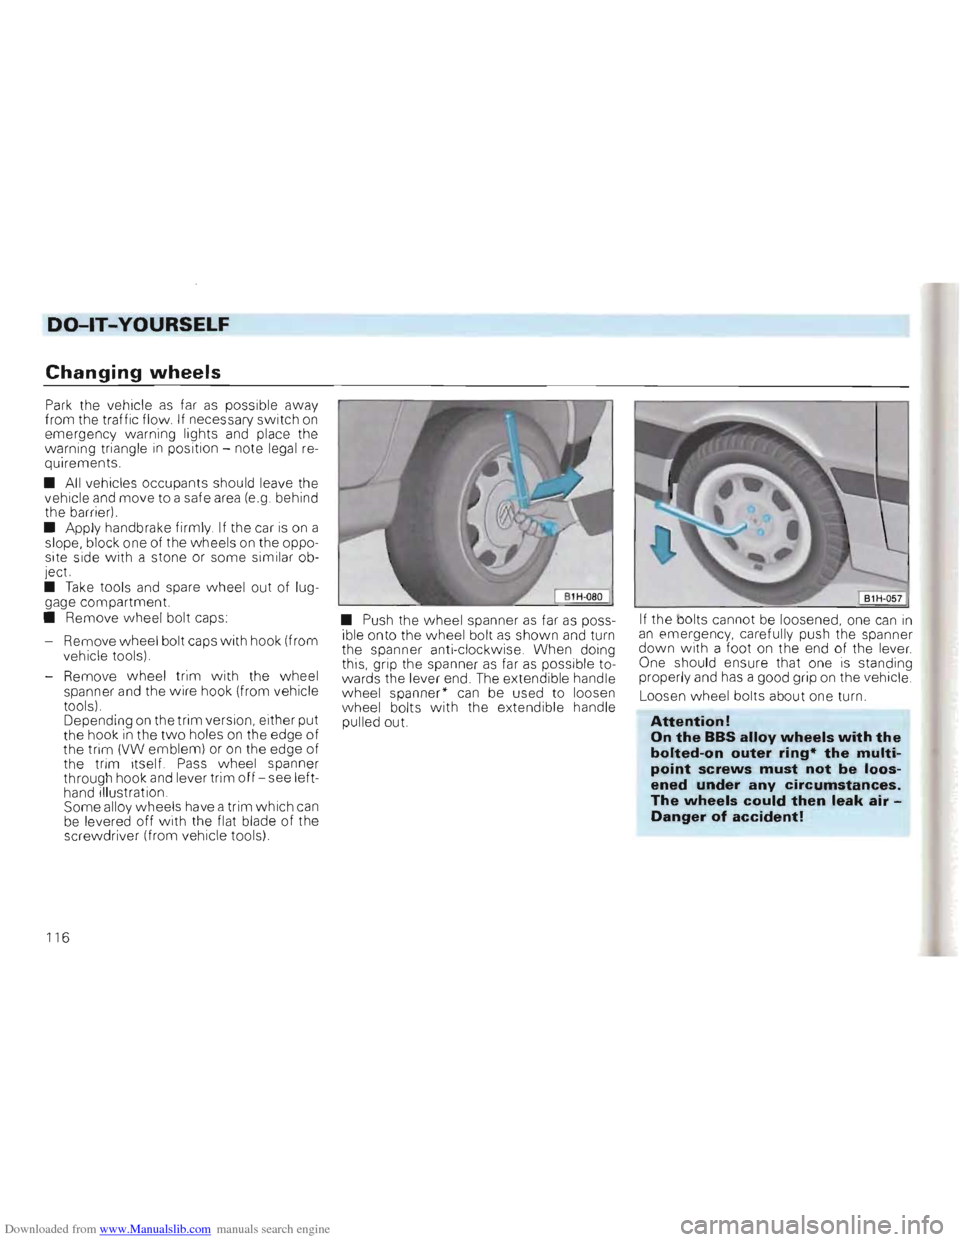
Depending
on the trim version , either put
the hook in the two holes on the edge of the trim (VW emblem) or on the edge of
the trim itself, Pass wheel spanner
through hook and lever trim off -see left
hand illustration ,
Some alloy wheels have a trim which can be levered off with the flat blade of the
screwdriver (from vehicle tools) •
Push the wheel spanner
as far as poss
ible onto the wheel bolt as shown and turn
the spanner anti-clockwise, When doing
this, grip the spanner
as far as possib le to
wards the lever end, The extend ib le handle
wheel spanner"
can be used to loosen wheel bolts with the extendible handle
pulled out. If
the bolts cannot be loosened, one can
in an emergency, carefully push the spanner down wi th a foot on the end of the lever.
One should ensure that one is standing
proper ly and has a good grip on the vehic le ,
Loosen
wheel bolts about one turn,
Attention!
On the BBS alloy wheels with the
bolted-on outer ring· the multi
point screws must not be loos
ened under any circumstances.
The wheels could then leak air Danger of accident!
116
Page 119 of 156
Downloaded from www.Manualslib.com manuals search engine DO-lT-YOURSELF
B1H:D5SI
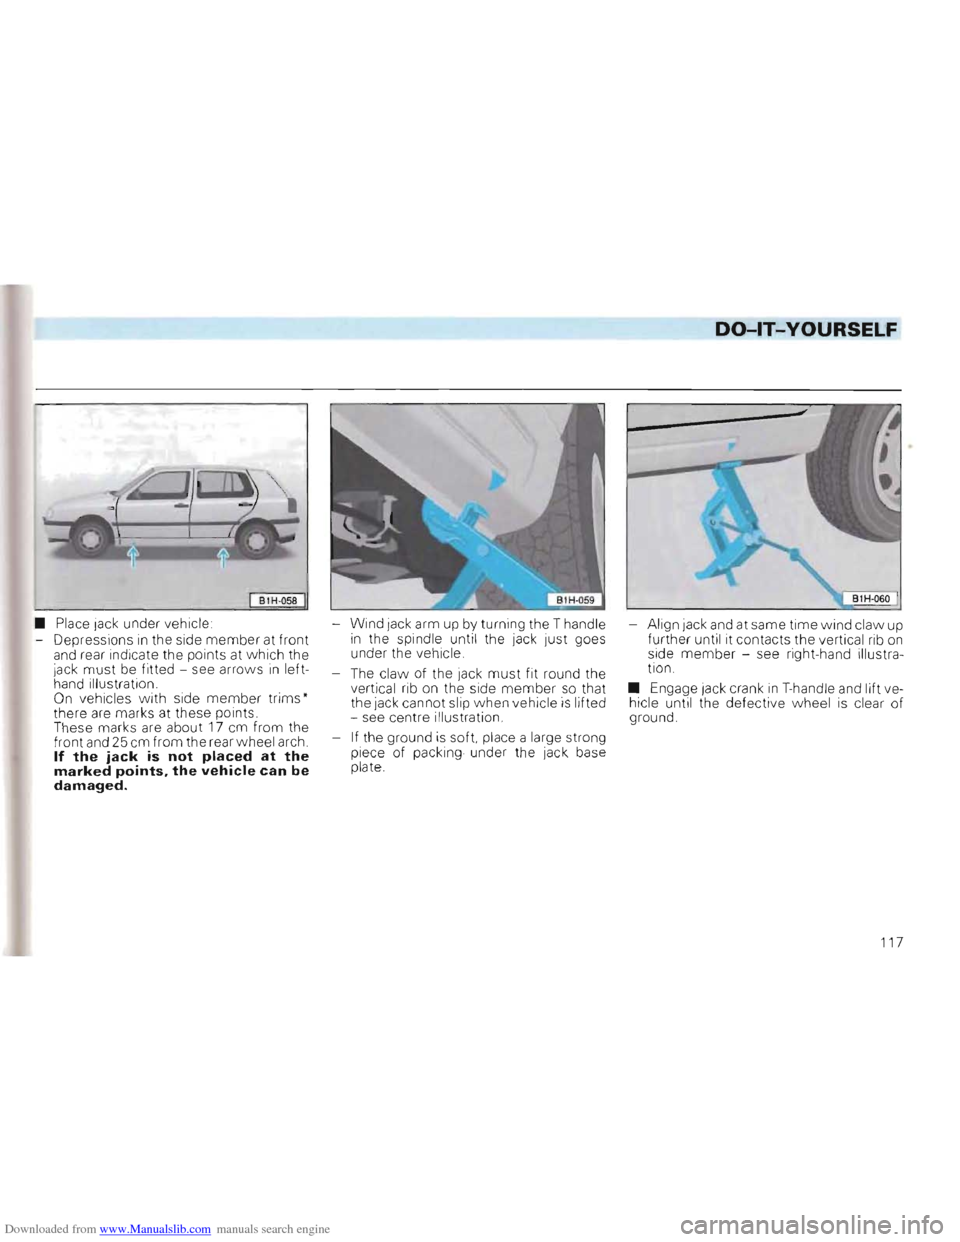
• Place lack under vehicle
- Depressions
in the side member at front and rear indicate the points at w hich the
j ack must be fitted -see arrows in left
hand illustration.
On vehicles w ith side member trims' there are marks at these points.
These marks are about 17 cm from the
front and 25 cm from the rear wheel arch.
If the jack is not placed at the marked points. the vehicle can be damaged.
-Wind lack arm up by turning the T handle in the spindle until the jack just goes
under the veh icle.
-
The cla w of the jack must fit round the
v ertical rib on the side member so that
the jack cannot slip when vehicle is lifted
- see centre illustration.
- If
the ground
is soft, place a large strong
piece of packing under the jack base
plate . -
Align lack
and at same time wind claw up
further until it contacts the vertical rib on side member -see right-hand illustra
tion.
• Engage
Jack crank in T-handle and lift ve
hicle until the defective wheel is clear of
ground.
117
Page 120 of 156
Downloaded from www.Manualslib.com manuals search engine DO-lT-YOURSELF
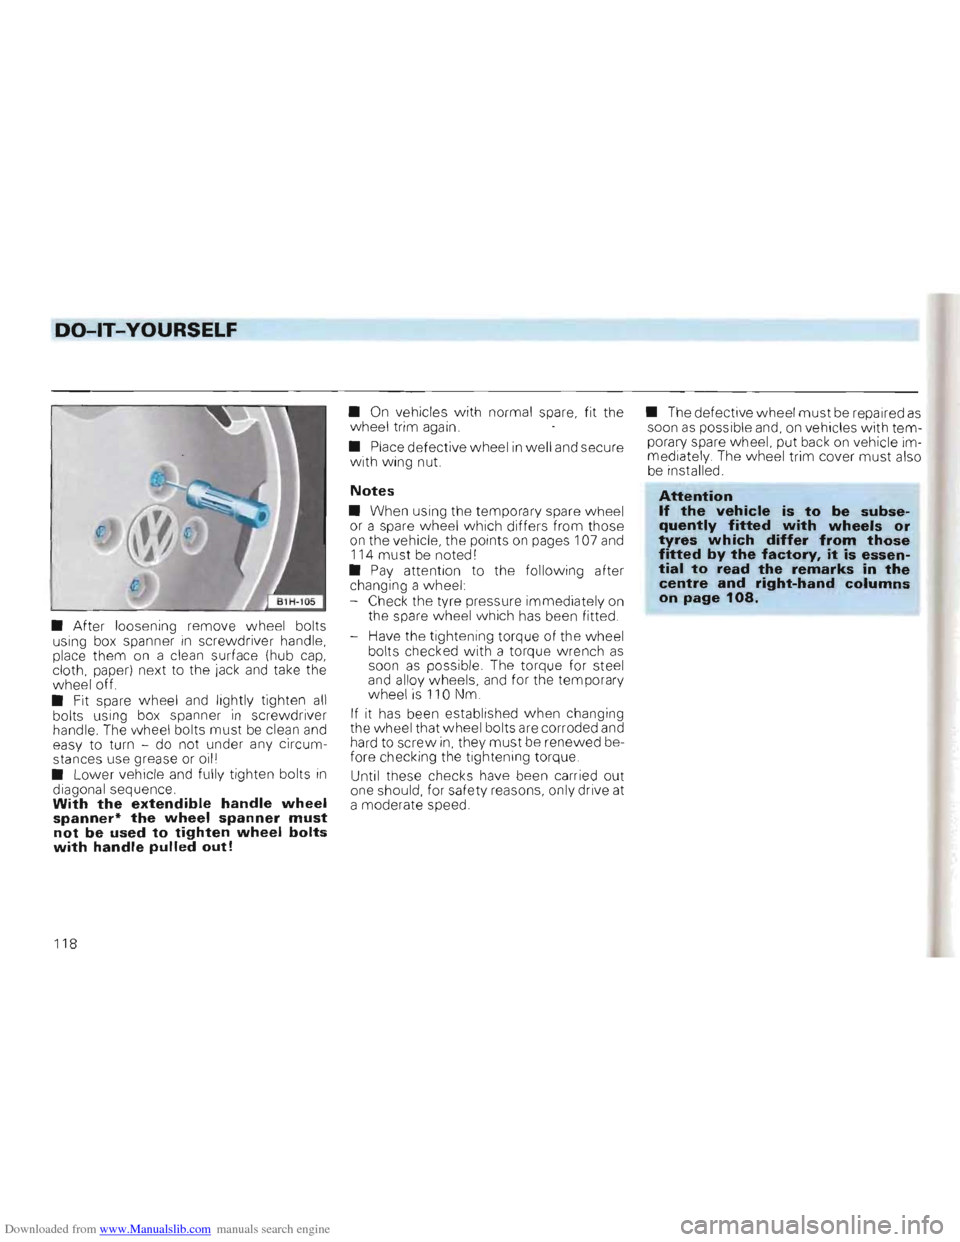
• After loosening remove wheel bolts
using box spanner in screwdriver handle,
place them on a clean surface (hub cap, cloth, paper) next to the jack and take the
wheel off.
• Fit spare w heel
and lightly tighten all bolts using box spanner in screwdriver
handle. The wheel bolts must be clean and
easy to turn -do not under any circum
stances use grease or oill
• L o
wer vehicle and fully tighten bolts in diagonal sequence. With the extendible handle wheel spanner* the wheel spanner must not be used to tighten wheel bolts with handle pulled out!
• On vehicles w ith normal spare, fit the
wheel trim again.
• Place defective wheel
in well and secure
with wing nut.
Notes
• When using the temporary spare wheel
or a spare wheel wh ich differs from those
on the vehicle, the points on pages 107 and
114 must be noted I
• Pay attention to the following after
changing a wheel:
- Check the tyre pressure immediatel y on
the spare wheel which has been fitted .
-
Have the tightening torque of the wheel
bolts checked with a torque wrench as soon as possible. The torque for steel and alloy wheels, and for the temporary
wheel is 110 Nm .
If it has been established when changing
the wheel that wheel bolts are corroded and
hard to screw
in, they must be renewed be
fore checking the tightening torque.
Until these checks have been carried out
one should, for safe ty reasons, only drive at
a moderate speed. •
The defective wheel
must be repaired as soon as possible and, on vehicles with tem
porary spare wheel, put back on vehicle im
mediately. The wheel trim cover must also be installed.
Attention If the vehicle is to be subsequently fitted with wheels or tyres which differ from those fitted by the factory. it is essential to read the remarks in the centre and right-hand columns on page 108.
118