VOLVO V60 2012 Owners Manual
Manufacturer: VOLVO, Model Year: 2012, Model line: V60, Model: VOLVO V60 2012Pages: 400, PDF Size: 9.28 MB
Page 311 of 400
07 Wheels and tyres
07
309ProCarManuals.com
Page 312 of 400
310
Engine compartment............................................................................. 312
Lamps................................................................................................... 319
Wiper blades and washer fluid.............................................................. 325
Battery................................................................................................... 327
Fuses..................................................................................................... 333
Car care................................................................................................ 344
ProCarManuals.com
Page 313 of 400
MAINTENANCE AND SERVICE
ProCarManuals.com
Page 314 of 400
08 Maintenance and service
Engine compartment
08
312
General
Volvo service programmeTo keep the car as safe and reliable as possi-
ble, follow the Volvo service programme as
specified in the Service and Warranty Booklet.
Volvo recommends engaging an authorised
Volvo workshop to perform the service and
maintenance work. Volvo workshops have the
personnel, special tools and service literature
to guarantee the highest quality of service.
IMPORTANT
For the Volvo warranty to apply, check and
follow the instructions in the Service and
Warranty Booklet.
Check regularlyCheck the following oils and fluids at regular
intervals, e.g. when refuelling:
•Coolant
•Engine oil
•Power steering fluid
•Washer fluid
WARNING
Remember that the radiator fan (located at
the front of the engine compartment, behind
the radiator) may start automatically some
after the engine has been switched off.
Always have the engine cleaned by a work-
shop. There is a risk of fire if the engine is
hot.
Raising the car
NOTE
Volvo recommends only using the jack that
belongs to the car model in question. If a
jack is selected other than the one recom-
mended by Volvo, follow the instructions for
use supplied with the equipment.
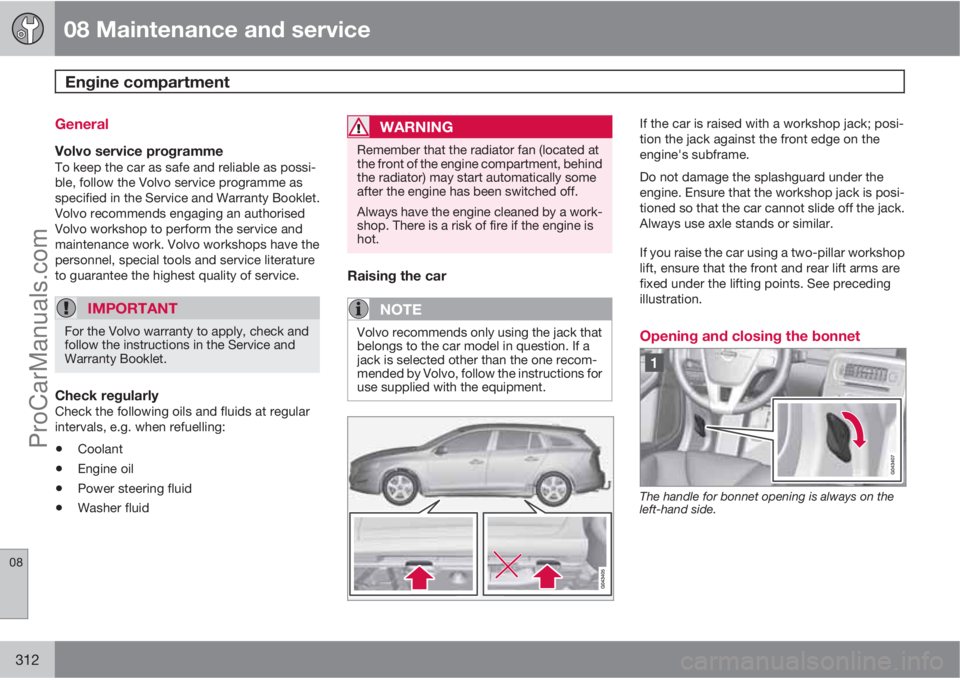
If the car is raised with a workshop jack; posi-
tion the jack against the front edge on the
engine's subframe.
Do not damage the splashguard under the
engine. Ensure that the workshop jack is posi-
tioned so that the car cannot slide off the jack.
Always use axle stands or similar.
If you raise the car using a two-pillar workshop
lift, ensure that the front and rear lift arms are
fixed under the lifting points. See preceding
illustration.
Opening and closing the bonnet
The handle for bonnet opening is always on the
left-hand side.
ProCarManuals.com
Page 315 of 400
08 Maintenance and service
Engine compartment
08
313
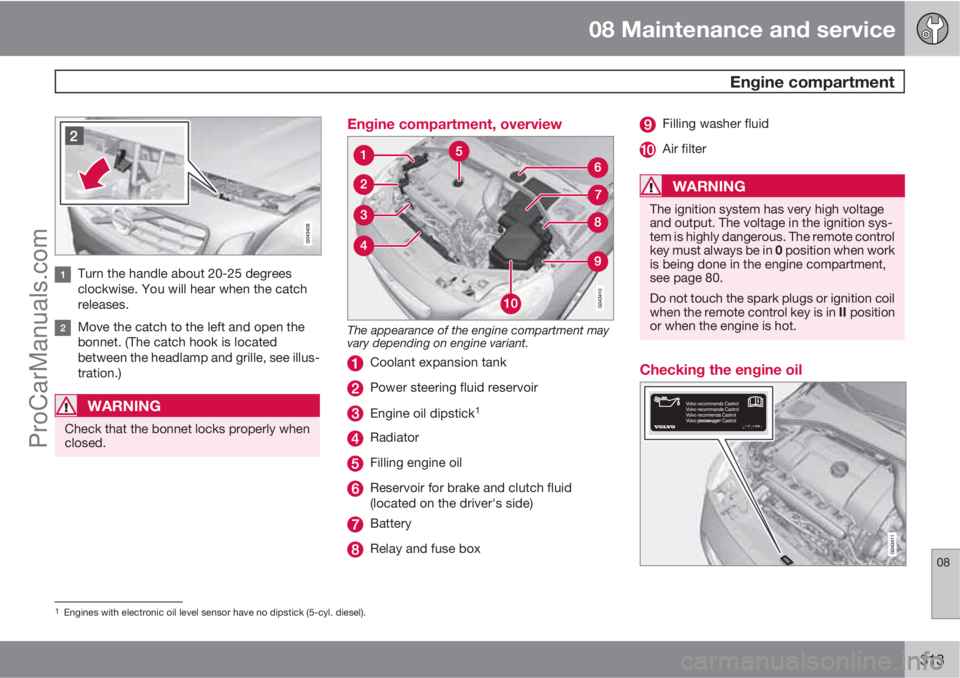
Turn the handle about 20-25 degrees
clockwise. You will hear when the catch
releases.
Move the catch to the left and open the
bonnet. (The catch hook is located
between the headlamp and grille, see illus-
tration.)
WARNING
Check that the bonnet locks properly when
closed.
Engine compartment, overview
The appearance of the engine compartment may
vary depending on engine variant.
Coolant expansion tank
Power steering fluid reservoir
Engine oil dipstick1
Radiator
Filling engine oil
Reservoir for brake and clutch fluid
(located on the driver's side)
Battery
Relay and fuse box
Filling washer fluid
Air filter
WARNING
The ignition system has very high voltage
and output. The voltage in the ignition sys-
tem is highly dangerous. The remote control
key must always be in 0 position when work
is being done in the engine compartment,
see page 80.
Do not touch the spark plugs or ignition coil
when the remote control key is in II position
or when the engine is hot.
Checking the engine oil
1Engines with electronic oil level sensor have no dipstick (5-cyl. diesel).
ProCarManuals.com
Page 316 of 400
08 Maintenance and service
Engine compartment
08
314
Volvo recommends Castrol oil products.
When driving under adverse conditions, see
page 359.
IMPORTANT
In order to fulfil the requirements for the
engine's service intervals all engines are
filled with a specially adapted synthetic
engine oil at the factory. The choice of oil
has been made very carefully with regard to
service life, starting characteristics, fuel
consumption and environmental impact.
An approved engine oil must be used in
order that the recommended service inter-
vals can be applied. Only use a prescribed
grade of oil for both filling and oil change,
otherwise you will risk affecting service life,
starting characteristics, fuel consumption
and environmental impact.
Volvo Car Corporation disclaims all war-
ranty liability if engine oil of the prescribed
grade and viscosity is not used.
Volvo recommends that oil changes are car-
ried out at an authorised Volvo workshop.
Volvo uses different systems for warning of
low/high oil level or low/high oil pressure. Cer-
tain variants have an oil pressure sensor, and
then the lamp for oil pressure is used. Other
variants have an oil level sensor, and then thedriver is informed via the warning symbol in the
centre of the instrument unit as well as by dis-
play texts. Certain models have both variants.
Contact a Volvo dealer for more information.
Change the engine oil and oil filter in accord-
ance with the intervals specified in the Service
and Warranty Booklet.
Using oil of a higher than specified grade is
permitted. If the car is driven in adverse con-
ditions, Volvo recommends using an oil of a
higher grade, see page 359.
For capacities, see page 360 and onwards.
Engine with oil dipstick2
G021734
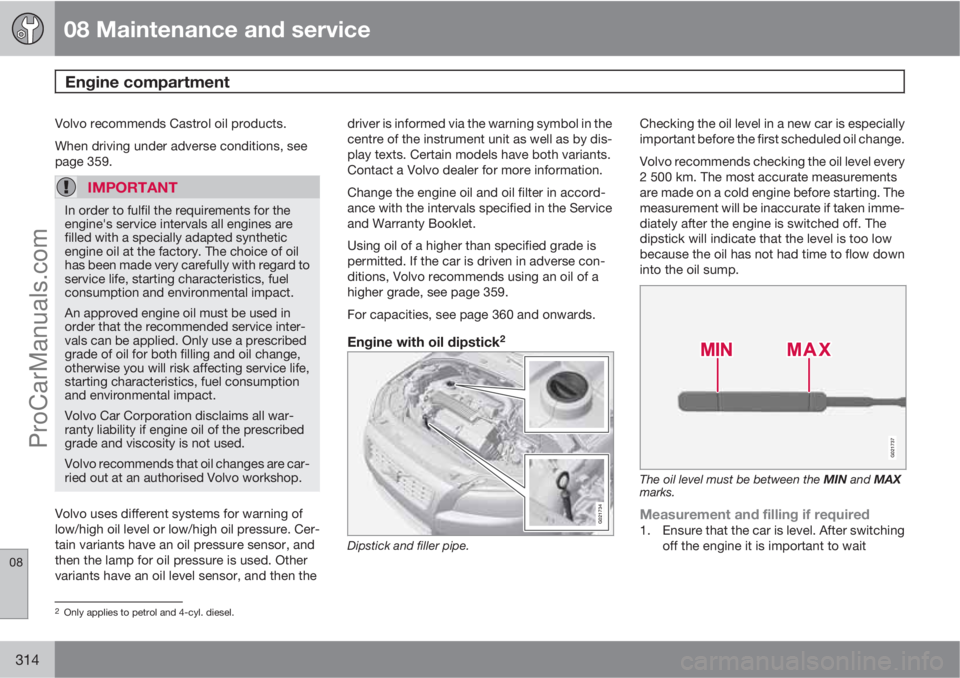
Dipstick and filler pipe.
Checking the oil level in a new car is especially
important before the first scheduled oil change.
Volvo recommends checking the oil level every
2 500 km. The most accurate measurements
are made on a cold engine before starting. The
measurement will be inaccurate if taken imme-
diately after the engine is switched off. The
dipstick will indicate that the level is too low
because the oil has not had time to flow down
into the oil sump.
G021737
The oil level must be between the MIN and MAX
marks.
Measurement and filling if required1. Ensure that the car is level. After switching
off the engine it is important to wait
2Only applies to petrol and 4-cyl. diesel.
ProCarManuals.com
Page 317 of 400
08 Maintenance and service
Engine compartment
08
315
5 minutes to allow the oil time to run back
to the sump.
2. Pull up and wipe the dipstick.
3. Re-insert the dipstick.
4. Pull it out and check the level.
5.
If the level is close to MIN then 0.5 litres
should be added. If the level is significantly
below, then an additional amount is
required.
6. If required, check the level again, do it after
driving a short distance. Then repeat steps
1 - 4.
WARNING
Never fill above the MAX mark. The level
should never be above MAX or below MIN
as this could lead to engine damage.
WARNING
Do not spill oil onto the hot exhaust manifold
due to the risk of fire.
Engine with electronic oil level sensor3
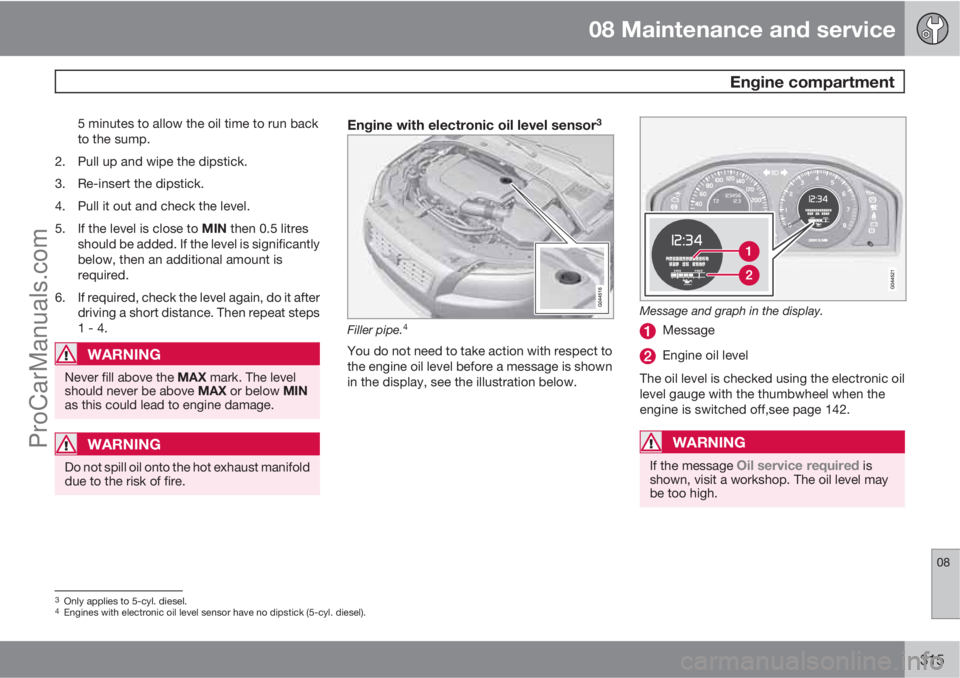
Filler pipe.4
You do not need to take action with respect to
the engine oil level before a message is shown
in the display, see the illustration below.
Message and graph in the display.
Message
Engine oil level
The oil level is checked using the electronic oil
level gauge with the thumbwheel when the
engine is switched off,see page 142.
WARNING
If the message Oil service required is
shown, visit a workshop. The oil level may
be too high.
3Only applies to 5-cyl. diesel.4Engines with electronic oil level sensor have no dipstick (5-cyl. diesel).
ProCarManuals.com
Page 318 of 400
08 Maintenance and service
Engine compartment
08
316
IMPORTANT
In the event of the message Oil level low
Refill 0,5 Ltr, only fill with 0.5 litres.
NOTE
The oil level is only detected by the system
during driving. The system cannot directly
detect changes when the oil is filled or
drained. The car must be driven
about 30 km before the oil level display is
correct.
WARNING
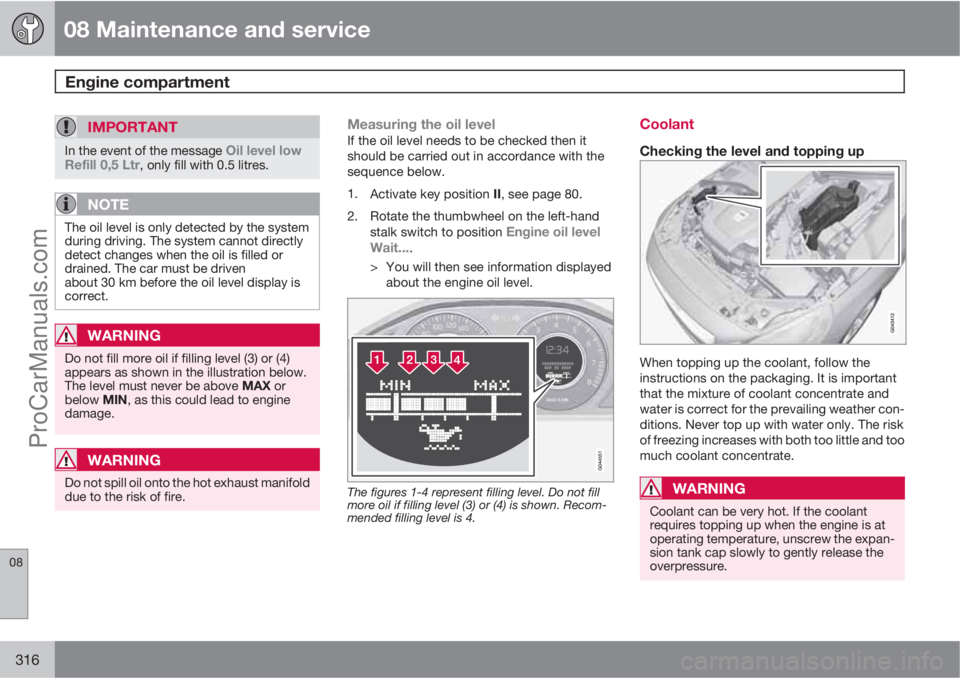
Do not fill more oil if filling level (3) or (4)
appears as shown in the illustration below.
The level must never be above MAX or
below MIN, as this could lead to engine
damage.
WARNING
Do not spill oil onto the hot exhaust manifold
due to the risk of fire.
Measuring the oil levelIf the oil level needs to be checked then it
should be carried out in accordance with the
sequence below.
1.
Activate key position II, see page 80.
2. Rotate the thumbwheel on the left-hand
stalk switch to position
Engine oil level
Wait....
> You will then see information displayed
about the engine oil level.
The figures 1-4 represent filling level. Do not fill
more oil if filling level (3) or (4) is shown. Recom-
mended filling level is 4.
Coolant
Checking the level and topping up
When topping up the coolant, follow the
instructions on the packaging. It is important
that the mixture of coolant concentrate and
water is correct for the prevailing weather con-
ditions. Never top up with water only. The risk
of freezing increases with both too little and too
much coolant concentrate.
WARNING
Coolant can be very hot. If the coolant
requires topping up when the engine is at
operating temperature, unscrew the expan-
sion tank cap slowly to gently release the
overpressure.
ProCarManuals.com
Page 319 of 400
08 Maintenance and service
Engine compartment
08
317
For capacities and for standards regarding
water quality, see page 361.
Check the coolant regularlyThe level must lie between the MIN and MAX
marks on the expansion tank. If the system is
not filled sufficiently, high temperatures could
occur, causing a risk of damage to the engine.
IMPORTANT
•A high content of chlorine, chlorides
and other salts may cause corrosion in
the cooling system.
•Always use coolant with anti-corrosion
agent as recommended by Volvo.
•Ensure that the coolant mixture is 50%
water and 50% coolant.
•Mix the coolant with approved quality
tap water. In the event of any doubt
about water quality, used ready-mixed
coolant in accordance with Volvo rec-
ommendations.
•When changing coolant/replacing cool-
ing system components, flush the cool-
ing system clean with approved quality
tap water or flush with ready-mixed
coolant.
•The engine must only be run with a well-
filled cooling system. Otherwise, tem-
peratures that are too high may occur
resulting in the risk of damage (cracks)
in the cylinder head.
Brake and clutch fluid
Checking the levelBrake and clutch fluid have a common reser-
voir. The level must be between the MIN and
MAX marks that are visible inside the reservoir.
Check the level regularly.
Change the brake fluid every other year or at
every other regular service.
For capacities and recommended fluid grade,
see page 361. The fluid should be changed
annually on cars driven in conditions requiring
hard, frequent braking, such as driving in
mountains or tropical climates with high
humidity.
WARNING
If the brake fluid is under the MIN level in the
brake fluid reservoir, do not drive further
before topping up the brake fluid. Volvo rec-
ommends that the reason for the loss of
brake fluid is investigated by an authorised
Volvo workshop.
ProCarManuals.com
Page 320 of 400
08 Maintenance and service
Engine compartment
08
318
Filling
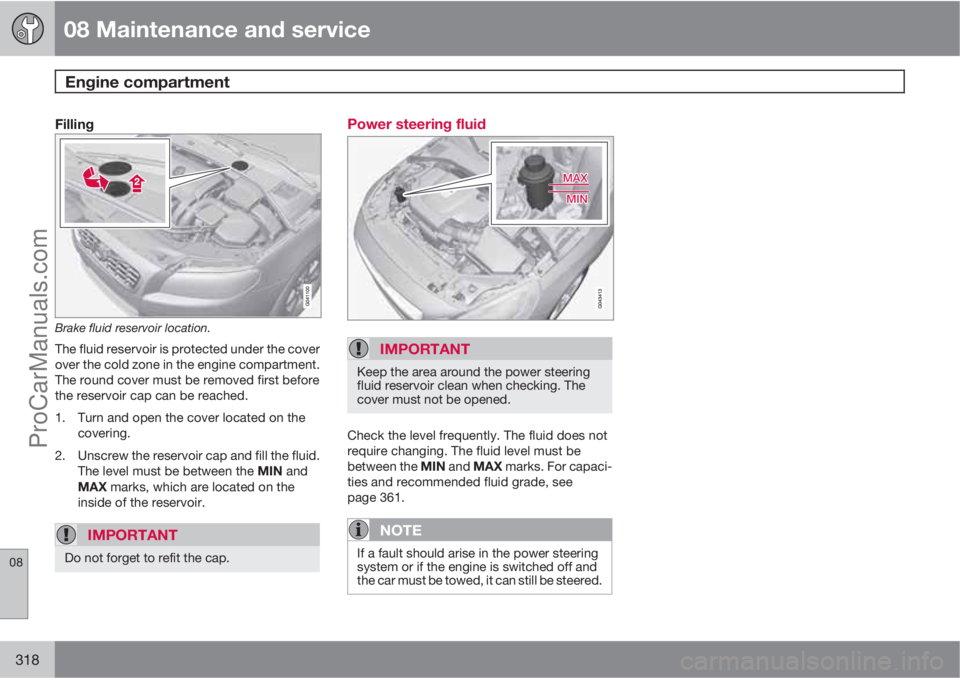
Brake fluid reservoir location.
The fluid reservoir is protected under the cover
over the cold zone in the engine compartment.
The round cover must be removed first before
the reservoir cap can be reached.
1. Turn and open the cover located on the
covering.
2. Unscrew the reservoir cap and fill the fluid.
The level must be between the MIN and
MAX marks, which are located on the
inside of the reservoir.
IMPORTANT
Do not forget to refit the cap.
Power steering fluid
IMPORTANT
Keep the area around the power steering
fluid reservoir clean when checking. The
cover must not be opened.
Check the level frequently. The fluid does not
require changing. The fluid level must be
between the MIN and MAX marks. For capaci-
ties and recommended fluid grade, see
page 361.
NOTE
If a fault should arise in the power steering
system or if the engine is switched off and
the car must be towed, it can still be steered.
ProCarManuals.com