VOLVO V60 2012 Workshop Manual
Manufacturer: VOLVO, Model Year: 2012, Model line: V60, Model: VOLVO V60 2012Pages: 400, PDF Size: 9.28 MB
Page 51 of 400
02 Locks and alarm
Remote control key/key blade
02
* Option/accessory, for more information, see Introduction.49 Unique PCC functions*
G021080
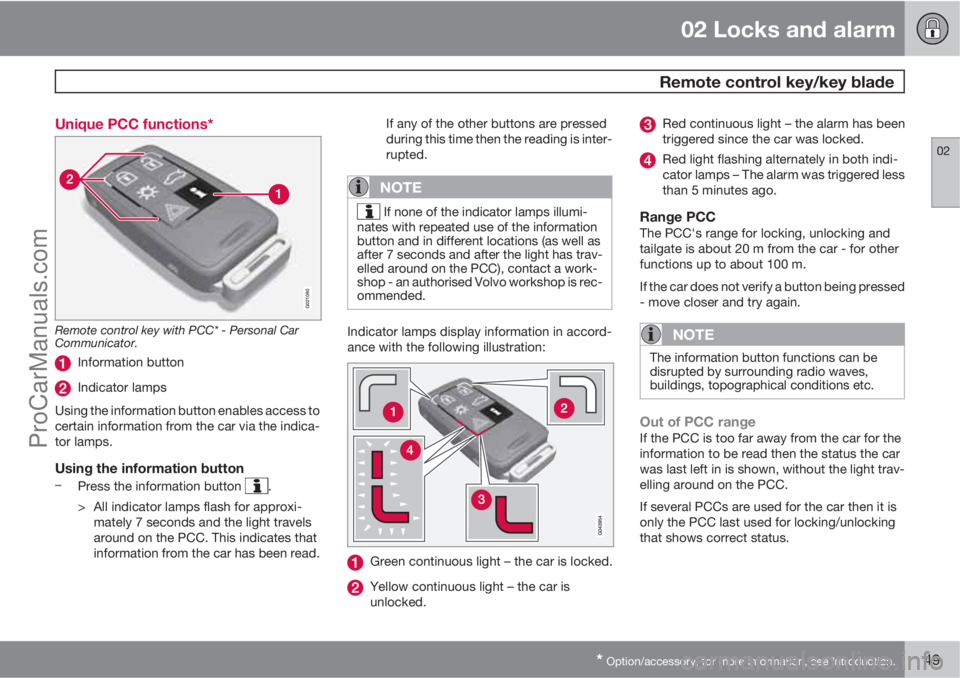
Remote control key with PCC* - Personal Car
Communicator.
Information button
Indicator lamps
Using the information button enables access to
certain information from the car via the indica-
tor lamps.
Using the information button–
Press the information button .
> All indicator lamps flash for approxi-
mately 7 seconds and the light travels
around on the PCC. This indicates that
information from the car has been read.If any of the other buttons are pressed
during this time then the reading is inter-
rupted.
NOTE
If none of the indicator lamps illumi-
nates with repeated use of the information
button and in different locations (as well as
after 7 seconds and after the light has trav-
elled around on the PCC), contact a work-
shop - an authorised Volvo workshop is rec-
ommended.
Indicator lamps display information in accord-
ance with the following illustration:
Green continuous light – the car is locked.
Yellow continuous light – the car is
unlocked.
Red continuous light – the alarm has been
triggered since the car was locked.
Red light flashing alternately in both indi-
cator lamps – The alarm was triggered less
than 5 minutes ago.
Range PCCThe PCC's range for locking, unlocking and
tailgate is about 20 m from the car - for other
functions up to about 100 m.
If the car does not verify a button being pressed
- move closer and try again.
NOTE
The information button functions can be
disrupted by surrounding radio waves,
buildings, topographical conditions etc.
Out of PCC rangeIf the PCC is too far away from the car for the
information to be read then the status the car
was last left in is shown, without the light trav-
elling around on the PCC.
If several PCCs are used for the car then it is
only the PCC last used for locking/unlocking
that shows correct status.
ProCarManuals.com
Page 52 of 400
02 Locks and alarm
Remote control key/key blade
02
50* Option/accessory, for more information, see Introduction.
NOTE
If no indicator lamps illuminate when
the information button is used within range
then this may be because the last commu-
nication between the PCC and the car was
disrupted by surrounding radio waves,
buildings, topographical conditions etc.
Detachable key blade
A remote control key contains a detachable
key blade of metal with which some functions
can be activated and some operations carried
out.
The key blade's unique code is provided by
authorised Volvo workshops, which are rec-
ommended when ordering new key blades.
Key blade functionsUsing the remote control key's detachable key
blade:
•the left-hand front door can be opened
manually if central locking cannot be acti-
vated with the remote control key, see
page 56.
•the rear doors' mechanical child safety
locks can be activated/deactivated, see
page 64.
•the right-hand front door and the rear
doors can be locked manually, e.g. in the
event of power failure, see page 59.
•access to the glovebox and cargo area
(privacy locking*) can be blocked, see
page 51.
•the airbag for front passenger seat
(PACOS)* can be activated/deactivated,
see page 22.
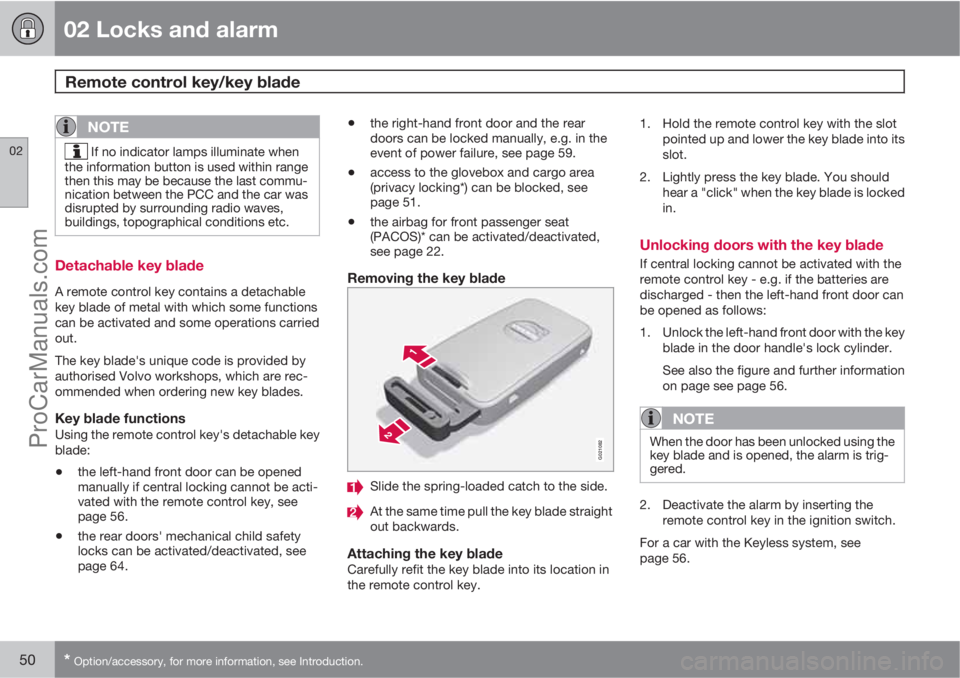
Removing the key blade
G021082
Slide the spring-loaded catch to the side.
At the same time pull the key blade straight
out backwards.
Attaching the key bladeCarefully refit the key blade into its location in
the remote control key.1. Hold the remote control key with the slot
pointed up and lower the key blade into its
slot.
2. Lightly press the key blade. You should
hear a "click" when the key blade is locked
in.
Unlocking doors with the key blade
If central locking cannot be activated with the
remote control key - e.g. if the batteries are
discharged - then the left-hand front door can
be opened as follows:
1. Unlock the left-hand front door with the key
blade in the door handle's lock cylinder.
See also the figure and further information
on page see page 56.
NOTE
When the door has been unlocked using the
key blade and is opened, the alarm is trig-
gered.
2. Deactivate the alarm by inserting the
remote control key in the ignition switch.
For a car with the Keyless system, see
page 56.
ProCarManuals.com
Page 53 of 400
02 Locks and alarm
Privacy locking*
02
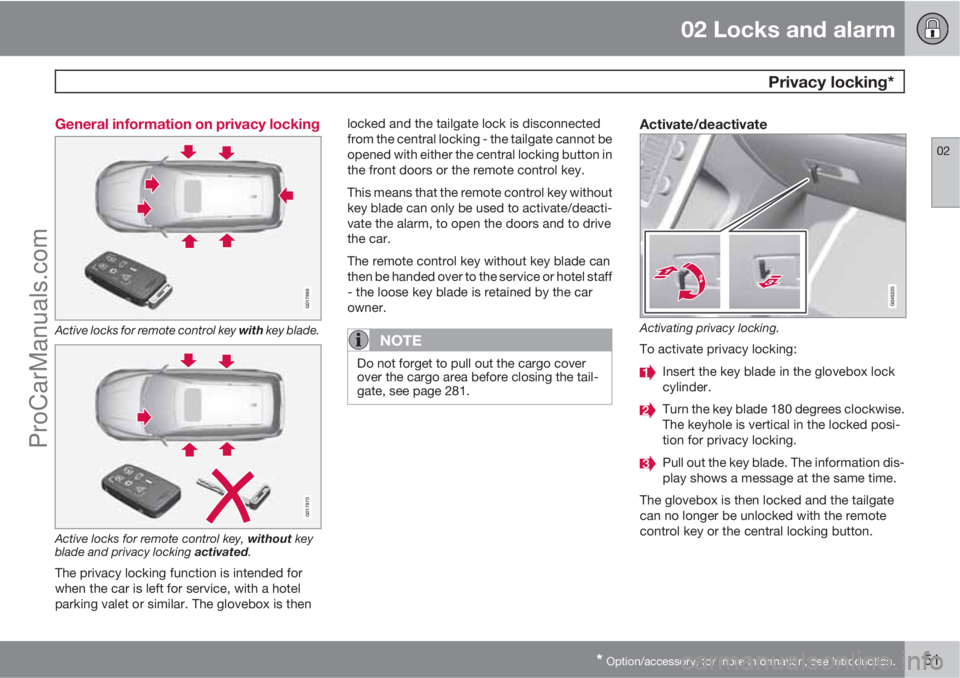
* Option/accessory, for more information, see Introduction.51 General information on privacy locking
G017869
Active locks for remote control key with key blade.
G017870
Active locks for remote control key, without key
blade and privacy locking activated.
The privacy locking function is intended for
when the car is left for service, with a hotel
parking valet or similar. The glovebox is thenlocked and the tailgate lock is disconnected
from the central locking - the tailgate cannot be
opened with either the central locking button in
the front doors or the remote control key.
This means that the remote control key without
key blade can only be used to activate/deacti-
vate the alarm, to open the doors and to drive
the car.
The remote control key without key blade can
then be handed over to the service or hotel staff
- the loose key blade is retained by the car
owner.
NOTE
Do not forget to pull out the cargo cover
over the cargo area before closing the tail-
gate, see page 281.
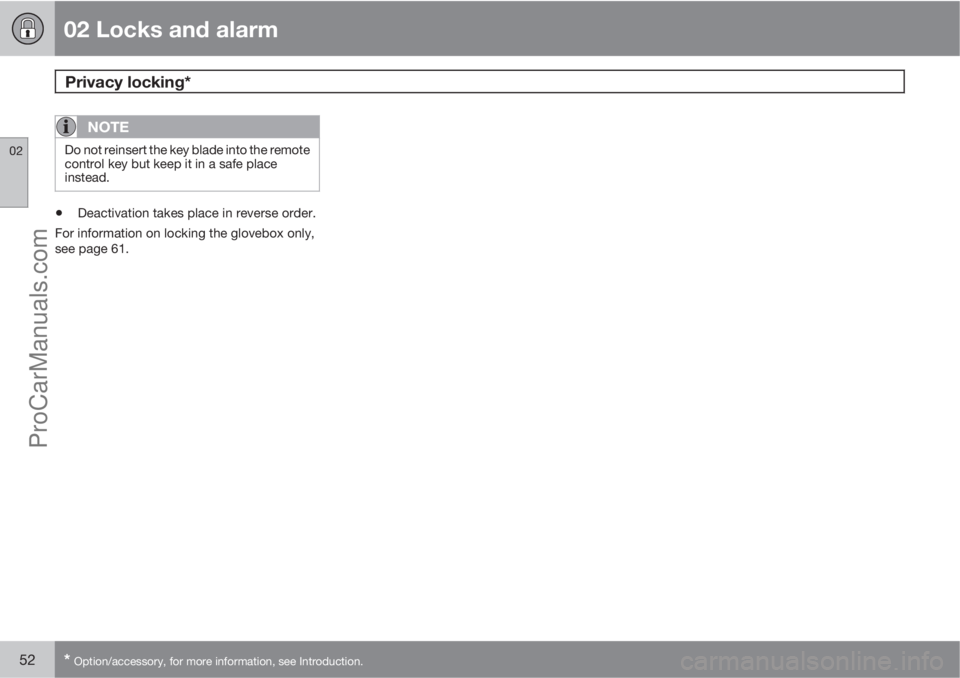
Activate/deactivate
Activating privacy locking.
To activate privacy locking:
Insert the key blade in the glovebox lock
cylinder.
Turn the key blade 180 degrees clockwise.
The keyhole is vertical in the locked posi-
tion for privacy locking.
Pull out the key blade. The information dis-
play shows a message at the same time.
The glovebox is then locked and the tailgate
can no longer be unlocked with the remote
control key or the central locking button.
ProCarManuals.com
Page 54 of 400
02 Locks and alarm
Privacy locking*
02
52* Option/accessory, for more information, see Introduction.
NOTE
Do not reinsert the key blade into the remote
control key but keep it in a safe place
instead.
•Deactivation takes place in reverse order.
For information on locking the glovebox only,
see page 61.
ProCarManuals.com
Page 55 of 400
02 Locks and alarm
Battery replacement, remote control key/PCC*
02
* Option/accessory, for more information, see Introduction.53 Replacing the battery
The batteries should be replaced if:
•the information symbol is illuminated and
the display shows Low battery in remote
control. Please change batteries.
and/or
•the locks repeatedly do not react to signals
from the remote control key within
20 metres from the car.
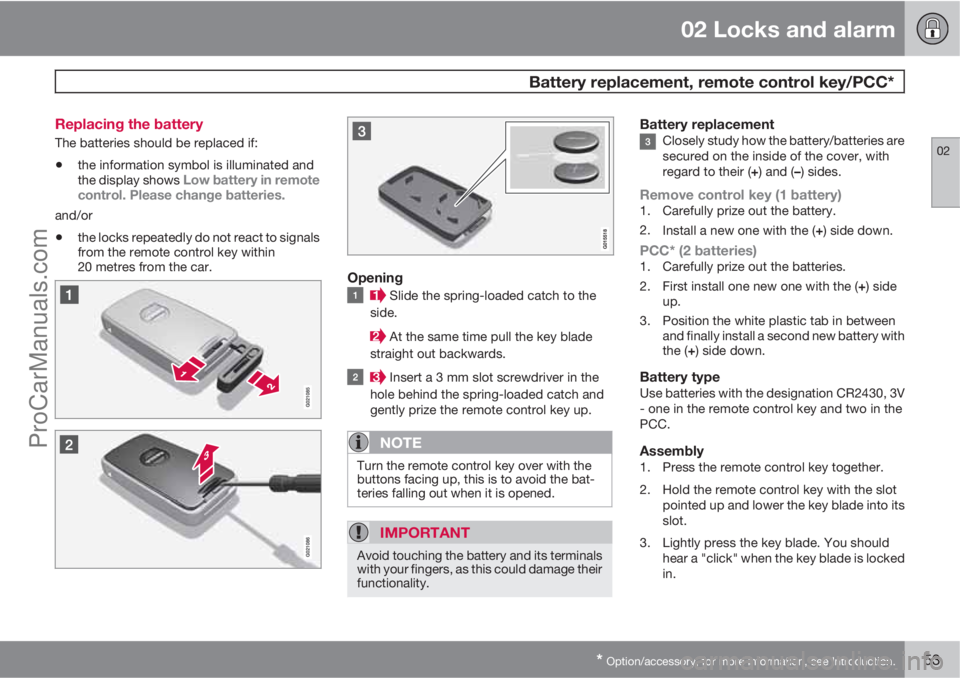
Opening
Slide the spring-loaded catch to the
side.
At the same time pull the key blade
straight out backwards.
Insert a 3 mm slot screwdriver in the
hole behind the spring-loaded catch and
gently prize the remote control key up.
NOTE
Turn the remote control key over with the
buttons facing up, this is to avoid the bat-
teries falling out when it is opened.
IMPORTANT
Avoid touching the battery and its terminals
with your fingers, as this could damage their
functionality.
Battery replacementClosely study how the battery/batteries are
secured on the inside of the cover, with
regard to their (+) and (–) sides.
Remove control key (1 battery)1. Carefully prize out the battery.
2.
Install a new one with the (+) side down.
PCC* (2 batteries)1. Carefully prize out the batteries.
2.
First install one new one with the (+) side
up.
3. Position the white plastic tab in between
and finally install a second new battery with
the (+) side down.
Battery typeUse batteries with the designation CR2430, 3V
- one in the remote control key and two in the
PCC.
Assembly1. Press the remote control key together.
2. Hold the remote control key with the slot
pointed up and lower the key blade into its
slot.
3. Lightly press the key blade. You should
hear a "click" when the key blade is locked
in.
ProCarManuals.com
Page 56 of 400
02 Locks and alarm
Battery replacement, remote control key/PCC*
02
54* Option/accessory, for more information, see Introduction.
IMPORTANT
Make sure that you dispose of old batteries
in an environmentally-friendly way.
ProCarManuals.com
Page 57 of 400
02 Locks and alarm
Keyless drive*
02
* Option/accessory, for more information, see Introduction.55 Keyless lock and ignition system (only
PCC
1)
General
The keyless drive function in the PCC allows
the car to be unlocked, driven and locked with-
out the need for a key. You simply have to have
the PCC with you. The system makes it easier
and more convenient to open the car, e.g.
when your hands are full.
Both of the car's PCCs incorporate the Keyless
function. Additional PCCs can be ordered, see
page 46.
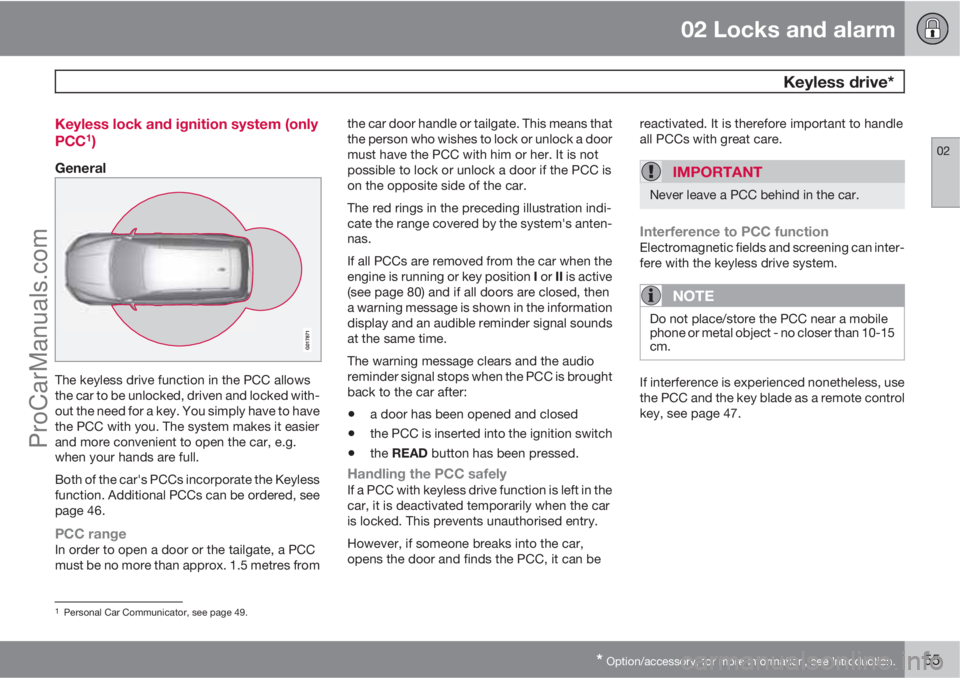
PCC rangeIn order to open a door or the tailgate, a PCC
must be no more than approx. 1.5 metres fromthe car door handle or tailgate. This means that
the person who wishes to lock or unlock a door
must have the PCC with him or her. It is not
possible to lock or unlock a door if the PCC is
on the opposite side of the car.
The red rings in the preceding illustration indi-
cate the range covered by the system's anten-
nas.
If all PCCs are removed from the car when the
engine is running or key position I or II is active
(see page 80) and if all doors are closed, then
a warning message is shown in the information
display and an audible reminder signal sounds
at the same time.
The warning message clears and the audio
reminder signal stops when the PCC is brought
back to the car after:
•a door has been opened and closed
•the PCC is inserted into the ignition switch
•the READ button has been pressed.
Handling the PCC safelyIf a PCC with keyless drive function is left in the
car, it is deactivated temporarily when the car
is locked. This prevents unauthorised entry.
However, if someone breaks into the car,
opens the door and finds the PCC, it can bereactivated. It is therefore important to handle
all PCCs with great care.
IMPORTANT
Never leave a PCC behind in the car.
Interference to PCC functionElectromagnetic fields and screening can inter-
fere with the keyless drive system.
NOTE
Do not place/store the PCC near a mobile
phone or metal object - no closer than 10-15
cm.
If interference is experienced nonetheless, use
the PCC and the key blade as a remote control
key, see page 47.
1Personal Car Communicator, see page 49.
ProCarManuals.com
Page 58 of 400
02 Locks and alarm
Keyless drive*
02
56* Option/accessory, for more information, see Introduction.
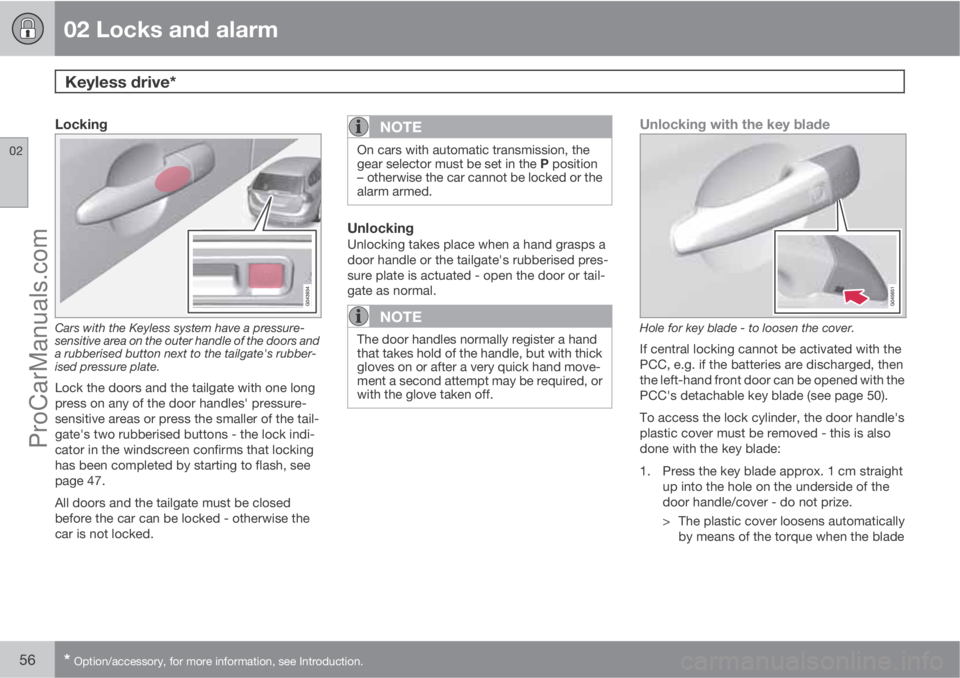
Locking
Cars with the Keyless system have a pressure-
sensitive area on the outer handle of the doors and
a rubberised button next to the tailgate's rubber-
ised pressure plate.
Lock the doors and the tailgate with one long
press on any of the door handles' pressure-
sensitive areas or press the smaller of the tail-
gate's two rubberised buttons - the lock indi-
cator in the windscreen confirms that locking
has been completed by starting to flash, see
page 47.
All doors and the tailgate must be closed
before the car can be locked - otherwise the
car is not locked.
NOTE
On cars with automatic transmission, the
gear selector must be set in the P position
– otherwise the car cannot be locked or the
alarm armed.
UnlockingUnlocking takes place when a hand grasps a
door handle or the tailgate's rubberised pres-
sure plate is actuated - open the door or tail-
gate as normal.
NOTE
The door handles normally register a hand
that takes hold of the handle, but with thick
gloves on or after a very quick hand move-
ment a second attempt may be required, or
with the glove taken off.
Unlocking with the key blade
Hole for key blade - to loosen the cover.
If central locking cannot be activated with the
PCC, e.g. if the batteries are discharged, then
the left-hand front door can be opened with the
PCC's detachable key blade (see page 50).
To access the lock cylinder, the door handle's
plastic cover must be removed - this is also
done with the key blade:
1. Press the key blade approx. 1 cm straight
up into the hole on the underside of the
door handle/cover - do not prize.
> The plastic cover loosens automatically
by means of the torque when the blade
ProCarManuals.com
Page 59 of 400
02 Locks and alarm
Keyless drive*
02
* Option/accessory, for more information, see Introduction.57
is pushed straight up and into the open-
ing.
2. Then insert the key blade in the lock cylin-
der and unlock the door.
3. Refit the plastic cover after unlocking.
NOTE
When the driver's door is unlocked using the
key blade and is opened, the alarm is trig-
gered. It is switched off by inserting the PCC
in the ignition switch, see page 66.
Key memory2 – driver's seat and door
mirrors
PCC memory function
If several people each with a PCC approach the
car, then the settings for seat and mirrors are
implemented for the person who opens the
driver's door.
After the driver's door has been opened by
person A with PCC-A, but person B with PCC-
B shall drive, the settings can be changed in
three ways:
•Standing by the driver's door, or sitting
behind the steering wheel, person Bpresses their PCC's unlock button, see
page 47.
•Select one of three possible memories for
seat adjustment with seat button 1-3, see
page 83.
•Adjust seat and mirrors manually, see
page 83 and 102.
Lock settingsThe Keyless function can be adapted by indi-
cating in the menu system MY CAR which
doors shall be unlocked, under Car settings
Lock settingsKeyless entry - there
select between
All doors unlock, Any door,Doors on same side and Both front doors.
For a description of the menu system, see
page 144.
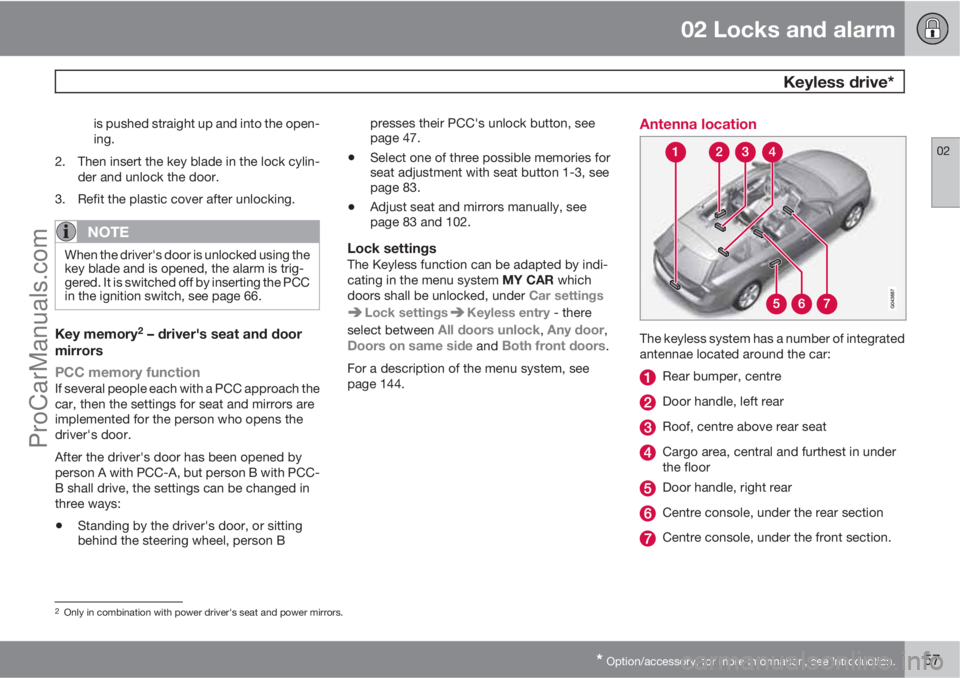
Antenna location
The keyless system has a number of integrated
antennae located around the car:
Rear bumper, centre
Door handle, left rear
Roof, centre above rear seat
Cargo area, central and furthest in under
the floor
Door handle, right rear
Centre console, under the rear section
Centre console, under the front section.
2Only in combination with power driver's seat and power mirrors.
ProCarManuals.com
Page 60 of 400
02 Locks and alarm
Keyless drive*
02
58* Option/accessory, for more information, see Introduction.
WARNING
People with pacemaker operations should
not come closer than 22 cm to the keyless
system's antennae with their pacemaker.
This is to prevent interference between the
pacemaker and the keyless system.
ProCarManuals.com