sensor VOLVO XC90 TWIN ENGINE 2018 Manual Online
[x] Cancel search | Manufacturer: VOLVO, Model Year: 2018, Model line: XC90 TWIN ENGINE, Model: VOLVO XC90 TWIN ENGINE 2018Pages: 686, PDF Size: 17 MB
Page 466 of 686
||STARTING AND DRIVING
464
Refueling is done as follows.
1. Turn off the engine and open the fuel filler
door.
NOTE Refueling must be done within approximately
10 minutes of opening the fuel filler door.
After this time, the valve opened by pushing
the button will close and it will no longer be
possible to refuel without the pump's nozzle
switching off.
If the valve is closed before refueling is com-
plete - press the button again and wait until
the driver display shows the message
Fuel
tank Ready for refueling. 2. Select a fuel approved for use in the vehicle.
For more information on approved fuels, see
the section on "Gasoline".
3.
Insert the pump's nozzle into the fuel filler
pipe's opening. There are two flaps just
inside the fuel filler pipe and the pump's noz-
zle must push both of these flaps open
before fuel can be added. 4. Avoid overfilling the tank. Do not press the
handle on the filler nozzle again after it has
initially stopped pumping.
> The fuel tank is now filled.
NOTE An over-full tank may overflow in hot weather.
CAUTION
Avoid spilling gasoline during refueling. In
addition to causing damage to the environ-
ment, gasolines containing alcohol can cause
damage to painted surfaces, which may not
be covered under the New Vehicle Limited
Warranty.
Refueling from a fuel containerWhen filling from a fuel container, use the funnel
provided in a foam block under the floor hatch in
the cargo compartment.
1. Open the fuel filler door.
2. Insert the funnel into the fuel filler pipe's
opening. There are two flaps just inside the
fuel filler pipe and the tube section of the
funnel must push both of these flaps open
before fuel can be added.
Related information
• Opening/closing the fuel filler door (p. 462) Fuel
Volvo recommends the use of detergent gaso-
line to control engine deposits.
Deposit control gasoline (gasoline with
detergent additives)
Detergent gasoline is effective in keeping injec-
tors and intake valves clean. Consistent use of
deposit control gasolines will help ensure good
driveability and fuel economy. If you are not sure
whether the gasoline contains deposit control
additives, check with the service station operator.
NOTE
Volvo recommends not using external fuel
injector cleaning systems, e.g. do not add
detergent additives to gasoline before or after
refueling.
Unleaded fuelAll Volvo vehicles have a three-way catalytic con-
verter and must only use unleaded gasoline. US
and Canadian regulations require that pumps
delivering unleaded gasoline are labeled
"UNLEADED". Only the nozzles of these pumps
will fit in your vehicle's fuel filler inlet. It is unlaw-
ful to dispense leaded fuel into a vehicle labeled
"unleaded gasoline only". Leaded gasoline dam-
ages the three-way catalytic converter and the
heated oxygen sensor system. Repeated use of
leaded gasoline will lessen the effectiveness of
Page 469 of 686

STARTING AND DRIVING
467
WARNINGCarbon monoxide is a poisonous, colorless,
and odorless gas. It is present in all exhaust
gases. If you ever smell exhaust fumes inside
the vehicle, make sure the passenger com-
partment is ventilated, and immediately return
the vehicle to a trained and qualified Volvo
service technician for correction.
Demanding drivingIn demanding driving conditions, e.g. when driving
in a hot climates, driving with a trailer or driving
for longer periods at higher altitudes (mountain
landscapes) than normal, it is recommended
switching to a higher octane fuel than AKI 91
6
or
changing gasoline brand to take full advantage of
your car's engine capacity and obtain the opti-
mum driving force.
Related information
• Fuel (p. 464)
• Emission controls (p. 467) Emission controls
Three-way catalytic converter
•
Keep your engine properly tuned. Certain
engine malfunctions, particularly involving the
electrical, fuel or distributor ignition systems,
may cause unusually high three-way catalytic
converter temperatures. Do not continue to
operate your vehicle if you detect engine
misfire, noticeable loss of power or other
unusual operating conditions, such as engine
overheating or backfiring. A properly tuned
engine will help avoid malfunctions that
could damage the three-way catalytic con-
verter.
• Do not park your vehicle over combustible
materials, such as grass or leaves, which can
come into contact with the hot exhaust sys-
tem and cause such materials to ignite under
certain wind and weather conditions.
• Excessive starter cranking (in excess of one
minute), or an intermittently firing or flooded
engine can cause three-way catalytic con-
verter or exhaust system overheating.
• Remember that tampering or unauthorized
modifications to the engine, the Engine Con-
trol Module, or the vehicle may be illegal and
can cause three-way catalytic converter or
exhaust system overheating. This includes:
altering fuel injection settings or compo-
nents, altering emission system components or location or removing components, and/or
repeated use of leaded fuel.NOTE Unleaded fuel is required for vehicles with
three-way catalytic converters.
Heated oxygen sensorsThe heated oxygen sensors monitor the oxygen
content of the exhaust gases. Readings are fed
into a control module that continuously monitors
engine functions and controls fuel injection. The
ratio of fuel to air into the engine is continuously
adjusted for efficient combustion to help reduce
harmful emissions.
Related information
•
Octane rating (p. 465)
• Fuel (p. 464) 6
AKI (Anti Knock Index) is an average value of RON (Research Octane Nu\
mber) and MON (Motor Octane Number) - (RON)+(MON)/2
Page 583 of 686

LOADING, STORAGE AND PASSENGER COMPARTMENT
* Option/accessory.581
Related information
•Electrical outlets (p. 582)
• Using the glove compartment (p. 585)
• Sun visors (p. 586)
• Tunnel console (p. 581)
• Connecting a device via the USB port
(p. 514) Tunnel console
The tunnel console is located between the front
seats. Storage compartment with cover*. The cover
can be opened/closed by pressing the han-
dle. Storage compartment with a 12 V outlet and
cup holders for the driver and passenger.
Storage compartment and USB port under
the armrest.
Climate control panel for the rear seats* or
storage compartment.WARNING Store loose objects, such as cell phone, cam-
era, remote control for extra equipment, etc.,
in the glove compartment or another compart-
ment. Otherwise, these could injure people in
the vehicle in the event of hard braking or a
collision.
NOTE
One of the sensors for the alarm* is located
under the cup holder in the center console.
Avoid placing coins, keys and other metal
objects in the cup holder as this could trigger
the alarm.
CAUTION Keep in mind that glossy surfaces can be
easily scratched by e.g. metal objects. Do not
place keys, phones or similar items on sensi-
tive surfaces.
Related information
•
Passenger compartment interior (p. 580)
• Electrical outlets (p. 582)
• Climate system controls (p. 213)
Page 612 of 686
MAINTENANCE AND SERVICE
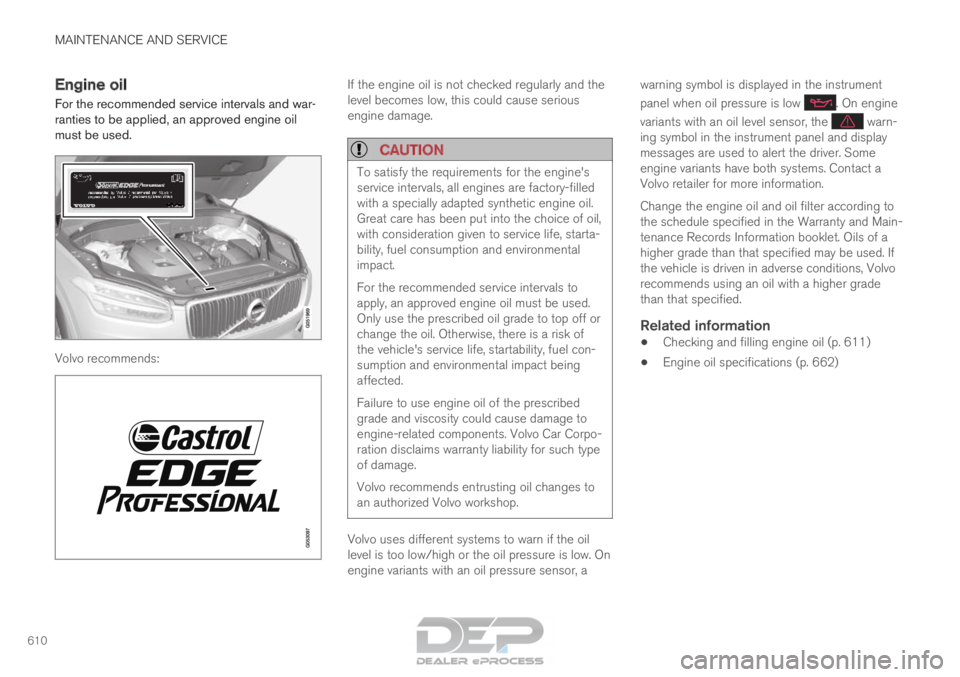
610Engine oil
For the recommended service intervals and war-
ranties to be applied, an approved engine oil
must be used. Volvo recommends: If the engine oil is not checked regularly and the
level becomes low, this could cause serious
engine damage.
CAUTION
To satisfy the requirements for the engine's
service intervals, all engines are factory-filled
with a specially adapted synthetic engine oil.
Great care has been put into the choice of oil,
with consideration given to service life, starta-
bility, fuel consumption and environmental
impact.
For the recommended service intervals to
apply, an approved engine oil must be used.
Only use the prescribed oil grade to top off or
change the oil. Otherwise, there is a risk of
the vehicle's service life, startability, fuel con-
sumption and environmental impact being
affected.
Failure to use engine oil of the prescribed
grade and viscosity could cause damage to
engine-related components. Volvo Car Corpo-
ration disclaims warranty liability for such type
of damage.
Volvo recommends entrusting oil changes to
an authorized Volvo workshop.
Volvo uses different systems to warn if the oil
level is too low/high or the oil pressure is low. On
engine variants with an oil pressure sensor, awarning symbol is displayed in the instrument
panel when oil pressure is low . On engine
variants with an oil level sensor, the warn-
ing symbol in the instrument panel and display
messages are used to alert the driver. Some
engine variants have both systems. Contact a
Volvo retailer for more information.
Change the engine oil and oil filter according to
the schedule specified in the Warranty and Main-
tenance Records Information booklet. Oils of a
higher grade than that specified may be used. If
the vehicle is driven in adverse conditions, Volvo
recommends using an oil with a higher grade
than that specified.
Related information
• Checking and filling engine oil (p. 611)
• Engine oil specifications (p. 662)
Page 613 of 686
MAINTENANCE AND SERVICE
}}
611
Checking and filling engine oil
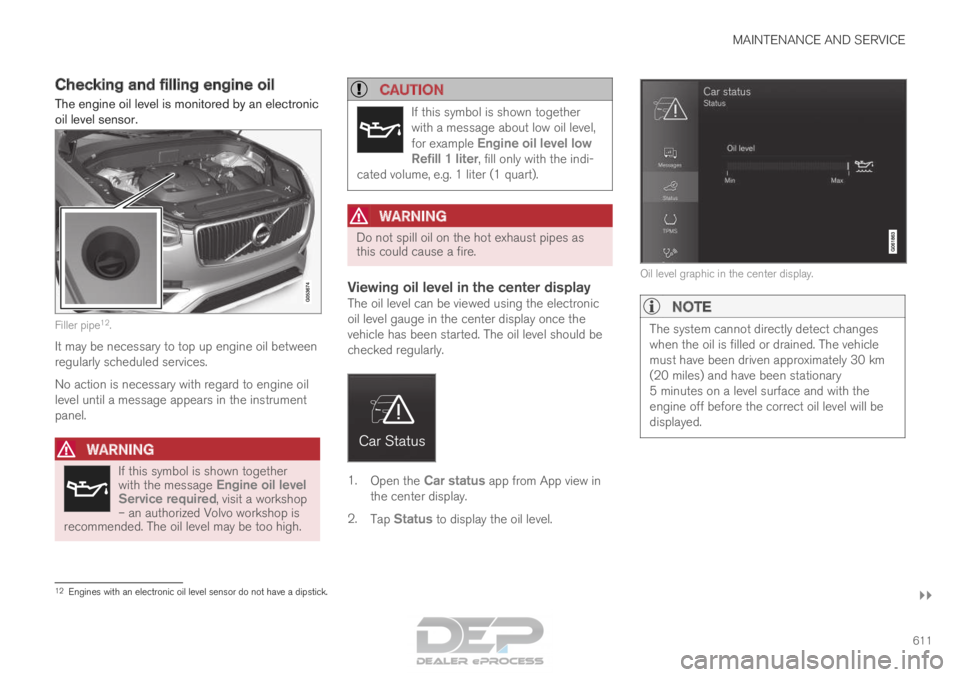
The engine oil level is monitored by an electronic
oil level sensor. Filler pipe
12
.
It may be necessary to top up engine oil between
regularly scheduled services.
No action is necessary with regard to engine oil
level until a message appears in the instrument
panel.
WARNING If this symbol is shown together
with the message
Engine oil level
Service required, visit a workshop – an authorized Volvo workshop is
recommended. The oil level may be too high.
CAUTION If this symbol is shown together
with a message about low oil level,
for example
Engine oil level low
Refill 1 liter, fill only with the indi-
cated volume, e.g. 1 liter (1 quart).
WARNING Do not spill oil on the hot exhaust pipes as
this could cause a fire.
Viewing oil level in the center displayThe oil level can be viewed using the electronic
oil level gauge in the center display once the
vehicle has been started. The oil level should be
checked regularly.
1.
Open the Car status app from App view in
the center display.
2. Tap Status to display the oil level. Oil level graphic in the center display.NOTE
The system cannot directly detect changes
when the oil is filled or drained. The vehicle
must have been driven approximately 30 km
(20 miles) and have been stationary
5 minutes on a level surface and with the
engine off before the correct oil level will be
displayed.
12
Engines with an electronic oil level sensor do not have a dipstick.
Page 626 of 686
||MAINTENANCE AND SERVICE
* Option/accessory.
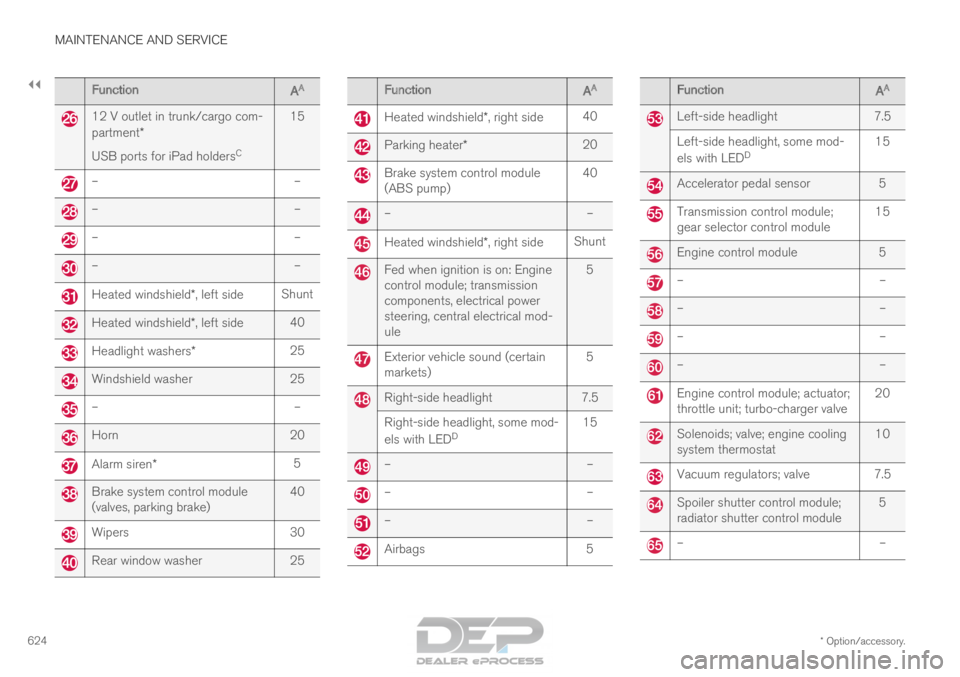
624 Function
AA 12 V outlet in trunk/cargo com-
partment*
USB ports for iPad holders
C15 –
––
––
––
–Heated windshield*, left side
ShuntHeated windshield*, left side
40Headlight washers*
25Windshield washer
25–
–Horn
20Alarm siren*
5Brake system control module
(valves, parking brake)
40Wipers
30Rear window washer
25 Function
AA Heated windshield*, right side
40 Parking heater*
20 Brake system control module
(ABS pump)
40 –
– Heated windshield*, right side
Shunt Fed when ignition is on: Engine
control module; transmission
components, electrical power
steering, central electrical mod-
ule
5 Exterior vehicle sound (certain
markets)
5 Right-side headlight
7.5
Right-side headlight, some mod-
els with LED D 15 –
– –
– –
– Airbags
5 Function
AA Left-side headlight
7.5
Left-side headlight, some mod-
els with LED D 15 Accelerator pedal sensor
5 Transmission control module;
gear selector control module
15 Engine control module
5 –
– –
– –
– –
– Engine control module; actuator;
throttle unit; turbo-charger valve
20 Solenoids; valve; engine cooling
system thermostat
10 Vacuum regulators; valve 7.5
Spoiler shutter control module;
radiator shutter control module
5 –
–
Page 627 of 686
MAINTENANCE AND SERVICE
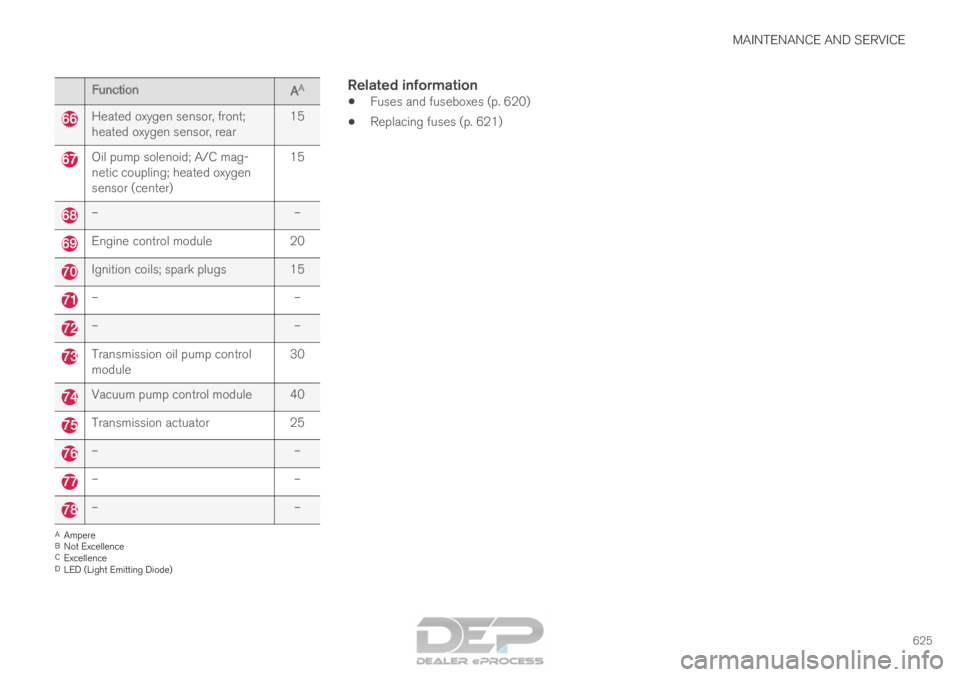
625Function
AA Heated oxygen sensor, front;
heated oxygen sensor, rear
15Oil pump solenoid; A/C mag-
netic coupling; heated oxygen
sensor (center)
15–
–Engine control module
20Ignition coils; spark plugs 15
–
––
–Transmission oil pump control
module
30Vacuum pump control module 40
Transmission actuator
25–
––
––
–A
Ampere
B Not Excellence
C Excellence
D LED (Light Emitting Diode)
Related information
• Fuses and fuseboxes (p. 620)
• Replacing fuses (p. 621)
Page 629 of 686
MAINTENANCE AND SERVICE
}}
* Option/accessory. 627
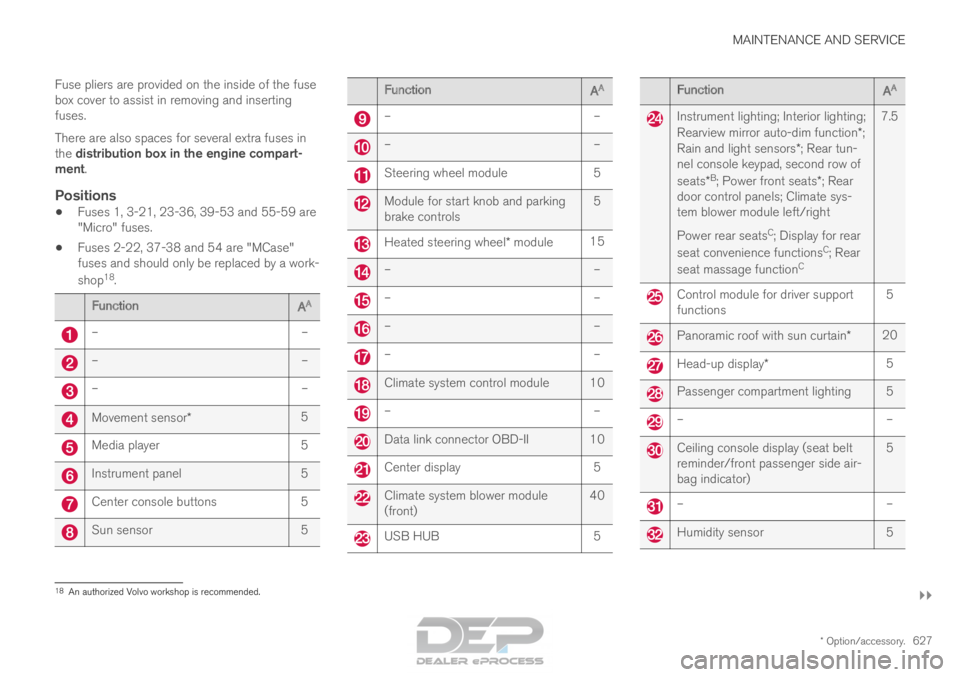
Fuse pliers are provided on the inside of the fuse
box cover to assist in removing and inserting
fuses.
There are also spaces for several extra fuses in
the distribution box in the engine compart-
ment.
Positions
•
Fuses 1, 3-21, 23-36, 39-53 and 55-59 are
"Micro" fuses.
• Fuses 2-22, 37-38 and 54 are "MCase"
fuses and should only be replaced by a work-
shop 18
. Function
AA –
––
––
–Movement sensor*
5Media player
5Instrument panel
5Center console buttons
5Sun sensor
5 Function
AA –
– –
– Steering wheel module
5 Module for start knob and parking
brake controls
5 Heated steering wheel* module
15 –
– –
– –
– –
– Climate system control module 10
–
– Data link connector OBD-II 10
Center display
5 Climate system blower module
(front)
40 USB HUB
5 Function
AA Instrument lighting; Interior lighting;
Rearview mirror auto-dim function*;
Rain and light sensors*; Rear tun-
nel console keypad, second row of
seats* B
; Power front seats*; Rear
door control panels; Climate sys-
tem blower module left/right
Power rear seats C
; Display for rear
seat convenience functions C
; Rear
seat massage function C7.5 Control module for driver support
functions
5 Panoramic roof with sun curtain*
20 Head-up display*
5 Passenger compartment lighting 5
–
– Ceiling console display (seat belt
reminder/front passenger side air-
bag indicator)
5 –
– Humidity sensor
518
An authorized Volvo workshop is recommended.
Page 643 of 686

MAINTENANCE AND SERVICE
641
Automatic car washes
The vehicle should be washed as soon as it
becomes dirty. This makes the vehicle easier to
clean because dirt does not attach as strongly. It
also reduces the risk of scratches and keeps the
vehicle looking new.
Automatic car washesAn automatic car wash is a fast and easy way to
keep your vehicle clean, but it does not reach all
areas of the vehicle. For best results, Volvo rec-
ommends hand washing your vehicle or supple-
menting automatic car washes with a hand wash.
NOTE
Volvo recommends not washing the vehicle in
an automatic car wash during the first few
months; the paintwork on new vehicles takes
some time to fully harden.
CAUTION
Before driving the vehicle into a car wash,
deactivate the Automatic Braking when Sta-
tionary and Automatic Parking Brake Applica-
tion functions. If the functions are not deacti-
vated, the brake system will seize when the
vehicle is stationary and the vehicle will not be
able to roll.
CAUTION For automatic car washes in which the vehicle
is pulled forward on rolling wheels:
1.
Before washing the vehicle, make sure
that the automatic rain sensor is deacti-
vated. If it is not deactivated and inadver-
tently starts, the wiper arms could be
damaged.
2. To help prevent damage from the auto- matic car wash machinery, make sure
that the door mirrors are folded in, anten-
nas retracted or removed, and any auxili-
ary lights secured.
3. Drive into the automatic car wash.
4. Turn off the "Automatic Braking when Stationary" function using the switch in
the tunnel console.
5. Turn off the "Automatic Parking Brake Application" function in the center dis-
play's Top view.
6. Turn off the engine by turning the start knob in the tunnel console clockwise.
Hold the knob in position for at least
2 seconds.
The vehicle is now ready for the automatic car
wash.
CAUTION The system will automatically change to P
mode if the above steps are not followed. In P
mode, the wheels are locked, which they
should not be when the vehicle is being
washed in a car wash.
Related information
•
Cleaning the exterior (p. 638)
• Polishing and waxing (p. 639)
• Hand washing (p. 639)
• High-pressure washing (p. 642)
• Cleaning the wiper blades (p. 642)
• Cleaning exterior plastic, rubber and trim
components (p. 643)
• Cleaning rims (p. 644)
• Corrosion protection (p. 644)
Page 649 of 686

MAINTENANCE AND SERVICE
}}
647
It is important to use the right color.
Related information
•
Paintwork (p. 645)
• Touching up minor paint damage (p. 645) Changing rear window wipers
The wiper blades help remove water from the
windshield and rear window. Along with the
washer fluid, they clean the glass and help
improve visibility while driving. The windshield
and rear window wiper blades can be replaced.
Changing rear window wipers Lift the wiper arm from the window and pull the lower
section of the blade to the right.1. Grasp the center of the wiper blade and
lift it from the window to the stop position.
NOTE When the wiper arm is halfway folded out, it
will stop in a locking position that helps pre-
vent the arm from falling back onto the rear
window. The wiper arm must be pulled past
the locking position stop in order to change
the wiper blade.
2. Grip the lower part of the blade and pull
to the right until the blade loosens from the
arm.
3.
Press the new wiper blade until it clicks into
place. Check to make sure the blade is
securely in place.
4. Fold the wiper arm back toward the window.
CAUTION Check the blades regularly. Neglected main-
tenance shortens the life of the blades.
Related information
•
Using the rain sensor (p. 177)
• Using the windshield and headlight washers
(p. 179)
• Using automatic rear window wiping when
backing up (p. 181)