display VOLVO XC90 TWIN ENGINE HYBRID 2017 Owners Manual
[x] Cancel search | Manufacturer: VOLVO, Model Year: 2017, Model line: XC90 TWIN ENGINE HYBRID, Model: VOLVO XC90 TWIN ENGINE HYBRID 2017Pages: 584, PDF Size: 14.2 MB
Page 376 of 584

DRIVER SUPPORT
* Option/accessory, for more information, see Introduction.374
Park Assist Pilot (PAP)* symbolsand messages
Park Assist Pilot uses graphics and text mes-sages to indicate if there is a problem with thesystem.
Various PAP-related combinations of graphicsand text messages are displayed in the instru-ment panel and sometimes also include suitableactions.
The following table provides some examples.
MessageExplanation
Park Assist System
Unavailable Service required
The system is not functioning properly. Contact a trained and qualified Volvo service technician.
Park Assist System
Sensors blocked, cleaning needed
One or more of the system's sensors are blocked. Check and clean the sensors as soon as possible.
A text message can be erased by briefly pressingthe O button in the center of the right-side steer-ing wheel keypad.
Contact a Volvo retailer or a trained and qualifiedVolvo service technician If a message indicatingthat PAP is not functioning properly remains dis-played or recurs.
Related information
•Park Assist Pilot (PAP)* (p. 368)
•Using Park Assist Pilot (PAP)* (p. 369)
•Park Assist Pilot (PAP)* limitations (p. 372)
Page 380 of 584
||
STARTING AND DRIVING
* Option/accessory, for more information, see Introduction.378
Instrument panel symbols
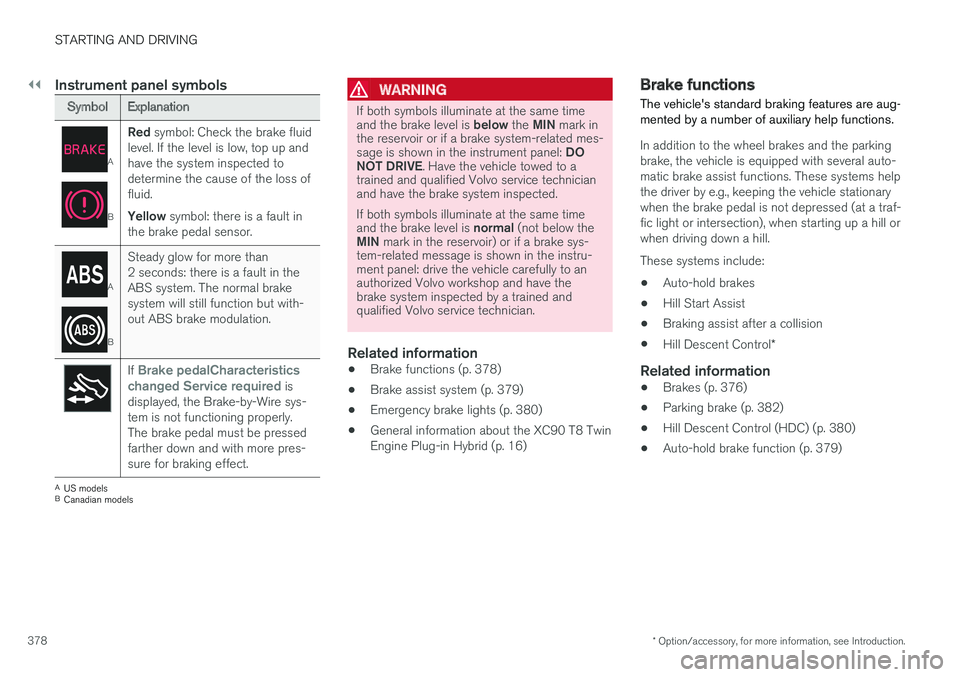
SymbolExplanation
A
B
Red symbol: Check the brake fluidlevel. If the level is low, top up andhave the system inspected todetermine the cause of the loss offluid.
Yellow symbol: there is a fault inthe brake pedal sensor.
A
B
Steady glow for more than2 seconds: there is a fault in theABS system. The normal brakesystem will still function but with-out ABS brake modulation.
If Brake pedalCharacteristicschanged Service required isdisplayed, the Brake-by-Wire sys-tem is not functioning properly.The brake pedal must be pressedfarther down and with more pres-sure for braking effect.
AUS modelsBCanadian models
WARNING
If both symbols illuminate at the same timeand the brake level is below the MIN mark inthe reservoir or if a brake system-related mes-sage is shown in the instrument panel: DONOT DRIVE. Have the vehicle towed to atrained and qualified Volvo service technicianand have the brake system inspected.
If both symbols illuminate at the same timeand the brake level is normal (not below theMIN mark in the reservoir) or if a brake sys-tem-related message is shown in the instru-ment panel: drive the vehicle carefully to anauthorized Volvo workshop and have thebrake system inspected by a trained andqualified Volvo service technician.
Related information
•Brake functions (p. 378)
•Brake assist system (p. 379)
•Emergency brake lights (p. 380)
•General information about the XC90 T8 TwinEngine Plug-in Hybrid (p. 16)
Brake functions
The vehicle's standard braking features are aug-mented by a number of auxiliary help functions.
In addition to the wheel brakes and the parkingbrake, the vehicle is equipped with several auto-matic brake assist functions. These systems helpthe driver by e.g., keeping the vehicle stationarywhen the brake pedal is not depressed (at a traf-fic light or intersection), when starting up a hill orwhen driving down a hill.
These systems include:
•Auto-hold brakes
•Hill Start Assist
•Braking assist after a collision
•Hill Descent Control*
Related information
•Brakes (p. 376)
•Parking brake (p. 382)
•Hill Descent Control (HDC) (p. 380)
•Auto-hold brake function (p. 379)
Page 383 of 584

STARTING AND DRIVING
* Option/accessory, for more information, see Introduction.381
When HDC and LSC are activated, this changesthe response from the accelerator pedal andengine.
Activating HDC
This function can be activated in different ways,depending on how the vehicle is equipped.
Using the drive mode control *
Select the Off Road drive mode to activate thefunction.
Select a different drive mode to turn HDC off. Ifthis is done while the vehicle is on a steep down-grade, engine braking will decrease gradually.
From the center display's Function view
Models without the drive modecontrol have a button for HillDescent Control in the centerdisplay's Function view.
•Tap the button to activate. A light in the but-ton illuminates when the function is acti-vated.
NOTE
The function is deactivated when driving athigher speeds and must be reactivated atlower speeds if so desired.
Related information
•Brake functions (p. 378)
•Low Speed Control (LSC) (p. 428)
•Drive modes (p. 420)
Hill Start Assist
Hill Start Assist (HSA) helps prevent the vehiclefrom rolling backwards when starting up a hill. Ifyou are backing up a hill, HSA helps prevent thevehicle from rolling forward.
HSA makes it easier to start or back up on a hillby retaining pressure on the brake pedal for sev-eral seconds after the pedal has been released inorder to keep the vehicle at a standstill.
The brakes will be released after several secondsor when the driver presses the accelerator pedal.
HSA is available even if the Auto-hold brakingfunction is turned off.
Related information
•Brake functions (p. 378)
•Auto-hold brake function (p. 379)
Page 386 of 584
||
STARTING AND DRIVING
384
Heavy load uphill
A heavy load, such as a trailer, can cause thevehicle to roll backward when the parking brakeis released automatically on a steep incline. Tohelp avoid this:
1. Keep the electric parking brake controlpushed in.
2. While pressing the accelerator pedal to pullaway, release the parking brake control onlyafter the vehicle begins to move.
Parking brake settings
Automatically setting the parking brake can beturned on or off in the center display's Top view.
1.Tap Settings in Top view.
2.Tap My CarElectric Parking Brake anddeselect Auto Activate Parking Brake.
Related information
•Parking brake (p. 382)
•Parking brake malfunctions (p. 384)
•Auto-hold brake function (p. 379)
Parking brake malfunctions
If it has not been possible to apply or release theparking brake after several attempts, consult atrained and authorized Volvo service technicianor retailer.
An audible signal will sound if the parking brakeis applied when the vehicle is being driven. If thevehicle must be parked while the parking brake isnot functioning properly:
•Put the gear selector in P.
•If the vehicle is pointing uphill, turn the frontwheels so that they point away from the curb.
•If the vehicle is pointing downhill, turn thefront wheels so that they point toward thecurb.
•Put the gear selector in P.
Low battery charge level
If the battery is discharged, the parking brakecannot be operated. Connect an auxiliary batteryto the vehicle.
Replacing brake pads
The rear brake pads have to be replaced by atrained and authorized Volvo service techniciandue to the design of the electric parking brake.
Symbols in the instrument panel
SymbolExplanation
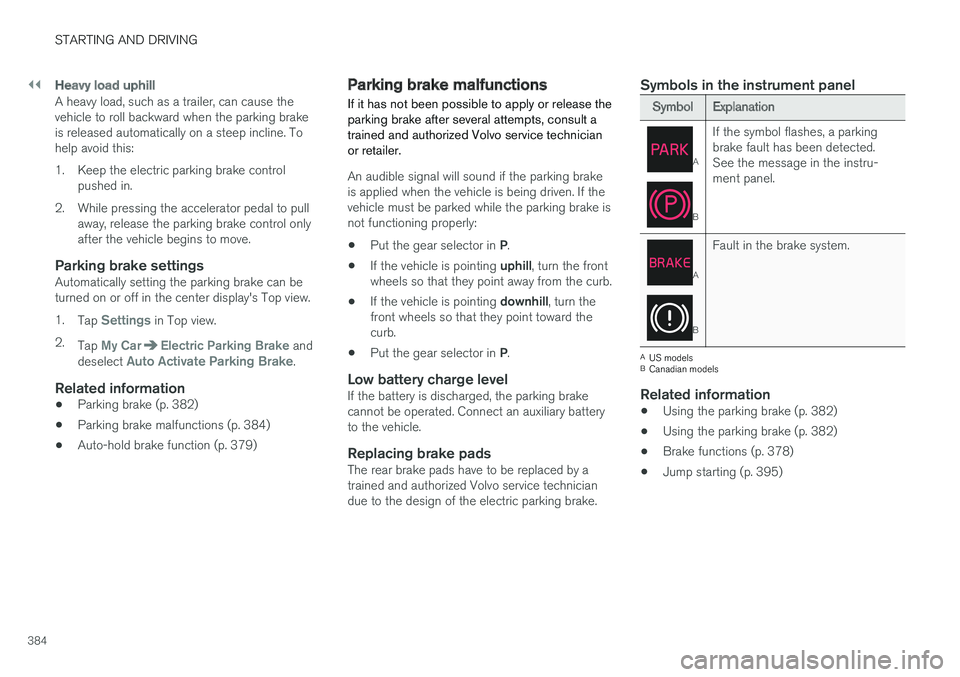
A
B
If the symbol flashes, a parkingbrake fault has been detected.See the message in the instru-ment panel.
A
B
Fault in the brake system.
AUS modelsBCanadian models
Related information
•Using the parking brake (p. 382)
•Using the parking brake (p. 382)
•Brake functions (p. 378)
•Jump starting (p. 395)
Page 389 of 584
STARTING AND DRIVING
}}
387
Driving through standing water
The vehicle should be driven with extreme cau-tion if it is necessary to drive through standingwater.
The vehicle can be driven through water up to adepth approximately level with the floor at walk-ing speed to help prevent water from enteringthe differential and/or the transmission or dam-aging electrical components.
•If possible, check the depth of the waterbefore driving through it. Take particular carewhen driving through flowing water.
•Before driving through water, always selectthe Off Road drive mode to ensure that thegasoline engine is running and to maximizeground clearance.
•After driving through water, apply the brakesand check that they are functioning correctly.
•Clean the electrical connections for trailerwiring after driving in mud or water.
•When driving through water, maintain lowspeed and do not stop in the water.
CAUTION
•Damage may occur to the engine, trans-mission, electrical components, etc. if thevehicle is driven through water higherthan its floor level. Be aware that wavescreated by other vehicles could cause thelevel to temporarily be above the vehicle'sfloor level.
•Damage to any components due to waterabove the floor level, vapor lock or insuffi-cient oil is not covered under warranty.
•If the engine has been stopped while thevehicle is in water, do not attempt torestart it. Have the vehicle towed out ofthe water and inspected by a trained andqualified Volvo service technician.
WARNING
•Avoid driving through standing or rushingwater. Doing so can be dangerous and itmay also be difficult to determine theactual depth of the water.
•If water cannot be avoided, after drivingthrough the water, press lightly on thebrake pedal to ensure that the brakes arefunctioning normally. Water or mud canmake the brake linings slippery, resultingin delayed braking effect.
Related information
•Towing recommendations (p. 389)
Overheating the engine andtransmission
In demanding driving conditions, such as whentransporting heavy loads, driving in mountainousareas or in very hot weather there is a risk ofoverheating the engine or transmission.
•The engine's output may be slightly limited ifthere is a risk of overheating.
•Remove e.g., auxiliary lights mounted in frontof the grille in hot weather.
•If the temperature of the engine coolantbecomes too high, the warning symbol willilluminate and the message Enginetemperature/Stop safely will be displayed.Stop the vehicle as soon as possible in asafe place and let the engine idle for severalminutes.
•If the message Engine temperature/Hightemperature Turn off engine or Enginecoolant/Stop safely is displayed, stopsafely and turn off the engine.
•If the transmission begins to overheat, analternative gear shifting program will beselected. An integrated protective functionwill also by activated, the warning symbol willilluminate and the message TransmissionwarmHigh temperature Reduce speedor Transmission warmStop safely, waitfor cooling will be displayed in the instru-ment panel.
Page 395 of 584
STARTING AND DRIVING
}}
393
Opening/closing the fuel filler door
The fuel tank has a filling system that does nothave a cover.
Opening/closing the fuel filler door
An arrow next to the fuel pumpsymbol in the instrument panelindicates the side of the vehiclewhere the fuel filler door islocated.
1. Press the button on the lighting panel.
>Pressure equalization in the fuel tank cau-ses a slight delay before the fuel fillerdoor opens. Fuel tank Fuel lid isopening will be displayed in the instru-ment panel, followed by Fuel tank Readyfor refueling.
2.After refueling, close the fuel filler door bypressing lightly.
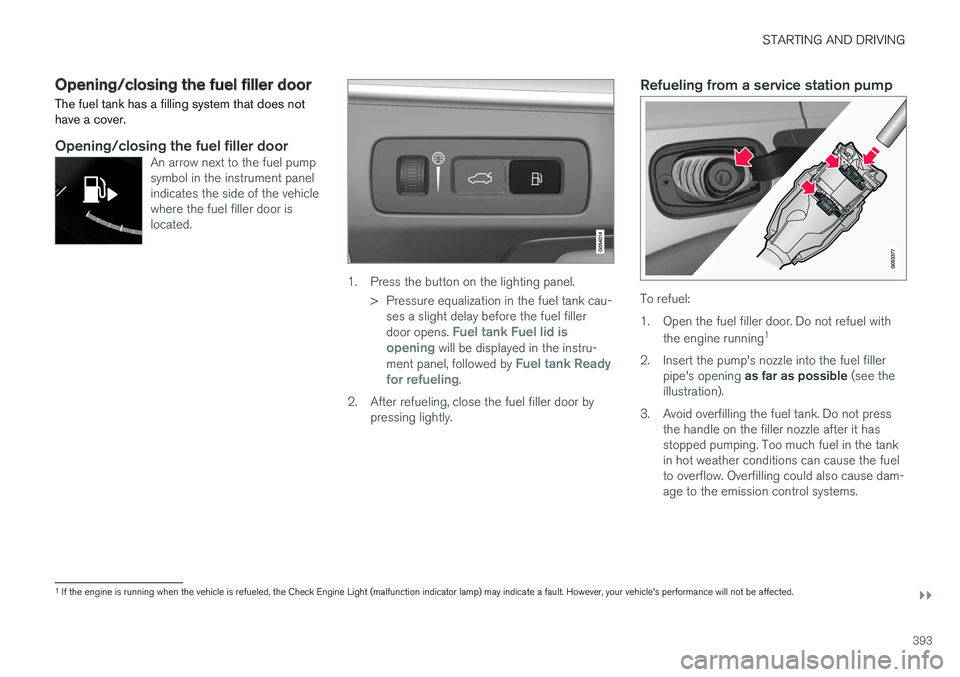
Refueling from a service station pump
To refuel:
1.Open the fuel filler door. Do not refuel with
the engine running1
2. Insert the pump's nozzle into the fuel fillerpipe's opening as far as possible (see theillustration).
3. Avoid overfilling the fuel tank. Do not pressthe handle on the filler nozzle after it hasstopped pumping. Too much fuel in the tankin hot weather conditions can cause the fuelto overflow. Overfilling could also cause dam-age to the emission control systems.
1If the engine is running when the vehicle is refueled, the Check Engine Light (malfunction indicator lamp) may indicate a fault. However, your vehicle's performance will not be affected.
Page 397 of 584
STARTING AND DRIVING
}}
395
Jump starting
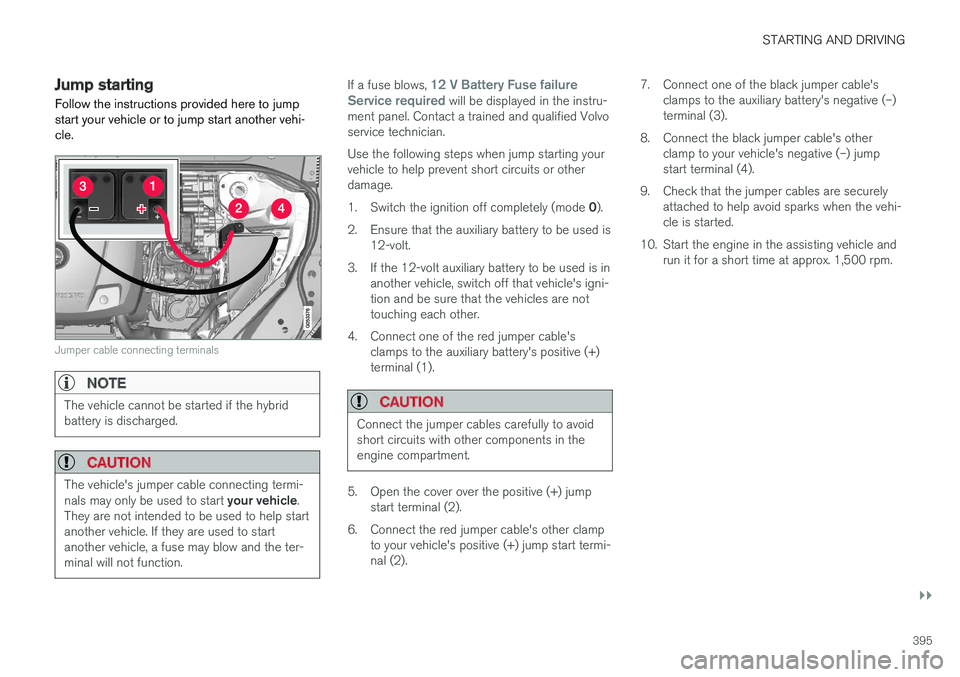
Follow the instructions provided here to jumpstart your vehicle or to jump start another vehi-cle.
Jumper cable connecting terminals
NOTE
The vehicle cannot be started if the hybridbattery is discharged.
CAUTION
The vehicle's jumper cable connecting termi-nals may only be used to start your vehicle.They are not intended to be used to help startanother vehicle. If they are used to startanother vehicle, a fuse may blow and the ter-minal will not function.
If a fuse blows, 12 V Battery Fuse failureService required will be displayed in the instru-ment panel. Contact a trained and qualified Volvoservice technician.
Use the following steps when jump starting yourvehicle to help prevent short circuits or otherdamage.
1.Switch the ignition off completely (mode 0).
2.Ensure that the auxiliary battery to be used is12-volt.
3. If the 12-volt auxiliary battery to be used is inanother vehicle, switch off that vehicle's igni-tion and be sure that the vehicles are nottouching each other.
4. Connect one of the red jumper cable'sclamps to the auxiliary battery's positive (+)terminal (1).
CAUTION
Connect the jumper cables carefully to avoidshort circuits with other components in theengine compartment.
5. Open the cover over the positive (+) jumpstart terminal (2).
6.Connect the red jumper cable's other clampto your vehicle's positive (+) jump start termi-nal (2).
7. Connect one of the black jumper cable'sclamps to the auxiliary battery's negative (–)terminal (3).
8. Connect the black jumper cable's otherclamp to your vehicle's negative (–) jumpstart terminal (4).
9. Check that the jumper cables are securelyattached to help avoid sparks when the vehi-cle is started.
10. Start the engine in the assisting vehicle andrun it for a short time at approx. 1,500 rpm.
Page 399 of 584
STARTING AND DRIVING
}}
397
Driving with a trailer
When towing a trailer, always observe the legalrequirements of the state/province.
•All Volvo models are equipped with energy-absorbing shock-mounted bumpers. Trailerhitch installation should not interfere with theproper operation of this bumper system.
Trailer towing does not normally present any par-ticular problems, but take into consideration:
•Increase tire pressure to recommended fullpressure.
•When your vehicle is new, avoid towing heavytrailers during the first 620 miles (1,000 km).
•Maximum speed when towing a trailer:50 mph (80 km/h).
•Engine and transmission are subject toincreased loads. Therefore, engine coolanttemperature should be closely watched whendriving in hot climates or hilly terrain. Use alower gear and turn off the air conditioner ifthe temperature gauge needle enters the redrange.
•If the automatic transmission begins to over-heat, a message will be displayed in the textwindow.
•Avoid overload and other abusive operation.
•Hauling a trailer affects handling, durability,and economy.
•It is necessary to balance trailer brakes withthe towing vehicle brakes to provide a safestop (check and observe state/local regula-tions).
•Do not connect the trailer's brake systemdirectly to the vehicle's brake system.
•More frequent vehicle maintenance isrequired.
•Remove the ball holder when the hitch is notbeing used.
NOTE
•When parking the vehicle with a trailer ona hill, apply the parking brake before put-ting the gear selector in P. Always followthe trailer manufacturer's recommenda-tions for wheel chocking.
•When starting on a hill, put the gearselector in D before releasing the parkingbrake.
•If you use the manual (Geartronic) shiftpositions while towing a trailer, make surethe gear you select does not put toomuch strain on the engine (using toohigh a gear).
•The drawbar assembly/trailer hitch maybe rated for trailers heavier than the vehi-cle is designed to tow. Please adhere toVolvo's recommended trailer weights.
•Avoid driving with a trailer on inclines ofmore than 15%.
Page 402 of 584

||
STARTING AND DRIVING
400
How TSA works
Once swaying has begun, it can be very difficultto stop, which makes it difficult to control thevehicle and trailer.
The TSA system continuously monitors the vehi-cle's movements, particularly lateral movement. Ifthe system detects a tendency to sway, thebrakes are applied individually on the frontwheels, which has a stabilizing effect on the vehi-cle and trailer. This is often enough to enable thedriver to regain control of the vehicle.
If this is not adequate to stop the swaying motion,the brakes are applied to all of the wheels on thevehicle and on the trailer if it is equipped withbrakes, and engine power is temporarily reduced.As the swaying motion begins to decrease andthe vehicle-trailer have once again become sta-ble, TSA will now stop regulating the brakes/engine power and the driver regains control ofthe vehicle.
TSA is deactivated if the driver deactivates ESCin the center display's menu system.
When the ESC symbol in theinstrument panel flashes, TSAis active.
Related information
•Detachable trailer hitch (p. 398)
•Driving with a trailer (p. 397)
•Electronic Stability Control (ESC) (p. 263)
Ignition modes
The vehicle's ignition can be put in variousmodes (levels) to make different functions availa-ble.
The vehicle's ignition has 3 modes: 0, I, and IIthat can be used to operate various functionswithout starting the engine. The following tableshows examples of which functions are availablein the respective modes.
Page 403 of 584
STARTING AND DRIVING
* Option/accessory, for more information, see Introduction.401
ModeFunctions available
0•The odometer, clock and tem-perature gauge are illuminated
•Power seats* can be adjusted
•The power windows can be oper-ated
•The 12-volt socket in the cargocompartment can be used
•The center display is activatedand can be used
•The infotainment system can beused for a limited time
In this mode, certain functions canonly be used for a limited time to helpminimize battery drain
I•The laminated panoramic roof*,power seats*/windows,12-voltsockets in the passenger com-partment, Bluetooth, navigationsystem*, climate system blower,windshield wipers can be oper-ated
•The infotainment system will start(if it was started when the ignitionwas switched off)
Using electrical current will drainthe start battery in this mode.
ModeFunctions available
II•The headlights illuminate
•Warning/indicator lights illumi-nate for 5 seconds
•A number of other functions willalso be activated. However, theheated seats* and heated rearwindow functions can only beactivated when the engine is run-ning.
This mode should only be used forvery short periods to help avoiddraining the battery.
Selecting an ignition mode
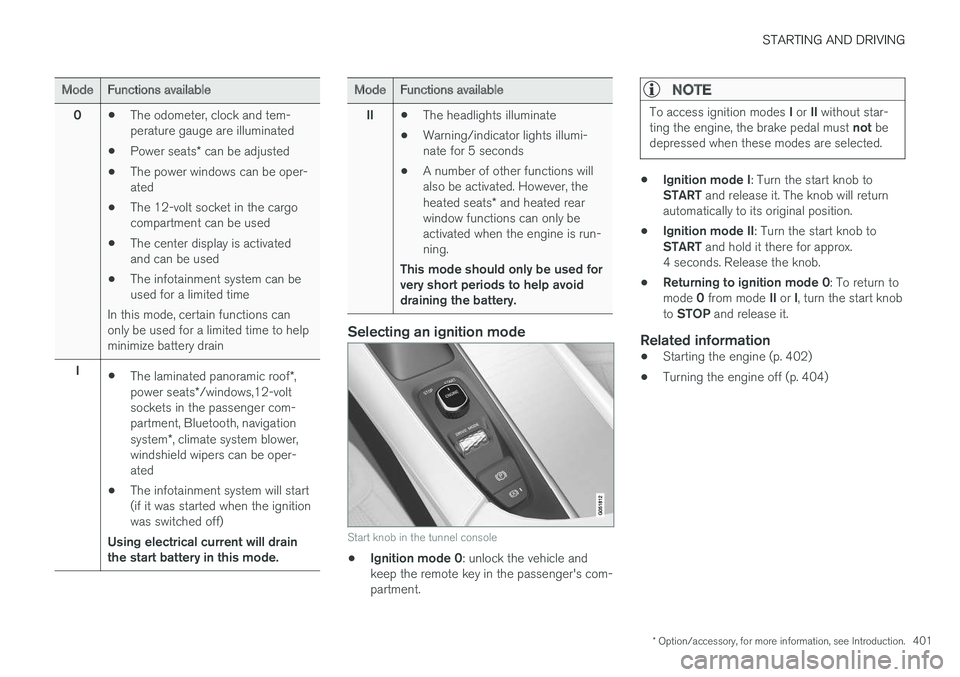
Start knob in the tunnel console
•Ignition mode 0: unlock the vehicle andkeep the remote key in the passenger's com-partment.
NOTE
To access ignition modes I or II without star-ting the engine, the brake pedal must not bedepressed when these modes are selected.
•Ignition mode I: Turn the start knob toSTART and release it. The knob will returnautomatically to its original position.
•Ignition mode II: Turn the start knob toSTART and hold it there for approx.4 seconds. Release the knob.
•Returning to ignition mode 0: To return tomode 0 from mode II or I, turn the start knobto STOP and release it.
Related information
•Starting the engine (p. 402)
•Turning the engine off (p. 404)