check engine YAMAHA DT125R 2000 User Guide
[x] Cancel search | Manufacturer: YAMAHA, Model Year: 2000, Model line: DT125R, Model: YAMAHA DT125R 2000Pages: 91, PDF Size: 4.67 MB
Page 50 of 91
6-13
PERIODIC MAINTENANCE AND MINOR REPAIR
1
2
3
4
56
7
8
9
EAU01808
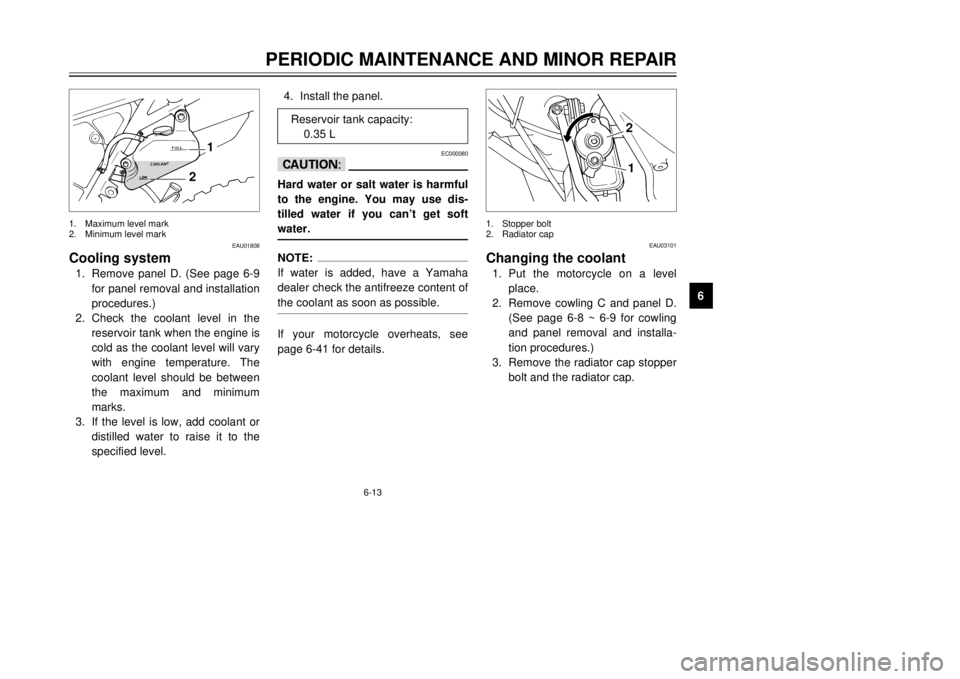
Cooling system1.Remove panel D. (See page 6-9
for panel removal and installation
procedures.)
2.Check the coolant level in the
reservoir tank when the engine is
cold as the coolant level will vary
with engine temperature. The
coolant level should be between
the maximum and minimum
marks.
3.If the level is low, add coolant or
distilled water to raise it to the
specified level.4.Install the panel.
EC000080
cCHard water or salt water is harmful
to the engine. You may use dis-
tilled water if you canÕt get soft
water.NOTE:
If water is added, have a Yamaha
dealer check the antifreeze content of
the coolant as soon as possible.If your motorcycle overheats, see
page 6-41 for details.
2
1
1.Maximum level mark
2.Minimum level mark
EAU03101
Changing the coolant1.Put the motorcycle on a level
place.
2.Remove cowling C and panel D.
(See page 6-8 ~ 6-9 for cowling
and panel removal and installa-
tion procedures.)
3.Remove the radiator cap stopper
bolt and the radiator cap.
12
1.Stopper bolt
2.Radiator cap
Reservoir tank capacity:
0.35 L
3MB-9-E7 12/27/00 2:52 PM Page 49
Page 52 of 91
6-15
PERIODIC MAINTENANCE AND MINOR REPAIR
1
2
3
4
56
7
8
9
EC000080
cCHard water or salt water is harmful
to the engine. You may use dis-
tilled water if you canÕt get soft
water.10.Install the radiator cap.
11.Run the engine several minutes.
Stop the engine and recheck the
coolant level in the radiator. If it
is low, add more coolant until it
reaches the top of the radiator.
12.Install the radiator cap stopper
bolt.
13.Fill the reservoir tank with
coolant up to maximum level.
14.Install the reservoir tank cap and
check for coolant leakage.NOTE:
If any leakage is found, ask a
Yamaha dealer to inspect the cooling
system.15.Install the cowling and the panel.
1
EAU03107
Air filterThe air filter should be cleaned at the
specified intervals. It should be
cleaned more frequently when riding
in unusually wet or dusty areas.
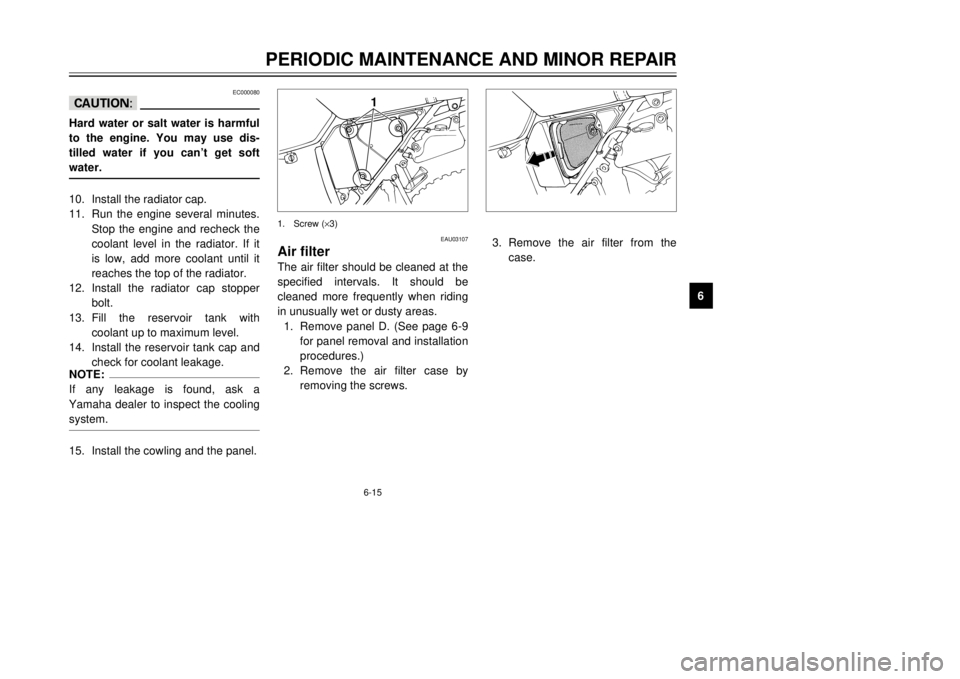
1.Remove panel D. (See page 6-9
for panel removal and installation
procedures.)
2.Remove the air filter case by
removing the screws.1.Screw (´3)
3.Remove the air filter from the
case.
3MB-9-E7 12/27/00 2:52 PM Page 51
Page 54 of 91
6-17
PERIODIC MAINTENANCE AND MINOR REPAIR
1
2
3
4
56
7
8
9
b
a
1
EAU00632
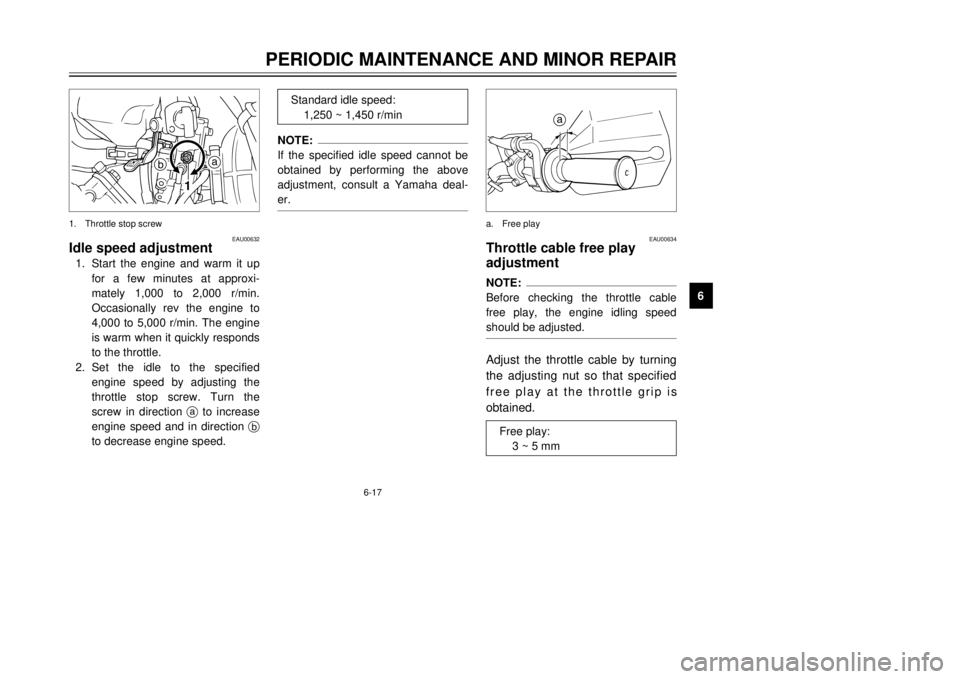
Idle speed adjustment1.Start the engine and warm it up
for a few minutes at approxi-
mately 1,000 to 2,000 r/min.
Occasionally rev the engine to
4,000 to 5,000 r/min. The engine
is warm when it quickly responds
to the throttle.
2.Set the idle to the specified
engine speed by adjusting the
throttle stop screw. Turn the
screw in direction ato increase
engine speed and in direction b
to decrease engine speed.1.Throttle stop screw
NOTE:
If the specified idle speed cannot be
obtained by performing the above
adjustment, consult a Yamaha deal-
er.
Standard idle speed:
1,250 ~ 1,450 r/min
a
EAU00634
Throttle cable free play
adjustmentNOTE:
Before checking the throttle cable
free play, the engine idling speed
should be adjusted.Adjust the throttle cable by turning
the adjusting nut so that specified
free play at the throttle grip is
obtained.a.Free play
Free play:
3 ~ 5 mm
3MB-9-E7 12/27/00 2:52 PM Page 53
Page 66 of 91
6-29
PERIODIC MAINTENANCE AND MINOR REPAIR
1
2
3
4
56
7
8
9
EAU02986
Sidestand lubricationLubricate the sidestand pivoting point
and metal-to-metal contact surfaces.
Check that the sidestand moves up
and down smoothly.
EW000113
wIf the sidestand does not move
smoothly, consult a Yamaha deal-
er.
Recommended lubricant:
Engine oil
EAU02939
Front fork inspectionVisual check
EW000115
wSecurely support the motorcycle
so there is no danger of it falling
over.Check for scratches or damage on
the inner tube and excessive oil leak-
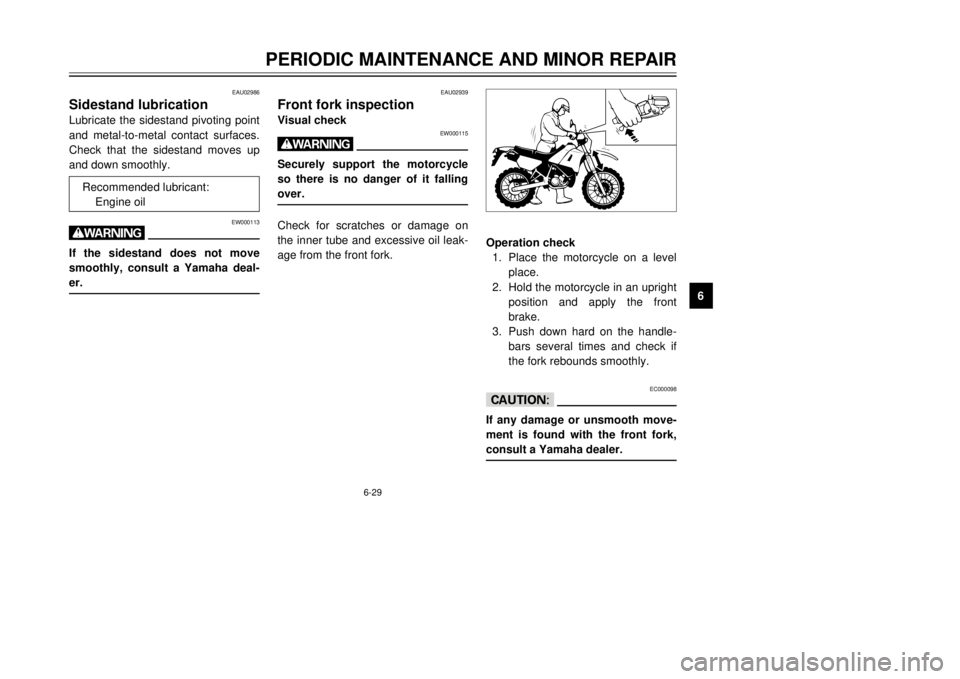
age from the front fork.Operation check
1.Place the motorcycle on a level
place.
2.Hold the motorcycle in an upright
position and apply the front
brake.
3.Push down hard on the handle-
bars several times and check if
the fork rebounds smoothly.
EC000098
cCIf any damage or unsmooth move-
ment is found with the front fork,
consult a Yamaha dealer.
3MB-9-E7 12/27/00 2:52 PM Page 65
Page 73 of 91
6-36
PERIODIC MAINTENANCE AND MINOR REPAIR
1
2
3
4
56
7
8
9
122
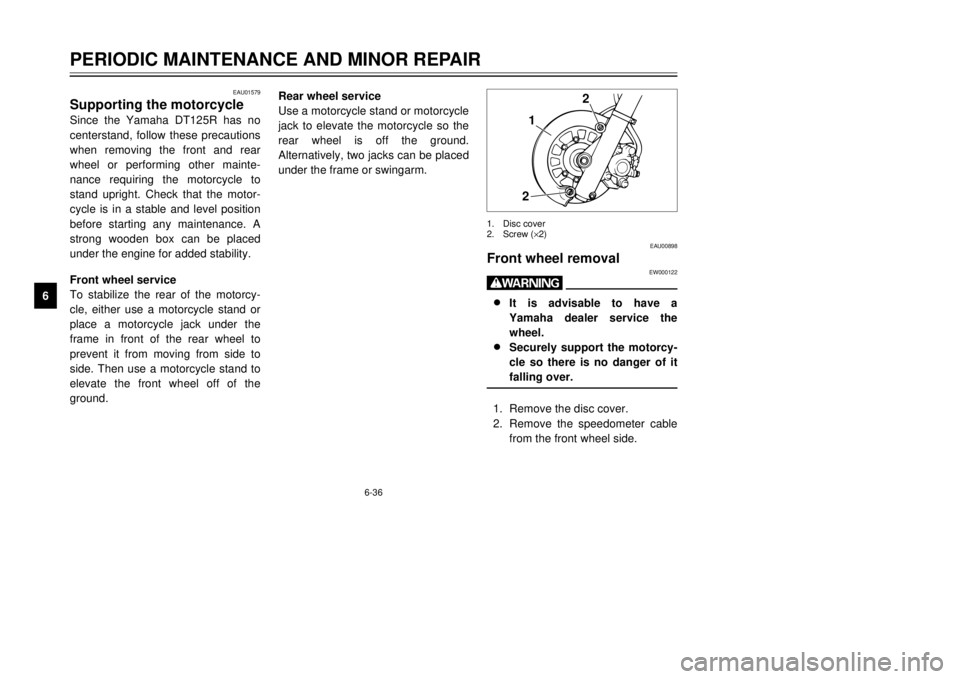
1.Disc cover
2.Screw (´2)
EAU00898
Front wheel removal
EW000122
w8
8
It is advisable to have a
Yamaha dealer service the
wheel.
8 8
Securely support the motorcy-
cle so there is no danger of it
falling over.1.Remove the disc cover.
2.Remove the speedometer cable
from the front wheel side.
EAU01579
Supporting the motorcycleSince the Yamaha DT125R has no
centerstand, follow these precautions
when removing the front and rear
wheel or performing other mainte-
nance requiring the motorcycle to
stand upright. Check that the motor-
cycle is in a stable and level position
before starting any maintenance. A
strong wooden box can be placed
under the engine for added stability.
Front wheel service
To stabilize the rear of the motorcy-
cle, either use a motorcycle stand or
place a motorcycle jack under the
frame in front of the rear wheel to
prevent it from moving from side to
side. Then use a motorcycle stand to
elevate the front wheel off of the
ground.Rear wheel service
Use a motorcycle stand or motorcycle
jack to elevate the motorcycle so the
rear wheel is off the ground.
Alternatively, two jacks can be placed
under the frame or swingarm.
3MB-9-E7 12/27/00 2:52 PM Page 72
Page 75 of 91
6-38
PERIODIC MAINTENANCE AND MINOR REPAIR
1
2
3
4
56
7
8
9
1
1
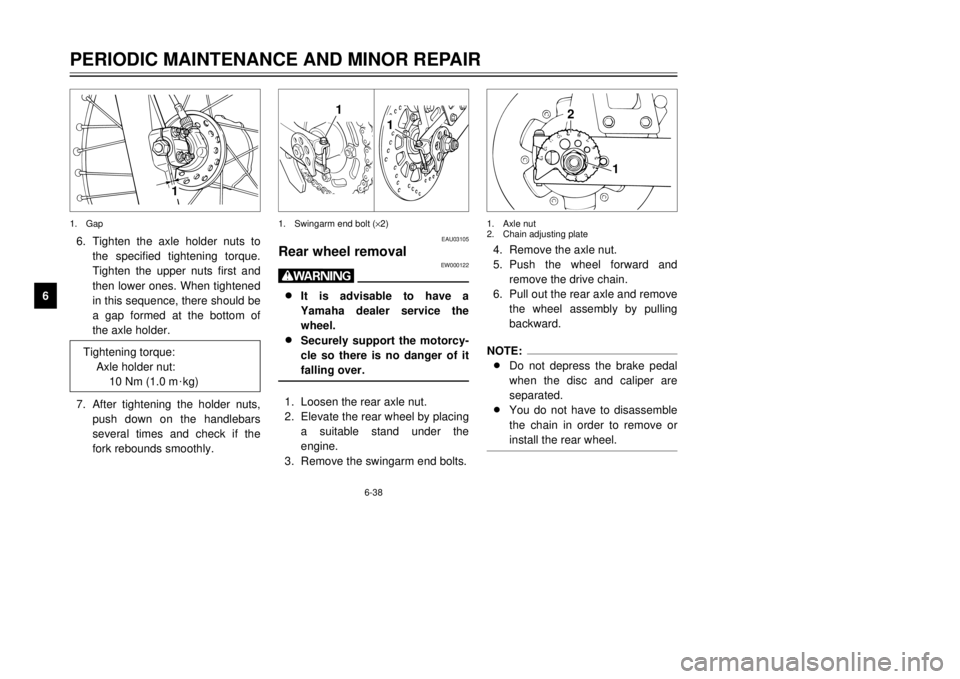
1.Swingarm end bolt (´2)
EAU03105
Rear wheel removal
EW000122
w8
8
It is advisable to have a
Yamaha dealer service the
wheel.
8 8
Securely support the motorcy-
cle so there is no danger of it
falling over.1.Loosen the rear axle nut.
2.Elevate the rear wheel by placing
a suitable stand under the
engine.
3.Remove the swingarm end bolts.4.Remove the axle nut.
5.Push the wheel forward and
remove the drive chain.
6.Pull out the rear axle and remove
the wheel assembly by pulling
backward.
NOTE:
8Do not depress the brake pedal
when the disc and caliper are
separated.
8You do not have to disassemble
the chain in order to remove or
install the rear wheel.
2
1
1.Axle nut
2.Chain adjusting plate
6.Tighten the axle holder nuts to
the specified tightening torque.
Tighten the upper nuts first and
then lower ones. When tightened
in this sequence, there should be
a gap formed at the bottom of
the axle holder.
7.After tightening the holder nuts,
push down on the handlebars
several times and check if the
fork rebounds smoothly. Tightening torque:
Axle holder nut:
10 Nm (1.0 m
0kg)1
1.Gap
3MB-9-E7 12/27/00 2:52 PM Page 74
Page 77 of 91
6-40
PERIODIC MAINTENANCE AND MINOR REPAIR
1
2
3
4
56
7
8
9
EAU03108
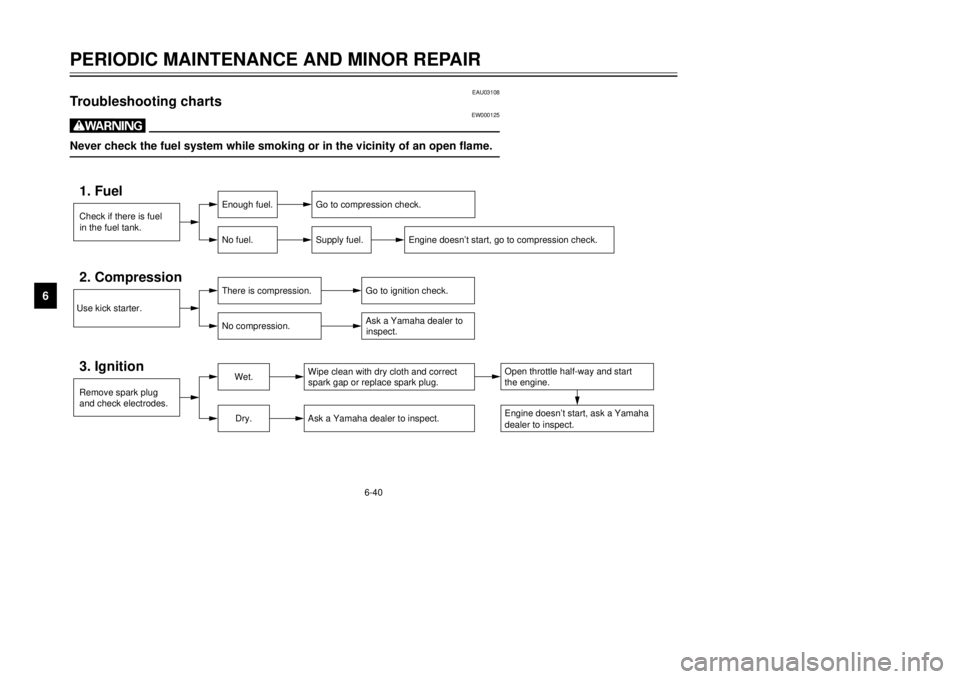
Troubleshooting charts
EW000125
wNever check the fuel system while smoking or in the vicinity of an open flame.Check if there is fuel1. Fuel
Enough fuel.
No fuel.
Go to compression check.
Supply fuel.
Engine doesn’t start, go to compression check.
Use kick starter.2. Compression
There is compression.
No compression.
Go to ignition check.
Ask a Yamaha dealer to
Remove spark plug3. Ignition
Wet.
Dry.
Wipe clean with dry cloth and correct
Ask a Yamaha dealer to inspect.
Engine doesn’t start, ask a YamahaOpen throttle half-way and start
in the fuel tank.
and check electrodes.spark gap or replace spark plug.the engine.
dealer to inspect. inspect.
3MB-9-E7 12/27/00 2:52 PM Page 76
Page 78 of 91
6-41
PERIODIC MAINTENANCE AND MINOR REPAIR
1
2
3
4
56
7
8
9
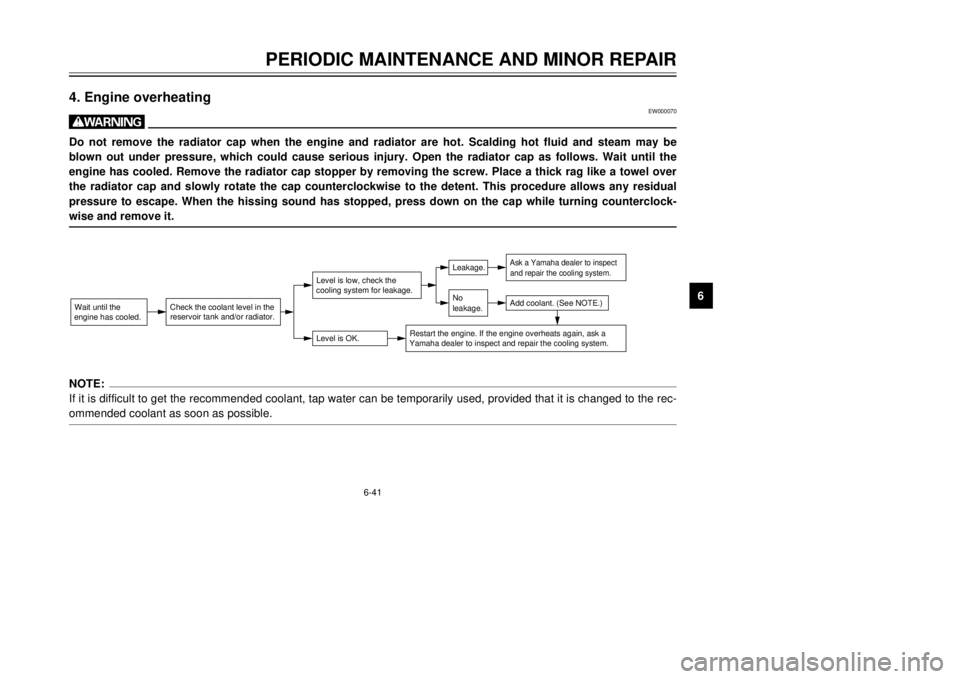
4. Engine overheating
EW000070
wDo not remove the radiator cap when the engine and radiator are hot. Scalding hot fluid and steam may be
blown out under pressure, which could cause serious injury. Open the radiator cap as follows. Wait until the
engine has cooled. Remove the radiator cap stopper by removing the screw. Place a thick rag like a towel over
the radiator cap and slowly rotate the cap counterclockwise to the detent. This procedure allows any residual
pressure to escape. When the hissing sound has stopped, press down on the cap while turning counterclock-
wise and remove it.Wait until the
Check the coolant level in the
Level is OK.Level is low, check the
NoLeakage.
Ask a Yamaha dealer to inspectAdd coolant. (See NOTE.)
Restart the engine. If the engine overheats again, ask a
engine has cooled.reservoir tank and/or radiator.cooling system for leakage.
Yamaha dealer to inspect and repair the cooling system. leakage.
and repair the cooling system.
NOTE:
If it is difficult to get the recommended coolant, tap water can be temporarily used, provided that it is changed to the rec-
ommended coolant as soon as possible.
3MB-9-E7 12/27/00 2:52 PM Page 77