belt YAMAHA TMAX 2017 Owners Manual
[x] Cancel search | Manufacturer: YAMAHA, Model Year: 2017, Model line: TMAX, Model: YAMAHA TMAX 2017Pages: 124, PDF Size: 14.56 MB
Page 8 of 124

Table of contents
Checking the rear brake lock .........8-22
Checking the front and rear brake pads ...........................................8-22
Checking the brake fluid level........8-23
Changing the brake fluid................8-24
Drive belt slack ..............................8-24
Checking and lubricating the
cables .........................................8-25
Checking and lubricating the throttle grip and cable.................8-25
Lubricating the front and rear brake levers................................8-26
Checking and lubricating the
centerstand and sidestand .........8-26
Checking the front fork ..................8-27
Checking the steering ....................8-27
Checking the wheel bearings ........8-28
Battery ...........................................8-28
Replacing the fuses .......................8-30
Vehicle lights .................................8-32
Replacing a front turn signal light
bulb ............................................8-33
Replacing the license plate light bulb ............................................8-33
Troubleshooting .......... ...................8-34
Troubleshooting charts ..................8-35
Emergency mode ..........................8-37
Scooter care and storage .................9-1
Matte color caution ..........................9-1
Care .................................................9-1
Storage ............................................9-4
Specifications ..................................10-1
Consumer information ...................11-1
Identification numbers ...................11-1
Diagnostic connector . ....................11-2
Vehicle data recording ...................11-2
Index .................................................12-1
BV1-28199-E0.book 2 ページ 2016年12月19日 月曜日 午前11時25分
Page 38 of 124

Instrument and control functions
5-5
1
2
3
4
5
6
7
8
9
10
11
12
13
14
EAU77335
Multi-function display
WARNING
EWA12313
Be sure to stop the vehicle before
making any setting changes to the
multi-function display. Changing
settings while riding can distract the
operator and increase the risk of an
accident. Fuel meter
The fuel meter indicates the amount of
fuel in the fuel tank. The display seg-
ments of the fuel meter disappear from
“F” (full) towards “E” (empty) as the fuel
level decreases. When the last seg-
ment starts flashing, refuel as soon as
possible.
TIP
If a problem is detected in the fuel me-
ter electrical circuit,
the fuel meter will
flash repeatedly. Have a Yamaha deal-
er check the vehicle.
Coolant temperature meter
The coolant temperature varies with
changes in the weather and engine
load. If the top segment starts flashing,
the information display automatically
1. Information display
2. Function display
3. Fuel meter
4. Clock
5. Drive mode display (XP530-A, XP530D-A)
6. Coolant temperature meter
1. Oil change indicator “Oil”
2. V-belt replacement indicator “V-Belt”
3. Eco indicator “ECO”
1 2 3 4 2
5
6
1 2
3
1. Fuel meter
1. Coolant temperature meter
1
1
BV1-28199-E0.book 5 ページ 2016年12月19日 月曜日 午前11時25分
Page 39 of 124
Instrument and control functions
5-6
1
2
3
4
5
6
7
8
9
10
11
12
13
14
changes to “C-TEMP” and “Hi” flashes.
Stop the vehicle and let the engine
cool. (See page 8-36.)
TIP
The information display cannot be
changed while the engine is overheat-
ing.
NOTICE
ECA10022
Do not continue to operate the en-
gine if it is overheating.
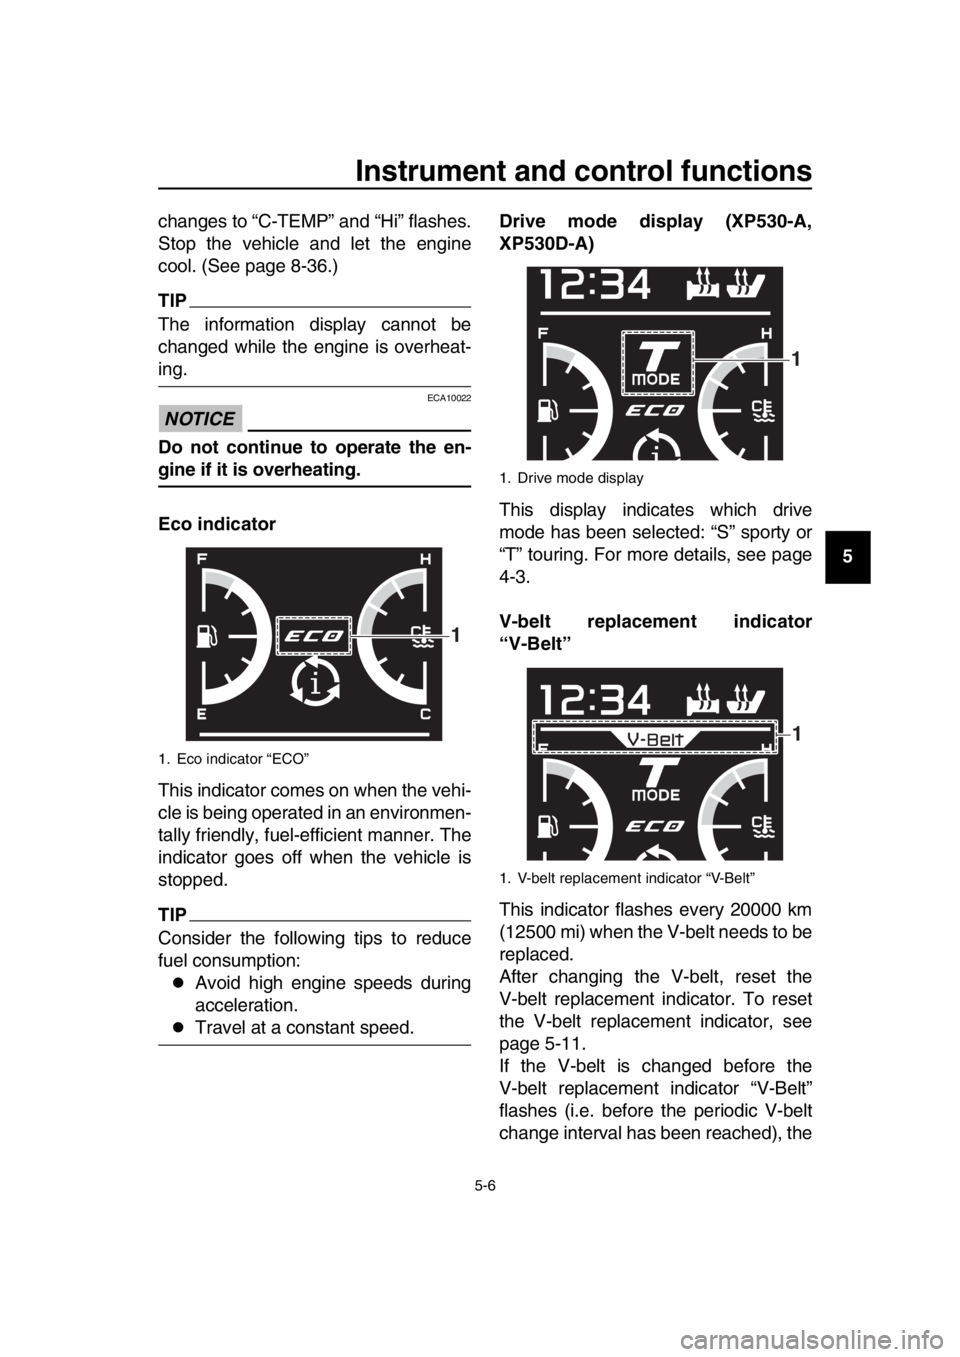
Eco indicator
This indicator comes on when the vehi-
cle is being operated in an environmen-
tally friendly, fuel-efficient manner. The
indicator goes off when the vehicle is
stopped.
TIP
Consider the following tips to reduce
fuel consumption:
Avoid high engine speeds during
acceleration.
Travel at a constant speed.
Drive mode display (XP530-A,
XP530D-A)
This display indicates which drive
mode has been selected: “S” sporty or
“T” touring. For more details, see page
4-3.
V-belt replacement indicator
“V-Belt”
This indicator flashes every 20000 km
(12500 mi) when the V-belt needs to be
replaced.
After changing the V-belt, reset the
V-belt replacement indicator. To reset
the V-belt replacement indicator, see
page 5-11.
If the V-belt is changed before the
V-belt replacement indicator “V-Belt”
flashes (i.e. before the periodic V-belt
change interval has been reached), the
1. Eco indicator “ECO”
1
1. Drive mode display
1. V-belt replacement indicator “V-Belt”
1
1
BV1-28199-E0.book 6 ページ 2016年12月19日 月曜日 午前11時25分
Page 40 of 124
Instrument and control functions
5-7
1
2
3
4
5
6
7
8
9
10
11
12
13
14 indicator “V-Belt” must be reset after
the V-belt change for the next periodic
V-belt change to be indicated at the
correct time.
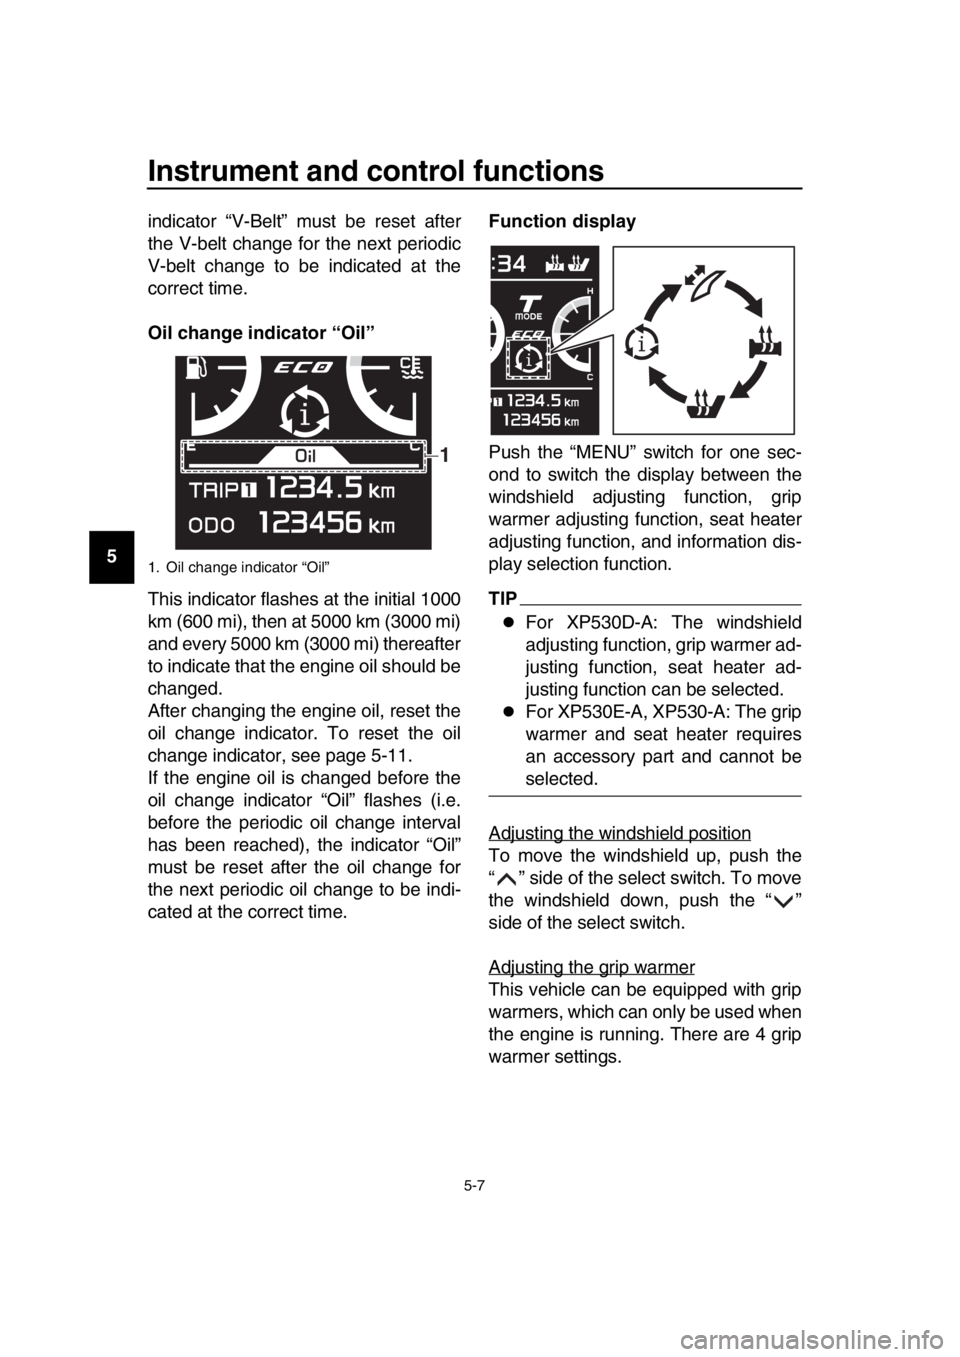
Oil change indicator “Oil”
This indicator flashes at the initial 1000
km (600 mi), then at 5000 km (3000 mi)
and every 5000 km (3000 mi) thereafter
to indicate that the engine oil should be
changed.
After changing the engine oil, reset the
oil change indicator. To reset the oil
change indicator, see page 5-11.
If the engine oil is changed before the
oil change indicator “Oil” flashes (i.e.
before the periodic oil change interval
has been reached), the indicator “Oil”
must be reset after the oil change for
the next periodic oil change to be indi-
cated at the correct time.
Function display
Push the “MENU” switch for one sec-
ond to switch the display between the
windshield adjusting function, grip
warmer adjusting function, seat heater
adjusting function, and information dis-
play selection function.
TIP
For XP530D-A: The windshield
adjusting function, grip warmer ad-
justing function, seat heater ad-
justing function can be selected.
For XP530E-A, XP530-A: The grip
warmer and seat heater requires
an accessory part and cannot be
selected.
Adjusting the windshield position
To move the windshield up, push the
“ ” side of the select switch. To move
the windshield down, push the “ ”
side of the select switch.
Adjusting the grip warmer
This vehicle can be equipped with grip
warmers, which can only be used when
the engine is running. There are 4 grip
warmer settings.
1. Oil change indicator “Oil”
1
BV1-28199-E0.book 7 ページ 2016年12月19日 月曜日 午前11時25分
Page 44 of 124
Instrument and control functions
5-11
1
2
3
4
5
6
7
8
9
10
11
12
13
14 Setting mode
TIP
The vehicle must be stopped to
change settings in this mode.
Starting off or turning the vehicle
power off saves all settings made,
then exits the setting mode.
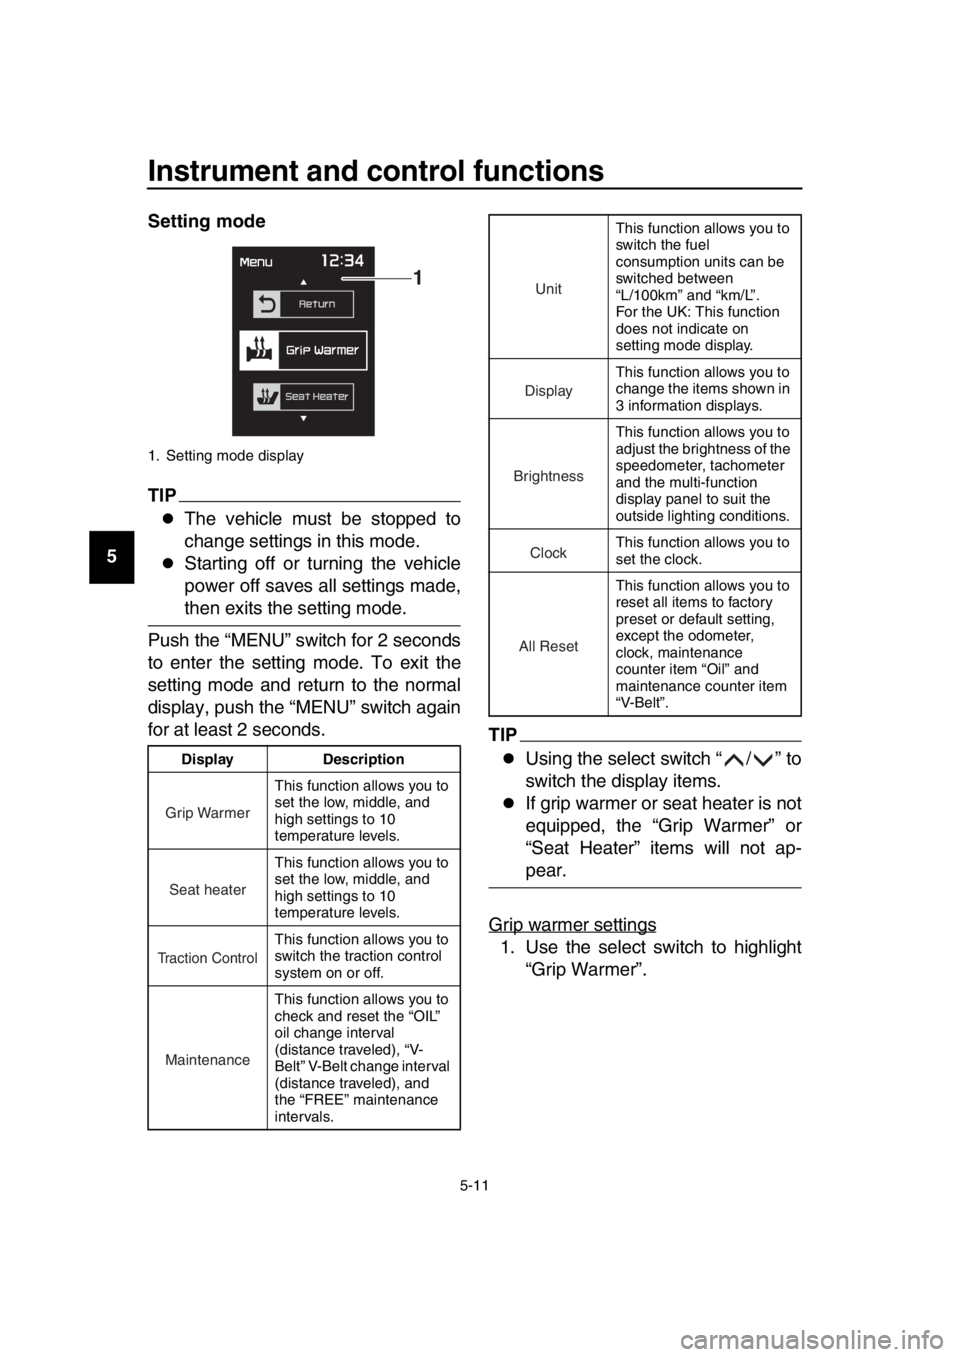
Push the “MENU” switch for 2 seconds
to enter the setting mode. To exit the
setting mode and return to the normal
display, push the “MENU” switch again
for at least 2 seconds.
TIP
Using the select switch “ / ” to
switch the display items.
If grip warmer or seat heater is not
equipped, the “Grip Warmer” or
“Seat Heater” items will not ap-
pear.
Grip warmer settings
1. Use the select switch to highlight “Grip Warmer”.
1. Setting mode display
Display Description This function allows you to
set the low, middle, and
high settings to 10
temperature levels.
This function allows you to
set the low, middle, and
high settings to 10
temperature levels.
This function allows you to
switch the traction control
system on or off.
This function allows you to
check and reset the “OIL”
oil change interval
(distance traveled), “V-
Belt” V-Belt change interval
(distance traveled), and
the “FREE” maintenance
intervals.
1
Grip Warmer
Seat heater
Traction Control
Maintenance
This function allows you to
switch the fuel
consumption units can be
switched between
“L/100km” and “km/L”.
For the UK: This function
does not indicate on
setting mode display.
This function allows you to
change the items shown in
3 information displays.
This function allows you to
adjust the brightness of the
speedometer, tachometer
and the multi-function
display panel to suit the
outside lighting conditions.
This function allows you to
set the clock.
This function allows you to
reset all items to factory
preset or default setting,
except the odometer,
clock, maintenance
counter item “Oil” and
maintenance counter item
“V-Belt”.
Unit
Display
Brightness
Clock
All Reset
BV1-28199-E0.book 11 ページ 2016年12月19日 月曜日 午前11時25分
Page 50 of 124
Instrument and control functions
5-17
1
2
3
4
5
6
7
8
9
10
11
12
13
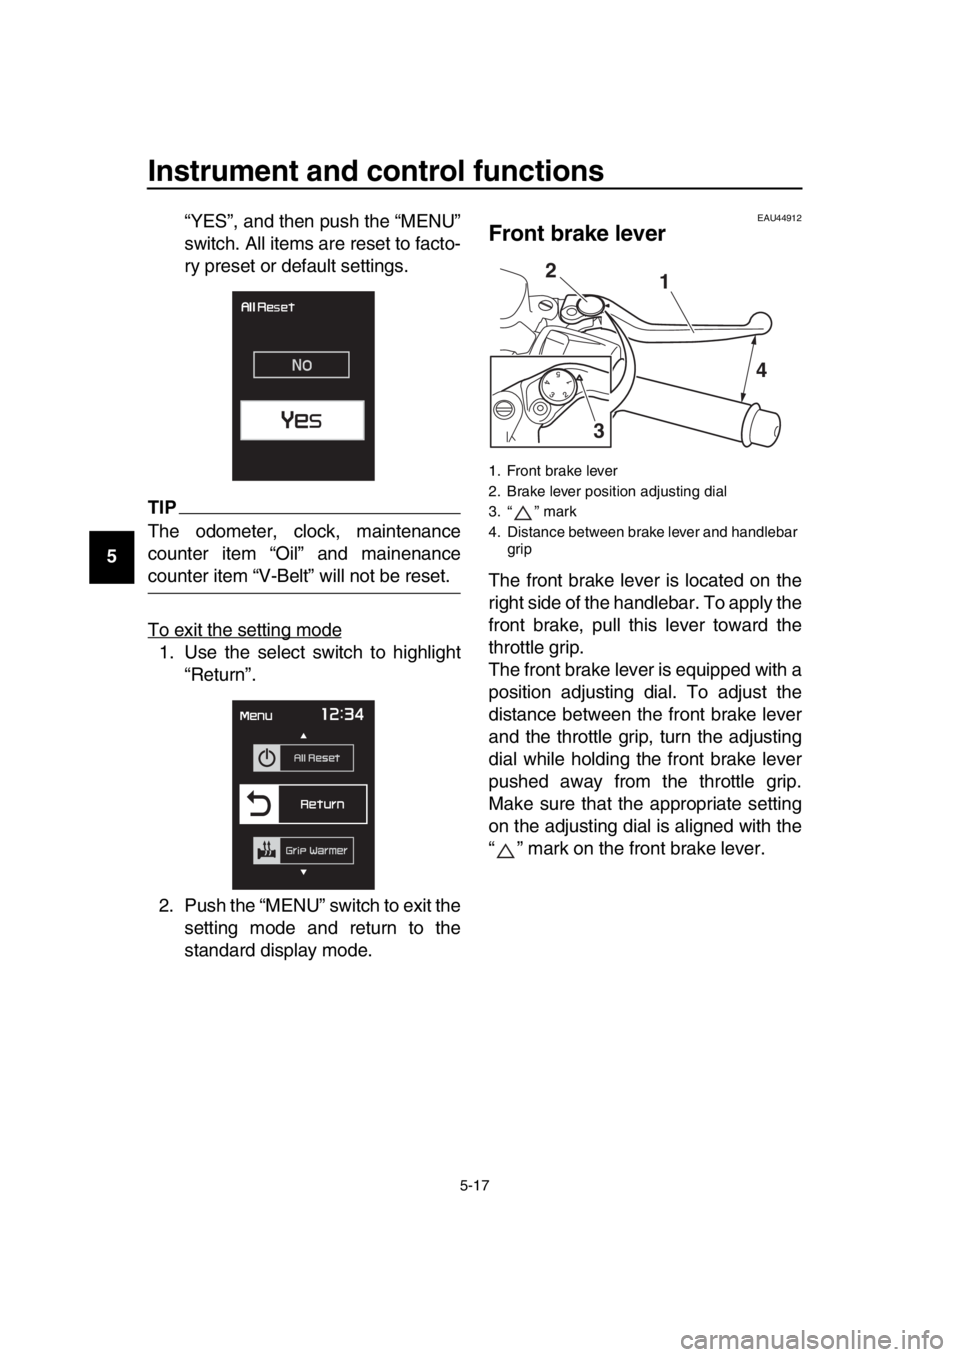
14 “YES”, and then push the “MENU”
switch. All items are reset to facto-
ry preset or default settings.
TIP
The odometer, clock, maintenance
counter item “Oil” and mainenance
counter item “V-Belt” will not be reset.
To exit the setting mode
1. Use the select switch to highlight
“Return”.
2. Push the “MENU” switch to exit the setting mode and return to the
standard display mode.
EAU44912
Front brake lever
The front brake lever is located on the
right side of the handlebar. To apply the
front brake, pull this lever toward the
throttle grip.
The front brake lever is equipped with a
position adjusting dial. To adjust the
distance between the front brake lever
and the throttle grip, turn the adjusting
dial while holding the front brake lever
pushed away from the throttle grip.
Make sure that the appropriate setting
on the adjusting dial is aligned with the
“ ” mark on the front brake lever.
1. Front brake lever
2. Brake lever position adjusting dial
3. “ ” mark
4. Distance between brake lever and handlebar grip
1
2
3 4
BV1-28199-E0.book 17 ページ 2016年12月19日 月曜日 午前11時25分
Page 76 of 124
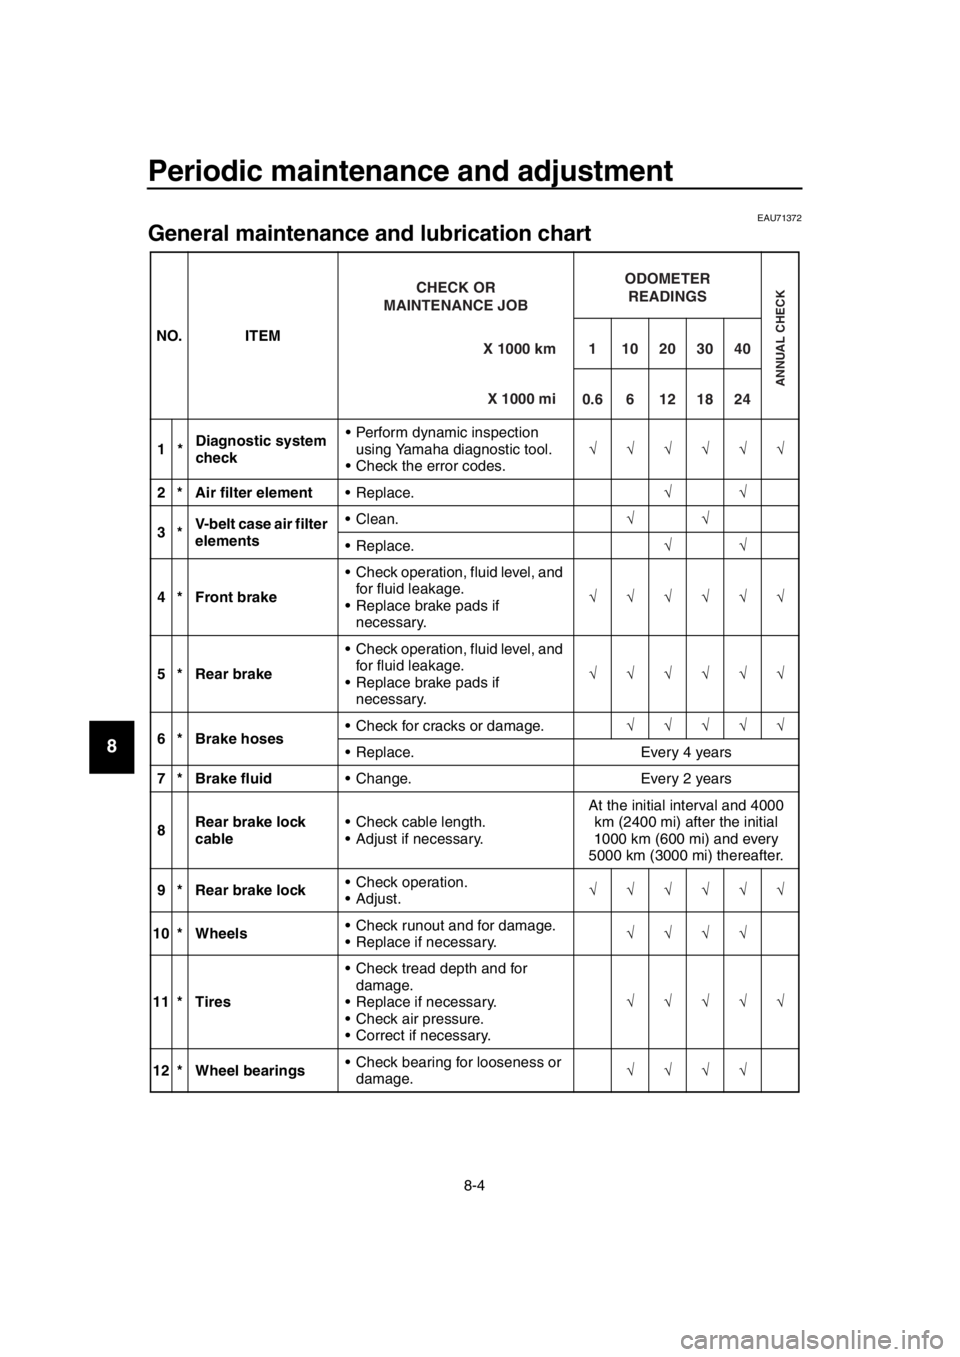
Periodic maintenance and adjustment
8-4
1
2
3
4
5
6
7
8
9
10
11
12
13
14
EAU71372
General maintenance and lubrication chart
NO. ITEM
1* Diagnostic system
check Perform dynamic inspection
using Yamaha diagnostic tool.
Check the error codes.
2 * Air filter element Replace.
3* V-belt case air filter
elements Clean.
Replace.
4 * Front brake Check operation, fluid level, and
for fluid leakage.
Replace brake pads if necessary.
5 * Rear brake Check operation, fluid level, and
for fluid leakage.
Replace brake pads if necessary.
6 * Brake hoses Check for cracks or damage.
Replace. Every 4 years
7 * Brake fluid Change. Every 2 years
8 Rear brake lock
cable Check cable length.
Adjust if necessary. At the initial interval and 4000
km (2400 mi) after the initial
1000 km (600 mi) and every
5000 km (3000 mi) thereafter.
9 * Rear brake lock Check operation.
Adjust.
10 * Wheels Check runout and for damage.
Replace if necessary.
11 * Tires Check tread depth and for
damage.
Replace if necessary.
Check air pressure.
Correct if necessary.
12 * Wheel bearings Check bearing for looseness or
damage. X 1000 km
CHECK OR
MAINTENANCE JOB
X 1000 mi
ODOMETER READINGS
ANNUAL CHECK
110203040
0.66121824
BV1-28199-E0.book 4 ページ 2016年12月19日 月曜日 午前11時25分
Page 77 of 124

Periodic maintenance and adjustment
8-5
1
2
3
4
5
6
7
8
9
10
11
12
13
14
13 * Drive belt Check belt condition.
Replace if damaged.
Check belt tension.
Adjust if necessary. At the initial interval and every
10000 km (6000 mi) until 40000 km (24000 mi), and every 5000 km (3000 mi) thereafter.
14 * Drive pulley and
drive axle Lubricate.
15 * Steering bearings Check bearing assemblies for
looseness.
Moderately repack with lithium- soap-based grease.
16 * Chassis fasteners Make sure that all nuts, bolts
and screws are properly
tightened.
17 Front and rear
brake lever pivot
shaft Lubricate with silicone grease.
18 Sidestand,
centerstand Check operation.
Lubricate with lithium-soap-
based grease.
19 * Sidestand switch Check operation and replace if
necessary.
20 * Front fork Check operation and for oil
leakage.
Replace if necessary.
21 * Shock absorber
assembly Check operation and for oil
leakage.
Replace if necessary.
22 * Rear suspension
relay arm and
connecting arm
pivoting points Check operation.
23 Engine oil Change (warm engine before
draining).
Check oil level and vehicle for oil leakage. At the initial interval and
when the oil change
indicator flashes or comes on [every 5000km (3000 mi)].
24 Engine oil filter
cartridge Replace.
NO. ITEM
X 1000 km
CHECK OR
MAINTENANCE JOB
X 1000 mi
ODOMETER READINGS
ANNUAL CHECK
110203040
0.66121824
BV1-28199-E0.book 5 ページ 2016年12月19日 月曜日 午前11時25分
Page 78 of 124

Periodic maintenance and adjustment
8-6
1
2
3
4
5
6
7
8
9
10
11
12
13
14
EAU72780
TIP
Engine air filter and V-belt air filters This model’s engine air filter is equipped with a disposable oil-coated paper element, which must not be cleaned with compressed air to avoid damaging
it.
The engine air filter element needs to be replaced and the V-belt air filter el- ements need to be serviced more frequent ly when riding in unusually wet or
dusty areas.
Hydraulic brake service After disassembling the brake master cylinders and calipers, always change the fluid. Regularly check the brake fluid levels and fill the reservoirs
as required.
Every two years replace the internal components of the brake master cylin- ders and calipers, and change the brake fluid.
Replace the brake hoses every four years and if cracked or damaged.
25 * Cooling system Check coolant level and vehicle
for coolant leakage.
Change. Every 3 years
26 * V-belt Replace. When the V-belt replacement
indicator flashes [every 20000 km (12000 mi)]
27 * Front and rear
brake switches Check operation.
28 * Moving parts and
cables Lubricate.
29 * Throttle grip
housing and cable Check operation and free play.
Adjust the throttle cable free
play if necessary.
Lubricate the throttle grip housing, cable and grip warmer
wire.
30 * Lights, signals and
switches Check operation.
Adjust headlight beam.
NO. ITEM
X 1000 km
CHECK OR
MAINTENANCE JOB
X 1000 mi
ODOMETER READINGS
ANNUAL CHECK
110203040
0.66121824
BV1-28199-E0.book 6 ページ 2016年12月19日 月曜日 午前11時25分
Page 96 of 124

Periodic maintenance and adjustment
8-24
1
2
3
4
5
6
7
8
9
10
11
12
13
14
EAU22733
Changing the brake fluid
Have a Yamaha dealer change the
brake fluid at the intervals specified in
the periodic maintenance and lubrica-
tion chart. In addition, have the oil seals
of the master cylinders and calipers as
well as the brake hoses replaced at the
intervals listed below or whenever they
are damaged or leaking.
Oil seals: Replace every two
years.
Brake hoses: Replace every four
years.
EAU51991
Drive belt slack
The drive belt slack should be checked
and adjusted by a Yamaha dealer at
the intervals specified in the periodic
maintenance and lubrication chart.
BV1-28199-E0.book 24 ページ 2016年12月19日 月曜日 午前11時25分