engine YAMAHA WR 400F 2000 Notices Demploi (in French)
[x] Cancel search | Manufacturer: YAMAHA, Model Year: 2000, Model line: WR 400F, Model: YAMAHA WR 400F 2000Pages: 654, PDF Size: 60.12 MB
Page 576 of 654

6 - 2
–+ELEC
MAP-CONTROLLED CDI UNIT
MAP-CONTROLLED CDI UNIT
A map-controlled, CDI ignition system is used in the WR400F.
The microcomputer in the CDI unit detects the engine speed and throttle position, thus determining
the optimum ignition timing through the entire operating range. In this way, quick throttle response
can be achieved according to various riding conditions.
n
Function of Component
Component Function
TPS
(throttle position sensor)Detects throttle valve opening and inputs it into the computer in the
CDI unit as a throttle opening signal.
Pickup coil Detects signal rotor revolutions and inputs them into the computer in
the CDI unit as engine revolution signals.
CDI unit The signals of the TPS and pickup coil sensor are analyzed by the
computer in the CDI unit, which then adjusts ignition timing for the
operation requirements.
n
Principal of 3-Dimensional Control
Conventionally, ignition timing was controlled only
by engine revolutions (2-dimensional control).
However, ignition timing needs advancement also
by engine load. Thus, accurate ignition timing can
be determined by adding throttle opening to deter-
mine ignition timing (3-dimensional control).
3-D Image Map of Ignition Timing
(different from actual characteristics)
CDI unit
Throttle position sensor
Pickup coil AC magneto rotorIgnition coil
Revolutions
Ignition timing
Throttle opening
Page 580 of 654
6 - 3
–+ELEC
IGNITION SYSTEM
EC620000
IGNITION SYSTEM
EC621001
INSPECTION STEPS
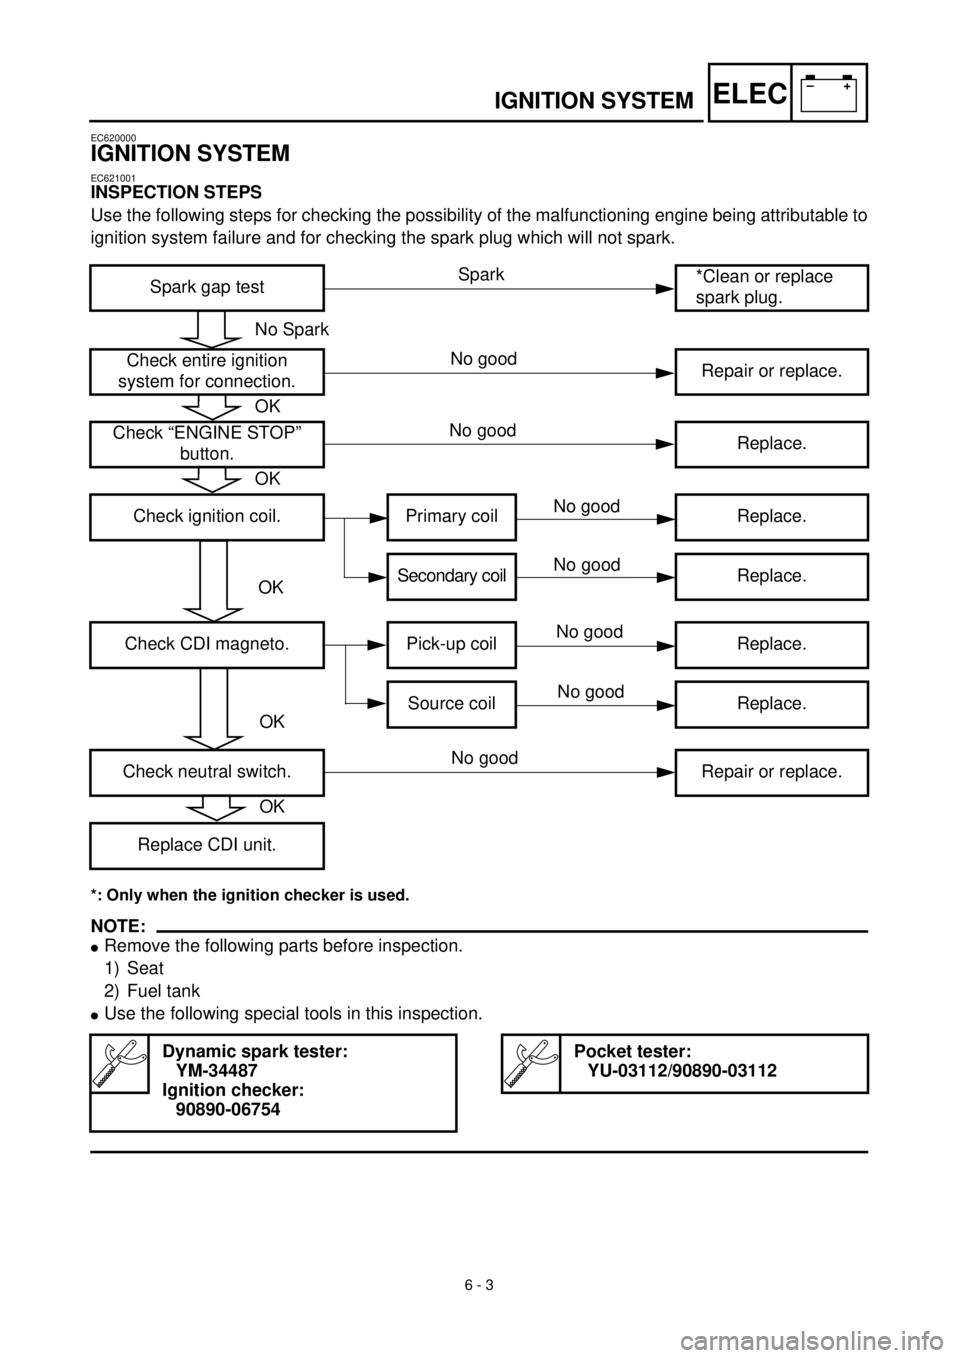
Use the following steps for checking the possibility of the malfunctioning engine being attributable to
ignition system failure and for checking the spark plug which will not spark.
*: Only when the ignition checker is used.
NOTE:
l
Remove the following parts before inspection.
1) Seat
2) Fuel tank
l
Use the following special tools in this inspection.
Spark gap test*Clean or replace
spark plug.
Check entire ignition
system for connection.Repair or replace.
Check “ENGINE STOP”
button.Replace.
Check ignition coil. Primary coil Replace.
Secondary coilReplace.
Check CDI magneto. Pick-up coil Replace.
Source coil Replace.
Check neutral switch. Repair or replace.
Replace CDI unit.
Dynamic spark tester:
YM-34487
Ignition checker:
90890-06754
Pocket tester:
YU-03112/90890-03112
No Spark
OK
OK
OK
OK
Spark
No good
No good
No good
No good
No good
No good
No good
OK
Page 581 of 654
–+ELEC
SYSTEME D’ALLUMAGE
SYSTEME D’ALLUMAGE
ETAPES DU CONTROLE
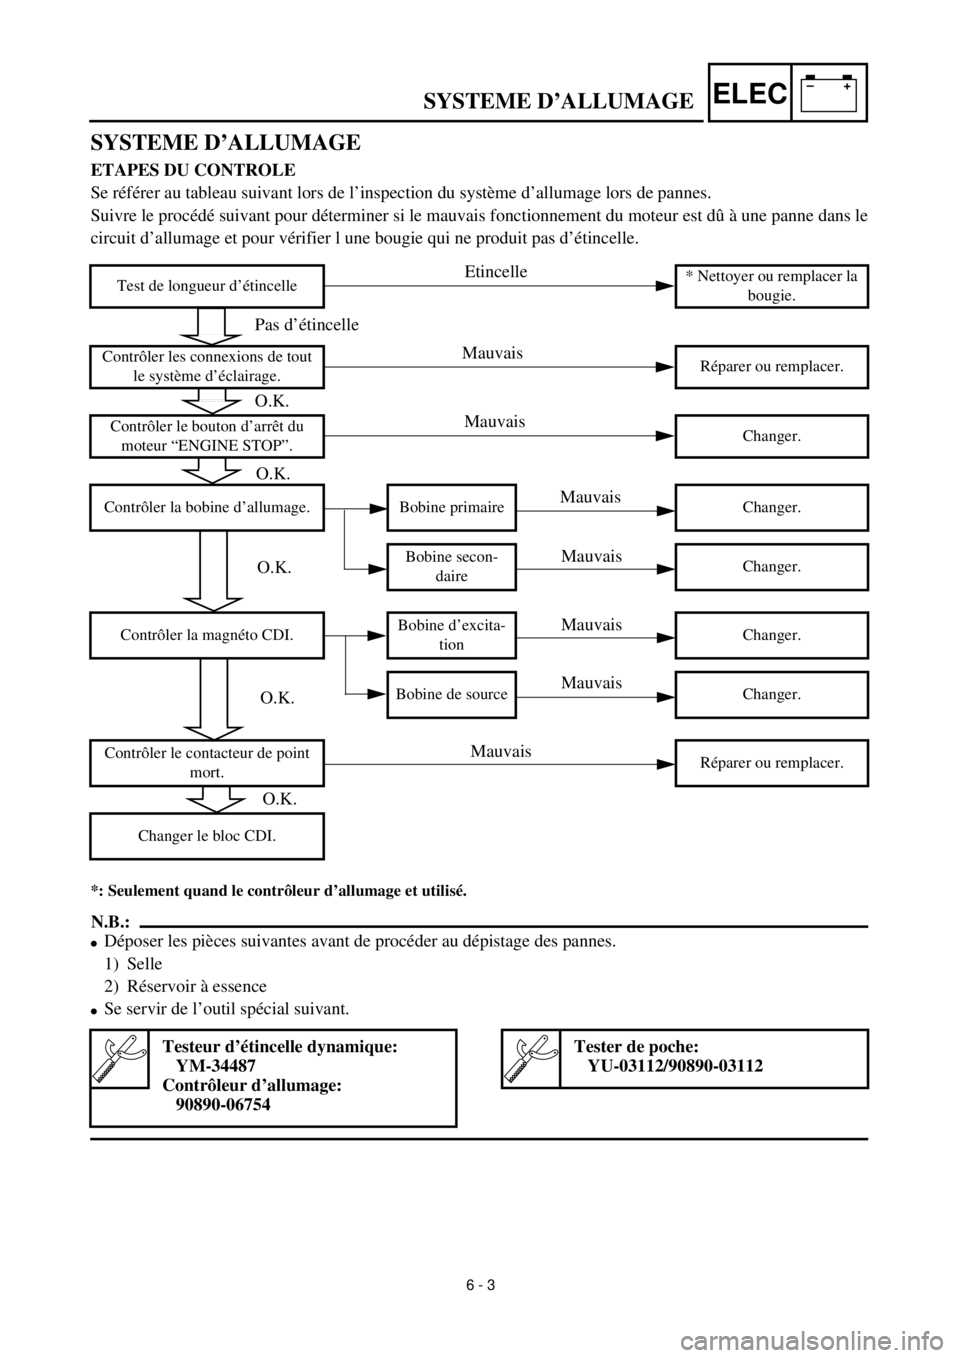
Se référer au tableau suivant lors de l’inspection du système d’allumage lors de pannes.
Suivre le procédé suivant pour déterminer si le mauvais fonctionnement du moteur est dû à une panne dans le
circuit d’allumage et pour vérifier l une bougie qui ne produit pas d’étincelle.
*: Seulement quand le contrôleur d’allumage et utilisé.
N.B.:
l
Déposer les pièces suivantes avant de procéder au dépistage des pannes.
1) Selle
2) Réservoir à essence
l
Se servir de l’outil spécial suivant.
Test de longueur d’étincelle* Nettoyer ou remplacer la
bougie.
Contrôler les connexions de tout
le système d’éclairage.Réparer ou remplacer.
Contrôler le bouton d’arrêt du
moteur “ENGINE STOP”.Changer.
Contrôler la bobine d’allumage. Bobine primaire Changer.
Bobine secon-
daireChanger.
Contrôler la magnéto CDI.Bobine d’excita-
tionChanger.
Bobine de source Changer.
Contrôler le contacteur de point
mort.Réparer ou remplacer.
Changer le bloc CDI.
Testeur d’étincelle dynamique:
YM-34487
Contrôleur d’allumage:
90890-06754
Tester de poche:
YU-03112/90890-03112
Pas d’étincelle
O.K.
Etincelle
Mauvais
Mauvais
Mauvais
Mauvais
Mauvais
Mauvais
Mauvais
O.K.
O.K.
O.K.
O.K.
6 - 3
Page 582 of 654
–+ELEC
ZÜNDANLAGE
ZÜNDANLAGE
FEHLERSUCHE
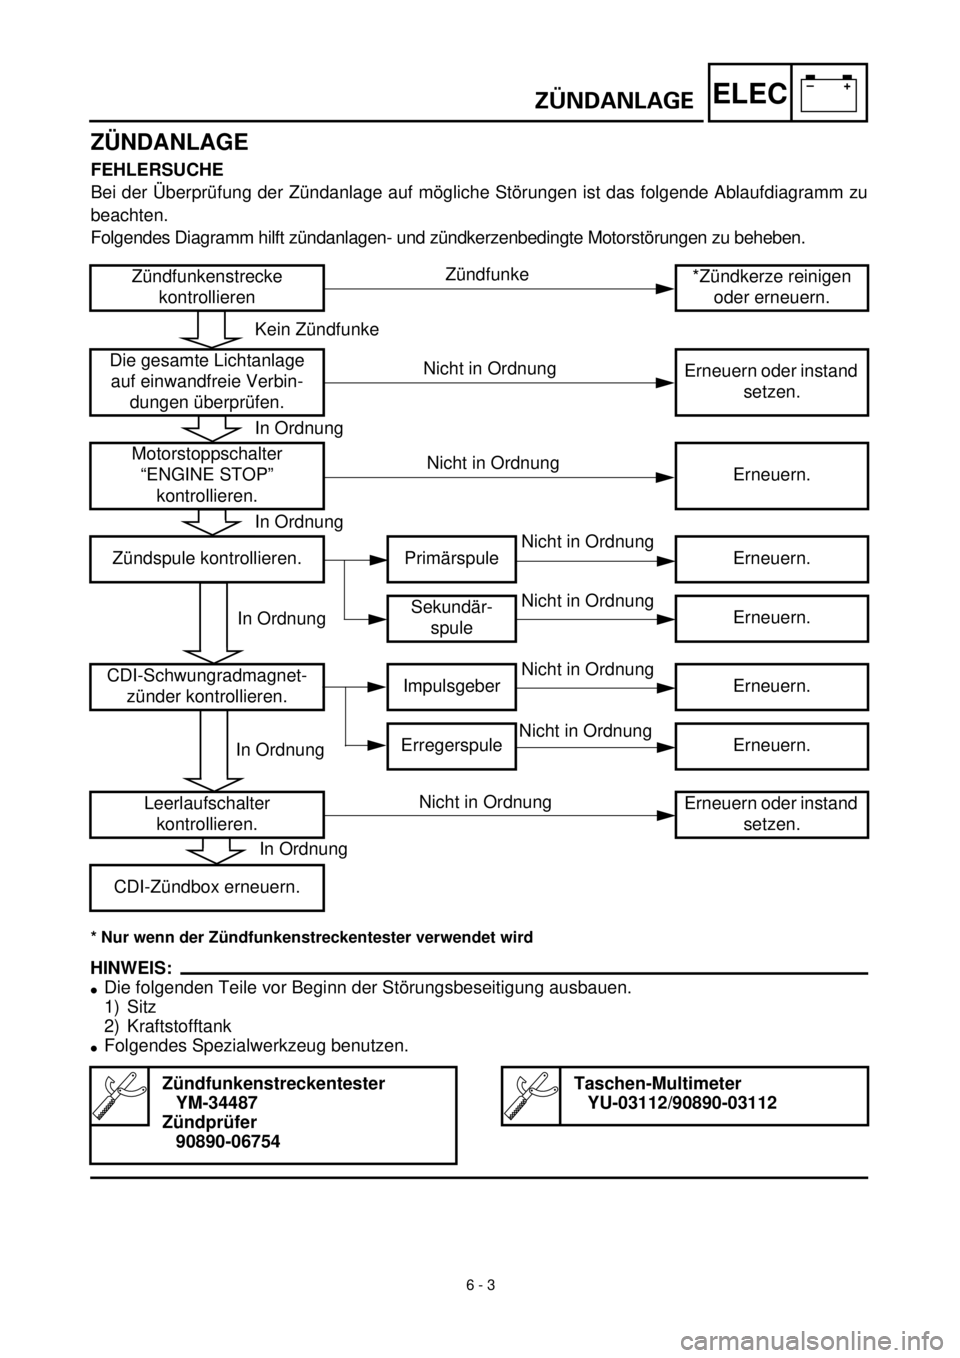
Bei der Überprüfung der Zündanlage auf mögliche Störungen ist das folgende Ablaufdiagramm zu
beachten.
Folgendes Diagramm hilft zündanlagen- und zündkerzenbedingte Motorstörungen zu beheben.
* Nur wenn der Zündfunkenstreckentester verwendet wird
HINWEIS:
l
Die folgenden Teile vor Beginn der Störungsbeseitigung ausbauen.
1) Sitz
2) Kraftstofftank
l
Folgendes Spezialwerkzeug benutzen.
Zündfunkenstrecke
kontrollieren*Zündkerze reinigen
oder erneuern.
Die gesamte Lichtanlage
auf einwandfreie Verbin-
dungen überprüfen.Erneuern oder instand
setzen.
Motorstoppschalter
“ENGINE STOP”
kontrollieren.Erneuern.
Zündspule kontrollieren. Primärspule Erneuern.
Sekundär-
spuleErneuern.
CDI-Schwungradmagnet-
zünder kontrollieren.Impulsgeber Erneuern.
Erregerspule Erneuern.
Leerlaufschalter
kontrollieren.Erneuern oder instand
setzen.
CDI-Zündbox erneuern.
Zündfunkenstreckentester
YM-34487
Zündprüfer
90890-06754Taschen-Multimeter
YU-03112/90890-03112
Kein Zündfunke
In Ordnung
In Ordnung
In Ordnung
In Ordnung
Zündfunke
Nicht in Ordnung
In Ordnung
Nicht in Ordnung
Nicht in Ordnung
Nicht in Ordnung
Nicht in Ordnung
Nicht in Ordnung
Nicht in Ordnung
6 - 3
Page 583 of 654
–+ELECSISTEMA DE ENCENDIDO
SISTEMA DE ENCENDIDO
PASOS PARA LA INSPECCIÓN
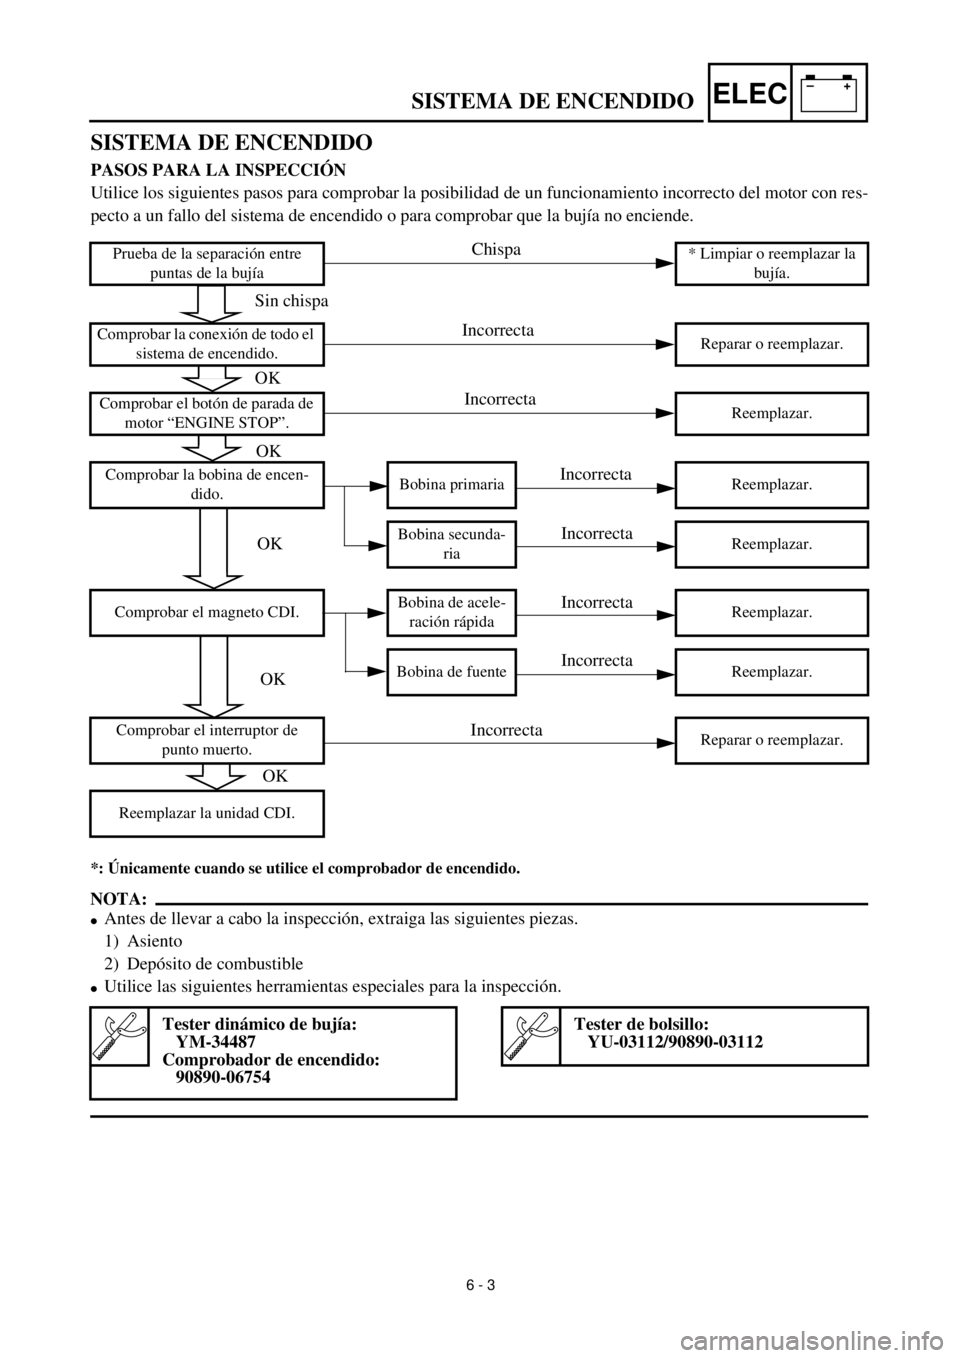
Utilice los siguientes pasos para comprobar la posibilidad de un funcionamiento incorrecto del motor con res-
pecto a un fallo del sistema de encendido o para comprobar que la bujía no enciende.
*: Únicamente cuando se utilice el comprobador de encendido.
NOTA:
lAntes de llevar a cabo la inspección, extraiga las siguientes piezas.
1) Asiento
2) Depósito de combustible
lUtilice las siguientes herramientas especiales para la inspección.
Prueba de la separación entre
puntas de la bujía* Limpiar o reemplazar la
bujía.
Comprobar la conexión de todo el
sistema de encendido.Reparar o reemplazar.
Comprobar el botón de parada de
motor “ENGINE STOP”.Reemplazar.
Comprobar la bobina de encen-
dido.Bobina primaria Reemplazar.
Bobina secunda-
riaReemplazar.
Comprobar el magneto CDI.Bobina de acele-
ración rápidaReemplazar.
Bobina de fuente Reemplazar.
Comprobar el interruptor de
punto muerto.Reparar o reemplazar.
Reemplazar la unidad CDI.
Tester dinámico de bujía:
YM-34487
Comprobador de encendido:
90890-06754Tester de bolsillo:
YU-03112/90890-03112
Sin chispa
OK
Chispa
Incorrecta
Incorrecta
Incorrecta
Incorrecta
Incorrecta
Incorrecta
Incorrecta
OK
OK
OK
OK
6 - 3
Page 584 of 654
6 - 4
–+ELEC
IGNITION SYSTEM
EC622001
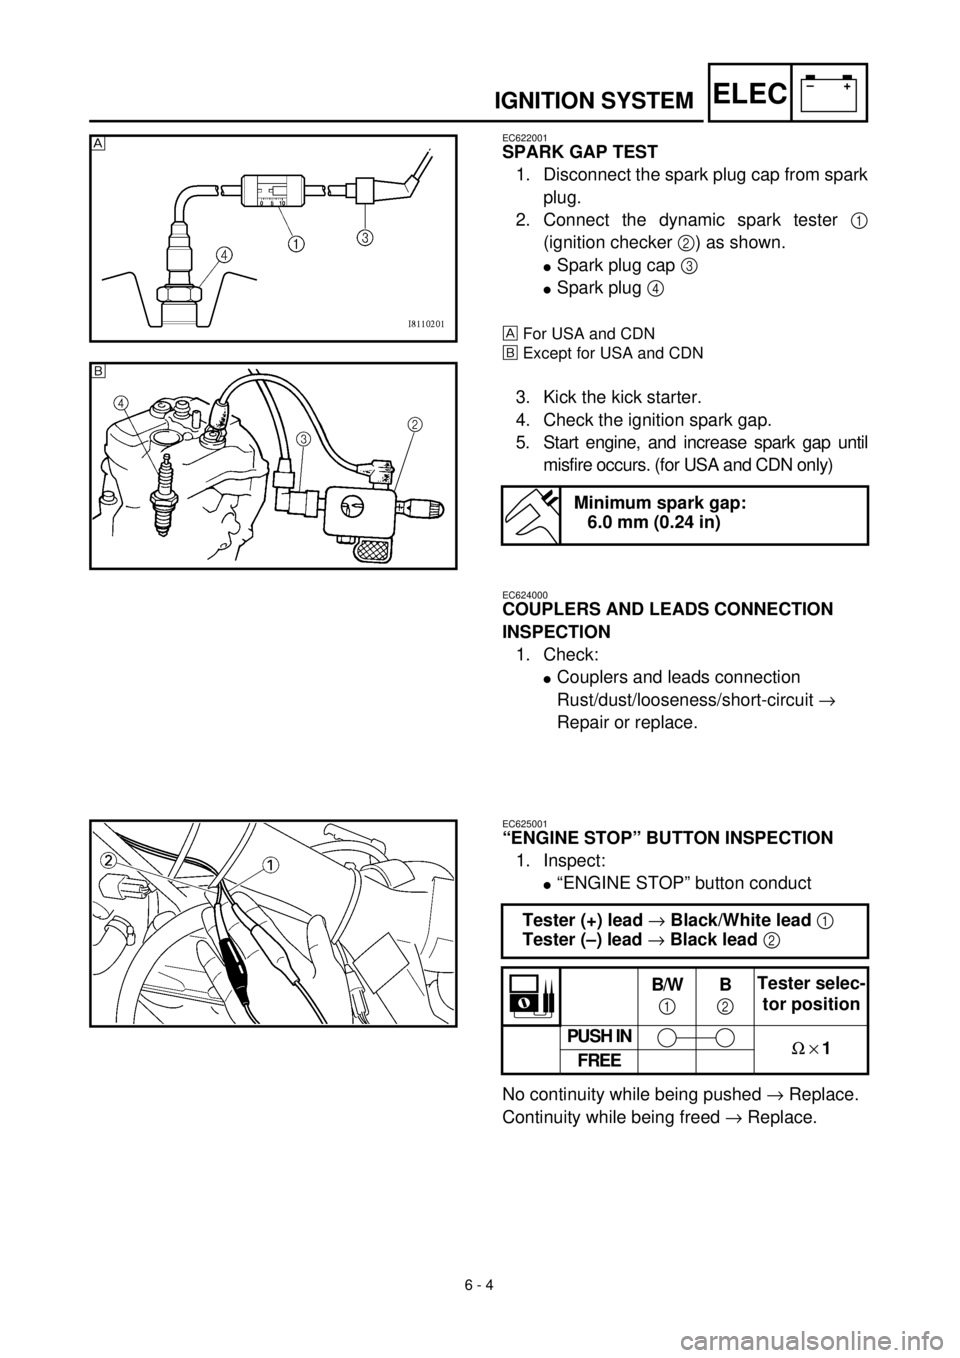
SPARK GAP TEST
1. Disconnect the spark plug cap from spark
plug.
2. Connect the dynamic spark tester
1
(ignition checker
2
) as shown.
l
Spark plug cap
3
l
Spark plug
4
For USA and CDN
õ
Except for USA and CDN
3. Kick the kick starter.
4. Check the ignition spark gap.
5. Start engine, and increase spark gap until
misfire occurs. (for USA and CDN only)
Minimum spark gap:
6.0 mm (0.24 in)
õ
EC624000
COUPLERS AND LEADS CONNECTION
INSPECTION
1. Check:
l
Couplers and leads connection
Rust/dust/looseness/short-circuit
®
Repair or replace.
EC625001
“ENGINE STOP” BUTTON INSPECTION
1. Inspect:
l
“ENGINE STOP” button conduct
No continuity while being pushed
®
Replace.
Continuity while being freed
®
Replace.
Tester (+) lead
®
Black/White lead
1
Tester (–) lead
®
Black lead
2
B/W
1
B
2
Tester selec-
tor position
PUSH IN
W
´
1
FREE
Page 585 of 654
–+ELEC
SYSTEME D’ALLUMAGE
ZÜNDANLAGE
SISTEMA DE ENCENDIDO
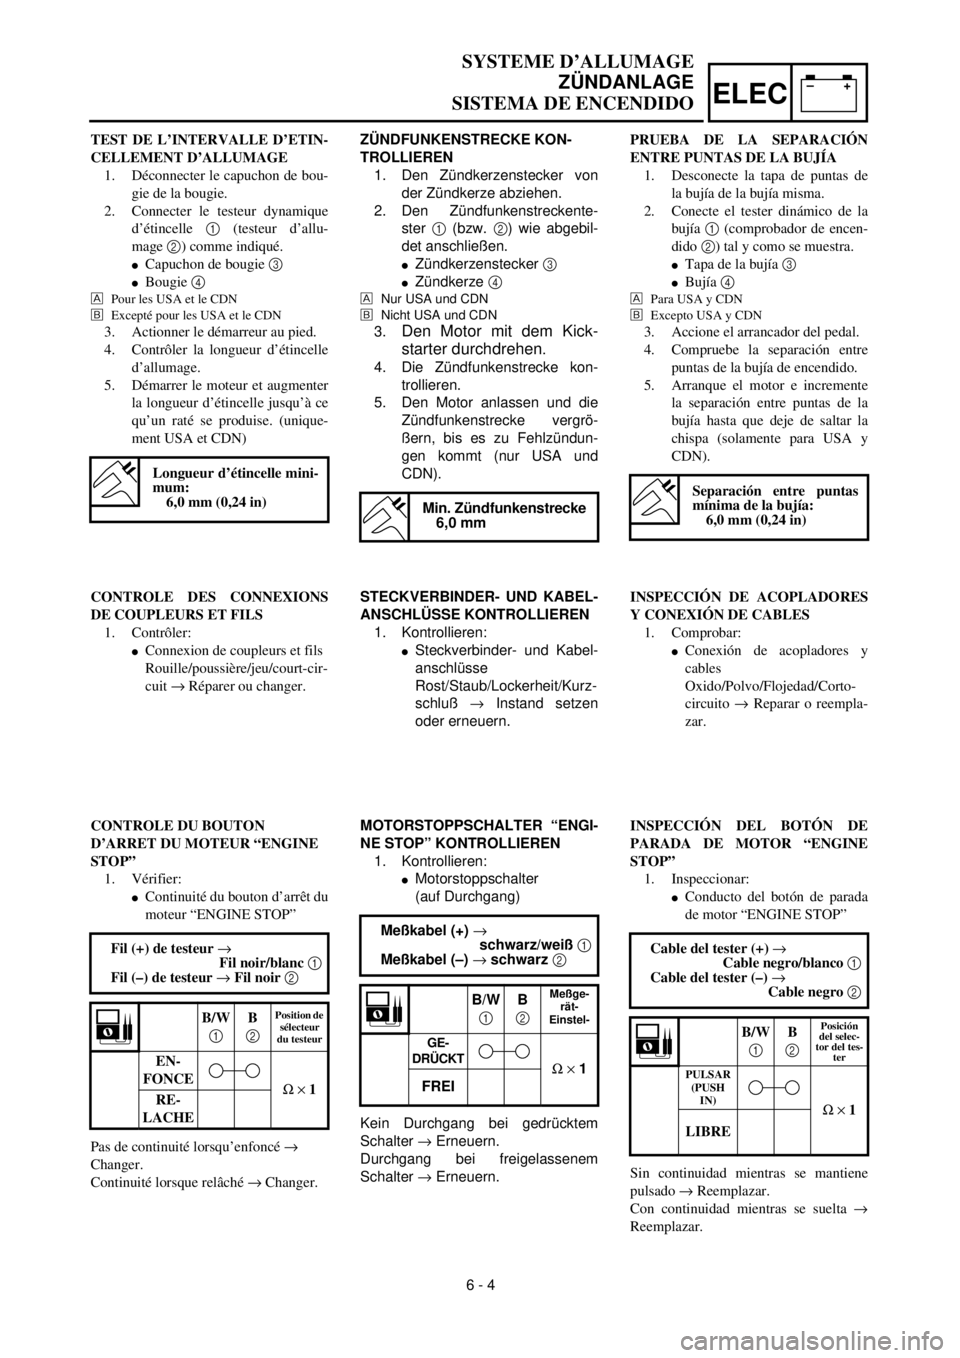
ZÜNDFUNKENSTRECKE KON-
TROLLIEREN
1. Den Zündkerzenstecker von
der Zündkerze abziehen.
2. Den Zündfunkenstreckente-
ster 1 (bzw. 2) wie abgebil-
det anschließen.
lZündkerzenstecker 3
lZündkerze 4
Nur USA und CDN
õNicht USA und CDN
3.Den Motor mit dem Kick-
starter durchdrehen
.
4. Die Zündfunkenstrecke kon-
trollieren.
5. Den Motor anlassen und die
Zündfunkenstrecke vergrö-
ßern, bis es zu Fehlzündun-
gen kommt (nur USA und
CDN).
Min. Zündfunkenstrecke
6,0 mm
STECKVERBINDER- UND KABEL-
ANSCHLÜSSE KONTROLLIEREN
1. Kontrollieren:
lSteckverbinder- und Kabel-
anschlüsse
Rost/Staub/Lockerheit/Kurz-
schluß ® Instand setzen
oder erneuern.
MOTORSTOPPSCHALTER “ENGI-
NE STOP” KONTROLLIEREN
1. Kontrollieren:
lMotorstoppschalter
(auf Durchgang)
Kein Durchgang bei gedrücktem
Schalter ® Erneuern.
Durchgang bei freigelassenem
Schalter ® Erneuern. Meßkabel (+) ®
schwarz/weiß 1
Meßkabel (–) ® schwarz 2
B/W
1 B
2 Meßge-
rät-
Einstel-
GE-
DRÜCKT
W ´ 1
FREI
TEST DE L’INTERVALLE D’ETIN-
CELLEMENT D’ALLUMAGE
1. Déconnecter le capuchon de bou-
gie de la bougie.
2. Connecter le testeur dynamique
d’étincelle 1 (testeur d’allu-
mage 2) comme indiqué.
lCapuchon de bougie 3
lBougie 4
Pour les USA et le CDN
õExcepté pour les USA et le CDN
3. Actionner le démarreur au pied.
4. Contrôler la longueur d’étincelle
d’allumage.
5. Démarrer le moteur et augmenter
la longueur d’étincelle jusqu’à ce
qu’un raté se produise. (unique-
ment USA et CDN)
Longueur d’étincelle mini-
mum:
6,0 mm (0,24 in)
CONTROLE DES CONNEXIONS
DE COUPLEURS ET FILS
1. Contrôler:
lConnexion de coupleurs et fils
Rouille/poussière/jeu/court-cir-
cuit ® Réparer ou changer.
CONTROLE DU BOUTON
D’ARRET DU MOTEUR “ENGINE
STOP”
1. Vérifier:
lContinuité du bouton d’arrêt du
moteur “ENGINE STOP”
Pas de continuité lorsqu’enfoncé ®
Changer.
Continuité lorsque relâché ® Changer. Fil (+) de testeur ®
Fil noir/blanc 1
Fil (–) de testeur ® Fil noir 2
B/W
1B
2Position de
sélecteur
du testeur
EN-
FONCE
W ´ 1
RE-
LACHE
6 - 4PRUEBA DE LA SEPARACIÓN
ENTRE PUNTAS DE LA BUJÍA
1. Desconecte la tapa de puntas de
la bujía de la bujía misma.
2. Conecte el tester dinámico de la
bujía 1 (comprobador de encen-
dido 2) tal y como se muestra.
lTapa de la bujía 3
lBujía 4
Para USA y CDN
õExcepto USA y CDN
3. Accione el arrancador del pedal.
4. Compruebe la separación entre
puntas de la bujía de encendido.
5. Arranque el motor e incremente
la separación entre puntas de la
bujía hasta que deje de saltar la
chispa (solamente para USA y
CDN).
Separación entre puntas
mínima de la bujía:
6,0 mm (0,24 in)
INSPECCIÓN DE ACOPLADORES
Y CONEXIÓN DE CABLES
1. Comprobar:
lConexión de acopladores y
cables
Oxido/Polvo/Flojedad/Corto-
circuito ® Reparar o reempla-
zar.
INSPECCIÓN DEL BOTÓN DE
PARADA DE MOTOR “ENGINE
STOP”
1. Inspeccionar:
lConducto del botón de parada
de motor “ENGINE STOP”
Sin continuidad mientras se mantiene
pulsado ® Reemplazar.
Con continuidad mientras se suelta ®
Reemplazar.Cable del tester (+) ®
Cable negro/blanco 1
Cable del tester (–) ®
Cable negro 2
B/W
1B
2Posición
del selec-
tor del tes-
ter
PULSAR
(PUSH
IN)
W ´ 1
LIBRE
Page 590 of 654

6 - 7
–+ELECTPS (THROTTLE POSITION SENSOR) SYSTEM
EC69000
TPS (THROTTLE POSITION SENSOR) SYSTEM
EC691000
INSPECTION STEPS
If the TPS will not operate, use the following inspection steps.
*marked: Refer to “IGNITION SYSTEM” section.
NOTE:
lRemove the following parts before inspection.
1) Seat
2) Fuel tank
lUse the following special tools in this inspection.
Check entire ignition
system for connection.Repair or replace.
Check TPS. TPS coil Replace.
*Check CDI magneto. Source coil Replace.
Check CDI unit.TPS input
voltageReplace.
Pocket tester:
YU-03112/90890-03112Inductive tachometer:
YU-8036-1
Engine tachometer:
90890-03113
No good
No good
No good
No good
OK
OK
OK
Page 598 of 654

6 - 10
–+ELECTPS (THROTTLE POSITION SENSOR) SYSTEM
6. Adjust:
lTPS coil resistance at idle speed
Adjustment steps:
Adjust the angle of the TPS 1 to obtain
the resistance calculated (example: 650 ~
750 W)
Tester (+) lead ® Yellow lead 2
Tester (–) lead ® Black lead 3
7. Tighten:
lScrew (TPS) 1
8. Install:
lTPS coupler
EC694000
TPS INPUT VOLTAGE INSPECTION
1. Disconnect the TPS coupler.
2. Start the engine.
3. Inspect:
lTPS input voltage
Out of specification ® Replace the CDI
unit.
Tester (+) lead ® Blue lead 1
Tester (–) lead ® Black lead 2
TPS input
voltageTester selector
position
4 ~ 6 V DCV-20
Page 606 of 654
7 - 1
TUN
EC700000
TUNING
EC710000
ENGINE
Carburetor setting
l
The air/fuel mixture will vary depending on
atmospheric conditions. Therefore, it is nec-
essary to take into consideration the air pres-
sure, ambient temperature, humidity, etc.,
when adjusting the carburetor.
l
Perform a test run to check for proper engine
performance (e.g., throttle response) and
spark plug(-s) discoloration or fouling. Use
these readings to determine the best possi-
ble carburetor setting.
NOTE:
It is recommended to keep a record of all car-
buretor settings and external conditions (e.g.,
atmospheric conditions, track/surface condi-
tions, lap times) to make future carburetor set-
ting easier.
WARNING
l
The carburetor is a part of the fuel line.
Therefore, be sure to install it in a well-
ventilated area, away from flammable
objects and any sources of fire.
l
Never look into the carburetor intake.
Flames may shoot out from the pipe if the
engine backfires while it is being started.
Gasoline may be discharged from the
accelerator pump nozzle when the carbu-
retor has been removed.
CAUTION:
l
The carburetor is extremely sensitive to
foreign matter (dirt, sand, water, etc.).
During installation, do not allow foreign
matter to get into the carburetor.
l
Always handle the carburetor and its
components carefully. Even slight
scratches, bends or damage to carbure-
tor parts may prevent the carburetor from
functioning correctly. Carefully perform
all servicing with the appropriate tools
and without applying excessive force.
l
When the engine is stopped or when
riding at no load, do not open and close
the throttle unnecessarily. Otherwise, too
much fuel may be discharged, starting
may become difficult or the engine may
not run well.
SETTING
7