engine YAMAHA WR 400F 2000 Notices Demploi (in French)
[x] Cancel search | Manufacturer: YAMAHA, Model Year: 2000, Model line: WR 400F, Model: YAMAHA WR 400F 2000Pages: 654, PDF Size: 60.12 MB
Page 430 of 654
4 - 84
ENGCRANKCASE AND CRANKSHAFT
EC4N4101
Crankcase
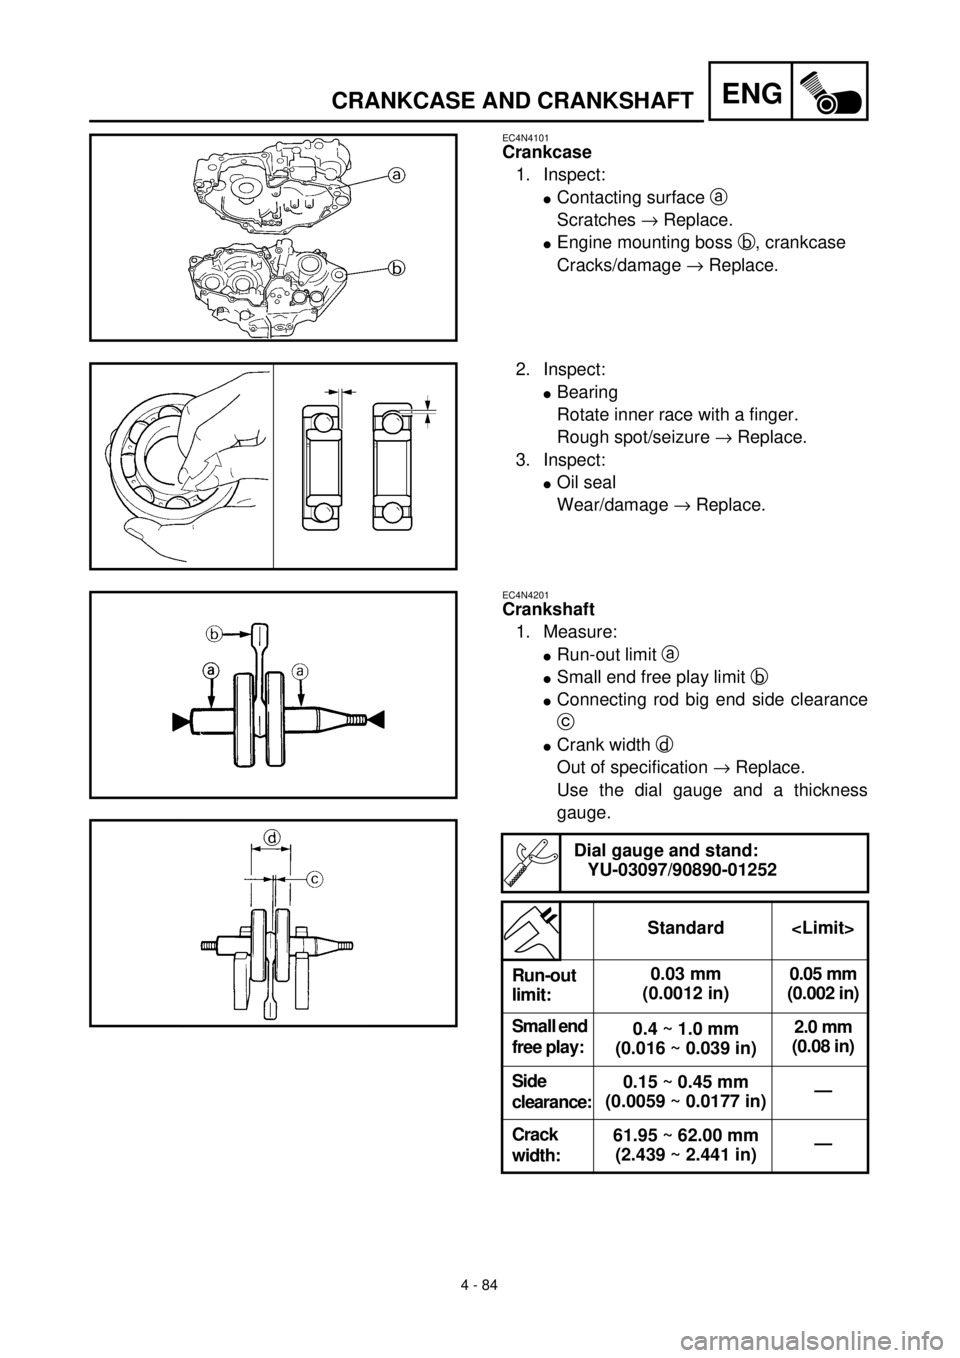
1. Inspect:
lContacting surface a
Scratches ® Replace.
lEngine mounting boss b, crankcase
Cracks/damage ® Replace.
2. Inspect:
lBearing
Rotate inner race with a finger.
Rough spot/seizure ® Replace.
3. Inspect:
lOil seal
Wear/damage ® Replace.
EC4N4201
Crankshaft
1. Measure:
lRun-out limit a
lSmall end free play limit b
lConnecting rod big end side clearance
c
lCrank width d
Out of specification ® Replace.
Use the dial gauge and a thickness
gauge.
Dial gauge and stand:
YU-03097/90890-01252
Standard
Run-out
limit:0.03 mm
(0.0012 in)0.05 mm
(0.002 in)
Small end
free play:0.4 ~ 1.0 mm
(0.016 ~ 0.039 in)2.0 mm
(0.08 in)
Side
clearance:0.15 ~ 0.45 mm
(0.0059 ~ 0.0177 in)—
Crack
width:61.95 ~ 62.00 mm
(2.439 ~ 2.441 in)—
Page 436 of 654
4 - 87
ENGCRANKCASE AND CRANKSHAFT
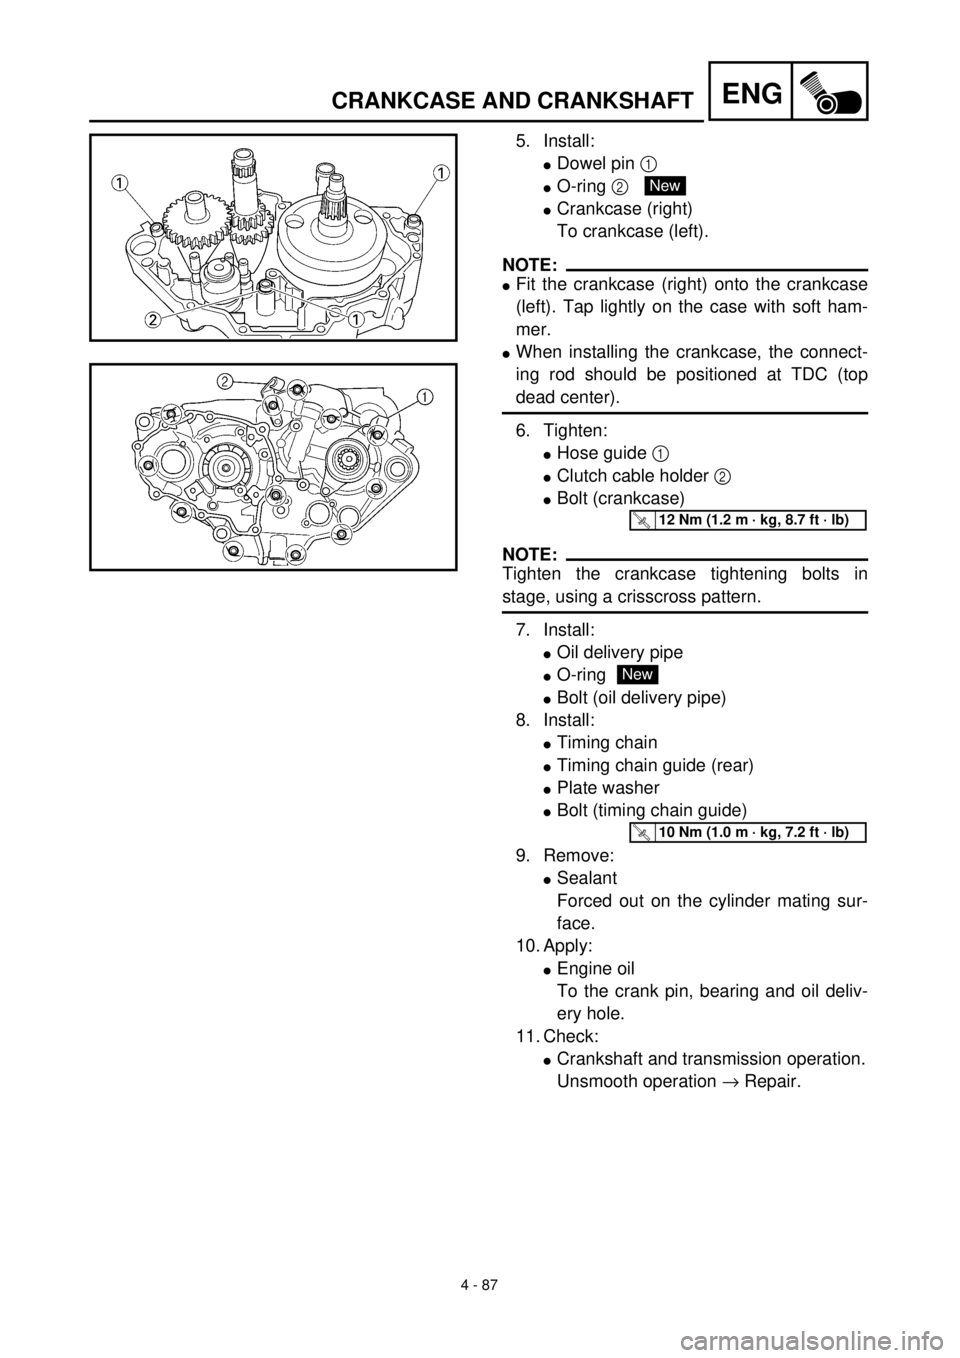
5. Install:
lDowel pin 1
lO-ring 2
lCrankcase (right)
To crankcase (left).
NOTE:
lFit the crankcase (right) onto the crankcase
(left). Tap lightly on the case with soft ham-
mer.
lWhen installing the crankcase, the connect-
ing rod should be positioned at TDC (top
dead center).
6. Tighten:
lHose guide 1
lClutch cable holder 2
lBolt (crankcase)
NOTE:
Tighten the crankcase tightening bolts in
stage, using a crisscross pattern.
7. Install:
lOil delivery pipe
lO-ring
lBolt (oil delivery pipe)
8. Install:
lTiming chain
lTiming chain guide (rear)
lPlate washer
lBolt (timing chain guide)
9. Remove:
lSealant
Forced out on the cylinder mating sur-
face.
10. Apply:
lEngine oil
To the crank pin, bearing and oil deliv-
ery hole.
11. Check:
lCrankshaft and transmission operation.
Unsmooth operation ® Repair.
New
T R..12 Nm (1.2 m · kg, 8.7 ft · lb)
New
T R..10 Nm (1.0 m · kg, 7.2 ft · lb)
Page 438 of 654
ENG
4 - 88
TRANSMISSION, SHIFT CAM AND SHIFT FORK
TRANSMISSION, SHIFT CAM AND SHIFT FORK
TRANSMISSION, SHIFT CAM AND SHIFT FORK
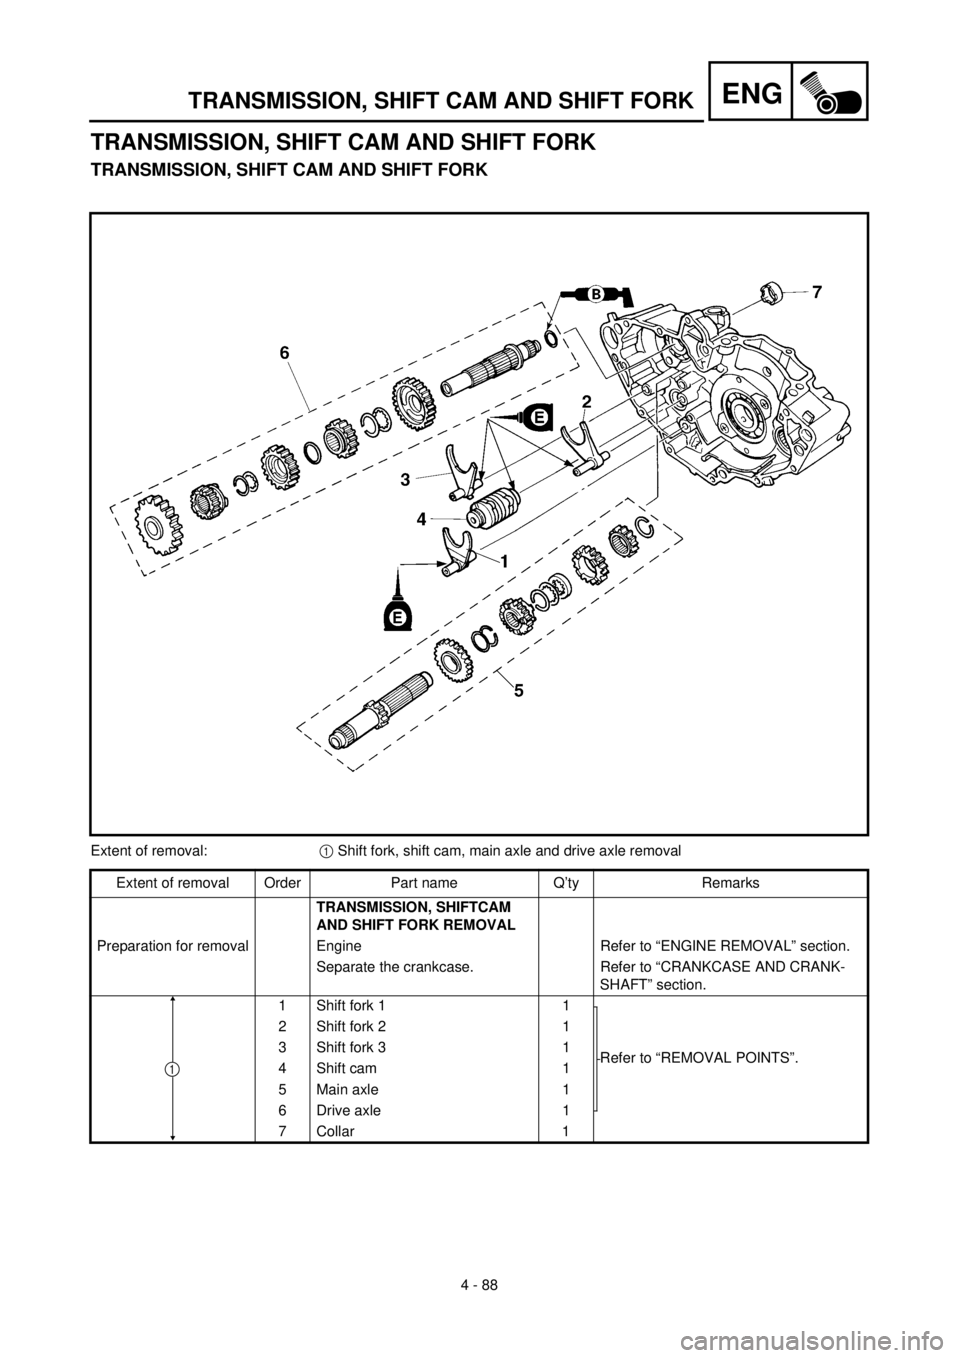
Extent of removal:1 Shift fork, shift cam, main axle and drive axle removal
Extent of removal Order Part name Q’ty Remarks
TRANSMISSION, SHIFTCAM
AND SHIFT FORK REMOVAL
Preparation for removal Engine Refer to “ENGINE REMOVAL” section.
Separate the crankcase. Refer to “CRANKCASE AND CRANK-
SHAFT” section.
1 Shift fork 1 1
Refer to “REMOVAL POINTS”. 2 Shift fork 2 1
3 Shift fork 3 1
4 Shift cam 1
5 Main axle 1
6 Drive axle 1
7Collar
1
1
Page 446 of 654
4 - 92
ENGTRANSMISSION, SHIFT CAM AND SHIFT FORK
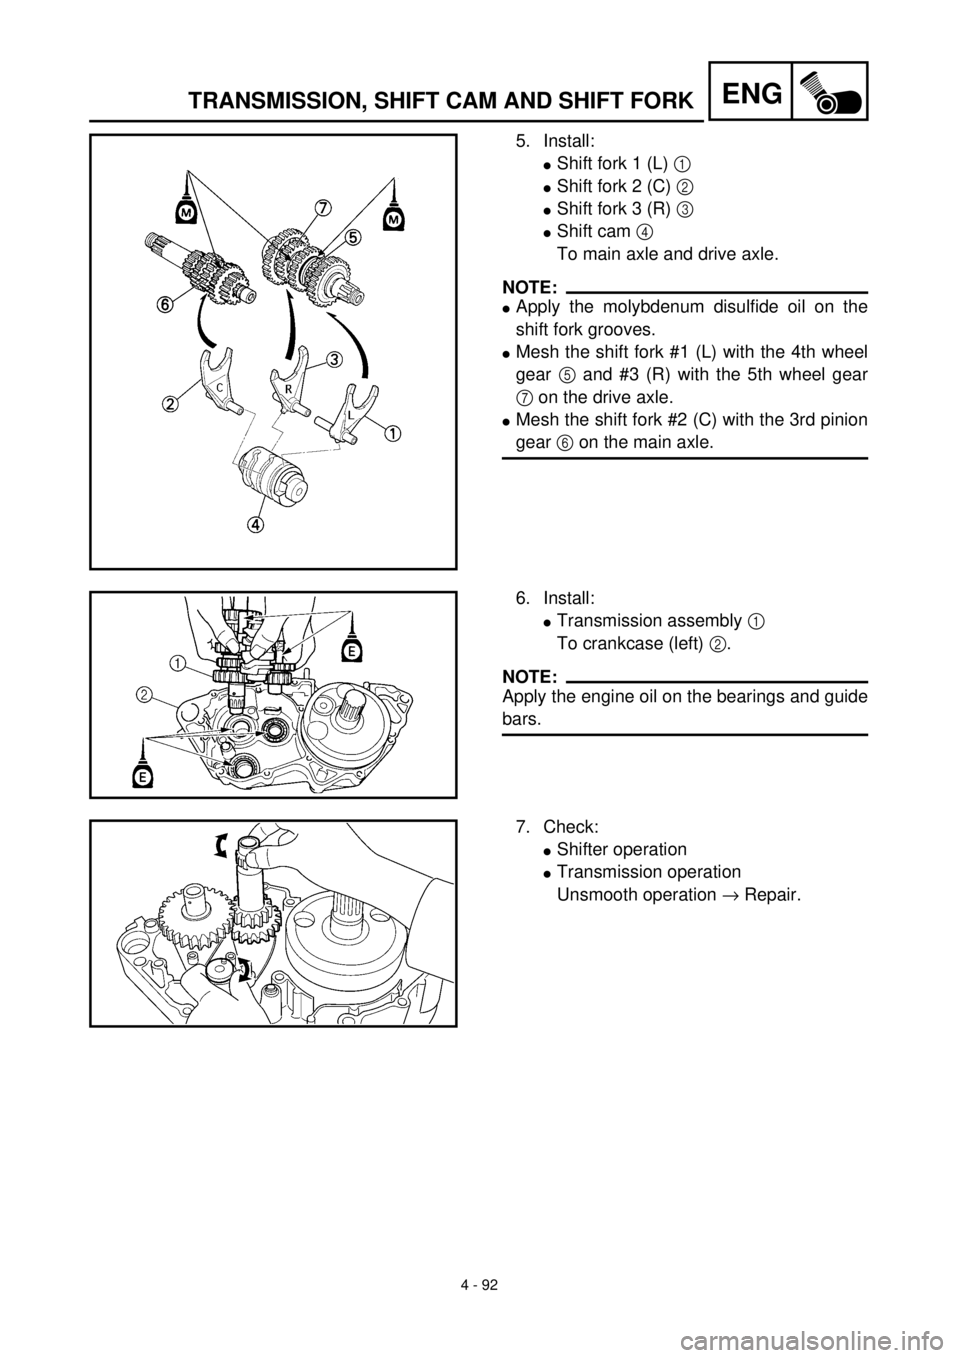
5. Install:
lShift fork 1 (L) 1
lShift fork 2 (C) 2
lShift fork 3 (R) 3
lShift cam 4
To main axle and drive axle.
NOTE:
lApply the molybdenum disulfide oil on the
shift fork grooves.
lMesh the shift fork #1 (L) with the 4th wheel
gear 5 and #3 (R) with the 5th wheel gear
7 on the drive axle.
lMesh the shift fork #2 (C) with the 3rd pinion
gear 6 on the main axle.
6. Install:
lTransmission assembly 1
To crankcase (left) 2.
NOTE:
Apply the engine oil on the bearings and guide
bars.
7. Check:
lShifter operation
lTransmission operation
Unsmooth operation ® Repair.
Page 448 of 654
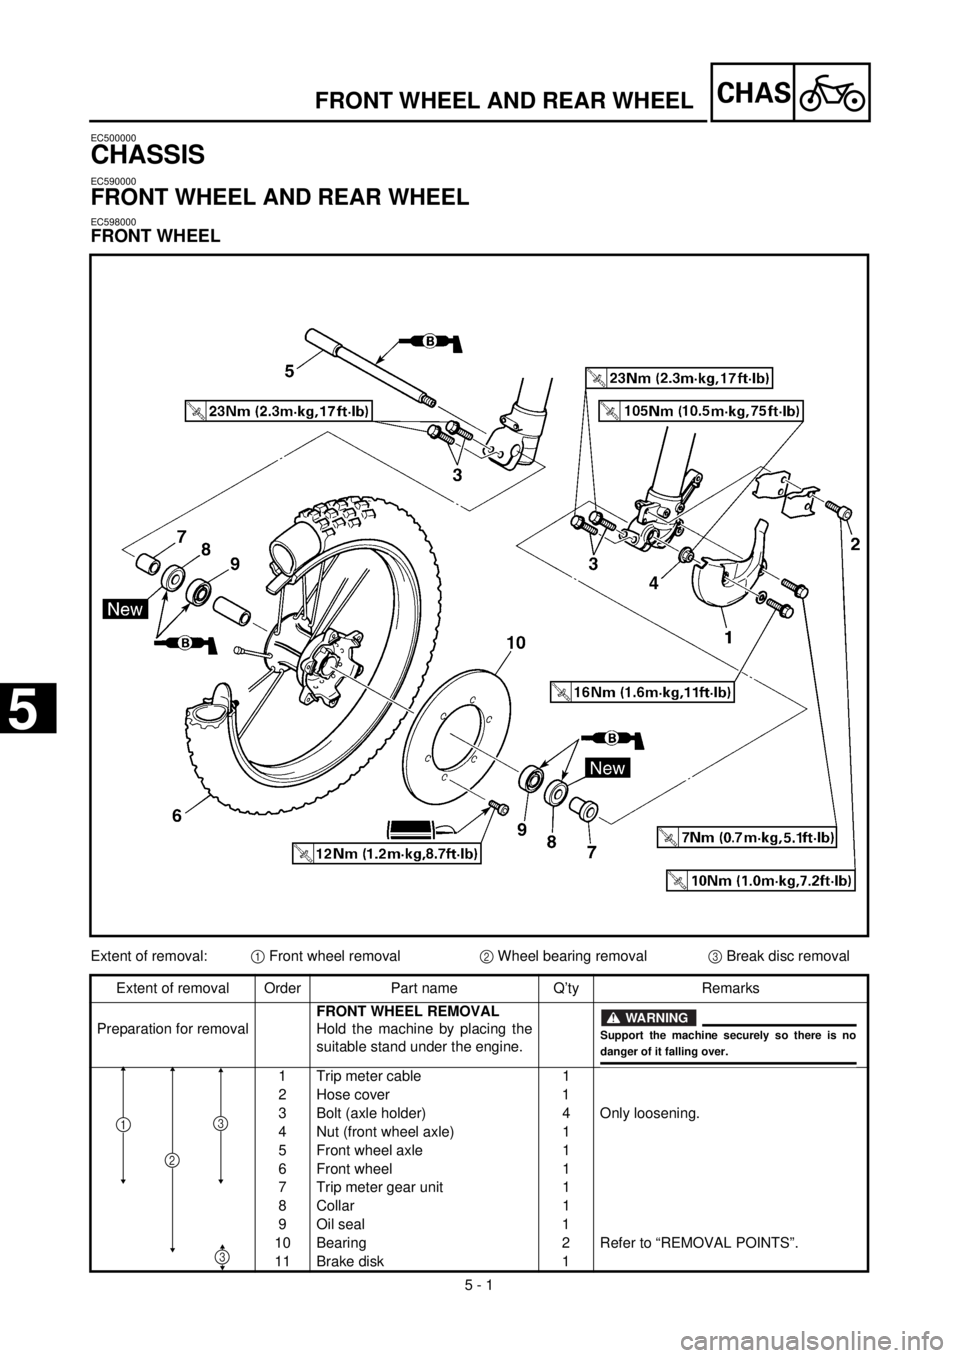
5 - 1
CHAS
EC500000
CHASSIS
EC590000
FRONT WHEEL AND REAR WHEEL
EC598000
FRONT WHEEL
FRONT WHEEL AND REAR WHEEL
Extent of removal:
1
Front wheel removal
2
Wheel bearing removal
3
Break disc removal
Extent of removal Order Part name Q’ty Remarks
Preparation for removal
FRONT WHEEL REMOVAL
Hold the machine by placing the
suitable stand under the engine.
1 Trip meter cable 1
2 Hose cover 1
3 Bolt (axle holder) 4 Only loosening.
4 Nut (front wheel axle) 1
5 Front wheel axle 1
6 Front wheel 1
7 Trip meter gear unit 1
8 Collar 1
9 Oil seal 1
10 Bearing 2 Refer to “REMOVAL POINTS”.
11 Brake disk 1
WARNING
Support the machine securely so there is nodanger of it falling over.
2
31
3
5
Page 450 of 654
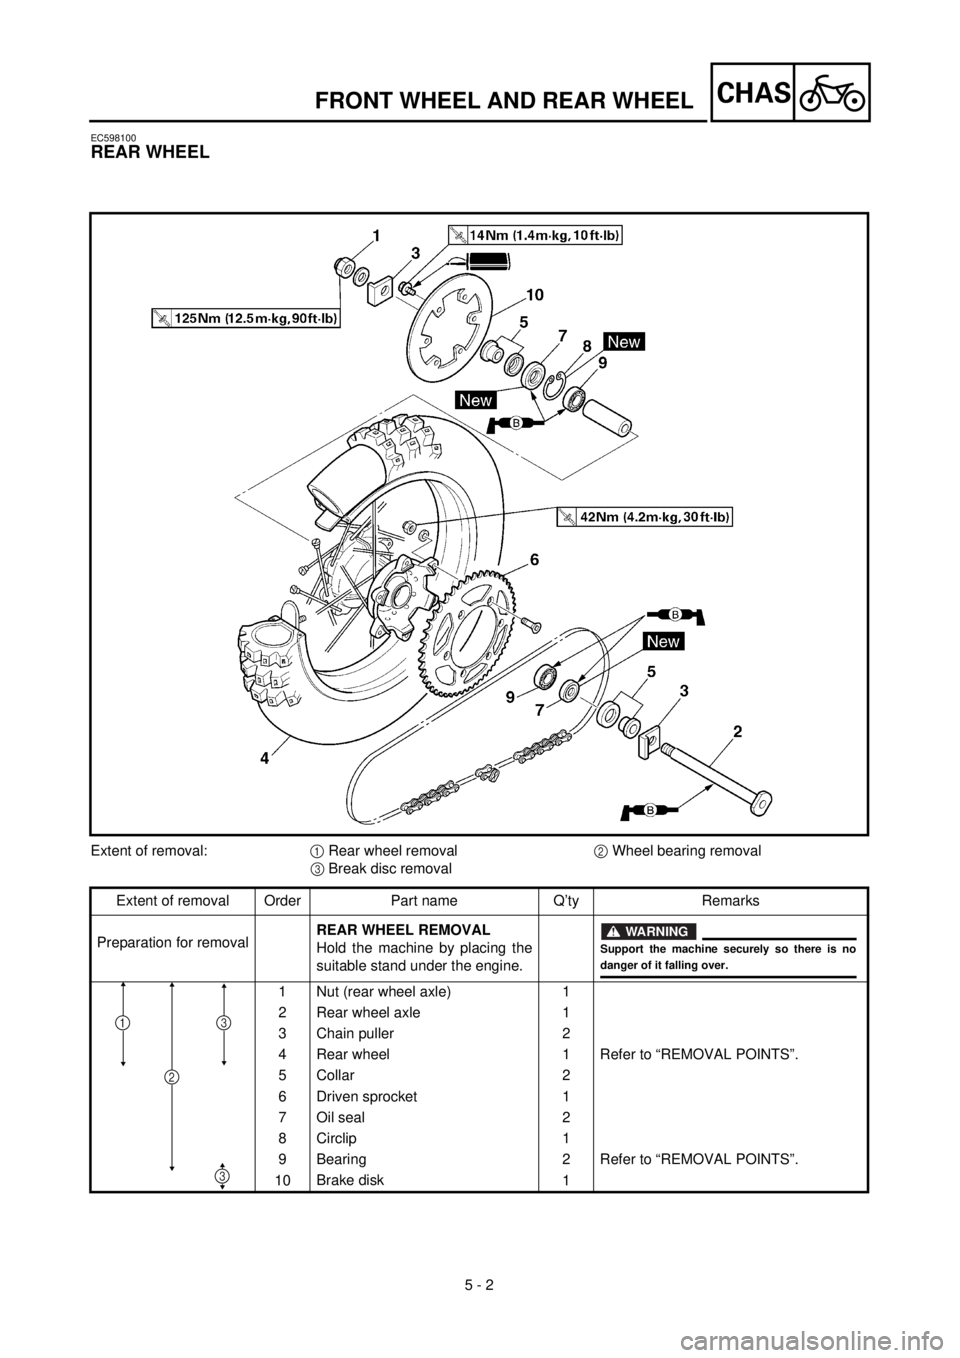
5 - 2
CHAS
EC598100
REAR WHEEL
Extent of removal:
1
Rear wheel removal
2
Wheel bearing removal
3
Break disc removal
Extent of removal Order Part name Q’ty Remarks
Preparation for removal
REAR WHEEL REMOVAL
Hold the machine by placing the
suitable stand under the engine.
1 Nut (rear wheel axle) 1
2 Rear wheel axle 1
3 Chain puller 2
4 Rear wheel 1 Refer to “REMOVAL POINTS”.
5 Collar 2
6 Driven sprocket 1
7 Oil seal 2
8 Circlip 1
9 Bearing 2 Refer to “REMOVAL POINTS”.
10Brake disk
1
WARNING
Support the machine securely so there is nodanger of it falling over.
2
31
3
FRONT WHEEL AND REAR WHEEL
Page 466 of 654
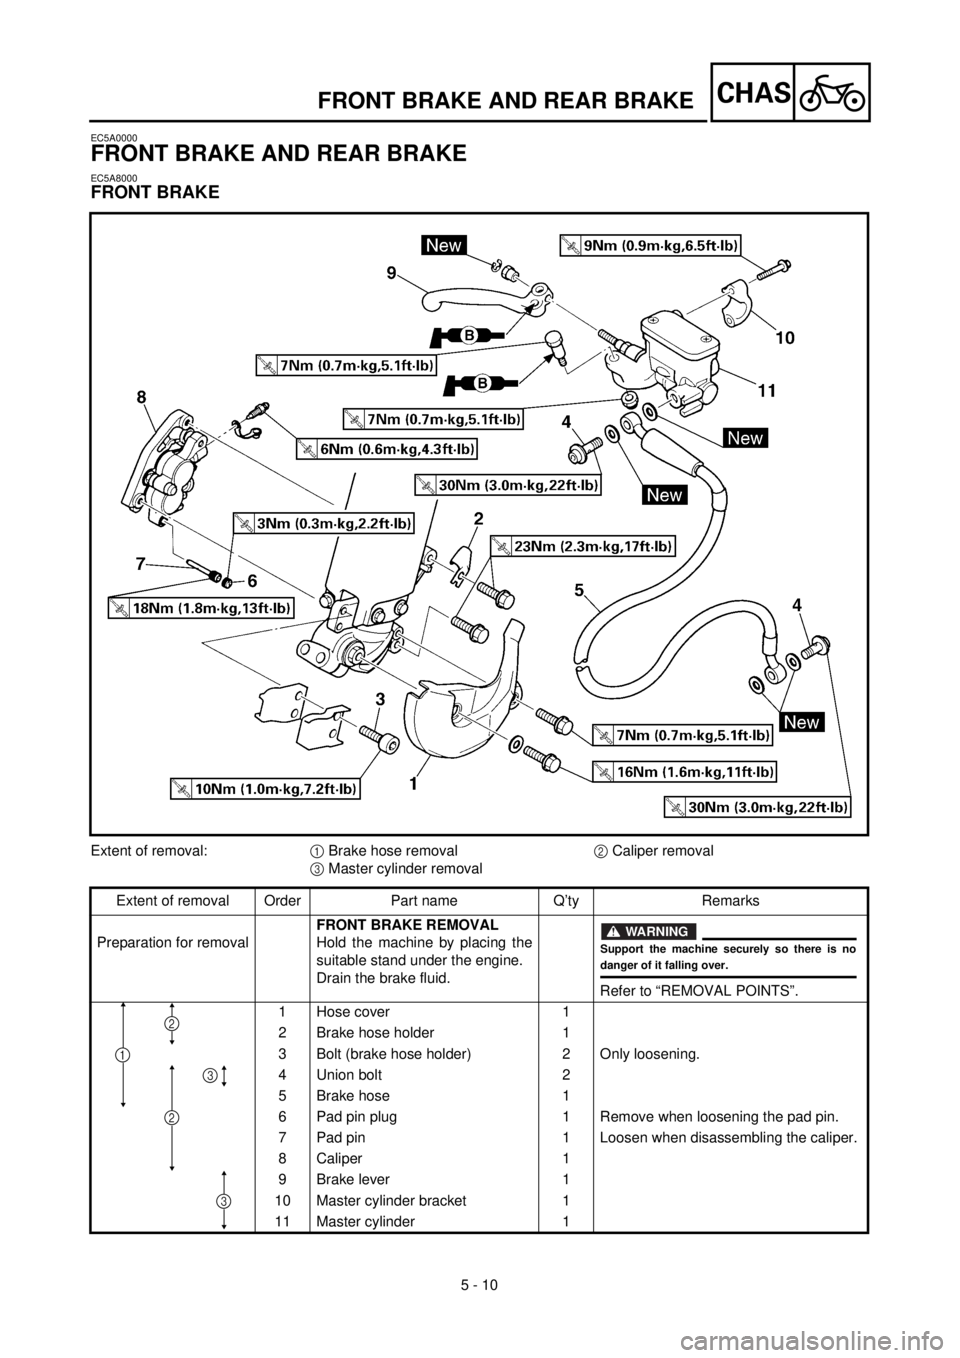
5 - 10
CHASFRONT BRAKE AND REAR BRAKE
EC5A0000
FRONT BRAKE AND REAR BRAKE
EC5A8000
FRONT BRAKE
Extent of removal:1 Brake hose removal2 Caliper removal
3 Master cylinder removal
Extent of removal Order Part name Q’ty Remarks
Preparation for removalFRONT BRAKE REMOVAL
Hold the machine by placing the
suitable stand under the engine.
Drain the brake fluid.
Refer to “REMOVAL POINTS”.
1 Hose cover 1
2 Brake hose holder 1
3 Bolt (brake hose holder) 2 Only loosening.
4 Union bolt 2
5 Brake hose 1
6 Pad pin plug 1 Remove when loosening the pad pin.
7 Pad pin 1 Loosen when disassembling the caliper.
8 Caliper 1
9 Brake lever 1
10 Master cylinder bracket 1
11 Master cylinder 1
WARNING
Support the machine securely so there is nodanger of it falling over.
2
3
1
3
2
Page 468 of 654
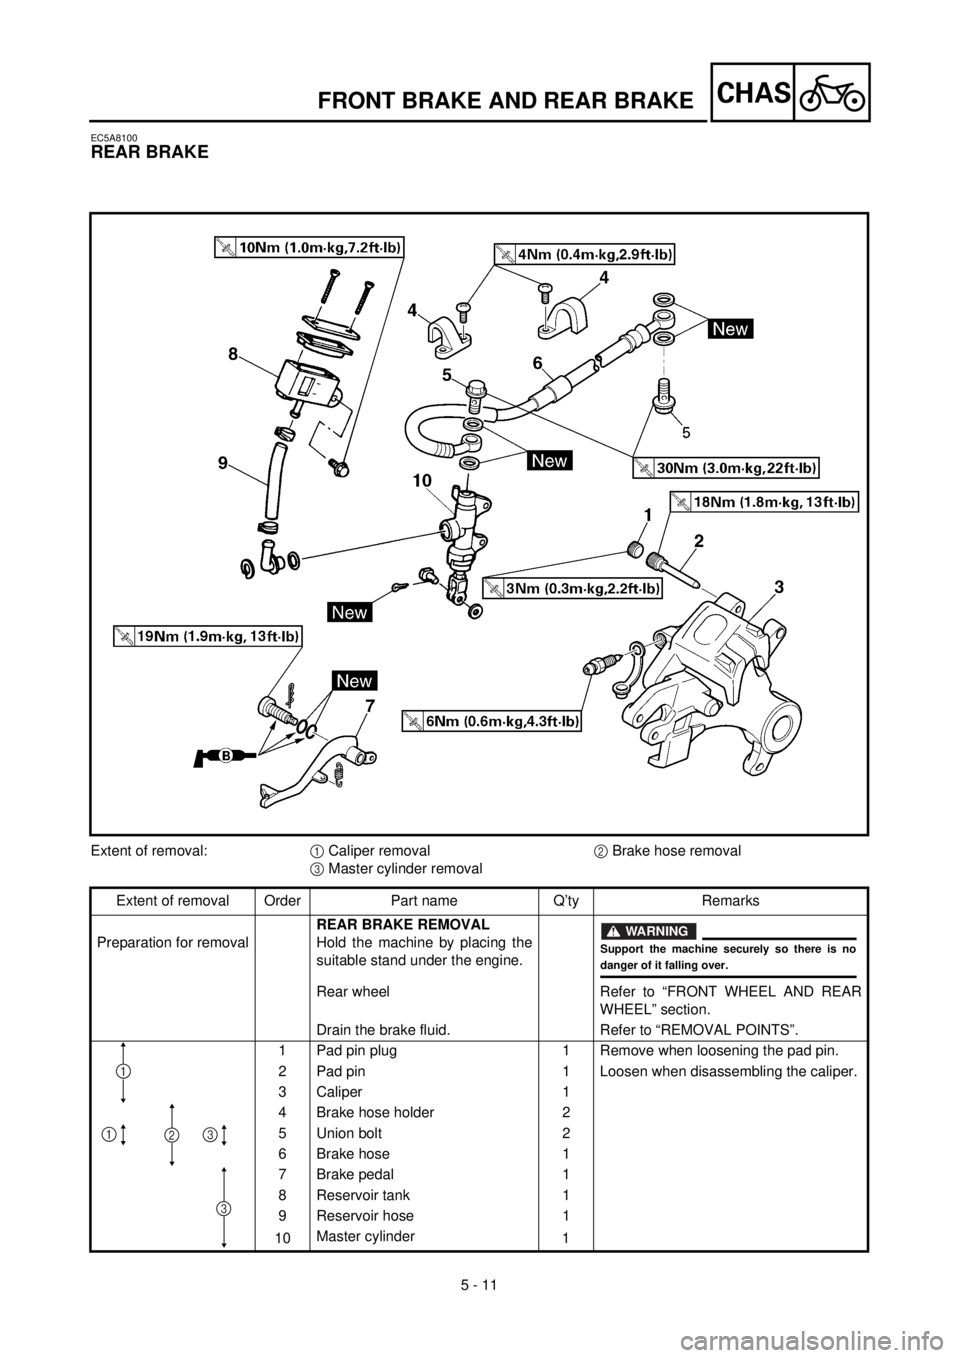
5 - 11
CHAS
EC5A8100
REAR BRAKE
Extent of removal:1 Caliper removal2 Brake hose removal
3 Master cylinder removal
Extent of removal Order Part name Q’ty Remarks
Preparation for removalREAR BRAKE REMOVAL
Hold the machine by placing the
suitable stand under the engine.
Rear wheel Refer to “FRONT WHEEL AND REAR
WHEEL” section.
Drain the brake fluid. Refer to “REMOVAL POINTS”.
1 Pad pin plug 1 Remove when loosening the pad pin.
2 Pad pin 1 Loosen when disassembling the caliper.
3 Caliper 1
4 Brake hose holder 2
5 Union bolt 2
6 Brake hose 1
7 Brake pedal 1
8 Reservoir tank 1
9 Reservoir hose 1
10Master cylinder
1
WARNING
Support the machine securely so there is nodanger of it falling over.
3
1
321
FRONT BRAKE AND REAR BRAKE
Page 500 of 654
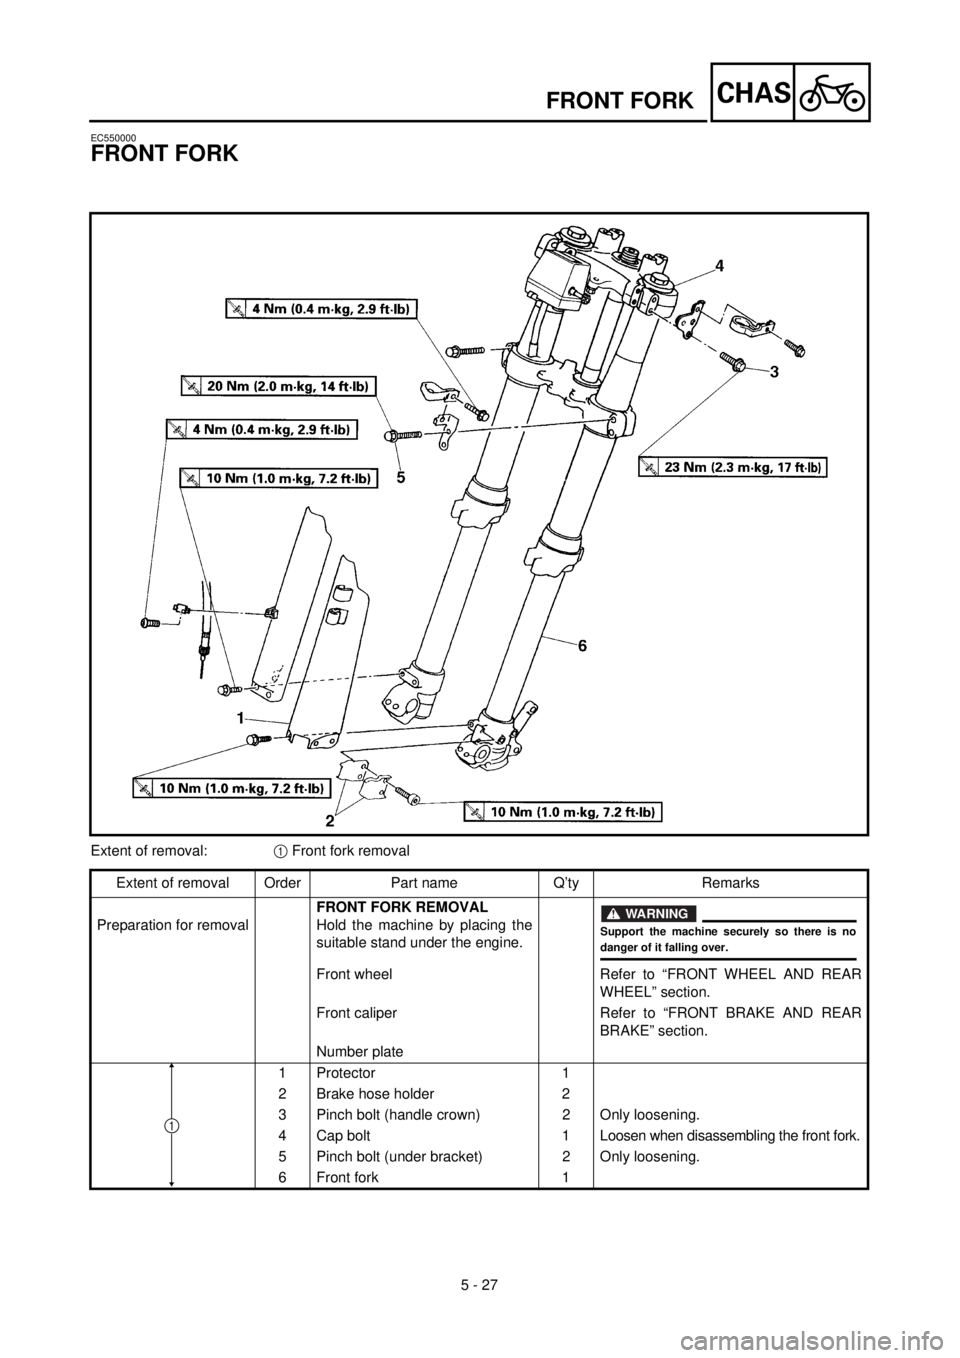
5 - 27
CHASFRONT FORK
EC550000
FRONT FORK
Extent of removal:1 Front fork removal
Extent of removal Order Part name Q’ty Remarks
Preparation for removalFRONT FORK REMOVAL
Hold the machine by placing the
suitable stand under the engine.
Front wheel Refer to “FRONT WHEEL AND REAR
WHEEL” section.
Front caliper Refer to “FRONT BRAKE AND REAR
BRAKE” section.
Number plate
1 Protector 1
2 Brake hose holder 2
3 Pinch bolt (handle crown) 2 Only loosening.
4 Cap bolt 1Loosen when disassembling the front fork.
5 Pinch bolt (under bracket) 2 Only loosening.
6 Front fork 1
WARNING
Support the machine securely so there is nodanger of it falling over.
1
Page 526 of 654
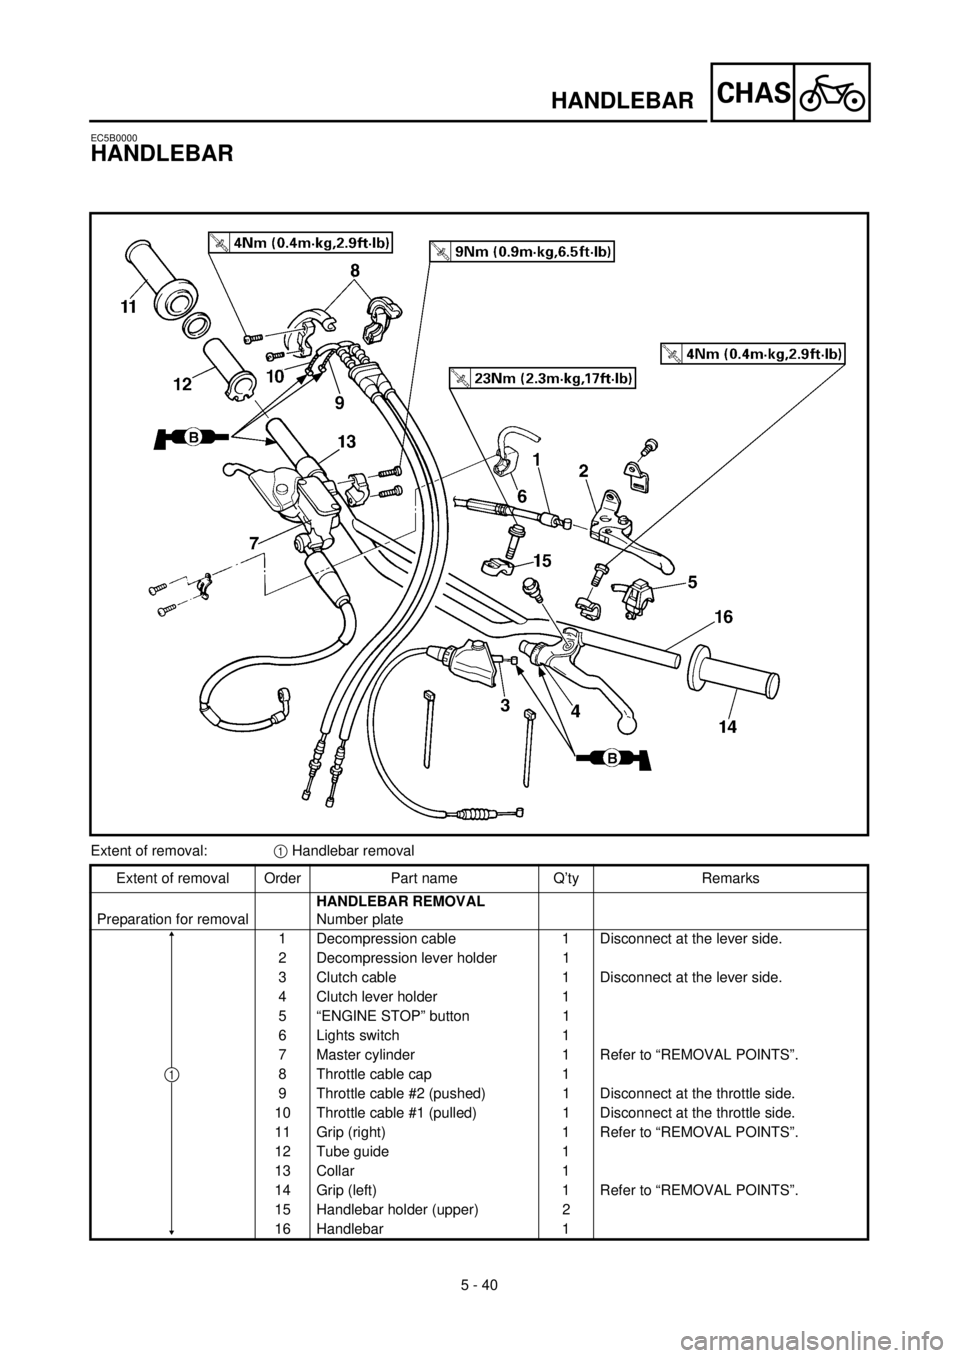
5 - 40
CHAS
EC5B0000
HANDLEBAR
Extent of removal:1 Handlebar removal
Extent of removal Order Part name Q’ty Remarks
Preparation for removalHANDLEBAR REMOVAL
Number plate
1 Decompression cable 1 Disconnect at the lever side.
2 Decompression lever holder 1
3 Clutch cable 1 Disconnect at the lever side.
4 Clutch lever holder 1
5 “ENGINE STOP” button 1
6 Lights switch 1
7 Master cylinder 1 Refer to “REMOVAL POINTS”.
8 Throttle cable cap 1
9 Throttle cable #2 (pushed) 1 Disconnect at the throttle side.
10 Throttle cable #1 (pulled) 1 Disconnect at the throttle side.
11 Grip (right) 1 Refer to “REMOVAL POINTS”.
12 Tube guide 1
13 Collar 1
14 Grip (left) 1 Refer to “REMOVAL POINTS”.
15 Handlebar holder (upper) 2
16 Handlebar 1
1
HANDLEBAR