YAMAHA YZ125LC 2001 Betriebsanleitungen (in German)
Manufacturer: YAMAHA, Model Year: 2001, Model line: YZ125LC, Model: YAMAHA YZ125LC 2001Pages: 558, PDF-Größe: 13.11 MB
Page 181 of 558
3-26
VERIFICATION DE LA FOURCHE AVANT
INSPEKTION DER VORDERRADGABEL
ISPEZIONE DELLA FORCELLA ANTERIORE
INSP
ADJ
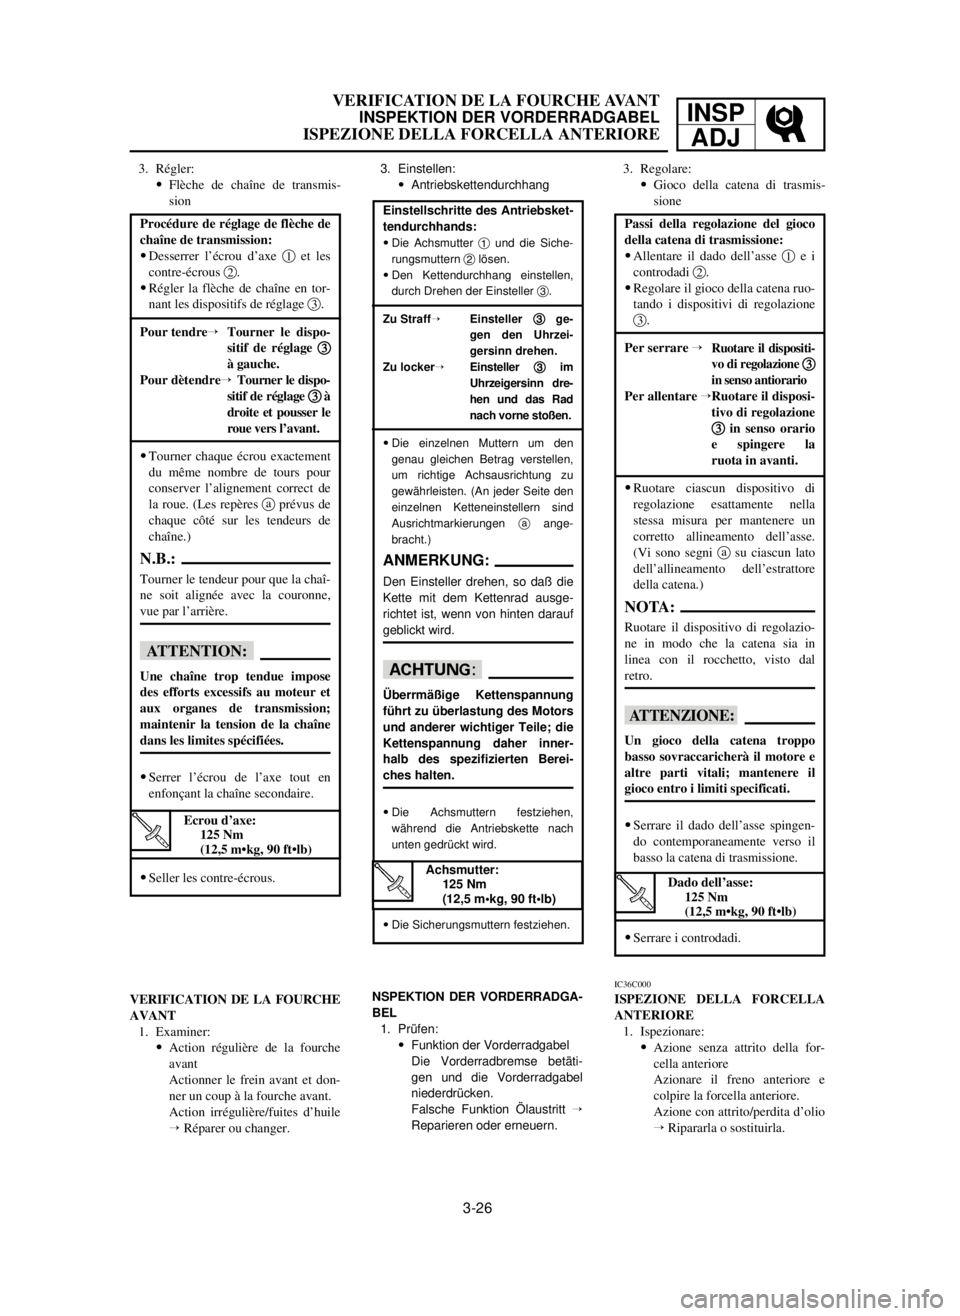
Passi della regolazione del gioco
della catena di trasmissione:
9Allentare il dado dell’asse 1e i
controdadi 2.
9Regolare il gioco della catena ruo-
tando i dispositivi di regolazione
3.
Per serrare Õ
Ruotare il dispositi-
vo di regolazione 3 3
in senso antiorario
Per allentare ÕRuotare il disposi-
tivo di regolazione
3 3
in senso orario
e spingere la
ruota in avanti.
9Ruotare ciascun dispositivo di
regolazione esattamente nella
stessa misura per mantenere un
corretto allineamento dell’asse.
(Vi sono segni asu ciascun lato
dell’allineamento dell’estrattore
della catena.)
NOTA:
Ruotare il dispositivo di regolazio-
ne in modo che la catena sia in
linea con il rocchetto, visto dal
retro.
iI
Un gioco della catena troppo
basso sovraccaricherà il motore e
altre parti vitali; mantenere il
gioco entro i limiti specificati.
9Serrare il dado dell’asse spingen-
do contemporaneamente verso il
basso la catena di trasmissione.
9Serrare i controdadi.
Einstellschritte des Antriebsket-
tendurchhands:
9Die Achsmutter 1und die Siche-
rungsmuttern 2lösen.
9Den Kettendurchhang einstellen,
durch Drehen der Einsteller 3.
Zu StraffÕEinsteller 3 3
ge-
gen den Uhrzei-
gersinn drehen.
Zu lockerÕEinsteller 3 3
im
Uhrzeigersinn dre-
hen und das Rad
nach vorne stoßen.
9Die einzelnen Muttern um den
genau gleichen Betrag verstellen,
um richtige Achsausrichtung zu
gewährleisten. (An jeder Seite den
einzelnen Ketteneinstellern sind
Ausrichtmarkierungen aange-
bracht.)
ANMERKUNG:
Den Einsteller drehen, so daß die
Kette mit dem Kettenrad ausge-
richtet ist, wenn von hinten darauf
geblickt wird.
dD
Überrmäßige Kettenspannung
führt zu überlastung des Motors
und anderer wichtiger Teile; die
Kettenspannung daher inner-
halb des spezifizierten Berei-
ches halten.
9Die Achsmuttern festziehen,
während die Antriebskette nach
unten gedrückt wird.
9Die Sicherungsmuttern festziehen.
3. Régler:
9Flèche de chaîne de transmis-
sion
Procédure de réglage de flèche de
chaîne de transmission:
9Desserrer l’écrou d’axe 1et les
contre-écrous 2.
9Régler la flèche de chaîne en tor-
nant les dispositifs de réglage 3.
Pour tendreÕTourner le dispo-
sitif de réglage 3 3
à gauche.
Pour dètendreÕTourner le dispo-
sitif de réglage 3 3
à
droite et pousser le
roue vers l’avant.
9Tourner chaque écrou exactement
du même nombre de tours pour
conserver l’alignement correct de
la roue. (Les repères aprévus de
chaque côté sur les tendeurs de
chaîne.)
N.B.:
Tourner le tendeur pour que la chaî-
ne soit alignée avec la couronne,
vue par l’arrière.
fF
Une chaîne trop tendue impose
des efforts excessifs au moteur et
aux organes de transmission;
maintenir la tension de la chaîne
dans les limites spécifiées.
9Serrer l’écrou de l’axe tout en
enfonçant la chaîne secondaire.
9Seller les contre-écrous.
3. Einstellen:
9Antriebskettendurchhang3. Regolare:
9Gioco della catena di trasmis-
sione
Ecrou d’axe:
125 Nm
(12,5 m•kg, 90 ft•lb)
Dado dell’asse:
125 Nm
(12,5 m•kg, 90 ft•lb)Achsmutter:
125 Nm
(12,5 m•kg, 90 ft•lb)
NSPEKTION DER VORDERRADGA-
BEL
1. Prüfen:
9Funktion der Vorderradgabel
Die Vorderradbremse betäti-
gen und die Vorderradgabel
niederdrücken.
Falsche Funktion Ölaustritt Õ
Reparieren oder erneuern.IC36C000
ISPEZIONE DELLA FORCELLA
ANTERIORE
1. Ispezionare:
9Azione senza attrito della for-
cella anteriore
Azionare il freno anteriore e
colpire la forcella anteriore.
Azione con attrito/perdita d’olio
ÕRipararla o sostituirla. VERIFICATION DE LA FOURCHE
AVANT
1. Examiner:
9Action régulière de la fourche
avant
Actionner le frein avant et don-
ner un coup à la fourche avant.
Action irrégulière/fuites d’huile
Õ Réparer ou changer.
5MV-9-30-3B 6/19/00 1:49 PM Page 17
Page 182 of 558

3-27
FRONT FORK OIL SEAL AND DUST SEAL CLEANING/
FRONT FORK REBOUND DAMPING FORCE ADJUSTMENTINSP
ADJ
Minimum
20 clicks out
(from maximum
position)
EC36D001
FRONT FORK OIL SEAL AND DUST SEAL
CLEANING
1. Remove:
9Protector
9Dust seal 1
NOTE:
Use a thin screw driver, and be careful not to
damage the inner fork tube and dust seal.
2. Clean:
9Dust seal a
9Oil seal b
NOTE:
9Clean the dust seal and oil seal after every run.
9Apply the lithium soap base grease on the in-
ner tube.
EC36H002
FRONT FORK REBOUND DAMPING
FORCE
ADJUSTMENT
1. Adjust:
9Rebound damping force
9STANDARD POSITION:
This is the position which is back by the spe-
cific number of clicks from the fully turned-in
position.
Stiffer a a
ÕIncrease the rebound damping
force. (Turn the adjuster 1 1
in.)
Softer b b
ÕDecrease the rebound
damping force. (Turn the
adjuster 1 1
out.)
Extent of adjustment:
Maximum
Fully turned in
position
Standard position:
12 clicks out
*10 clicks out
*For EUROPE
5MV-9-30-3B 6/19/00 1:49 PM Page 18
Page 183 of 558
3-27
NETTOYAGE DE BAGUE D’ETANCHETTE ET DE JOINT ANTIPOUSSIERE DE FOURCHE AVANT/
REGLAGE DE LA FORCE D’AMORTISSEMENT DE REBOND DE LA FOURCHE AVANT
REINIGUNG DER ÖLDICHTUNG UND STAUBDICHTUNG DER VORDERRADGABEL/
EINSTELLUNG DER EXPANSIONS-DÄMPFUNGSKRAFT DER VORDERRADGABEL
PULITURA DEL PARAOLIO E DEL PARAPOLVERE DELLA FORCELLA ANTERIORE/
REGOLAZIONE DELLA FORZA DI SMORZAMENTO DELL’ESTENSIONE DELLA FORCELLA ANTERIORE
INSP
ADJ
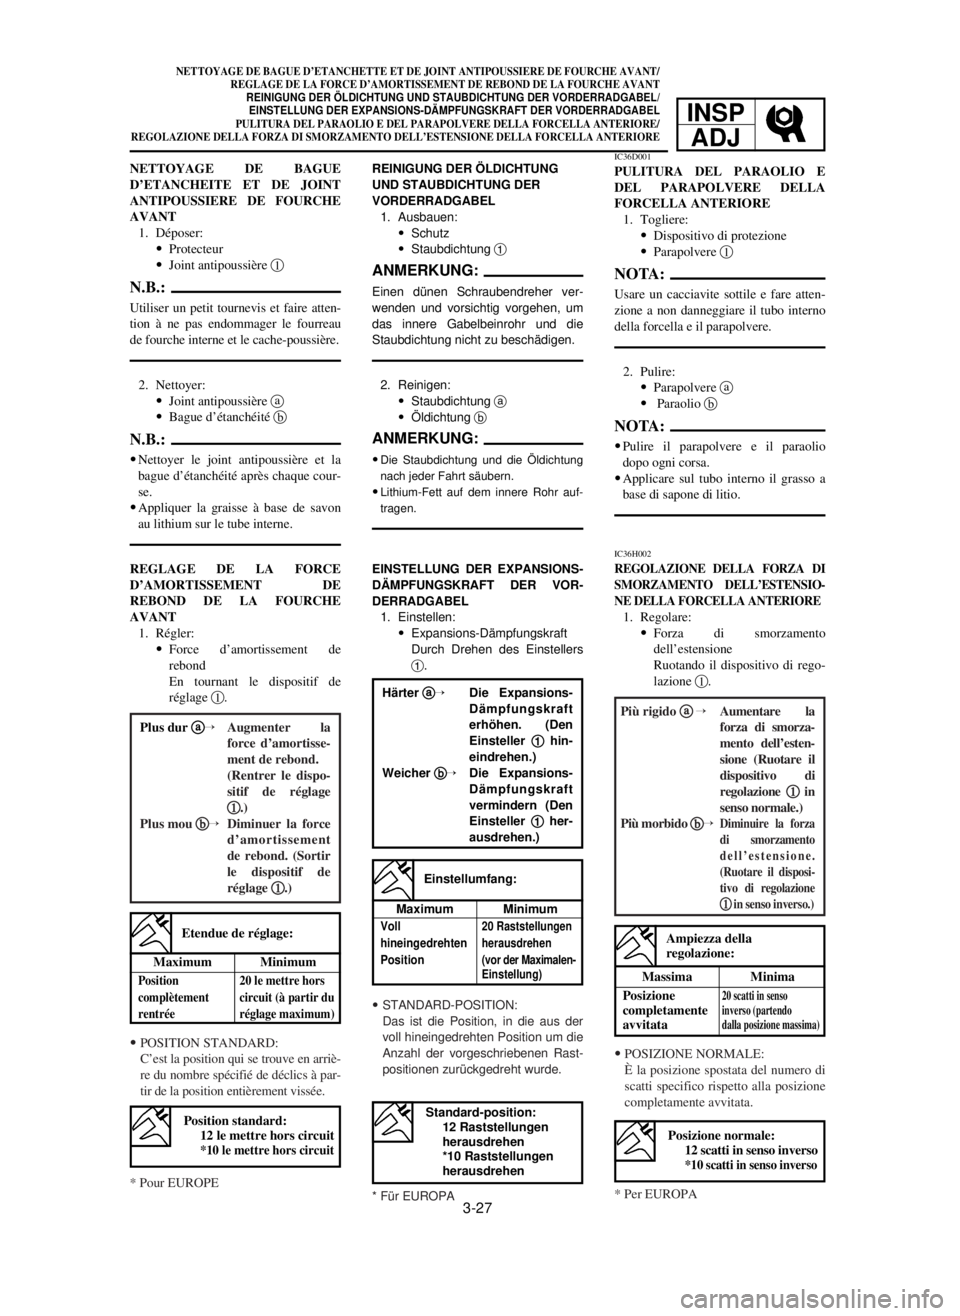
REINIGUNG DER ÖLDICHTUNG
UND STAUBDICHTUNG DER
VORDERRADGABEL
1. Ausbauen:
9Schutz
9Staubdichtung 1
ANMERKUNG:
Einen dünen Schraubendreher ver-
wenden und vorsichtig vorgehen, um
das innere Gabelbeinrohr und die
Staubdichtung nicht zu beschädigen.
2. Reinigen:
9Staubdichtung a
9Öldichtung b
ANMERKUNG:
9Die Staubdichtung und die Öldichtung
nach jeder Fahrt säubern.
9Lithium-Fett auf dem innere Rohr auf-
tragen.
EINSTELLUNG DER EXPANSIONS-
DÄMPFUNGSKRAFT DER VOR-
DERRADGABEL
1. Einstellen:
9Expansions-Dämpfungskraft
Durch Drehen des Einstellers
1.
IC36D001
PULITURA DEL PARAOLIO E
DEL PARAPOLVERE DELLA
FORCELLA ANTERIORE
1. Togliere:
9Dispositivo di protezione
9Parapolvere 1
NOTA:
Usare un cacciavite sottile e fare atten-
zione a non danneggiare il tubo interno
della forcella e il parapolvere.
2. Pulire:
9Parapolvere a
9Paraolio b
NOTA:
9Pulire il parapolvere e il paraolio
dopo ogni corsa.
9Applicare sul tubo interno il grasso a
base di sapone di litio.
IC36H002
REGOLAZIONE DELLA FORZA DI
SMORZAMENTO DELL’ESTENSIO-
NE DELLA FORCELLA ANTERIORE
1. Regolare:
9Forza di smorzamento
dell’estensione
Ruotando il dispositivo di rego-
lazione 1. NETTOYAGE DE BAGUE
D’ETANCHEITE ET DE JOINT
ANTIPOUSSIERE DE FOURCHE
AVANT
1. Déposer:
9Protecteur
9Joint antipoussière 1
N.B.:
Utiliser un petit tournevis et faire atten-
tion à ne pas endommager le fourreau
de fourche interne et le cache-poussière.
2. Nettoyer:
9Joint antipoussière a
9Bague d’étanchéité b
N.B.:
9Nettoyer le joint antipoussière et la
bague d’étanchéité après chaque cour-
se.
9Appliquer la graisse à base de savon
au lithium sur le tube interne.
REGLAGE DE LA FORCE
D’AMORTISSEMENT DE
REBOND DE LA FOURCHE
AVANT
1. Régler:
9Force d’amortissement de
rebond
En tournant le dispositif de
réglage 1.
Position standard:
12 le mettre hors circuit
*10 le mettre hors circuitPosizione normale:
12 scatti in senso inverso
*10 scatti in senso inverso
Standard-position:
12 Raststellungen
herausdrehen
*10 Raststellungen
herausdrehen
Maximum Minimum
Position 20 le mettre hors
complètement circuit (à partir du
rentrée réglage maximum)
Etendue de réglage:
Massima Minima
Posizione
20 scatti in senso completamente inverso (partendo avvitatadalla posizione massima)
Ampiezza della
regolazione:
Maximum Minimum
Voll 20 Raststellungen
hineingedrehten herausdrehen
Position (vor der Maximalen-
Einstellung)
Einstellumfang: Härter a a
ÕDie Expansions-
Dämpfungskraft
erhöhen. (Den
Einsteller 1 1
hin-
eindrehen.)
Weicher b b
ÕDie Expansions-
Dämpfungskraft
vermindern (Den
Einsteller 1 1
her-
ausdrehen.)
Plus dur a aÕAugmenter la
force d’amortisse-
ment de rebond.
(Rentrer le dispo-
sitif de réglage
1 1
.)
Plus mou b b
ÕDiminuer la force
d’amortissement
de rebond. (Sortir
le dispositif de
réglage 1 1
.)
Più rigido a a
ÕAumentare la
forza di smorza-
mento dell’esten-
sione (Ruotare il
dispositivo di
regolazione 1 1
in
senso normale.)
Più morbido b b
Õ
Diminuire la forza
di smorzamento
dell’estensione.
(Ruotare il disposi-
tivo di regolazione
1 1
in senso inverso.)
9POSITION STANDARD:
C’est la position qui se trouve en arriè-
re du nombre spécifié de déclics à par-
tir de la position entièrement vissée.
9STANDARD-POSITION:
Das ist die Position, in die aus der
voll hineingedrehten Position um die
Anzahl der vorgeschriebenen Rast-
positionen zurückgedreht wurde.
9POSIZIONE NORMALE:
È la posizione spostata del numero di
scatti specifico rispetto alla posizione
completamente avvitata.
* Pour EUROPE
* Für EUROPA* Per EUROPA
5MV-9-30-3B 6/19/00 1:49 PM Page 19
Page 184 of 558

3-28
FRONT FORK COMPRESSION DAMPING FORCE
ADJUSTMENTINSP
ADJ
cC
Do not force the adjuster past the minimum
or maximum extent of adjustment. The ad-
juster may be damaged.
w
Always adjust each front fork to the same
setting. Uneven adjustment can cause
poor handling and loss of stability.
EC36J001
FRONT FORK COMPRESSION DAMPING
FORCE ADJUSTMENT
1. Remove:
9Rubber cap
2. Adjust:
9Compression damping force
By turning the adjuster 1.
Stiffer a a
ÕIncrease the compression
damping force. (Turn the
adjuster 1 1
in.)
Softer b b
ÕDecrease the compression
damping force. (Turn the
adjuster 1 1
out.)
Minimum
20 clicks out
(from maximum
position)
Extent of adjustment:
Maximum
Fully turned in
position
5MV-9-30-3B 6/19/00 1:49 PM Page 20
Page 185 of 558
3-28
REGLAGE DE LA FORCE D’AMORTISSEMENT DE COMPRESSION DE LA
FOURCHE AVANT
EINSTELLUNG DER KOMPRESSIONS-DÄMPFUNGSKRAFT DER VORDERRADGABELREGOLAZIONE DELLA FORZA DI SMORZAMENTO DELLA COMPRES-
SIONE DELLA FORCELLA ANTERIOREINSP
ADJ
dD
Den Einsteller nicht über die Mini-
mum- oder Maximum-Einstellpositi-
on zwingen. Der Einsteller könnte
beschädigt werden.
W
Die Vorderrad-Gabelbeine auf den
gleichen Wert einstellen. Ungleich-
mäßige Einstellung kann zu ver-
schlechtertem Fahrverhalten und
verminderter Stabilität führen.
iI
Non forzare il dispositivo di regola-
zione oltre l’ampiezza di regolazione
minima o massima. Il dispositivo di
regolazione può risultare danneggia-
to.
T
Regolare sempre ciascuna forcella
anteriore alla stessa impostazione.
Una regolazione non uniforme può
provocare difficoltà di manovra e
perdita di stabilità.
fF
Ne pas forcer le régulateur au-delà
du minimum ou du maximum au
risque de l’endommager.
XG
Toujours régler à la même position
sur chaque bras de fourche avant. Un
réglage inégal peut entraîner une
mauvaise maniabilité et une perte de
stabilité.
Maximum Minimum
Position 20 le mettre hors
complètement circuit (à partir du
rentrée réglage maximum)
Etendue de réglage:
Massima Minima
Posizione
20 scatti in senso completamente inverso (partendo avvitatadalla posizione massima)
Ampiezza della
regolazione:
Härter a a
ÕDie Kompressi-
ons-Dämpfungs-
kraft erhöhen.
(Den Einsteller 1 1
hineindrehen).
Weicher a a
ÕDie Kompressi-
ons-Dämpfungs-
kraft vermindern
(Den Einsteller 1 1
herausdrehen.)
Plus dur a a
ÕAugmenter la
force d’amortisse-
ment de compres-
sion. (Rentrer le
dispositif de
réglage 1 1
.)
Plus mou b b
ÕDiminuer la force
d’amortissement
de compression.
(Sortir le dispositif
de réglage 1 1
.)Più rigido a a
ÕAumentare la
forza di smorza-
mento della com-
pressione. (Ruota-
re il dispositivo di
regolazione 1 1
in
senso normale.)
Più morbido b b
ÕDiminuire la
forza di smorza-
mento della com-
pressione. (Ruo-
tare il dispositivo
di regolazione 1 1
in senso inverso.)
Maximum Minimum
Voll 20 Raststellungen
hineingedrehten herausdrehen
Position (vor der Maximalen-
Einstellung)
Einstellumfang:
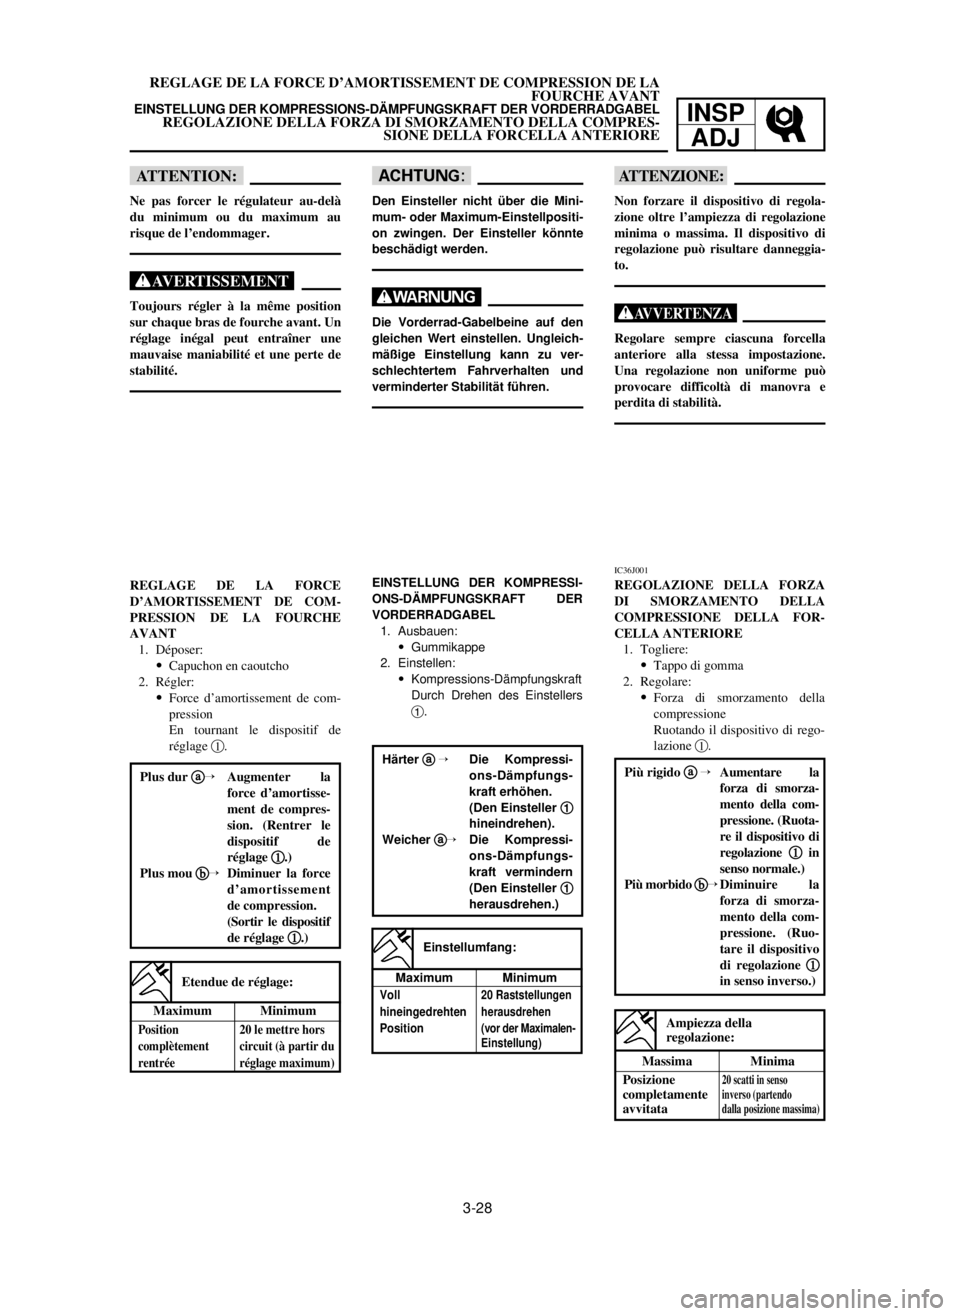
REGLAGE DE LA FORCE
D’AMORTISSEMENT DE COM-
PRESSION DE LA FOURCHE
AVANT
1. Déposer:
9Capuchon en caoutcho
2. Régler:
9Force d’amortissement de com-
pression
En tournant le dispositif de
réglage 1.EINSTELLUNG DER KOMPRESSI-
ONS-DÄMPFUNGSKRAFT DER
VORDERRADGABEL
1. Ausbauen:
9Gummikappe
2. Einstellen:
9Kompressions-Dämpfungskraft
Durch Drehen des Einstellers
1.IC36J001
REGOLAZIONE DELLA FORZA
DI SMORZAMENTO DELLA
COMPRESSIONE DELLA FOR-
CELLA ANTERIORE
1. Togliere:
9Tappo di gomma
2. Regolare:
9Forza di smorzamento della
compressione
Ruotando il dispositivo di rego-
lazione 1.
5MV-9-30-3B 6/19/00 1:49 PM Page 21
Page 186 of 558

3-29
REAR SHOCK ABSORBER INSPECTION
INSP
ADJ
9STANDARD POSITION:
This is the position which is back by the spe-
cific number of clicks from the fully turned-in
position.
cC
Do not force the adjuster past the minimum
or maximum extent of adjustment. The ad-
juster may be damaged.
w
Always adjust each front fork to the same
setting. Uneven adjustment can cause
poor handling and loss of stability.
3. Install:
9Rubber cap
EC36K000
REAR SHOCK ABSORBER INSPECTION
1. Inspect:
9Swingarm smooth action
Abnormal noise/Unsmooth action Õ
Grease the pivoting points or repair the
pivoting points.
Damage/Oil leakage ÕReplace.
Standard position:
14 clicks out
*12 clicks out
*For EUROPE
5MV-9-30-3B 6/19/00 1:49 PM Page 22
Page 187 of 558
3-29
VERIFICATION DE L’AMORTISSEUR ARRIERE
INSPEKTION DES HINTERRAD-STOSSDÄMPFERS
ISPEZIONE DELL’AMMORTIZZATORE POSTERIORE
INSP
ADJ
9STANDARD-POSITION:
Das ist die Position, in die aus der
voll hineingedrehten Position um die
Anzahl der vorgeschriebenen Rast-
positionen zurückgedreht wurde.
dD
Den Einsteller nicht über die Mini-
mum- oder Maximum-Einstellpositi-
on zwingen. Der Einsteller könnte
beschädigt werden.
W
Die Vorderrad-Gabelbeine auf den
gleichen Wert einstellen. Ungleich-
mäßige Einstellung kann zu ver-
schlechtertem Fahrverhalten und
verminderter Stabilität führen.
3. Einbauen:
9Gummikappe
9POSIZIONE NORMALE:
È la posizione spostata del numero di
scatti specifico rispetto alla posizione
completamente avvitata.
iI
Non forzare il dispositivo di regola-
zione oltre l’ampiezza di regolazione
minima o massima. Il dispositivo di
regolazione può risultare danneggia-
to.
T
Regolare sempre ciascuna forcella
anteriore alla stessa impostazione.
Una regolazione non uniforme può
provocare difficoltà di manovra e
perdita di stabilità.
3. Installare:
9Tappo di gomma 9POSITION STANDARD:
C’est la position qui se trouve en
arrière du nombre spécifié de déclics
à partir de la position entièrement vis-
sée.
fF
Ne pas forcer le régulateur au-delà
du minimum ou du maximum au
risque de l’endommager.
XG
Toujours régler à la même position
sur chaque bras de fourche avant. Un
réglage inégal peut entraîner une
mauvaise maniabilité et une perte de
stablilité.
3. Monter:
9Capuchon en caoutcho
Position standard:
14 le mettre hors circuit
*12 le mettre hors circuit
Posizione normale:
14 scatti in senso
inverso
*12 scatti in senso
inversoStandard-position:
14 Raststellungen
herausdrehen
*12 Raststellungen
herausdrehen
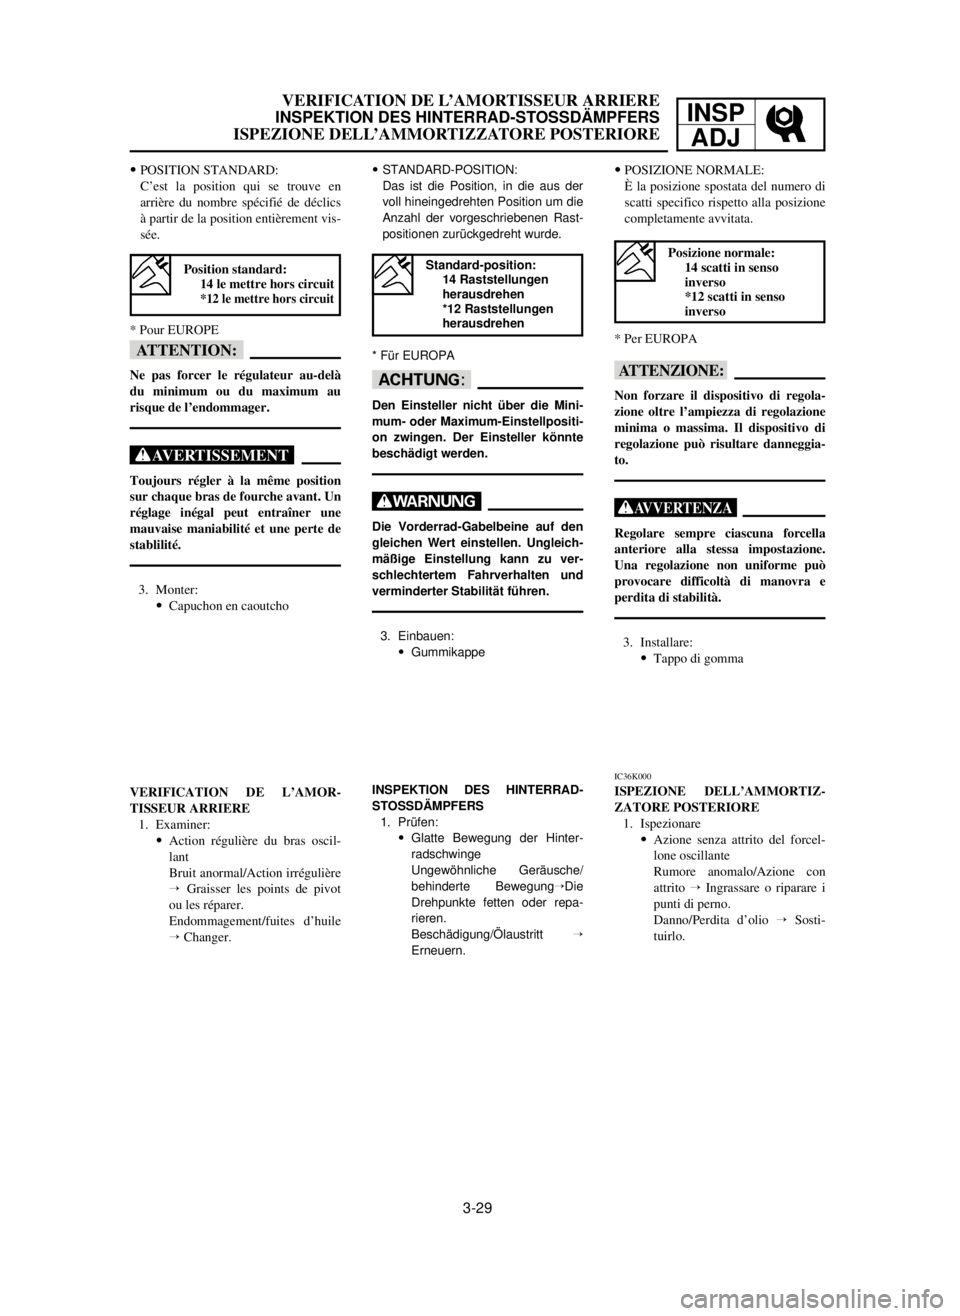
VERIFICATION DE L’AMOR-
TISSEUR ARRIERE
1. Examiner:
9Action régulière du bras oscil-
lant
Bruit anormal/Action irrégulière
Õ Graisser les points de pivot
ou les réparer.
Endommagement/fuites d’huile
Õ Changer.INSPEKTION DES HINTERRAD-
STOSSDÄMPFERS
1. Prüfen:
9Glatte Bewegung der Hinter-
radschwinge
Ungewöhnliche Geräusche/
behinderte BewegungÕDie
Drehpunkte fetten oder repa-
rieren.
Beschädigung/Ölaustritt Õ
Erneuern.IC36K000
ISPEZIONE DELL’AMMORTIZ-
ZATORE POSTERIORE
1. Ispezionare
9Azione senza attrito del forcel-
lone oscillante
Rumore anomalo/Azione con
attrito ÕIngrassare o riparare i
punti di perno.
Danno/Perdita d’olio ÕSosti-
tuirlo. * Pour EUROPE
* Für EUROPA
* Per EUROPA
5MV-9-30-3B 6/19/00 1:49 PM Page 23
Page 188 of 558

3-30
REAR SHOCK ABSORBER SPRING PRELOAD
ADJUSTMENTINSP
ADJ
EC36M013
REAR SHOCK ABSORBER SPRING
PRELOAD ADJUSTMENT
1. Elevate the rear wheel by placing the suit-
able stand under the engine.
2. Remove:
9Rear frame
3. Loosen:
9Locknut 1
4. Adjust:
9Spring preload
By turning the adjuster 2.
NOTE:
9Be sure to remove all dirt and mud from around
the locknut and adjuster before
adjustment.
9The length of the spring (installed) changes 1.5
mm (0.06 in) per turn of the adjuster.
cC
Never attempt to turn the adjuster beyond
the maximum or minimum setting.
5. Tighten:
9Locknut
6. Install:
9Rear frame
Stiffer ÕIncrease the spring preload.
(Turn the adjuster 2 2
in.)
Softer ÕDecrease the spring pre-
load. (Turn the adjuster 2 2
out.)
Extent of adjustment
242~260 mm
(9.53~10.24 in)
*257~275 mm
(10.12~10.83 in)
Spring length (installed) a a
:
Standard length
248 mm (9.76 in)
*262 mm (10.31 in)
*For EUROPE
29 Nm (2.9 m•kg, 21 ft•lb)
5MV-9-30-3B 6/19/00 1:49 PM Page 24
Page 189 of 558
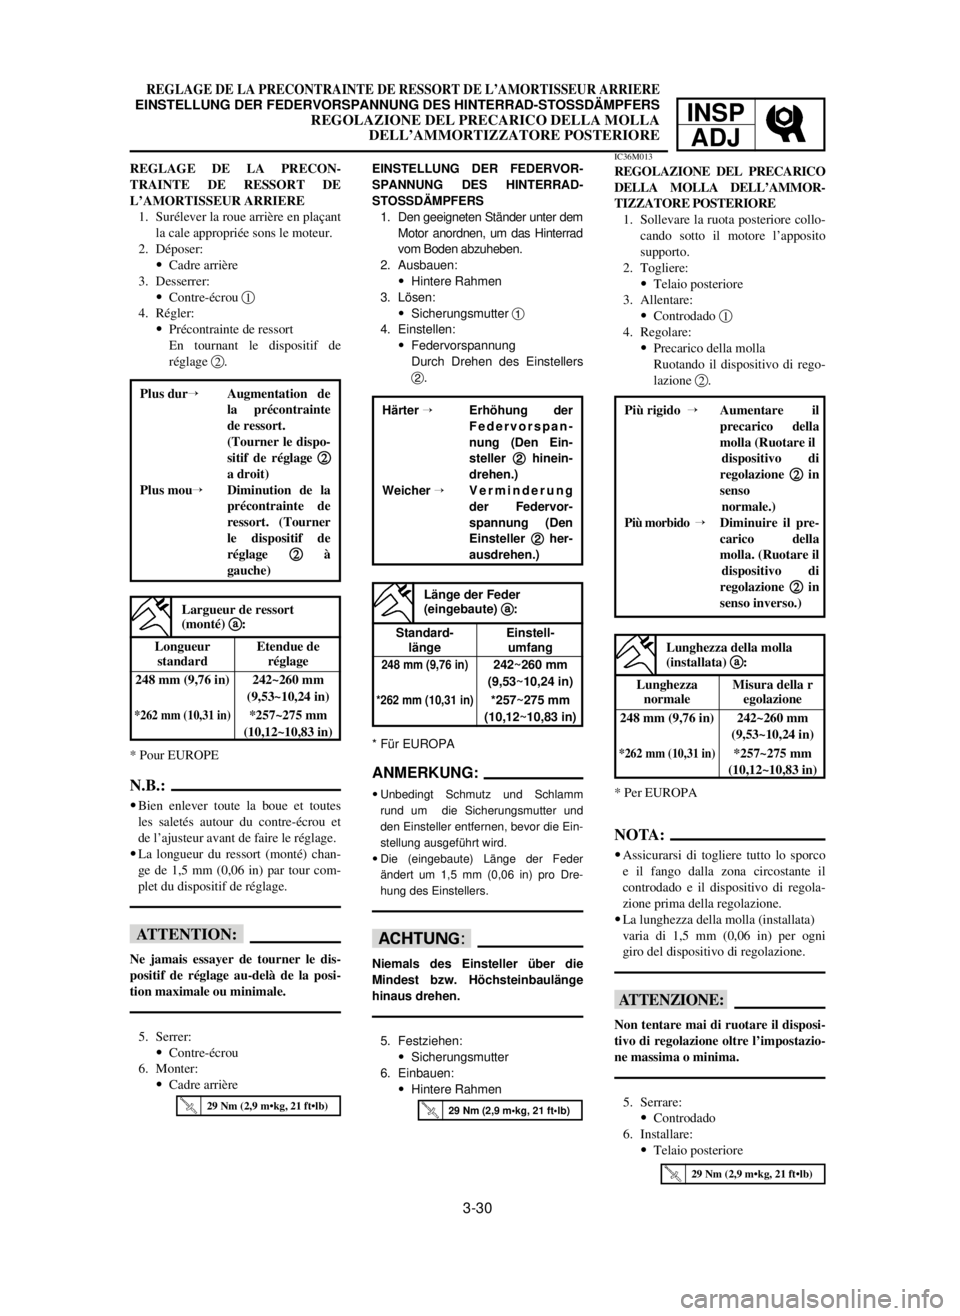
3-30
REGLAGE DE LA PRECONTRAINTE DE RESSORT DE L’AMORTISSEUR ARRIERE
EINSTELLUNG DER FEDERVORSPANNUNG DES HINTERRAD-STOSSDÄMPFERS
REGOLAZIONE DEL PRECARICO DELLA MOLLA
DELL’AMMORTIZZATORE POSTERIOREINSP
ADJ
EINSTELLUNG DER FEDERVOR-
SPANNUNG DES HINTERRAD-
STOSSDÄMPFERS
1. Den geeigneten Ständer unter dem
Motor anordnen, um das Hinterrad
vom Boden abzuheben.
2. Ausbauen:
9Hintere Rahmen
3. Lösen:
9Sicherungsmutter 1
4. Einstellen:
9Federvorspannung
Durch Drehen des Einstellers
2.
ANMERKUNG:
9Unbedingt Schmutz und Schlamm
rund um die Sicherungsmutter und
den Einsteller entfernen, bevor die Ein-
stellung ausgeführt wird.
9Die (eingebaute) Länge der Feder
ändert um 1,5 mm (0,06 in) pro Dre-
hung des Einstellers.
dD
Niemals des Einsteller über die
Mindest bzw. Höchsteinbaulänge
hinaus drehen.
5. Festziehen:
9Sicherungsmutter
6. Einbauen:
9Hintere Rahmen
IC36M013
REGOLAZIONE DEL PRECARICO
DELLA MOLLA DELL’AMMOR-
TIZZATORE POSTERIORE
1. Sollevare la ruota posteriore collo-
cando sotto il motore l’apposito
supporto.
2. Togliere:
9Telaio posteriore
3. Allentare:
9Controdado 1
4. Regolare:
9Precarico della molla
Ruotando il dispositivo di rego-
lazione 2.
NOTA:
9Assicurarsi di togliere tutto lo sporco
e il fango dalla zona circostante il
controdado e il dispositivo di regola-
zione prima della regolazione.
9La lunghezza della molla (installata)
varia di 1,5 mm (0,06 in) per ogni
giro del dispositivo di regolazione.
iI
Non tentare mai di ruotare il disposi-
tivo di regolazione oltre l’impostazio-
ne massima o minima.
5. Serrare:
9Controdado
6. Installare:
9Telaio posteriore REGLAGE DE LA PRECON-
TRAINTE DE RESSORT DE
L’AMORTISSEUR ARRIERE
1. Surélever la roue arrière en plaçant
la cale appropriée sons le moteur.
2. Déposer:
9Cadre arrière
3. Desserrer:
9Contre-écrou 1
4. Régler:
9Précontrainte de ressort
En tournant le dispositif de
réglage 2.
N.B.:
9Bien enlever toute la boue et toutes
les saletés autour du contre-écrou et
de l’ajusteur avant de faire le réglage.
9La longueur du ressort (monté) chan-
ge de 1,5 mm (0,06 in) par tour com-
plet du dispositif de réglage.
fF
Ne jamais essayer de tourner le dis-
positif de réglage au-delà de la posi-
tion maximale ou minimale.
5. Serrer:
9Contre-écrou
6. Monter:
9Cadre arrière
Longueur Etendue de standard réglage
248 mm (9,76 in) 242~260 mm
(9,53~10,24 in)
*262 mm (10,31 in) *257~275 mm
(10,12~10,83 in)
Largueur de ressort
(monté) a a
:
Standard- Einstell-länge umfang
248 mm (9,76 in)242~260 mm
(9,53~10,24 in)
*262 mm (10,31 in)*257~275 mm
(10,12~10,83 in)
Länge der Feder
(eingebaute) a a
:
Lunghezza Misura della rnormale egolazione
248 mm (9,76 in) 242~260 mm
(9,53~10,24 in)
*262 mm (10,31 in) *257~275 mm
(10,12~10,83 in)
Lunghezza della molla
(installata) a a
:
Härter ÕErhöhung der
Federvorspan-
nung (Den Ein-
steller 2 2
hinein-
drehen.)
Weicher ÕVerminderung
der Federvor-
spannung (Den
Einsteller 2 2
her-
ausdrehen.)
Plus durÕAugmentation de
la précontrainte
de ressort.
(Tourner le dispo-
sitif de réglage 2 2
a droit)
Plus mouÕDiminution de la
précontrainte de
ressort. (Tourner
le dispositif de
réglage 2 2
à
gauche)
Più rigido ÕAumentare il
precarico della
molla (Ruotare il
dispositivo di
regolazione 2 2
in
senso
normale.)
Più morbido ÕDiminuire il pre-
carico della
molla. (Ruotare il
dispositivo di
regolazione 2 2
in
senso inverso.)
* Pour EUROPE* Für EUROPA
* Per EUROPA
29 Nm (2,9 m•kg, 21 ft•lb)29 Nm (2,9 m•kg, 21 ft•lb)
29 Nm (2,9 m•kg, 21 ft•lb)
5MV-9-30-3B 6/19/00 1:49 PM Page 25
Page 190 of 558

3-31
REAR SHOCK ABSORBER REBOUND DAMPING
FORCE ADJUSTMENTINSP
ADJ
EC36N014
REAR SHOCK ABSORBER REBOUND
DAMPING FORCE ADJUSTMENT
1. Adjust:
9Rebound damping force
By turning the adjuster 1.
9STANDARD POSITION:
This is the position which is back by the specif-
ic number of clicks from the fully turned-in posi-
tion. (Which align the punch mark aon the ad-
juster with the punch mark bon the bracket.)
*For EUROPE
cC
Do not force the adjuster past the mini-
mum or maximum extent of adjustment.
The adjuster may be damaged.
Stiffer a a
ÕIncrease the rebound damping
force. (Turn the adjuster 1 1
in.)
Softer b b
ÕDecrease the rebound
damping force. (Turn the ad-
juster 1 1
out.)
Minimum
20 clicks out
(from maximum
position)
Extent of adjustment:
Maximum
Fully turned in
position
Standard position:
About 12 clicks out
*About 10 clicks out
5MV-9-30-3B 6/19/00 1:49 PM Page 26