Acura MDX 2017 Navigation Manual
Manufacturer: ACURA, Model Year: 2017, Model line: MDX, Model: Acura MDX 2017Pages: 369, PDF Size: 29.59 MB
Page 81 of 369
80
MapMap Legend
System Setup
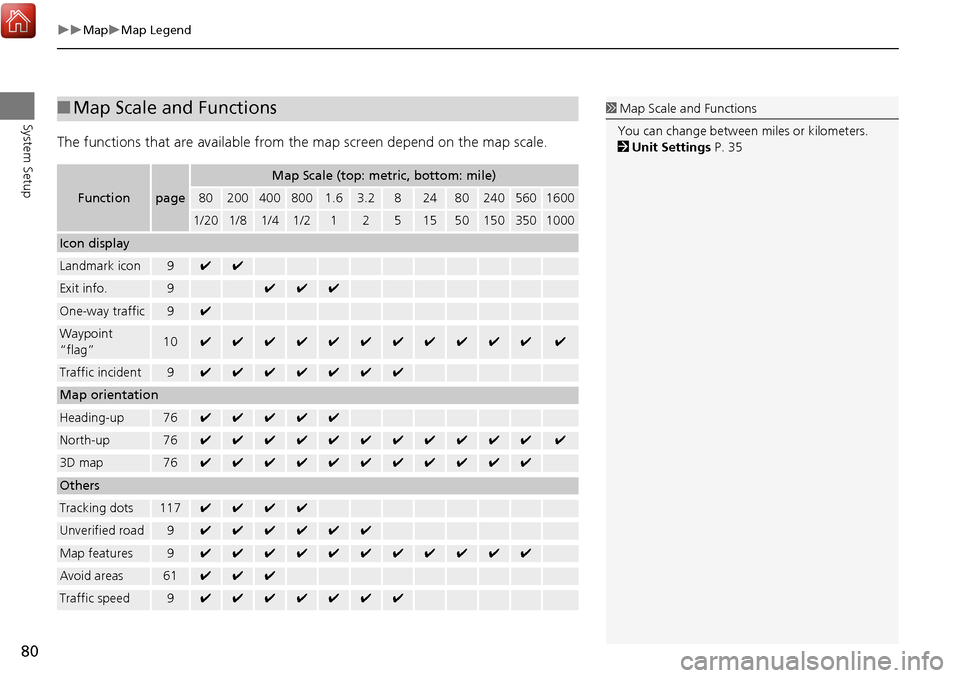
The functions that are available from the map screen depend on the map scale.
■Map Scale and Functions
Functionpage
Map Scale (top: metric, bottom: mile)
802004008001.63.2824802405601600
1/201/81/41/212515501503501000
Icon display
Landmark icon9✔✔
Exit info.9✔✔✔
One-way traffic9✔
Waypoint
“flag”10✔✔✔✔✔✔✔✔✔✔✔✔
Traffic incident9✔✔✔✔✔✔✔
Map orientation
Heading-up76✔✔✔✔✔
North-up76✔✔✔✔✔✔✔✔✔✔✔✔
3D map76✔✔✔✔✔✔✔✔✔✔✔
Others
Tracking dots117✔✔✔✔
Unverified road9✔✔✔✔✔✔
Map features9✔✔✔✔✔✔✔✔✔✔✔
Avoid areas61✔✔✔
Traffic speed9✔✔✔✔✔✔✔
1 Map Scale and Functions
You can change between miles or kilometers.
2 Unit Settings P. 35
Page 82 of 369
81
MapMap Legend
System Setup
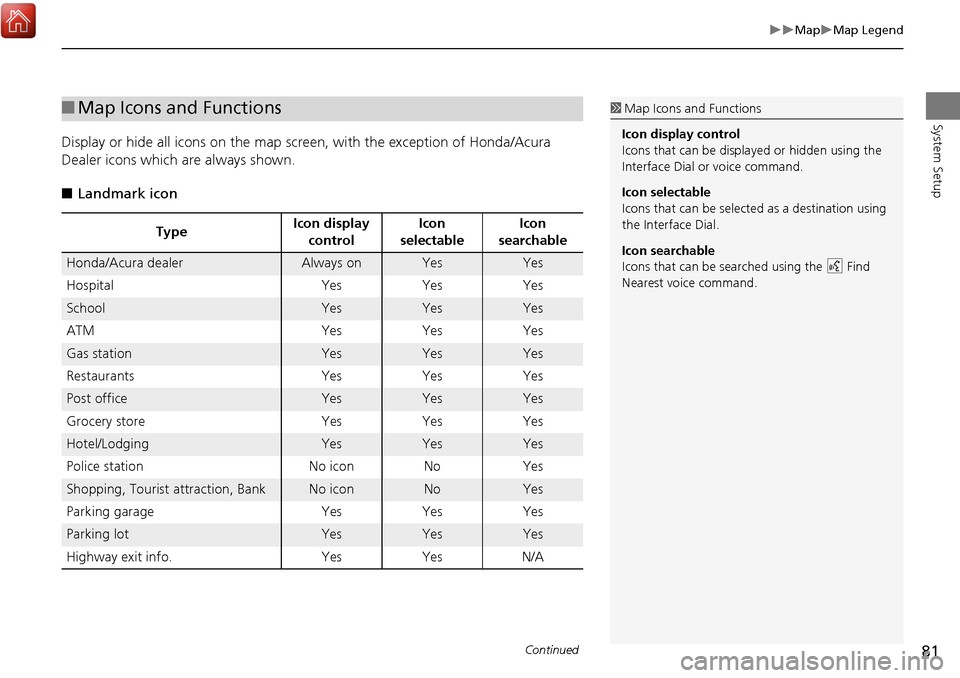
Display or hide all icons on the map screen, with the exception of Honda/Acura
Dealer icons which are always shown.
■ Landmark icon
■Map Icons and Functions
Type Icon display
control Icon
selectable Icon
searchable
Honda/Acura dealerAlways onYesYes
Hospital YesYes Yes
SchoolYesYesYes
ATM YesYes Yes
Gas stationYesYesYes
Restaurants YesYes Yes
Post officeYesYesYes
Grocery store YesYes Yes
Hotel/LodgingYesYesYes
Police station No iconNoYes
Shopping, Tourist attraction, BankNo iconNoYes
Parking garage YesYes Yes
Parking lotYesYesYes
Highway exit info. YesYesN/A
1Map Icons and Functions
Icon display control
Icons that can be displa yed or hidden using the
Interface Dial or voice command.
Icon selectable
Icons that can be selected as a destination using
the Interface Dial.
Icon searchable
Icons that can be searched using the d Find
Nearest voice command.
Continued
Page 83 of 369
82
MapMap Legend
System Setup
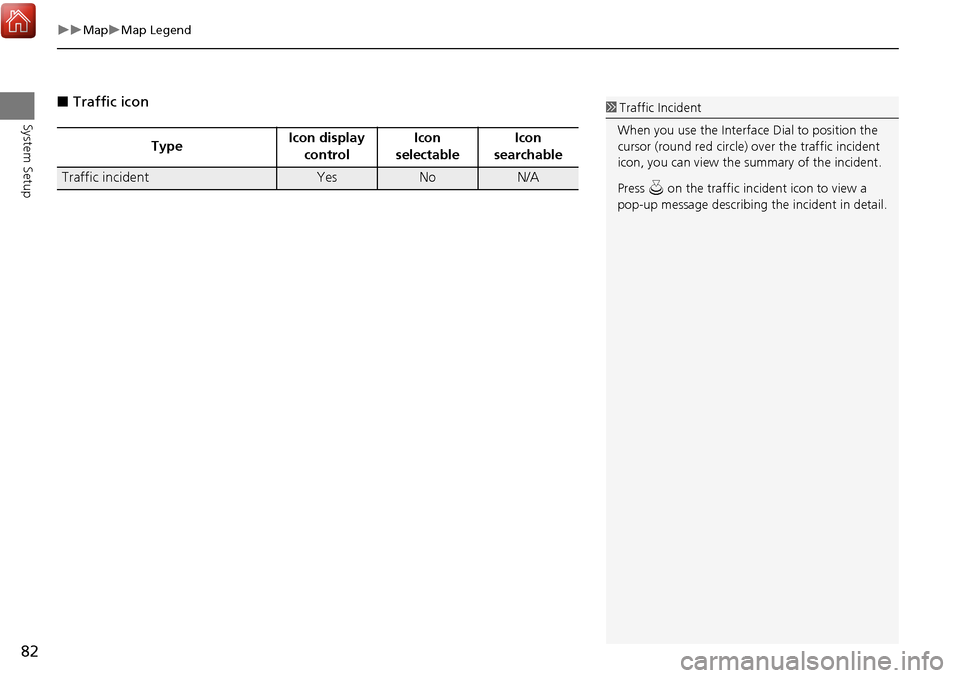
■Traffic icon
Type Icon display
control Icon
selectable Icon
searchable
Traffic incidentYesNoN/A
1 Traffic Incident
When you use the Interface Dial to position the
cursor (round red circle) ov er the traffic incident
icon, you can view the summary of the incident.
Press u on the traffic incident icon to view a
pop-up message describing the incident in detail.
Page 84 of 369
83
MapDisplay Tracking
System Setup
Display Tracking
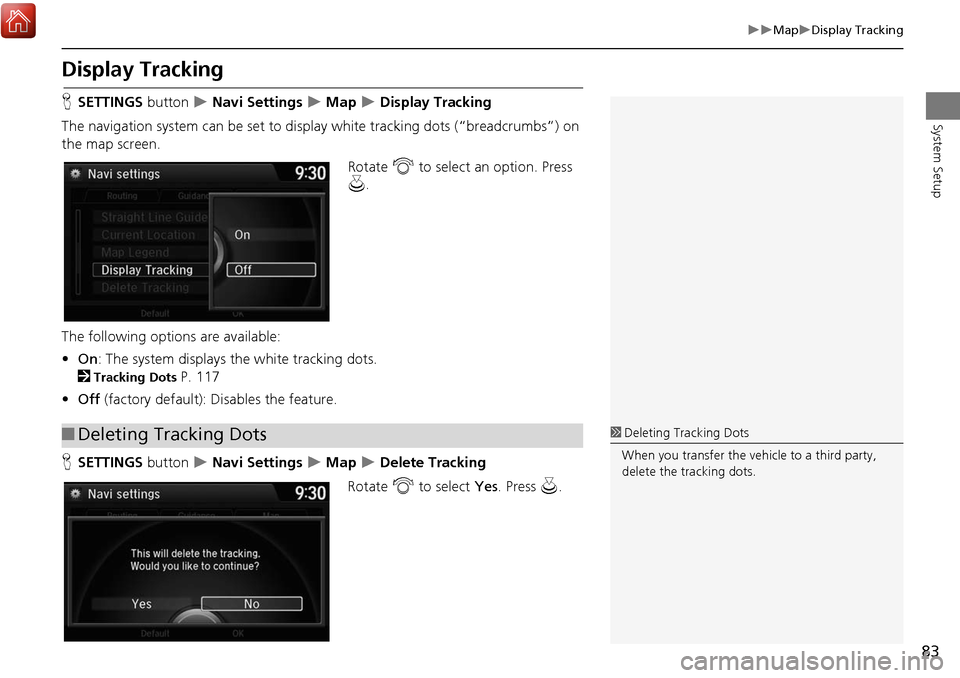
HSETTINGS button Navi Settings Map Display Tracking
The navigation system can be set to di splay white tracking dots (“breadcrumbs”) on
the map screen.
Rotate i to select an option. Press
u .
The following options are available:
• On : The system displays the white tracking dots.
2
Tracking Dots P. 117
• Off (factory default): Disables the feature.
H SETTINGS button
Navi Settings Map Delete Tracking
Rotate i to select Yes. Press u.
■Deleting Tracking Dots1 Deleting Tracking Dots
When you transfer the vehicle to a third party,
delete the tracking dots.
Page 85 of 369
84
MapCorrect Vehicle Position
System Setup
Correct Vehicle Position
HSETTINGS button Navi Settings Map Correct Vehicle Position
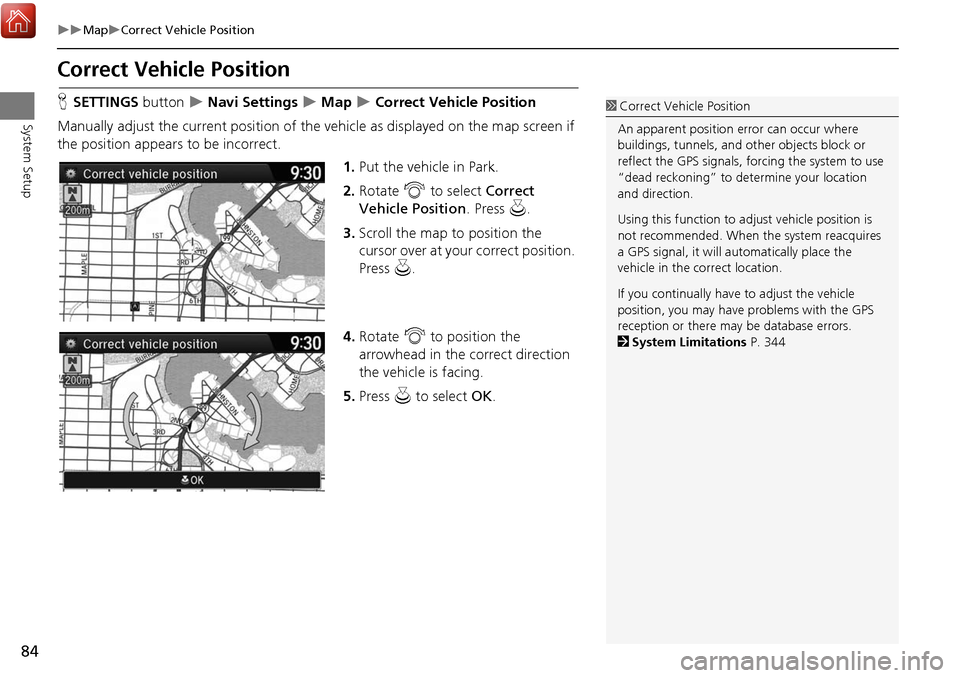
Manually adjust the current position of the vehicle as displayed on the map screen if
the position appear s to be incorrect.
1.Put the vehicle in Park.
2. Rotate i to select Correct
Vehicle Position . Press u.
3. Scroll the map to position the
cursor over at your correct position.
Press u.
4. Rotate i to position the
arrowhead in the correct direction
the vehicle is facing.
5. Press u to select OK.1Correct Vehicle Position
An apparent position error can occur where
buildings, tunnels, and ot her objects block or
reflect the GPS signals, forcing the system to use
“dead reckoning” to determine your location
and direction.
Using this function to ad just vehicle position is
not recommended. When the system reacquires
a GPS signal, it will automatically place the
vehicle in the correct location.
If you continually have to adjust the vehicle
position, you may have problems with the GPS
reception or there may be database errors.
2 System Limitations P. 344
Page 86 of 369
85
System Setup
Data Reset
Defaulting All the Settings
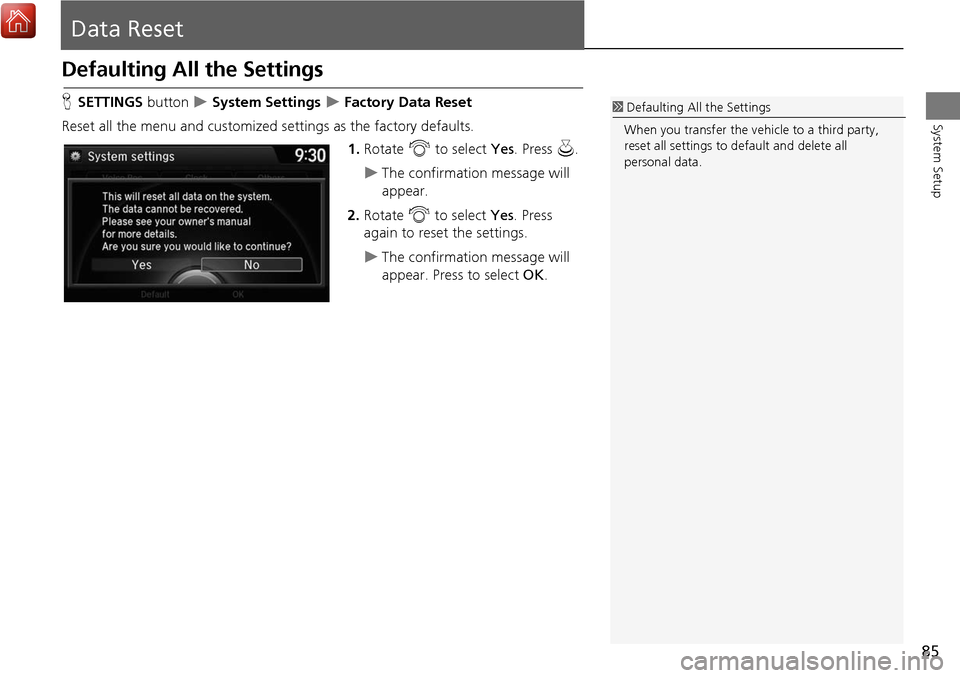
HSETTINGS button System Settings Factory Data Reset
Reset all the menu and customized settings as the factory defaults. 1.Rotate i to select Yes. Press u.
The confirmation message will
appear.
2. Rotate i to select Yes. Press
again to reset the settings.
The confirmation message will
appear. Press to select OK.
1Defaulting All the Settings
When you transfer the vehicle to a third party,
reset all settings to default and delete all
personal data.
Page 87 of 369
86
System Setup
On Demand Multi-Use Display™
Changing the Screen Settings
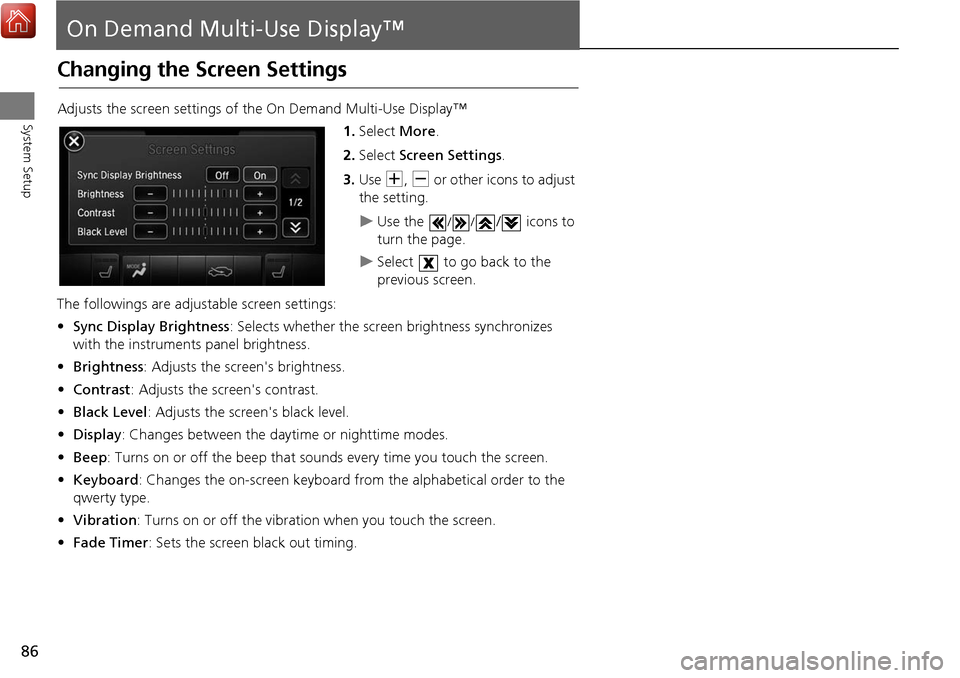
Adjusts the screen settings of the On Demand Multi-Use Display™1.Select More.
2. Select Screen Settings .
3. Use N, B or other icons to adjust
the setting.
Use the /// icons to
turn the page.
Select to go back to the
previous screen.
The followings are adju stable screen settings:
• Sync Display Brightness : Selects whether the screen brightness synchronizes
with the instruments panel brightness.
• Brightness: Adjusts the screen's brightness.
• Contrast : Adjusts the screen's contrast.
• Black Level : Adjusts the screen's black level.
• Display : Changes between the daytime or nighttime modes.
• Beep: Turns on or off the beep that sounds every time you touch the screen.
• Keyboard : Changes the on-screen keyboard fro m the alphabetical order to the
qwerty type.
• Vibration : Turns on or off the vibration when you touch the screen.
• Fade Timer : Sets the screen black out timing.
Page 88 of 369
87
Navigation
This section describes how to enter a destination, select a route to take,
and follow the route to your destination. It also describes how to change your route or destination along the way.
Entering a Destination........................... 88
Address ................................................. 90
Address Book ......................................... 96
Previous Destination ............................... 97
Place Category ....................................... 98
Local Search ......................................... 100
Place Name .......................................... 102
Place Phone Number ............................ 105
Download POI ...................................... 106
Scenic Route ........................................ 107
Intersection .......................................... 108
Map Input............................................ 109
Coordinate .......................................... 111 Calculating the Route
............................112
Viewing the Routes ...............................113
Driving to Your Destination .................114
Viewing the Route ................................114
Listening to Voice Guidance ..................118
Reaching a Waypoint ............................119
Map Menu ..............................................120
Displaying the Map Menu .....................120
Hide Traffic Flow ...................................122
Directions .............................................123
Traffic Rerouting™................................125
Changing Your Route ............................127
Pausing the Route .................................128
Canceling the Route .............................128 Adding Waypoints ............................... 129
Editing the Destination List ................... 133
Taking a Detour ................................... 135
Avoiding Streets ................................... 135
Changing Your Destination ................. 136
Find Nearest Place ................................ 136
Selecting a Destination on the Map ...... 137
Entering a New Destination .................. 138
Resuming Your Trip .............................. 139
Page 89 of 369
88
Navigation
Entering a Destination
HMENU button (on map)
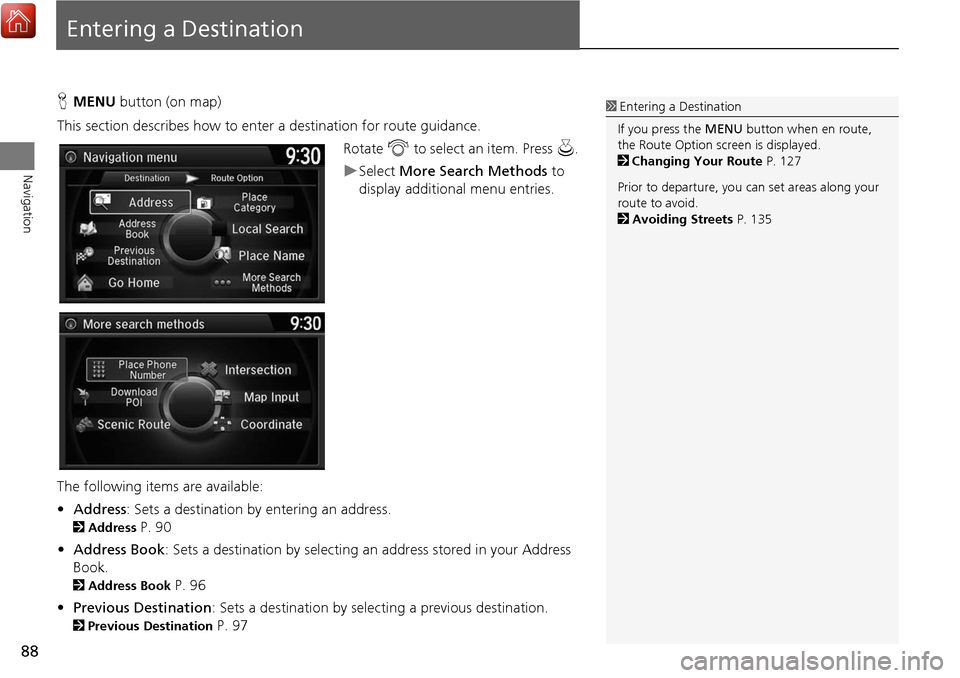
This section describes how to enter a destination for route guidance. Rotate i to select an item. Press u .
Select More Search Methods to
display additional menu entries.
The following item s are available:
• Address : Sets a destination by entering an address.
2Address P. 90
• Address Book: Sets a destination by selecting an address stored in your Address
Book.
2 Address Book P. 96
• Previous Destination : Sets a destination by select ing a previous destination.
2Previous Destination P. 97
1Entering a Destination
If you press the MENU button when en route,
the Route Option screen is displayed.
2 Changing Your Route P. 127
Prior to departure, you can set areas along your
route to avoid.
2 Avoiding Streets P. 135
Page 90 of 369
89
Entering a Destination
Navigation
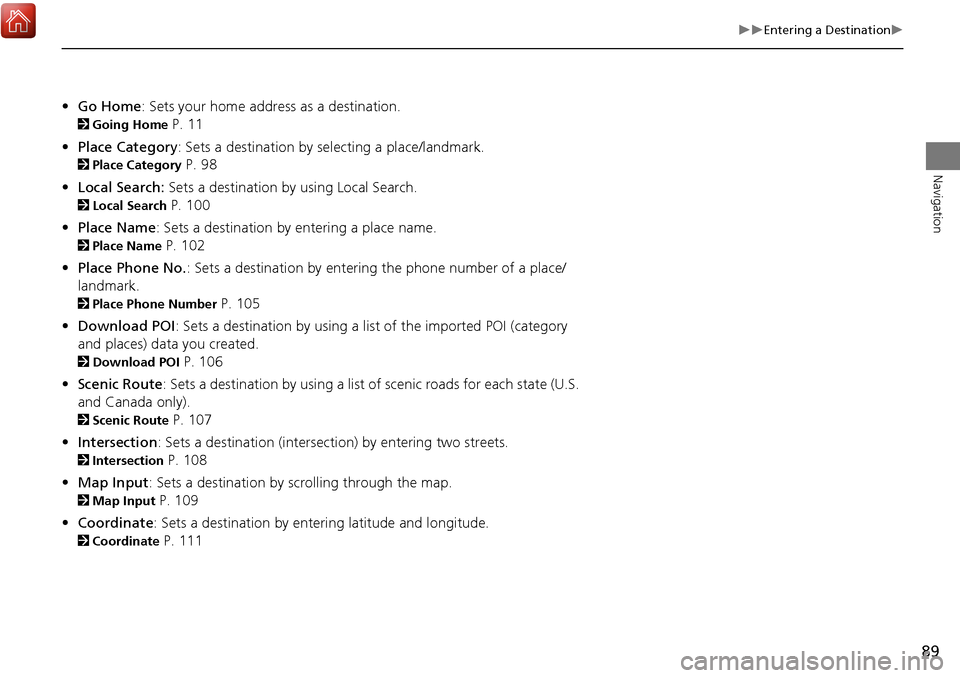
•Go Home : Sets your home address as a destination.
2Going Home P. 11
• Place Category : Sets a destination by selecting a place/landmark.
2Place Category P. 98
• Local Search: Sets a destination by using Local Search.
2Local Search P. 100
• Place Name : Sets a destination by entering a place name.
2Place Name P. 102
• Place Phone No. : Sets a destination by entering the phone number of a place/
landmark.
2 Place Phone Number P. 105
• Download POI: Sets a destination by using a lis t of the imported POI (category
and places) data you created.
2 Download POI P. 106
• Scenic Route : Sets a destination by using a list of scenic roads for each state (U.S.
and Canada only).
2 Scenic Route P. 107
• Intersection : Sets a destination (intersection) by entering two streets.
2Intersection P. 108
• Map Input : Sets a destination by scrolling through the map.
2Map Input P. 109
• Coordinate: Sets a destination by entering latitude and longitude.
2 Coordinate P. 111