ACURA NSX 1991 Service Repair Manual
Manufacturer: ACURA, Model Year: 1991, Model line: NSX, Model: ACURA NSX 1991Pages: 1640, PDF Size: 60.48 MB
Page 1201 of 1640
Description
Lock-up System (cont'd)
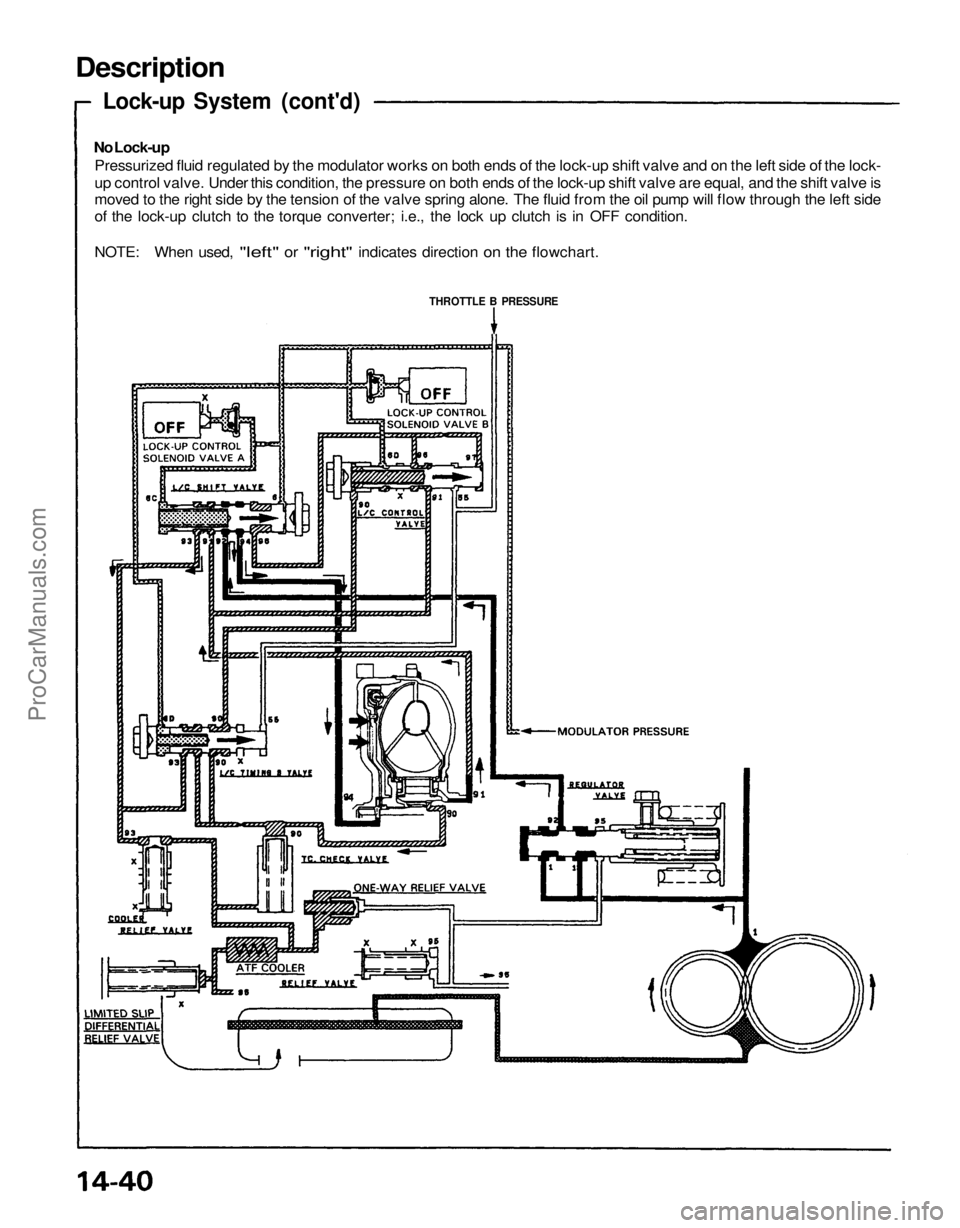
No Lock-up
Pressurized fluid regulated by the modulator works on both ends of the lock-up shift valve and on the left side of the lock-
up control valve. Under this condition, the pressure on both ends of the lock-up shift valve are equal, and the shift valve is
moved to the right side by the tension of the valve spring alone. The fluid from the oil pump will flow through the left side
of the lock-up clutch to the torque converter; i.e., the lock up clutch is in OFF condition.
NOTE: When used,
"left"
or
"right"
indicates direction
on the
flowchart.
THROTTLE B PRESSUREProCarManuals.com
Page 1202 of 1640
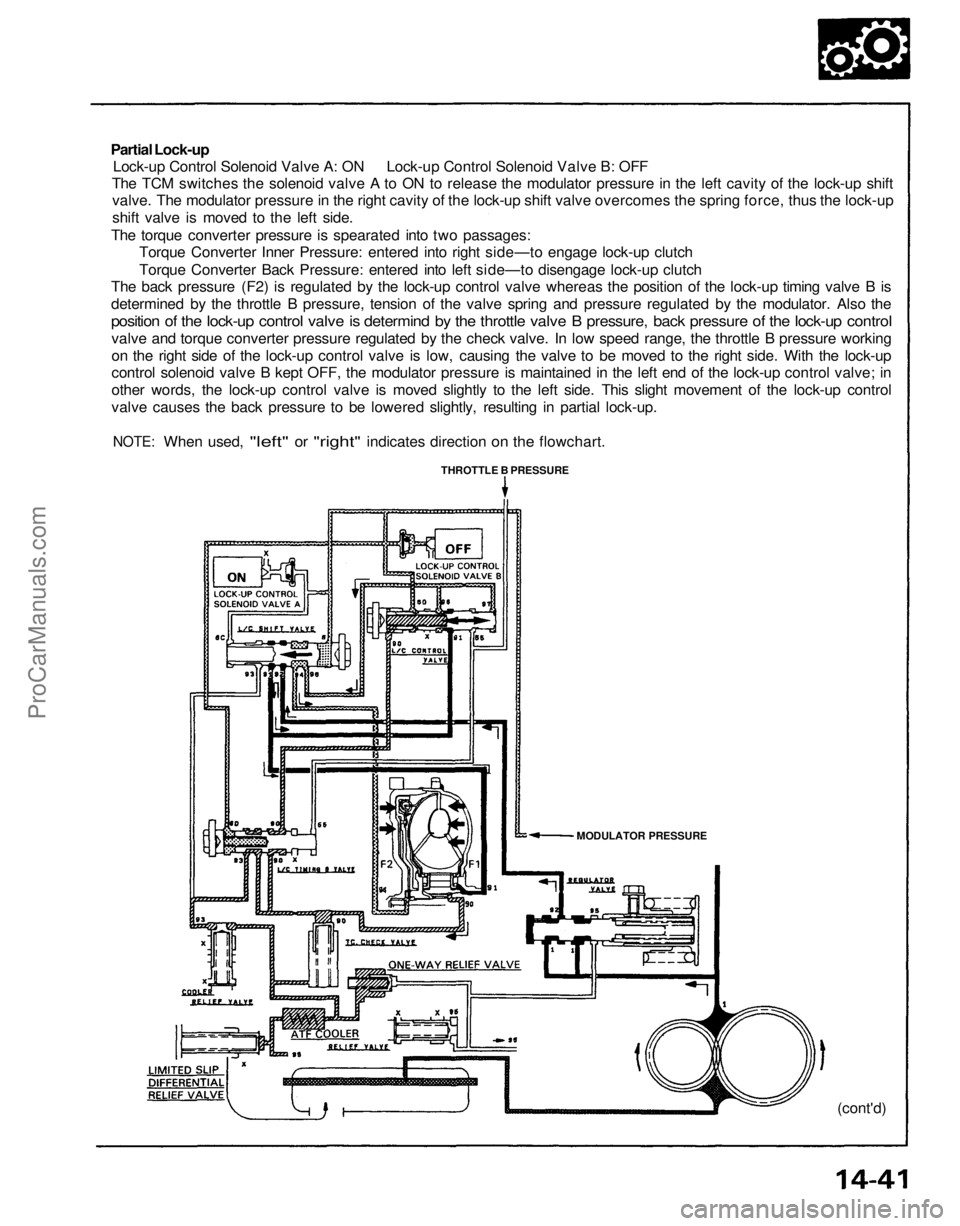
Partial Lock-up
Lock-up Control Solenoid Valve A: ON Lock-up Control Solenoid Valve B: OFF
The TCM switches the solenoid valve A to ON to release the modulator pressure in the left cavity of the lock-up shift
valve. The modulator pressure in the right cavity of the lock-up shift valve overcomes the spring force, thus the lock-up
shift valve is moved to the left side.
The torque converter pressure is spearated into two passages:
Torque Converter Inner Pressure: entered into right side—to engage lock-up clutch
Torque Converter Back Pressure: entered into left side—to disengage lock-up clutch
The back pressure (F2) is regulated by the lock-up control valve whereas the position of the lock-up timing valve B is
determined by the throttle B pressure, tension of the valve spring and pressure regulated by the modulator. Also the
position of the lock-up control valve is determind by the throttle valve B pressure, back pressure of the lock-up control
valve and torque converter pressure regulated by the check valve. In low speed range, the throttle B pressure working
on the right side of the lock-up control valve is low, causing the valve to be moved to the right side. With the lock-up
control solenoid valve B kept OFF, the modulator pressure is maintained in the left end of the lock-up control valve; in
other words, the lock-up control valve is moved slightly to the left side. This slight movement of the lock-up control
valve causes the back pressure to be lowered slightly, resulting in partial lock-up.
NOTE:
When used,
"left"
or
"right"
indicates direction
on the
flowchart.
THROTTLE B PRESSURE
MODULATOR PRESSURE
(cont'd)ProCarManuals.com
Page 1203 of 1640
Description
Lock-up System (cont'd)
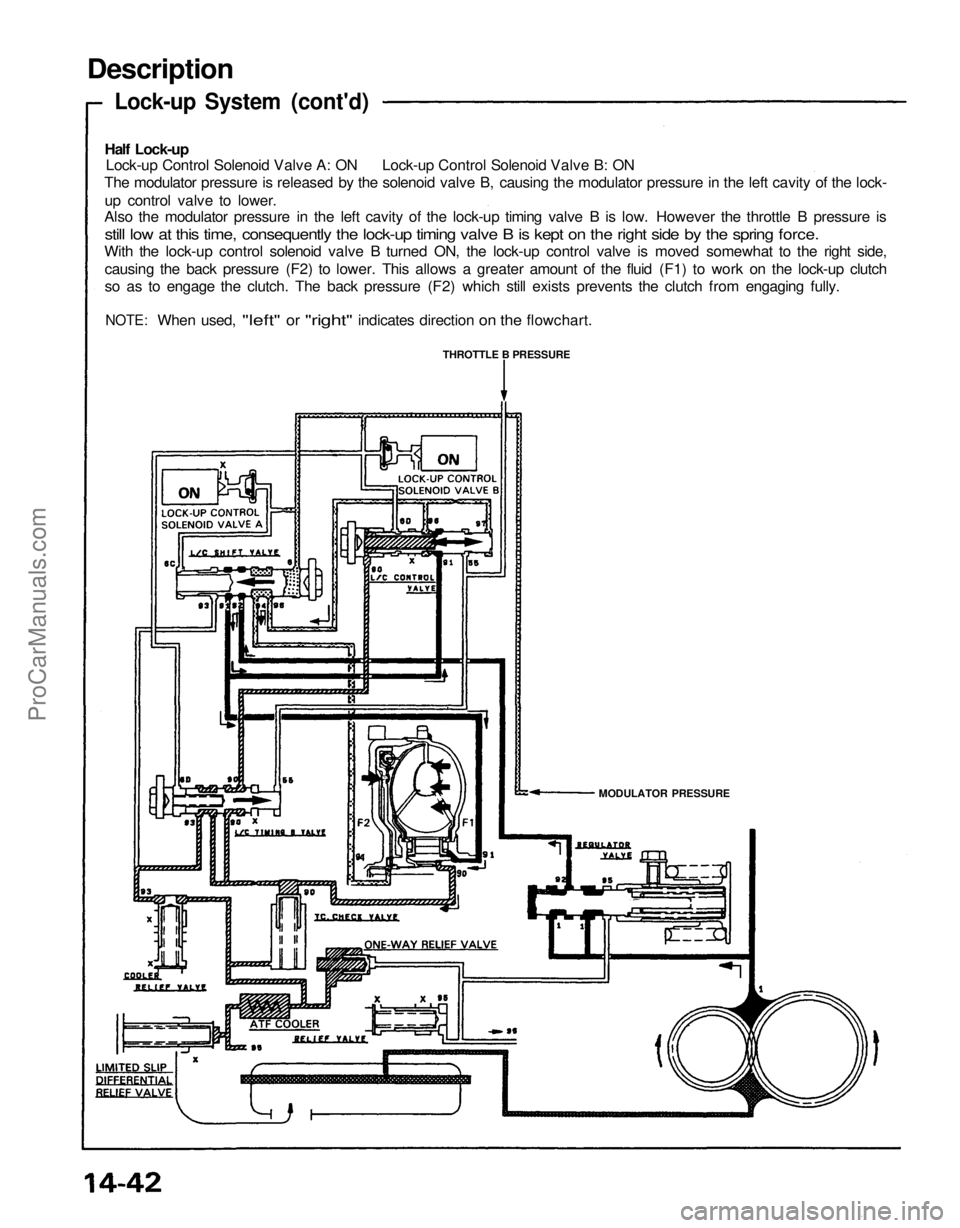
Half Lock-up
Lock-up Control Solenoid Valve A: ON Lock-up Control Solenoid Valve B: ON
The modulator pressure is released by the solenoid valve B, causing the modulator pressure in the left cavity of the lock-
up control valve to lower.
Also the modulator pressure in the left cavity of the lock-up timing valve B is low. However the throttle B pressure is
still low at this time, consequently the lock-up timing valve B is kept on the right side by the spring force.
With the lock-up control solenoid valve B turned ON, the lock-up control valve is moved somewhat to the right side,
causing the back pressure (F2) to lower. This allows a greater amount of the fluid (F1) to work on the lock-up clutch
so as to engage the clutch. The back pressure (F2) which still exists prevents the clutch from engaging fully.
NOTE:
When used,
"left"
or
"right"
indicates direction
on the
flowchart.
MODULATOR PRESSURE
THROTTLE B PRESSUREProCarManuals.com
Page 1204 of 1640
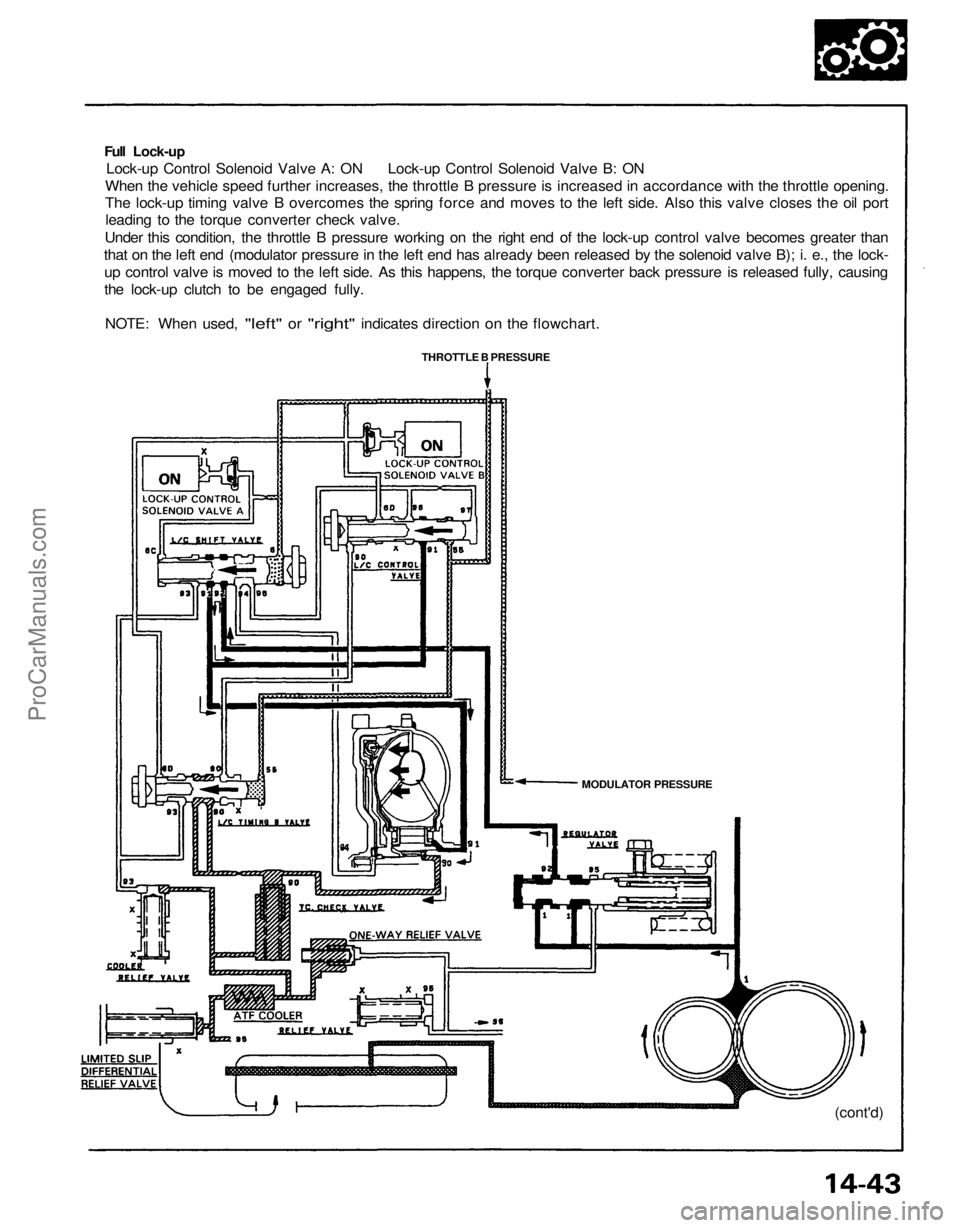
Full Lock-up
Lock-up Control Solenoid Valve A: ON Lock-up Control Solenoid Valve B: ON
When the vehicle speed further increases, the throttle B pressure is increased in accordance with the throttle opening.
The lock-up timing valve B overcomes the spring force and moves to the left side. Also this valve closes the oil port
leading to the torque converter check valve.
Under this condition, the throttle B pressure working on the right end of the lock-up control valve becomes greater than
that on the left end (modulator pressure in the left end has already been released by the solenoid valve B); i. e., the lock-
up control valve is moved to the left side. As this happens, the torque converter back pressure is released fully, causing
the lock-up clutch to be engaged fully.
NOTE: When used,
"left"
or
"right"
indicates direction
on the
flowchart.
MODULATOR PRESSURE
(cont'd)
THROTTLE B PRESSUREProCarManuals.com
Page 1205 of 1640
Description
Lock-up System (cont'd)
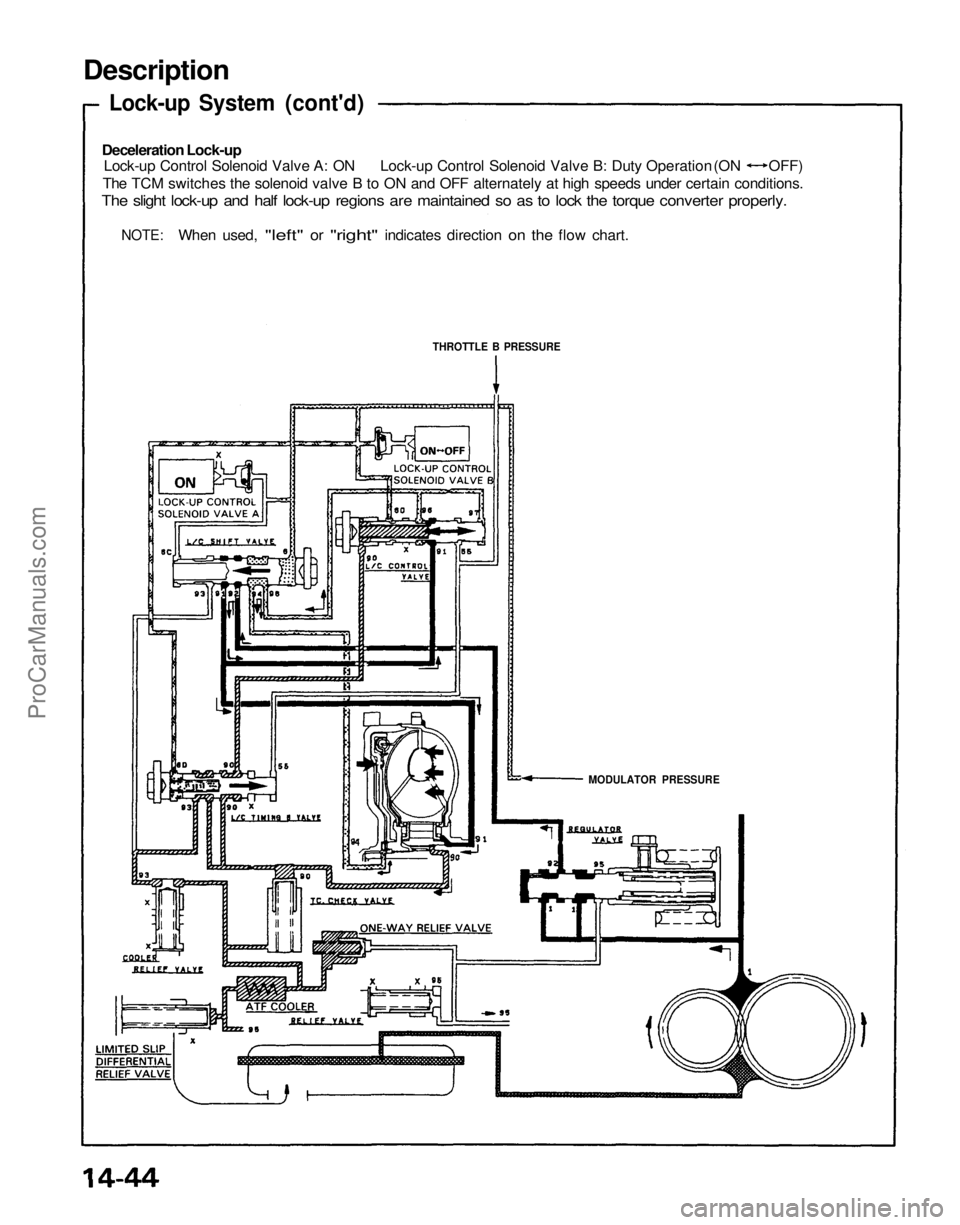
Deceleration Lock-up
Lock-up Control Solenoid Valve A: ON Lock-up Control Solenoid Valve B: Duty Operation (ON OFF)
The TCM switches the solenoid valve B to ON and OFF alternately at high speeds under certain conditions.
The slight lock-up and half lock-up regions are maintained so as to lock the torque converter properly.
NOTE:
When used,
"left"
or
"right"
indicates direction
on the
flow chart.
MODULATOR PRESSURE
THROTTLE B PRESSUREProCarManuals.com
Page 1206 of 1640
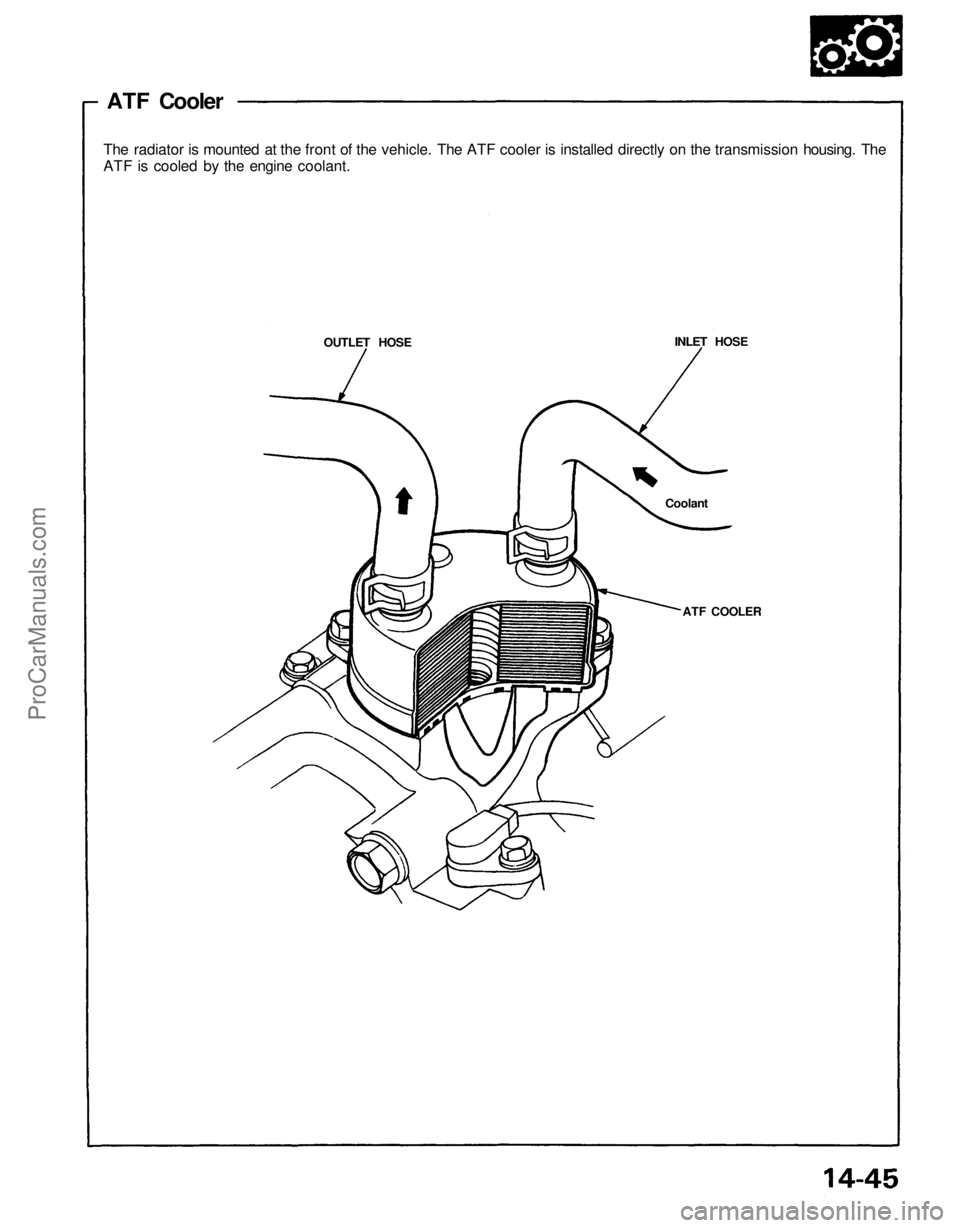
ATF Cooler
The radiator is mounted at the front of the vehicle. The ATF cooler is installed directly on the transmission housing. The
ATF is cooled by the engine coolant.
OUTLET HOSE
INLET HOSE
Coolant
ATF COOLERProCarManuals.com
Page 1207 of 1640
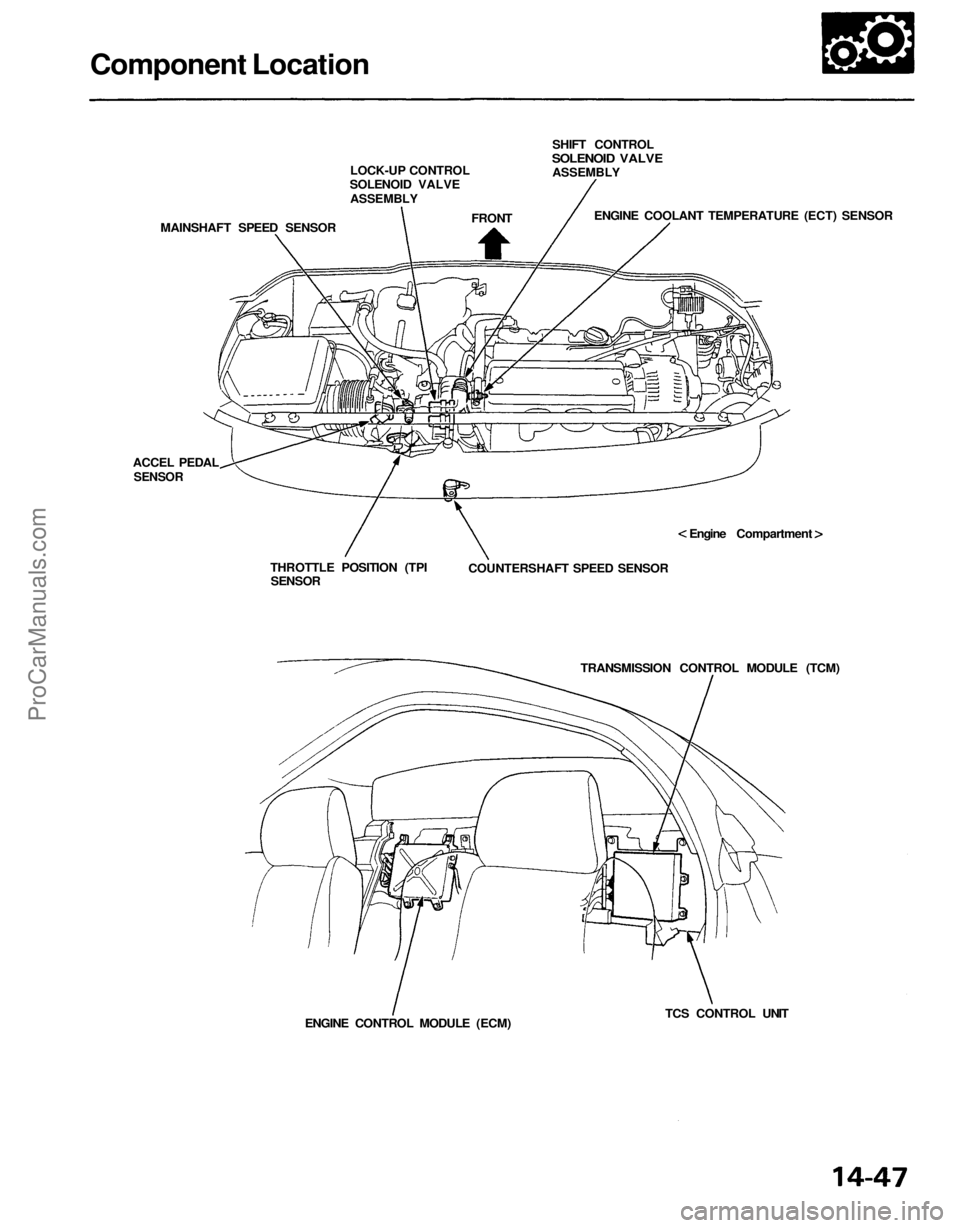
Component Location
LOCK-UP CONTROL
SOLENOID VALVE
ASSEMBLY
MAINSHAFT SPEED SENSOR
FRONT
SHIFT CONTROL
SOLENOID VALVE
ASSEMBLY
ENGINE COOLANT TEMPERATURE (ECT) SENSOR
Engine Compartment
COUNTERSHAFT SPEED SENSOR
TRANSMISSION CONTROL MODULE (TCM)
TCS CONTROL UNIT
ENGINE CONTROL MODULE (ECM)
THROTTLE POSITION (TPI
SENSOR
ACCEL PEDAL
SENSORProCarManuals.com
Page 1208 of 1640
Troubleshooting Procedures
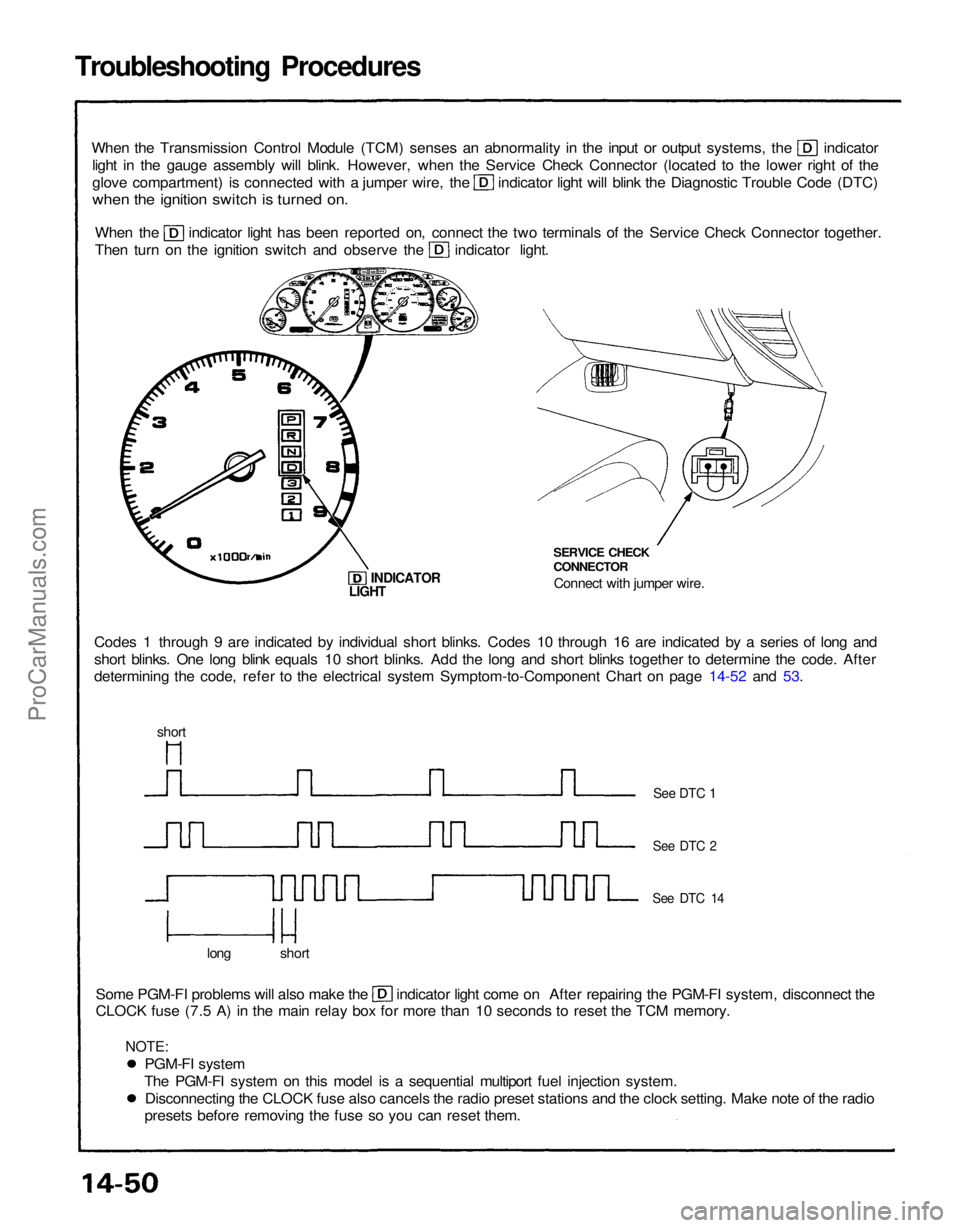
When the Transmission Control Module (TCM) senses an abnormality in the input or output systems, the indicator
light in the gauge assembly will blink. However, when the Service Check Connector (located to the lower right of the glove compartment) is connected with a jumper wire, the indicator light will blink the Diagnostic Trouble Code (DTC)
when the ignition switch is turned on.
When the indicator light has been reported on, connect the two terminals of the Service Check Connector together.
Then turn on the ignition switch and observe the indicator light.
Codes 1 through 9 are indicated by individual short blinks. Codes 10 through 16 are indicated by a series of long and
short blinks. One long blink equals 10 short blinks. Add the long and short blinks together to determine the code. After
determining the code, refer to the electrical system Symptom-to-Component Chart on page 14-52 and 53. SERVICE CHECK
CONNECTOR
Connect with jumper wire.
INDICATOR
Some PGM-FI problems will also make the indicator light come on After repairing the PGM-FI system, disconnect the
CLOCK fuse (7.5 A) in the main relay box for more than 10 seconds to reset the TCM memory.
long short
See DTC 1
See DTC 2
See DTC 14
LIGHT
short
PGM-FI system
The PGM-FI system on this model is a sequential multiport fuel injection system. Disconnecting the CLOCK fuse also cancels the radio preset stations and the clock setting. Make note of the radio
presets before removing the fuse so you can reset them.
NOTE:ProCarManuals.com
Page 1209 of 1640
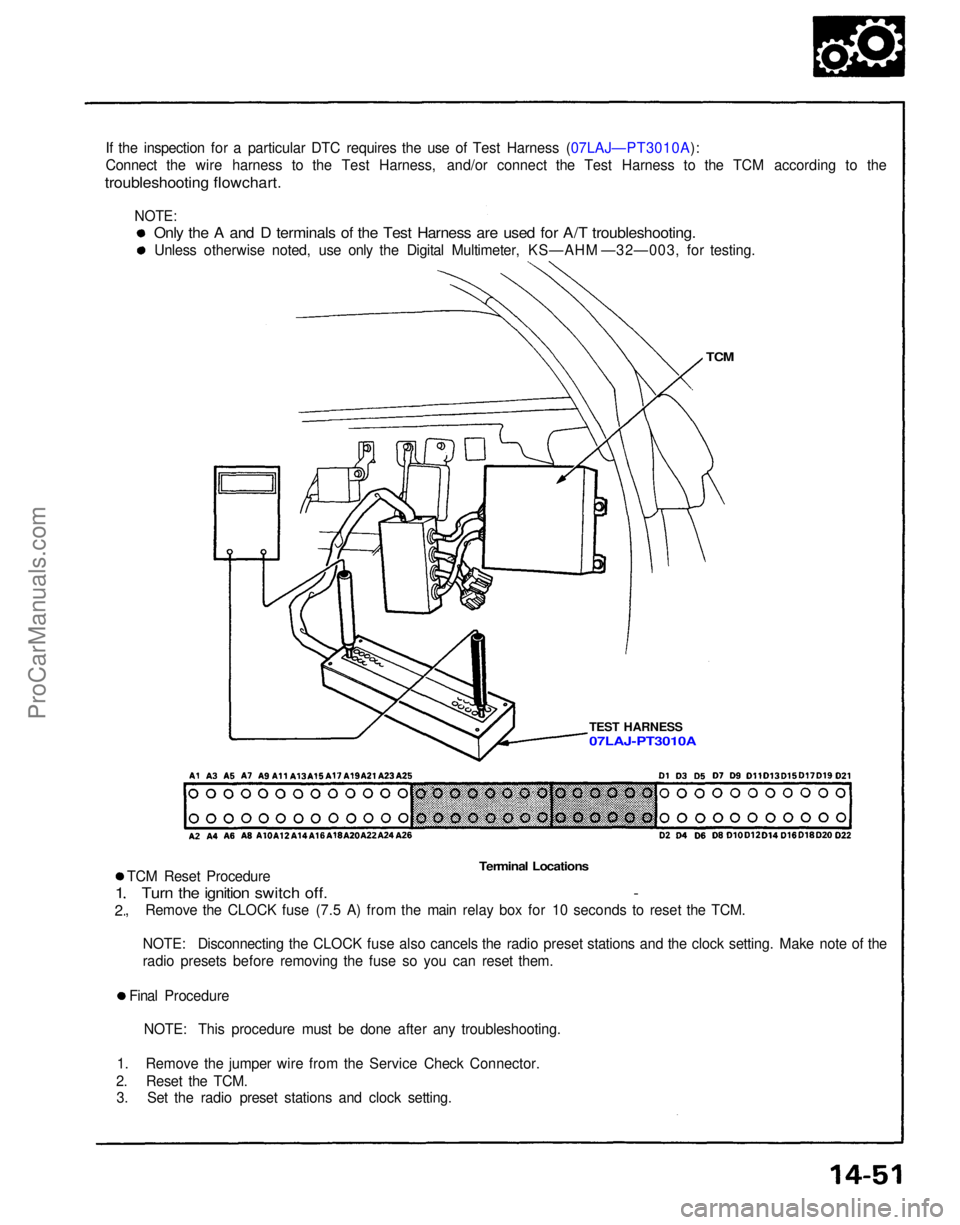
If the inspection for a particular DTC requires the use of Test Harness (07LAJ—PT3010A):
Connect the wire harness to the Test Harness, and/or connect the Test Harness to the TCM according to the
troubleshooting flowchart.
TCM
TEST HARNESS
Terminal Locations
TCM Reset Procedure
Turn the ignition switch off. -
, Remove the CLOCK fuse (7.5 A) from the main relay box for 10 seconds to reset the TCM.
1
2
NOTE: Disconnecting the CLOCK fuse also cancels the radio preset stations and the clock setting. Make note of the
radio presets before removing the fuse so you can reset them.
Final Procedure NOTE: This procedure must be done after any troubleshooting.
1. Remove the jumper wire from the Service Check Connector.
2. Reset the TCM. 3. Set the radio preset stations and clock setting.
Only the A and D terminals of the Test Harness are used for A/T troubleshooting.
Unless otherwise noted, use only the Digital Multimeter, KS—AHM —32—003, for testing.
07LAJ-PT3010A
NOTE:ProCarManuals.com
Page 1210 of 1640
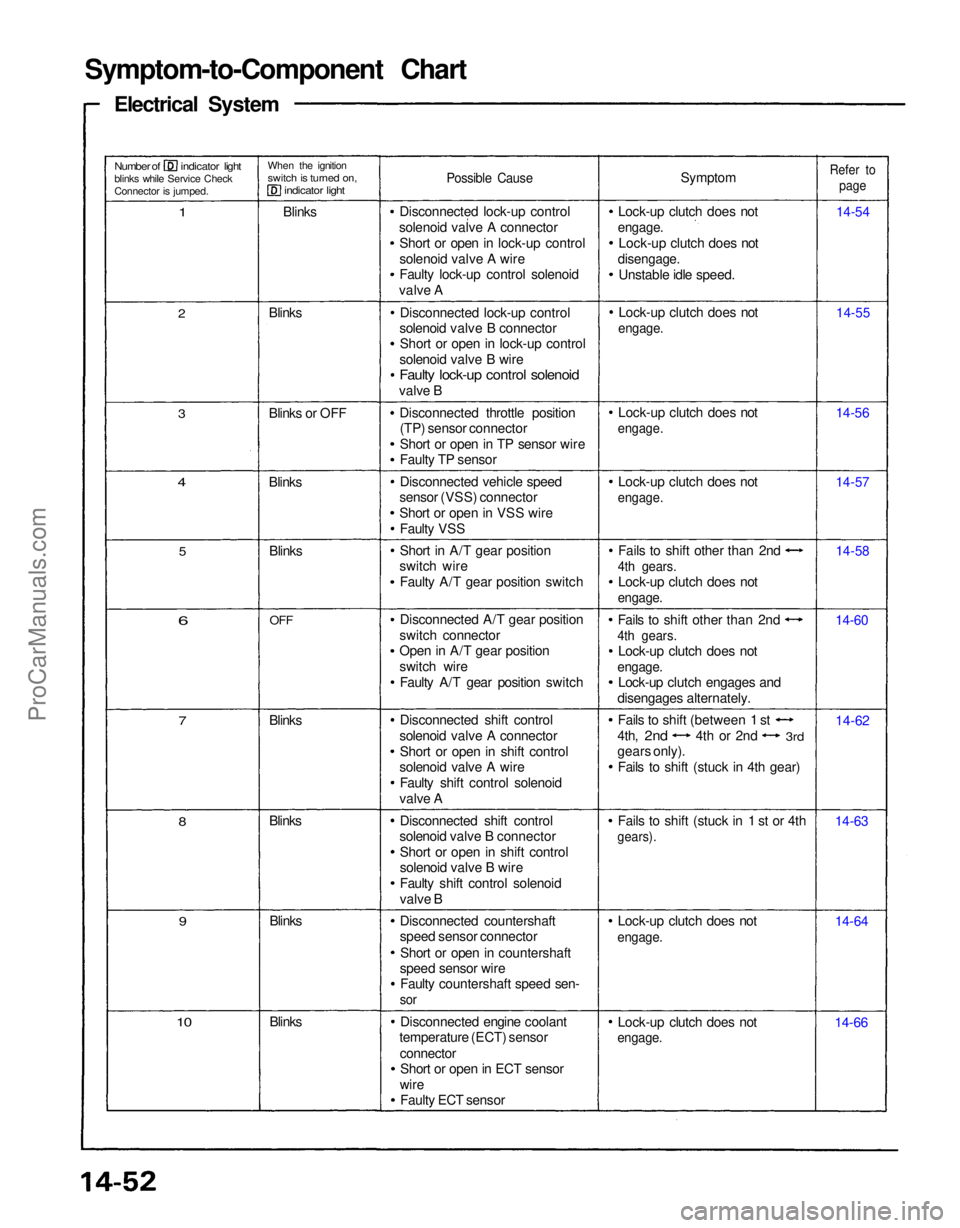
Symptom-to-Component Chart
Electrical System
Number of indicator light
blinks while Service Check
Connector is jumped.
When the ignition
switch is turned on,
indicator light
1
Blinks
Possible Cause
Symptom
Lock-up clutch does not
engage.
Lock-up clutch does not
disengage.
Unstable idle speed.
Refer to
page
14-54
14-55
14-56
14-57
14-58
14-60
14-62
14-63
14-64
14-66
Lock-up clutch does not
engage.
Lock-up clutch does not
engage.
Fails to shift (stuck in 1 st or 4th
gears).
Fails to shift other than 2nd
4th gears.
Lock-up clutch does not
engage.
Lock-up clutch engages and
disengages alternately. Fails to shift other than 2nd
4th gears.
Lock-up clutch does not
engage.
Lock-up clutch does not
engage.
Lock-up clutch does not
engage.
Lock-up clutch does not
engage.
Disconnected lock-up control
solenoid valve A connector Short or open in lock-up control
solenoid valve A wire
Faulty lock-up control solenoid
valve A
Disconnected lock-up control
solenoid valve B connector Short or open in lock-up control
solenoid valve B wire
Faulty lock-up control solenoid
valve B
Disconnected throttle position(TP) sensor connector
Short or open in TP sensor wire
Faulty TP sensor
Disconnected vehicle speed
sensor (VSS) connector
Short or open in VSS wire
Faulty VSS
Short in A/T gear position
switch wire
Faulty A/T gear position switch
Disconnected A/T gear position
switch connector
Open in A/T gear position
switch wire Faulty A/T gear position switch
Disconnected shift control
solenoid valve A connector Short or open in shift control
solenoid valve A wire
Faulty shift control solenoid
valve A
Disconnected shift control
solenoid valve B connector
Short or open in shift control
solenoid valve B wire
Faulty shift control solenoid
valve B
Disconnected countershaft
speed sensor connector
Short or open in countershaft
speed sensor wire Faulty countershaft speed sen-
sor
Disconnected engine coolant
temperature (ECT) sensor
connectorShort or open in ECT sensor
wire Faulty ECT sensor
Blinks
10
9
Blinks
Blinks
8
7
Blinks
6
OFF
Blinks
5
4
Blinks
3
Blinks or OFF Blinks
2
Fails to shift (between 1 st
4th,
2nd
4th or 2nd
3rd
gears only).
Fails to shift (stuck in 4th gear)ProCarManuals.com