ACURA NSX 1991 Service Repair Manual
Manufacturer: ACURA, Model Year: 1991, Model line: NSX, Model: ACURA NSX 1991Pages: 1640, PDF Size: 60.48 MB
Page 1161 of 1640
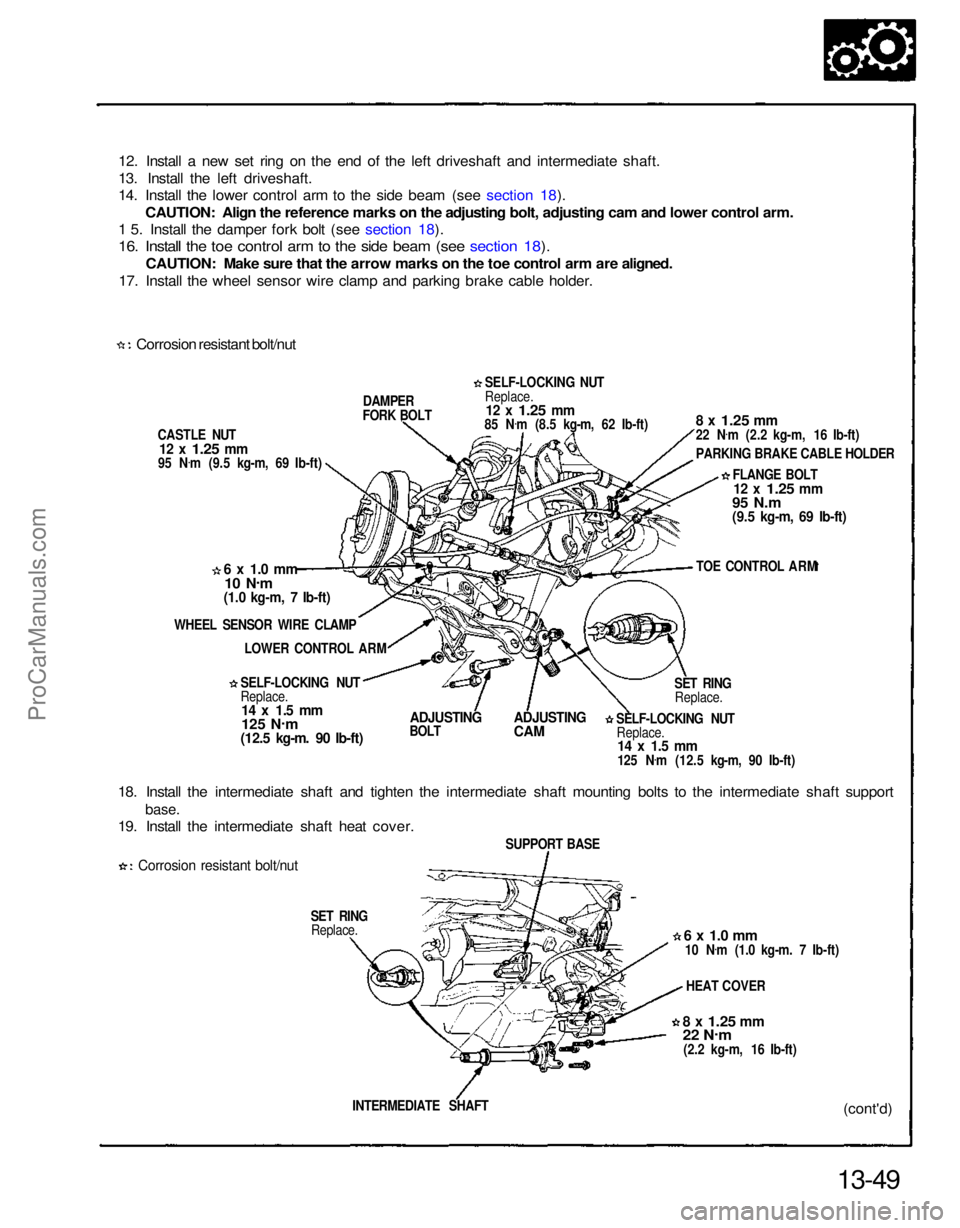
12. Install a new set ring on the end of the left driveshaft and intermediate shaft.
13. Install the left driveshaft.
14. Install the lower control arm to the side beam (see section 18).
CAUTION: Align the reference marks on the adjusting bolt, adjusting cam and lower control arm.
1 5. Install the damper fork bolt (see section 18).
16. Install the toe control arm to the side beam (see section 18).
CAUTION: Make sure that the arrow marks on the toe control arm are aligned.
17. Install the wheel sensor wire clamp and parking brake cable holder.
Corrosion resistant bolt/nut
CASTLE NUT
12 x
1.25
mm
95 N .
m (9.5 kg-m, 69 Ib-ft) DAMPER
FORK BOLT
6 x 1.0 mm
10 N .
m
(1.0 kg-m, 7 Ib-ft)
WHEEL SENSOR WIRE CLAMP LOWER CONTROL ARM
SELF-LOCKING NUT
Replace.
14 x 1.5 mm
125 N .
m
(12.5 kg-m. 90 Ib-ft)
ADJUSTING
BOLT
ADJUSTING
CAM
18. Install the intermediate shaft and tighten the intermediate shaft mounting bolts to the intermediate shaft support
base.
19. Install the intermediate shaft heat cover.
Corrosion resistant bolt/nut
SET RINGReplace.
13-49(cont'd)
INTERMEDIATE SHAFT
8 x
1.25
mm
22 N
.
m
(2.2 kg-m, 16 Ib-ft) HEAT COVER
6 x 1.0 mm
10 N .
m (1.0 kg-m. 7 Ib-ft)
SUPPORT BASE SELF-LOCKING NUT
Replace.
14 x 1.5 mm
125 N .
m (12.5 kg-m, 90 Ib-ft) SET RING
Replace. TOE CONTROL ARM
FLANGE BOLT
12 x
1.25
mm
95 N.m
(9.5 kg-m, 69 Ib-ft)
8 x
1.25
mm
22 N
.
m (2.2 kg-m, 16 Ib-ft)
PARKING BRAKE CABLE HOLDER
SELF-LOCKING NUT
Replace.
12 x
1.25
mm
85 N .
m (8.5 kg-m, 62 Ib-ft)ProCarManuals.com
Page 1162 of 1640
Transmission Assembly
Installation (cont'd)
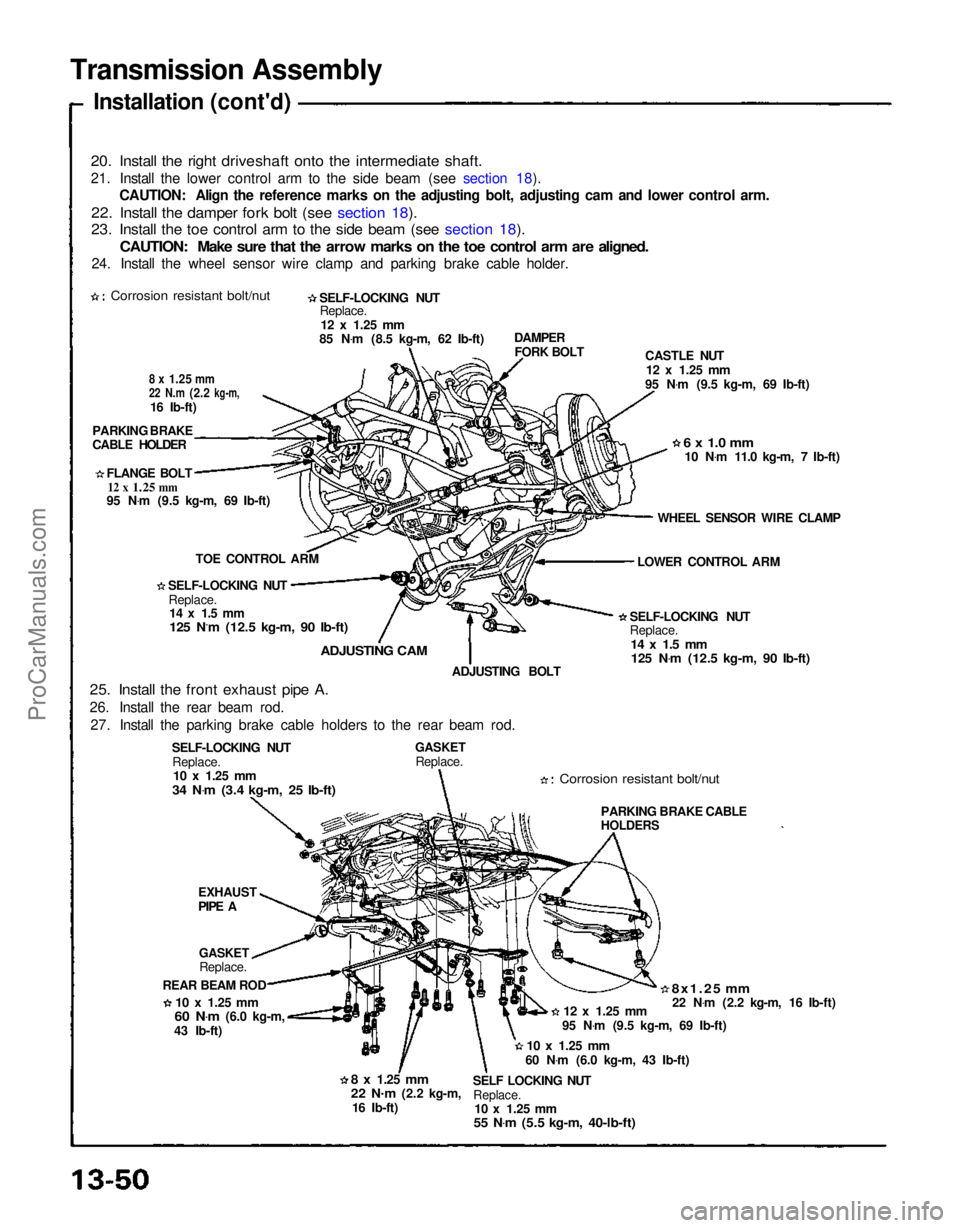
20. Install the right driveshaft onto the intermediate shaft.
21. Install the lower control arm to the side beam (see section 18). CAUTION: Align the reference marks on the adjusting bolt, adjusting cam and lower control arm.
22. Install the damper fork bolt (see section 18).
23. Install the toe control arm to the side beam (see section 18).
CAUTION: Make sure that the arrow marks on the toe control arm are aligned.
24. Install the wheel sensor wire clamp and parking brake cable holder.
Corrosion resistant bolt/nut
SELF-LOCKING NUT
Replace.
12 x
1.25
mm
85 N .
m (8.5 kg-m, 62 Ib-ft)
8 x
1.25
mm
22 N.m
(2.2
kg-m,
16 Ib-ft)
PARKING BRAKE
CABLE HOLDER
FLANGE BOLT
12 x
1.25
mm
95 N .
m (9.5 kg-m, 69 Ib-ft)
TOE CONTROL ARM
SELF-LOCKING NUT Replace.
14 x 1.5 mm
125 N.m (12.5 kg-m, 90 Ib-ft)
ADJUSTING CAM
25. Install the front exhaust pipe A.
26. Install the rear beam rod. 27. Install the parking brake cable holders to the rear beam rod. ADJUSTING BOLT
SELF-LOCKING NUT Replace.
10 x
1.25
mm
34 N .
m (3.4 kg-m, 25 Ib-ft)
GASKET
Replace.
Corrosion resistant bolt/nut
SELF-LOCKING NUT
Replace.
14 x 1.5 mm
125 N .
m (12.5 kg-m, 90 Ib-ft)
LOWER CONTROL ARM
WHEEL SENSOR WIRE CLAMP
6 x 1.0 mm
10 N .
m 11.0 kg-m, 7 Ib-ft)
CASTLE NUT
12 x
1.25
mm
95 N .
m (9.5 kg-m, 69 Ib-ft)
DAMPER
FORK BOLT
EXHAUST
PIPE A
GASKET
Replace.
REAR BEAM ROD
10 x
1.25
mm
60 N .
m
(6.0 kg-m,
43 Ib-ft)
8 x
1.25
mm
22 N.
m
(2.2 kg-m,
16 Ib-ft) SELF LOCKING NUT
Replace.
10 x
1.25
mm
55 N .
m (5.5 kg-m, 40-lb-ft)
10 x
1.25
mm
60 N .
m (6.0 kg-m, 43 Ib-ft) 95 N
.
m (9.5 kg-m, 69 Ib-ft)
12 x
1.25
mm
8x1.25 mm
22 N .
m (2.2 kg-m, 16 Ib-ft)
PARKING BRAKE CABLE
HOLDERSProCarManuals.com
Page 1163 of 1640
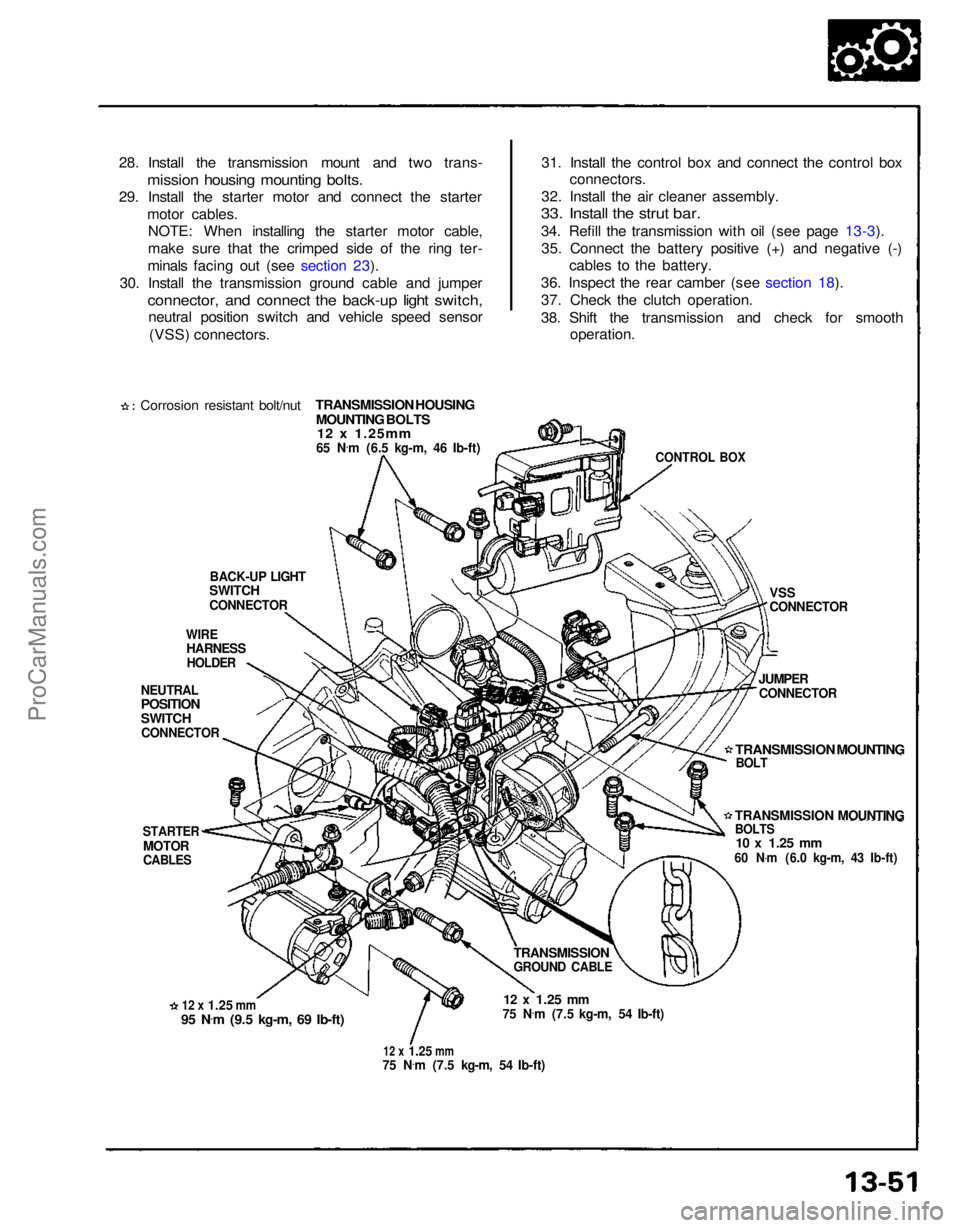
28. Install the transmission mount and two trans-
mission housing mounting bolts.
29. Install the starter motor and connect the starter
motor cables.NOTE: When installing the starter motor cable,
make sure that the crimped side of the ring ter-
minals facing out (see section 23).
30. Install the transmission ground cable and jumper
connector, and connect the back-up light switch,
neutral position switch and vehicle speed sensor
(VSS) connectors.
Corrosion resistant bolt/nut
TRANSMISSION HOUSING
MOUNTING BOLTS12 x 1.25mm
65 N
.
m (6.5 kg-m, 46 Ib-ft)
BACK-UP LIGHT
SWITCH
CONNECTOR
WIRE
HARNESS
HOLDER
NEUTRAL
POSITION
SWITCH
CONNECTOR
STARTER
MOTOR
CABLES
12 x
1.25
mm
95 N
.
m (9.5 kg-m, 69 Ib-ft)
12 x
1.25
mm
75 N
.
m (7.5 kg-m, 54 Ib-ft)
12 x
1.25
mm
75 N .
m (7.5 kg-m, 54 Ib-ft)
TRANSMISSION
GROUND CABLE
TRANSMISSION MOUNTING
BOLTS
10 x
1.25
mm
60 N .
m (6.0 kg-m, 43 Ib-ft)
JUMPER
CONNECTOR
VSS
CONNECTOR
CONTROL BOX
31. Install the control box and connect the control box
connectors.
32. Install the air cleaner assembly.
33. Install the strut bar.
34. Refill the transmission with oil (see page 13-3).
35. Connect the battery positive (+) and negative (-) cables to the battery.
36. Inspect the rear camber (see section 18).
37. Check the clutch operation.
38. Shift the transmission and check for smooth operation.
TRANSMISSION MOUNTING
BOLTProCarManuals.com
Page 1164 of 1640
Ref.
No.
Tool Number
Description
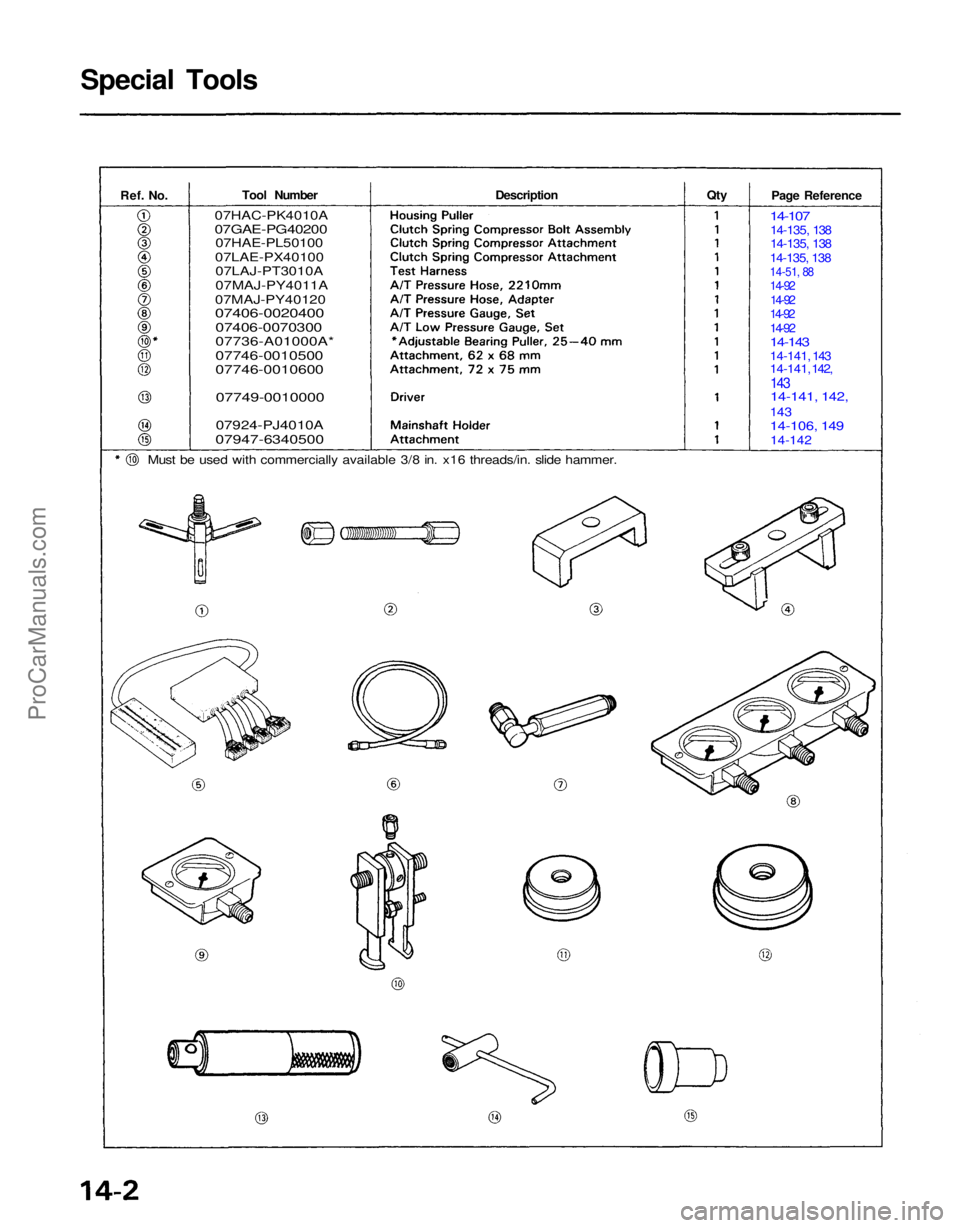
Must be used with commercially available 3/8 in. x16 threads/in. slide hammer.
Special Tools
Page Reference
14-107
14-135, 138
14-135, 138
14-135, 138
14-51, 88
14-92
14-92
14-92
14-92
14-143
14-141, 143
14-141, 142,
143
14-141, 142,
143
14-106, 149
14-142
07HAC-PK4010A
07GAE-PG40200
07HAE-PL50100
07LAE-PX40100 07LAJ-PT3010A
07MAJ-PY4011A
07MAJ-PY40120
07406-0020400
07406-0070300
07736-A01000A*
07746-0010500
07746-0010600
07749-0010000
07924-PJ4010A
07947-6340500
QtyProCarManuals.com
Page 1165 of 1640
Description
The automatic transmission is a combination of a 3-element torque converter and a triple-shaft electronically controlled
automatic transmission which provides 4 speeds forward and 1 in reverse. The entire unit is positioned in line with the
engine.
TORQUE CONVERTER, GEARS AND CLUTCHES
The torque converter consists of a pump, turbine and stator, assembled in a single unit.
They are connected to the engine crankshaft so they turn together as a unit as the engine turns.
Around the outside of the torque converter is a ring gear which meshes with the starter pinion when the engine is being
started. The entire torque converter assembly serves as a flywheel while transmitting power to the transmission mainshaft.
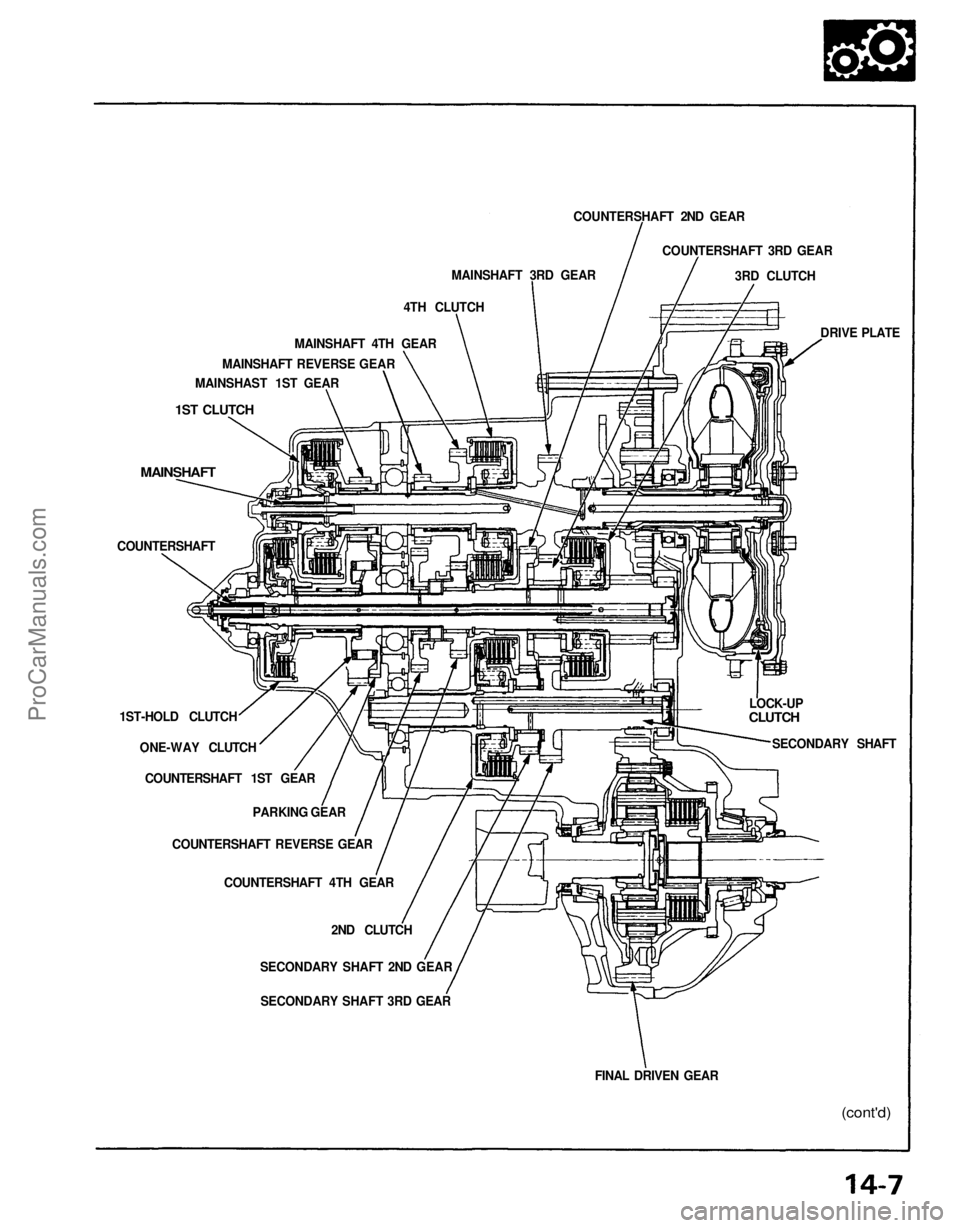
The transmission has three parallel shafts, the mainshaft, the countershaft, and the secondary shaft. The mainshaft is
in line with the engine crankshaft.
The mainshaft includes the clutches for 1st, and 4th, and gears for 3rd, 4th, Reverse and 1st (3rd gear is integral with
the mainshaft, while reverse gear is integral with 4th gear).
The countershaft includes the clutches for 1st-Hold and 3rd, and gears for 2nd, 3rd, 4th, Reverse and 1st.
The secondary shaft includes the 2nd clutch and gears for 2nd and 3rd.
The 4th and reverse gears can be locked to the countershaft at its center, providing 4th gear or Reverse, depending on
which way the selector is moved.
The gears on the mainshaft and secondary shaft are in constant mesh with those on the countershaft.
When certain combinations of gears in the transmission are engaged by clutches, power is transmitted from the main-
shaft to the countershaft to provide , , , and
ELECTRONIC CONTROL
The electronic control system consists of the Transmission Control Module (TCM), sensors, a linear solenoid and 4
solenoid valves. Shifting and lock-up are electronically controlled for comfortable driving under all conditions.
The TCM is located on the insulator center bulkhead, behind the driver's seat.
HYDRAULIC CONTROL
The valve bodies include the main valve body, secondary valve body, servo body, regulator valve body, throttle valve
body, lock-up valve body and the 2nd accumulator body.
They are bolted to the torque converter housing as an assembly.
The main valve body contains the manual valve, 1-2 shift valve, 2-3 shift valve, 3-4 shift valve, relief valve, one-way
relief valve and oil pump gears.
The secondary valve body contains the 3-2 kick-down valve, CPC (clutch pressure control) valve, 2nd orifice control
valve, 3rd orifice control valve, modulator valve, 4th exhaust valve, servo control valve, 2nd exhaust valve and 4-3 kick-
down valve.
The servo body contains the accumulator pistons and servo valve. The throttle valve body includes the throttle valve B
which is bolted onto the servo body.
The regulator valve body contains the pressure regulator valve, lock-up control valve and cooler relief valve. Fluid from
the regulator passes through the manual valve to the various control valves.
The lock-up valve body contains the lock-up timing B valve and lock-up shift valve. The 2nd accumulator body contains
the accumulator pistons and limited slip differential (LSD) relief valve.
The torque converter check valve is located in the torque converter housing, under the main valve body.
The 1st, 1st-hold, 3rd and 4th clutches receive oil from their respective feed pipes.
SHIFT CONTROL MECHANISM
Input from various sensors located throughout the car determines which shift control solenoid valve the TCM will ac-
tivate. Activating a shift control solenoid valve changes modulator pressure, causing a shift valve to move. This
pressurizes a line to one of the clutches, engaging that clutch and its corresponding gear.
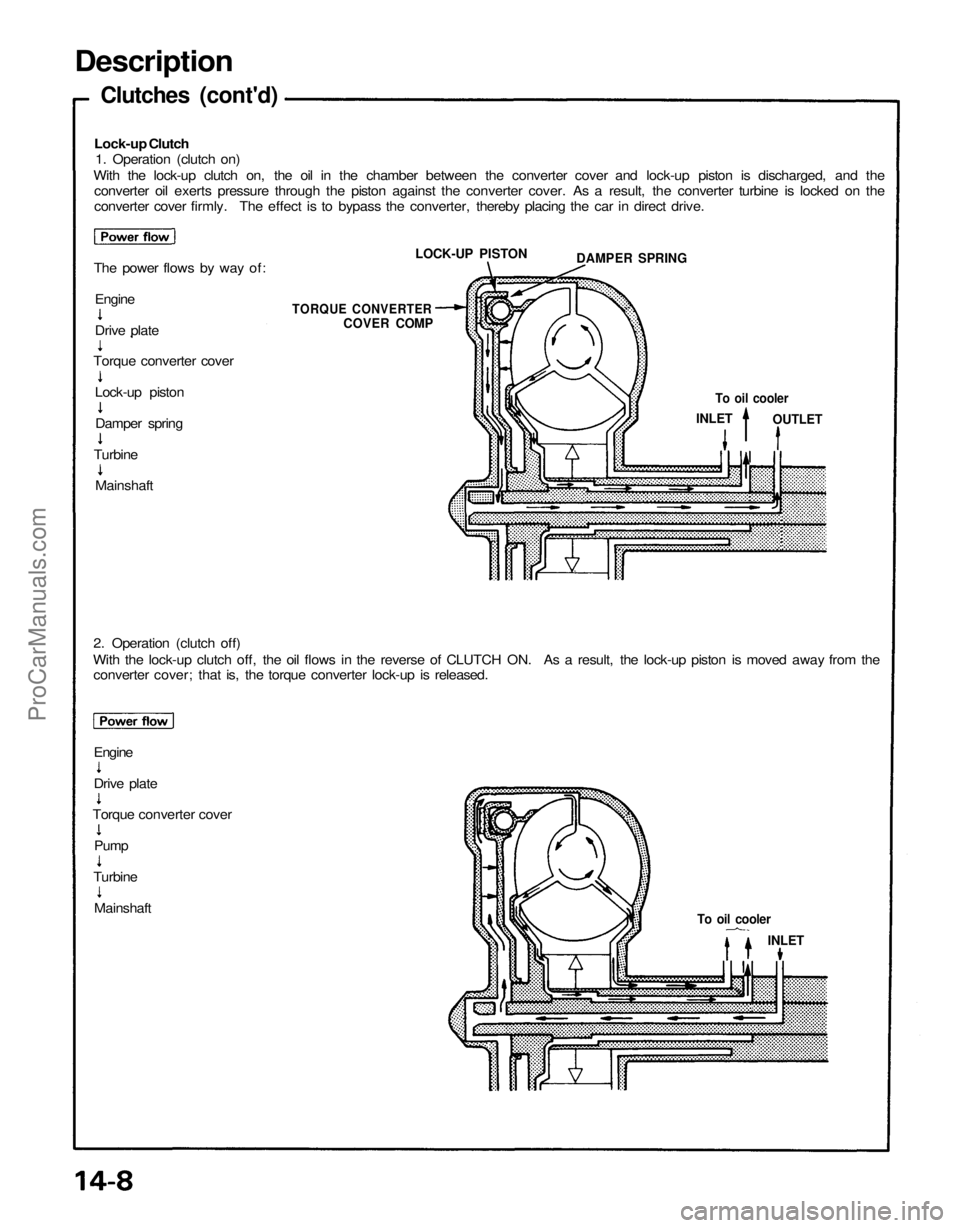
LOCK-UP MECHANISM
In position and position in 2nd, 3rd and 4th, pressurized fluid is drained from the back of the torque converter
through an oil passage, causing the lock-up piston to be held, against the torque converter cover. As this takes place, the
mainshaft rotates at the same speed as the engine crankshaft. Together with hydraulic control, the TCM optimizes the
timing of the lock-up mechaism.
The lock-up valves control the range of lock-up according to lock-up control solenoid valves A and B, and throttle valve B.
When lock-up control solenoid valves A and B activate, modulator pressure changes. The lock-up control solenoid valves
A and B are mounted on the torque converter housing, and are controlled by the TCM.
(cont'd)ProCarManuals.com
Page 1166 of 1640
REVERSE,
Description
(cont'd)
AUTOMATIC TRANSAXLE (A/T) GEAR POSITION INDICATOR
A/T gear position indicator in the instrument panel shows what gear has been selected without having to look down at
the console.
ATF COOLER
With this mid-engine type car, the radiator is mounted at the front of the car, so the ATF cooler is installed directly on
the transmission housing. Position
Description
PARK
REVERSE
NEUTRAL
DRIVE
THIRD
SECOND
FIRST
Rear wheels locked; parking pawl engaged with parking gear on countershaft.
All clutches released.
Reverse; reverse selector engaged with countershaft reverse gear and 4th clutch locked.
All clutches released.
General driving; starts in low speed, shifts automatically, depending on vehicle
speed and throttle position. Downshifts'through 3rd, 2nd and 1st on deceleration
to stop.
The lock-up mechanism comes into operation in 2nd, 3rd and 4th.
Driving in 3rd gear; stays in 3rd gear, does not shift up and down.
For climbing or downhill and light engine braking on high speed condition.
The lock-up mecharism comes into operation.
Driving in 2nd gear; stays in 2nd gear, does not shift up and down.
For engine braking or better traction starting off on loose or slippery surface.
Driving in 1st gear, stays in 1st gear, does not shift up.
For engine braking.
GEAR SELECTION
The selector lever has seven positons:
PARK,
NEUTRAL,
1st through 4th gear positions,
3rd
gear,
2nd gear and
1st gear.
Starting is possible only in
and
position through use of a slide-type, neutral-safety switch.
ProCarManuals.com
Page 1167 of 1640
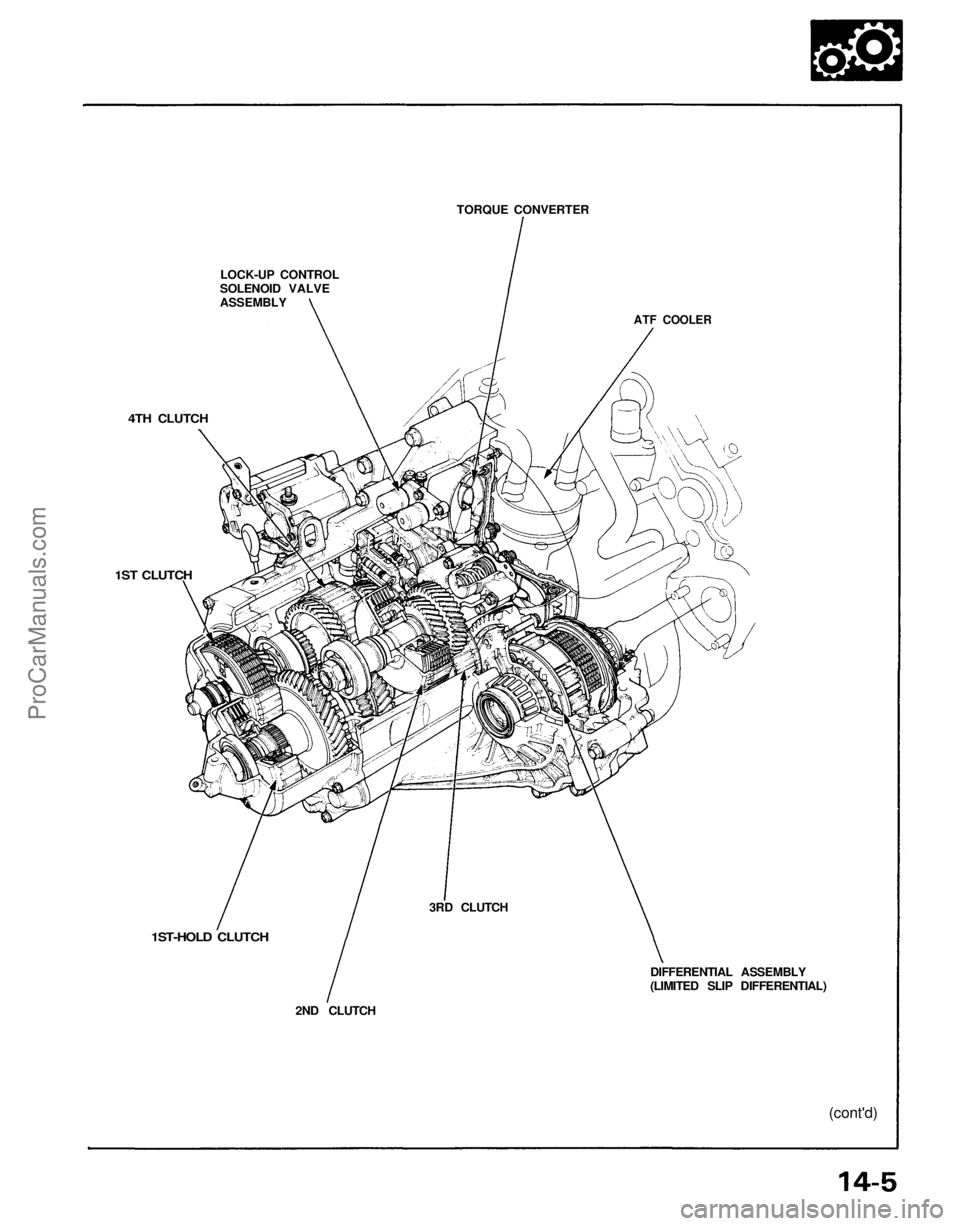
LOCK-UP CONTROL
SOLENOID VALVE
ASSEMBLY
TORQUE CONVERTER
ATF COOLER
4TH CLUTCH
1ST CLUTCH
1ST-HOLD CLUTCH
2ND CLUTCH
3RD CLUTCH
DIFFERENTIAL ASSEMBLY
(LIMITED SLIP DIFFERENTIAL)
(cont'd)ProCarManuals.com
Page 1168 of 1640
Description
Clutches
The four speed automatic transmission uses hydraulically actuated clutches to engage or disengage the transmission
gears. When clutch pressure is introduced into the clutch drum, the clutch piston is applied. This presses the friction
discs and steel plates together, locking them so they don't slip. Power is then transmitted through the engaged clutch
pack to its hub-mounted gear.
Likewise, when clutch pressure is bled from the clutch pack, the piston releases the friction discs and steel plates, and
they are free to slide past each other while disengaged. This allows the gear to spin independently of its shaft, transmitting
no power.
1st Clutch
The 1st clutch engages/disengages 1st gear, and is located at the end of the mainshaft, just behind the left side cover.
The 1 st clutch is supplied clutch pressure by its oil feed pipe within the mainshaft.
1st-hold Clutch
The 1 st-hold clutch engages/disengages 1 st-hold or position, and is located at the end of the countershaft, just
behind the left side cover. The 1 st-hold clutch is supplied clutch pressure by its oil feed pipe within the countershaft.
2nd Clutch
The 2nd clutch engages/disengages 2nd gear, and is located on the secondary shaft. The 2nd clutch is supplied clutch
pressure through the secondary shaft by a circuit connected to the 2nd accumulator body.
3rd Clutch
The 3rd clutch engages/disengages 3rd gear, and is located at the end of the countershaft, opposite the left side cover.
The 3rd clutch is supplied clutch pressure by its oil feed pipe within the countershaft.
4th Clutch
The 4th clutch engages/disengages 4th gear, as well as reverse gear, and is located at the center of the mainshaft. The
4th clutch is supplied clutch pressure by its oil feed pipe within the mainshaft.
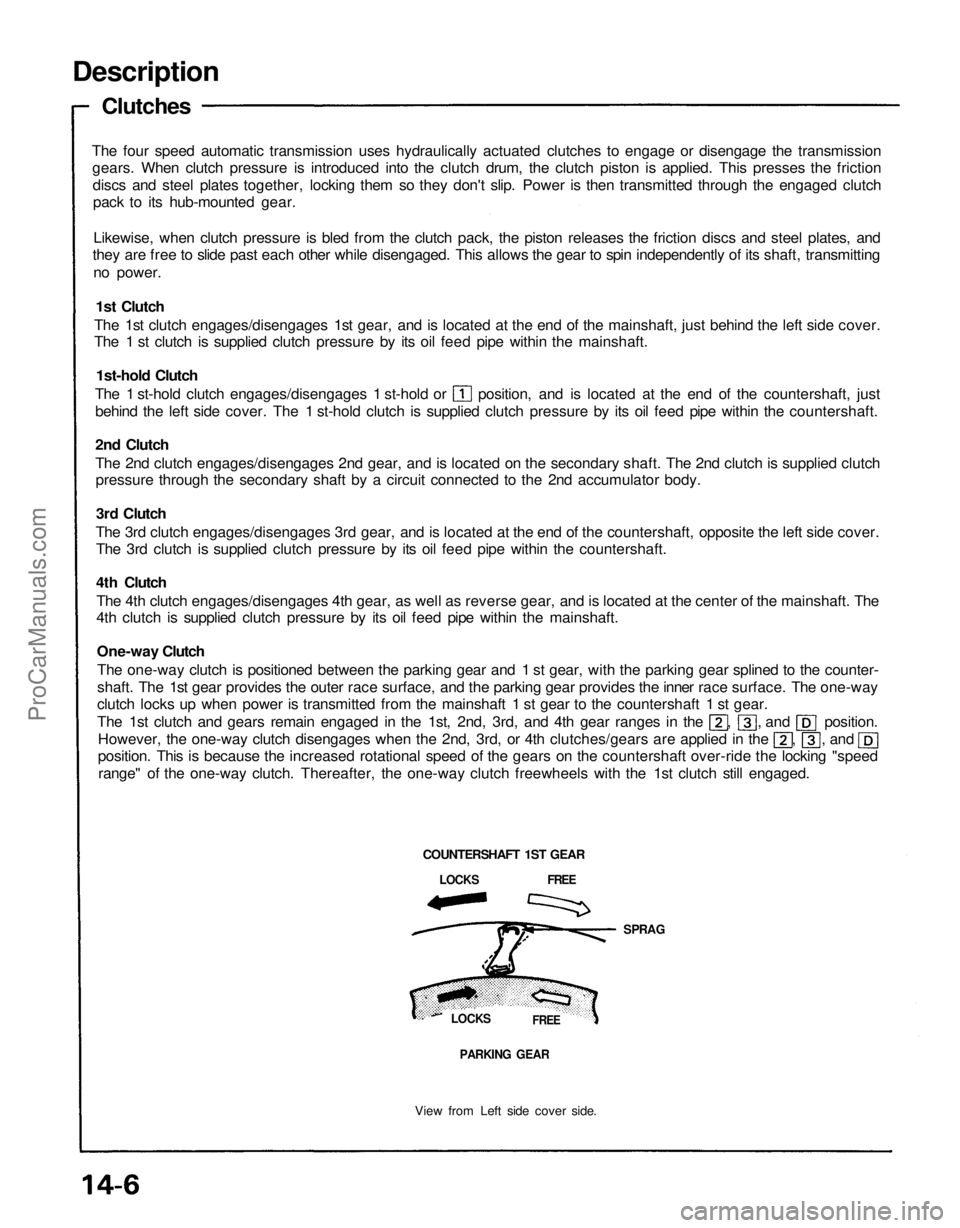
One-way Clutch
The one-way clutch is positioned between the parking gear and 1 st gear, with the parking gear splined to the counter-
shaft. The 1st gear provides the outer race surface, and the parking gear provides the inner race surface. The one-way
clutch locks up when power is transmitted from the mainshaft 1 st gear to the countershaft 1 st gear.
The 1st clutch and gears remain engaged in the 1st, 2nd, 3rd, and 4th gear ranges in the , , and position.
However, the one-way clutch disengages when the 2nd, 3rd, or 4th clutches/gears are applied in the , , and
position. This is because the increased rotational speed of the gears on the countershaft over-ride the locking "speed
range" of the one-way clutch. Thereafter, the one-way clutch freewheels with the 1st clutch still engaged.
COUNTERSHAFT 1ST GEAR
LOCKS FREE
SPRAG
LOCKS
FREE
PARKING GEAR
View from Left side cover side.ProCarManuals.com
Page 1169 of 1640
COUNTERSHAFT 2ND GEAR
COUNTERSHAFT 3RD GEAR
3RD CLUTCH
DRIVE PLATE
LOCK-UP
CLUTCH
SECONDARY SHAFT
(cont'd)
FINAL DRIVEN GEAR
SECONDARY SHAFT 2ND GEAR
SECONDARY SHAFT 3RD GEAR
2ND CLUTCH
COUNTERSHAFT 4TH GEAR
COUNTERSHAFT REVERSE GEAR
PARKING GEAR
COUNTERSHAFT 1ST GEAR
ONE-WAY CLUTCH
1ST-HOLD CLUTCH
COUNTERSHAFT
MAINSHAFT
1ST CLUTCH
MAINSHAST 1ST GEAR
MAINSHAFT REVERSE GEAR
MAINSHAFT 4TH GEAR
4TH CLUTCH
MAINSHAFT 3RD GEARProCarManuals.com
Page 1170 of 1640
Description
Clutches (cont'd)
Lock-up Clutch
1. Operation (clutch on)
With the lock-up clutch on, the oil in the chamber between the converter cover and lock-up piston is discharged, and the
converter oil exerts pressure through the piston against the converter cover. As a result, the converter turbine is locked on the
converter cover firmly. The effect is to bypass the converter, thereby placing the car in direct drive.
The power flows by way of:
2. Operation (clutch off)
With the lock-up clutch off, the oil flows in the reverse of CLUTCH ON. As a result, the lock-up piston is moved away from the
converter cover; that is, the torque converter lock-up is released.
Engine
To oil cooler
INLET
To oil cooler
INLET
OUTLET
TORQUE CONVERTER
COVER COMP
LOCK-UP PISTON
DAMPER SPRING
Engine
Drive plate
Torque converter cover
Lock-up piston
Damper spring
Turbine
Mainshaft
Drive plate
Torque converter cover
Pump
Turbine
MainshaftProCarManuals.com