oil ACURA NSX 1997 Service Owner's Guide
[x] Cancel search | Manufacturer: ACURA, Model Year: 1997, Model line: NSX, Model: ACURA NSX 1997Pages: 1503, PDF Size: 57.08 MB
Page 464 of 1503
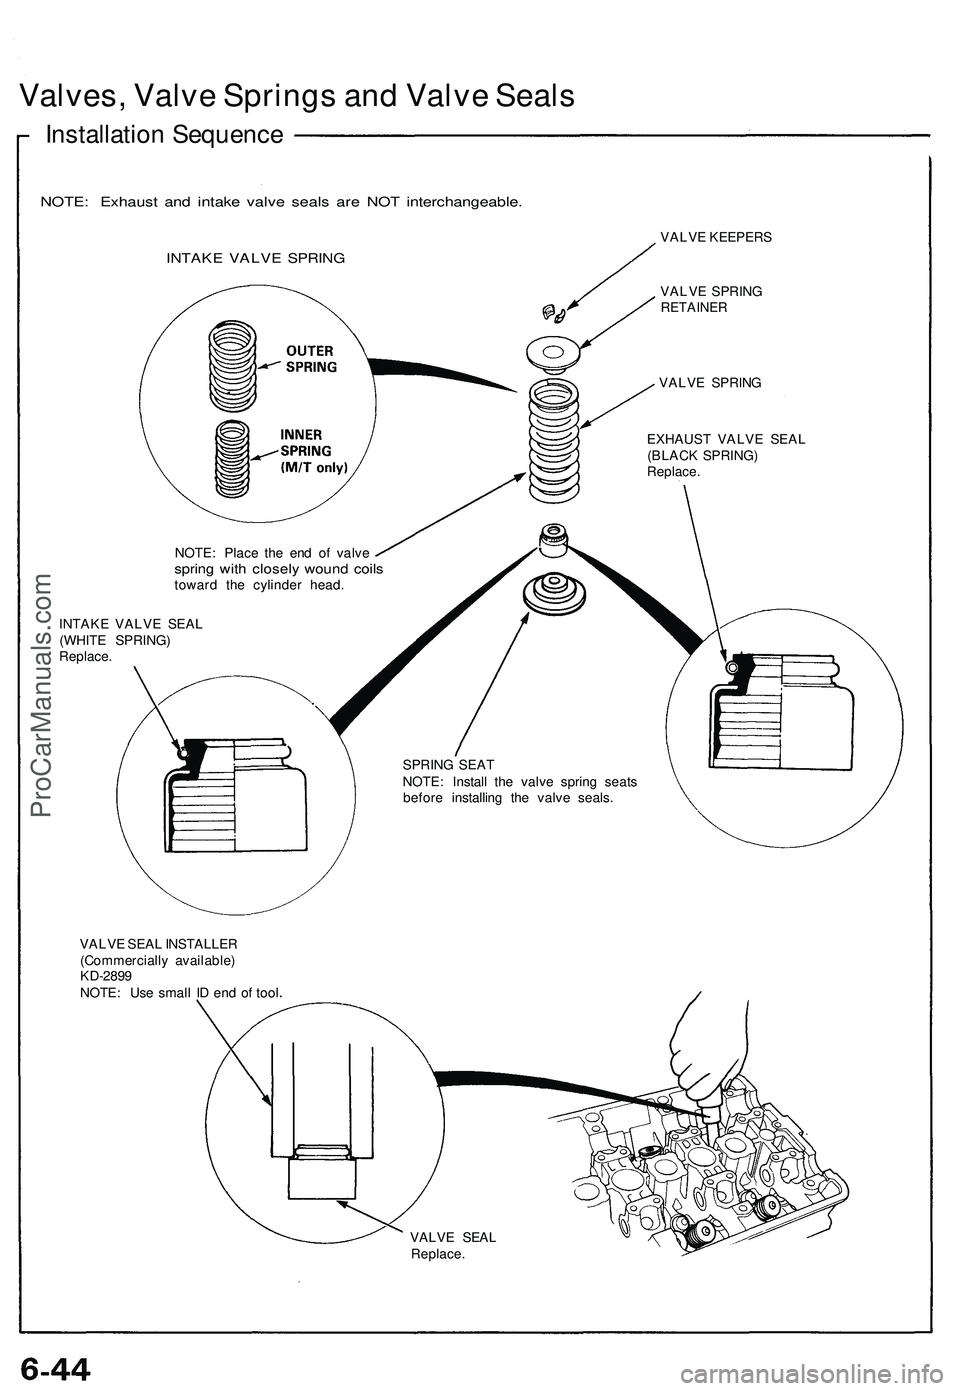
Valves, Valve Springs and Valve Seals
Installation Sequence
NOTE: Exhaust and intake valve seals are NOT interchangeable.
INTAKE VALVE SPRING
VALVE KEEPERS
VALVE SPRING
RETAINER
VALVE SPRING
EXHAUST VALVE SEAL
(BLACK SPRING)
Replace.
NOTE: Place the end of valve
spring with closely wound coils
toward the cylinder head.
INTAKE VALVE SEAL
(WHITE SPRING)
Replace.
SPRING SEAT
NOTE: Install the valve spring seats
before installing the valve seals.
VALVE SEAL INSTALLER
(Commercially available)
KD-2899
NOTE: Use small ID end of tool
VALVE SEAL
Replace.ProCarManuals.com
Page 465 of 1503
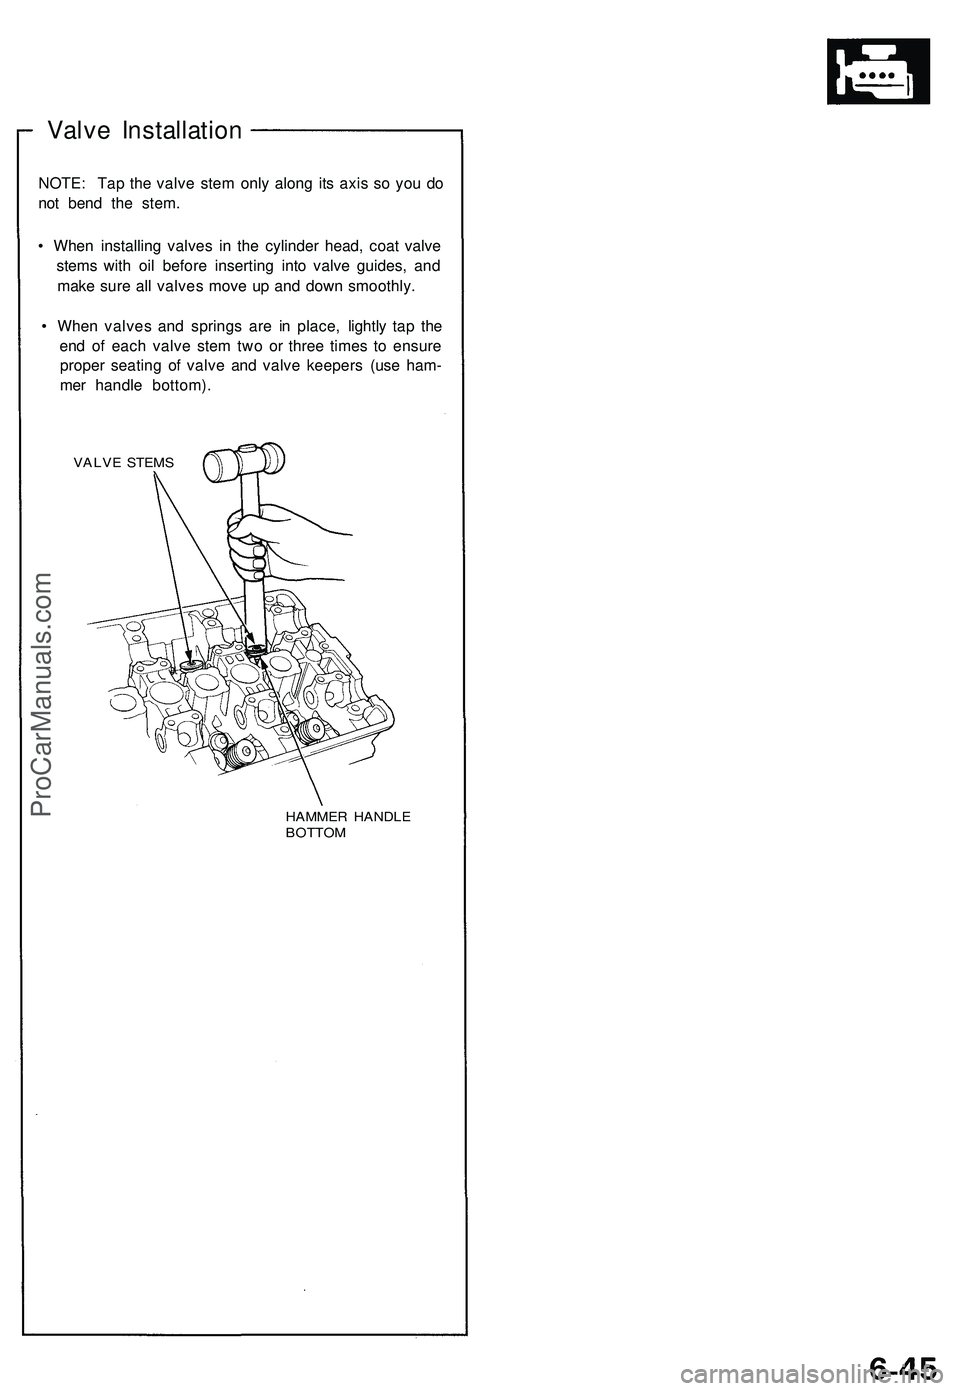
Valve Installation
NOTE: Tap the valve stem only along its axis so you do
not bend the stem.
• When installing valves in the cylinder head, coat valve
stems with oil before inserting into valve guides, and
make sure all valves move up and down smoothly.
• When valves and springs are in place, lightly tap the
end of each valve stem two or three times to ensure
proper seating of valve and valve keepers (use ham-
mer handle bottom).
VALVE STEMS
HAMMER HANDLE
BOTTOMProCarManuals.com
Page 467 of 1503
Cylinder Heads
Installation (cont'd)
Rear:
8 x
1.25
mm
22 N-m (2.2 kgf-m,
16 Ibf-ft)
REAR PRIMARY
HEATED OXYGEN SENSOR
(REAR PRIMARY HO2S)
44 N-m (4.5 kgf-m,
33 Ibf-ft)
Be careful not to damage.
GASKET
Replace.
REAR EXHAUST
MANIFOLD
EXHAUST
MANIFOLD
COVER
SELF-LOCKING NUT
8 x
1.25
mm
30 N-m (3.1 kgf-m,
22 Ibf-ft)
Replace.
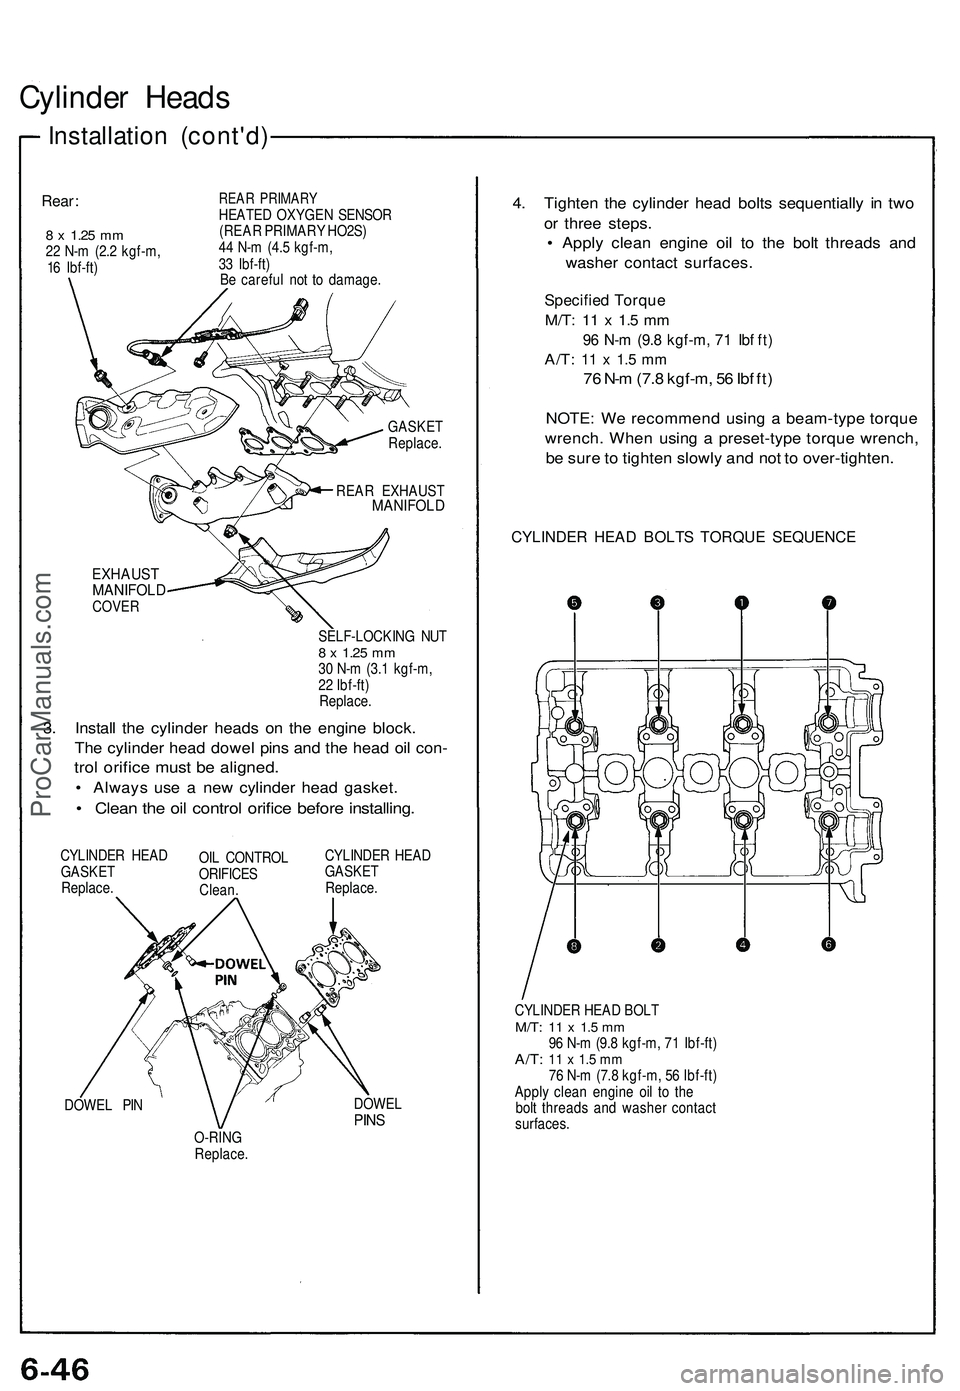
3. Install the cylinder heads on the engine block.
The cylinder head dowel pins and the head oil con-
trol orifice must be aligned.
• Always use a new cylinder head gasket.
• Clean the oil control orifice before installing.
CYLINDER HEAD
GASKET
Replace.
OIL CONTROL
ORIFICES
Clean.
CYLINDER HEAD
GASKET
Replace.
DOWEL PIN
DOWEL
PINS
O-RING
Replace.
4. Tighten the cylinder head bolts sequentially in two
or three steps.
• Apply clean engine oil to the bolt threads and
washer contact surfaces.
Specified Torque
M/T:
11 x 1.5 mm
96 N-m (9.8 kgf-m, 71 Ibf ft)
A/T:
11 x 1.5 mm
76 N-m (7.8 kgf-m, 56 Ibf ft)
NOTE: We recommend using a beam-type torque
wrench. When using a preset-type torque wrench,
be sure to tighten slowly and not to over-tighten.
CYLINDER HEAD BOLTS TORQUE SEQUENCE
CYLINDER HEAD BOLT
M/T:
11 x 1.5 mm
96 N-m (9.8 kgf-m, 71 Ibf-ft)
A/T:
11 x 1.5 mm
76 N-m (7.8 kgf-m, 56 Ibf-ft)
Apply clean engine oil to the
bolt threads and washer contact
surfaces.ProCarManuals.com
Page 468 of 1503
Rocker Arms
Installation
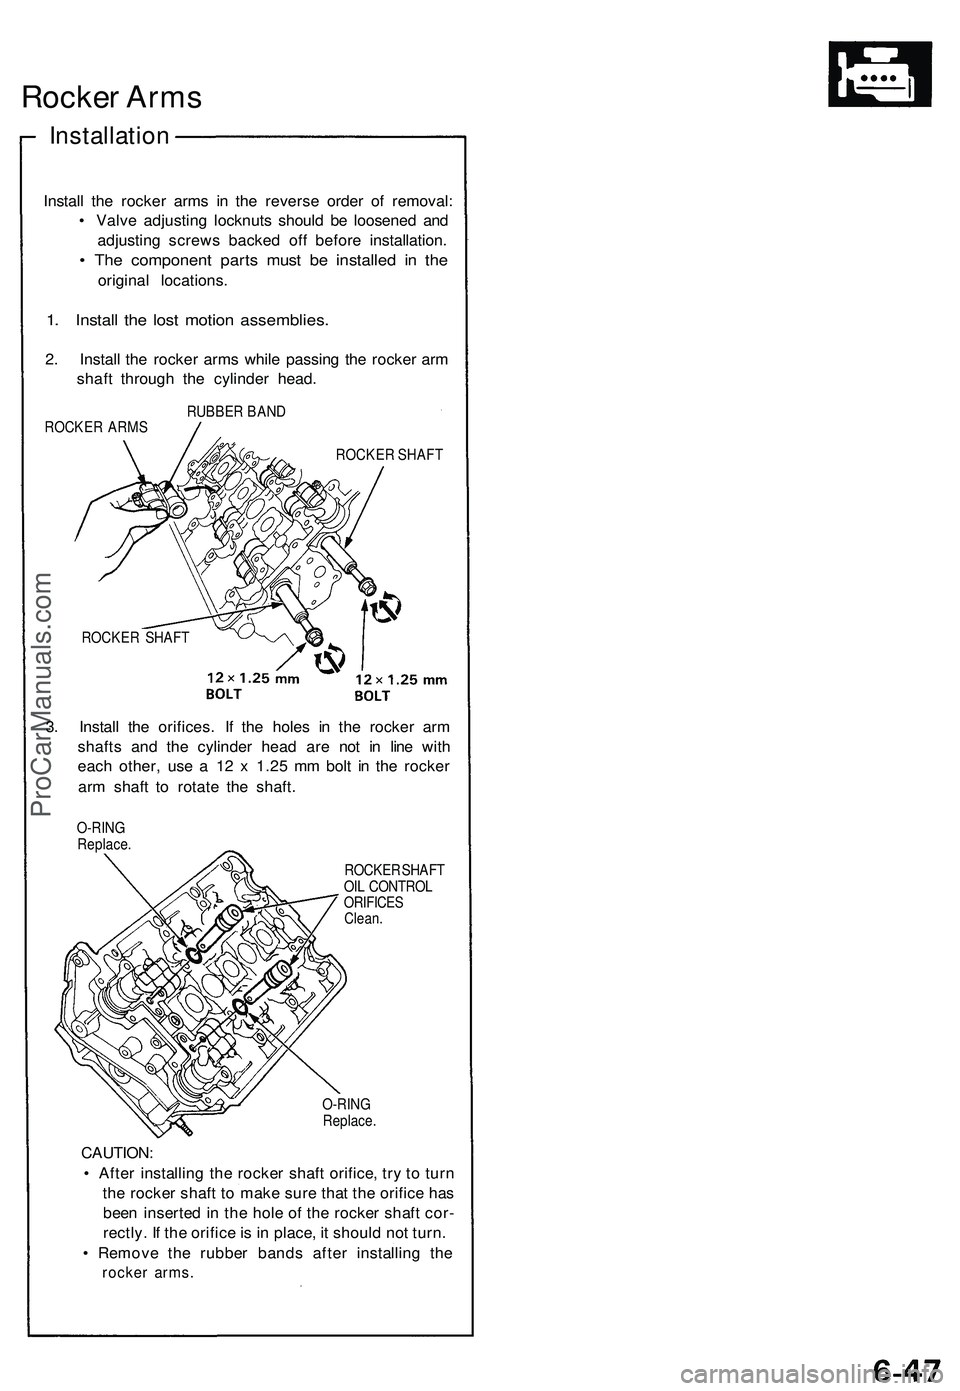
Install the rocker arms in the reverse order of removal:
• Valve adjusting locknuts should be loosened and
adjusting screws backed off before installation.
• The component parts must be installed in the
original locations.
1. Install the lost motion assemblies.
2. Install the rocker arms while passing the rocker arm
shaft through the cylinder head.
ROCKER ARMS
ROCKER SHAFT
ROCKER SHAFT
O-RING
Replace.
CAUTION:
• After installing the rocker shaft orifice, try to turn
the rocker shaft to make sure that the orifice has
been inserted in the hole of the rocker shaft cor-
rectly. If the orifice is in place, it should not turn.
• Remove the rubber bands after installing the
rocker arms.
RUBBER BAND
3. Install the orifices. If the holes in the rocker arm
shafts and the cylinder head are not in line with
each other, use a 12 x 1.25 mm bolt in the rocker
arm shaft to rotate the shaft.
O-RING
Replace.
ROCKER SHAFT
OIL CONTROL
ORIFICES
Clean.ProCarManuals.com
Page 469 of 1503
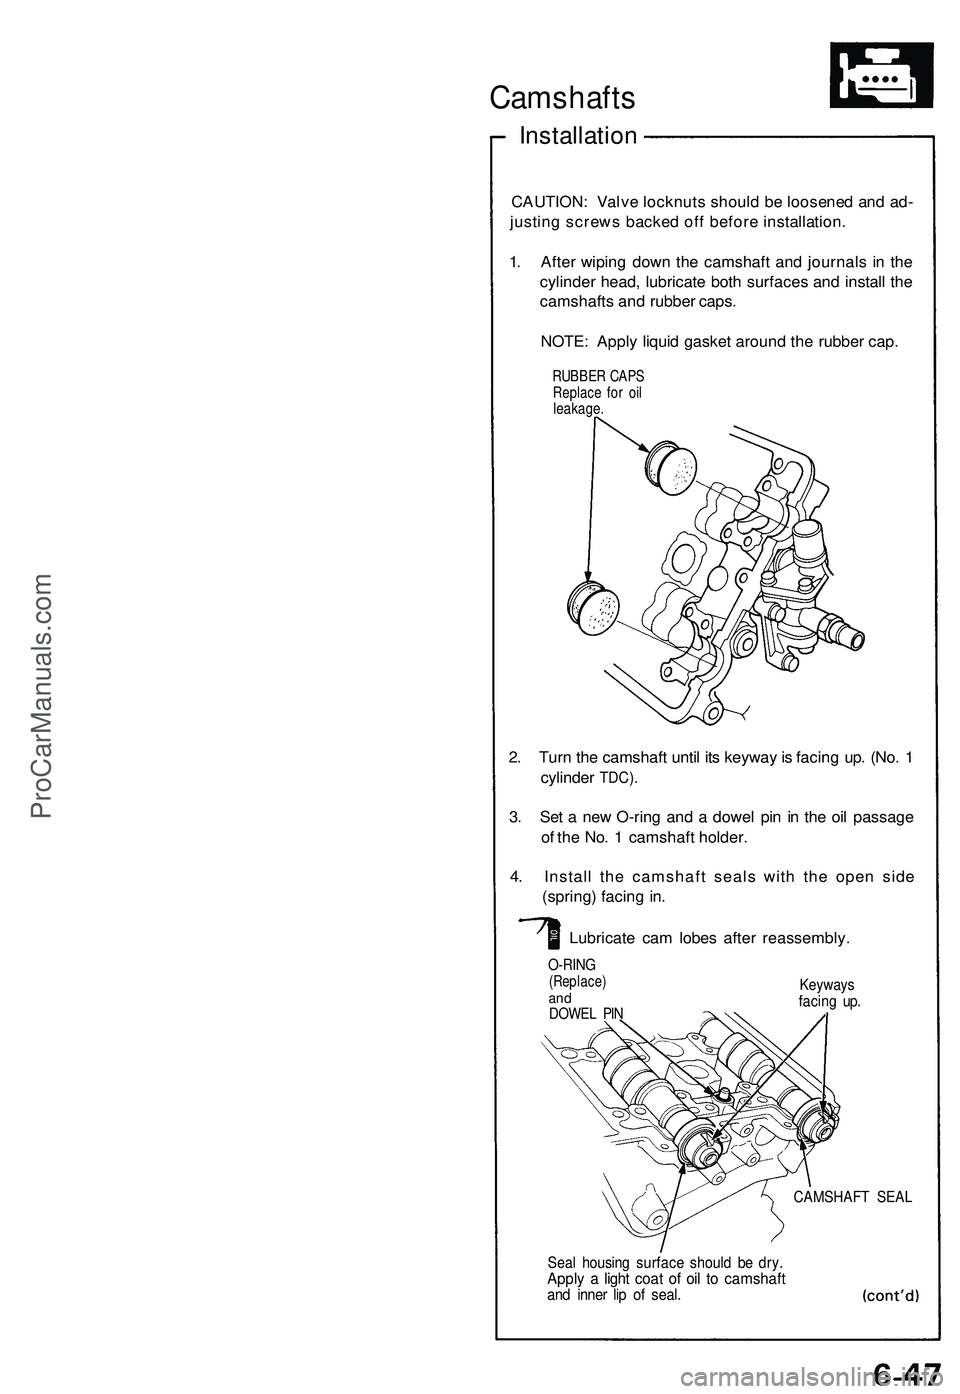
Camshafts
Installation
CAUTION: Valve locknuts should be loosened and ad-
justing screws backed off before installation.
1. After wiping down the camshaft and journals in the
cylinder head, lubricate both surfaces and install the
camshafts and rubber caps.
NOTE: Apply liquid gasket around the rubber cap.
2. Turn the camshaft until its keyway is facing up. (No. 1
cylinder
TDC).
3. Set a new O-ring and a dowel pin in the oil passage
of the No. 1 camshaft holder.
4. Install the camshaft seals with the open side
(spring) facing in.
Lubricate cam lobes after reassembly.
O-RING
(Replace)
and
DOWEL PIN
Keyways
facing up.
CAMSHAFT SEAL
Seal housing surface should be dry.
Apply a light coat of oil to camshaft
and inner lip of seal.
RUBBER CAPS
Replace for oil
leakage.ProCarManuals.com
Page 470 of 1503
Camshafts
Installation (cont'd)
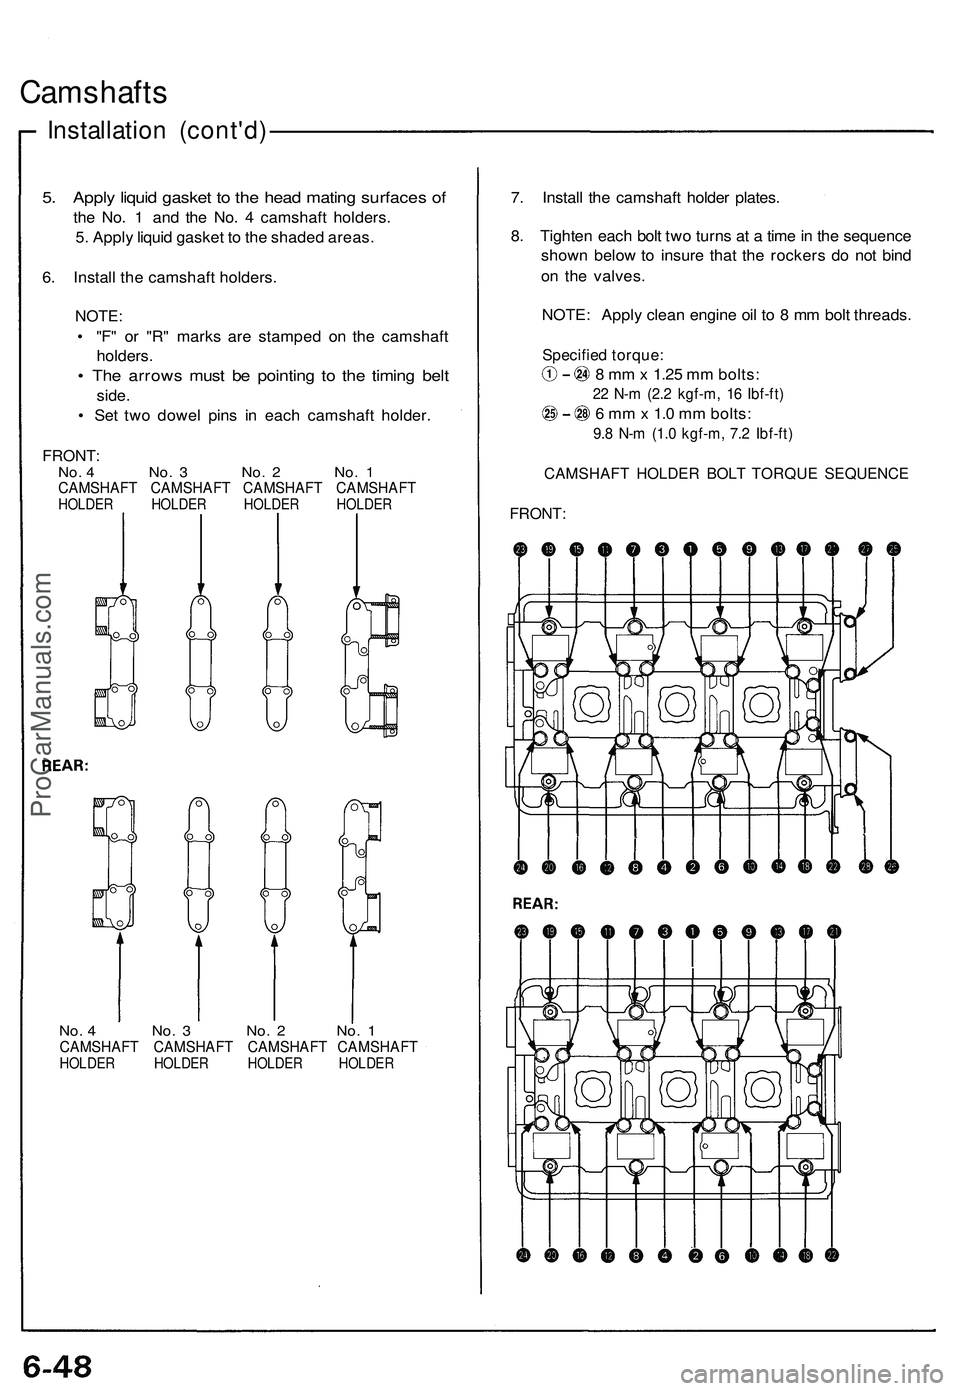
5. Apply liquid gasket to the head mating surfaces of
the No. 1 and the No. 4 camshaft holders.
5. Apply liquid gasket to the shaded areas.
6. Install the camshaft holders.
NOTE:
• "F" or "R" marks are stamped on the camshaft
holders.
• The arrows must be pointing to the timing belt
side.
• Set two dowel pins in each camshaft holder.
FRONT:
No. 4 No. 3 No. 2 No. 1
CAMSHAFT CAMSHAFT CAMSHAFT CAMSHAFT
HOLDER HOLDER HOLDER HOLDER
No. 4 No. 3 No. 2 No. 1
CAMSHAFT CAMSHAFT CAMSHAFT CAMSHAFT
HOLDER HOLDER HOLDER HOLDER
7. Install the camshaft holder plates.
8. Tighten each bolt two turns at a time in the sequence
shown below to insure that the rockers do not bind
on the valves.
NOTE: Apply clean engine oil to 8 mm bolt threads.
Specified torque:
8 mm x 1.25 mm bolts:
22 N-m (2.2 kgf-m, 16 Ibf-ft)
6 mm x 1.0 mm bolts:
9.8 N-m (1.0 kgf-m, 7.2 Ibf-ft)
CAMSHAFT HOLDER BOLT TORQUE SEQUENCE
FRONT:ProCarManuals.com
Page 472 of 1503
Camshafts
Installation (cont'd)
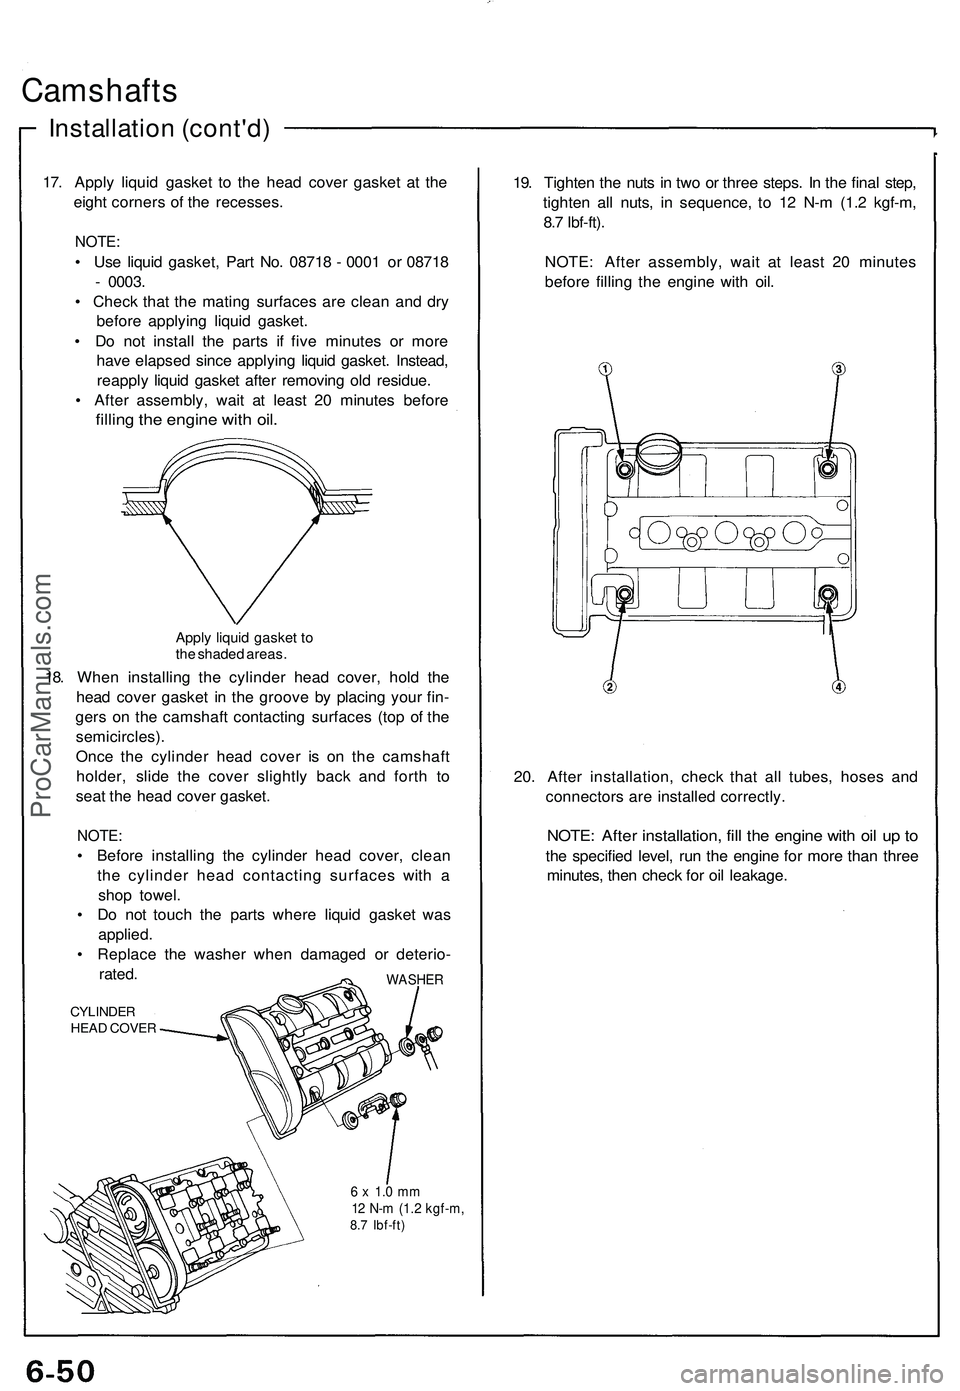
17. Apply liquid gasket to the head cover gasket at the
eight corners of the recesses.
NOTE:
• Use liquid gasket, Part No. 08718 - 0001 or 08718
- 0003.
• Check that the mating surfaces are clean and dry
before applying liquid gasket.
• Do not install the parts if five minutes or more
have elapsed since applying liquid gasket. Instead,
reapply liquid gasket after removing old residue.
• After assembly, wait at least 20 minutes before
filling the engine with oil.
Apply liquid gasket to
the shaded areas.
18. When installing the cylinder head cover, hold the
head cover gasket in the groove by placing your fin-
gers on the camshaft contacting surfaces (top of the
semicircles).
Once the cylinder head cover is on the camshaft
holder, slide the cover slightly back and forth to
seat the head cover gasket.
NOTE:
• Before installing the cylinder head cover, clean
the cylinder head contacting surfaces with a
shop towel.
• Do not touch the parts where liquid gasket was
applied.
• Replace the washer when damaged or deterio-
rated.
CYLINDER
HEAD COVER
WASHER
6 x 1.0 mm
12 N-m (1.2 kgf-m,
8.7 Ibf-ft)
19. Tighten the nuts in two or three steps. In the final step,
tighten all nuts, in sequence, to 12 N-m (1.2 kgf-m,
8.7 Ibf-ft).
NOTE: After assembly, wait at least 20 minutes
before filling the engine with oil.
20. After installation, check that all tubes, hoses and
connectors are installed correctly.
NOTE: After installation, fill the engine with oil up to
the specified level, run the engine for more than three
minutes, then check for oil leakage.ProCarManuals.com
Page 474 of 1503
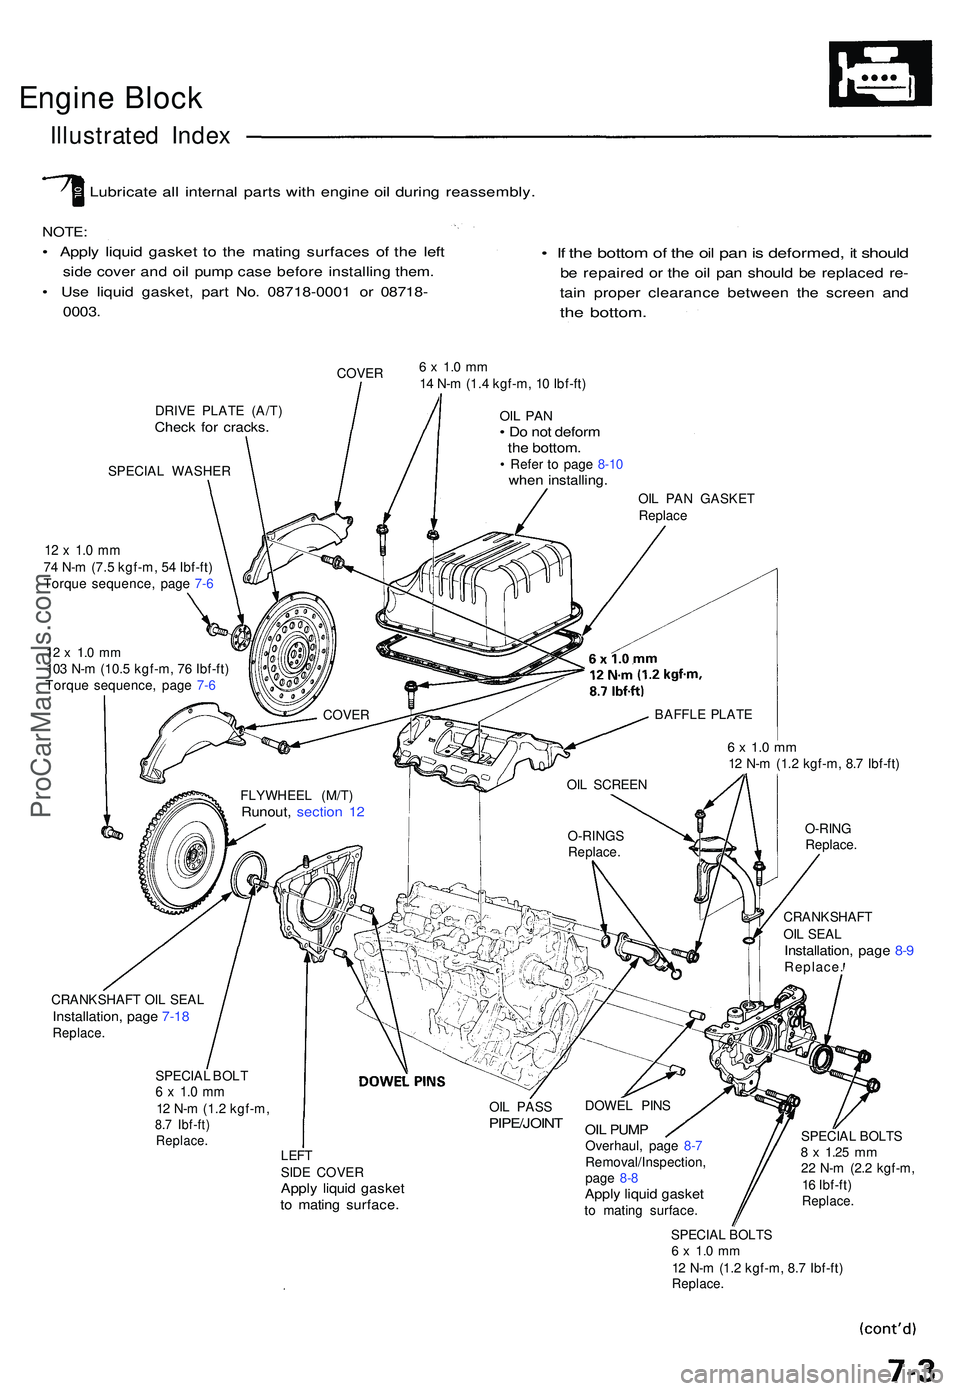
Engine Bloc k
Illustrate d Inde x
Lubricat e al l interna l part s wit h engin e oi l durin g reassembly .
NOTE:
• Appl y liqui d gaske t t o th e matin g surface s o f th e lef t
side cove r an d oi l pum p cas e befor e installin g them .
• Us e liqui d gasket , par t No . 0871 8-000 1 o r 0871 8-
0003 .
• I f th e botto m of th e oi l pa n is deformed , i t shoul d
be repaire d o r th e oi l pa n shoul d b e replace d re -
tain prope r clearanc e betwee n th e scree n an d
the bottom .
COVER
DRIV E PLAT E (A/T )
Check fo r cracks .
SPECIA L WASHER
12 x 1. 0 m m74 N- m (7. 5 kgf-m , 5 4 Ibf-ft )
Torqu e sequence , pag e 7- 6
12 x 1. 0 m m103 N- m (10. 5 kgf-m , 7 6 Ibf-ft )
Torqu e sequence , pag e 7- 6
6 x 1. 0 m m14 N- m (1. 4 kgf-m , 1 0 Ibf-ft )
OIL PA N• D o no t defor mthe bottom .• Refe r t o pag e 8-1 0whe n installing .
OIL PA N GASKE T
Replac e
6 x 1. 0 m m12 N- m (1. 2 kgf-m , 8. 7 Ibf-ft )
O-RIN G
Replace .
CRANKSHAF T
OI L SEA L
Installation , pag e 8- 9Replace .
CRANKSHAF T OI L SEA L
Installation , pag e 7-1 8Replace .
SPECIAL BOL T6 x 1. 0 m m12 N- m (1. 2 kgf-m ,8.7 Ibf-ft )Replace .
OIL PAS SPIPE/JOIN T
LEFTSIDE COVE RApply liqui d gaske tto matin g surface .
DOWEL PIN S
OIL PUM POverhaul , pag e 8- 7
Removal/Inspection ,
pag e 8- 8
Appl y liqui d gaske tto matin g surface . SPECIA
L BOLT S
8 x 1.2 5 mm22 N- m (2. 2 kgf-m ,
1 6 Ibf-ft )
Replace .
SPECIAL BOLT S6 x 1. 0 m m12 N- m (1. 2 kgf-m , 8. 7 Ibf-ft )Replace .
FLYWHEE L (M/T )Runout , sectio n 1 2
COVE R
OIL SCREE N
O-RING S
Replace .BAFFL
E PLAT E
ProCarManuals.com
Page 480 of 1503
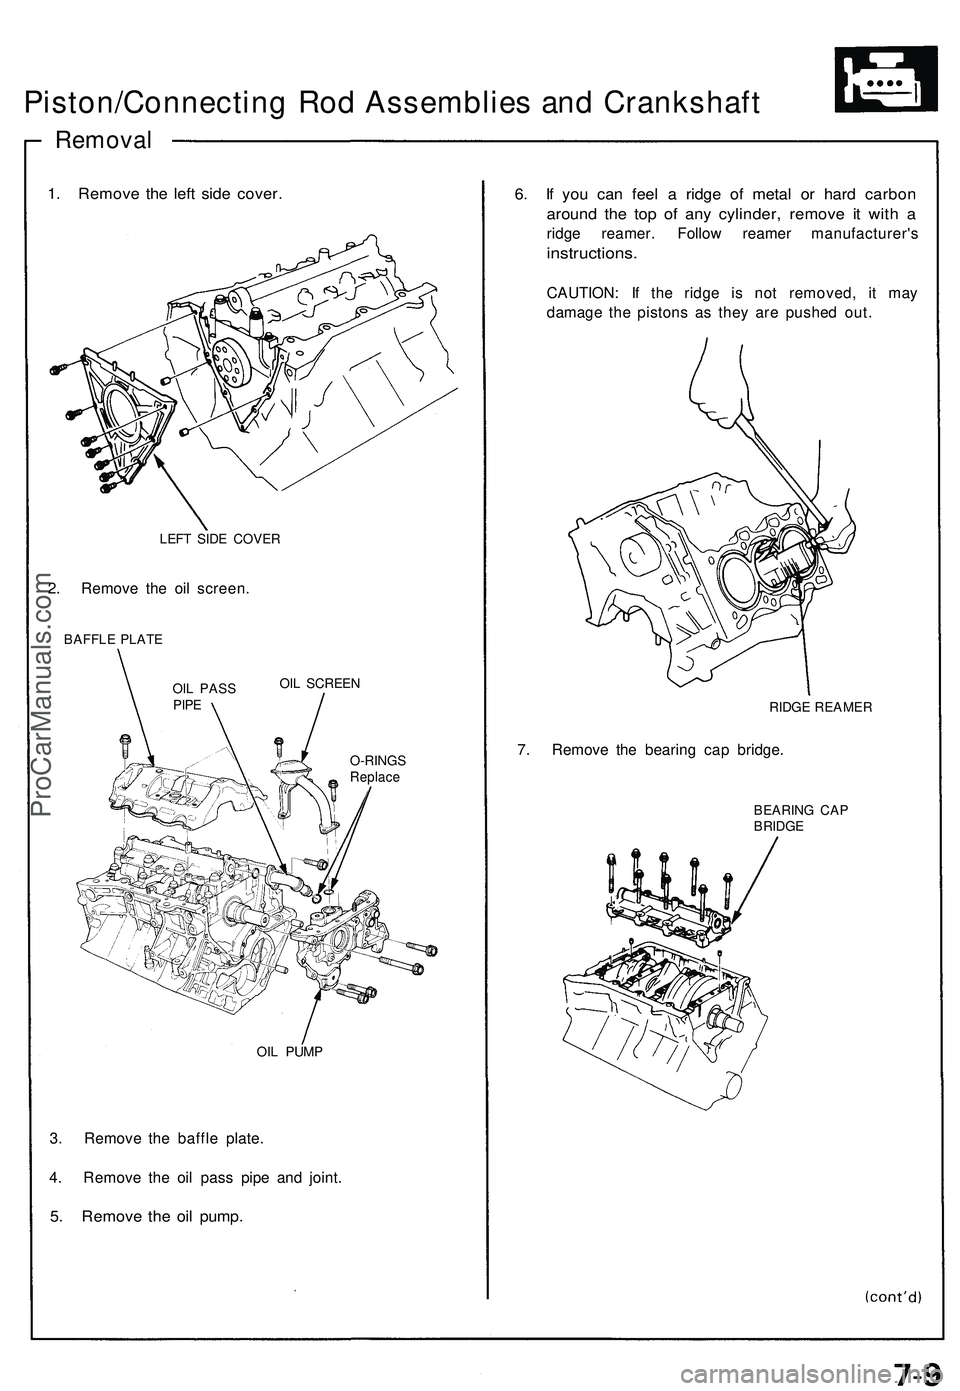
Piston/Connecting Ro d Assemblie s an d Crankshaf t
Removal
1. Remov e th e lef t sid e cover .
LEFT SID E COVE R
2. Remov e th e oi l screen .
BAFFLE PLAT E
OIL SCREE N
O-RING S
Replace
OIL PUM P
3. Remov e th e baffl e plate .
4 . Remov e th e oi l pas s pip e an d joint .
5. Remov e th e oi l pump .
6. I f yo u ca n fee l a ridg e o f meta l o r har d carbo n
around th e to p of an y cylinder , remov e i t wit h a
ridg e reamer . Follo w reame r manufacturer' s
instructions.
CAUTION: I f th e ridg e i s no t removed , i t ma y
damag e th e piston s a s the y ar e pushe d out .
RIDG E REAME R
7. Remov e th e bearin g ca p bridge .
BEARIN G CA PBRIDG E
OIL PAS SPIPE
ProCarManuals.com
Page 494 of 1503
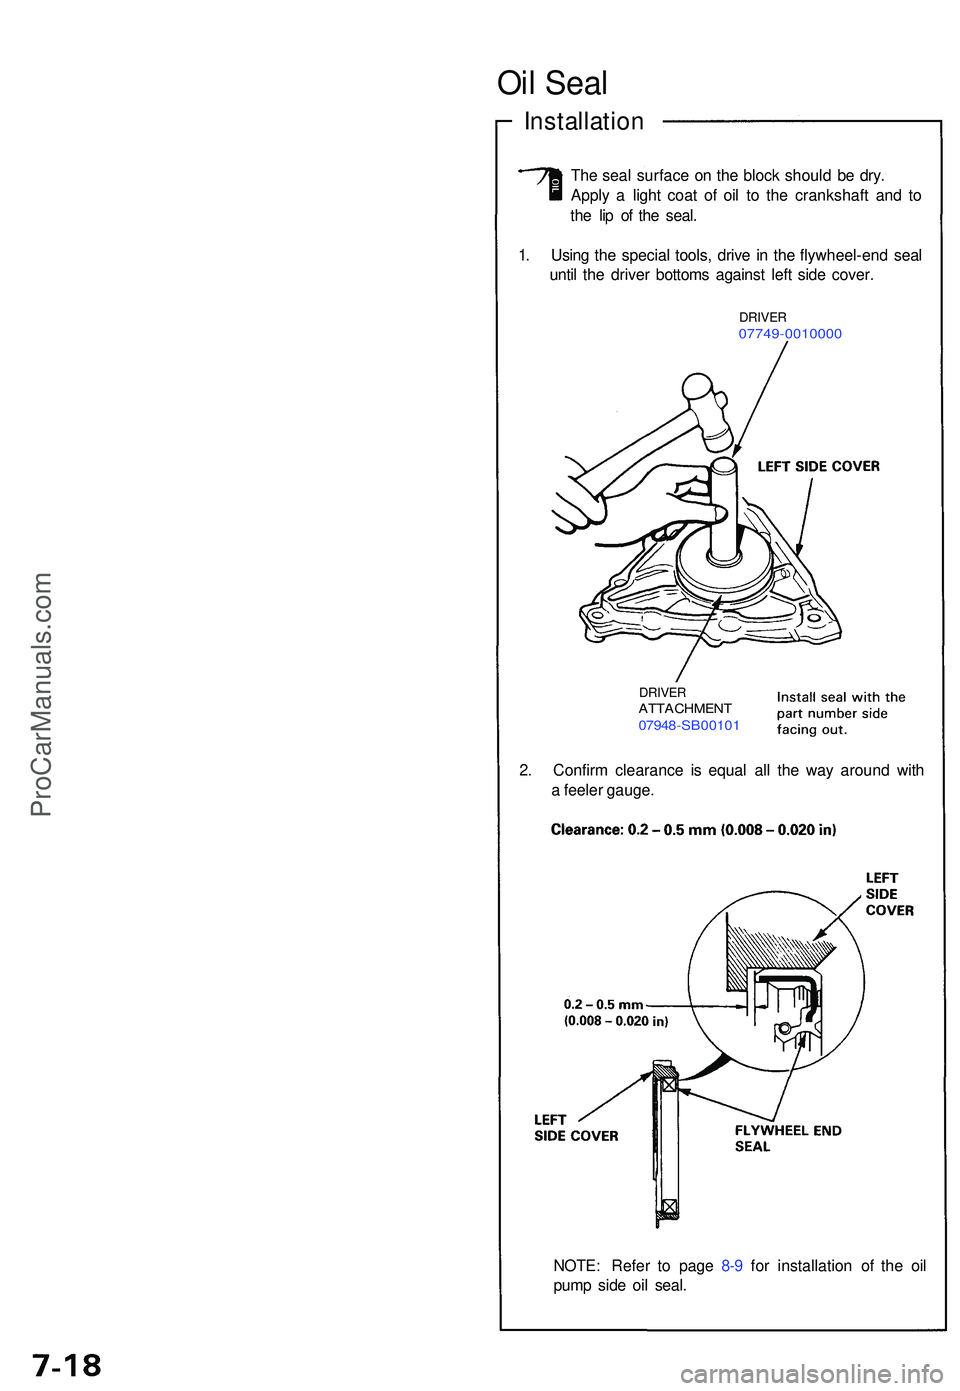
NOTE: Refe r t o pag e 8- 9 fo r installatio n o f th e oi l
pum p sid e oi l seal .
2
. Confir m clearanc e i s equa l al l th e wa y aroun d wit h
a feele r gauge .
DRIVERATTACHMEN T07948-SB0010 1
1. Usin g th e specia l tools , driv e i n th e flywheel-en d sea l
unti l th e drive r bottom s agains t lef t sid e cover .
DRIVE R07749-001000 0
The sea l surfac e o n th e bloc k shoul d b e dry .
Appl y a ligh t coa t o f oi l t o th e crankshaf t an d t o
th e li p o f th e seal .
Oil Sea l
Installatio n
ProCarManuals.com