check Acura RDX 2013 Owner's Guide
[x] Cancel search | Manufacturer: ACURA, Model Year: 2013, Model line: RDX, Model: Acura RDX 2013Pages: 364, PDF Size: 12.54 MB
Page 188 of 364

187Features
Audio Error MessagesCD PlayerIf a disc error occurs, you may see the following error messages.
Error Message
Cause
Solution
Unplayable File
Track/file format not supported
●Current track/file will be skipped. The next supported track/file
plays automatically.
Bad Disc Please check
owners manual. Push Eject
Mechanical error
●Press the (eject) button and remove the disc, and check that the
error message is cleared.●Check that the disc is not damaged or deformed, and insert the
disc again.
2Protecting CDs P. 192
●If the error message reappears, press the button, and pull out
the disc.●Insert a different disc.
If the new disc plays, there is a problem with the first disc.●If the error message repeats, or the disc cannot be removed,
contact a dealer.
Do not try to force the disc out of the player.
Mecha ErrorBad Disc Please check
owners manual.
Servo error
Check Disc
Disc error
●Check that the disc is not damaged or deformed.
2Protecting CDs P. 192
Page 189 of 364
188
uuAudio Error Messages uiPod ®/USB Flash Drive
Features
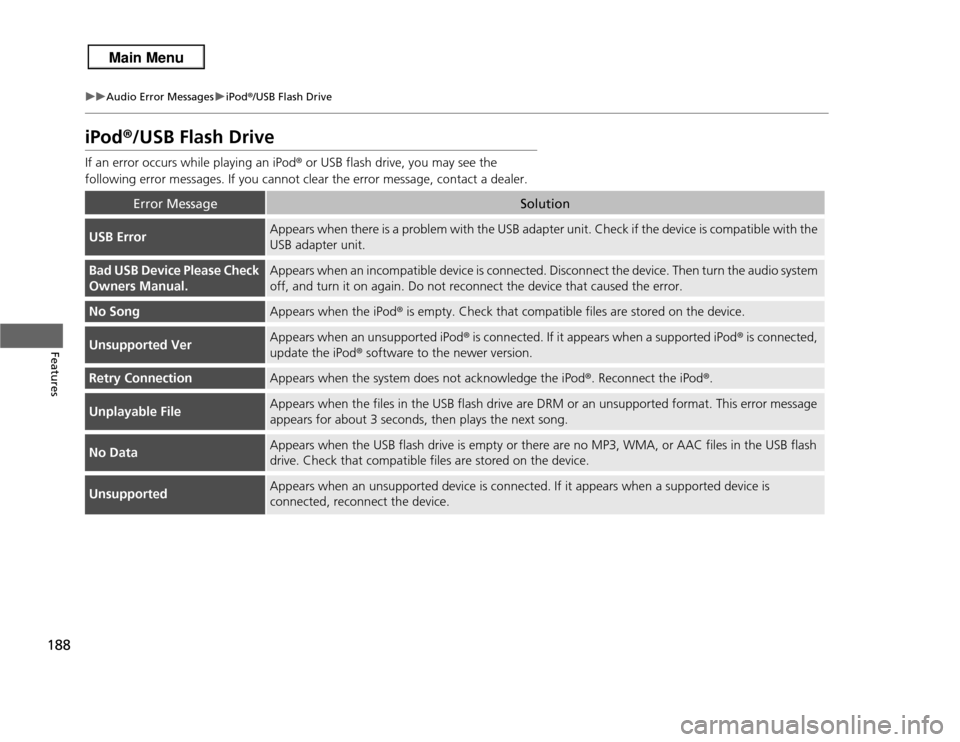
iPod®/USB Flash DriveIf an error occurs while playing an iPod ® or USB flash drive, you may see the
following error messages. If you cannot clear the error message, contact a dealer.
Error Message
Solution
USB Error
Appears when there is a problem with the USB adapter unit. Check if the device is compatible with the
USB adapter unit.
Bad USB Device Please Check
Owners Manual.
Appears when an incompatible device is connected. Disconnect the device. Then turn the audio system
off, and turn it on again. Do not reconnect the device that caused the error.
No Song
Appears when the iPod ® is empty. Check that compatible files are stored on the device.
Unsupported Ver
Appears when an unsupported iPod ® is connected. If it appears when a supported iPod ® is connected,
update the iPod ® software to the newer version.
Retry Connection
Appears when the system does not acknowledge the iPod ®. Reconnect the iPod ®.
Unplayable File
Appears when the files in the USB flash drive are DRM or an unsupported format. This error message
appears for about 3 seconds, then plays the next song.
No Data
Appears when the USB flash drive is empty or there are no MP3, WMA, or AAC files in the USB flash
drive. Check that compatible files are stored on the device.
Unsupported
Appears when an unsupported device is connected. If it appears when a supported device is
connected, reconnect the device.
Page 190 of 364
189
uuAudio Error Messages uPandora®
Features
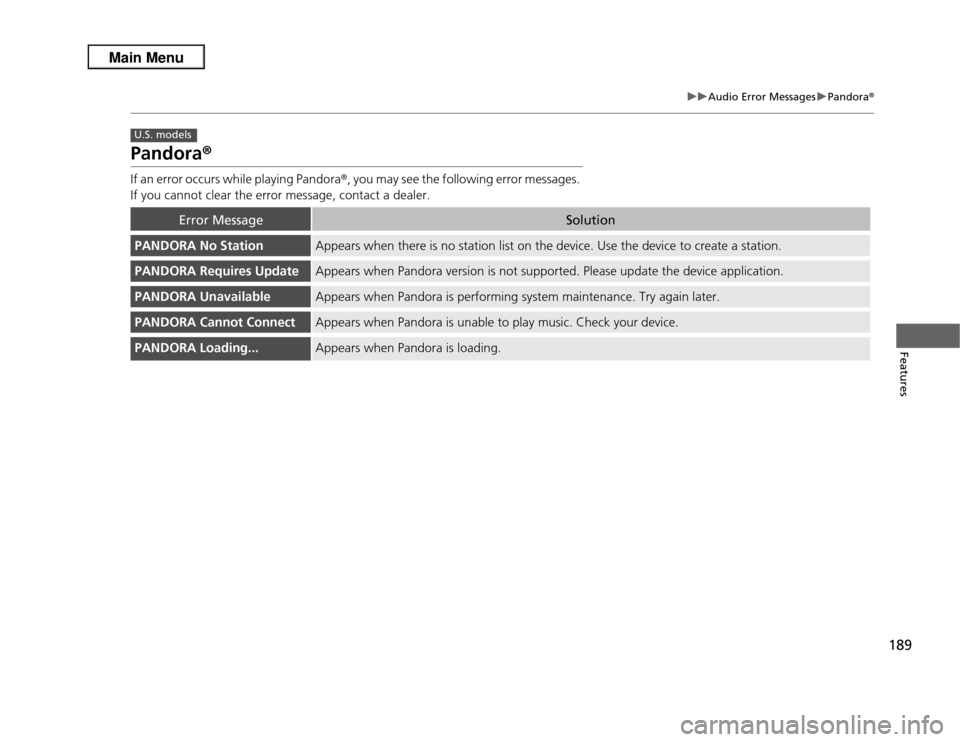
Pandora ®If an error occurs while playing Pandora ®, you may see the following error messages.
If you cannot clear the error message, contact a dealer.
Error Message
Solution
PANDORA No Station
Appears when there is no station list on the device. Use the device to create a station.
PANDORA Requires Update
Appears when Pandora version is not supported. Please update the device application.
PANDORA Unavailable
Appears when Pandora is performing system maintenance. Try again later.
PANDORA Cannot Connect
Appears when Pandora is unable to play music. Check your device.
PANDORA Loading...
Appears when Pandora is loading.
U.S. models
Page 191 of 364
190Features
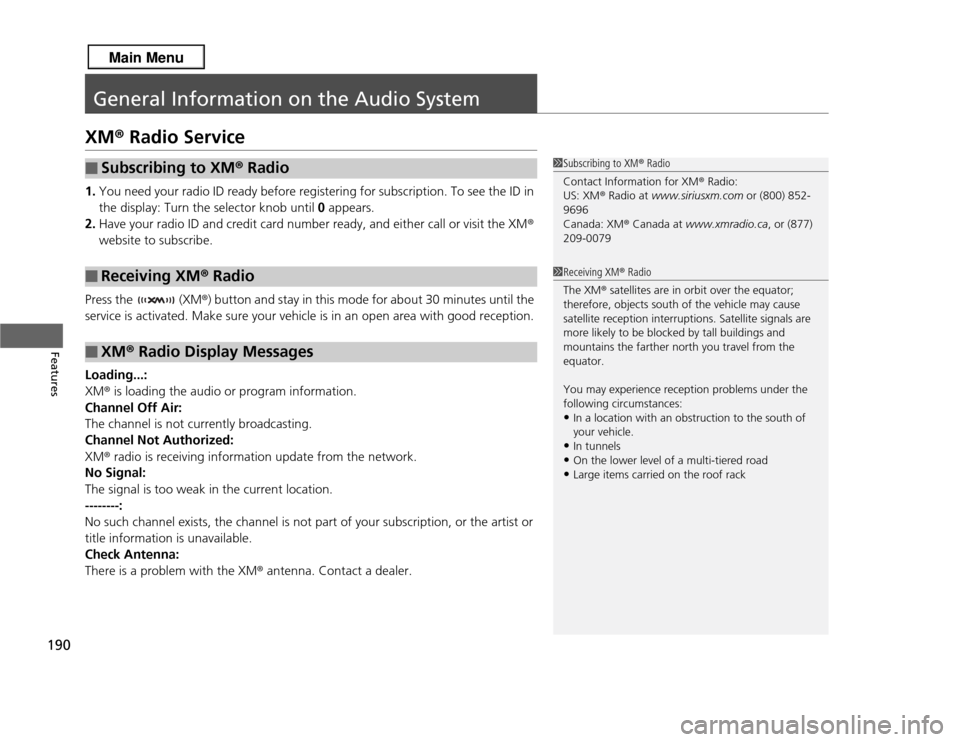
General Information on the Audio SystemXM® Radio Service1. You need your radio ID ready before registering for subscription. To see the ID in
the display: Turn the selector knob until 0 appears.
2. Have your radio ID and credit card number ready, and either call or visit the XM ®
website to subscribe.
Press the (XM ®) button and stay in this mode for about 30 minutes until the
service is activated. Make sure your vehicle is in an open area with good reception.
Loading...:
XM ® is loading the audio or program information.
Channel Off Air:
The channel is not currently broadcasting.
Channel Not Authorized:
XM ® radio is receiving information update from the network.
No Signal:
The signal is too weak in the current location.
--------:
No such channel exists, the channel is not part of your subscription, or the artist or
title information is unavailable.
Check Antenna:
There is a problem with the XM ® antenna. Contact a dealer.■
Subscribing to XM ® Radio
■
Receiving XM ® Radio
■
XM ® Radio Display Messages
1 Subscribing to XM ® Radio
Contact Information for XM ® Radio:
US: XM ® Radio at www.siriusxm.com or (800) 852-
9696
Canada: XM ® Canada at www.xmradio.ca , or (877)
209-00791 Receiving XM ® Radio
The XM ® satellites are in orbit over the equator;
therefore, objects south of the vehicle may cause
satellite reception interruptions. Satellite signals are
more likely to be blocked by tall buildings and
mountains the farther north you travel from the
equator.
You may experience reception problems under the
following circumstances:•In a location with an obstruction to the south of
your vehicle.•In tunnels•On the lower level of a multi-tiered road•Large items carried on the roof rack
Page 220 of 364
Continued
219
uuBluetooth ® HandsFreeLink ®u HFL Menus
Features
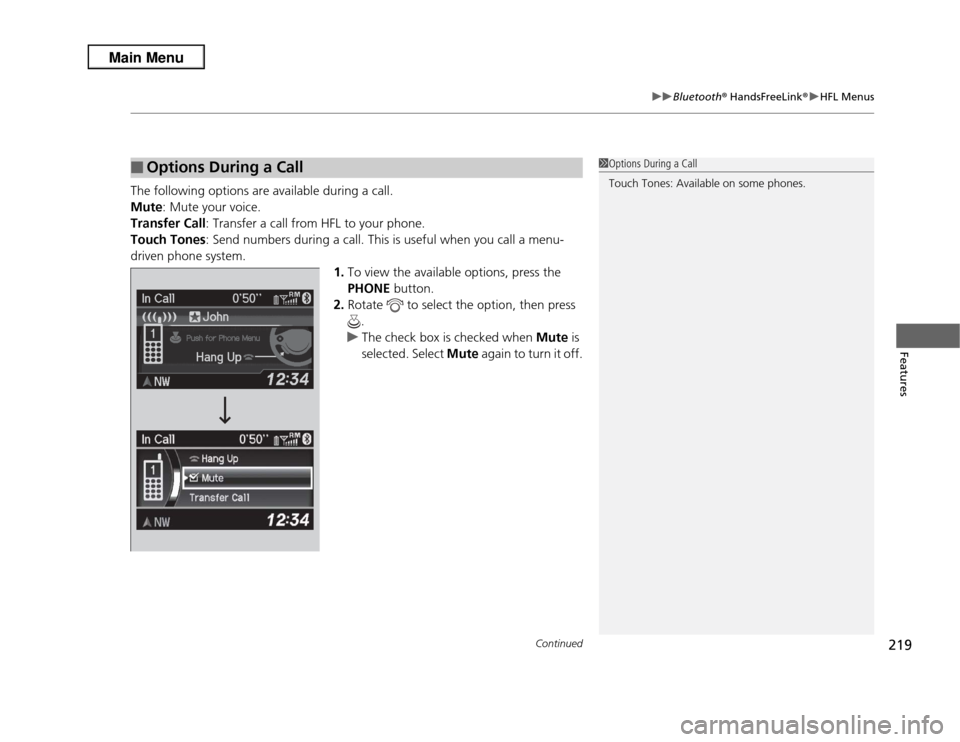
The following options are available during a call.
Mute : Mute your voice.
Transfer Call : Transfer a call from HFL to your phone.
Touch Tones : Send numbers during a call. This is useful when you call a menu-
driven phone system. 1.To view the available options, press the
PHONE button.
2. Rotate to select the option, then press
.
u The check box is checked when Mute is
selected. Select Mute again to turn it off.■
Options During a Call
1Options During a Call
Touch Tones: Available on some phones.
Page 229 of 364
228Driving
Before DrivingDriving PreparationCheck the following items before you start driving.
•Make sure there are no obstructions on the windows, door mirrors, exterior
lights, or other parts of the vehicle.
u Remove any frost, snow, or ice.
u Remove any snow on the roof, as this can slip down and obstruct your field of
vision while driving. If frozen solid, remove ice once it has softened.
u When removing ice from around the wheels, be sure not to damage the wheel
or wheel components.
• Make sure the hood is securely closed.
u If the hood opens while driving, your front view will be blocked.
• Make sure the tires are in good condition.
u Check air pressures, and check for damage and excessive wear.
2 Checking and Maintaining Tires P. 301
•Make sure there are no people or objects behind or around the vehicle.
u There are blind spots from the inside.■
Exterior Checks
1Exterior Checks
NOTICEWhen doors are frozen shut, use warm water around
the door edges to melt any ice. Do not try to force
them open, as this can damage the rubber trim
around the doors. When done, wipe dry to avoid
further freezing.
Do not pour warm water into the key cylinder.
You will be unable to insert key if the water freezes in
the hole.
Heat from the engine and exhaust can ignite
flammable materials left under the hood, causing a
fire. If you've parked your vehicle for an extended
period, inspect and remove any debris that may have
collected, such as dried grass and leaves that have
fallen or have been carried in for use as a nest by a
small animal.
Also check under the hood for leftover flammable
materials after you or someone else has performed
maintenance on your vehicle.
Page 230 of 364
Continued
229
uuBefore Driving uDriving Preparation
Driving
• Store or secure all items on board properly.
u Carrying too much cargo, or improp erly storing it, can affect your vehicle's
handling, stability, stopping distance, and tires, and make it unsafe.
2 Maximum Load Limit P. 231
•Do not pile items higher than the seat height.
u They can block your view and may be thrown forward in the event of sudden
braking.
• Do not place anything in the front seat footwells. Make sure to secure the floor
mat.
u An object or unsecured floor mat can interfere with your brake and accelerator
pedal operation while driving.
• If you have any animals on board, do not let them move around in the vehicle.
u They may interfere with driving and a crash could occur.
• Securely close and lock all doors and the tailgate.
2 Locking/Unlocking the Doors from the Inside P. 104
•Adjust your seating position properly.
u Adjust the head restraint, too.
2 Adjusting the Seats P. 136
2 Adjusting the Head Restraints P. 138
•Adjust the mirrors and steering wheel properly for your driving.
u Adjust them while sitting in the proper driving position.
2 Adjusting the Steering Wheel P. 132
2 Adjusting the Mirrors P. 133
■
Interior Checks
1Interior Checks
The headlight aim is set by the factory, and does not
need to be adjusted. However, if you regularly carry
heavy items in the cargo area or tow a trailer, have
the aiming readjusted at a dealer or by a qualified
technician.
Page 231 of 364

230
uuBefore Driving uDriving Preparation
Driving
• Be sure items placed on the floor behind the front seats cannot roll under the
seats.
u They can interfere with the driver's ability to operate the pedals, the operation
of the seats, or the operation of the sensors under the seats.
• Everyone in the vehicle must fasten their seat belt.
2 Fastening a Seat Belt P. 32
•Make sure that the indicators in the instrument panel come on when you start the
vehicle, and go off soon after.
u Always have a dealer check the vehicle if a problem is indicated.
2 Indicators P. 68
Page 234 of 364
233
Continued
Driving
Towing a TrailerTowing PreparationYour vehicle can tow a trailer if you carefully observe the load limits, use the proper
equipment, and follow the towing guidelines. Check the load limits before driving.
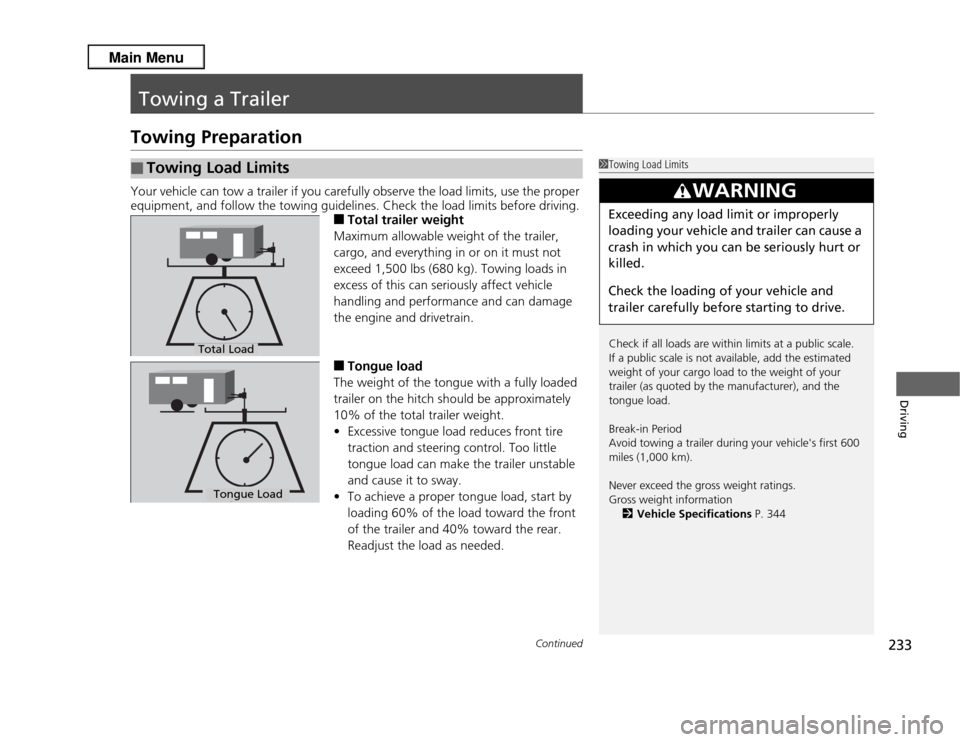
■
Total trailer weight
Maximum allowable weight of the trailer,
cargo, and everything in or on it must not
exceed 1,500 lbs (680 kg). Towing loads in
excess of this can seriously affect vehicle
handling and performance and can damage
the engine and drivetrain.
■
Tongue load
The weight of the tongue with a fully loaded
trailer on the hitch should be approximately
10% of the total trailer weight.
• Excessive tongue load reduces front tire
traction and steering control. Too little
tongue load can make the trailer unstable
and cause it to sway.
• To achieve a proper tongue load, start by
loading 60% of the load toward the front
of the trailer and 40% toward the rear.
Readjust the load as needed.
■
Towing Load Limits
1Towing Load Limits
Check if all loads are within limits at a public scale.
If a public scale is not available, add the estimated
weight of your cargo load to the weight of your
trailer (as quoted by the manufacturer), and the
tongue load.
Break-in Period
Avoid towing a trailer during your vehicle's first 600
miles (1,000 km).
Never exceed the gross weight ratings.
Gross weight information
2 Vehicle Specifications P. 344
3
WARNING
Exceeding any load limit or improperly
loading your vehicle and trailer can cause a
crash in which you can be seriously hurt or
killed.
Check the loading of your vehicle and
trailer carefully before starting to drive.
Total LoadTongue LoadTongue Load
Page 236 of 364
235
uuTowing a Trailer uTowing Preparation
Driving
■
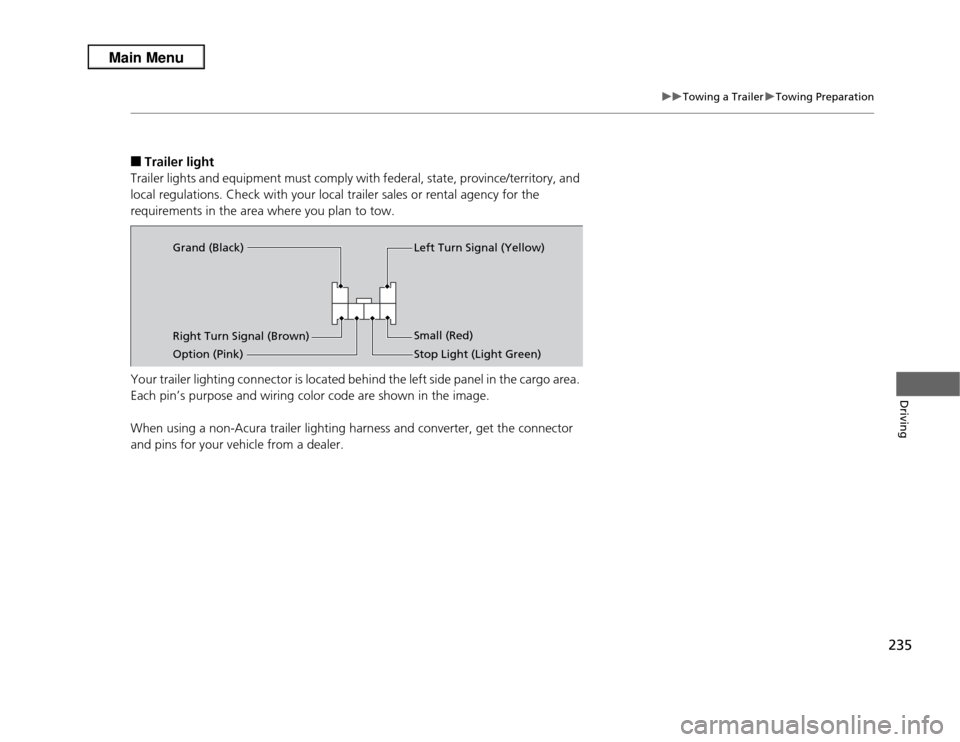
Trailer light
Trailer lights and equipment must comply with federal, state, province/territory, and
local regulations. Check with your local trailer sales or rental agency for the
requirements in the area where you plan to tow.
Your trailer lighting connector is located behind the left side panel in the cargo area.
Each pin’s purpose and wiring color code are shown in the image.
When using a non-Acura trailer lighting harness and converter, get the connector
and pins for your vehicle from a dealer.
Right Turn Signal (Brown) Left Turn Signal (Yellow)
Small (Red)
Stop Light (Light Green)
Option (Pink) Grand (Black)