ACURA RL KA9 1996 Service Repair Manual
Manufacturer: ACURA, Model Year: 1996, Model line: RL KA9, Model: ACURA RL KA9 1996Pages: 1954, PDF Size: 61.44 MB
Page 1011 of 1954
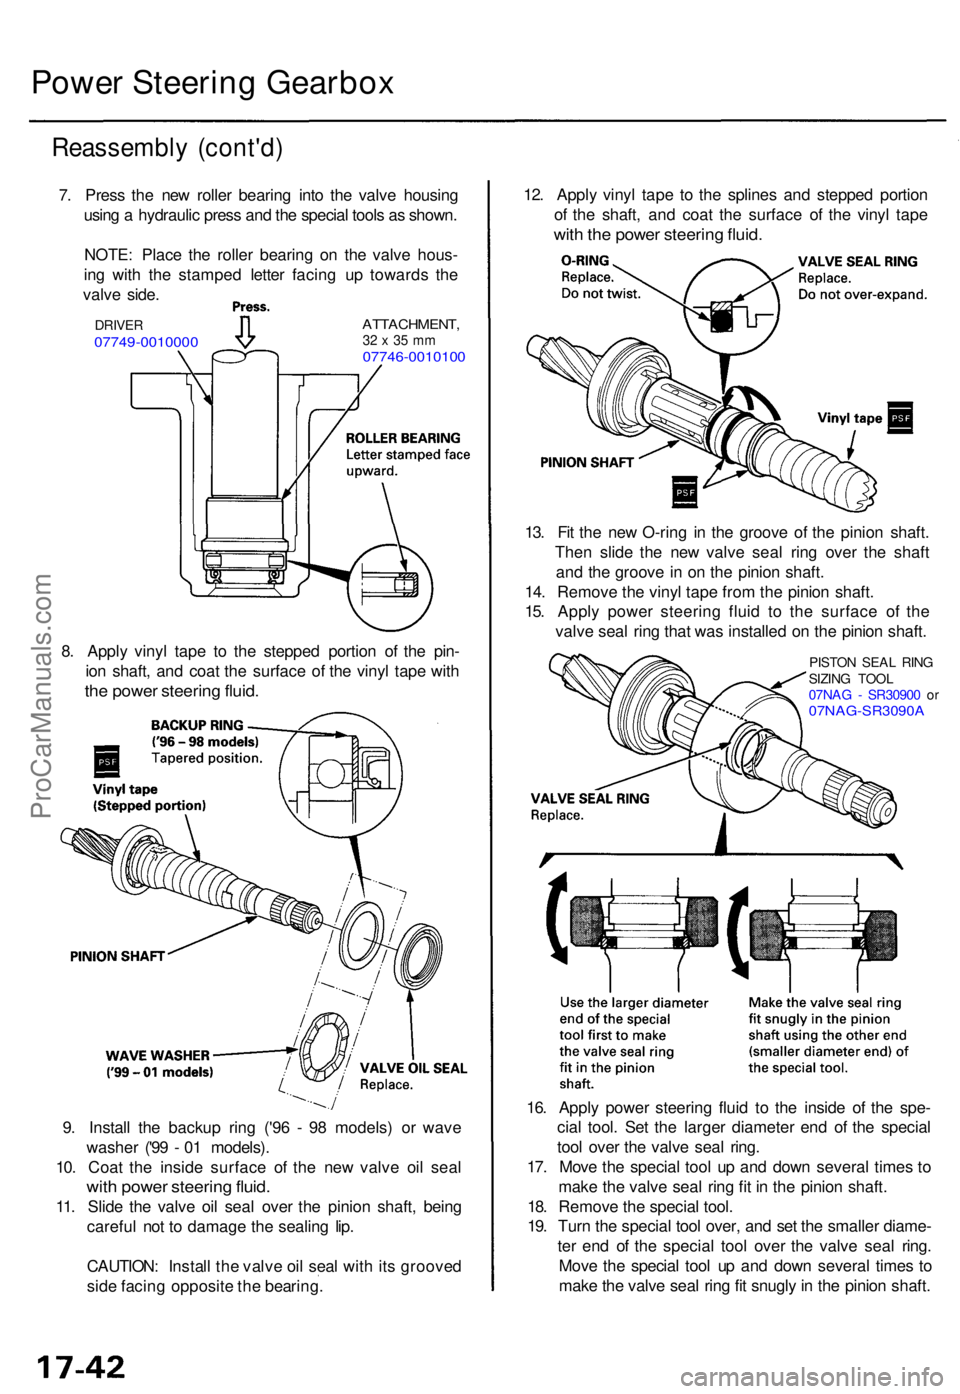
9. Instal l th e backu p rin g ('9 6 - 9 8 models ) o r wav e
washe r ('9 9 - 0 1 models) .
10 . Coa t th e insid e surfac e o f th e ne w valv e oi l sea l
with powe r steerin g fluid .
11. Slid e th e valv e oi l sea l ove r th e pinio n shaft , bein g
carefu l no t t o damag e th e sealin g lip .
CAUTION : Instal l th e valv e oi l sea l wit h it s groove d
sid e facin g opposit e th e bearing . 16
. Appl y powe r steerin g flui d t o th e insid e o f th e spe -
cia l tool . Se t th e large r diamete r en d o f th e specia l
too l ove r th e valv e sea l ring .
17 . Mov e th e specia l too l u p an d dow n severa l time s t o
mak e th e valv e sea l rin g fi t i n th e pinio n shaft .
18 . Remov e th e specia l tool .
19 . Tur n th e specia l too l over , an d se t th e smalle r diame -
te r en d o f th e specia l too l ove r th e valv e sea l ring .
Mov e th e specia l too l u p an d dow n severa l time s t o
mak e th e valv e sea l rin g fi t snugl y in th e pinio n shaft .
13
. Fi t th e ne w O-rin g i n th e groov e o f th e pinio n shaft .
The n slid e th e ne w valv e sea l rin g ove r th e shaf t
an d th e groov e in o n th e pinio n shaft .
14 . Remov e th e viny l tap e fro m th e pinio n shaft .
15 . Appl y powe r steerin g flui d t o th e surfac e o f th e
valv e sea l rin g tha t wa s installe d o n th e pinio n shaft .
PISTO N SEA L RIN G
SIZIN G TOO L
07NA G - SR3090 0 o r
07NAG-SR3090 A
8. Appl y viny l tap e t o th e steppe d portio n o f th e pin -
io n shaft , an d coa t th e surfac e o f th e viny l tap e wit h
the powe r steerin g fluid .
Reassembl y (cont'd )
7. Pres s th e ne w rolle r bearin g int o th e valv e housin g
usin g a hydrauli c pres s an d th e specia l tool s a s shown .
NOTE : Plac e th e rolle r bearin g o n th e valv e hous -
in g wit h th e stampe d lette r facin g u p toward s th e
valv e side .
DRIVE R07749-001000 0ATTACHMENT ,32 x 35 m m07746-001010 0
12. Appl y viny l tap e t o th e spline s an d steppe d portio n
o f th e shaft , an d coa t th e surfac e o f th e viny l tap e
with th e powe r steerin g fluid .
Powe r Steerin g Gearbo x
ProCarManuals.com
Page 1012 of 1954
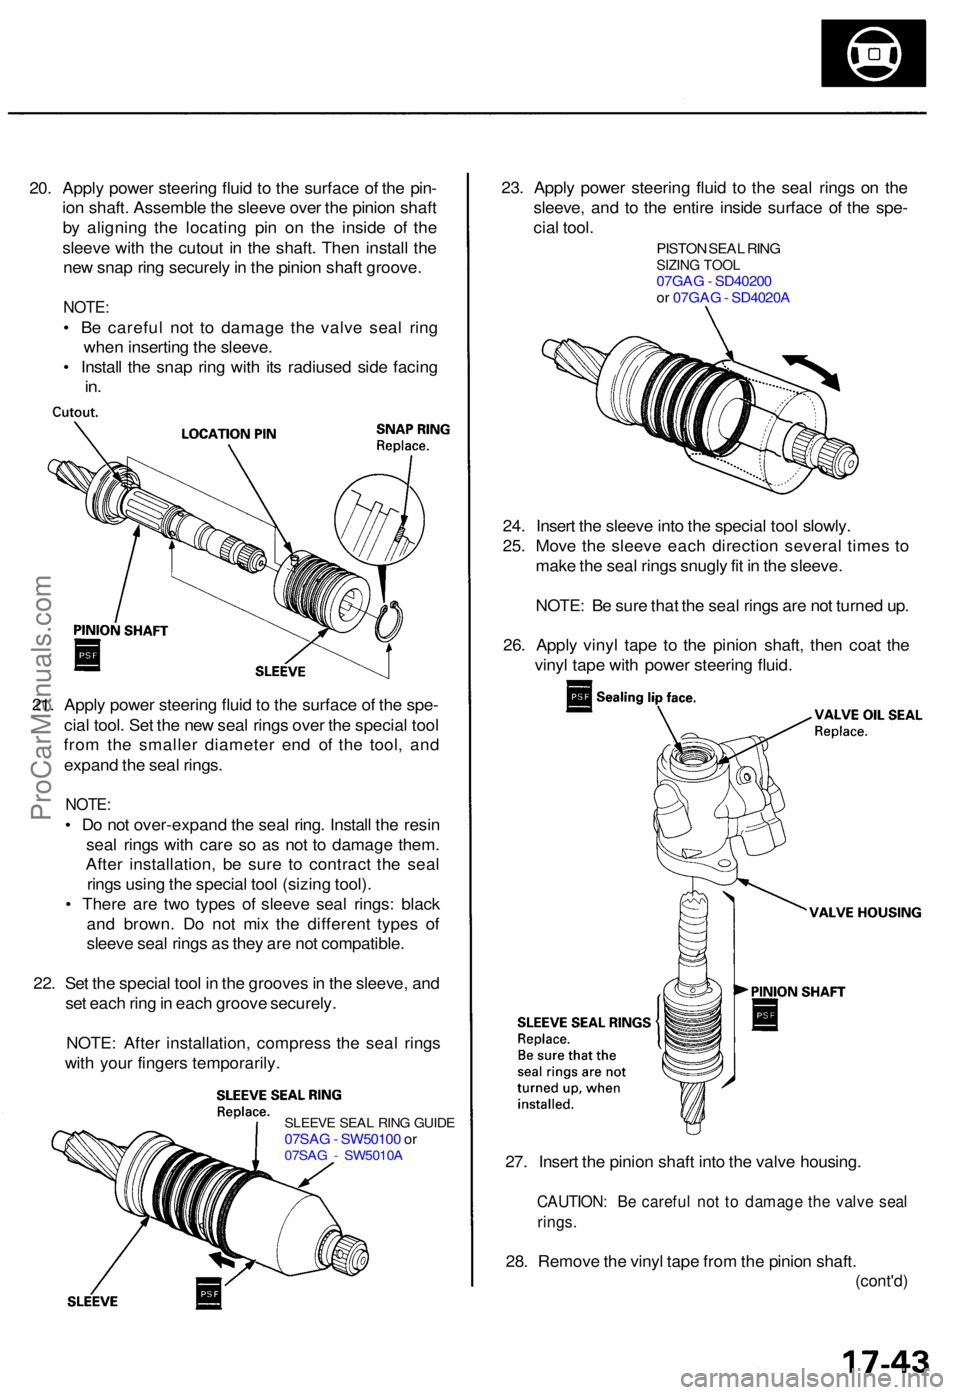
SLEEVE SEA L RIN G GUID E07SAG - SW5010 0 o r07SA G - SW5010 A27. Inser t th e pinio n shaf t int o th e valv e housing .
CAUTION : B e carefu l no t t o damag e th e valv e sea l
rings .
28. Remov e th e viny l tap e fro m th e pinio n shaft .
(cont'd )
20. Appl y powe r steerin g flui d t o th e surfac e o f th e pin -
io n shaft . Assembl e th e sleev e ove r th e pinio n shaf t
b y alignin g th e locatin g pi n o n th e insid e of the
sleev e wit h th e cutou t i n th e shaft . The n instal l th e
ne w sna p rin g securel y in th e pinio n shaf t groove .
NOTE:
• B e carefu l no t t o damag e th e valv e sea l rin g
whe n insertin g th e sleeve .
• Instal l th e sna p rin g wit h it s radiuse d sid e facin g
in.
23 . Appl y powe r steerin g flui d t o th e sea l ring s o n th e
sleeve , an d t o th e entir e insid e surfac e o f th e spe -
cia l tool .
PISTO N SEA L RIN GSIZIN G TOO L07GA G - SD4020 0
o r 07GA G - SD4020 A
24. Inser t th e sleev e int o th e specia l too l slowly .
25 . Mov e th e sleev e eac h directio n severa l time s t o
mak e th e sea l ring s snugl y fi t i n th e sleeve .
NOTE : B e sur e tha t th e sea l ring s ar e no t turne d up .
26 . Appl y viny l tap e t o th e pinio n shaft , the n coa t th e
viny l tap e wit h powe r steerin g fluid .
21 . Appl y powe r steerin g flui d to th e surfac e o f th e spe -
cia l tool . Se t th e ne w sea l ring s ove r th e specia l too l
fro m th e smalle r diamete r en d o f th e tool , an d
expan d th e sea l rings .
NOTE :
• D o no t over-expan d th e sea l ring . Instal l th e resi n
sea l ring s wit h car e s o a s no t t o damag e them .
Afte r installation , b e sur e t o contrac t th e sea l
ring s usin g th e specia l too l (sizin g tool) .
• Ther e ar e tw o type s o f sleev e sea l rings : blac k
an d brown . D o no t mi x th e differen t type s of
sleev e sea l ring s a s the y ar e no t compatible .
22 . Se t th e specia l too l i n th e groove s in th e sleeve , an d
se t eac h rin g in eac h groov e securely .
NOTE : Afte r installation , compres s th e sea l ring s
wit h you r finger s temporarily .
ProCarManuals.com
Page 1013 of 1954
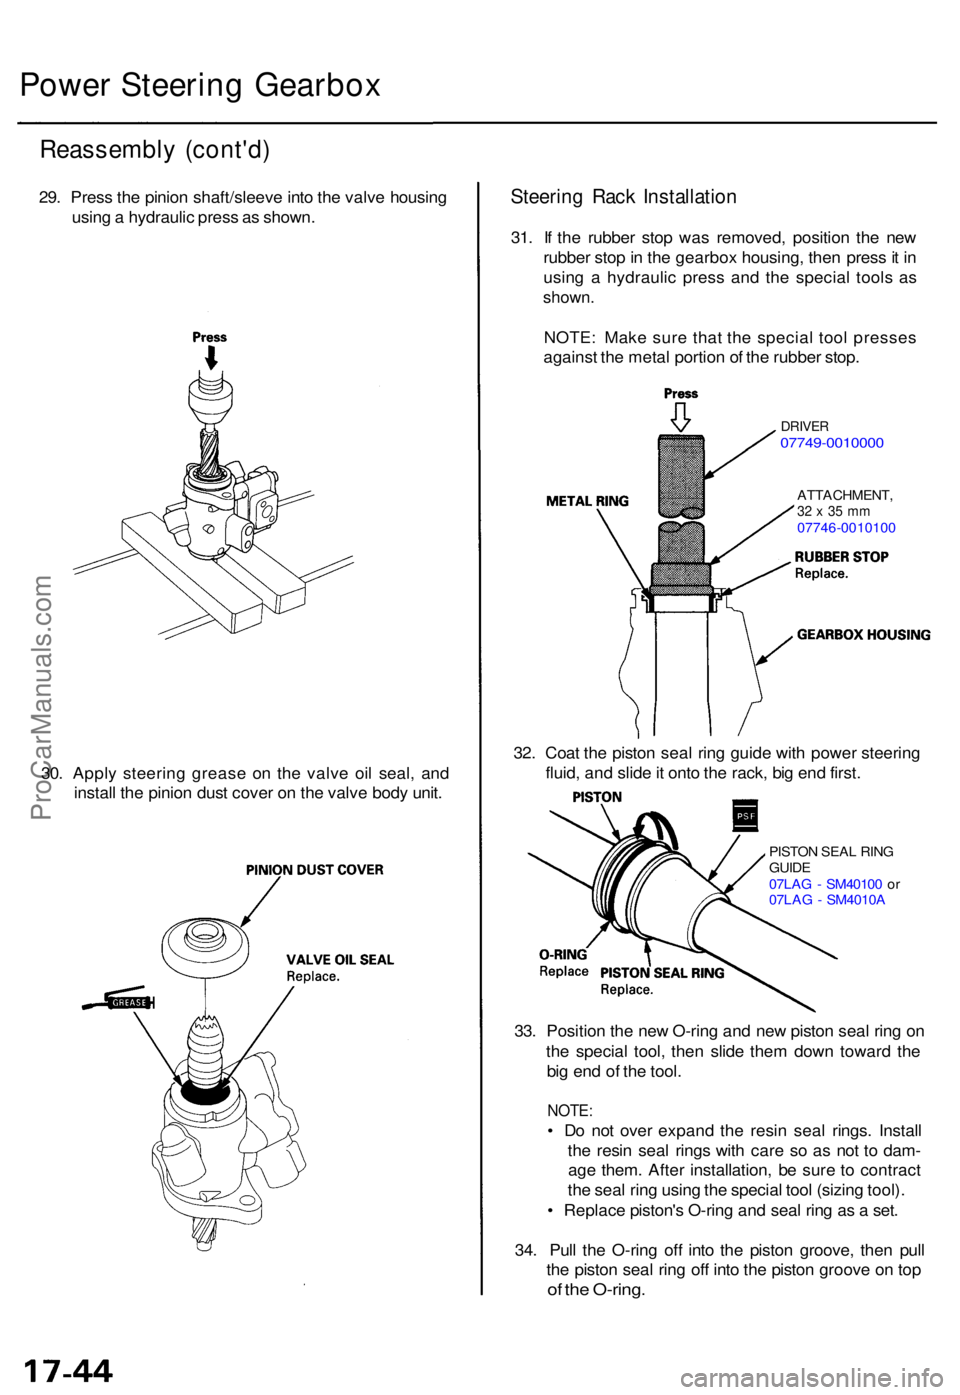
33. Positio n th e ne w O-rin g an d ne w pisto n sea l rin g o n
th e specia l tool , the n slid e the m dow n towar d th e
bi g en d o f th e tool .
NOTE :
• D o no t ove r expan d th e resi n sea l rings . Instal l
th e resi n sea l ring s wit h car e s o a s no t t o dam -
ag e them . Afte r installation , b e sur e t o contrac t
th e sea l rin g usin g th e specia l too l (sizin g tool) .
• Replac e piston' s O-rin g an d sea l rin g a s a set .
34 . Pul l th e O-rin g of f int o th e pisto n groove , the n pul l
th e pisto n sea l rin g of f int o th e pisto n groov e o n to p
of th e O-ring .
PISTON SEA L RIN GGUID E07LAG - SM4010 0 o r
07LA G - SM4010 A
32. Coa t th e pisto n sea l rin g guid e wit h powe r steerin g
fluid , an d slid e it ont o th e rack , bi g en d first .
30 . Appl y steerin g greas e o n th e valv e oi l seal , an d
instal l th e pinio n dus t cove r o n th e valv e bod y unit .
Steerin g Rac k Installatio n
31. I f th e rubbe r sto p wa s removed , positio n th e ne w
rubbe r sto p in th e gearbo x housing , the n pres s it i n
usin g a hydrauli c pres s an d th e specia l tool s a s
shown .
NOTE: Mak e sur e tha t th e specia l too l presse s
agains t th e meta l portio n o f th e rubbe r stop .
Powe r Steerin g Gearbo x
Reassembl y (cont'd )
29. Pres s th e pinio n shaft/sleev e int o th e valv e housin g
usin g a hydrauli c pres s a s shown .
DRIVER07749-001000 0
ATTACHMENT ,32 x 35 m m07746-001010 0
ProCarManuals.com
Page 1014 of 1954
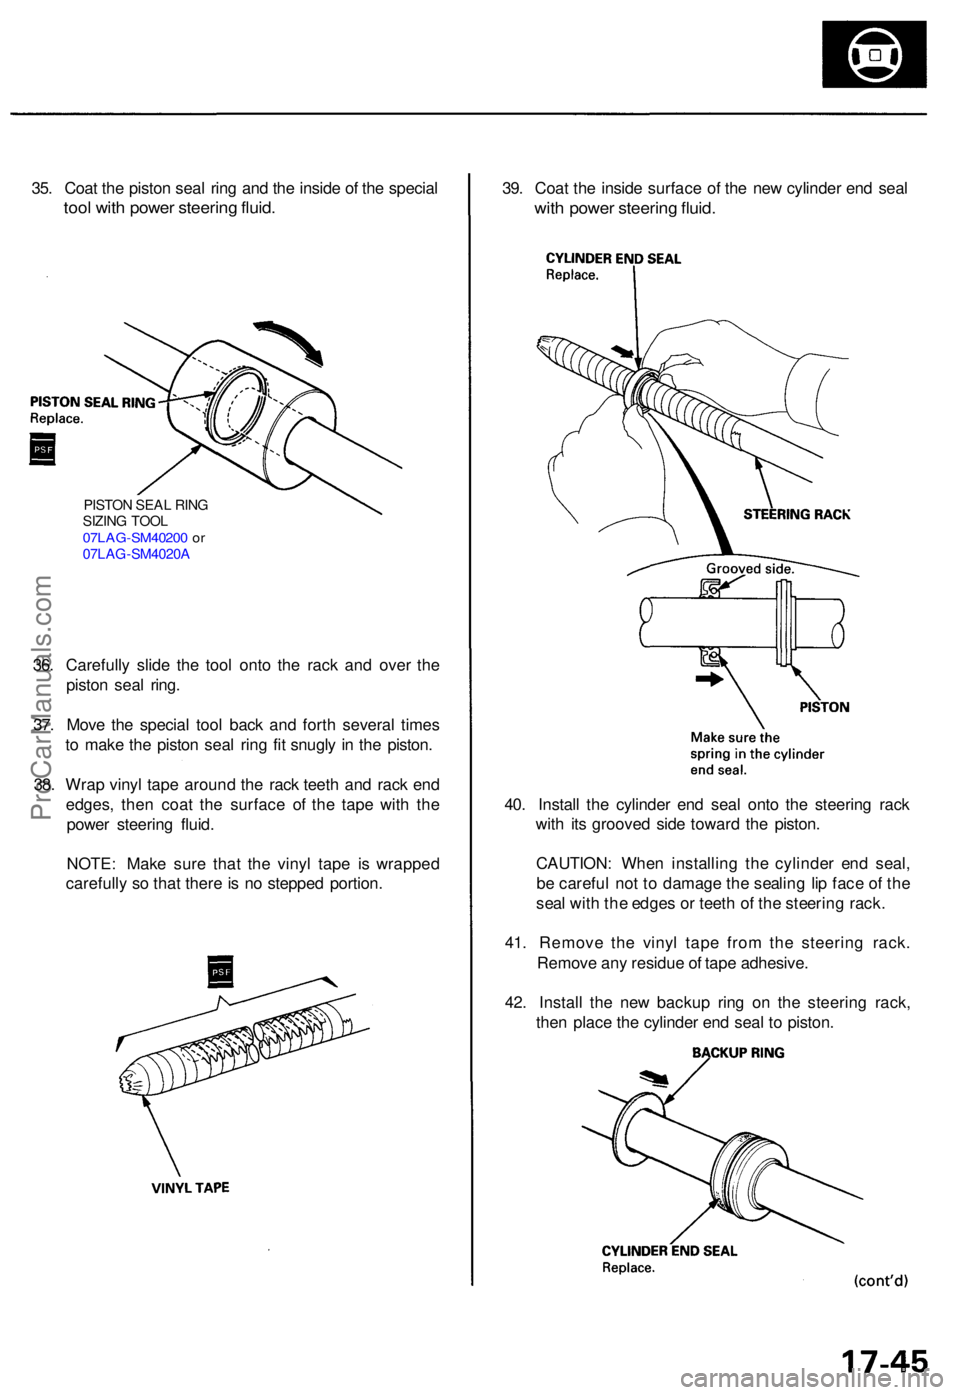
40. Instal l th e cylinde r en d sea l ont o th e steerin g rac k
wit h it s groove d sid e towar d th e piston .
CAUTION : Whe n installin g th e cylinde r en d seal ,
b e carefu l no t t o damag e th e sealin g li p fac e o f th e
sea l wit h th e edge s o r teet h o f th e steerin g rack .
41 . Remov e th e viny l tap e fro m th e steerin g rack .
Remov e an y residu e o f tap e adhesive .
42 . Instal l th e ne w backu p rin g o n th e steerin g rack ,
the n plac e th e cylinde r en d sea l t o piston .
36
. Carefull y slid e th e too l ont o th e rac k an d ove r th e
pisto n sea l ring .
37 . Mov e th e specia l too l bac k an d fort h severa l time s
t o mak e th e pisto n sea l rin g fi t snugl y i n th e piston .
38 . Wra p viny l tap e aroun d th e rac k teet h an d rac k en d
edges , the n coa t th e surfac e of the tap e wit h th e
powe r steerin g fluid .
NOTE : Mak e sur e tha t th e viny l tap e i s wrappe d
carefull y s o tha t ther e is n o steppe d portion .
PISTON SEA L RIN GSIZIN G TOO L07LAG-SM4020 0 o r07LA G-SM4020 A
39. Coa t th e insid e surfac e o f th e ne w cylinde r en d sea l
with powe r steerin g fluid .
35. Coa t th e pisto n sea l rin g an d th e insid e o f th e specia l
tool wit h powe r steerin g fluid .
ProCarManuals.com
Page 1015 of 1954
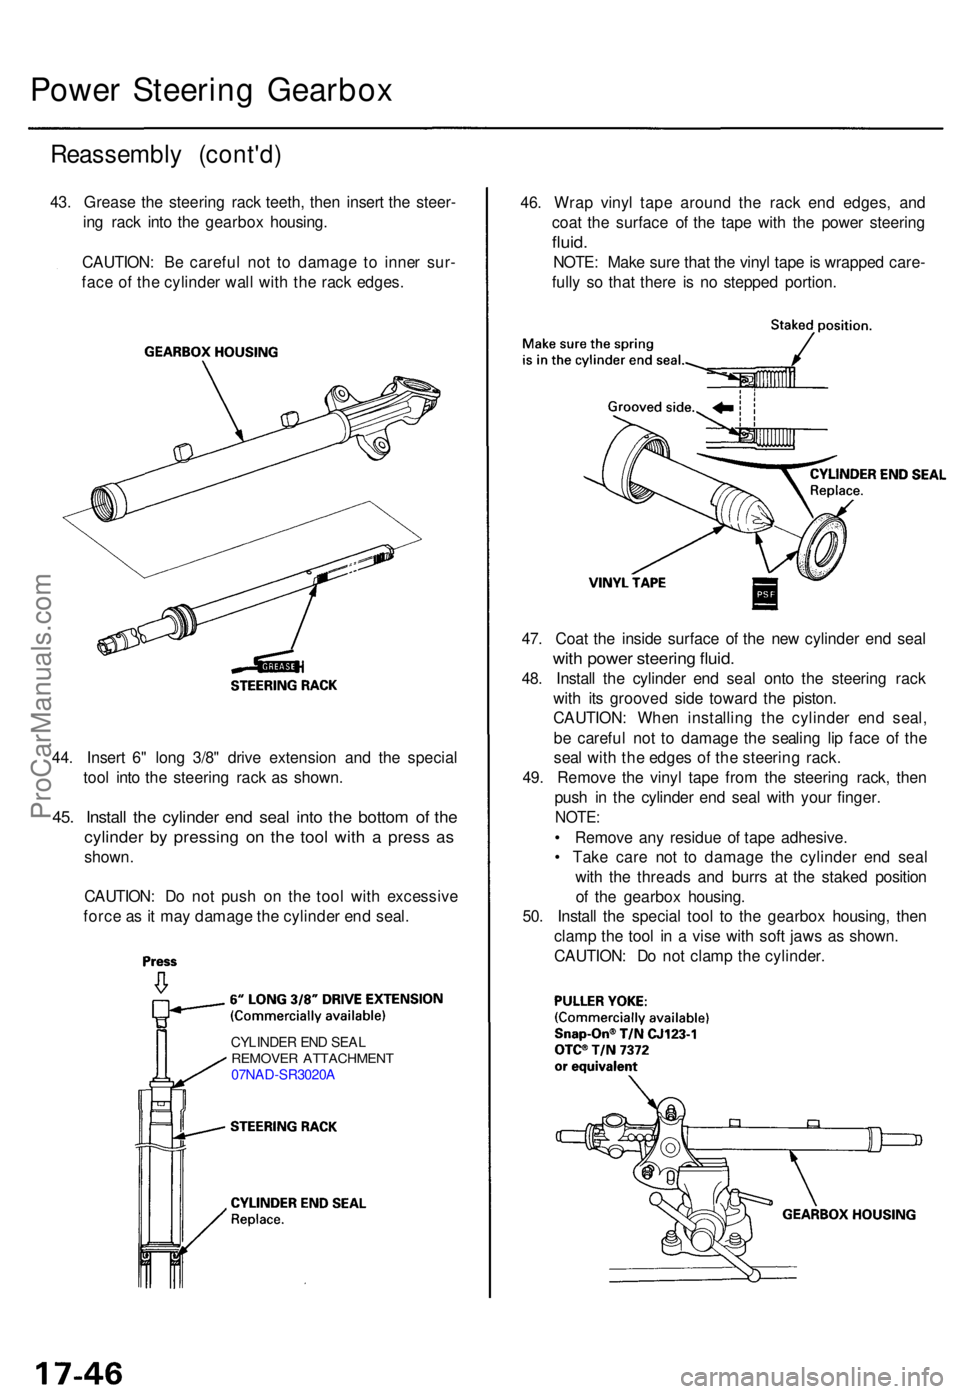
44. Inser t 6 " lon g 3/8 " driv e extensio n an d th e specia l
too l int o th e steerin g rac k a s shown .
45. Instal l th e cylinde r en d sea l int o th e botto m o f th e
cylinde r b y pressin g o n th e too l wit h a pres s a s
shown .
CAUTION : D o no t pus h o n th e too l wit h excessiv e
forc e a s it ma y damag e th e cylinde r en d seal . 47
. Coa t th e insid e surfac e o f th e ne w cylinde r en d sea l
with powe r steerin g fluid .
48. Instal l th e cylinde r en d sea l ont o th e steerin g rac k
wit h it s groove d sid e towar d th e piston .
CAUTION : Whe n installin g th e cylinde r en d seal ,
b e carefu l no t t o damag e th e sealin g li p fac e o f th e
sea l wit h th e edge s o f th e steerin g rack .
49 . Remov e th e vinyl tape fro m th e steerin g rack , the n
pus h i n th e cylinde r en d sea l wit h you r finger .
NOTE:
• Remov e an y residu e o f tap e adhesive .
• Tak e car e no t t o damag e th e cylinde r en d sea l
wit h th e thread s an d burr s a t th e stake d positio n
o f th e gearbo x housing .
50 . Instal l th e specia l too l t o th e gearbo x housing , the n
clam p th e too l i n a vis e wit h sof t jaw s a s shown .
CAUTION : D o no t clam p th e cylinder .
CYLINDE R EN D SEA LREMOVE R ATTACHMEN T07NAD-SR3020 A
Power Steerin g Gearbo x
Reassembl y (cont'd )
43. Greas e th e steerin g rac k teeth , the n inser t th e steer -
in g rac k int o th e gearbo x housing .
CAUTION : B e carefu l no t t o damag e t o inne r sur -
fac e o f th e cylinde r wal l wit h th e rac k edges . 46
. Wra p viny l tap e aroun d th e rac k en d edges , an d
coa t th e surfac e o f th e tap e wit h th e powe r steerin g
fluid.
NOTE : Mak e sur e tha t th e viny l tap e is wrappe d care -
full y s o tha t ther e i s n o steppe d portion .
ProCarManuals.com
Page 1016 of 1954
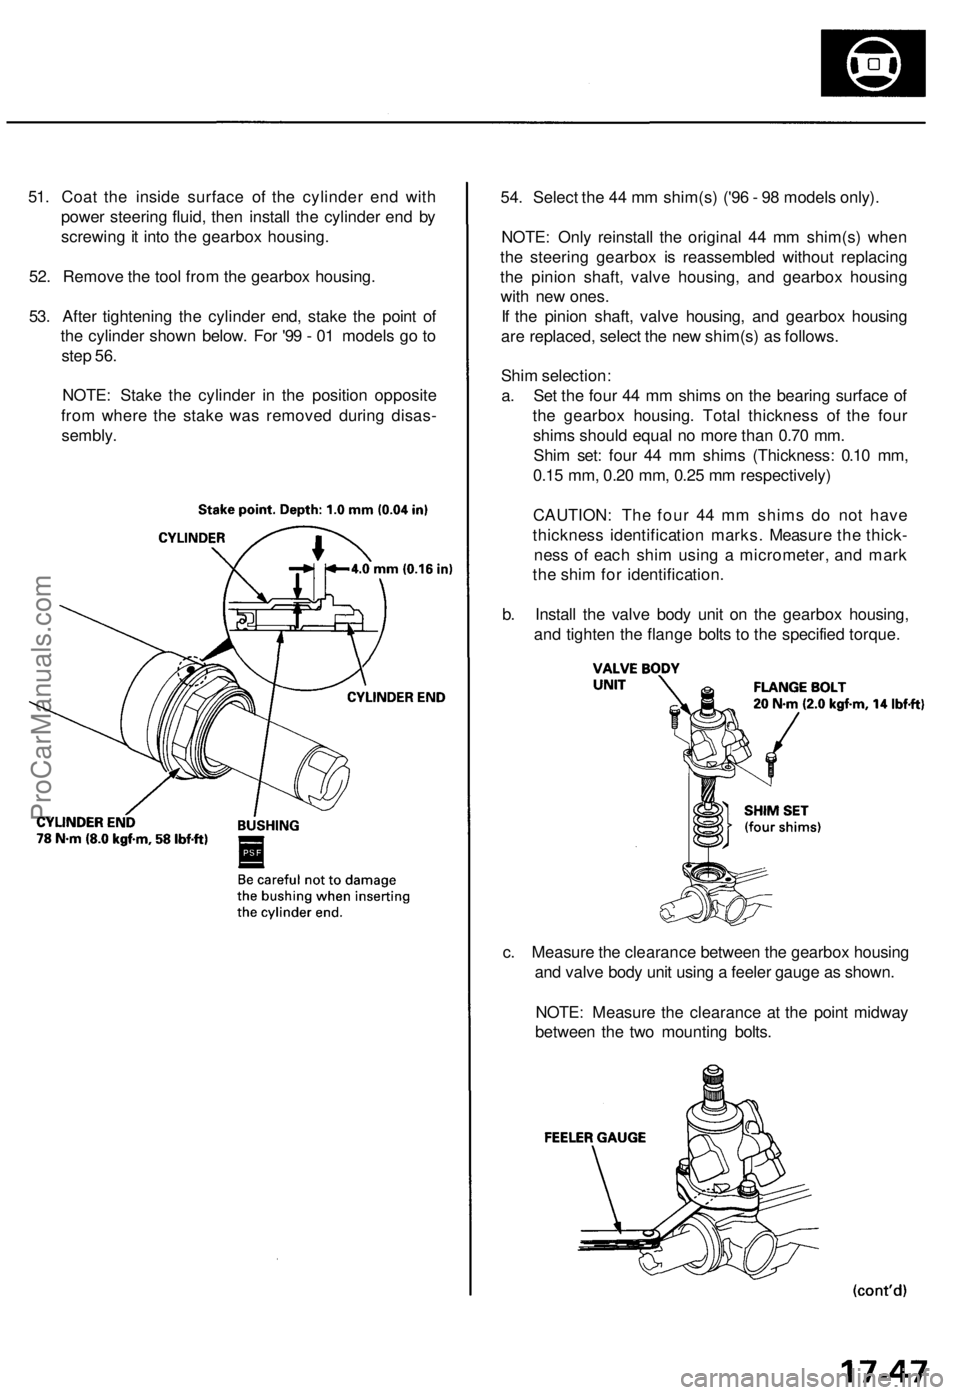
51. Coa t th e insid e surfac e o f th e cylinde r en d wit h
powe r steerin g fluid , the n instal l th e cylinde r en d b y
screwin g it int o th e gearbo x housing .
52 . Remov e th e too l fro m th e gearbo x housing .
53 . Afte r tightenin g th e cylinde r end , stak e th e poin t o f
th e cylinde r show n below . Fo r '9 9 - 0 1 model s g o t o
ste p 56 .
NOTE : Stak e th e cylinde r i n th e positio n opposit e
fro m wher e th e stak e wa s remove d durin g disas -
sembly . 54
. Selec t th e 4 4 m m shim(s ) ('9 6 - 9 8 model s only) .
NOTE : Onl y reinstal l th e origina l 4 4 m m shim(s ) whe n
th e steerin g gearbo x i s reassemble d withou t replacin g
th e pinio n shaft , valv e housing , an d gearbo x housin g
wit h ne w ones .
I f th e pinio n shaft , valv e housing , an d gearbo x housin g
ar e replaced , selec t th e ne w shim(s ) a s follows .
Shi m selection :
a . Se t th e fou r 4 4 m m shim s o n th e bearin g surfac e o f
th e gearbo x housing . Tota l thicknes s o f th e fou r
shim s shoul d equa l n o mor e tha n 0.7 0 mm .
Shi m set : fou r 4 4 m m shim s (Thickness : 0.1 0 mm ,
0.1 5 mm , 0.2 0 mm , 0.2 5 m m respectively )
CAUTION : Th e fou r 4 4 m m shim s d o no t hav e
thicknes s identificatio n marks . Measur e th e thick -
nes s o f eac h shi m usin g a micrometer , an d mar k
th e shi m fo r identification .
b . Instal l th e valv e bod y uni t o n th e gearbo x housing ,
an d tighte n th e flang e bolt s t o th e specifie d torque .
c . Measur e th e clearanc e betwee n th e gearbo x housin g
an d valv e bod y uni t usin g a feele r gaug e a s shown .
NOTE : Measur e th e clearanc e a t th e poin t midwa y
betwee n th e tw o mountin g bolts .
ProCarManuals.com
Page 1017 of 1954
Reassembly (cont'd )
d. Determin e th e require d thicknes s o f th e 4 4 m m
shim s b y subtractin g th e clearanc e obtaine d i n th e
ste p - "C " fro m th e tota l thicknes s o f th e fou r shims .
(Tota l thicknes s o f th e fou r shims ) - (Clearance ) =
Require d thicknes s o f th e shim s
NOTE : Selec t th e shim s s o tha t th e tota l thicknes s
i s clos e to , bu t les s tha n th e require d thickness .
Example:
Measuremen t i s 0.2 8 m m (0.01 1 in) :
0.0 7 - 0.2 8 = 0.4 2 m m (0.02 8 - 0.01 1 = 0.01 7 in )
Th e selecte d shim s shoul d b e 0.2 5 m m (0.01 0 in ) an d
0.1 5 m m (0.00 6 in ) i n thickness .
I f th e require d shi m thicknes s i s 0.1 0 m m o r less , n o
shim s ar e necessary .
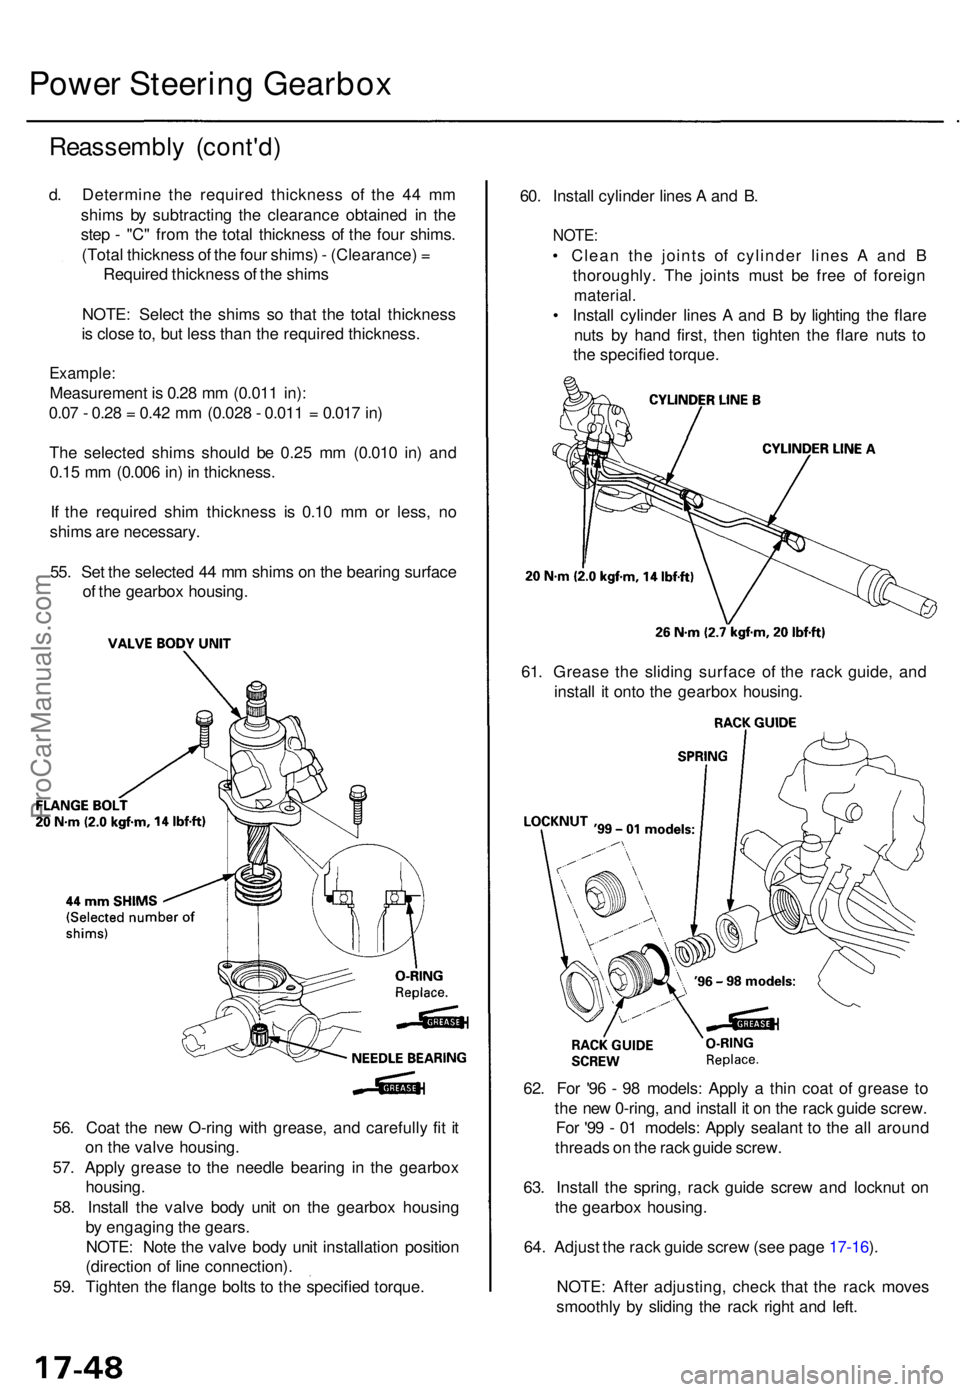
55 . Se t th e selecte d 4 4 m m shim s o n th e bearin g surfac e
o f th e gearbo x housing . 60
. Instal l cylinde r line s A an d B .
NOTE :
• Clea n th e joint s o f cylinde r line s A an d B
thoroughly . Th e joint s mus t b e fre e o f foreig n
material .
• Instal l cylinde r line s A an d B by lightin g th e flar e
nut s b y han d first , the n tighte n th e flar e nut s t o
th e specifie d torque .
Power Steerin g Gearbo x
61. Greas e th e slidin g surfac e of the rac k guide , an d
instal l i t ont o th e gearbo x housing .
62 . Fo r '9 6 - 9 8 models : Appl y a thi n coa t o f greas e t o
th e ne w 0-ring , an d instal l i t o n th e rac k guid e screw .
Fo r '9 9 - 0 1 models : Appl y sealan t t o th e al l aroun d
thread s o n th e rac k guid e screw .
63 . Instal l th e spring , rac k guid e scre w an d locknu t o n
th e gearbo x housing .
64 . Adjus t th e rac k guid e scre w (se e pag e 17-16 ).
NOTE : Afte r adjusting , chec k tha t th e rac k move s
smoothl y b y slidin g th e rac k righ t an d left .
56
. Coa t th e ne w O-rin g wit h grease , an d carefull y fi t i t
o n th e valv e housing .
57 . Appl y greas e t o th e needl e bearin g i n th e gearbo x
housing .
58 . Instal l th e valv e bod y uni t o n th e gearbo x housin g
b y engagin g th e gears.
NOTE : Not e th e valv e bod y uni t installatio n positio n
(directio n o f lin e connection) .
59 . Tighte n th e flang e bolt s t o th e specifie d torque .
ProCarManuals.com
Page 1018 of 1954
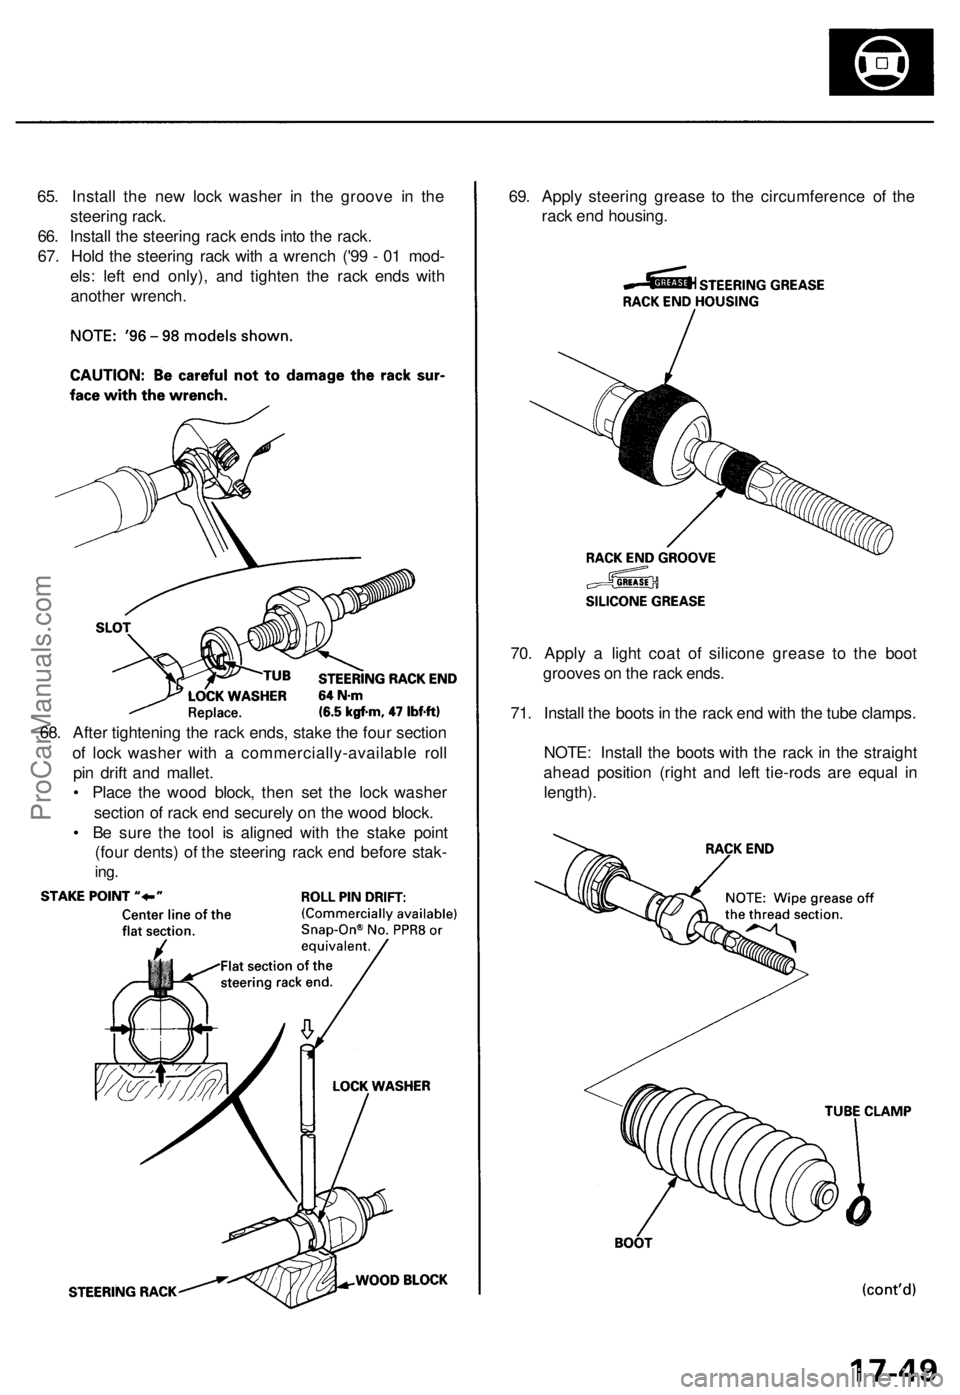
65. Install the new lock washer in the groove in the
steering rack.
66. Install the steering rack ends into the rack.
67. Hold the steering rack with a wrench ('99 - 01 mod-
els: left end only), and tighten the rack ends with
another wrench.
69. Apply steering grease to the circumference of the
rack end housing.
70. Apply a light coat of silicone grease to the boot
grooves on the rack ends.
71. Install the boots in the rack end with the tube clamps.
NOTE: Install the boots with the rack in the straight
ahead position (right and left tie-rods are equal in
length).
68. After tightening the rack ends, stake the four section
of lock washer with a commercially-available roll
pin drift and mallet.
• Place the wood block, then set the lock washer
section of rack end securely on the wood block.
• Be sure the tool is aligned with the stake point
(four dents) of the steering rack end before stak-
ing.ProCarManuals.com
Page 1019 of 1954
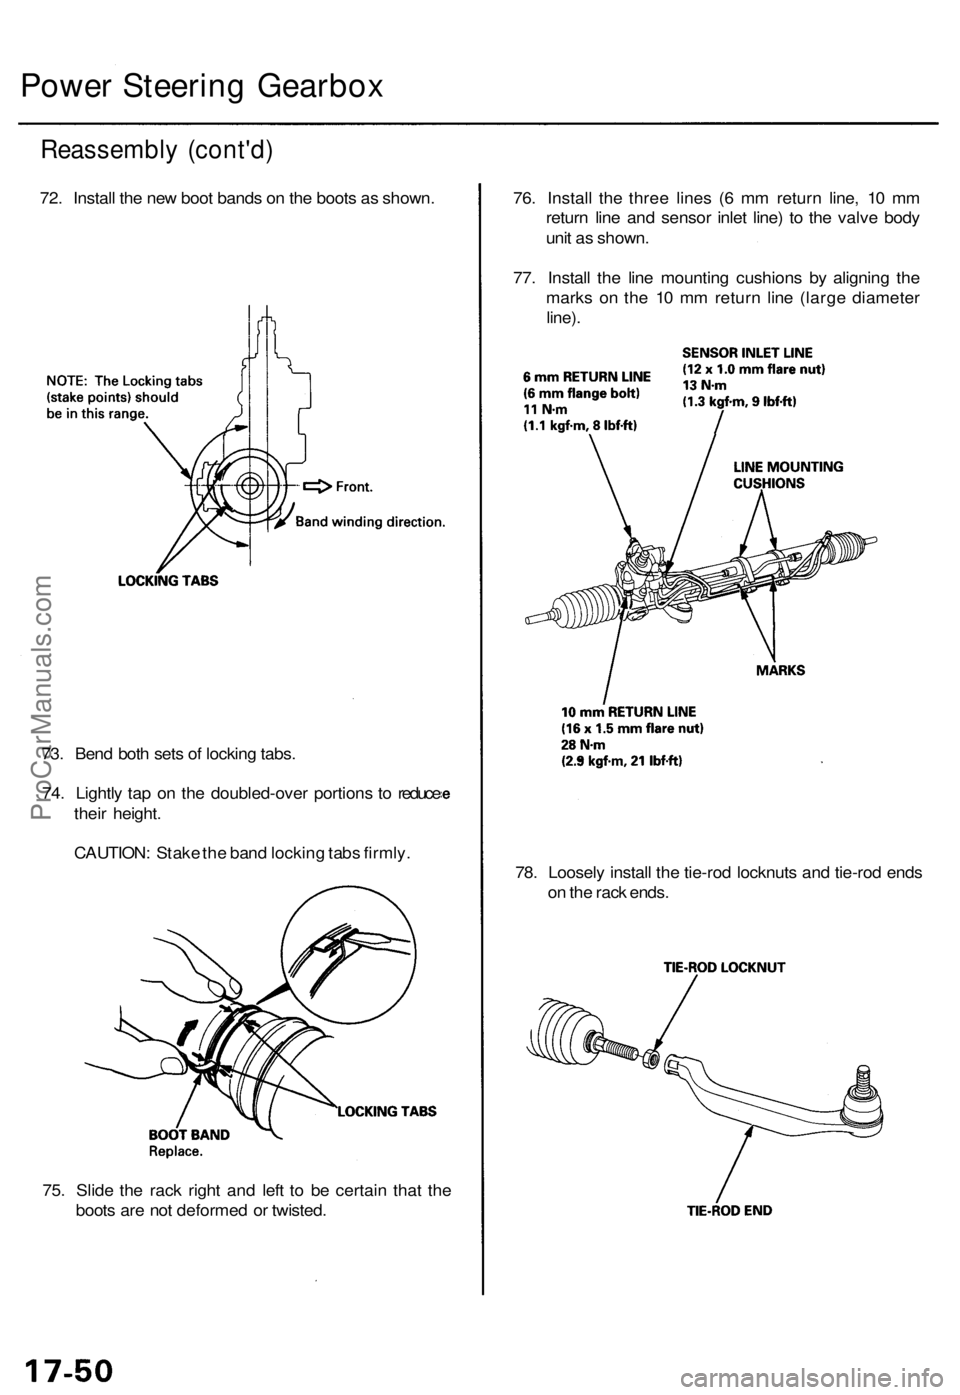
75. Slid e th e rac k righ t an d lef t t o b e certai n tha t th e
boot s ar e no t deforme d o r twisted . 78
. Loosel y instal l th e tie-ro d locknut s an d tie-ro d end s
o n th e rac k ends .
73
. Ben d bot h set s o f lockin g tabs .
74 . Lightl y ta p o n th e doubled-ove r portion s t o reduc e
thei r height .
CAUTION : Stak e th e ban d lockin g tab s firmly . 76
. Instal l th e thre e line s ( 6 m m retur n line , 1 0 m m
retur n lin e an d senso r inle t line ) t o th e valv e bod y
uni t a s shown .
77 . Instal l th e lin e mountin g cushion s b y alignin g th e
mark s o n th e 1 0 m m retur n lin e (larg e diamete r
line).
Reassembl y (cont'd )
72. Instal l th e ne w boo t band s o n th e boot s a s shown .
Power Steerin g Gearbo x
ProCarManuals.com
Page 1020 of 1954
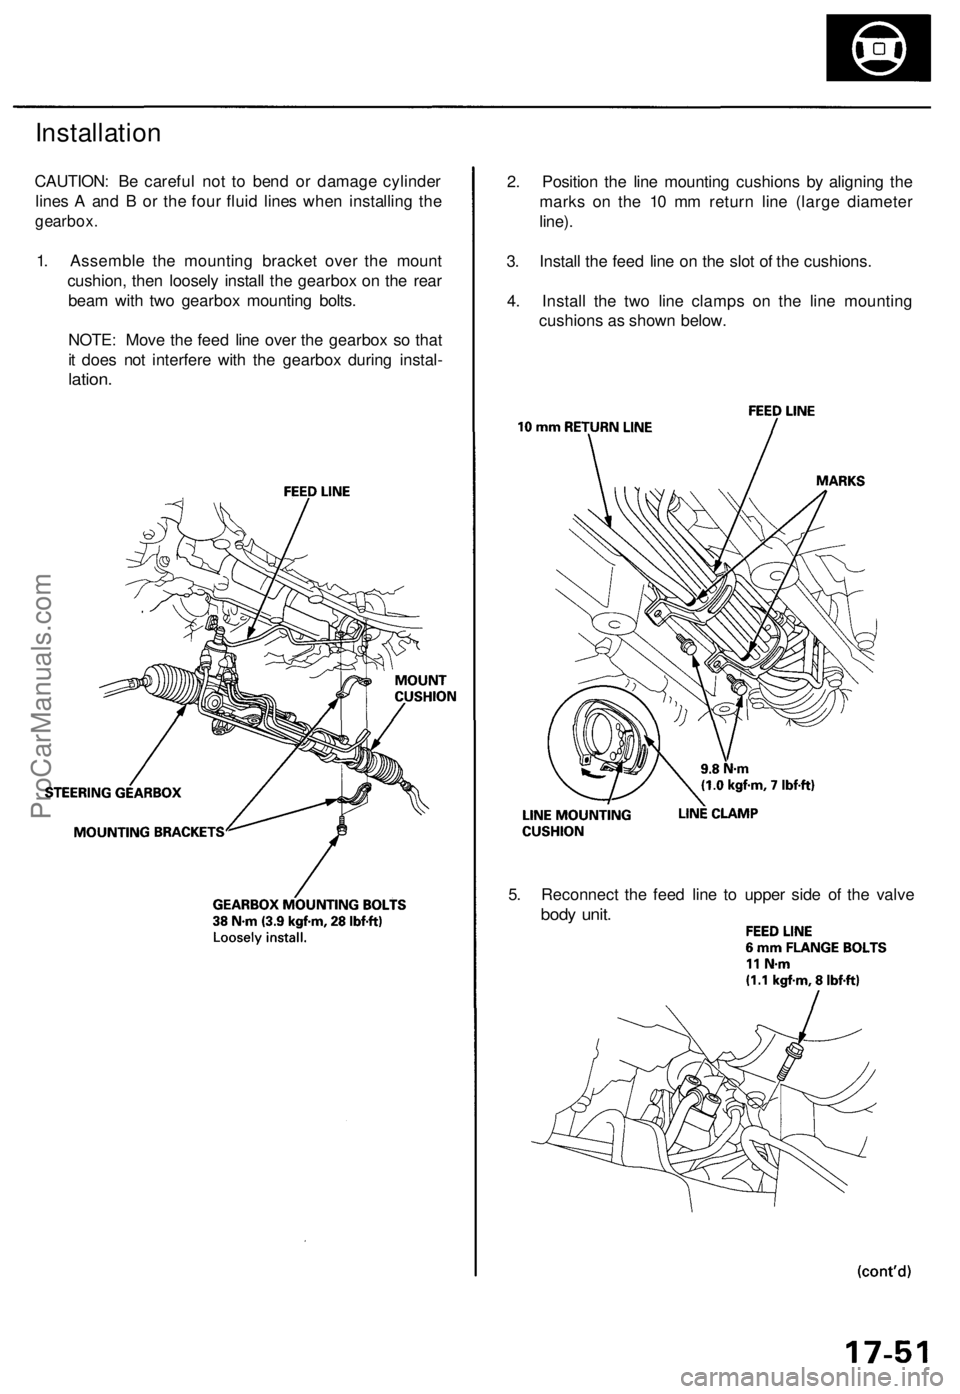
5. Reconnect the feed line to upper side of the valve
body unit.
2. Position the line mounting cushions by aligning the
marks on the 10 mm return line (large diameter
line).
3. Install the feed line on the slot of the cushions.
4. Install the two line clamps on the line mounting
cushions as shown below.
Installation
CAUTION: Be careful not to bend or damage cylinder
lines A and B or the four fluid lines when installing the
gearbox.
1. Assemble the mounting bracket over the mount
cushion, then loosely install the gearbox on the rear
beam with two gearbox mounting bolts.
NOTE: Move the feed line over the gearbox so that
it does not interfere with the gearbox during instal-
lation.ProCarManuals.com