ACURA RL KA9 1996 Service Repair Manual
Manufacturer: ACURA, Model Year: 1996, Model line: RL KA9, Model: ACURA RL KA9 1996Pages: 1954, PDF Size: 61.44 MB
Page 1681 of 1954
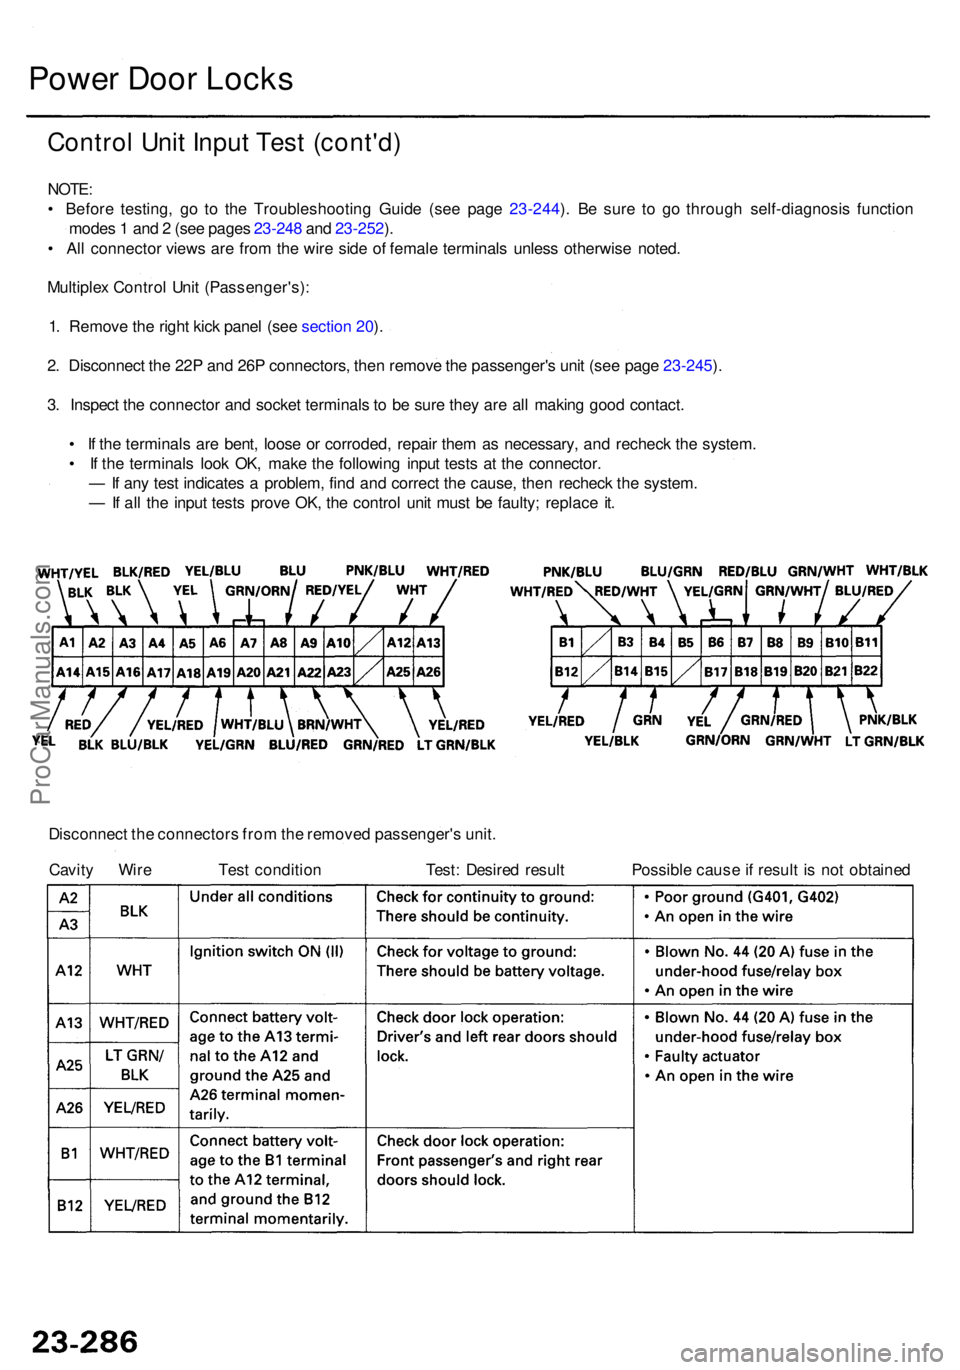
Power Doo r Lock s
Contro l Uni t Inpu t Tes t (cont'd )
NOTE:
• Befor e testing , g o t o th e Troubleshootin g Guid e (se e pag e 23-244 ). B e sur e t o g o throug h self-diagnosi s functio n
mode s 1 an d 2 (se e page s 23-24 8 an d 23-252 ).
• Al l connecto r view s ar e fro m th e wir e sid e o f femal e terminal s unles s otherwis e noted .
Multiple x Contro l Uni t (Passenger's) :
1 . Remov e th e righ t kic k pane l (se e sectio n 20 ).
2 . Disconnec t th e 22 P an d 26 P connectors , the n remov e th e passenger' s uni t (se e pag e 23-245 ).
3 . Inspec t th e connecto r an d socke t terminal s t o b e sur e the y ar e al l makin g goo d contact .
• I f th e terminal s ar e bent , loos e o r corroded , repai r the m a s necessary , an d rechec k th e system .
• I f th e terminal s loo k OK , mak e th e followin g inpu t test s a t th e connector .
— If an y tes t indicate s a problem , fin d an d correc t th e cause , the n rechec k th e system .
— If al l th e inpu t test s prov e OK , th e contro l uni t mus t b e faulty ; replac e it .
Disconnec t th e connector s fro m th e remove d passenger' s unit .
Cavit y Wir e Tes t conditio n Test : Desire d resul t Possibl e caus e if resul t i s no t obtaine d
ProCarManuals.com
Page 1682 of 1954
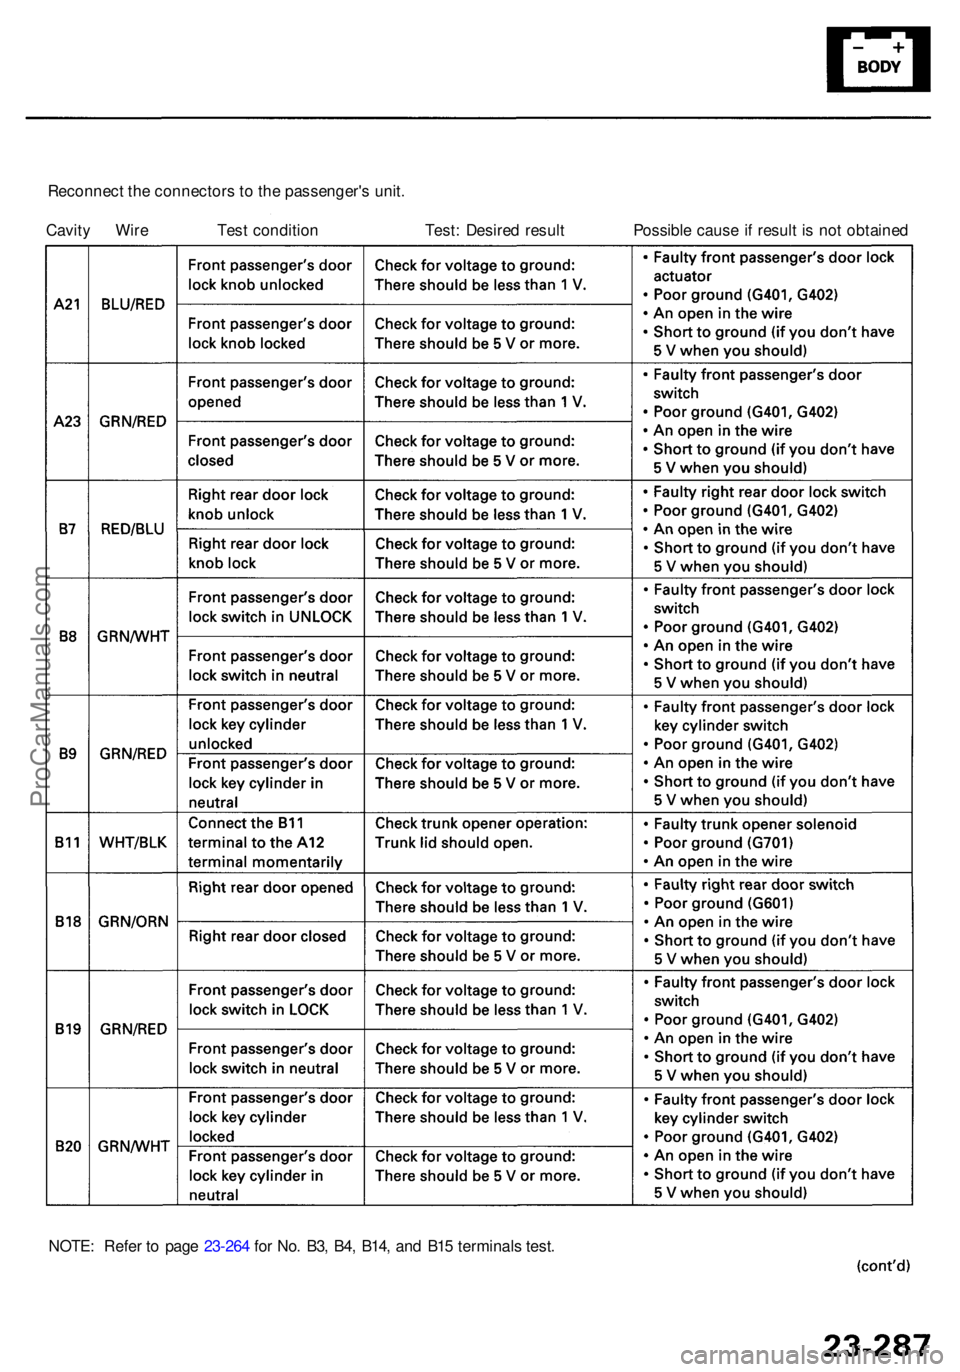
Reconnect th e connector s to th e passenger' s unit .
Cavit y Wir e Tes t conditio n Test : Desire d resul t Possibl e caus e if resul t i s no t obtaine d
NOTE : Refe r t o pag e 23-26 4 fo r No . B3 , B4 , B14 , an d B1 5 terminal s test .
ProCarManuals.com
Page 1683 of 1954
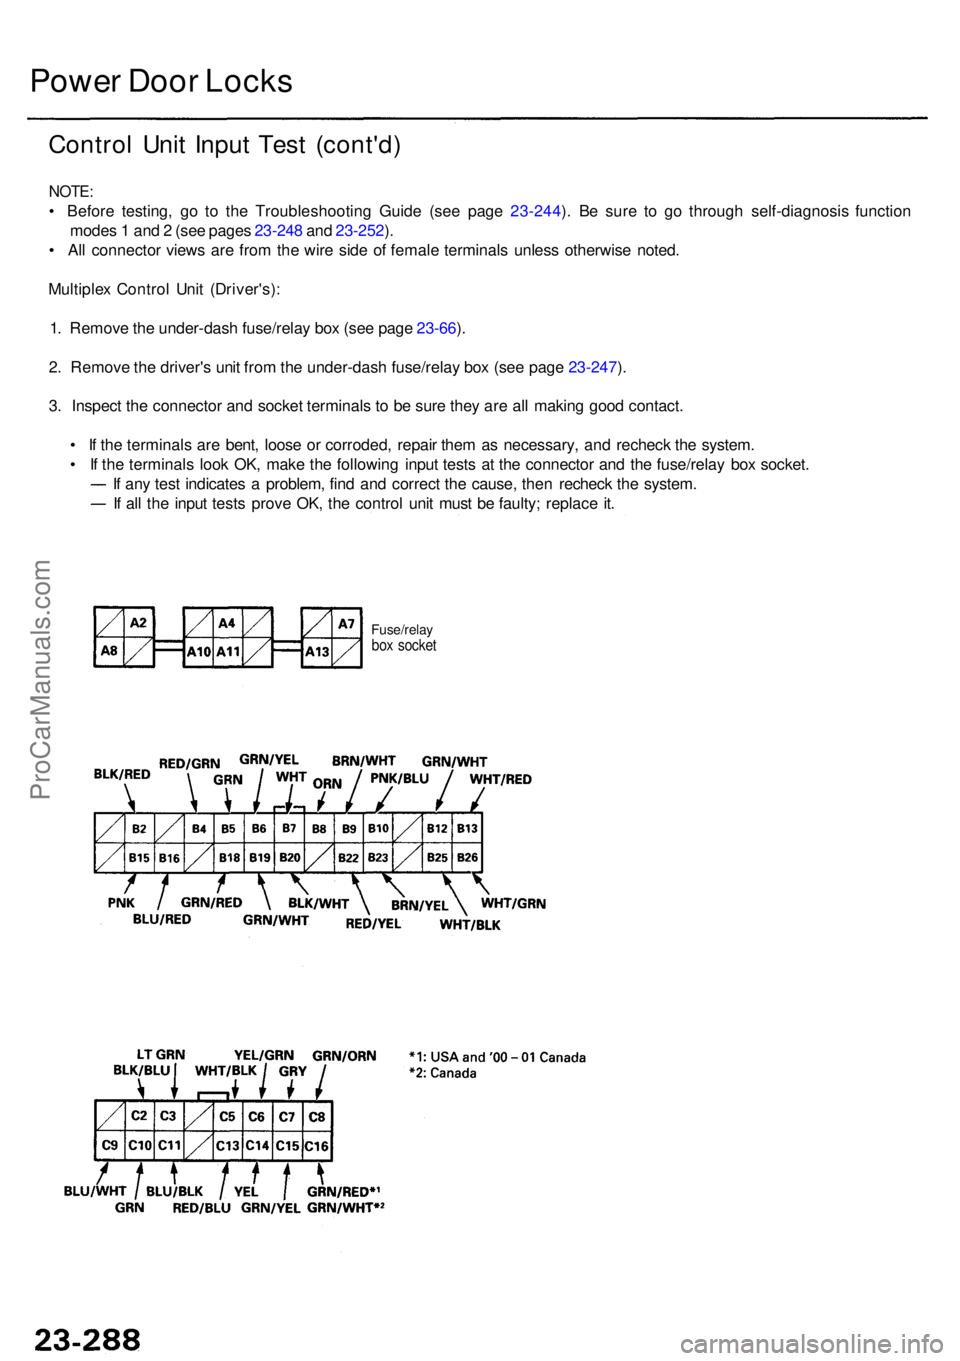
Power Doo r Lock s
Contro l Uni t Inpu t Tes t (cont'd )
NOTE:
• Befor e testing , g o t o th e Troubleshootin g Guid e (se e pag e 23-244 ). B e sur e t o g o throug h self-diagnosi s functio n
mode s 1 an d 2 (se e page s 23-24 8 an d 23-252 ).
• Al l connecto r view s ar e fro m th e wir e sid e o f femal e terminal s unles s otherwis e noted .
Multiple x Contro l Uni t (Driver's) :
1 . Remov e th e under-das h fuse/rela y bo x (se e pag e 23-66 ).
2 . Remov e th e driver' s uni t fro m th e under-das h fuse/rela y bo x (se e pag e 23-247 ).
3 . Inspec t th e connecto r an d socke t terminal s t o b e sur e the y ar e al l makin g goo d contact .
• I f th e terminal s ar e bent , loos e o r corroded , repai r the m a s necessary , an d rechec k th e system .
• I f th e terminal s loo k OK , mak e th e followin g inpu t test s a t th e connecto r an d th e fuse/rela y bo x socket .
I f an y tes t indicate s a problem , fin d an d correc t th e cause , the n rechec k th e system .
I f al l th e inpu t test s prov e OK , th e contro l uni t mus t b e faulty ; replac e it .
Fuse/rela ybox socke t
ProCarManuals.com
Page 1684 of 1954
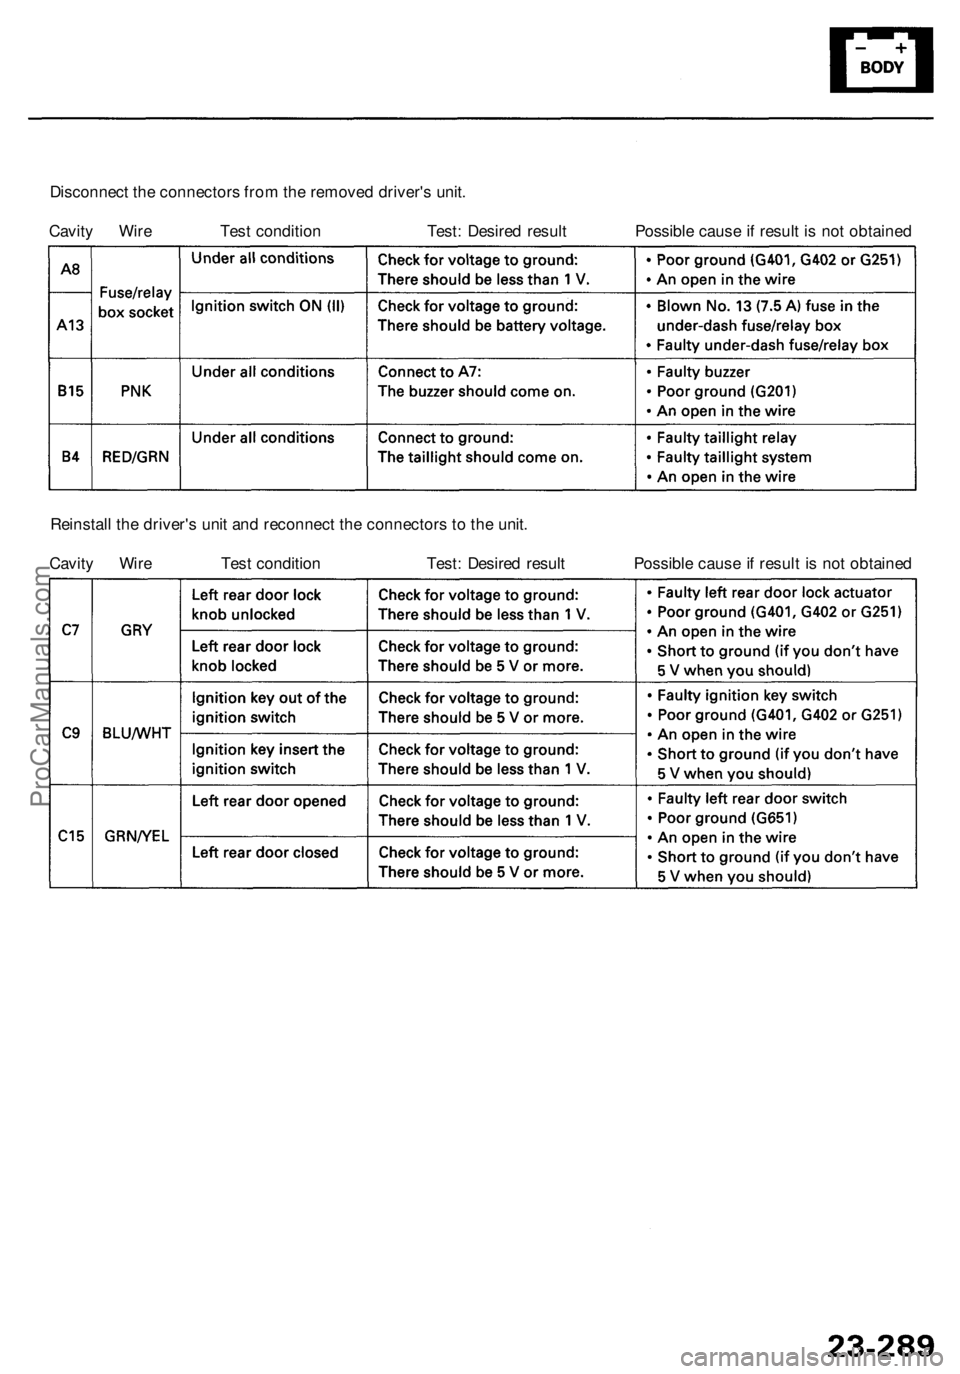
Disconnect th e connector s fro m th e remove d driver' s unit .
Cavit y Wir e Tes t conditio n Test : Desire d resul t Possibl e caus e if resul t i s no t obtaine d
Reinstal l th e driver' s uni t an d reconnec t th e connector s to th e unit .
Cavit y Wir e Tes t conditio n Test : Desire d resul t Possibl e caus e if resul t i s no t obtaine d
ProCarManuals.com
Page 1685 of 1954
Power Doo r Lock s
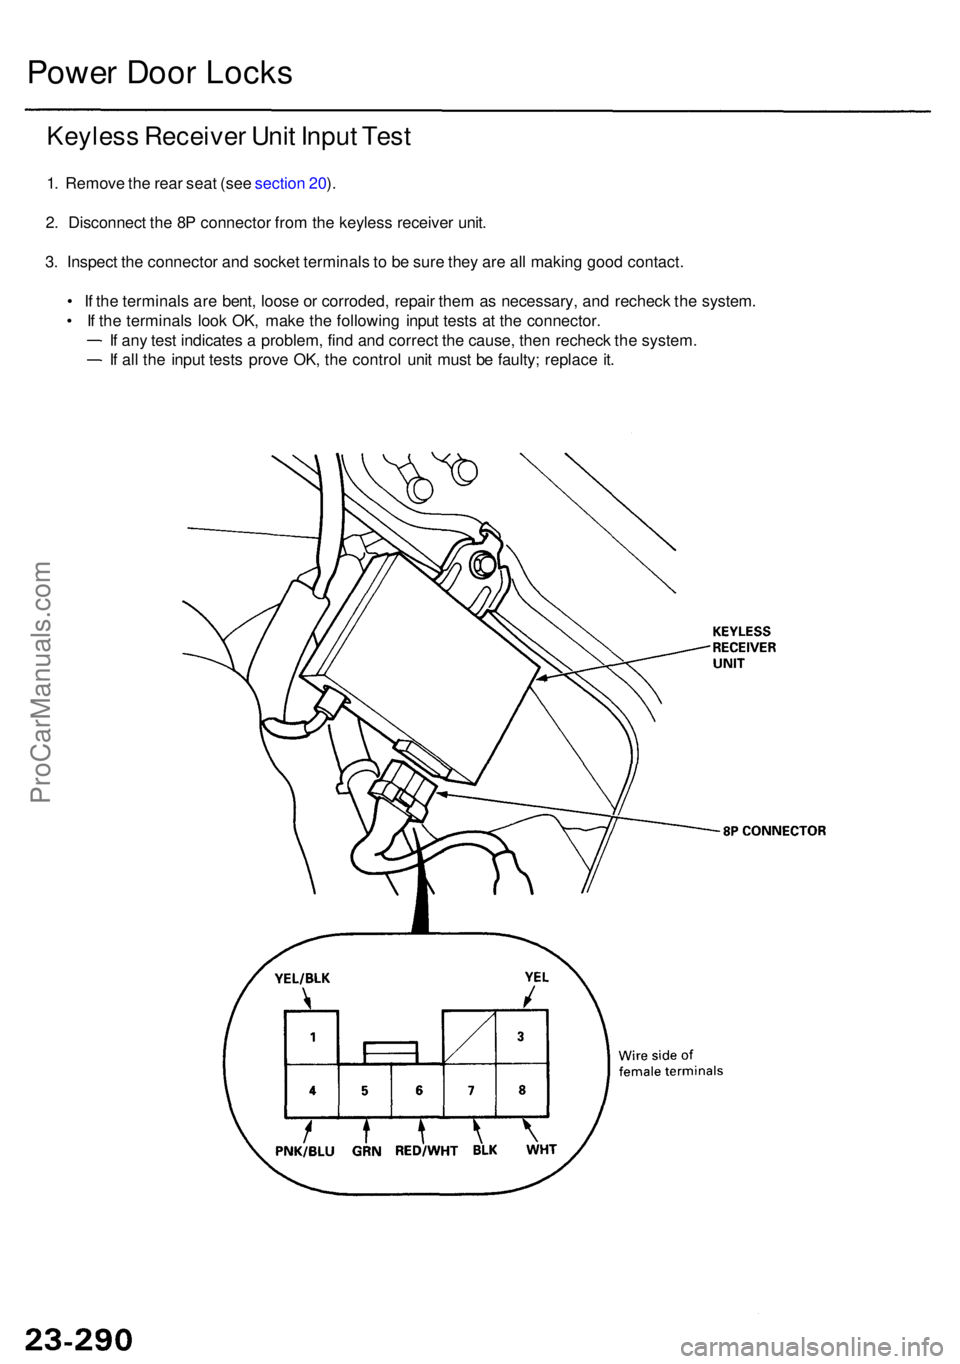
Keyles s Receive r Uni t Inpu t Tes t
1. Remov e th e rea r sea t (se e sectio n 20 ).
2 . Disconnec t th e 8 P connecto r fro m th e keyles s receive r unit .
3 . Inspec t th e connecto r an d socke t terminal s t o b e sur e the y ar e al l makin g goo d contact .
• I f th e terminal s ar e bent , loos e o r corroded , repai r the m a s necessary , an d rechec k th e system .
• I f th e terminal s loo k OK , mak e th e followin g inpu t test s a t th e connector .
I f an y tes t indicate s a problem , fin d an d correc t th e cause , the n rechec k th e system .
I f al l th e inpu t test s prov e OK , th e contro l uni t mus t b e faulty ; replac e it .
ProCarManuals.com
Page 1686 of 1954
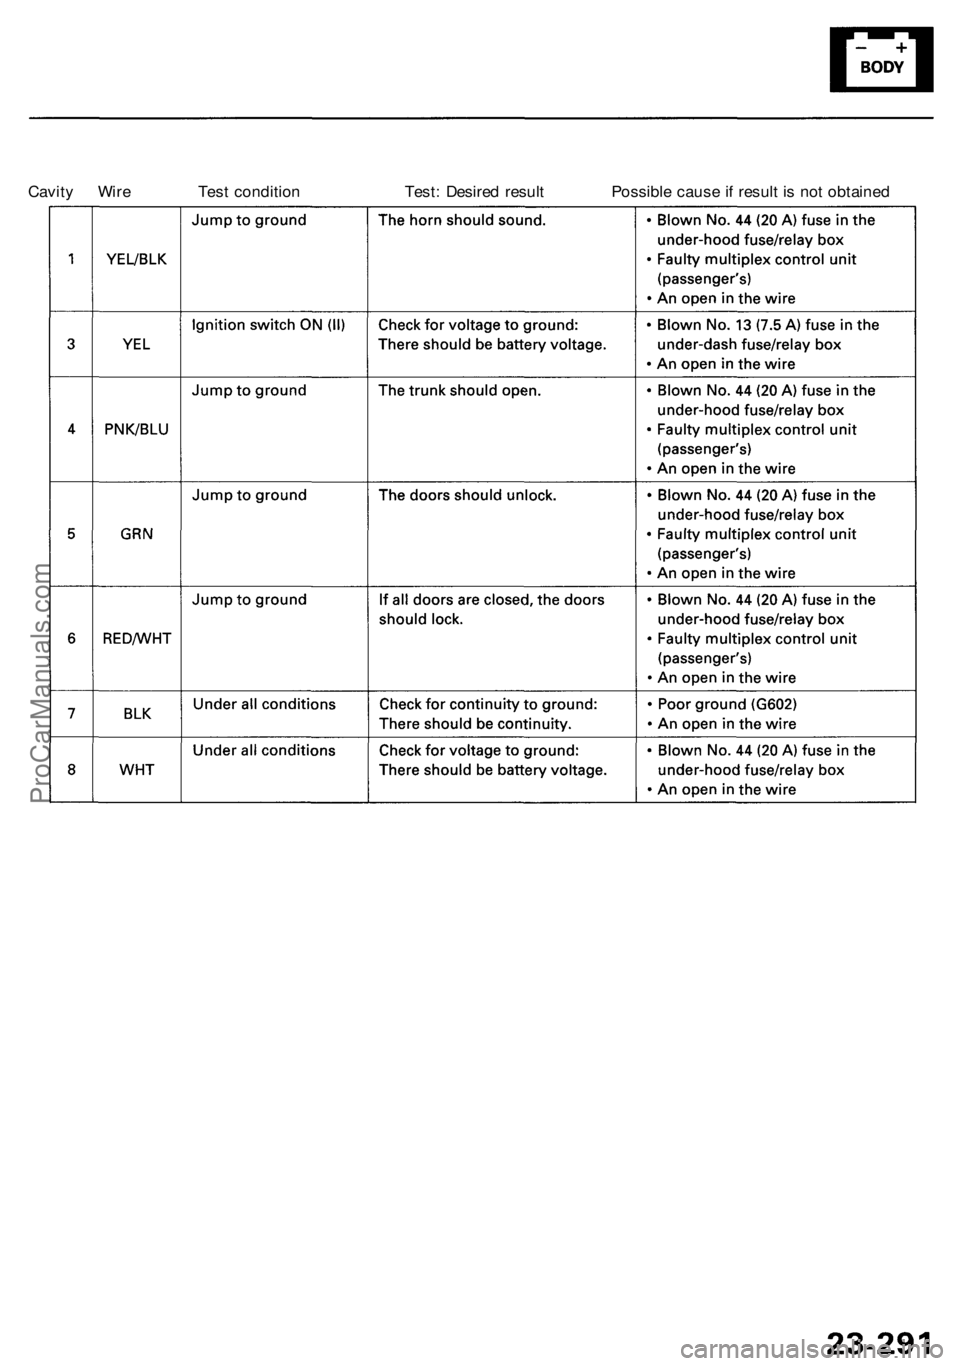
Cavity Wir e Tes t conditio n Test : Desire d resul t Possibl e caus e if resul t i s no t obtaine d
ProCarManuals.com
Page 1687 of 1954
Power Doo r Lock s
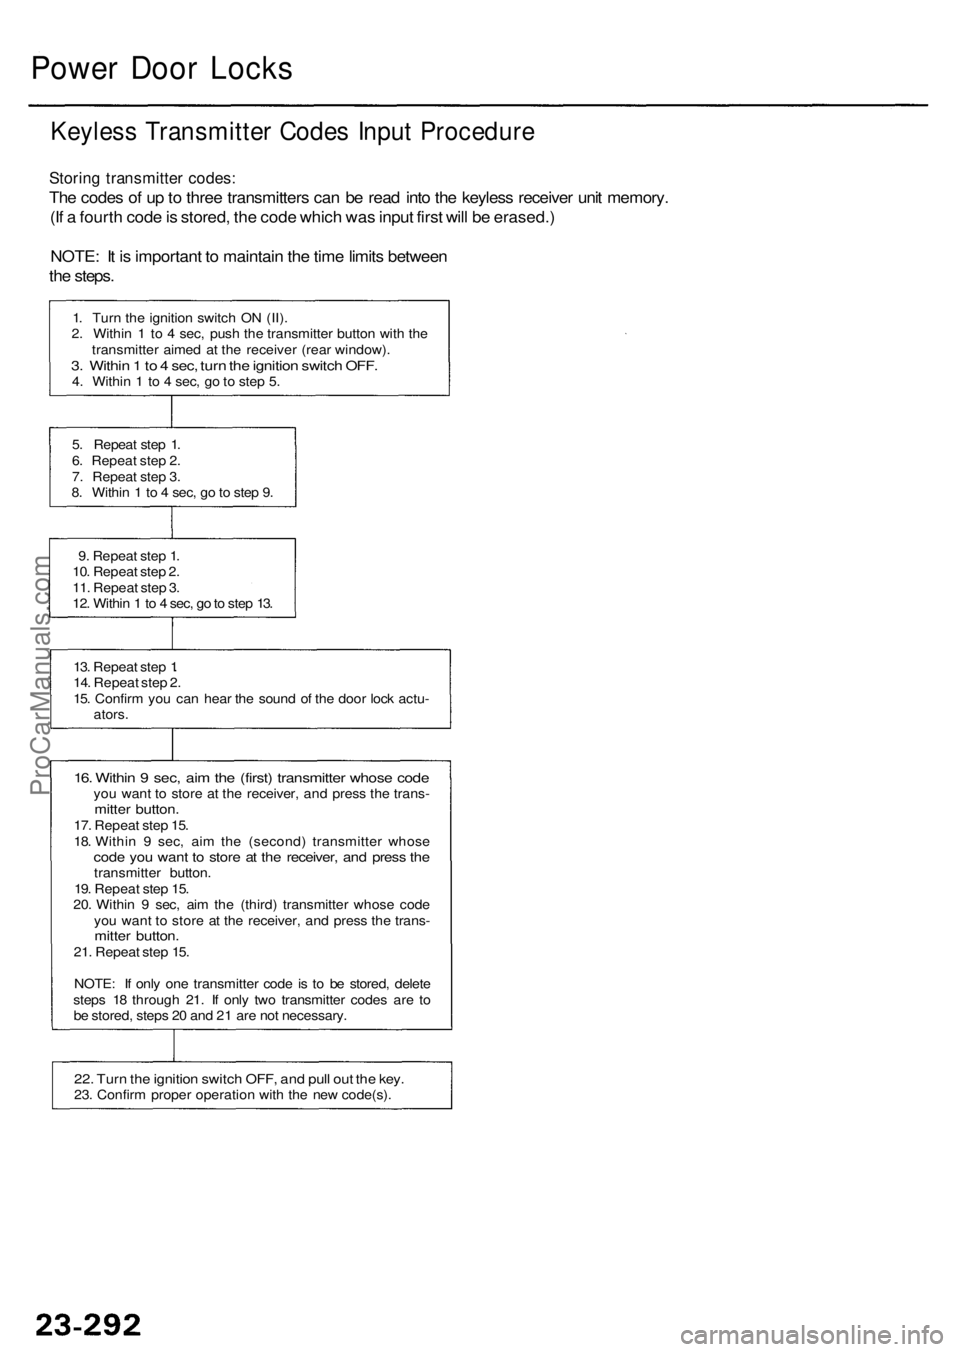
Keyles s Transmitte r Code s Inpu t Procedur e
Storing transmitte r codes :
The code s o f u p to thre e transmitter s ca n b e rea d int o th e keyles s receive r uni t memory .
(I f a fourt h cod e is stored , th e cod e whic h wa s inpu t firs t wil l b e erased. )
NOTE : I t i s importan t t o maintai n th e tim e limit s betwee n
th e steps .
1. Tur n th e ignitio n switc h O N (II) .
2 . Withi n 1 to 4 sec , pus h th e transmitte r butto n wit h th e
transmitte r aime d a t th e receive r (rea r window) .
3. Withi n 1 to 4 sec , tur n th e ignitio n switc h OFF .4. Withi n 1 to 4 sec , g o to ste p 5 .
5 . Repea t ste p 1 .
6 . Repea t ste p 2 .
7 . Repea t ste p 3 .
8 . Withi n 1 to 4 sec , g o to ste p 9 .
9 . Repea t ste p 1 .
10 . Repea t ste p 2 .
11 . Repea t ste p 3 .
12 . Withi n 1 to 4 sec , g o to ste p 13 .
13 . Repea t ste p 1.
14 . Repea t ste p 2 .
15 . Confir m yo u ca n hea r th e soun d o f th e doo r loc k actu -
ators .
16. Withi n 9 sec , ai m th e (first ) transmitte r whos e cod eyou wan t t o stor e a t th e receiver , an d pres s th e trans -mitter button .17. Repea t ste p 15 .
18 . Withi n 9 sec , ai m th e (second ) transmitte r whos e
code yo u wan t t o stor e a t th e receiver , an d pres s th etransmitte r button .
19 . Repea t ste p 15 .
20 . Withi n 9 sec , ai m th e (third ) transmitte r whos e cod e
yo u wan t t o stor e a t th e receiver , an d pres s th e trans -
mitter button .21. Repea t ste p 15 .
NOTE : I f onl y on e transmitte r cod e i s t o b e stored , delet e
step s 1 8 throug h 21 . I f onl y tw o transmitte r code s ar e t o
b e stored , step s 2 0 an d 2 1 ar e no t necessary .
22. Tur n th e ignitio n switc h OFF , an d pul l ou t th e key .23. Confir m prope r operatio n wit h th e ne w code(s) .
ProCarManuals.com
Page 1688 of 1954
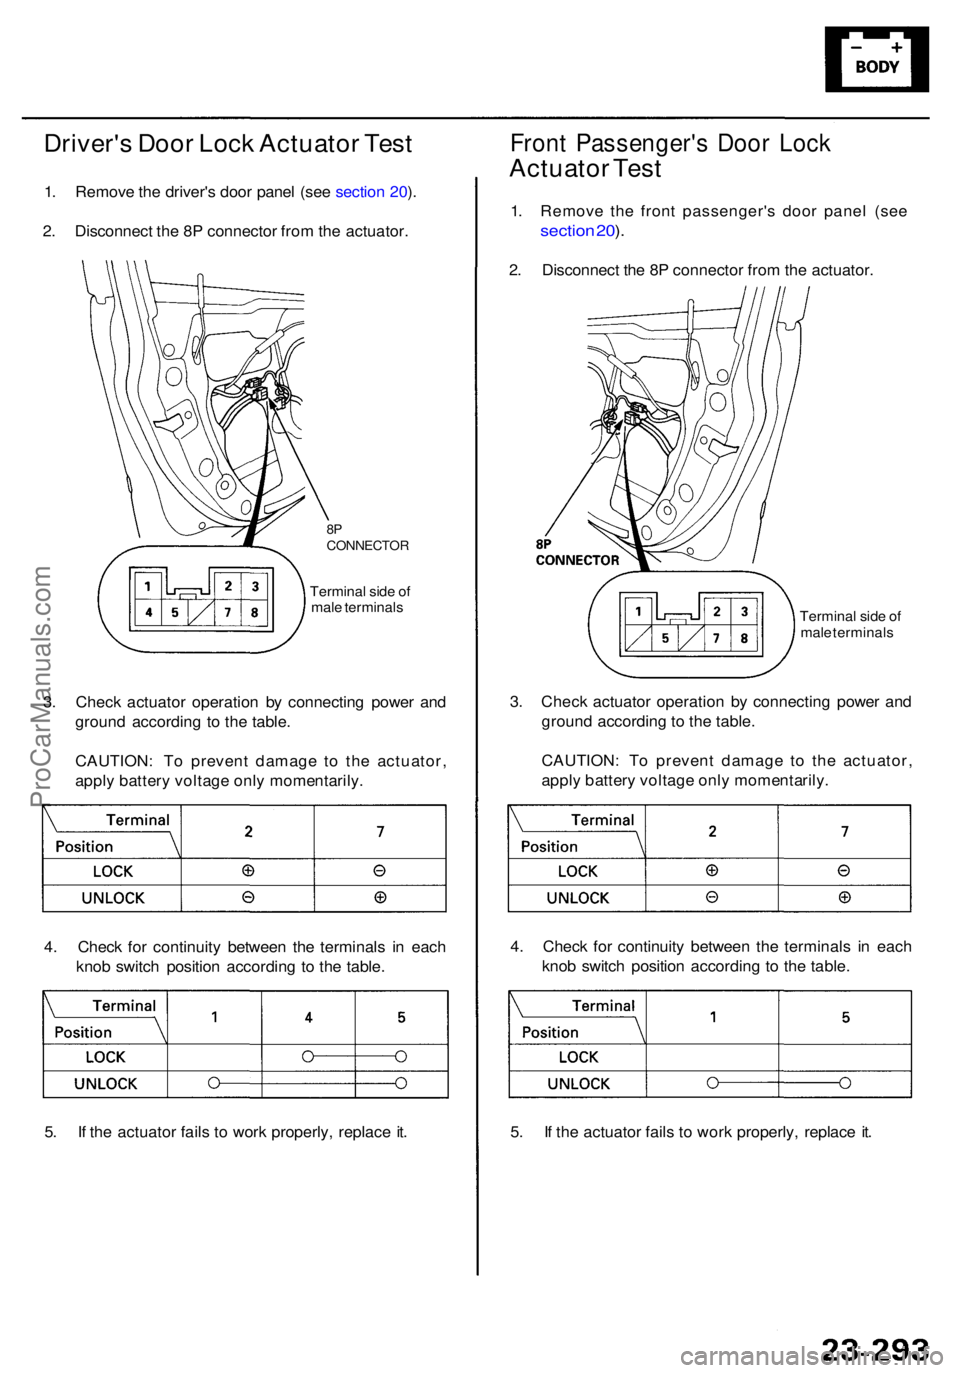
Driver's Doo r Loc k Actuato r Tes t
1. Remov e th e driver' s doo r pane l (se e sectio n 20 ).
2 . Disconnec t th e 8 P connecto r fro m th e actuator .
Front Passenger' s Doo r Loc k
Actuato r Tes t
1. Remove the front passenger's door panel (see
section 20 ).
2 . Disconnec t th e 8 P connecto r fro m th e actuator .
Terminal sid e o f
mal e terminal s
3. Chec k actuato r operatio n b y connectin g powe r an d
groun d accordin g t o th e table .
CAUTION : T o preven t damag e t o th e actuator ,
appl y batter y voltag e onl y momentarily .
4 . Chec k fo r continuit y betwee n th e terminal s i n eac h
kno b switc h positio n accordin g t o th e table .
5 . I f th e actuato r fail s t o wor k properly , replac e it .
4
. Chec k fo r continuit y betwee n th e terminal s i n eac h
kno b switc h positio n accordin g t o th e table .
5 . I f th e actuato r fail s t o wor k properly , replac e it .
3
. Chec k actuato r operatio n b y connectin g powe r an d
groun d accordin g t o th e table .
CAUTION : T o preven t damag e t o th e actuator ,
appl y batter y voltag e onl y momentarily .
Terminal sid e o f
mal e terminal s
8PCONNECTO R
ProCarManuals.com
Page 1689 of 1954
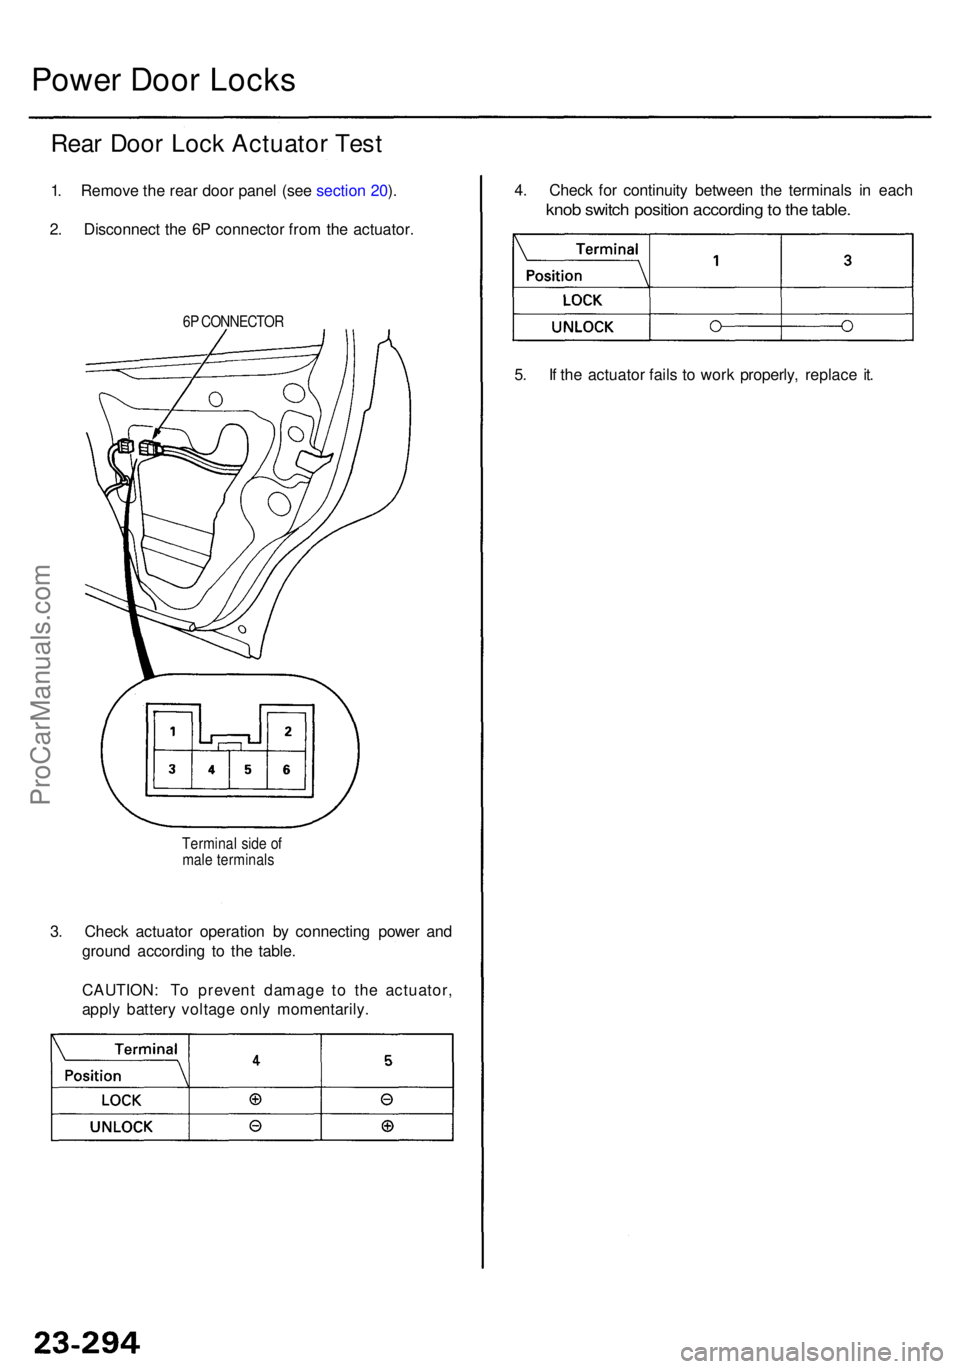
3. Chec k actuato r operatio n b y connectin g powe r an d
groun d accordin g t o th e table .
CAUTION : T o preven t damag e t o th e actuator ,
appl y batter y voltag e onl y momentarily .
Terminal sid e o f
mal e terminal s
Power Doo r Lock s
Rear Doo r Loc k Actuato r Tes t
1. Remov e th e rea r doo r pane l (se e sectio n 20 ).
2 . Disconnec t th e 6 P connecto r fro m th e actuator .
6P CONNECTO R
4. Chec k fo r continuit y betwee n th e terminal s i n eac h
knob switc h positio n accordin g to th e table .
5. I f th e actuato r fail s t o wor k properly , replac e it .
ProCarManuals.com
Page 1690 of 1954
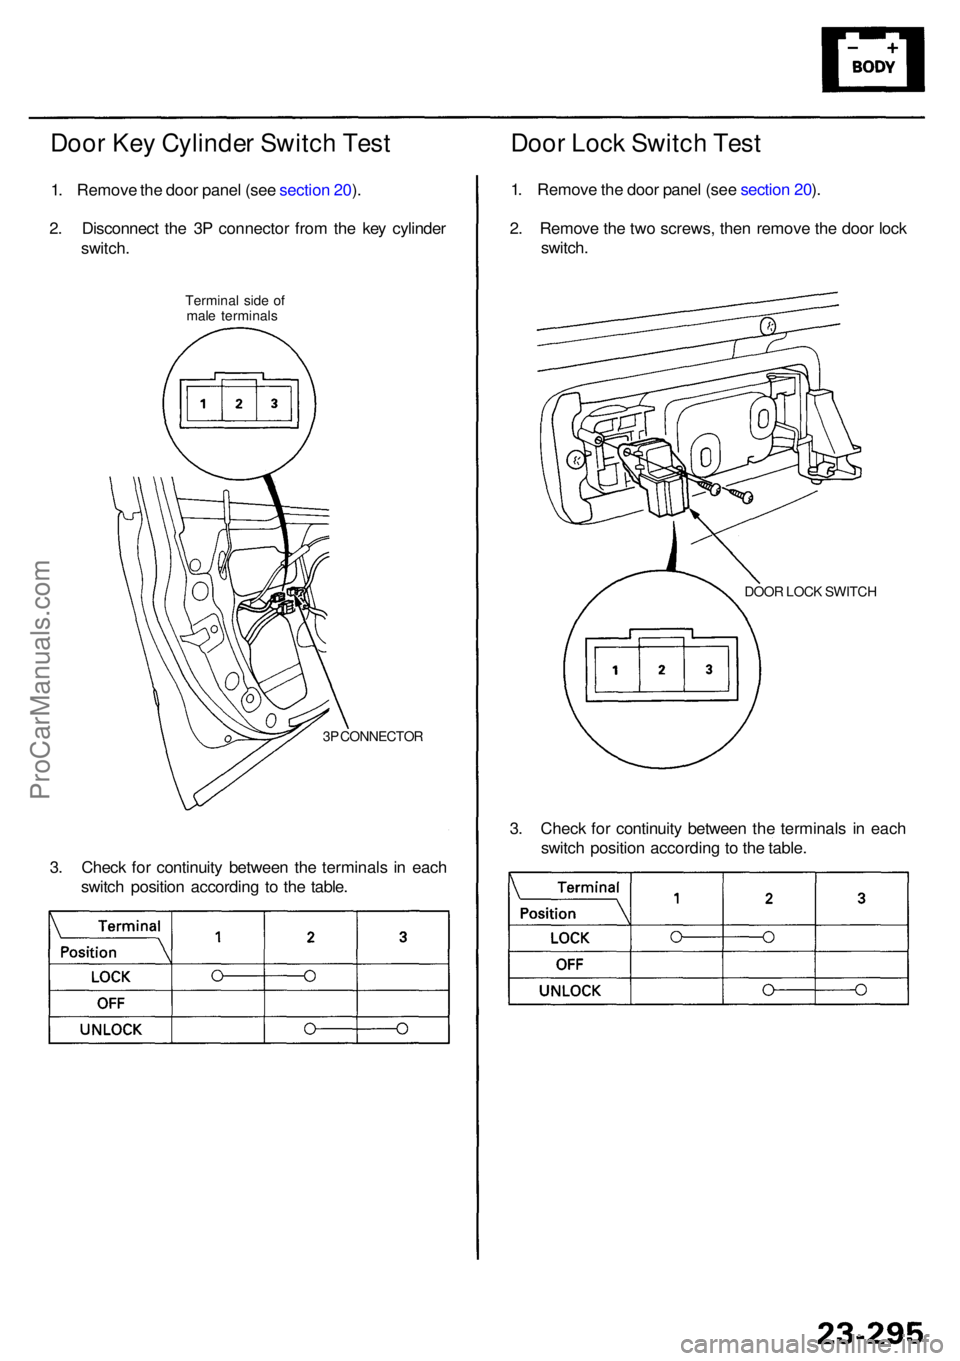
3. Chec k fo r continuit y betwee n th e terminal s i n eac h
switc h positio n accordin g t o th e table . 3
. Chec k fo r continuit y betwee n th e terminal s i n eac h
switc h positio n accordin g to th e table .
DOOR LOC K SWITC H
Door Loc k Switc h Tes t
1. Remov e th e doo r pane l (se e sectio n 20 ).
2 . Remov e th e tw o screws , the n remov e th e doo r loc k
switch .
Door Ke y Cylinde r Switc h Tes t
1. Remov e th e doo r pane l (se e sectio n 20 ).
2 . Disconnec t th e 3 P connecto r fro m th e ke y cylinde r
switch .
Termina l sid e o f
mal e terminal s
3P CONNECTO R
ProCarManuals.com