ACURA RL KA9 1996 Service Repair Manual
Manufacturer: ACURA, Model Year: 1996, Model line: RL KA9, Model: ACURA RL KA9 1996Pages: 1954, PDF Size: 61.44 MB
Page 1701 of 1954
Power Window s
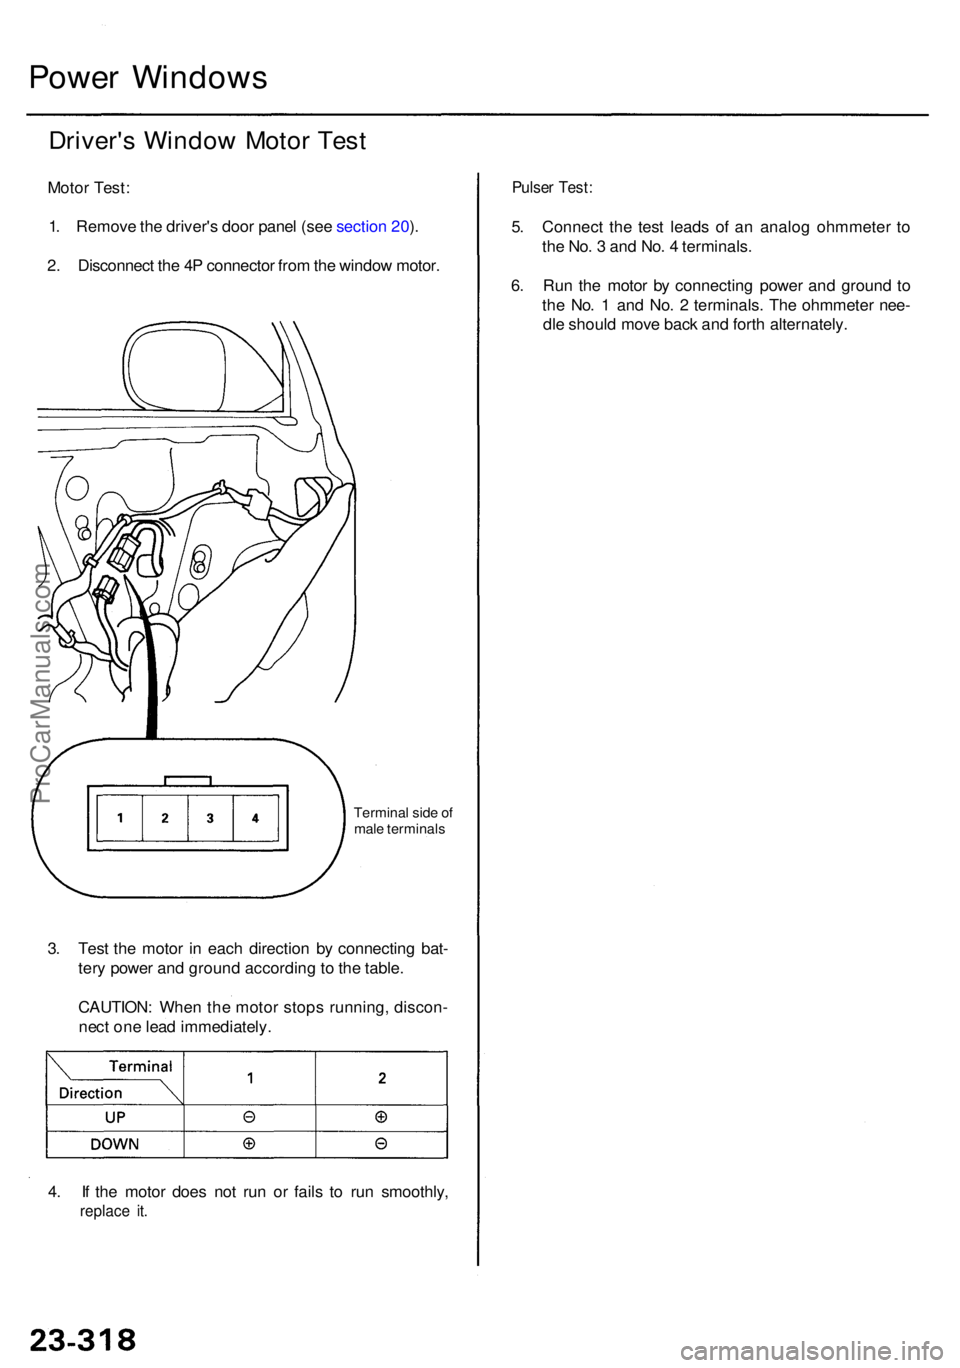
Driver's Windo w Moto r Tes t
Moto r Test :
1 . Remov e th e driver' s doo r pane l (se e sectio n 20 ).
2 . Disconnec t th e 4 P connecto r fro m th e windo w motor .
Termina l sid e o f
mal e terminal s
3. Tes t th e moto r i n eac h directio n b y connectin g bat -
ter y powe r an d groun d accordin g t o th e table .
CAUTION : Whe n th e moto r stop s running , discon -
nec t on e lea d immediately .
4 . I f th e moto r doe s no t ru n o r fail s t o ru n smoothly ,
replace it .
Pulse r Test :
5. Connec t th e tes t lead s o f a n analo g ohmmete r t o
th e No . 3 an d No . 4 terminals .
6 . Ru n th e moto r b y connectin g powe r an d groun d t o
th e No . 1 an d No . 2 terminals . Th e ohmmete r nee -
dl e shoul d mov e bac k an d fort h alternately .
ProCarManuals.com
Page 1702 of 1954
Wiper/Washer
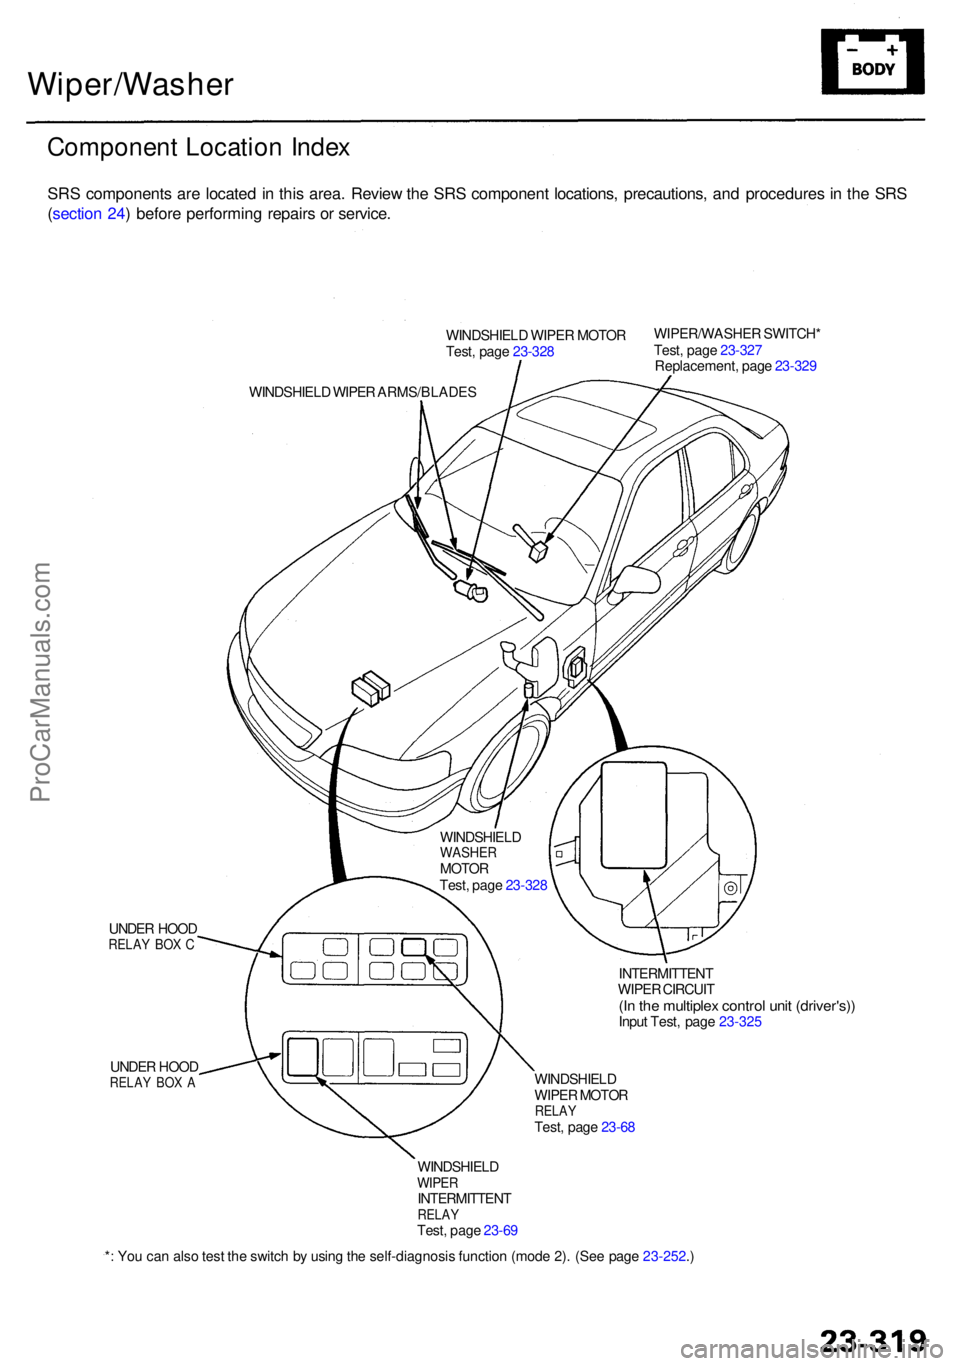
Component Locatio n Inde x
SRS component s ar e locate d in thi s area . Revie w th e SR S componen t locations , precautions , an d procedure s in th e SR S
( sectio n 24 ) befor e performin g repair s o r service .
WINDSHIEL D WIPE R MOTO R
Test , pag e 23-32 8 WIPER/WASHE
R SWITCH *
Test , pag e 23-32 7
Replacement , pag e 23-32 9
WINDSHIEL D WIPE R ARMS/BLADE S
UNDE R HOO D
RELA Y BO X C
UNDE R HOO DRELA Y BO X A
INTERMITTEN T
WIPE R CIRCUI T
(In th e multiple x contro l uni t (driver's) )Input Test , pag e 23-32 5
WINDSHIEL D
WIPE R MOTO R
RELAYTest, pag e 23-6 8
* : Yo u ca n als o tes t th e switc h b y usin g th e self-diagnosi s functio n (mod e 2) . (Se e pag e 23-252 .)
WINDSHIEL
D
WASHERMOTORTest, pag e 23-32 8
WINDSHIEL D
WIPERINTERMITTEN TRELAYTest, pag e 23-6 9
ProCarManuals.com
Page 1703 of 1954
Wiper/Washer
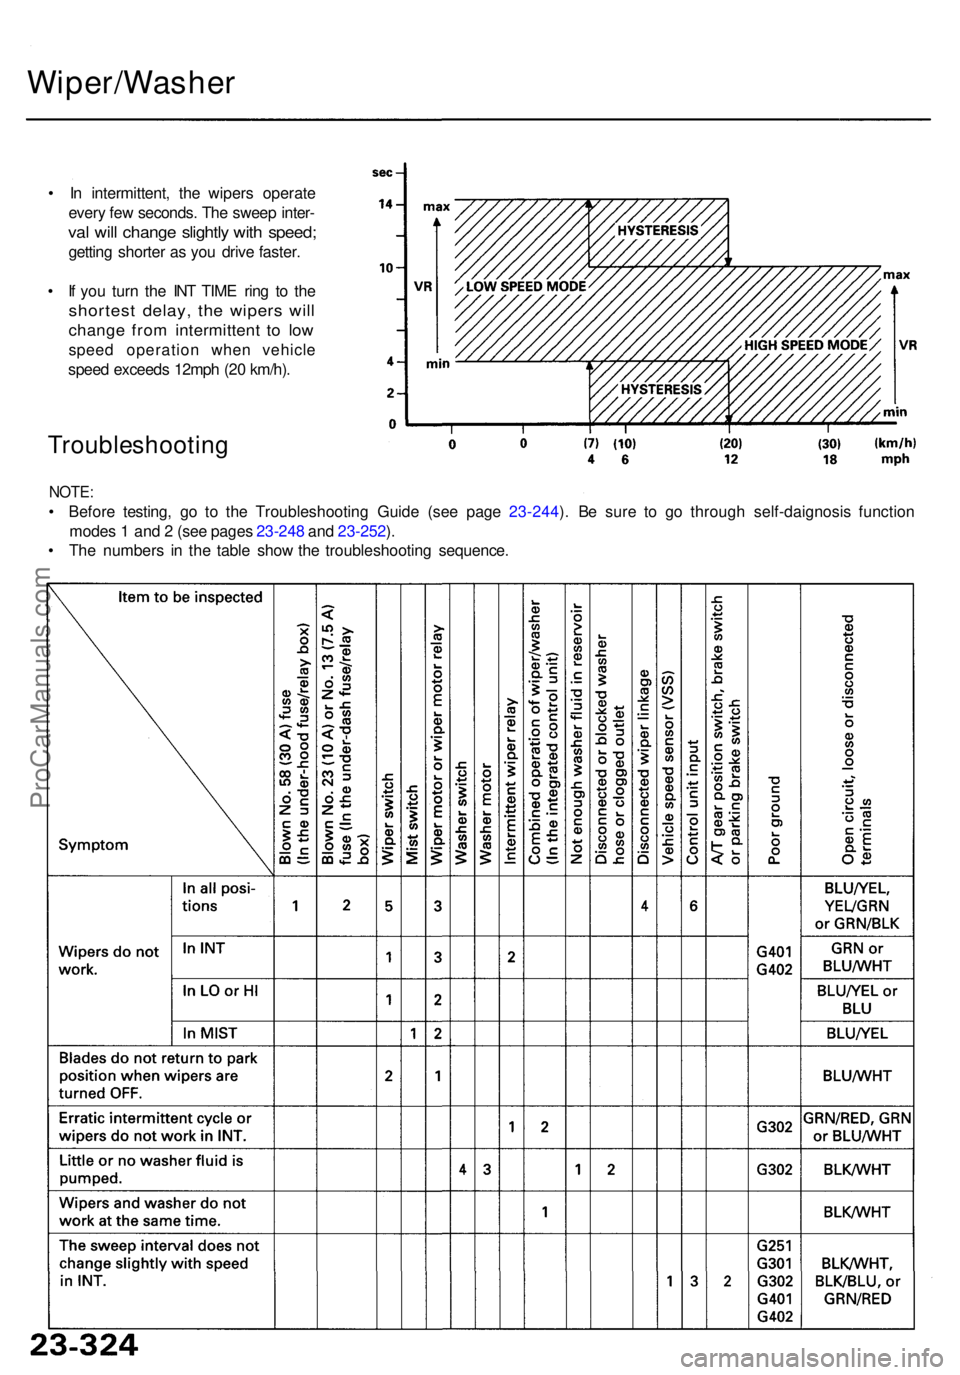
• I n intermittent , th e wiper s operat e
ever y fe w seconds . Th e swee p inter -
val wil l chang e slightl y wit h speed ;
getting shorte r a s yo u driv e faster .
• I f yo u tur n th e IN T TIM E rin g t o th e
shortes t delay , th e wiper s wil l
chang e fro m intermitten t t o lo w
spee d operatio n whe n vehicl e
spee d exceed s 12mp h (2 0 km/h) .
Troubleshootin g
NOTE:
• Befor e testing , g o t o th e Troubleshootin g Guid e (se e pag e 23-244 ). B e sur e t o g o throug h self-daignosi s functio n
mode s 1 an d 2 (se e page s 23-24 8 an d 23-252 ).
• Th e number s i n th e tabl e sho w th e troubleshootin g sequence .
ProCarManuals.com
Page 1704 of 1954
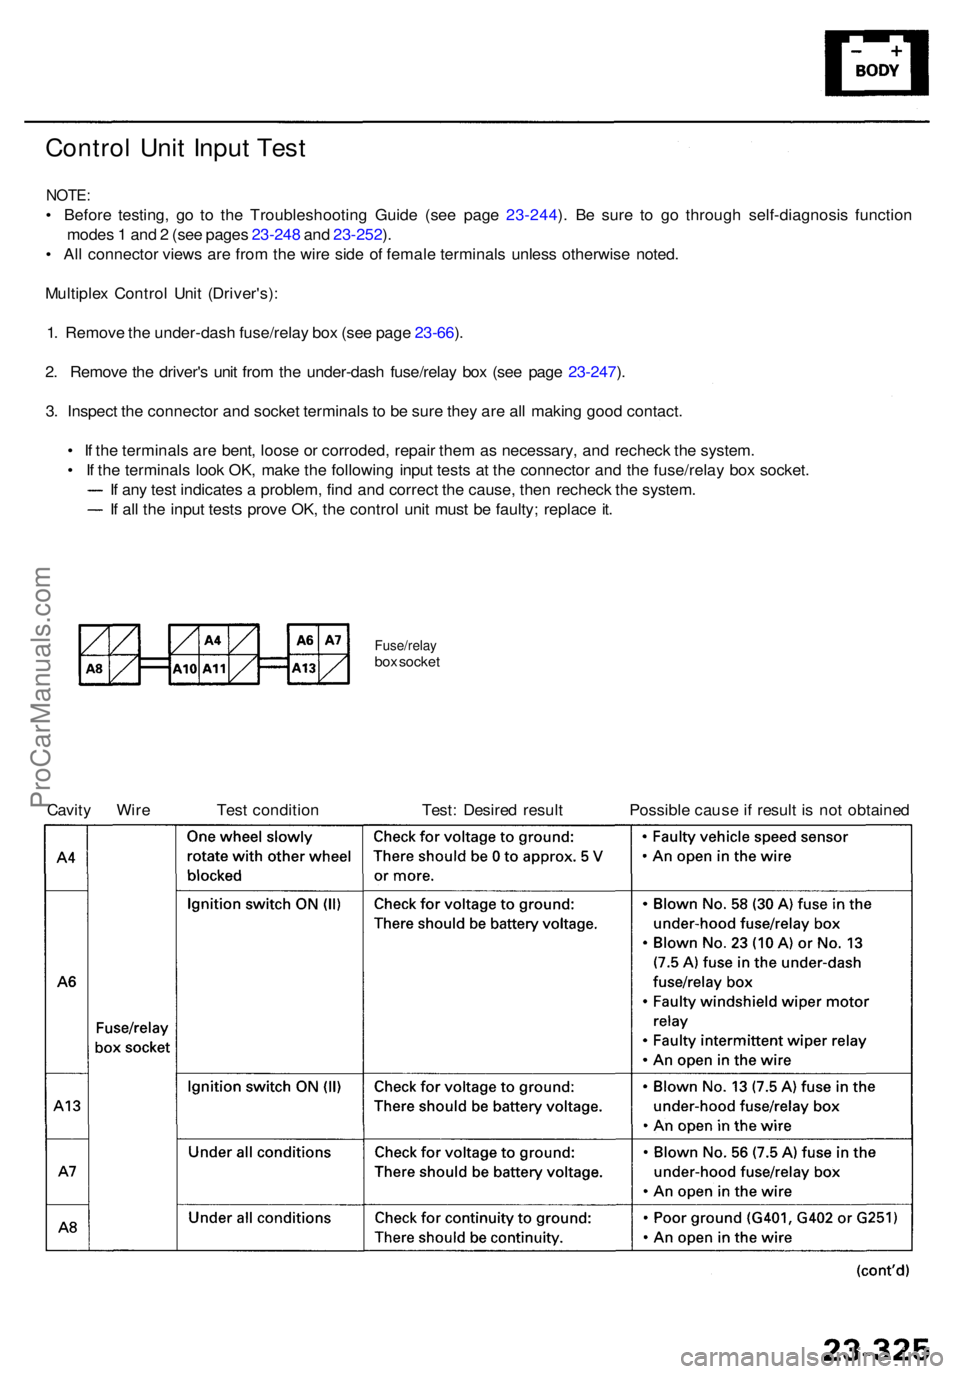
Control Uni t Inpu t Tes t
NOTE :
• Befor e testing , g o t o th e Troubleshootin g Guid e (se e pag e 23-244 ). B e sur e t o g o throug h self-diagnosi s functio n
mode s 1 an d 2 (se e page s 23-24 8 an d 23-252 ).
• Al l connecto r view s ar e fro m th e wir e sid e o f femal e terminal s unles s otherwis e noted .
Multiple x Contro l Uni t (Driver's) :
1 . Remov e th e under-das h fuse/rela y bo x (se e pag e 23-66 ).
2 . Remov e th e driver' s uni t fro m th e under-das h fuse/rela y bo x (se e pag e 23-247 ).
3 . Inspec t th e connecto r an d socke t terminal s t o b e sur e the y ar e al l makin g goo d contact .
• I f th e terminal s ar e bent , loos e o r corroded , repai r the m a s necessary , an d rechec k th e system .
• I f th e terminal s loo k OK , mak e th e followin g inpu t test s a t th e connecto r an d th e fuse/rela y bo x socket .
I f an y tes t indicate s a problem , fin d an d correc t th e cause , the n rechec k th e system .
I f al l th e inpu t test s prov e OK , th e contro l uni t mus t b e faulty ; replac e it .
Fuse/rela ybox socke t
Cavity Wir e Tes t conditio n Test : Desire d resul t Possibl e caus e if resul t i s no t obtaine d
ProCarManuals.com
Page 1705 of 1954
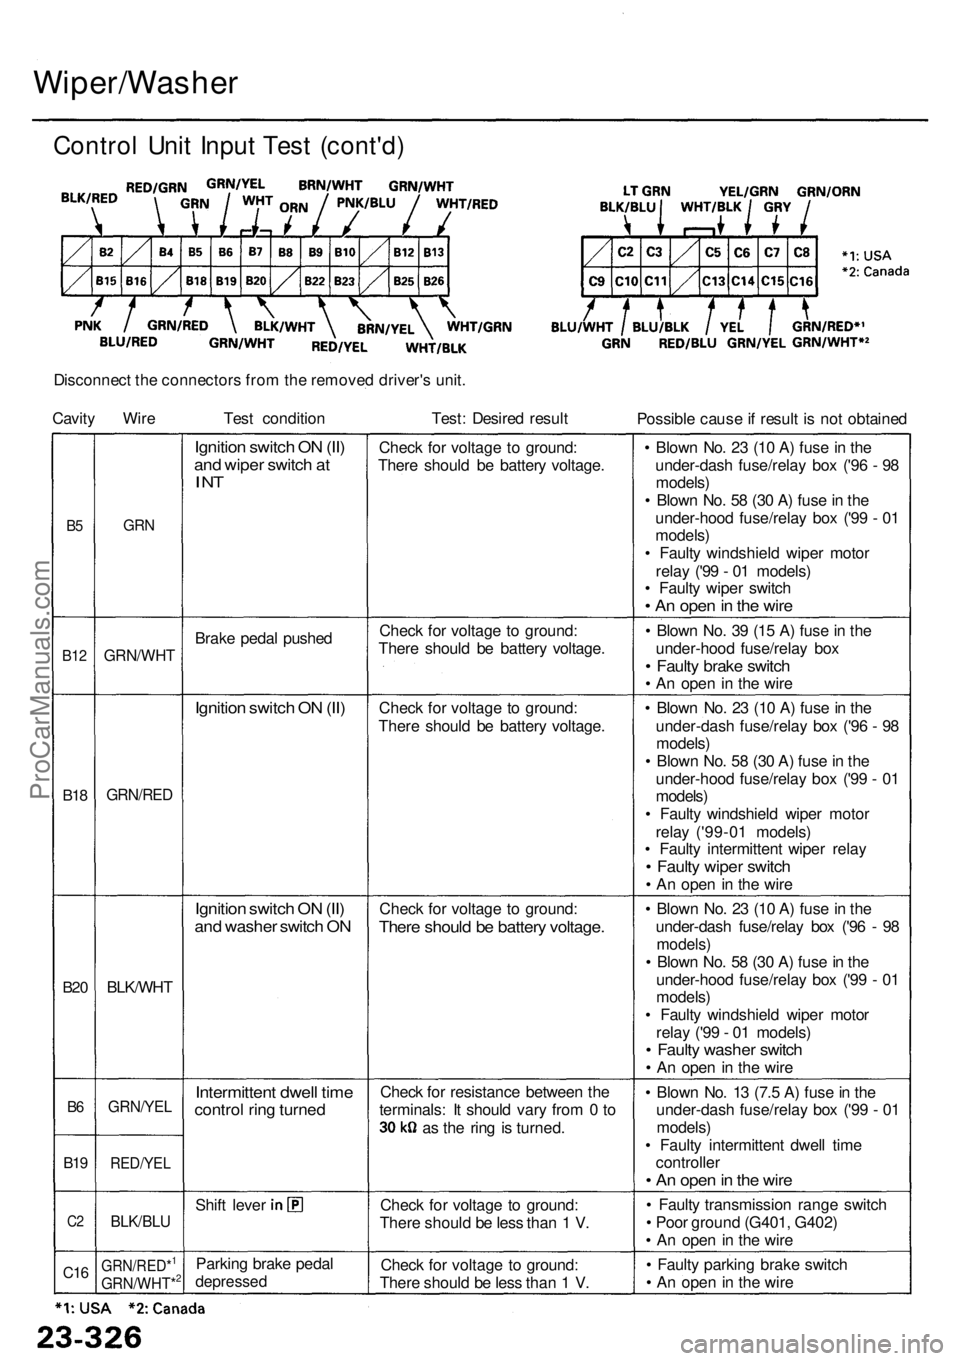
Wiper/Washer
Disconnect th e connector s fro m th e remove d driver' s unit .
Cavit y Wir e Test conditio n Test: Desire d resul t
Possible caus e if resul t i s no t obtaine d
B5
B1 2
B18
B2 0
B6
B1 9
C2
C1 6
GR N
GRN/WH T
GRN/RED
BLK/WHT
GRN/YE L
RED/YEL
BLK/BLU
GRN/RED*1
GRN/WHT*2
Ignition switc h O N (II )
an d wipe r switc h a tI NT
Brak e peda l pushe d
Ignition switc h O N (II )
Ignitio n switc h O N (II )
an d washe r switc h O N
Intermitten t dwel l tim econtro l rin g turne d
Shift leve r
Parkin g brak e peda l
depresse d
Check fo r voltag e t o ground :
Ther e shoul d b e batter y voltage .
Chec k fo r voltag e t o ground :
Ther e shoul d b e batter y voltage .
Chec k fo r voltag e t o ground :
Ther e shoul d b e batter y voltage .
Chec k fo r voltag e t o ground :
There shoul d b e batter y voltage .
Check fo r resistanc e betwee n th e
terminals : I t shoul d var y fro m 0 to
as th e rin g is turned .
Chec k fo r voltag e t o ground :
Ther e shoul d b e les s tha n 1 V .
Chec k fo r voltag e t o ground :
Ther e shoul d b e les s tha n 1 V . •
Blow n No . 2 3 (1 0 A ) fus e in th e
under-das h fuse/rela y bo x ('9 6 - 9 8
models )
• Blow n No . 5 8 (3 0 A ) fus e in th e
under-hoo d fuse/rela y bo x ('9 9 - 0 1
models )
• Fault y windshiel d wipe r moto r
rela y ('9 9 - 0 1 models )
• Fault y wipe r switc h
• A n ope n in th e wir e
• Blow n No . 3 9 (1 5 A ) fus e in th e
under-hoo d fuse/rela y bo x
• Fault y brak e switc h• A n ope n i n th e wir e
• Blow n No . 2 3 (1 0 A ) fus e in th e
under-das h fuse/rela y bo x ('9 6 - 9 8
models )
• Blow n No . 5 8 (3 0 A ) fus e in th e
under-hoo d fuse/rela y bo x ('9 9 - 0 1
models )
• Fault y windshiel d wipe r moto r
rela y ('99-0 1 models )
• Fault y intermitten t wipe r rela y
• Fault y wipe r switc h
• A n ope n in th e wir e
• Blow n No . 2 3 (1 0 A ) fus e in th e
under-das h fuse/rela y bo x ('9 6 - 9 8
models )
• Blow n No . 5 8 (3 0 A ) fus e in th e
under-hoo d fuse/rela y bo x ('9 9 - 0 1
models )
• Fault y windshiel d wipe r moto r
rela y ('9 9 - 0 1 models )
• Fault y washe r switc h
• A n ope n in th e wir e
• Blow n No . 1 3 (7. 5 A ) fus e in th e
under-das h fuse/rela y bo x ('9 9 - 0 1
models )
• Fault y intermitten t dwel l tim e
controlle r
• A n ope n in th e wir e
• Fault y transmissio n rang e switc h
• Poo r groun d (G401 , G402 )
• A n ope n i n th e wir e
• Fault y parkin g brak e switc h
• A n ope n in th e wir e
Contro l Uni t Inpu t Tes t (cont'd )
ProCarManuals.com
Page 1706 of 1954
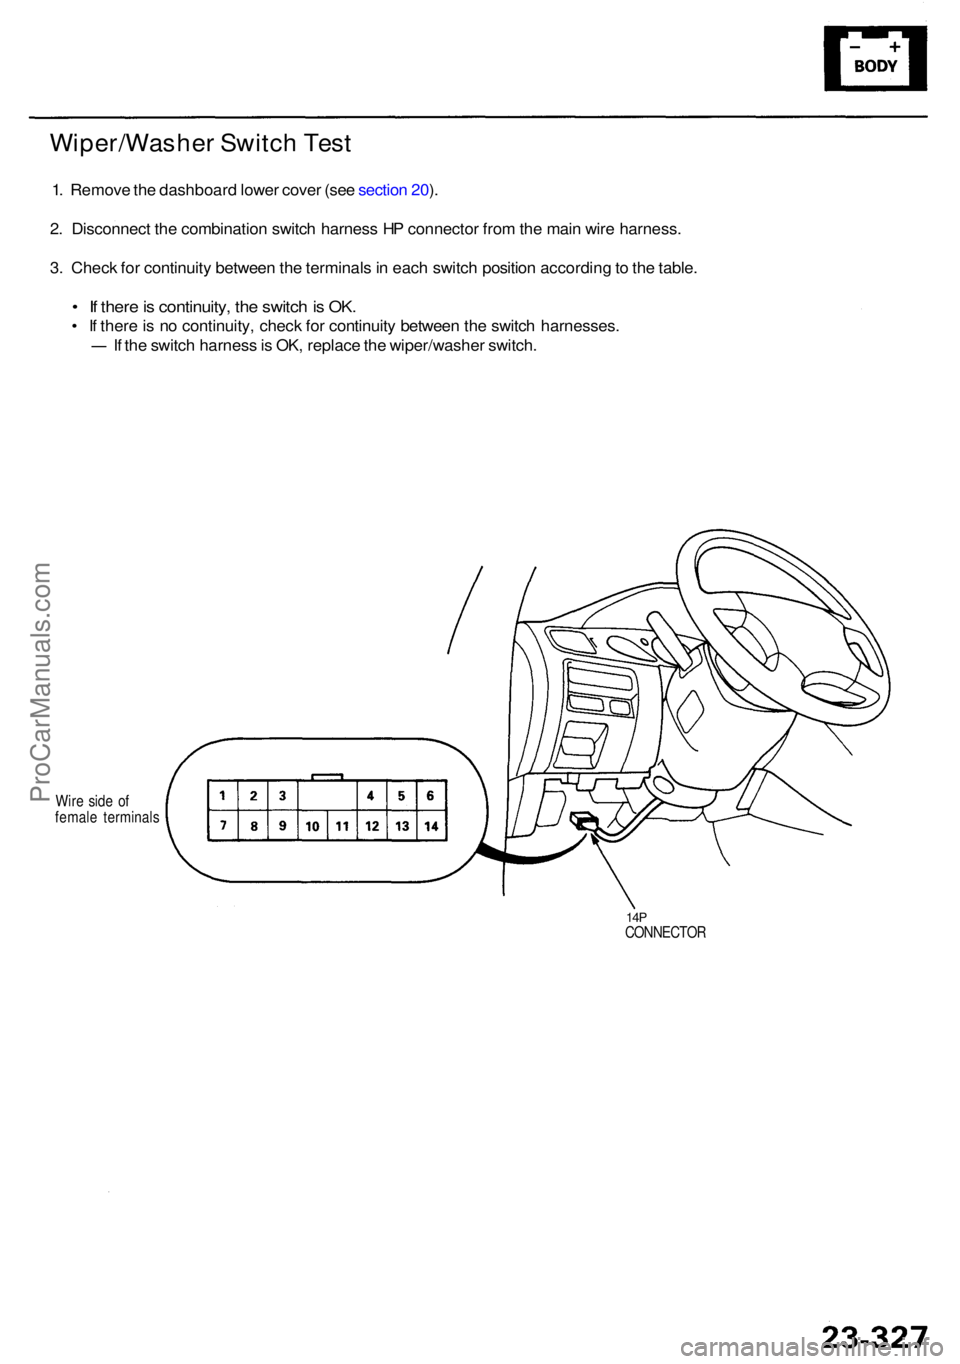
Wiper/Washer Switc h Tes t
1. Remov e th e dashboar d lowe r cove r (se e sectio n 20 ).
2 . Disconnec t th e combinatio n switc h harnes s H P connecto r fro m th e mai n wir e harness .
3 . Chec k fo r continuit y betwee n th e terminal s in eac h switc h positio n accordin g to th e table .
• I f ther e is continuity , th e switc h is OK .
• I f ther e is n o continuity , chec k fo r continuit y betwee n th e switc h harnesses .
I f th e switc h harnes s is OK , replac e th e wiper/washe r switch .
Wire sid e o f
femal e terminal s
14PCONNECTO R
ProCarManuals.com
Page 1707 of 1954
Wiper/Washer
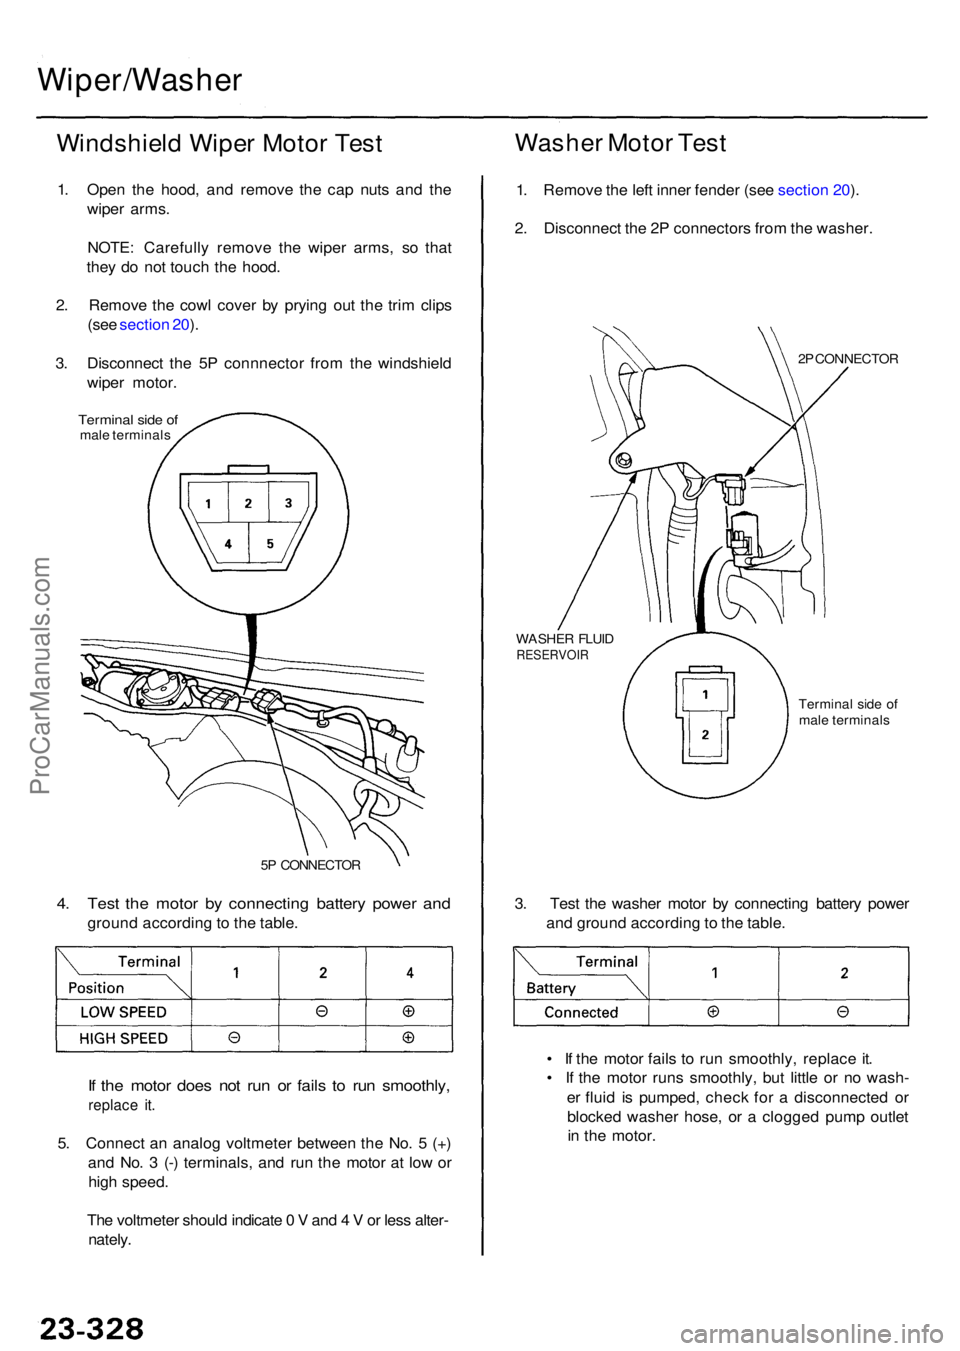
Windshield Wipe r Moto r Tes t
1. Ope n th e hood , an d remov e th e ca p nut s an d th e
wipe r arms .
NOTE : Carefull y remov e th e wipe r arms , s o tha t
the y d o no t touc h th e hood .
2 . Remov e th e cow l cove r b y pryin g ou t th e tri m clip s
(se e sectio n 20 ).
3 . Disconnec t th e 5 P connnecto r fro m th e windshiel d
wipe r motor .
Termina l sid e o fmal e terminal s
Washer Moto r Tes t
1. Remov e th e lef t inne r fende r (se e sectio n 20 ).
2 . Disconnec t th e 2 P connector s fro m th e washer .
2P CONNECTO R
WASHE R FLUI D
RESERVOI R
Terminal sid e o f
mal e terminal s
3. Tes t th e washe r moto r b y connectin g batter y powe r
an d groun d accordin g to th e table .
• I f th e moto r fail s t o ru n smoothly , replac e it .
• I f th e moto r run s smoothly , bu t littl e o r n o wash -
e r flui d i s pumped , chec k fo r a disconnecte d o r
blocke d washe r hose , o r a clogge d pum p outle t
i n th e motor .4. Tes t th e moto r b y connectin g batter y powe r an d
groun d accordin g to th e table .
5P CONNECTO R
If th e moto r doe s no t ru n o r fail s t o ru n smoothly ,
replace it .
5. Connec t a n analo g voltmete r betwee n th e No . 5 (+ )
an d No . 3 (- ) terminals , an d ru n th e moto r a t lo w o r
hig h speed .
Th e voltmete r shoul d indicat e 0 V and 4 V or les s alter -
nately .
ProCarManuals.com
Page 1708 of 1954
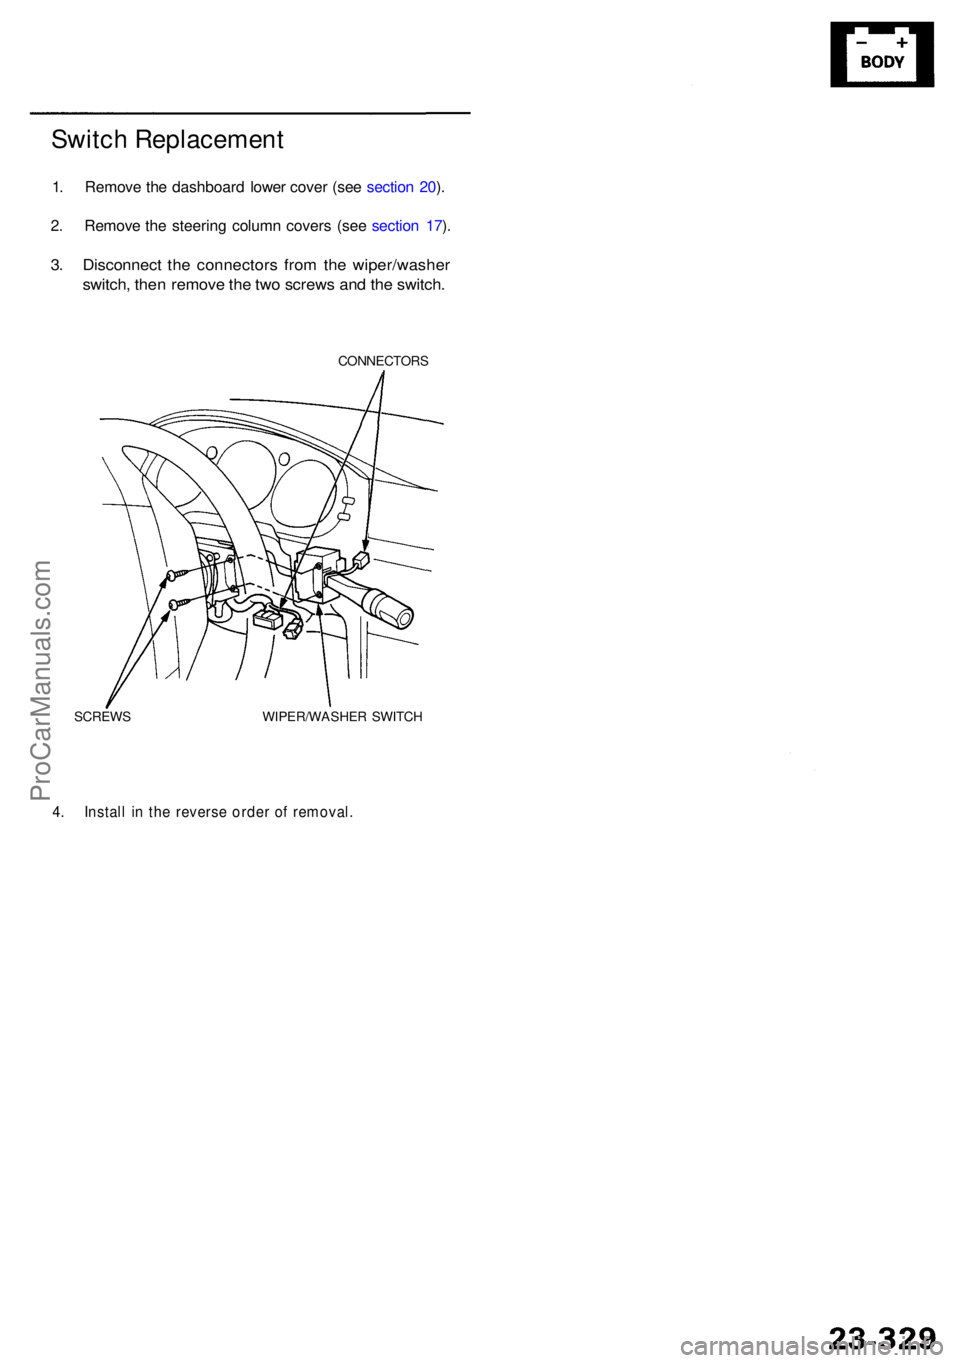
Switch Replacemen t
1. Remov e th e dashboar d lowe r cove r (se e sectio n 20 ).
2 . Remov e th e steerin g colum n cover s (se e sectio n 17 ).
3 . Disconnec t th e connector s fro m th e wiper/washe r
switch, the n remov e th e tw o screw s an d th e switch .
CONNECTOR S
SCREW S WIPER/WASHE R SWITC H
4. Instal l i n the revers e orde r o f removal .
ProCarManuals.com
Page 1709 of 1954
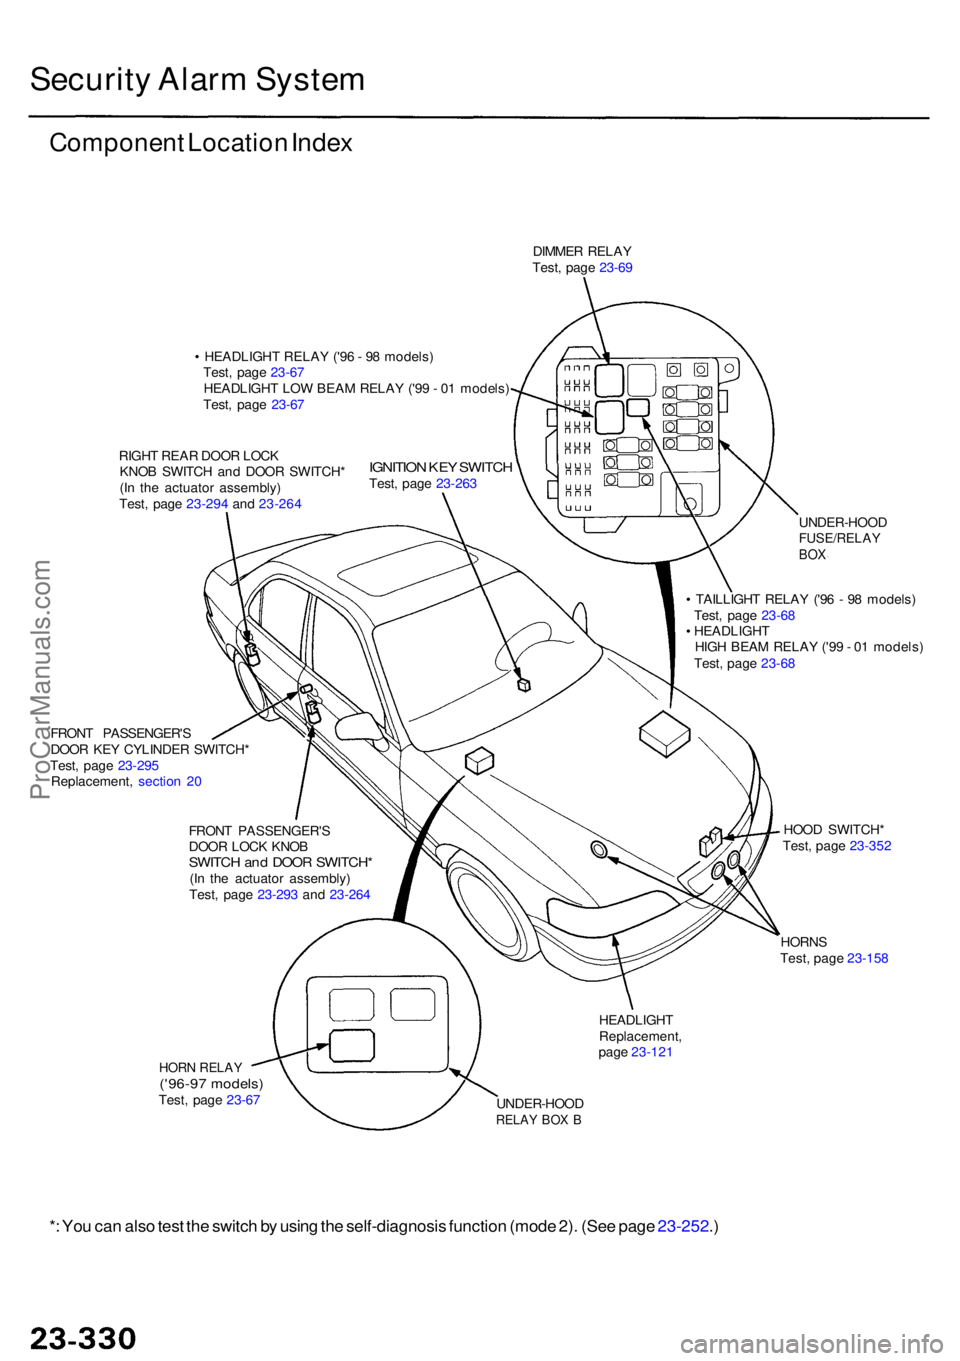
Security Alar m Syste m
Componen t Locatio n Inde x
DIMME R RELA Y
Test , pag e 23-6 9
• HEADLIGH T RELA Y ('9 6 - 9 8 models )
Test , pag e 23-6 7
HEADLIGH T LO W BEA M RELA Y ('9 9 - 0 1 models )
Test , pag e 23-6 7
RIGH T REA R DOO R LOC K
KNO B SWITC H an d DOO R SWITCH *
(I n th e actuato r assembly )
Test , pag e 23-29 4 an d 23-26 4
IGNITIO N KE Y SWITC HTest, pag e 23-26 3
FRON T PASSENGER' S
DOO R KE Y CYLINDE R SWITCH *
Test , pag e 23-29 5
Replacement , sectio n 2 0
FRON T PASSENGER' S
DOO R LOC K KNO B
SWITC H an d DOO R SWITCH *(In th e actuato r assembly )
Test , pag e 23-29 3 an d 23-26 4 UNDER-HOO
D
FUSE/RELAYBOX
• TAILLIGH T RELA Y ('9 6 - 9 8 models )
Test , pag e 23-6 8
• HEADLIGH T
HIG H BEA M RELA Y ('9 9 - 0 1 models )
Test , pag e 23-6 8
HOO D SWITCH *
Test , pag e 23-35 2
HORN S
Test , pag e 23-15 8
HEADLIGH TReplacement ,
pag e 23-12 1
UNDER-HOO D
RELAY BO X B
HOR N RELA Y('96-97 models )Test, pag e 23-6 7
*: Yo u ca n als o tes t th e switc h b y usin g th e self-diagnosi s functio n (mod e 2) . (Se e pag e 23-252 .)
ProCarManuals.com
Page 1710 of 1954
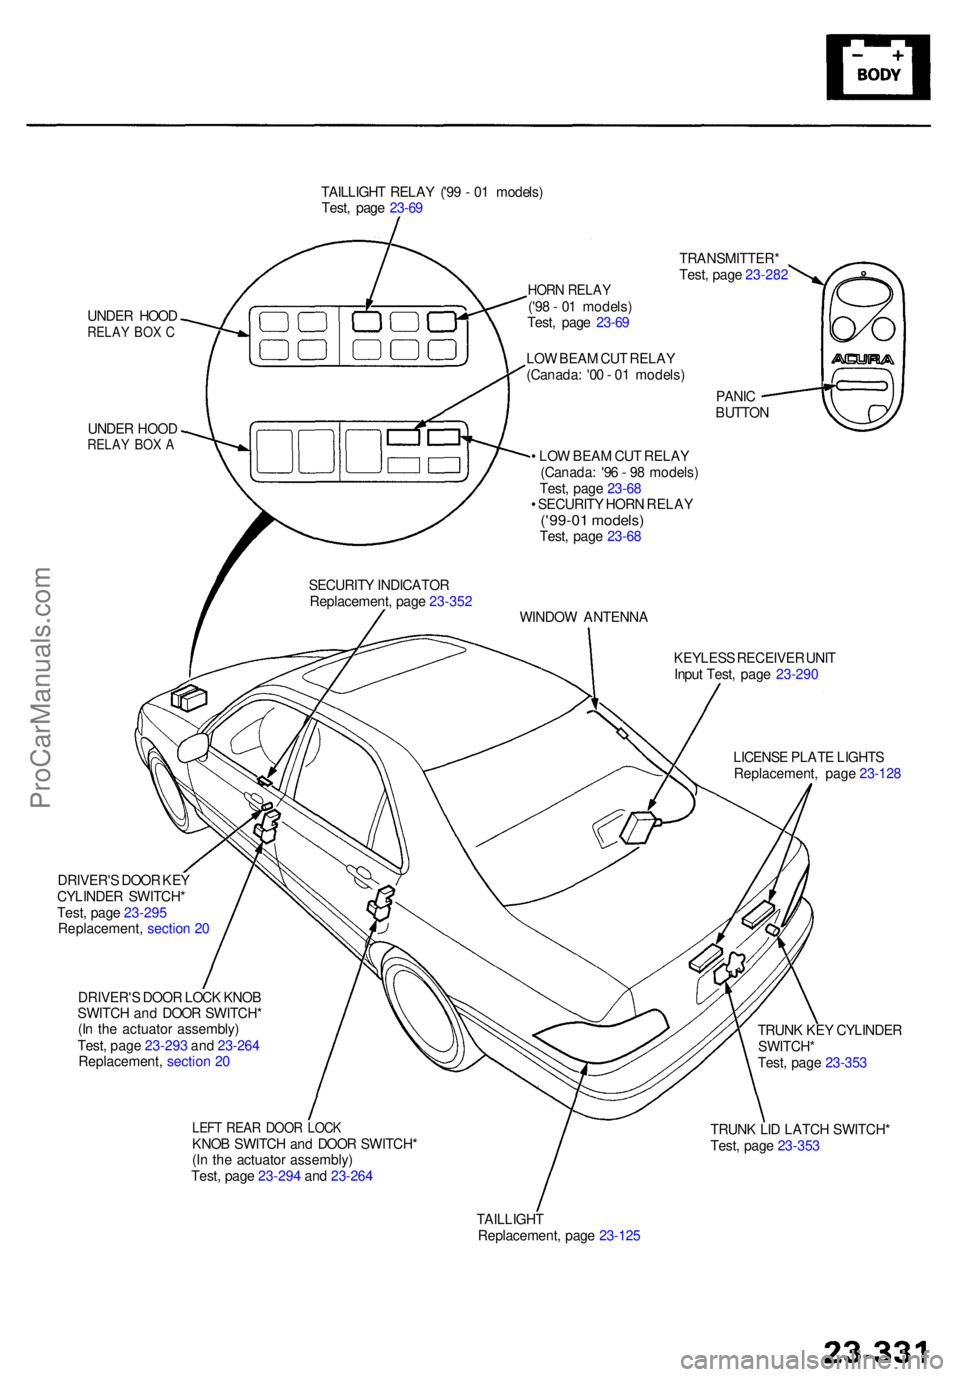
TAILLIGHT RELA Y ('9 9 - 0 1 models )
Test , pag e 23-6 9
UNDE R HOO D
RELA Y BO X C
UNDE R HOO DRELA Y BO X A
HOR N RELA Y('98 - 0 1 models )
Test , pag e 23-6 9 TRANSMITTER
*
Test , pag e 23-28 2
PANI C
BUTTO N
LO
W BEA M CU T RELA Y
(Canada : '0 0 - 0 1 models )
• LO W BEA M CU T RELA Y
(Canada : '9 6 - 9 8 models )
Test , pag e 23-6 8
• SECURIT Y HOR N RELA Y
('99-01 models )Test, pag e 23-6 8
WINDO W ANTENN A
KEYLES S RECEIVE R UNI T
Inpu t Test , pag e 23-29 0
LICENS E PLAT E LIGHT S
Replacement , pag e 23-12 8
SECURIT
Y INDICATO R
Replacement , pag e 23-35 2
TRUNK KE Y CYLINDE R
SWITCH *
Test , pag e 23-35 3
TRUN K LI D LATC H SWITCH *
Test , pag e 23-35 3
TAILLIGH T
Replacement , pag e 23-12 5
LEFT REA R DOO R LOC KKNOB SWITC H an d DOO R SWITCH *
(I n th e actuato r assembly )
Test , pag e 23-29 4 an d 23-26 4
DRIVER'
S DOO R LOC K KNO B
SWITC H an d DOO R SWITCH *
(I n th e actuato r assembly )
Test , pag e 23-29 3 an d 23-26 4
Replacement , sectio n 2 0
DRIVER'
S DOO R KE Y
CYLINDE R SWITCH *
Test , pag e 23-29 5
Replacement , sectio n 2 0
ProCarManuals.com