ACURA RL KA9 1996 Service Repair Manual
Manufacturer: ACURA, Model Year: 1996, Model line: RL KA9, Model: ACURA RL KA9 1996Pages: 1954, PDF Size: 61.44 MB
Page 191 of 1954
Emission Contro l Syste m
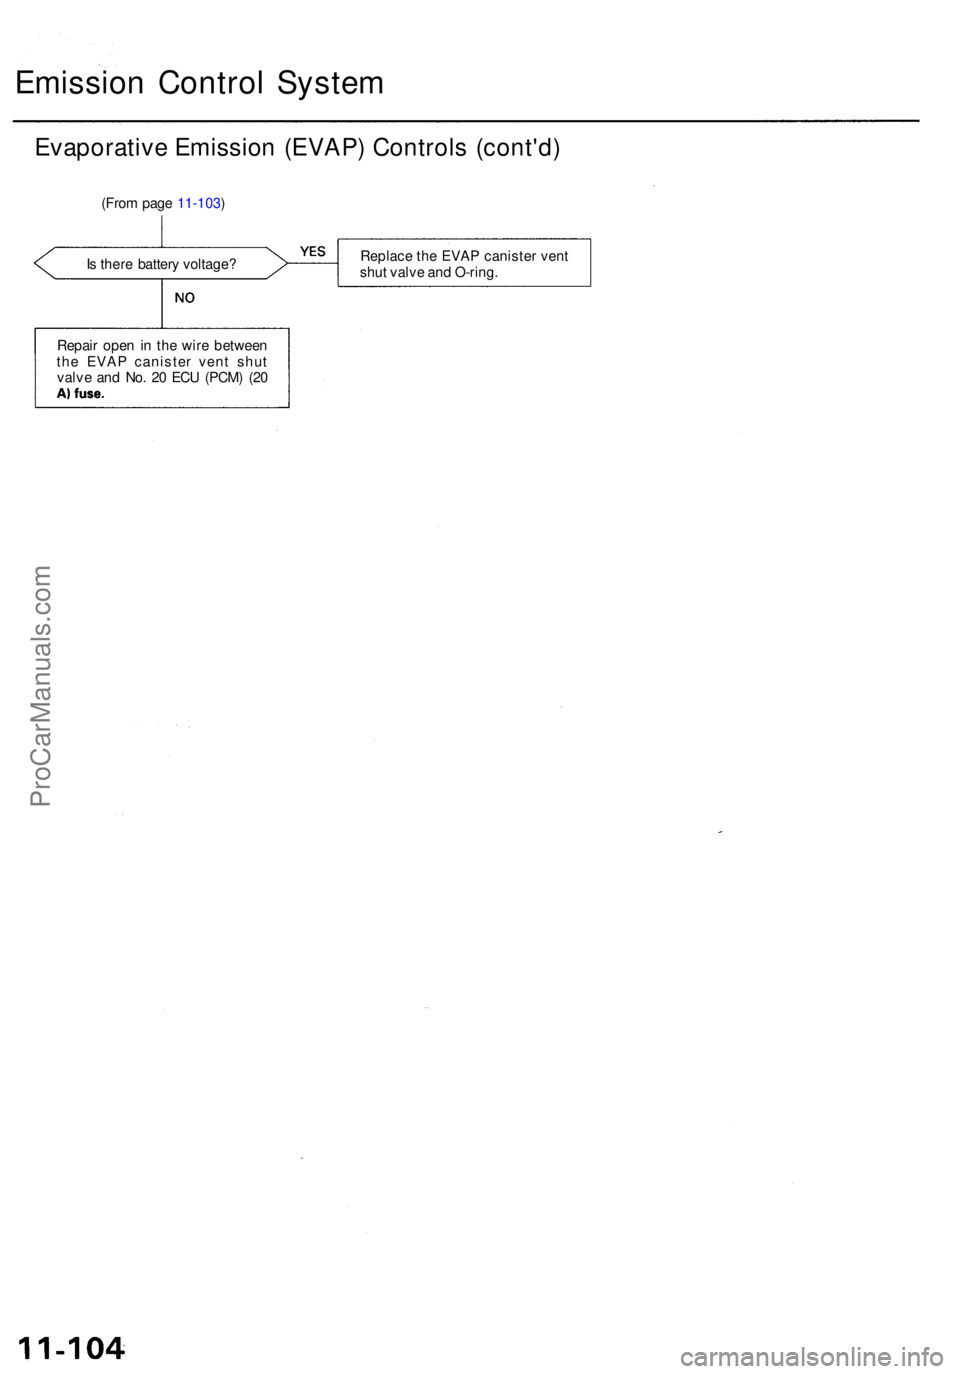
Evaporativ e Emissio n (EVAP ) Control s (cont'd )
(From pag e 11-103 )
I s ther e batter y voltage ? Replac
e th e EVA P caniste r ven t
shu t valv e an d O-ring .
Repai r ope n i n th e wir e betwee n
th e EVA P caniste r ven t shu t
valv e an d No . 2 0 EC U (PCM ) (2 0
A)fuse .
ProCarManuals.com
Page 192 of 1954
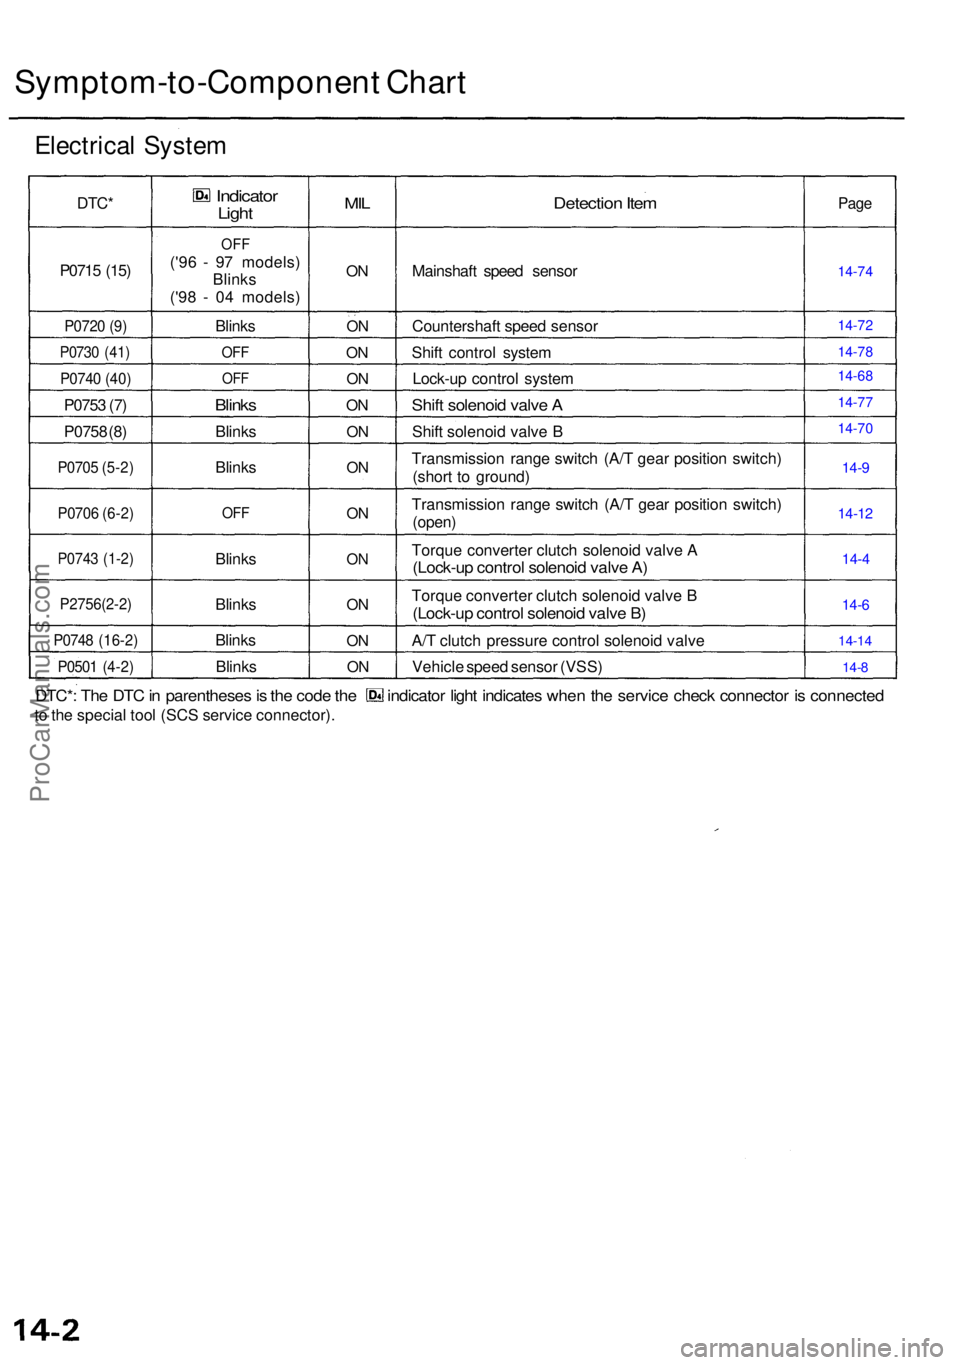
Symptom-to-Component Char t
Electrica l Syste m
DTC*
P071 5 (15 )
P072 0 (9 )
P073 0 (41 )
P074 0 (40 )
P075 3 (7 )
P075 8 (8 )
P070 5 (5-2 )
P070 6 (6-2 )
P074 3 (1-2 )
P2756(2-2 )
P0748 (16-2 )
P0501 (4-2 )
Indicato rLight
OFF
('96 - 9 7 models )
Blink s
('9 8 - 0 4 models )
Blink s
OFF
OFF
Blink s
Blink s
Blink s
OFF
Blink s
Blink s
Blink s
Blink s
MIL
ON
O N
O N
O N
ON
O N
O N
O N
O N
ON
O N
O N
Detectio n Ite m
Mainshaf t spee d senso r
Countershaf t spee d senso r
Shif t contro l syste m
Lock-u p contro l syste m
Shift solenoi d valv e A
Shif t solenoi d valv e B
Transmissio n rang e switc h (A/ T gea r positio n switch )
(shor t t o ground )
Transmissio n rang e switc h (A/ T gea r positio n switch )
(open)
Torqu e converte r clutc h solenoi d valv e A(Lock-u p contro l solenoi d valv e A )
Torqu e converte r clutc h solenoi d valv e B
(Lock-u p contro l solenoi d valv e B )
A/ T clutc h pressur e contro l solenoi d valv e
Vehicl e spee d senso r (VSS )
Page
14-9
14-1 2
14-4
14-6
14-1 4
14- 8
DTC* : Th e DT C in parenthese s is th e cod e th e indicato r ligh t indicate s whe n th e servic e chec k connecto r i s connecte d
to th e specia l too l (SC S servic e connector) .
14-74
14-72
14-78
14-77
14-70 14-68
ProCarManuals.com
Page 193 of 1954
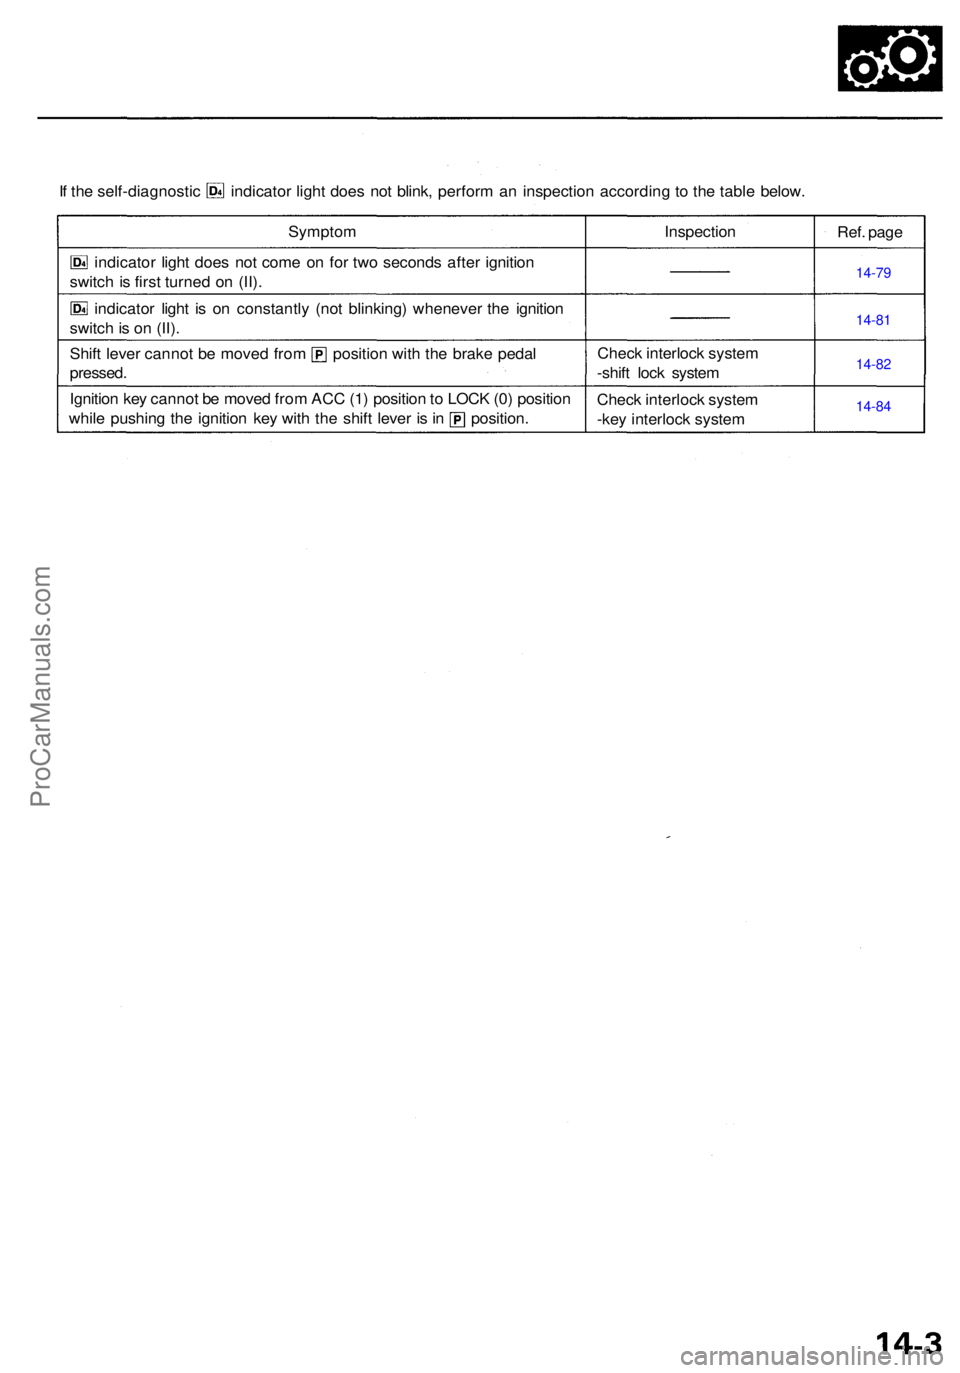
If th e self-diagnosti c indicator light doe s no t blink , perfor m a n inspectio n accordin g t o th e tabl e below .
Sympto m
indicato r ligh t doe s no t com e o n fo r tw o second s afte r ignitio n
switc h is firs t turne d o n (II) .
indicato r ligh t i s o n constantl y (no t blinking ) wheneve r th e ignitio n
switc h is o n (II) .
Shif t leve r canno t b e move d fro m positio n wit h th e brak e peda l
pressed .
Ignitio n ke y canno t b e move d fro m AC C (1 ) positio n to LOC K (0 ) positio n
while pushin g th e ignitio n ke y wit h th e shif t leve r i s in position . Inspectio
n
Chec k interloc k syste m
-shif t loc k syste m
Chec k interloc k syste m
-ke y interloc k syste m Ref
. pag e
14-79
14-81
14-82
14-84
ProCarManuals.com
Page 194 of 1954
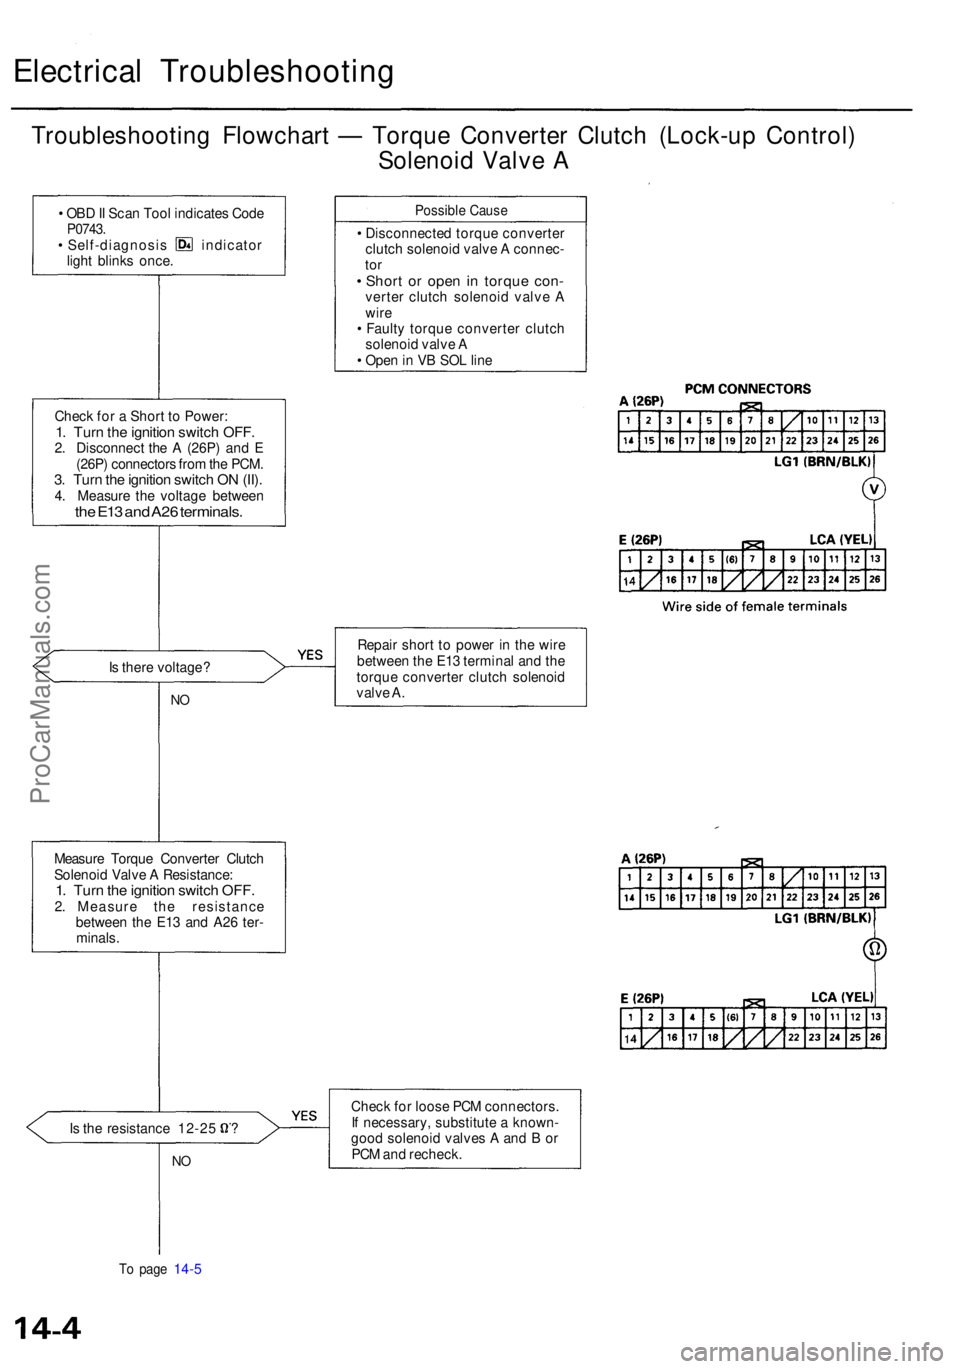
Electrical Troubleshootin g
Troubleshooting Flowchar t — Torqu e Converte r Clutc h (Lock-u p Control )
Solenoi d Valv e A
• OB D II Sca n Too l indicate s Cod eP0743 .• Self-diagnosi s indicato r
ligh t blink s once .
Possibl e Caus e
• Disconnecte d torqu e converte r
clutc h solenoi d valv e A connec -
tor• Shor t o r ope n in torqu e con -verte r clutc h solenoi d valv e A
wir e
• Fault y torqu e converte r clutc h
solenoi d valv e A
• Ope n in V B SO L lin e
Chec k fo r a Shor t t o Power :
1. Tur n th e ignitio n switc h OFF .2. Disconnec t th e A (26P ) an d E
(26P ) connector s fro m th e PCM .
3. Tur n th e ignitio n switc h O N (II) .4. Measur e th e voltag e betwee nthe E1 3 an d A2 6 terminals .
Is ther e voltage ?
NO
Repai r shor t t o powe r i n th e wir e
betwee n th e E1 3 termina l an d th e
torqu e converte r clutc h solenoi d
valv e A .
Measur e Torqu e Converte r Clutc h
Solenoi d Valv e A Resistance :
1. Tur n th e ignitio n switc h OFF .2. Measur e th e resistanc e
betwee n th e E1 3 an d A2 6 ter -
minals .
Is th e resistanc e 12-2 5 ?
N O
Chec k fo r loos e PC M connectors .
I f necessary , substitut e a known -
goo d solenoi d valve s A an d B or
PC M an d recheck .
To pag e 14-5
ProCarManuals.com
Page 195 of 1954
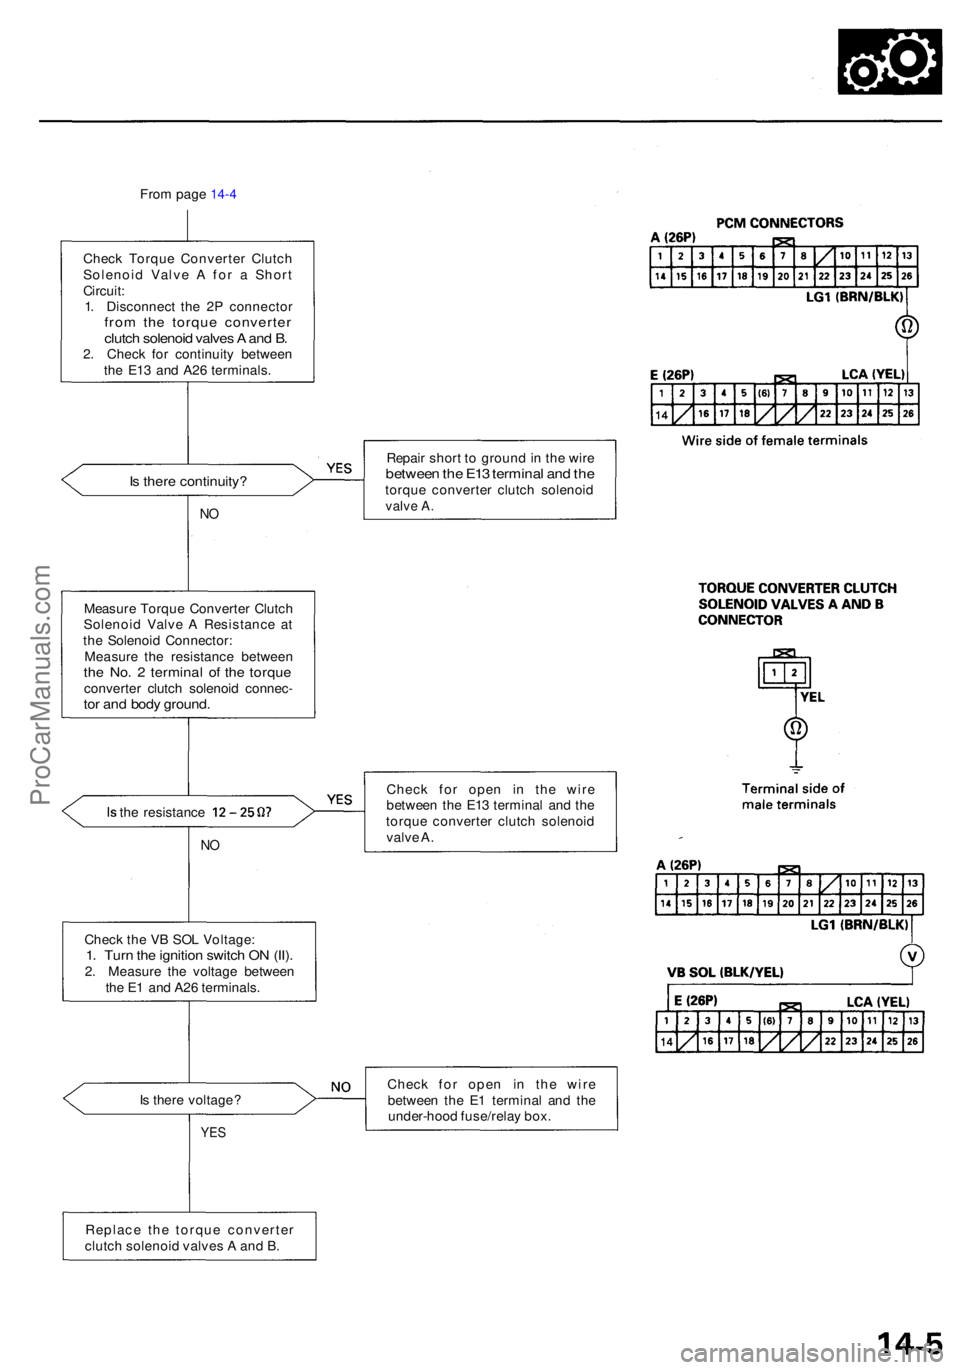
From pag e 14-4
Chec k Torqu e Converte r Clutc h
Solenoi d Valv e A fo r a Shor t
Circuit :
1 . Disconnec t th e 2 P connecto r
from th e torqu e converte rclutch solenoi d valve s A an d B .2. Chec k fo r continuit y betwee n
th e E1 3 an d A2 6 terminals .
Is ther e continuity ?
NO
Repai r shor t t o groun d in th e wir ebetwee n th e E1 3 termina l an d th etorqu e converte r clutc h solenoi dvalve A .
Measur e Torqu e Converte r Clutc h
Solenoi d Valv e A Resistanc e a t
th e Solenoi d Connector :
Measur e th e resistanc e betwee n
the No . 2 termina l o f th e torqu econverte r clutc h solenoi d connec -tor an d bod y ground .
Is th e resistanc e 12-25
NO
Chec k fo r ope n i n th e wir e
betwee n th e E1 3 termina l an d th e
torqu e converte r clutc h solenoi d
valv e A .
I s ther e voltage ?
YES
Chec k fo r ope n i n th e wir e
betwee n th e E 1 termina l an d th e
under-hoo d fuse/rela y box .
Replac e th e torqu e converte r
clutc h solenoi d valve s A an d B .
Chec
k th e V B SO L Voltage :
1. Tur n th e ignitio n switc h O N (II) .2. Measur e th e voltag e betwee n
th e E 1 an d A2 6 terminals .
ProCarManuals.com
Page 196 of 1954
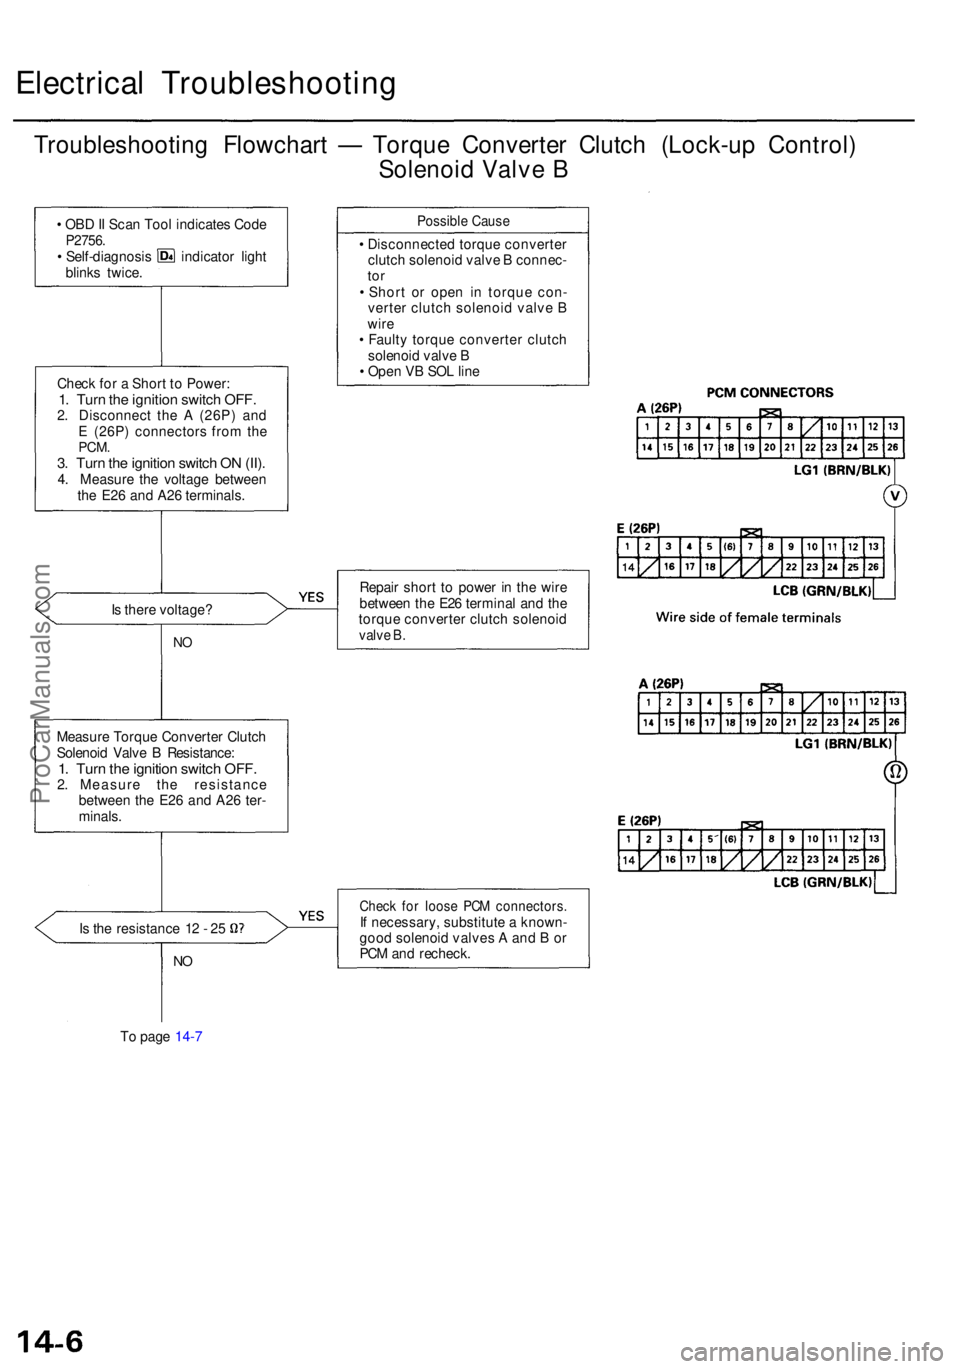
Electrical Troubleshootin g
Troubleshooting Flowchar t — Torqu e Converte r Clutc h (Lock-u p Control )
Solenoi d Valv e B
• OB D II Sca n Too l indicate s Cod eP2756 .• Self-diagnosi s indicato r ligh t
blink s twice .
Chec k fo r a Shor t t o Power :
1. Tur n th e ignitio n switc h OFF .2. Disconnec t th e A (26P ) an d
E (26P ) connector s fro m th e
PCM .3. Tur n th e ignitio n switc h O N (II) .4. Measur e th e voltag e betwee n
th e E2 6 an d A2 6 terminals .
I s ther e voltage ?
NO
Measur e Torqu e Converte r Clutc h
Solenoi d Valv e B Resistance :
1. Tur n th e ignitio n switc h OFF .2. Measur e th e resistanc e
betwee n th e E2 6 an d A2 6 ter -
minals .
Is th e resistanc e 1 2 - 2 5
NO
To pag e 14-7
Possibl e Caus e
• Disconnecte d torqu e converte r
clutc h solenoi d valv e B connec -
tor• Shor t o r ope n i n torqu e con -
verte r clutc h solenoi d valv e B
wir e
• Fault y torqu e converte r clutc h
solenoi d valv e B
• Ope n V B SO L lin e
Repai r shor t t o powe r i n th e wir e
betwee n th e E2 6 termina l an d th e
torqu e converte r clutc h solenoi d
valve B .
Chec k fo r loos e PC M connectors .If necessary , substitut e a known -
goo d solenoi d valve s A an d B or
PC M an d recheck .
ProCarManuals.com
Page 197 of 1954
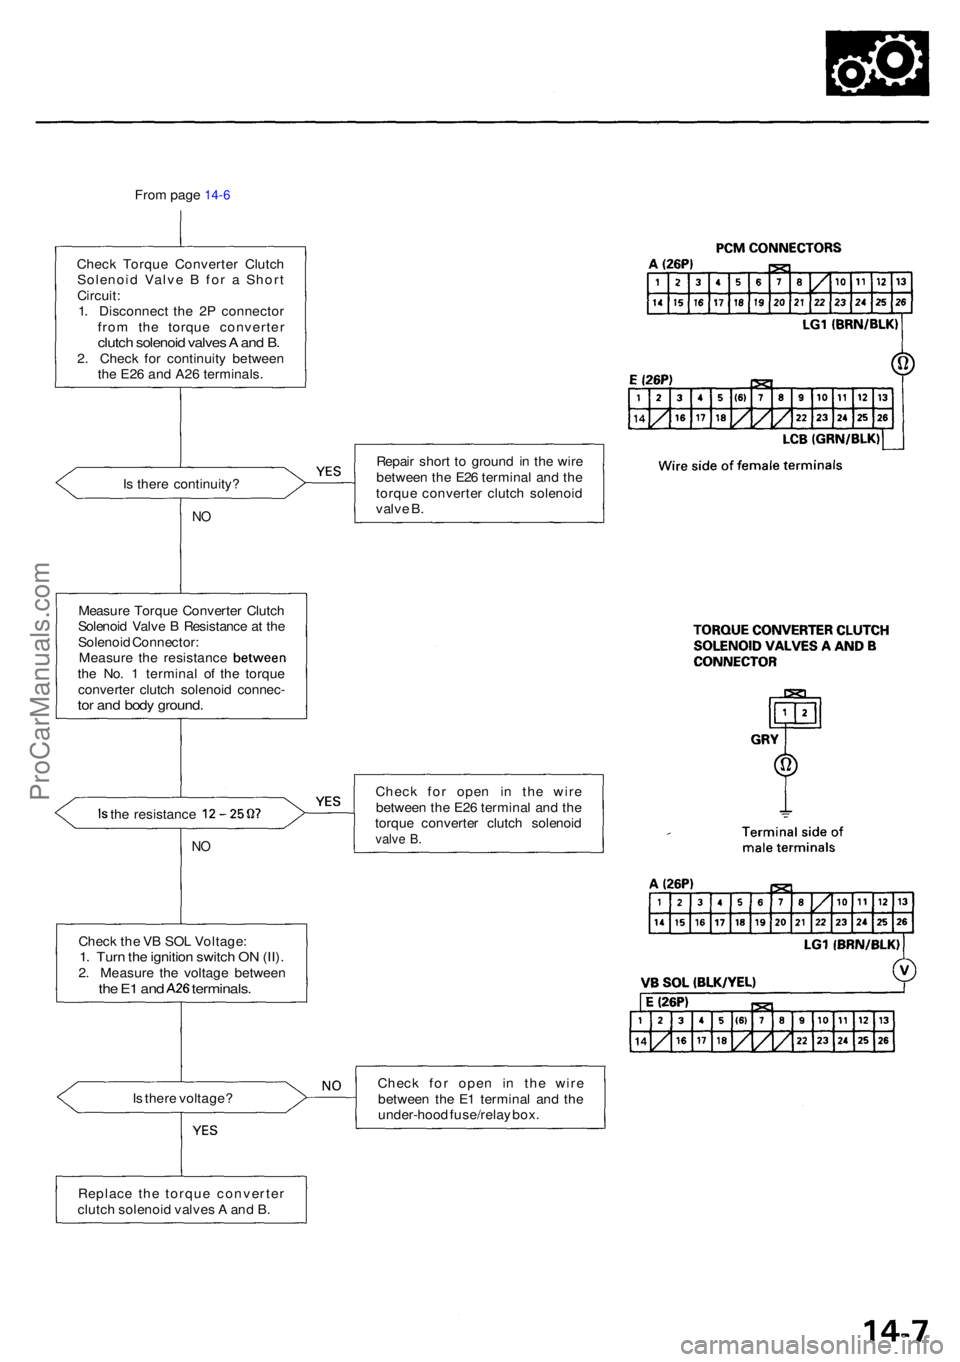
From pag e 14-6
Chec k Torqu e Converte r Clutc h
Solenoi d Valv e B fo r a Shor t
Circuit :
1 . Disconnec t th e 2 P connecto r
fro m th e torqu e converte r
clutch solenoi d valve s A an d B .2. Chec k fo r continuit y betwee n
th e E2 6 an d A2 6 terminals .
I s ther e continuity ?
NO
Repai r shor t t o groun d in th e wir e
betwee n th e E2 6 termina l an d th e
torqu e converte r clutc h solenoi d
valv e B .
Measur e Torqu e Converte r Clutc h
Solenoi d Valv e B Resistanc e a t th e
Solenoi d Connector :
Measure th e resistanc e betweenthe No . 1 termina l o f th e torqu e
converte r clutc h solenoi d connec -
tor an d bod y ground .
Is th e resistanc e 12-25
NO
Chec k fo r ope n i n th e wir e
betwee n th e E2 6 termina l an d th e
torqu e converte r clutc h solenoi d
valve B .
Is ther e voltage ? Chec
k fo r ope n i n th e wir e
betwee n th e E 1 termina l an d th e
under-hoo d fuse/rela y box .
Chec
k th e V B SO L Voltage :
1. Tur n th e ignitio n switc h O N (II) .2. Measur e th e voltag e betwee nthe E 1 an d A2 6 terminals .
Replace th e torqu e converte r
clutc h solenoi d valve s A an d B .
ProCarManuals.com
Page 198 of 1954
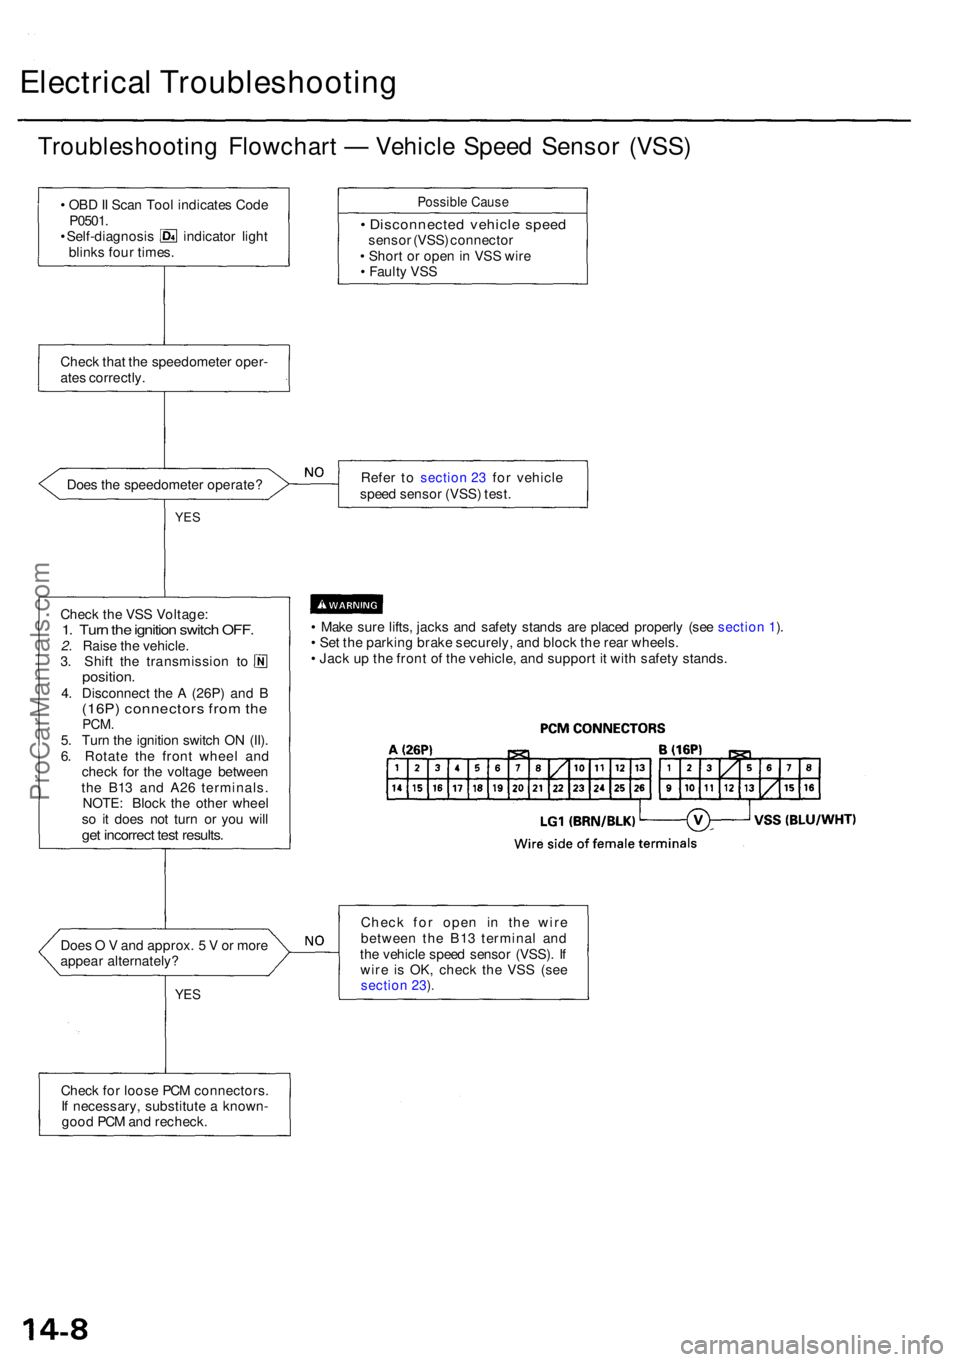
Electrical Troubleshootin g
Troubleshooting Flowchar t — Vehicl e Spee d Senso r (VSS )
• OB D II Sca n Too l indicate s Cod e
P0501 .
• Self-diagnosi s indicato r ligh t
blink s fou r times .
Possibl e Caus e
• Disconnecte d vehicl e spee dsenso r (VSS ) connecto r
• Shor t o r ope n in VS S wir e
• Fault y VS S
Chec k tha t th e speedomete r oper -
ate s correctly .
Doe s th e speedomete r operate ? Refe
r t o
section 23 fo r vehicl e
spee d senso r (VSS ) test .
YES
• Mak e sur e lifts , jack s an d safet y stand s ar e place d properl y (se e section 1).
• Se t th e parkin g brak e securely , an d bloc k th e rea r wheels .
• Jac k u p th e fron t o f th e vehicle , an d suppor t i t wit h safet y stands .
Doe s O V and approx . 5 V or mor e
appea r alternately ?
YES
Chec k fo r ope n i n th e wir e
betwee n th e B1 3 termina l an d
th e vehicl e spee d senso r (VSS) . I f
wir e i s OK , chec k th e VS S (se e
section 23).
Chec k fo r loos e PC M connectors .
I f necessary , substitut e a known -
goo d PC M an d recheck .
Chec
k th e VS S Voltage :
1. Tur n th e ignitio n switc h OFF .2. Rais e th e vehicle .
3 . Shif t th e transmissio n t o
position .4. Disconnec t th e A (26P ) an d B(16P ) connector s fro m th ePCM .5. Tur n th e ignitio n switc h O N (II) .
6 . Rotat e th e fron t whee l an d
chec k fo r th e voltag e betwee n
th e B1 3 an d A2 6 terminals .
NOTE : Bloc k th e othe r whee l
s o i t doe s no t tur n o r yo u wil l
get incorrec t tes t results .
ProCarManuals.com
Page 199 of 1954
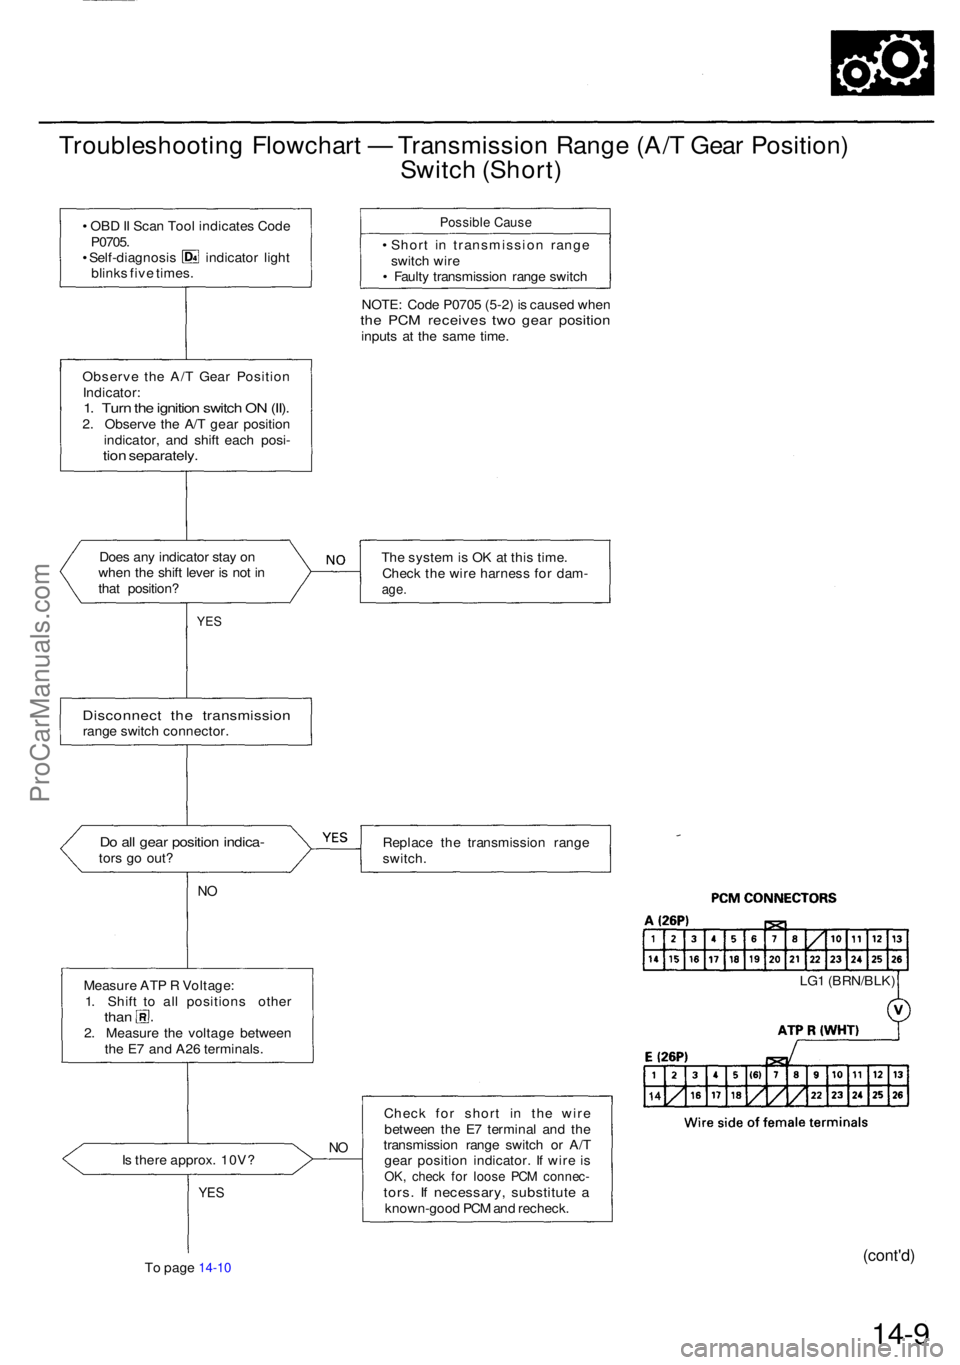
Troubleshooting Flowchar t — Transmissio n Rang e (A/ T Gea r Position )
Switc h (Short )
• OB D II Sca n Too l indicate s Cod e
P0705 .
• Self-diagnosi s indicato r ligh t
blink s fiv e times .
Possibl e Caus e
• Shor t i n transmissio n rang e
switc h wir e
• Fault y transmissio n rang e switc h
NOTE : Cod e P070 5 (5-2 ) i s cause d whe n
the PC M receive s tw o gea r positio ninputs a t th e sam e time .
Observ e th e A/ T Gea r Positio n
Indicator :1. Tur n th e ignitio n switc h O N (II) .2. Observ e th e A/ T gea r positio n
indicator , an d shif t eac h posi -
tion separately .
Does an y indicato r sta y o n
whe n th e shif t leve r i s no t i n
tha t position ? Th
e syste m is O K a t thi s time .
Chec k th e wir e harnes s fo r dam -
age.
YES
Disconnec t th e transmissio nrange switc h connector .
Do al l gea r positio n indica -tors g o out ? Replac
e th e transmissio n rang e
switch .
NO
Measur e AT P R Voltage :
1 . Shif t t o al l position s othe r
than2. Measur e th e voltag e betwee n
th e E 7 an d A2 6 terminals . LG
1 (BRN/BLK )
I s ther e approx . 10V ?
NO
YE S
To pag e 14-10
Chec k fo r shor t i n th e wir e
betwee n th e E 7 termina l an d th e
transmissio n rang e switc h o r A/ T
gea r positio n indicator . I f wir e i s
OK , chec k fo r loos e PC M connec -tors. I f necessary , substitut e aknown-goo d PC M an d recheck .
(cont'd)
14-9
ProCarManuals.com
Page 200 of 1954
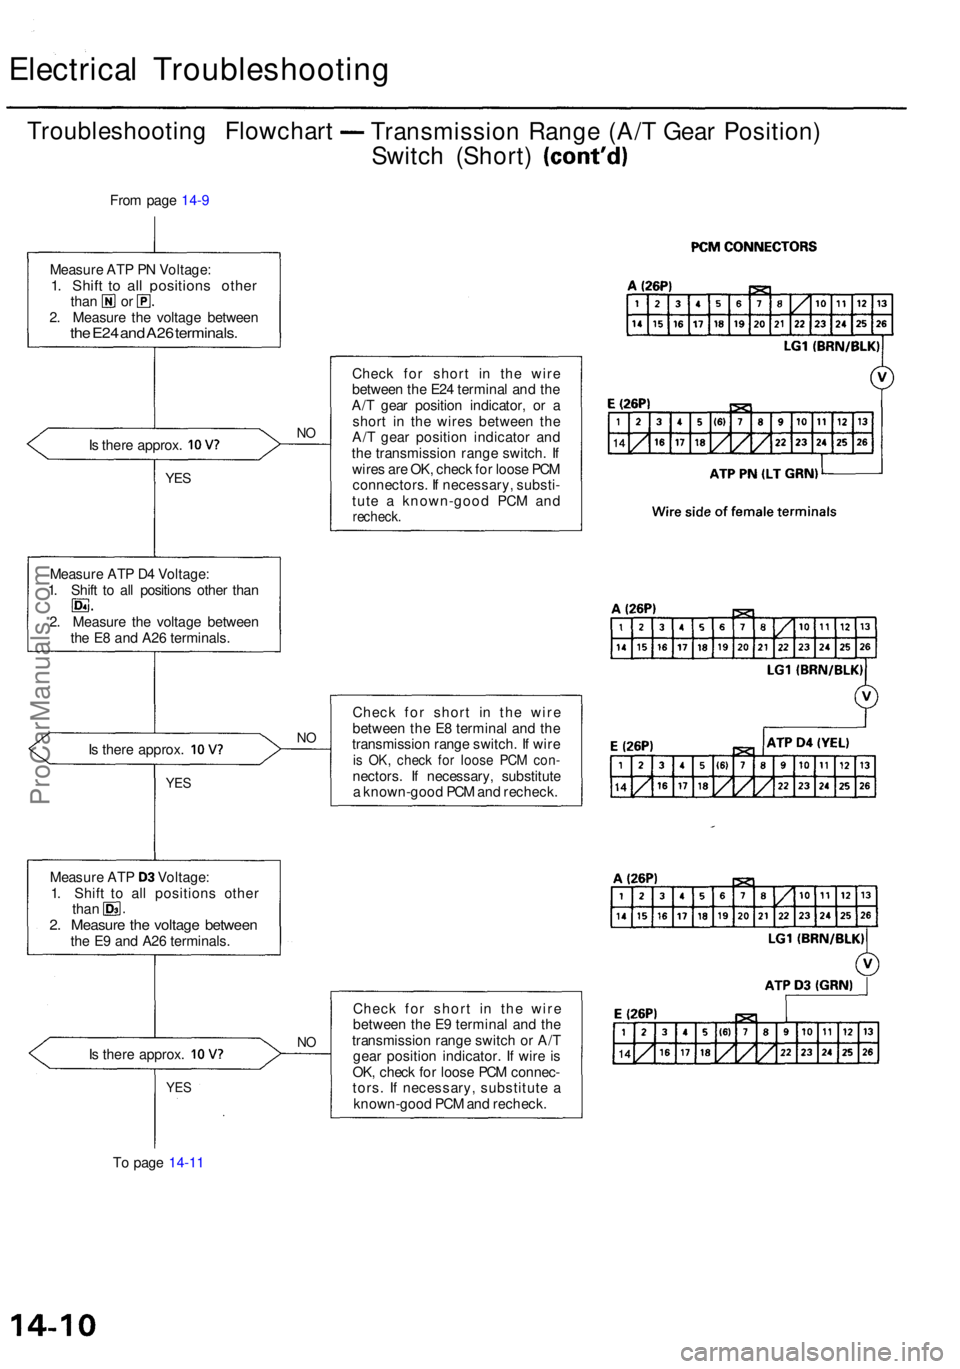
Electrical Troubleshootin g
Troubleshooting Flowchar t
Transmissio n Rang e (A/ T Gea r Position )
Switch (Short ) (cont'd )
From pag e 14-9
Is ther e approx . 10V?NO
YE S
Measur e AT P D 4 Voltage :1. Shif t t o al l position s othe r tha n
2 . Measur e th e voltag e betwee n
th e E 8 an d A2 6 terminals .
Is ther e approx . 10V?NO
YE S
Measur e AT P 03 Voltage :
1 . Shif t t o al l position s othe r
than2. Measur e th e voltag e betwee nthe E 9 an d A2 6 terminals .
Is ther e approx . 10V?NO
YE S
To pag e 14-11 Chec
k fo r shor t i n th e wir e
betwee n th e E2 4 termina l an d th e
A/ T gea r positio n indicator , o r a
shor t i n th e wire s betwee n th e
A/ T gea r positio n indicato r an d
th e transmissio n rang e switch . I f
wire s ar e OK , chec k fo r loos e PC M
connectors . I f necessary , substi -
tut e a known-goo d PC M an d
recheck .
Check fo r shor t i n th e wir e
betwee n th e E 8 termina l an d th e
transmissio n rang e switch . I f wir e
is OK , chec k fo r loos e PC M con -nectors . I f necessary , substitut e
a known-goo d PC M an d recheck .
Chec k fo r shor t i n th e wir e
betwee n th e E 9 termina l an d th e
transmissio n rang e switc h o r A/ T
gea r positio n indicator . I f wir e i s
OK , chec k fo r loos e PC M connec -
tors . I f necessary , substitut e a
known-goo d PC M an d recheck .
Measur
e AT P P N Voltage :
1. Shif t t o al l position s othe rthan o r
2 . Measur e th e voltag e betwee n
the E2 4 an d A2 6 terminals .
ProCarManuals.com