ACURA RL KA9 1996 Service Repair Manual
Manufacturer: ACURA, Model Year: 1996, Model line: RL KA9, Model: ACURA RL KA9 1996Pages: 1954, PDF Size: 61.44 MB
Page 201 of 1954
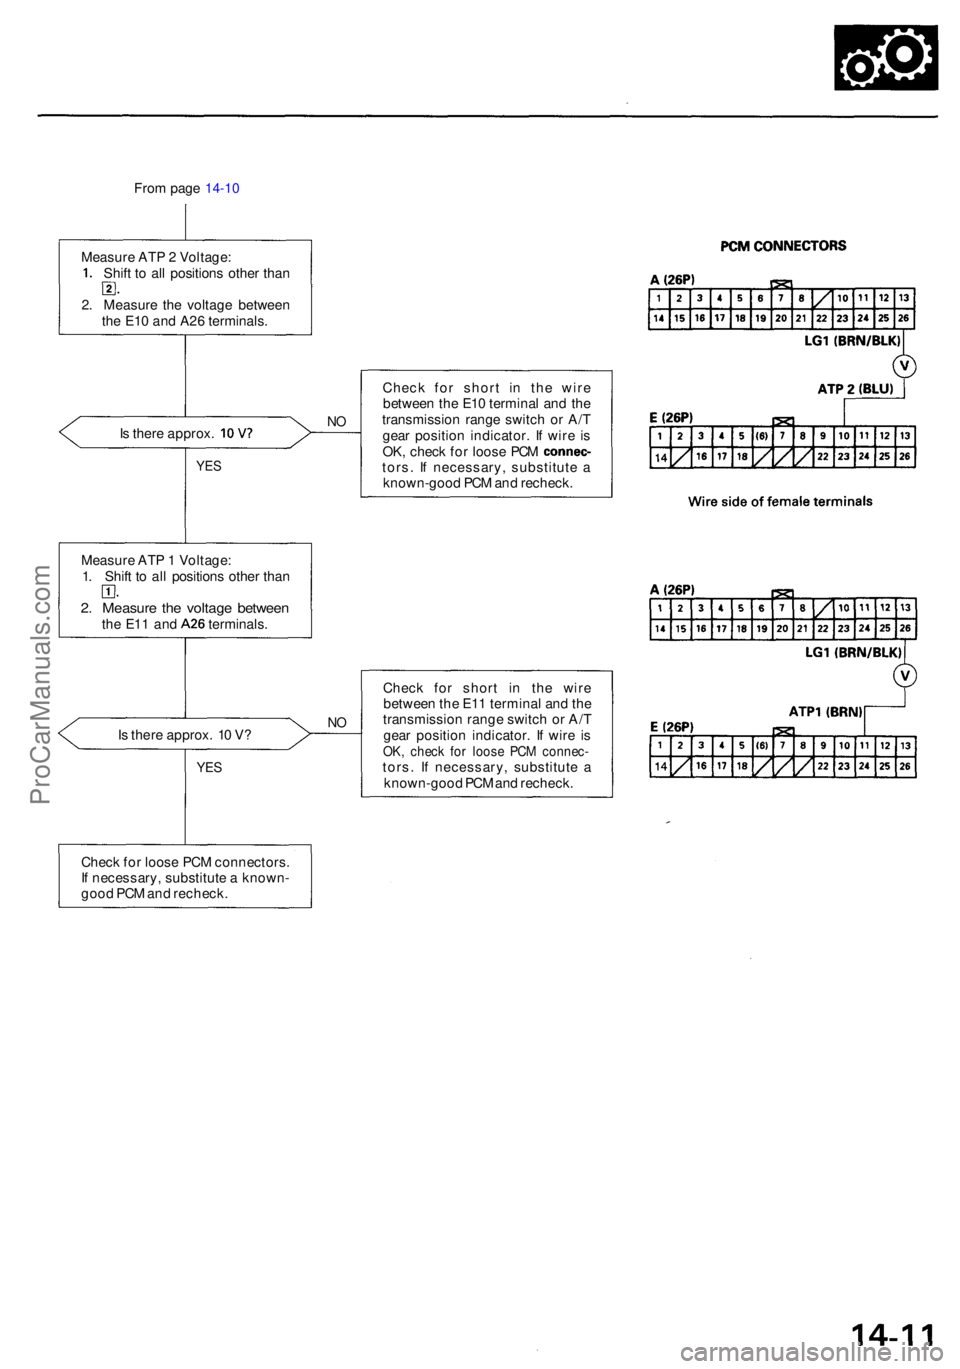
From pag e 14-10
Measur e AT P 2 Voltage :1. Shif t t o al l position s othe r tha n
2. Measur e th e voltag e betwee n
th e E1 0 an d A2 6 terminals .
Is ther e approx . 10V?NO
YE S
Measur e AT P 1 Voltage :
1 . Shif t t o al l position s othe r tha n
2. Measur e th e voltag e betwee nthe E1 1 an d A2 6 terminals .
I s ther e approx . 1 0 V ?
NO
YE S
Chec k fo r loos e PC M connectors .
I f necessary , substitut e a known -
goo d PC M an d recheck . Chec
k fo r shor t i n th e wir e
betwee n th e E1 0 termina l an d th e
transmissio n rang e switc h o r A/ T
gea r positio n indicator . I f wir e i s
OK , chec k fo r loos e PC M connec -tors. I f necessary , substitut e a
known-goo d PC M an d recheck .
Chec k fo r shor t i n th e wir e
betwee n th e E1 1 termina l an d th e
transmissio n rang e switc h o r A/ T
gea r positio n indicator . I f wir e i s
OK , chec k fo r loos e PC M connec -tors. I f necessary , substitut e a
known-goo d PC M an d recheck .
ProCarManuals.com
Page 202 of 1954
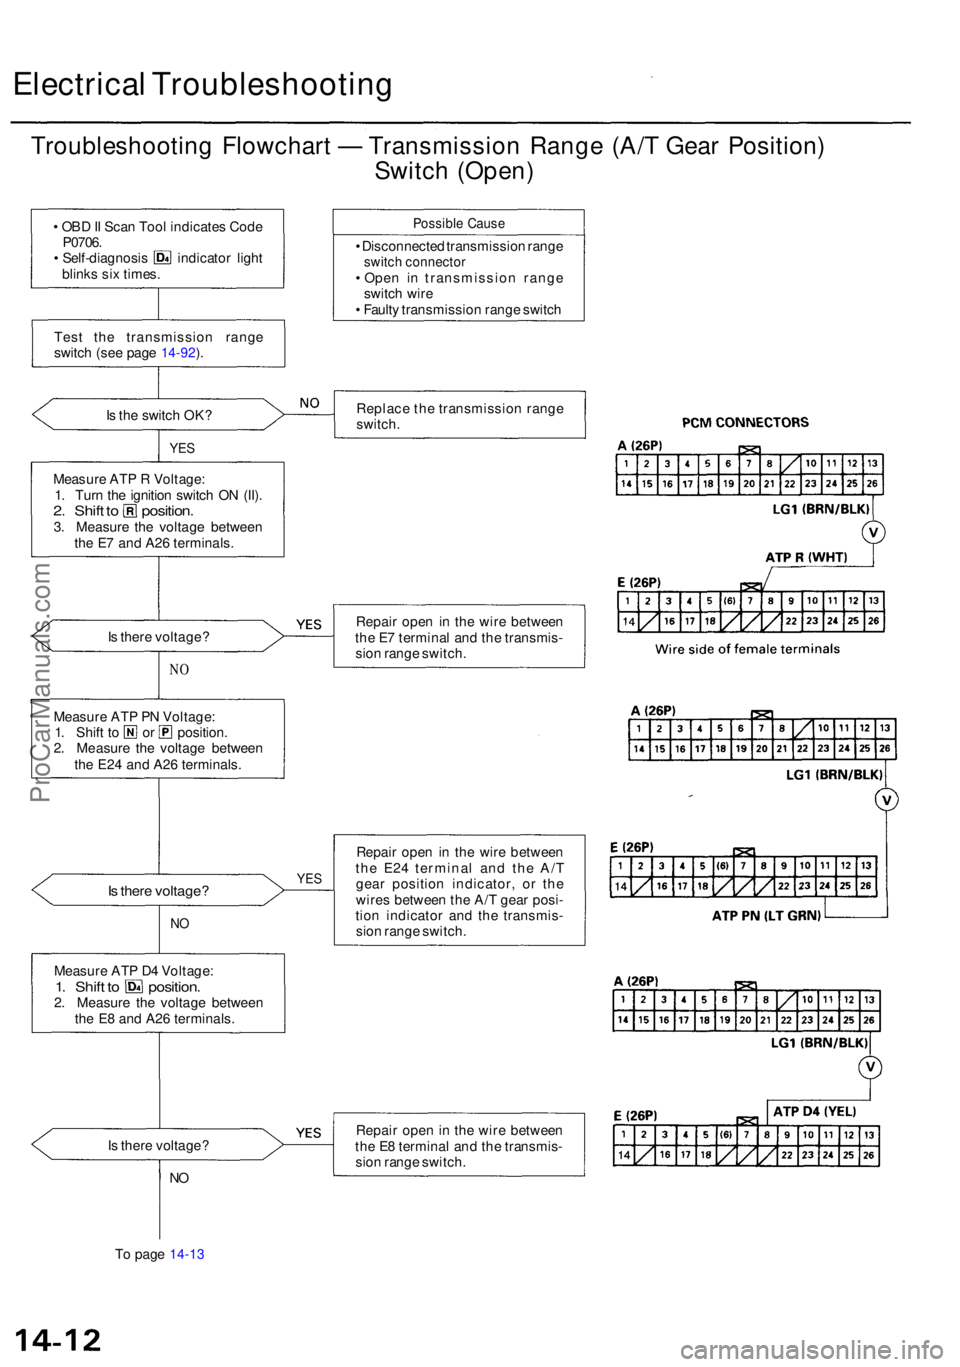
Electrical Troubleshootin g
Troubleshooting Flowchar t — Transmissio n Rang e (A/ T Gea r Position )
Switc h (Open )
• OB D II Sca n Too l indicate s Cod eP0706 .• Self-diagnosi s indicato r ligh t
blink s si x times .
Tes t th e transmissio n rang e
switc h (se e pag e
14-92).
I s th e switc h OK ?
YES
Measur e AT P R Voltage :
1 . Tur n th e ignitio n switc h O N (II) .
2. Shif t t o position .3. Measur e th e voltag e betwee n
th e E 7 an d A2 6 terminals .
I s ther e voltage ?
NO
Measur e AT P P N Voltage :1. Shif t t o o r position .
2 . Measur e th e voltag e betwee n
th e E2 4 an d A2 6 terminals .
Is ther e voltage ?YES
NO
Measur e AT P D 4 Voltage :1. Shif t t o position .2. Measur e th e voltag e betwee n
th e E 8 an d A2 6 terminals .
I s ther e voltage ?
NO
To pag e 14-13
Possibl e Caus e
• Disconnecte d transmissio n rang eswitc h connecto r• Ope n i n transmissio n rang e
switc h wir e
• Fault y transmissio n rang e switc h
Replac e th e transmissio n rang e
switch .
Repai r ope n i n th e wir e betwee n
th e E 7 termina l an d th e transmis -
sio n rang e switch .
Repai r ope n in th e wir e betwee n
th e E2 4 termina l an d th e A/ T
gea r positio n indicator , o r th e
wire s betwee n th e A/ T gea r posi -
tio n indicato r an d th e transmis -
sio n rang e switch .
Repai r ope n in th e wir e betwee n
th e E 8 termina l an d th e transmis -
sio n rang e switch .
ProCarManuals.com
Page 203 of 1954
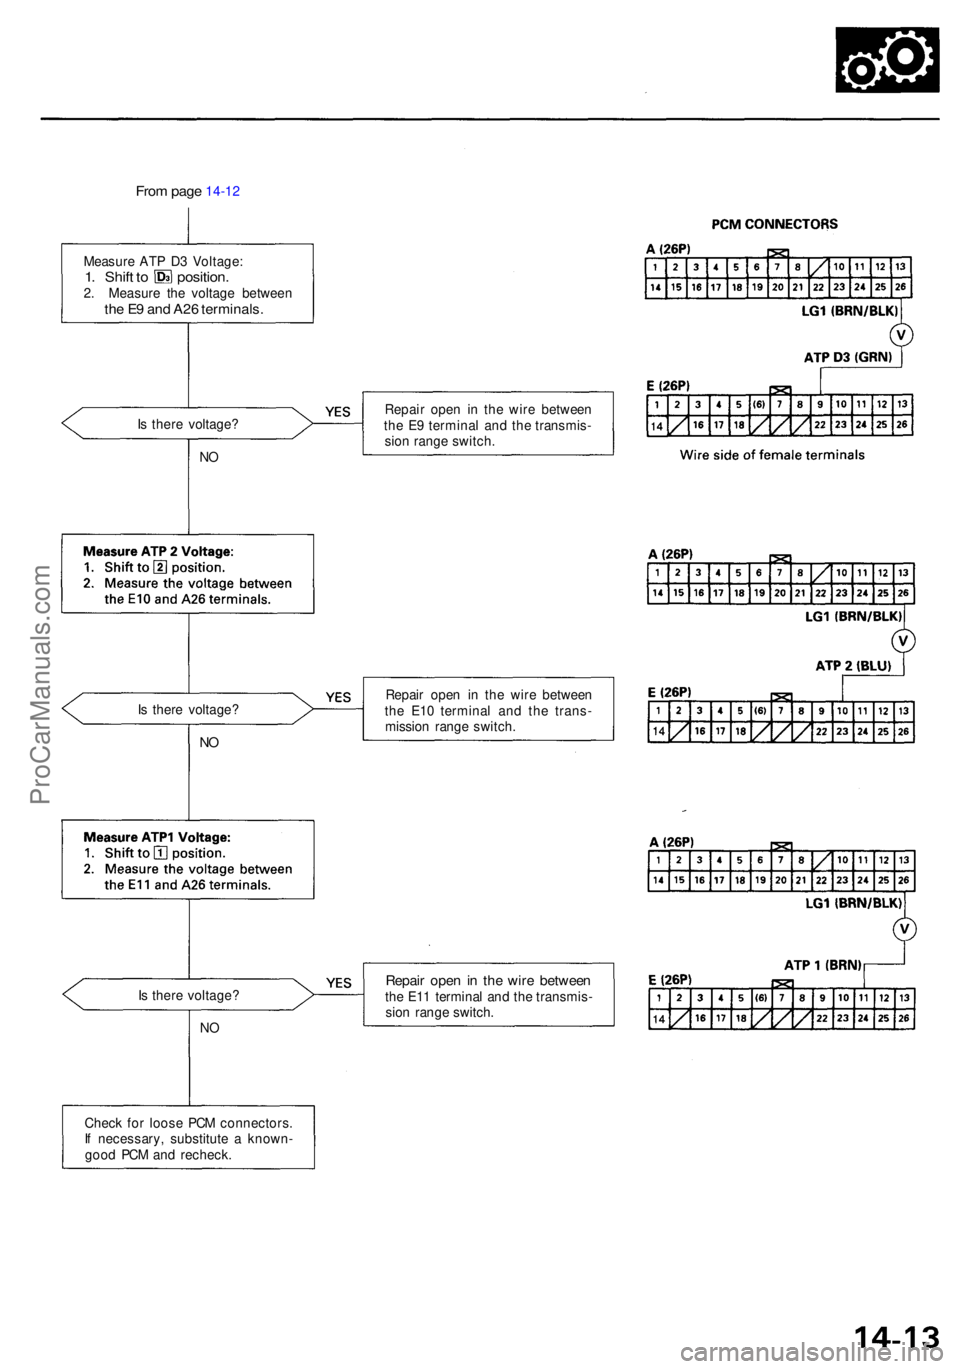
From pag e 14-12
Measur e AT P D 3 Voltage :1. Shif t t o position .2. Measur e th e voltag e betwee nthe E 9 an d A2 6 terminals .
Is ther e voltage ?
NO
Repai r ope n i n th e wir e betwee n
th e E 9 termina l an d th e transmis -
sio n rang e switch .
I s ther e voltage ?
NO
Repai r ope n i n th e wir e betwee n
th e E1 0 termina l an d th e trans -
missio n rang e switch .
I s ther e voltage ?
NO
Repai r ope n in th e wir e betwee nthe E1 1 termina l an d th e transmis -
sio n rang e switch .
Chec k fo r loos e PC M connectors .
I f necessary , substitut e a known -
goo d PC M an d recheck .
ProCarManuals.com
Page 204 of 1954
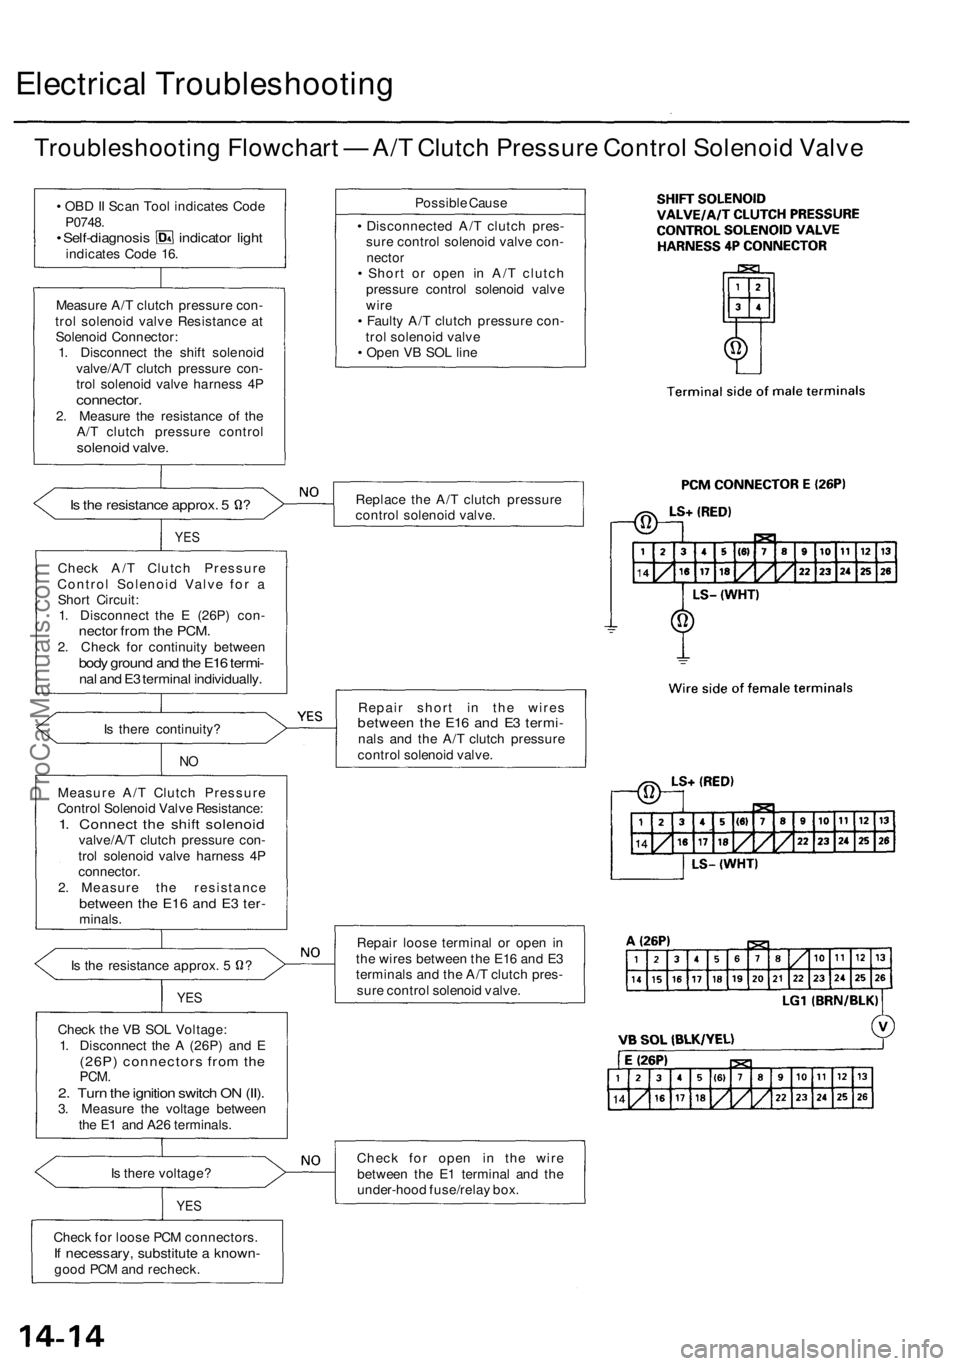
Electrical Troubleshooting
Troubleshooting Flowchart — A/T Clutch Pressure Control Solenoid Valve
• OBD II Scan Tool indicates Code
P0748.
• Self-diagnosis indicator light
indicates Code 16.
Measure A/T clutch pressure con-
trol solenoid valve Resistance at
Solenoid Connector:
1. Disconnect the shift solenoid
valve/A/T clutch pressure con-
trol solenoid valve harness 4P
connector.
2. Measure the resistance of the
A/T clutch pressure control
solenoid valve.
Is the resistance approx. 5 ?
YES
Check A/T Clutch Pressure
Control Solenoid Valve for a
Short Circuit:
1. Disconnect the E (26P) con-
nector from the PCM.
2. Check for continuity between
body ground and the E16 termi-
nal and E3 terminal individually.
Is there continuity?
NO
Measure A/T Clutch Pressure
Control Solenoid Valve Resistance:
1. Connect the shift solenoid
valve/A/T clutch pressure con-
trol solenoid valve harness 4P
connector.
2. Measure the resistance
between the E16 and E3 ter-
minals.
Is the resistance approx. 5 ?
YES
Check the VB SOL Voltage:
1. Disconnect the A (26P) and E
(26P) connectors from the
PCM.
2. Turn the ignition switch ON (II).
3. Measure the voltage between
the E1 and A26 terminals.
Is there voltage?
YES
Check for loose PCM connectors.
If necessary, substitute a known-
good PCM and recheck.
Possible Cause
• Disconnected A/T clutch pres-
sure control solenoid valve con-
nector
• Short or open in A/T clutch
pressure control solenoid valve
wire
• Faulty A/T clutch pressure con-
trol solenoid valve
• Open VB SOL line
Replace the A/T clutch pressure
control solenoid valve.
Repair short in the wires
between the E16 and E3 termi-
nals and the A/T clutch pressure
control solenoid valve.
Repair loose terminal or open in
the wires between the E16 and E3
terminals and the A/T clutch pres-
sure control solenoid valve.
Check for open in the wire
between the E1 terminal and the
under-hood fuse/relay box.ProCarManuals.com
Page 205 of 1954
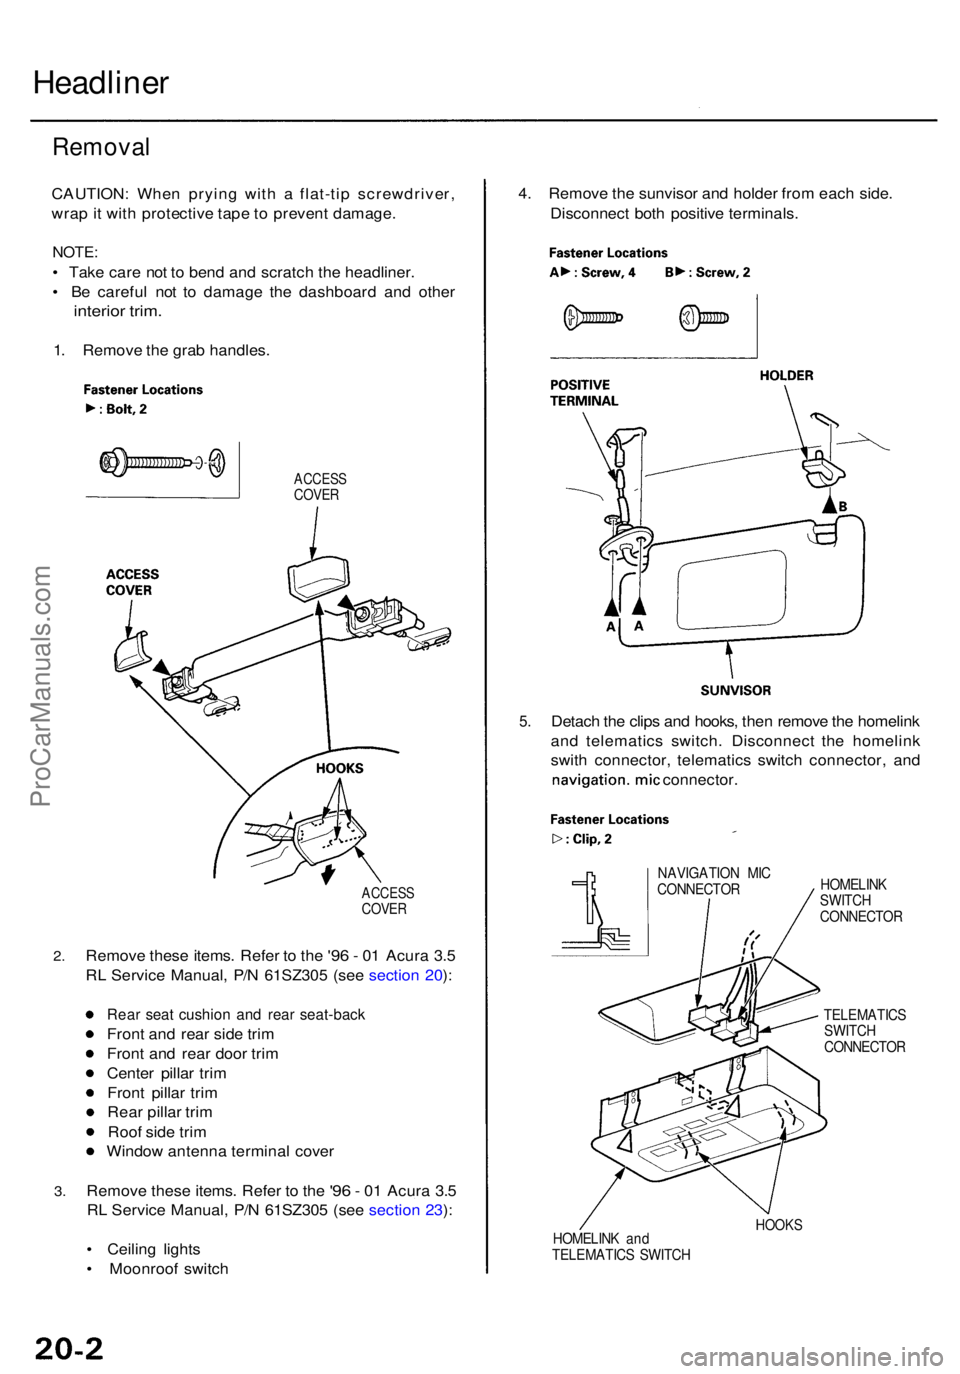
Headliner
Removal
CAUTION : Whe n pryin g wit h a flat-ti p screwdriver ,
wra p it wit h protectiv e tap e t o preven t damage .
NOTE:
• Tak e car e no t t o ben d an d scratc h th e headliner .
• B e carefu l no t t o damag e th e dashboar d an d othe r
interio r trim .
1. Remov e th e gra b handles .
ACCESSCOVER
2.
3.
ACCES SCOVER
Remov e thes e items . Refe r t o th e '96 - 0 1 Acur a 3. 5
R L Servic e Manual , P/ N
61SZ30 5 (see sectio n 20 ):
Rea r sea t cushio n an d rea r seat-bac k
Front an d rea r sid e tri m
Fron t an d rea r doo r tri m
Cente r pilla r tri m
Fron t pilla r tri m
Rea r pilla r tri m
Roo f sid e tri m
Windo w antenn a termina l cove r
Remov e thes e items . Refe r t o th e
'9 6 - 0 1 Acur a 3. 5
R L Servic e Manual , P/ N
61SZ30 5 (see sectio n 23 ):
• Ceilin g light s
• Moonroo f switc h 4
. Remov e th e sunviso r an d holde r fro m eac h side .
Disconnec t bot h positiv e terminals .
5.Detac h th e clip s an d hooks , the n remov e th e homelin k
an d telematic s switch . Disconnec t th e homelin k
swit h connector , telematic s switc h connector , an d
navigation , mic connector .
NAVIGATIO N MI C
CONNECTO R HOMELIN
K
SWITC H
CONNECTO R
TELEMATIC S
SWITC H
CONNECTO R
HOMELIN K an d
TELEMATIC S SWITC H
HOOKS
ProCarManuals.com
Page 206 of 1954
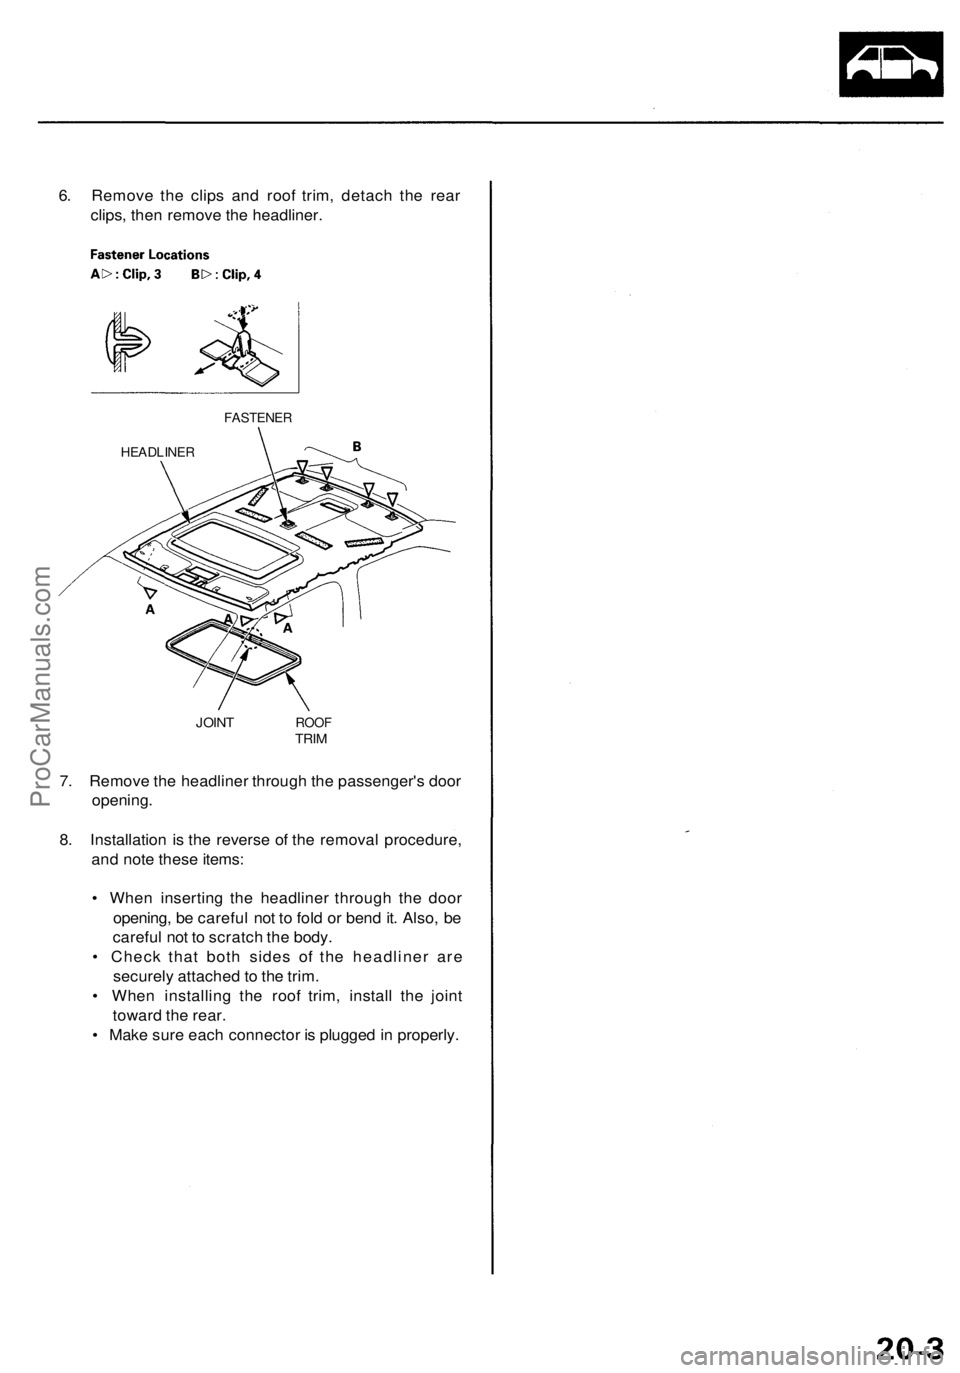
6. Remove the clips and roof trim, detach the rear
clips, then remove the headliner.
FASTENER
HEADLINER
JOINT
ROOF
TRIM
7. Remove the headliner through the passenger's door
opening.
8. Installation is the reverse of the removal procedure,
and note these items:
• When inserting the headliner through the door
opening, be careful not to fold or bend it. Also, be
careful not to scratch the body.
• Check that both sides of the headliner are
securely attached to the trim.
• When installing the roof trim, install the joint
toward the rear.
• Make sure each connector is plugged in properly.ProCarManuals.com
Page 207 of 1954
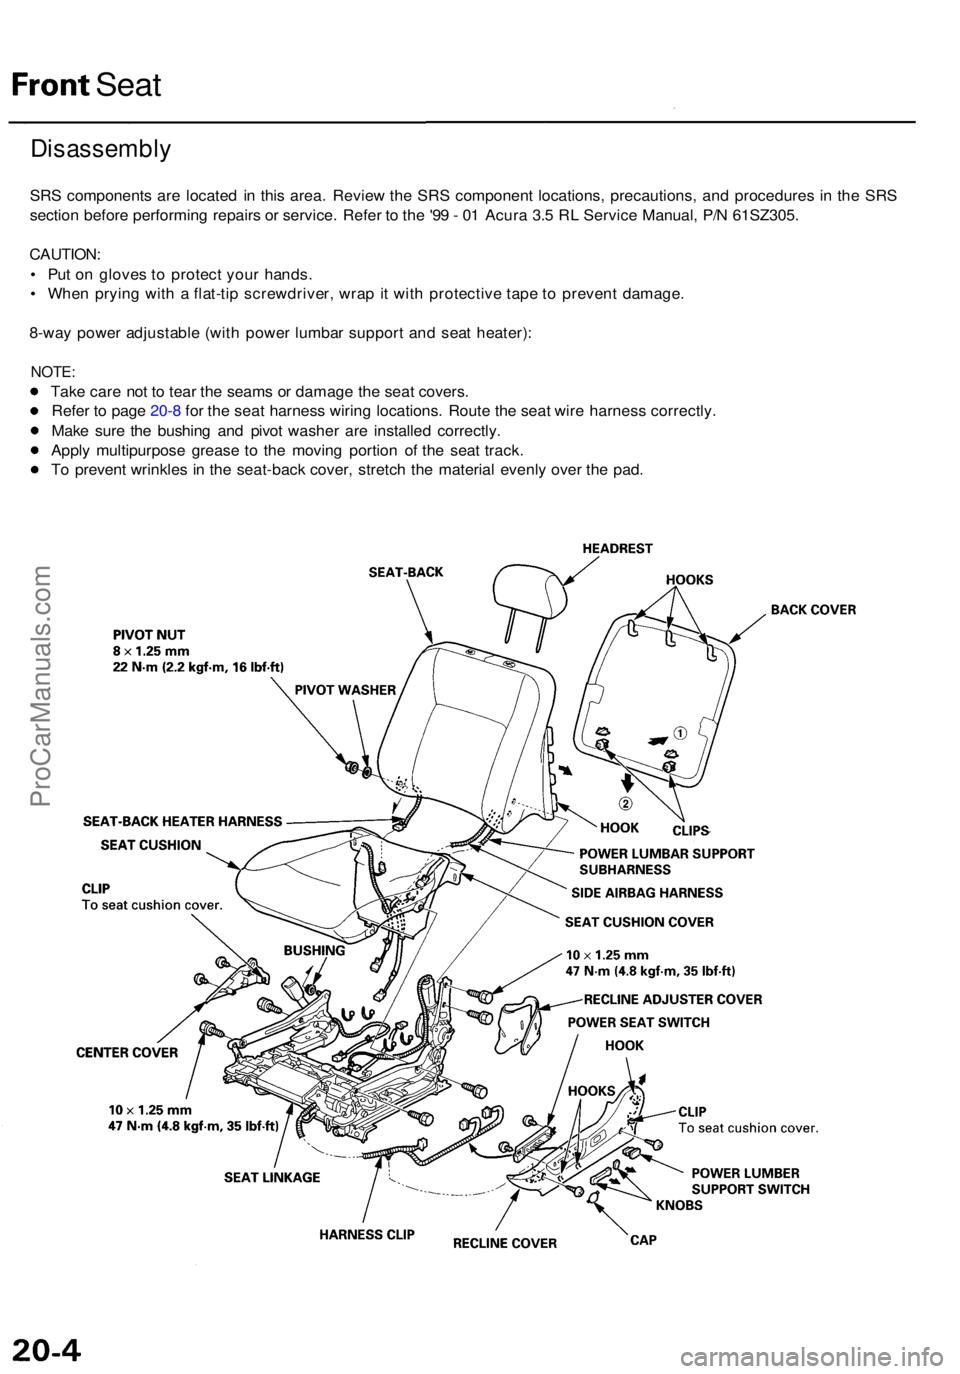
Front Seat
Disassembl y
SRS component s ar e locate d i n thi s area . Revie w th e SR S componen t locations , precautions , an d procedure s i n th e SR S
sectio n befor e performin g repair s o r service . Refe r t o th e
'99 - 0 1 Acur a 3. 5 R L Servic e Manual , P/ N 61SZ305 .
CAUTION :
• Pu t o n glove s t o protec t you r hands .
• Whe n pryin g wit h a flat-ti p screwdriver , wra p it wit h protectiv e tap e t o preven t damage .
8-wa y powe r adjustabl e (wit h powe r lumba r suppor t an d sea t heater) :
NOTE:
Take car e no t t o tea r th e seam s o r damag e th e sea t covers .
Refe r t o pag e 20- 8 fo r th e sea t harnes s wirin g locations . Rout e th e sea t wir e harnes s correctly .
Mak e sur e th e bushin g an d pivo t washe r ar e installe d correctly .
Appl y multipurpos e greas e t o th e movin g portio n o f th e sea t track .
T o preven t wrinkle s i n th e seat-bac k cover , stretc h th e materia l evenl y ove r th e pad .
ProCarManuals.com
Page 208 of 1954
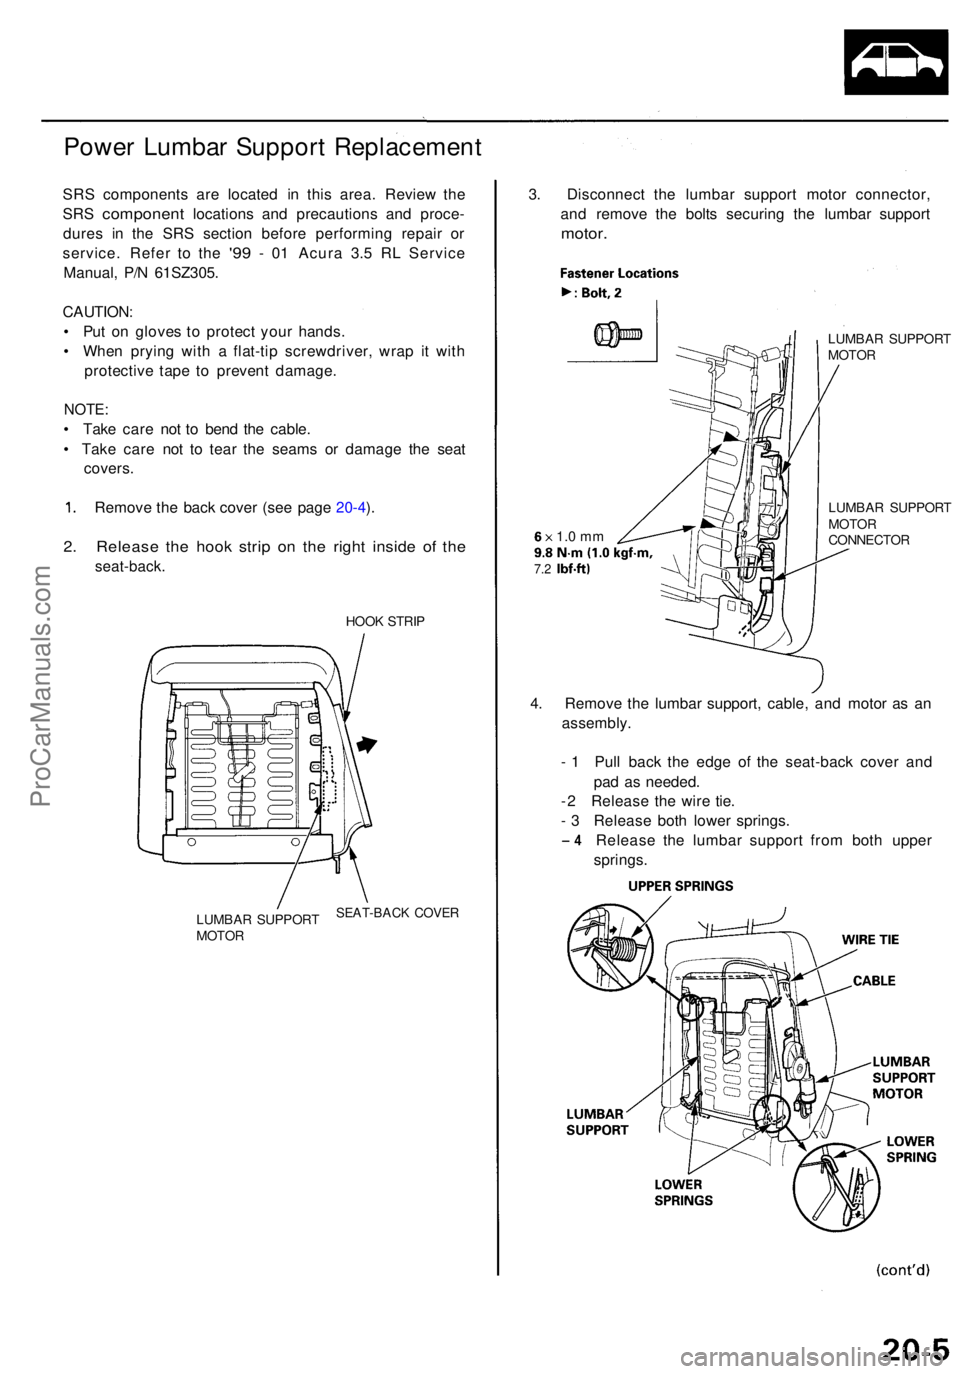
Power Lumba r Suppor t Replacemen t
SRS component s ar e locate d i n thi s area . Revie w th e
SR S
componen t locations an d precaution s an d proce -
dure s i n th e SR S sectio n befor e performin g repai r o r
service . Refe r t o th e
'99 - 0 1 Acur a 3. 5 R L Servic e
Manual , P/ N 61SZ305 .
CAUTION :
• Pu t o n glove s t o protec t you r hands .
• Whe n pryin g wit h a flat-ti p screwdriver , wra p i t wit h
protectiv e tap e t o preven t damage .
NOTE:
• Tak e car e no t t o ben d th e cable .
• Tak e car e no t t o tea r th e seam s o r damag e th e sea t
covers .
1. Remov e th e bac k cove r (se e pag e 20-4).
2 . Releas e th e hoo k stri p o n th e righ t insid e o f th e
seat-back .
HOOK STRI P
LUMBA R SUPPOR T
MOTO R
SEAT-BAC K COVE R
3. Disconnec t th e lumba r suppor t moto r connector ,
an d remov e th e bolt s securin g th e lumba r suppor t
motor.
LUMBA R SUPPOR T
MOTO R
6x 1. 0 m m9.8 N- m (1. 0 kgf-m ,7.2 Ibf-ft )
LUMBA R SUPPOR T
MOTO R
CONNECTO R
4. Remov e th e lumba r support , cable , an d moto r a s a n
assembly .
- 1 Pul l bac k th e edg e of the seat-bac k cove r an d
pa d a s needed .
- 2 Releas e th e wir e tie .
- 3 Releas e bot h lowe r springs .
-4 Releas e th e lumba r suppor t fro m bot h uppe r
springs .
ProCarManuals.com
Page 209 of 1954
Front Seat
Power Lumbar Support Replacement
(cont'd)
5. Install the lumbar support in the reverse order of
removal, and note these items:
• Replace the wire ties as news ones.
• To prevent wrinkles when installing a seat-back
cover, make sure the material is stretched evenly
over the pad before securing the hook strip.
• Replace the back panel clips as new ones.
20-6ProCarManuals.com
Page 210 of 1954
Front Sea t
Seat Cove r Replacemen t
SRS component s ar e locate d i n thi s area . Revie w th e
SR S componen t location s an d precaution s an d proce -
dure s i n th e SR S sectio n befor e performin g repai r o r
service . Refe r t o th e '9 9 - 0 1 Acur a 3. 5 R L Servic e
Manual , P/ N 61SZ305 .
CAUTION : Pu t o n glove s t o protec t you r hands .
NOTE:
• Tak e car e no t t o tea r th e seam s o r damag e th e sea t
covers .
• O n th e passenger' s sea t wit h sid e airbag , d o no t
touc h th e OPD S senso r i n th e seat-bac k pad , an d
kee p i t awa y fro m oil . Oi l ca n corrod e th e senso r
causin g i t t o fail .
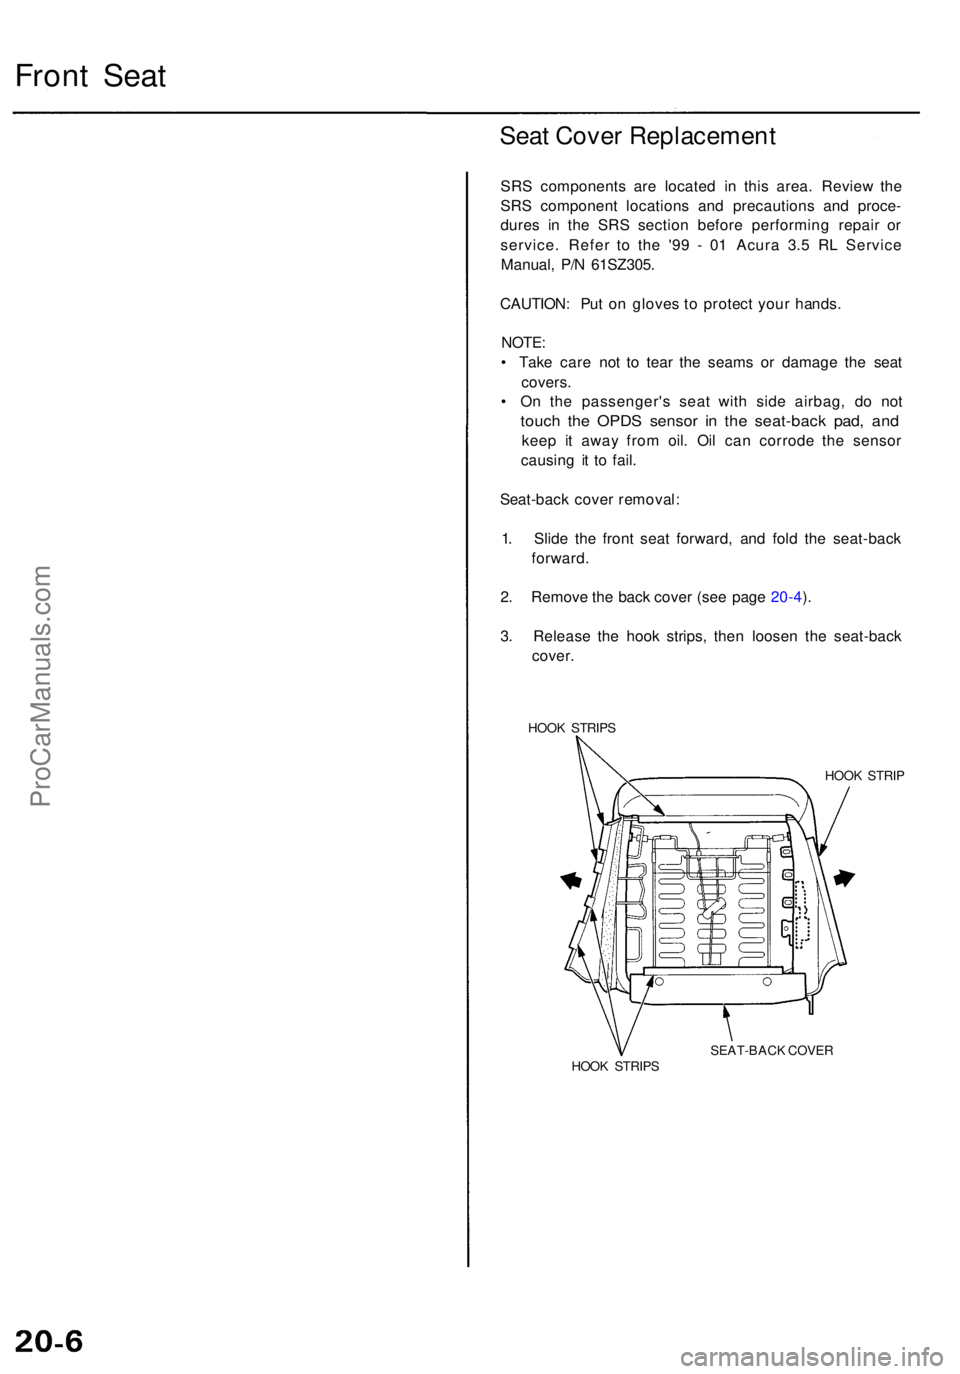
Seat-bac k cove r removal :
1 . Slid e th e fron t sea t forward , an d fol d th e seat-bac k
forward .
2 . Remov e th e bac k cove r (se e pag e 20-4 ).
3 . Releas e th e hoo k strips , the n loose n th e seat-bac k
cover.
HOOK STRIP S
HOOK STRI P
SEAT-BAC K COVE R
HOO K STRIP S
ProCarManuals.com