differential ACURA TL 1995 Service Owner's Manual
[x] Cancel search | Manufacturer: ACURA, Model Year: 1995, Model line: TL, Model: ACURA TL 1995Pages: 1771, PDF Size: 62.49 MB
Page 1094 of 1771
Differential
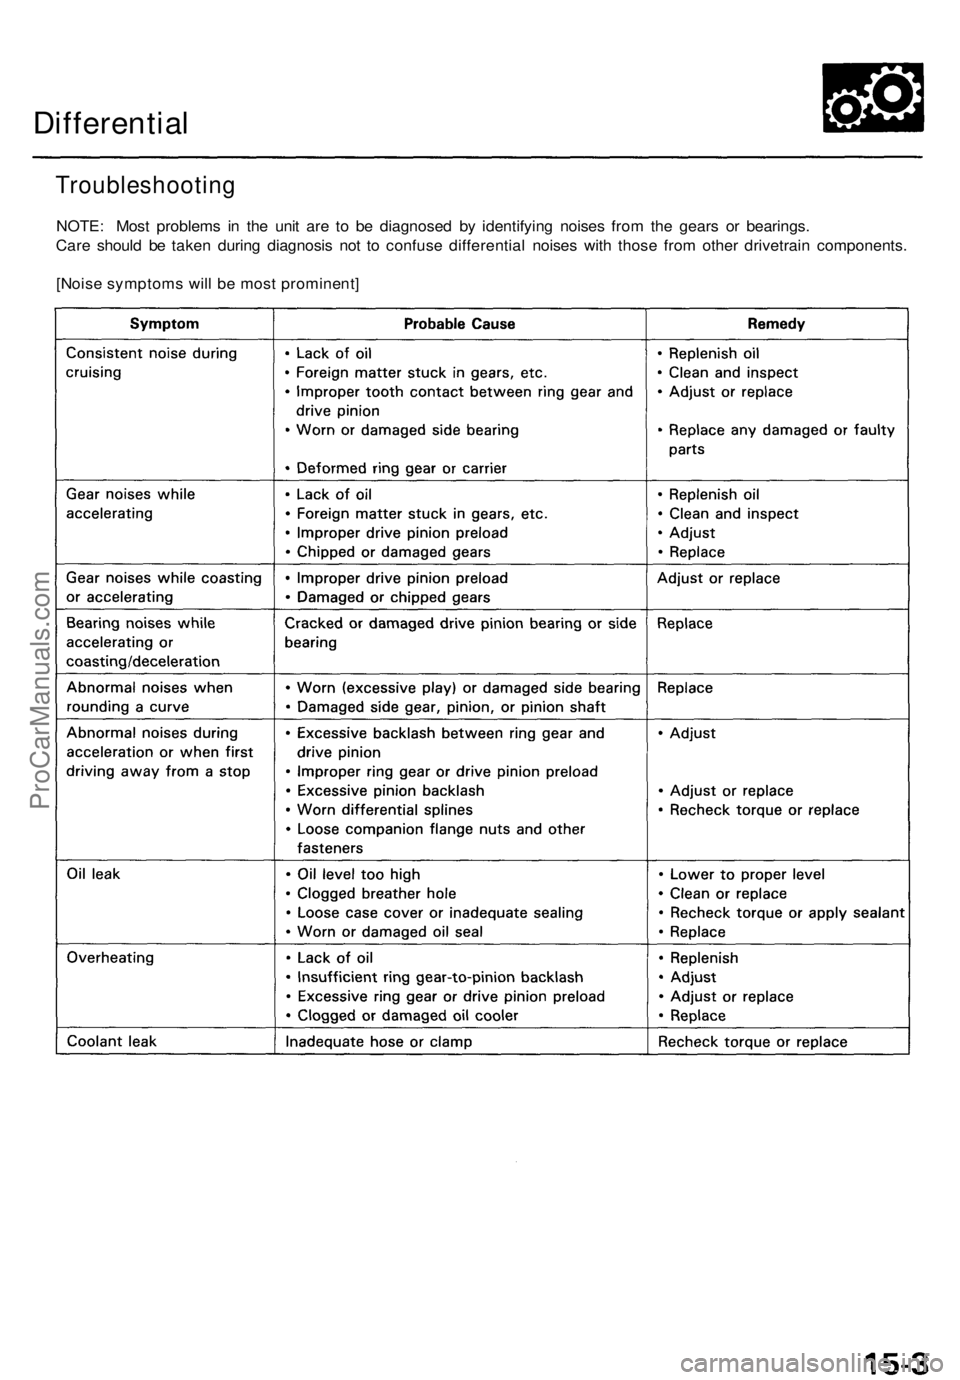
Troubleshootin g
NOTE: Mos t problem s i n th e uni t ar e t o b e diagnose d b y identifyin g noise s fro m th e gear s o r bearings .
Car e shoul d b e take n durin g diagnosi s no t t o confus e differentia l noise s wit h thos e fro m othe r drivetrai n components .
[Nois e symptom s wil l b e mos t prominent ]
ProCarManuals.com
Page 1095 of 1771
Maintenance
Differential Oi l
NOTE : Chec k th e oi l wit h engin e OFF , an d th e vehicl e
o n leve l ground .
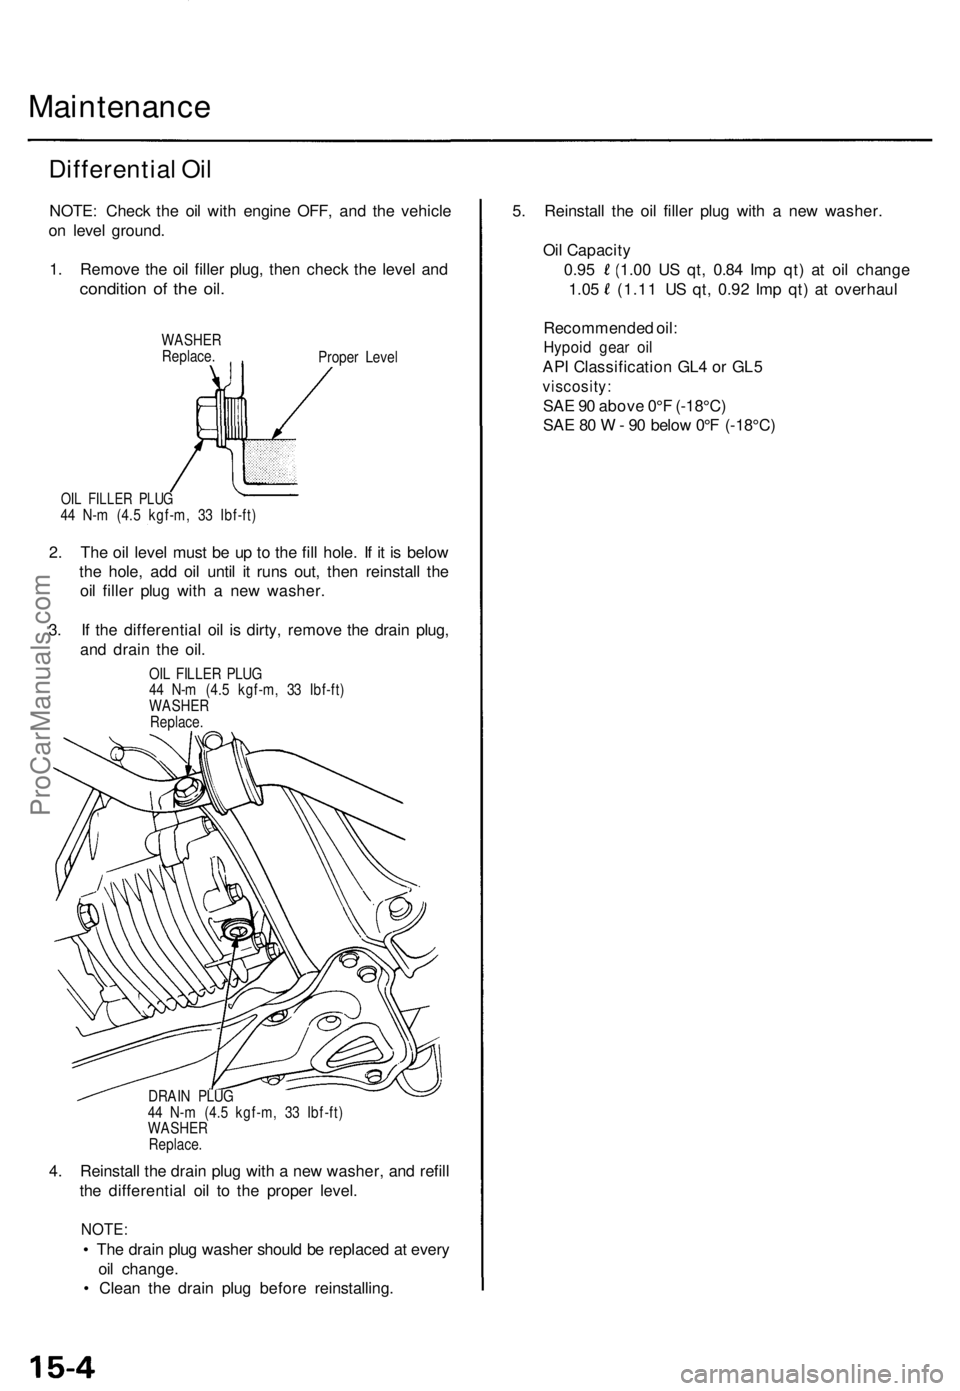
1 . Remov e th e oi l fille r plug , the n chec k th e leve l an d
conditio n o f th e oil .
WASHE R
Replace .
Proper Leve l
OIL FILLE R PLU G44 N- m (4. 5 kgf-m , 3 3 Ibf-ft )
2. Th e oi l leve l mus t b e u p t o th e fil l hole . I f i t i s belo w
th e hole , ad d oi l unti l i t run s out , the n reinstal l th e
oi l fille r plu g wit h a ne w washer .
3 . I f th e differentia l oi l i s dirty , remov e th e drai n plug ,
an d drai n th e oil .
OIL FILLE R PLU G
4 4 N- m (4. 5 kgf-m , 3 3 Ibf-ft )
WASHE R
Replace .
DRAI N PLU G
4 4 N- m (4. 5 kgf-m , 3 3 Ibf-ft )
WASHE R
Replace .
4. Reinstal l th e drai n plu g wit h a ne w washer , an d refil l
th e differentia l oi l t o th e prope r level .
NOTE :
• Th e drai n plu g washe r shoul d b e replace d a t ever y
oi l change .
• Clea n th e drai n plu g befor e reinstalling . 5
. Reinstal l th e oi l fille r plu g wit h a ne w washer .
Oi l Capacit y
0.9 5 (1.0 0 U S qt , 0.8 4 Im p qt) at oi l chang e
1.05 (1.1 1 U S qt , 0.9 2 Im p qt ) a t overhau l
Recommende d oil :
Hypoi d gea r oi l
AP I Classificatio n GL 4 o r GL 5
viscosity :
SAE 9 0 abov e 0°F (-18°C )
SA E 8 0 W - 9 0 belo w 0° F (-18°C )
ProCarManuals.com
Page 1096 of 1771
Differential Assembl y
Removal
Make sur e jack s an d safet y stand s ar e place d properly ,
and hois t bracket s ar e attache d to correc t position s
o n th e engine .
• Apply parkin g brak e an d bloc k rea r wheel s s o vehicl e
wil l no t rol l of f stand s an d fal l o n yo u whil e workin g
unde r it .
CAUTION : Us e fende r cover s to avoi d damagin g painte d
surfaces .
1. Befor e disconnectin g power , mak e sur e yo u hav e th e
anti-thef t cod e fo r th e radio , the n writ e dow n th e
frequencie s fo r th e radio' s prese t buttons .
2 . Disconnec t th e batter y negativ e (- ) an d positiv e (+ )
cable s fro m th e battery .
3. Remov e th e ai r cleane r housin g assembly .
4 . Remov e th e drai n plug , an d drai n th e differentia l oi l
(se e pag e 1 5-4 ).
5 . Remov e th e driveshaft s an d intermediat e shaf t (se e
sectio n 16 ).
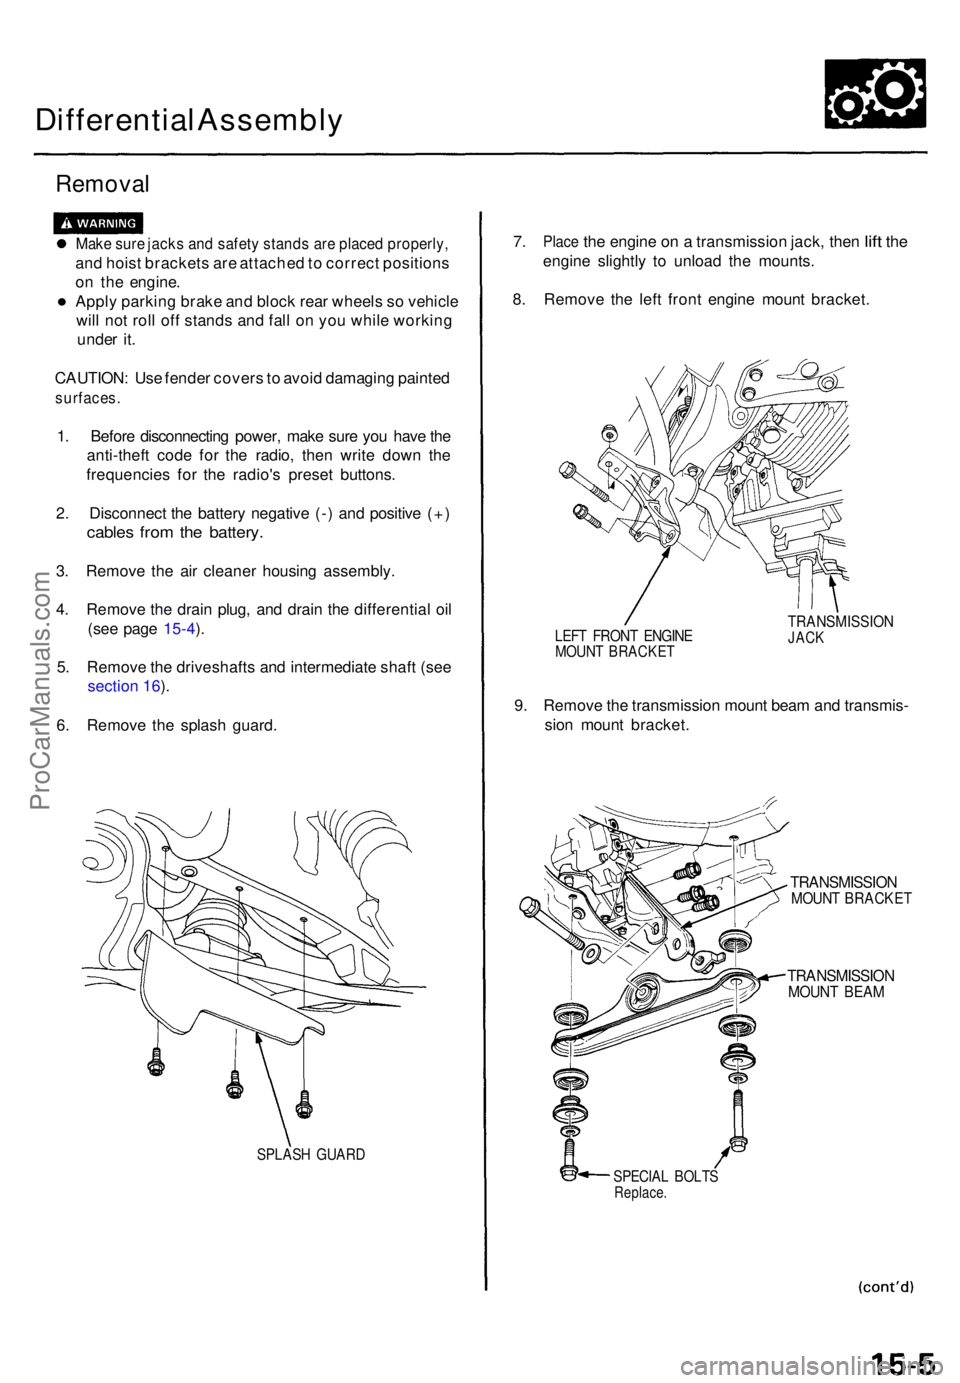
6 . Remov e th e splas h guard .
SPLAS H GUAR D
7. Plac e the engin e on a transmissio n jack , the n lift th e
engin e slightl y t o unloa d th e mounts .
8 . Remov e th e lef t fron t engin e moun t bracket .
LEFT FRON T ENGIN EMOUNT BRACKE T
TRANSMISSIO NJACK
9. Remov e th e transmissio n moun t bea m an d transmis -
sio n moun t bracket .
TRANSMISSIO NMOUNT BRACKE T
TRANSMISSIO NMOUNT BEA M
SPECIA L BOLT SReplace .
ProCarManuals.com
Page 1097 of 1771
Differential Assembl y
Removal (cont'd )
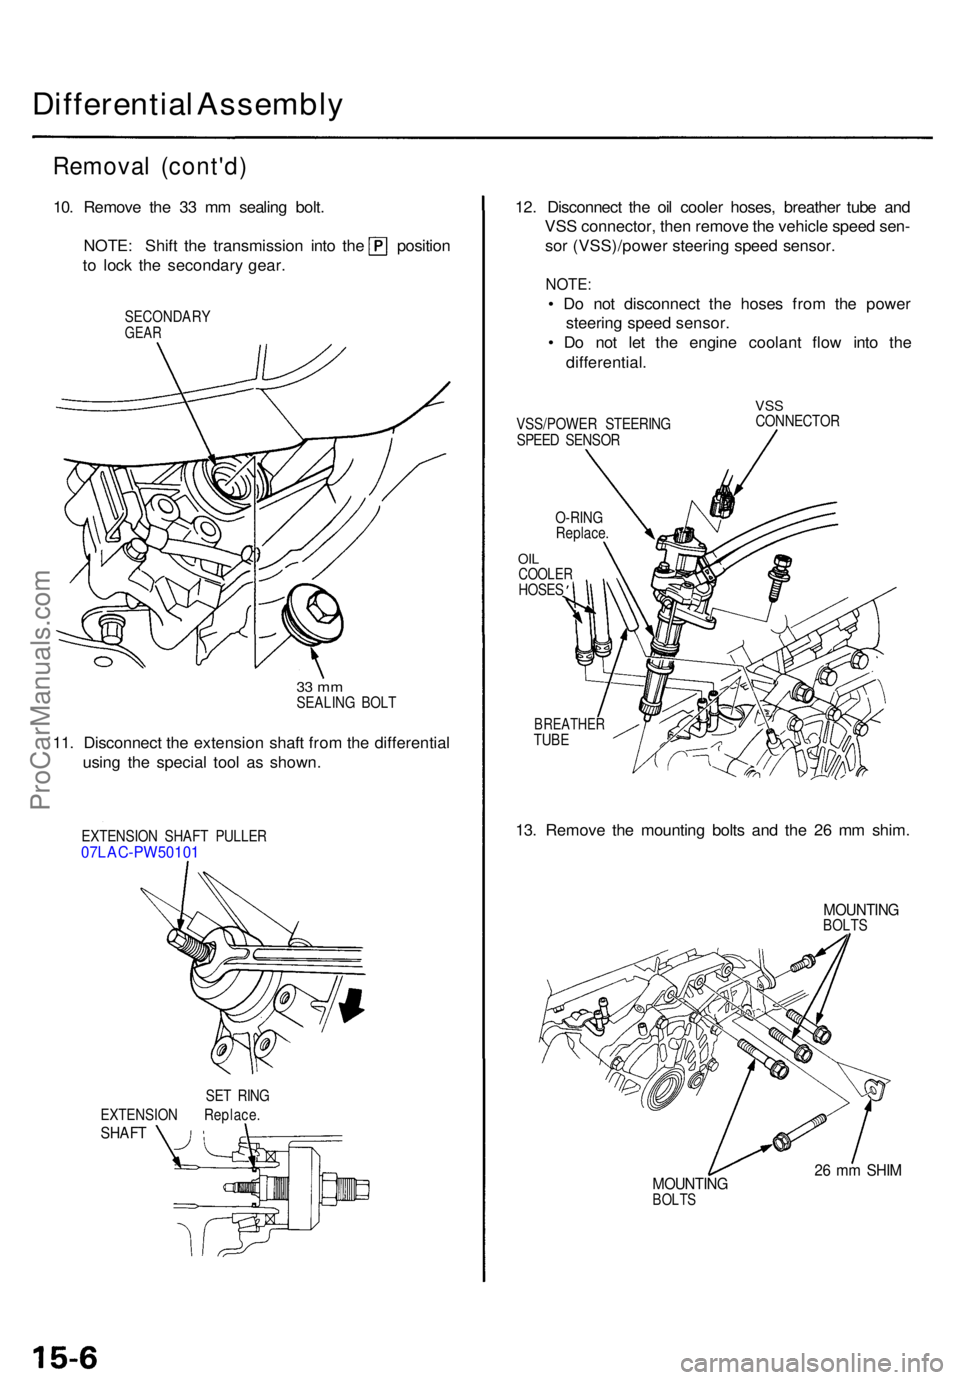
10. Remov e th e 3 3 m m sealin g bolt .
NOTE : Shif t th e transmissio n int o th e positio n
to loc k th e secondar y gear .
SECONDAR YGEAR
33 m mSEALIN G BOL T
11. Disconnec t th e extensio n shaf t fro m th e differentia l
usin g th e specia l too l a s shown .
EXTENSIO N SHAF T PULLE R07LAC-PW50101
SET RIN G
EXTENSIO N Replace .
SHAFT
12. Disconnec t th e oi l coole r hoses , breathe r tub e an d
VS S connector , the n remov e th e vehicl e spee d sen -
so r (VSS)/powe r steerin g spee d sensor .
NOTE:
• D o no t disconnec t th e hose s fro m th e powe r
steerin g spee d sensor .
• D o no t le t th e engin e coolan t flo w int o th e
differential .
VSS/POWE R STEERIN G
SPEE D SENSO R
VSSCONNECTO R
OILCOOLE RHOSES
BREATHE RTUBE
13. Remov e th e mountin g bolt s an d th e 2 6 m m shim .
MOUNTIN GBOLTS
MOUNTIN GBOLTS
26 m m SHI M
O-RIN G
Replace .
ProCarManuals.com
Page 1099 of 1771
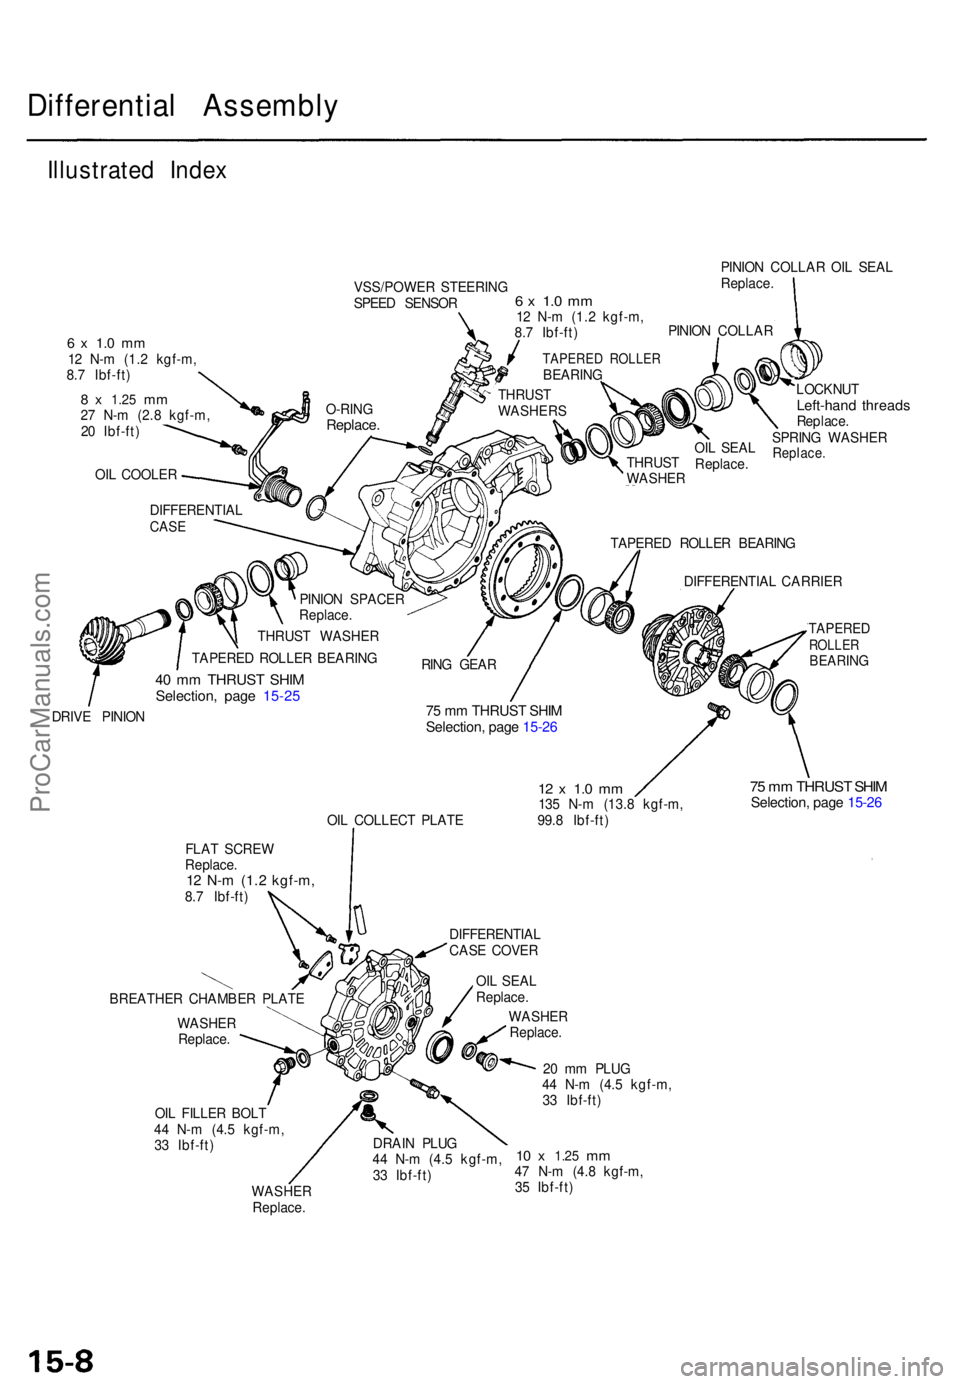
Differential Assembl y
Illustrated Inde x
VSS/POWE R STEERIN G
SPEE D SENSO R PINIO
N COLLA R OI L SEA L
Replace .
6 x 1. 0 m m12 N- m (1. 2 kgf-m ,
8. 7 Ibf-ft )
8 x 1.2 5 mm27 N- m (2. 8 kgf-m ,
2 0 Ibf-ft )
OI L COOLE R
6 x 1. 0 m m12 N- m (1. 2 kgf-m ,
8. 7 Ibf-ft )
LOCKNUT
Left-hand thread sReplace .
SPRIN G WASHE R
Replace.
DIFFERENTIA LCASE
PINIO N SPACE R
Replace .
THRUS T WASHE R
TAPERE D ROLLE R BEARIN G
40 m m THRUS T SHI MSelection , pag e 15-2 5
TAPERE D ROLLE R BEARIN G
DIFFERENTIA L CARRIE R
DRIV E PINIO N
75 m m THRUS T SHI MSelection , pag e 15-2 6
OIL COLLEC T PLAT E
12 x 1. 0 m m135 N- m (13. 8 kgf-m ,
99. 8 Ibf-ft )
TAPERE DROLLERBEARIN G
75 m m THRUS T SHI MSelection , pag e 15-2 6
FLA T SCRE W
Replace .
12 N- m (1. 2 kgf-m ,8.7 Ibf-ft )
BREATHE R CHAMBE R PLAT E
WASHE R
Replace .
OI L FILLE R BOL T
4 4 N- m (4. 5 kgf-m ,
3 3 Ibf-ft )
WASHE R
Replace . DIFFERENTIA
L
CAS E COVE R
OI L SEA L
Replace .
WASHE R
Replace .
DRAI N PLU G
4 4 N- m (4. 5 kgf-m ,
3 3 Ibf-ft ) 2
0 m m PLU G
4 4 N- m (4. 5 kgf-m ,
3 3 Ibf-ft )
10 x 1.2 5 mm47 N- m (4. 8 kgf-m ,
3 5 Ibf-ft ) OI
L SEA L
Replace .
THRUS
T
WASHE R
PINIO
N COLLA R
TAPERE D ROLLE RBEARING
O-RIN G
Replace .
THRUST
WASHER S
RIN G GEA R
ProCarManuals.com
Page 1101 of 1771
Differential Assembl y
Inspection (cont'd )
Bearing preloa d
6 . Remov e th e differentia l cas e cove r an d th e differen -
tia l carrier .
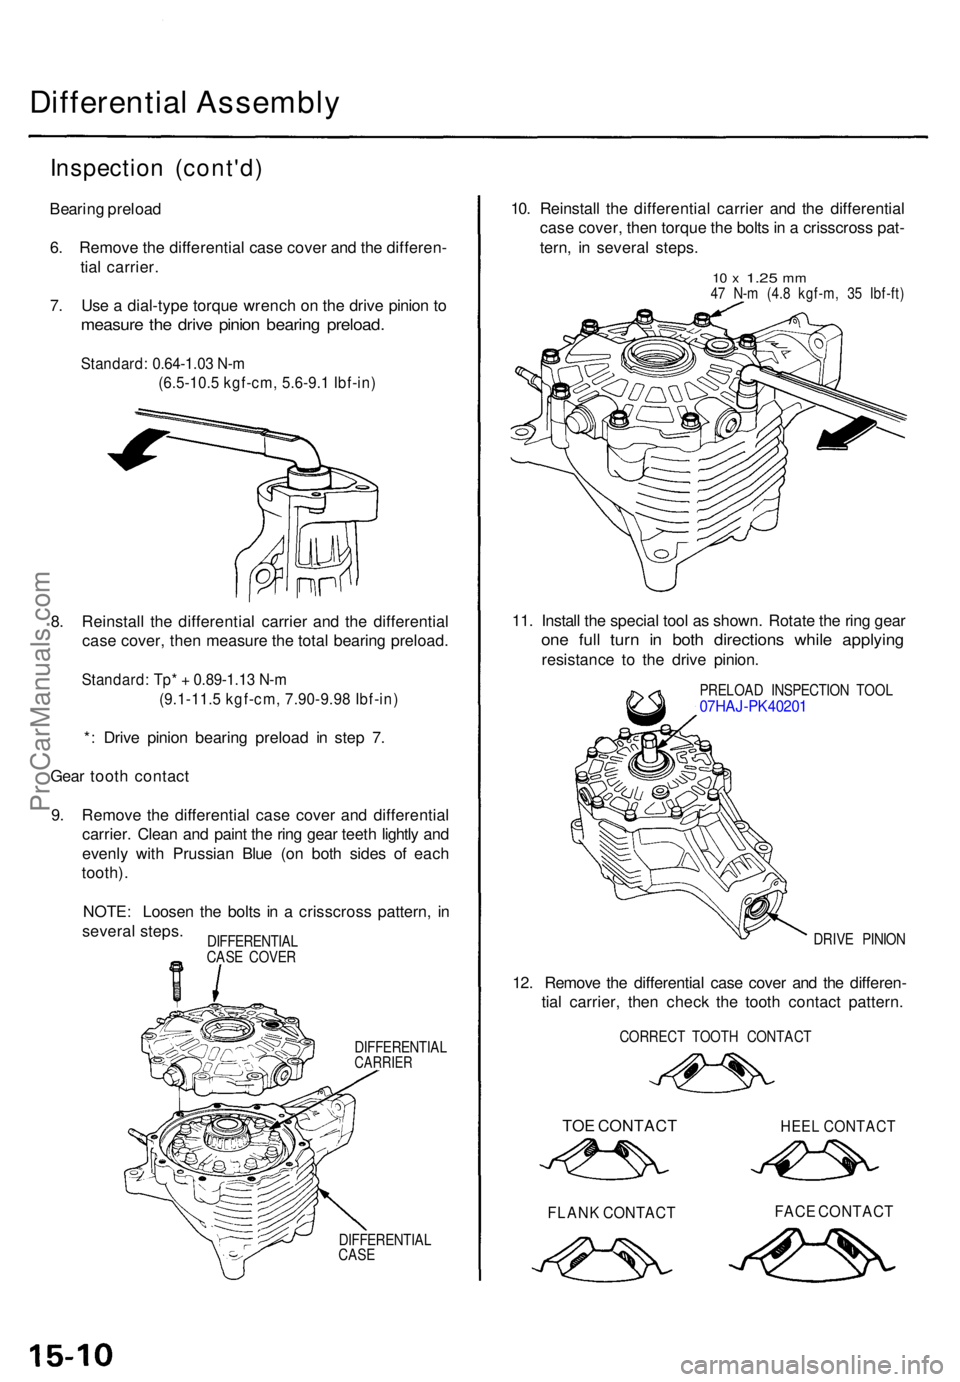
7 . Us e a dial-typ e torqu e wrenc h o n th e driv e pinio n t o
measur e th e driv e pinio n bearin g preload .
Standard: 0.64-1.03 N-m
(6.5-10.5 kgf-cm, 5.6-9.1 Ibf-in)
8. Reinstal l th e differentia l carrie r an d th e differentia l
cas e cover , the n measur e th e tota l bearin g preload .
Standard: Tp* + 0.89-1.13 N-m
(9.1-11.5 kgf-cm, 7.90-9.98 Ibf-in)
*: Driv e pinio n bearin g preloa d i n ste p 7 .
Gea r toot h contac t
9 . Remov e th e differentia l cas e cove r an d differentia l
carrier . Clea n an d pain t th e rin g gea r teet h lightl y an d
evenl y with Prussia n Blu e (o n bot h side s o f eac h
tooth) .
NOTE : Loose n th e bolt s i n a crisscros s pattern , i n
severa l steps .
DIFFERENTIA LCARRIER
DIFFERENTIA L
CAS E
10. Reinstal l th e differentia l carrie r an d th e differentia l
cas e cover , the n torqu e th e bolt s in a crisscros s pat -
tern , i n severa l steps .
10 x 1.2 5 mm47 N- m (4. 8 kgf-m , 3 5 Ibf-ft )
11. Instal l th e specia l too l a s shown . Rotat e th e rin g gea r
one ful l tur n i n bot h direction s whil e applyin g
resistanc e t o th e driv e pinion .
PRELOA D INSPECTIO N TOO L07HAJ-PK40201
DRIVE PINIO N
12. Remov e th e differentia l cas e cove r an d th e differen -
tia l carrier , the n chec k th e toot h contac t pattern .
CORREC T TOOT H CONTAC T
TOE CONTAC T HEE L CONTAC T
FLANK CONTAC T FAC E CONTAC T
DIFFERENTIA L
CAS E COVE R
ProCarManuals.com
Page 1103 of 1771
Differential Assembl y
Disassembl y (cont'd )
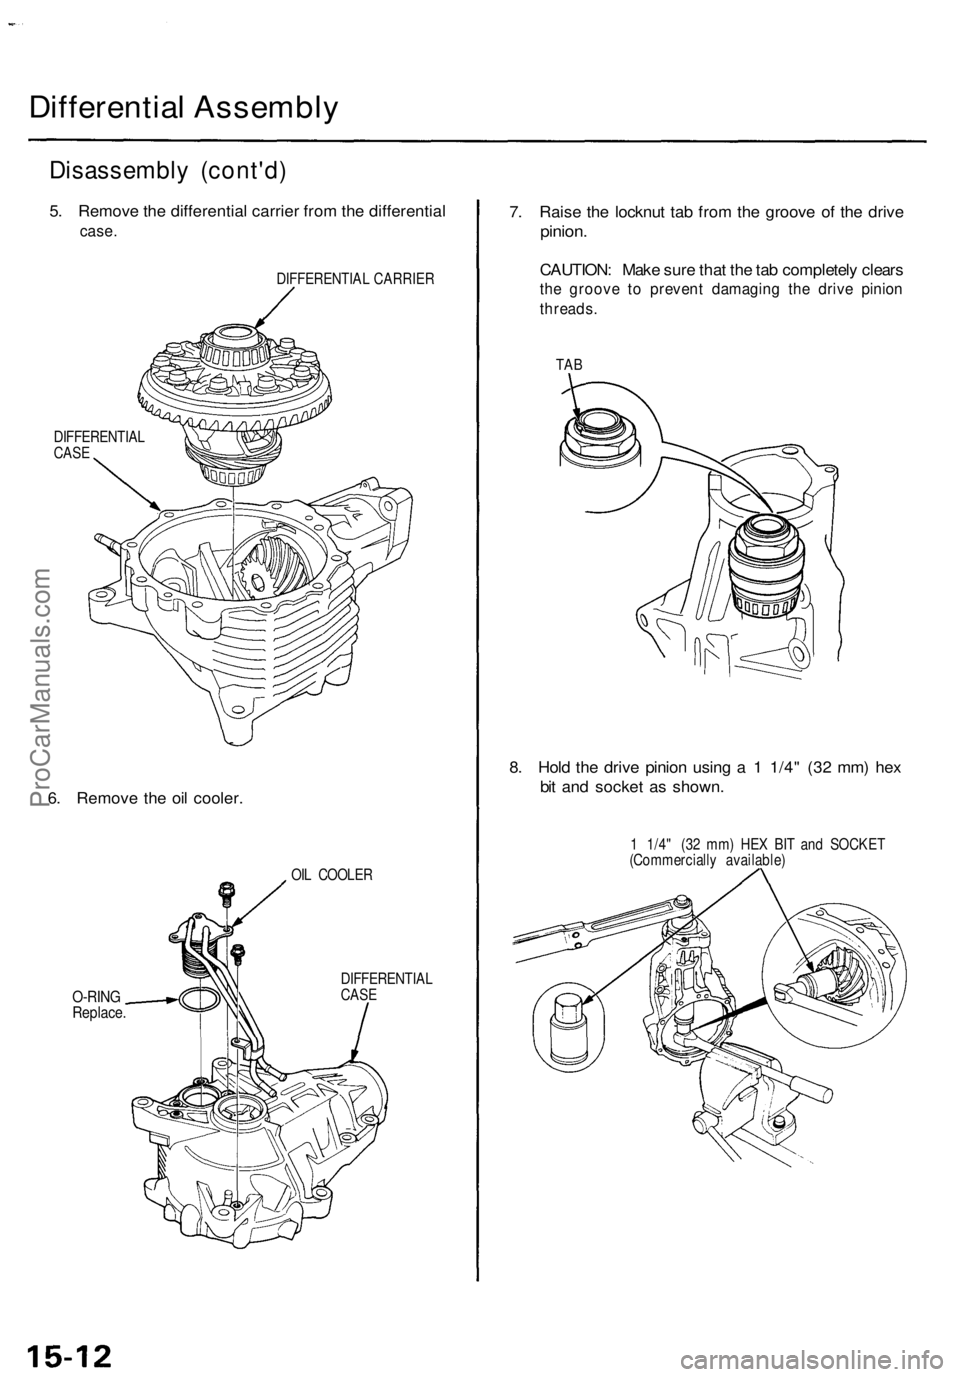
5. Remov e th e differentia l carrie r fro m th e differentia l
case.
DIFFERENTIA L CARRIE R
DIFFERENTIA L
CAS E
6. Remov e th e oi l cooler .
OIL COOLE R
O-RINGReplace .
DIFFERENTIA L
CAS E
7. Rais e th e locknu t ta b fro m th e groov e of the driv e
pinion .
CAUTION : Mak e sur e tha t th e ta b completel y clear s
the groov e t o preven t damagin g th e driv e pinio n
threads .
TAB
8. Hol d th e driv e pinio n usin g a 1 1/4 " (3 2 mm ) he x
bi t an d socke t a s shown .
1 1/4 " (3 2 mm ) HE X BI T an d SOCKE T
(Commerciall y available )
ProCarManuals.com
Page 1105 of 1771
Differential Assembl y
Disassembl y (cont'd )
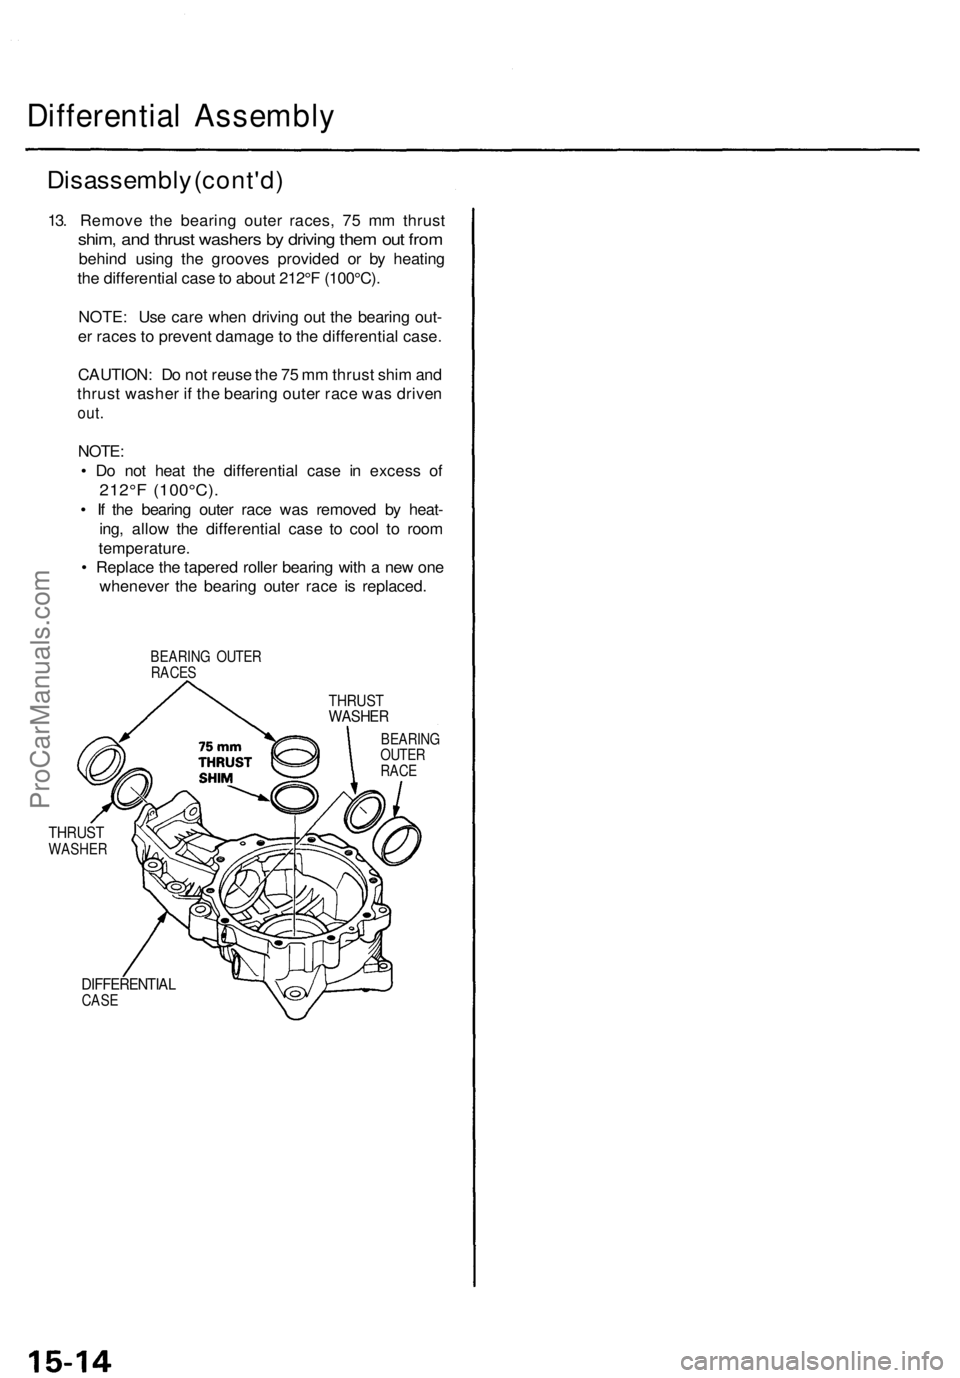
13. Remov e th e bearin g oute r races , 7 5 m m thrus t
shim, an d thrus t washer s b y drivin g the m ou t fro m
behin d usin g th e groove s provide d o r b y heatin g
th e differentia l cas e to abou t 212° F (100°C) .
NOTE : Us e car e whe n drivin g ou t th e bearin g out -
e r race s t o preven t damag e to th e differentia l case .
CAUTION : D o no t reus e th e 7 5 m m thrus t shi m an d
thrus t washe r i f th e bearin g oute r rac e wa s drive n
out.
NOTE :
• D o no t hea t th e differentia l cas e i n exces s o f
212° F (100°C) .
• I f th e bearin g oute r rac e wa s remove d b y heat -
ing , allo w th e differentia l cas e t o coo l t o roo m
temperature .
• Replac e th e tapere d rolle r bearin g wit h a ne w on e
wheneve r th e bearin g oute r rac e i s replaced .
BEARING OUTE RRACES
THRUS TWASHE R
BEARIN G
OUTE R
RAC E
THRUS TWASHE R
DIFFERENTIA LCASE
ProCarManuals.com
Page 1106 of 1771
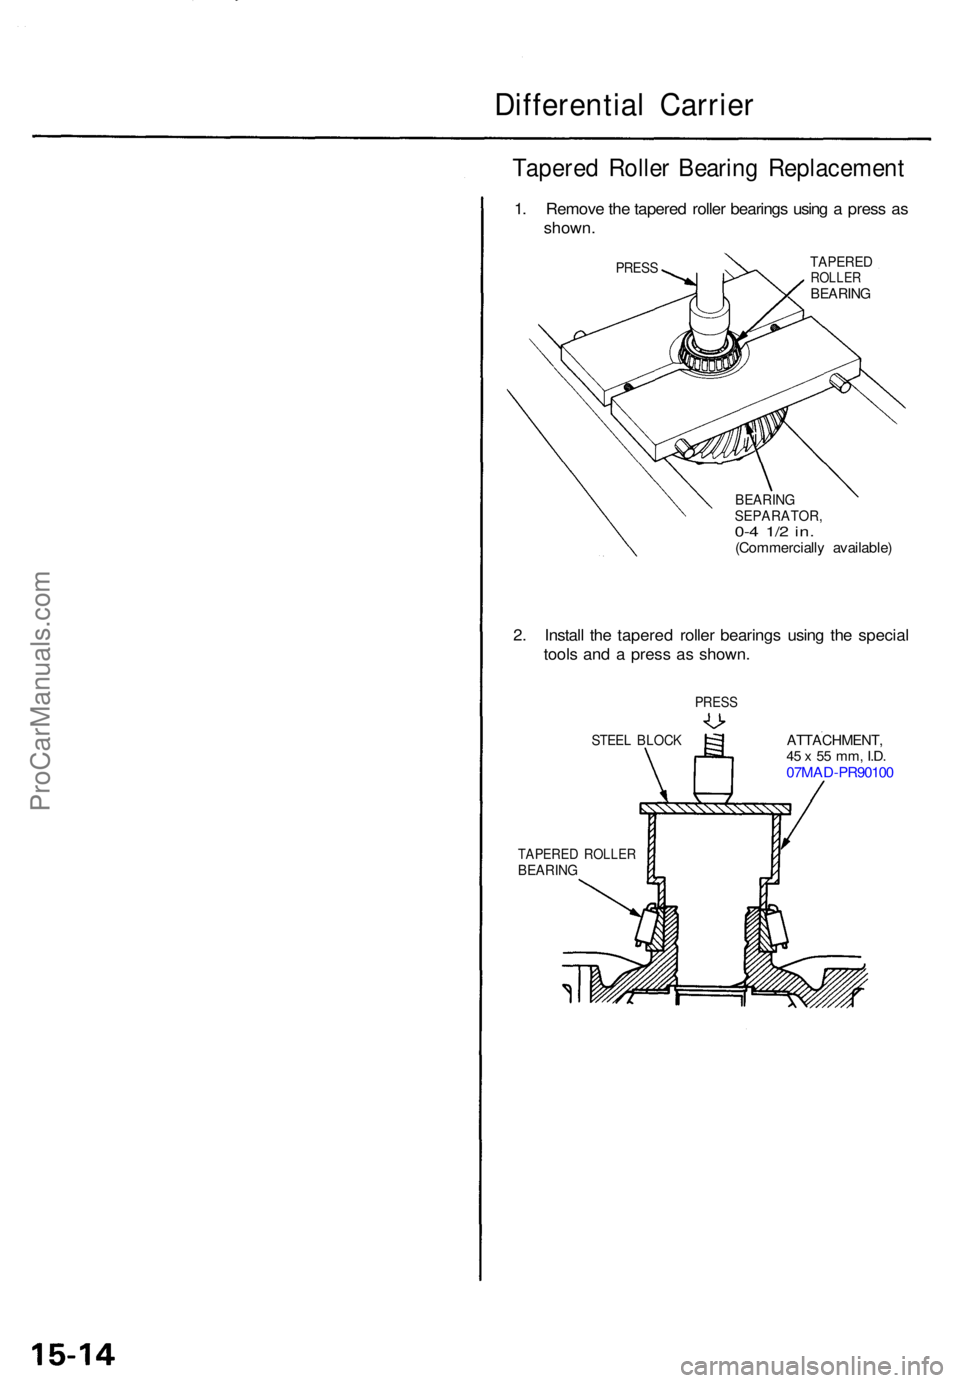
Differential Carrie r
Tapered Rolle r Bearin g Replacemen t
1. Remov e th e tapere d rolle r bearing s usin g a pres s a s
shown .
PRESSTAPERE DROLLERBEARIN G
BEARIN GSEPARATOR ,0-4 1/ 2 in .(Commerciall y available )
2. Instal l th e tapere d rolle r bearing s usin g th e specia l
tool s an d a pres s a s shown .
PRESS
STEEL BLOC KATTACHMENT ,45 x 55 mm , I.D.07MA D-PR9010 0
TAPERE D ROLLE RBEARING
ProCarManuals.com
Page 1107 of 1771
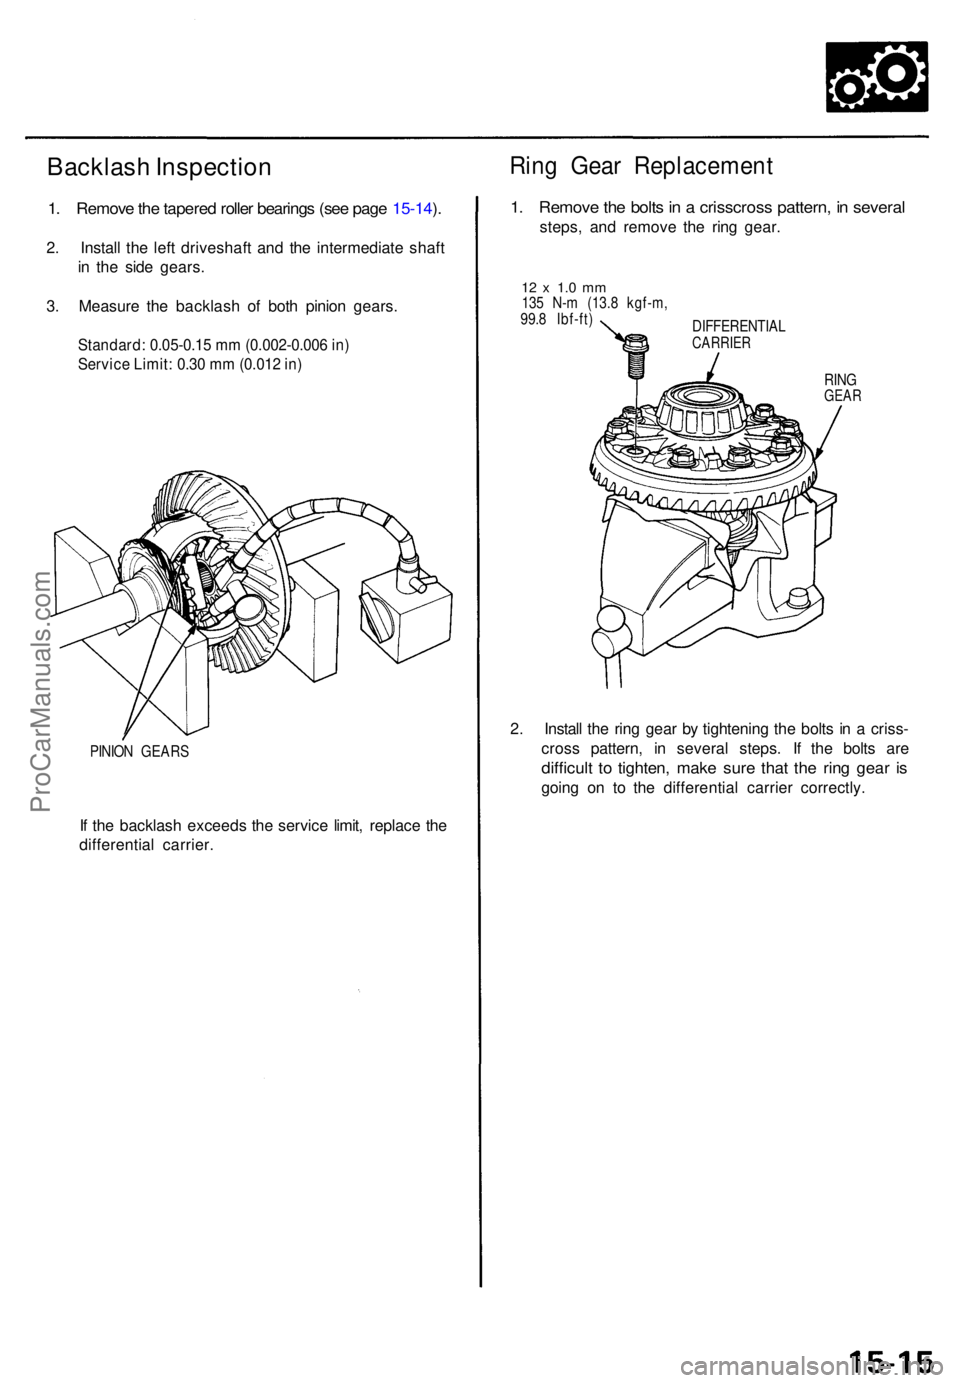
Backlash Inspectio n
1. Remov e th e tapere d rolle r bearing s (se e pag e 15-14 ).
2 . Instal l th e lef t driveshaf t an d th e intermediat e shaf t
i n th e sid e gears .
3 . Measur e th e backlas h o f bot h pinio n gears .
Standard: 0.05-0.15 mm (0.002-0.006 in)
Service Limit: 0.30 mm (0.012 in)
PINION GEAR S
If th e backlas h exceed s th e servic e limit , replac e th e
differentia l carrier .
Ring Gea r Replacemen t
1. Remov e th e bolt s in a crisscros s pattern , i n severa l
steps, an d remov e th e rin g gear .
12 x 1. 0 m m135 N- m (13. 8 kgf-m ,
99. 8 Ibf-ft )
DIFFERENTIAL
CARRIER
RINGGEA R
2. Instal l th e rin g gea r b y tightenin g th e bolt s i n a criss -
cros s pattern , i n severa l steps . I f th e bolt s ar e
difficul t t o tighten , mak e sur e tha t th e rin g gea r i s
goin g o n t o th e differentia l carrie r correctly .
ProCarManuals.com