engine ACURA TL 1995 Service Owner's Manual
[x] Cancel search | Manufacturer: ACURA, Model Year: 1995, Model line: TL, Model: ACURA TL 1995Pages: 1771, PDF Size: 62.49 MB
Page 53 of 1771
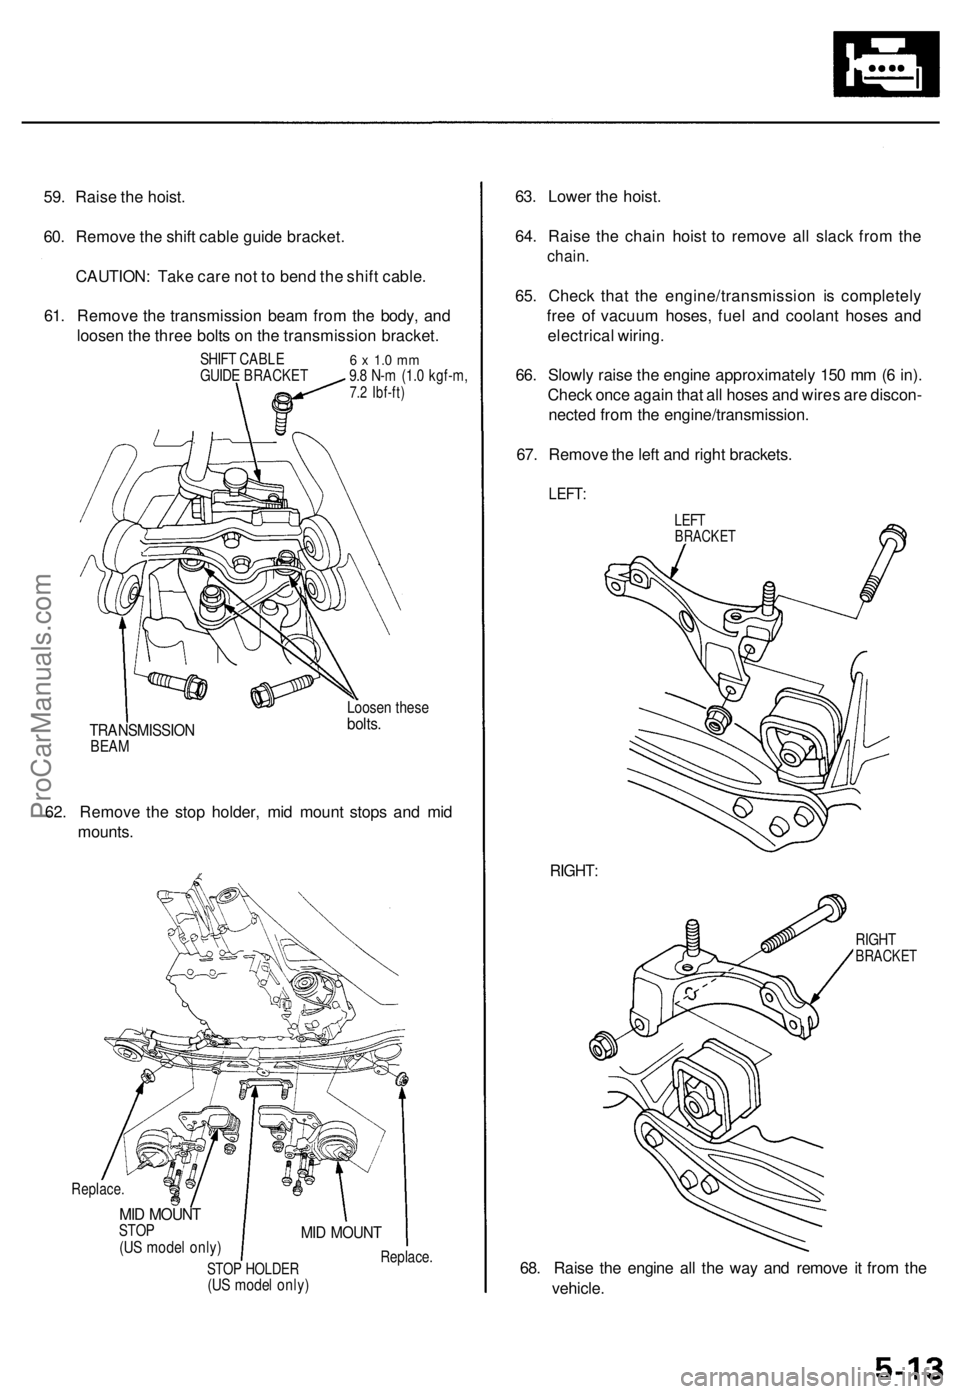
59. Raise the hoist.
60. Remove the shift cable guide bracket.
CAUTION: Take care not to bend the shift cable.
61. Remove the transmission beam from the body, and
loosen the three bolts on the transmission bracket.
SHIFT CABLE
GUIDE BRACKET
6 x 1.0 mm
9.8 N-m (1.0 kgf-m,
7.2 Ibf-ft)
TRANSMISSION
BEAM
Loosen these
bolts.
62. Remove the stop holder, mid mount stops and mid
mounts.
Replace.
MID MOUNT
STOP
(US model only)
STOP HOLDER
(US model only)
MID MOUNT
Replace.
63. Lower the hoist.
64. Raise the chain hoist to remove all slack from the
chain.
65. Check that the engine/transmission is completely
free of vacuum hoses, fuel and coolant hoses and
electrical wiring.
66. Slowly raise the engine approximately 150 mm (6 in).
Check once again that all hoses and wires are discon-
nected from the engine/transmission.
67. Remove the left and right brackets.
LEFT:
LEFT
BRACKET
RIGHT:
RIGHT
BRACKET
68. Raise the engine all the way and remove it from the
vehicle.ProCarManuals.com
Page 54 of 1771
Engine Removal/Installation
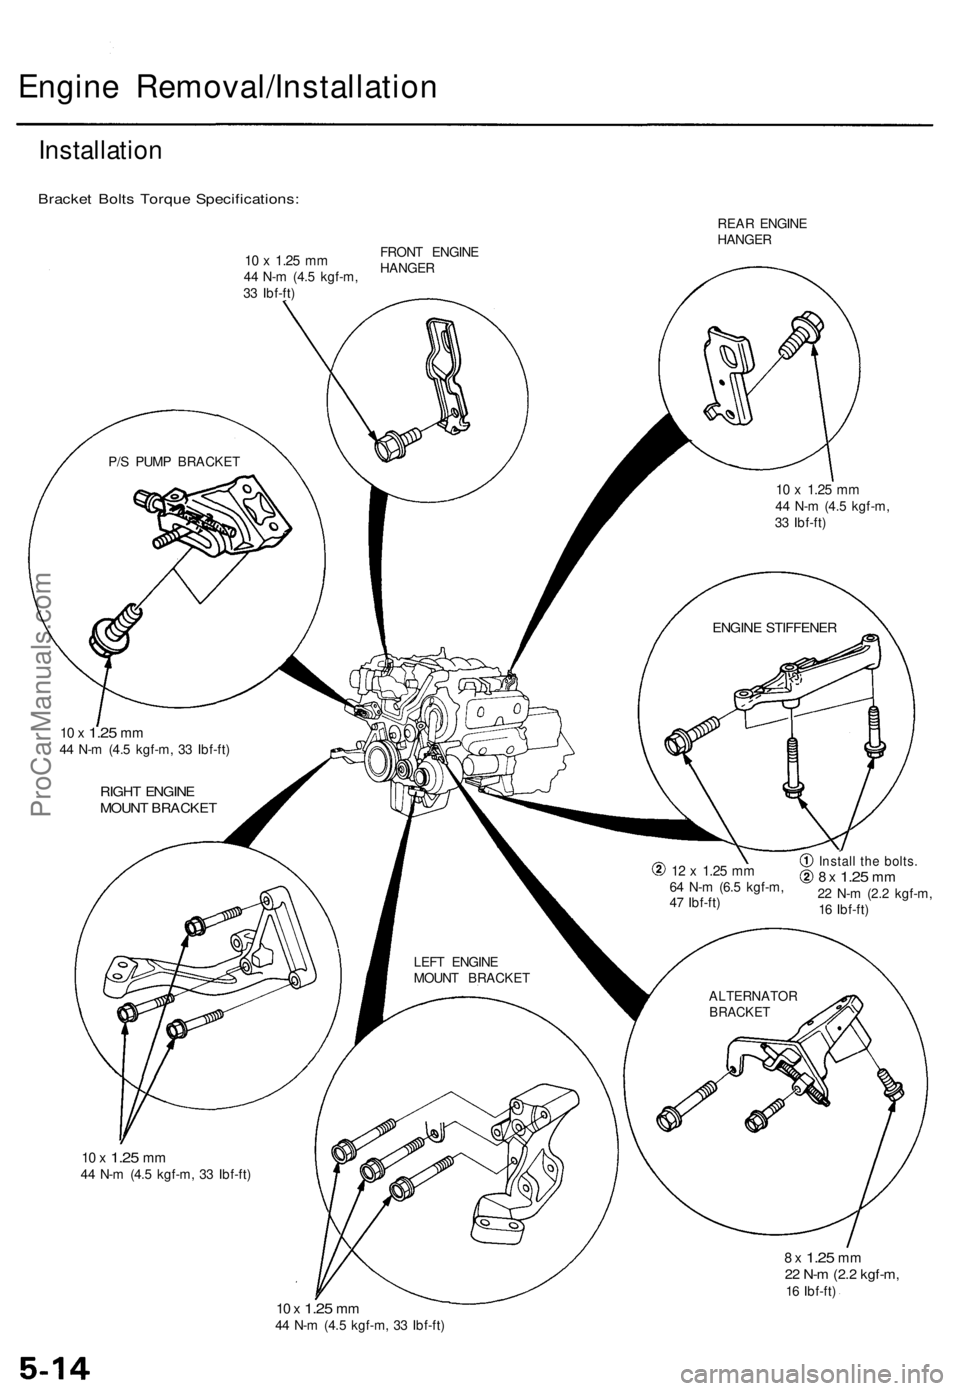
Installation
Bracket Bolts Torque Specifications:
REAR ENGINE
HANGER
P/S PUMP BRACKET
10 x
1.25
mm
44 N-m (4.5 kgf-m,
33 Ibf-ft)
ENGINE STIFFENER
10 x
1.25
mm
44 N-m (4.5 kgf-m, 33 Ibf-ft)
RIGHT ENGINE
MOUNT BRACKET
LEFT ENGINE
MOUNT BRACKET
12 x
1.25
mm
64 N-m (6.5 kgf-m,
47 Ibf-ft)
Install the bolts.
8 x
1.25
mm
22 N-m (2.2 kgf-m,
16 Ibf-ft)
ALTERNATOR
BRACKET
10 x
1.25
mm
44 N-m (4.5 kgf-m, 33 Ibf-ft)
8 x
1.25
mm
22 N-m (2.2 kgf-m,
16 Ibf-ft)
10 x
1.25
mm
44 N-m (4.5 kgf-m, 33 Ibf-ft)
10 x
1.25
mm
44 N-m (4.5 kgf-m,
33 Ibf-ft)
FRONT ENGINE
HANGERProCarManuals.com
Page 55 of 1771
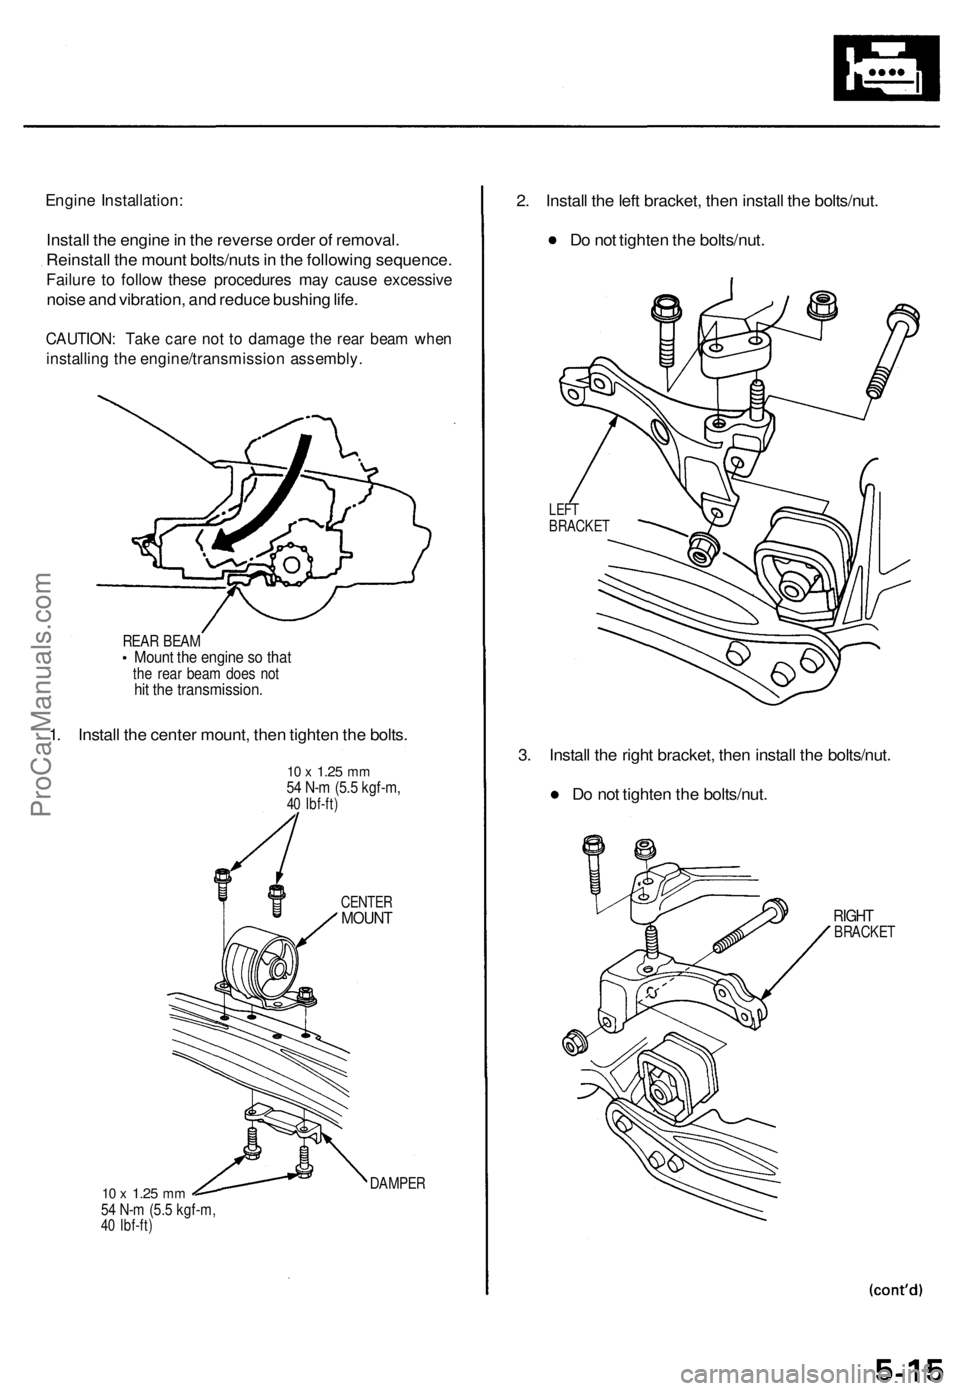
Engine Installation:
Install the engine in the reverse order of removal.
Reinstall the mount bolts/nuts in the following sequence.
Failure to follow these procedures may cause excessive
noise and vibration, and reduce bushing life.
CAUTION: Take care not to damage the rear beam when
installing the engine/transmission assembly.
REAR BEAM
Mount the engine so that
the rear beam does not
hit the transmission.
1. Install the center mount, then tighten the bolts.
10 x
1.25
mm
54 N-m (5.5 kgf-m,
40 Ibf-ft)
10 x
1.25
mm
54 N-m (5.5 kgf-m,
40 Ibf-ft)
CENTER
MOUNT
DAMPER
2. Install the left bracket, then install the bolts/nut.
Do not tighten the bolts/nut.
LEFT
BRACKET
3. Install the right bracket, then install the bolts/nut.
Do not tighten the bolts/nut.
RIGHT
BRACKETProCarManuals.com
Page 56 of 1771
Engine Removal/Installatio n
Installation (cont'd )
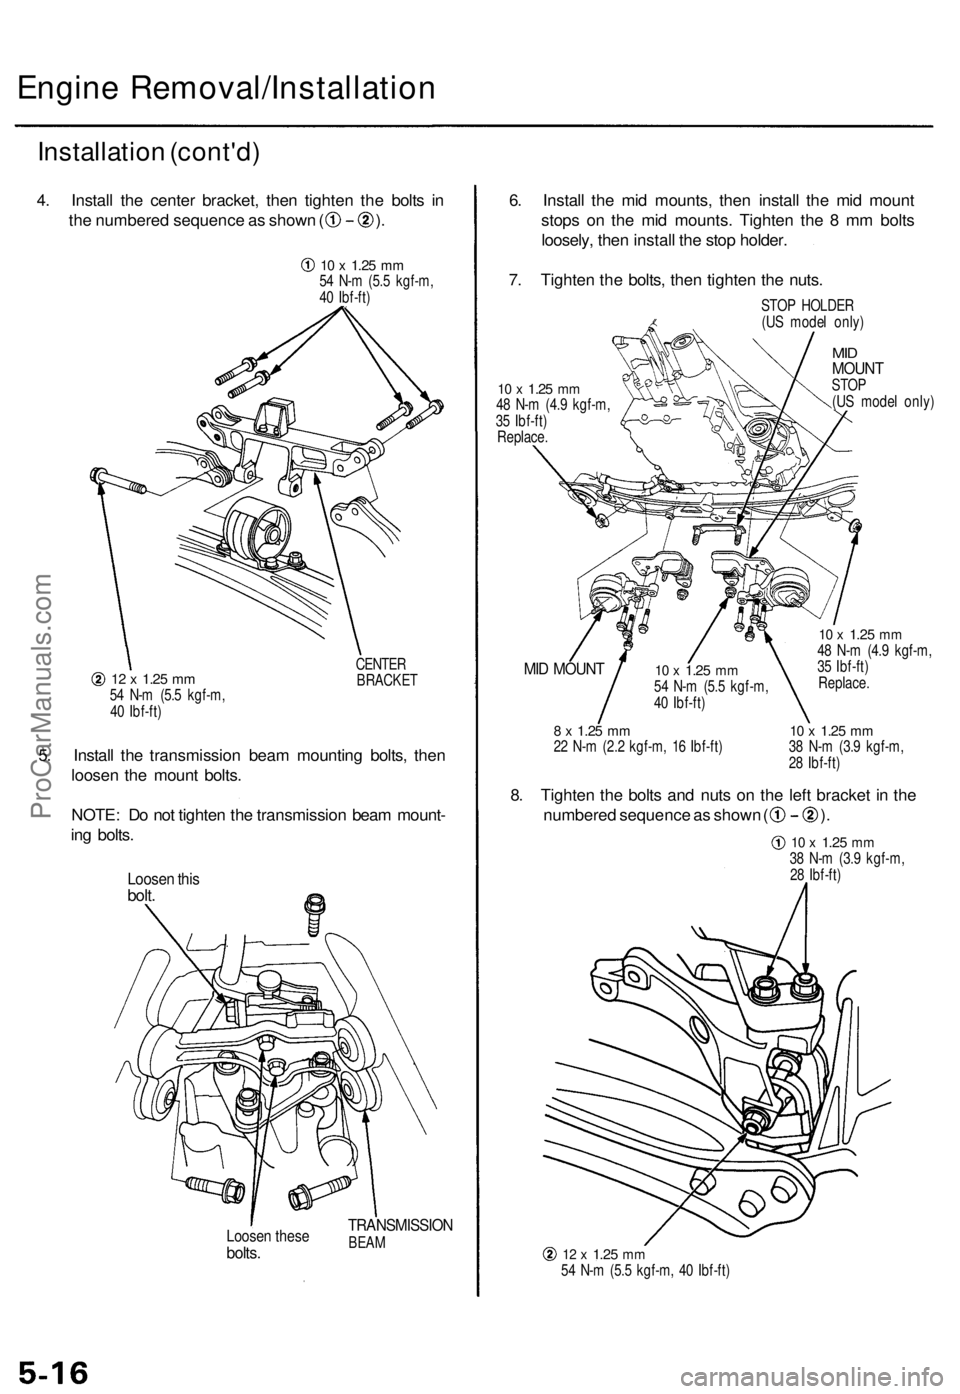
4. Instal l th e cente r bracket , the n tighte n th e bolt s i n
th e numbere d sequenc e a s show n ( ) .
12 x 1.2 5 mm54 N- m (5. 5 kgf-m ,
4 0 Ibf-ft ) CENTE
RBRACKE T
5. Instal l th e transmissio n bea m mountin g bolts , the n
loose n th e moun t bolts .
NOTE : D o no t tighte n th e transmissio n bea m mount -
in g bolts .
Loose n thi sbolt .
Loose n thes ebolts.
TRANSMISSIO NBEAM
6. Instal l th e mi d mounts , the n instal l th e mi d moun t
stop s o n th e mi d mounts . Tighte n th e 8 m m bolt s
loosely , the n instal l th e sto p holder .
7 . Tighte n th e bolts , the n tighte n th e nuts .
STOP HOLDE R
(U S mode l only )
10 x 1.2 5 mm48 N- m (4. 9 kgf-m ,
3 5 Ibf-ft )
Replace .
MIDMOUN TSTOP
(U S mode l only )
MID MOUN T
8 x 1.2 5 mm22 N- m (2. 2 kgf-m , 1 6 Ibf-ft )
10 x 1.2 5 mm48 N- m (4. 9 kgf-m ,
3 5 Ibf-ft )
Replace .
10 x 1.2 5 mm38 N- m (3. 9 kgf-m ,
2 8 Ibf-ft )
8. Tighte n th e bolt s an d nut s o n th e lef t bracke t i n th e
numbere d sequenc e a s show n ( ).
12 x 1.2 5 mm54 N- m (5. 5 kgf-m , 4 0 Ibf-ft )
10 x 1.2 5 mm54 N- m (5. 5 kgf-m ,
4 0 Ibf-ft )
10 x 1.2 5 mm38 N- m (3. 9 kgf-m ,
2 8 Ibf-ft )
10 x 1.2 5 mm54 N- m (5. 5 kgf-m ,
4 0 Ibf-ft )
ProCarManuals.com
Page 57 of 1771
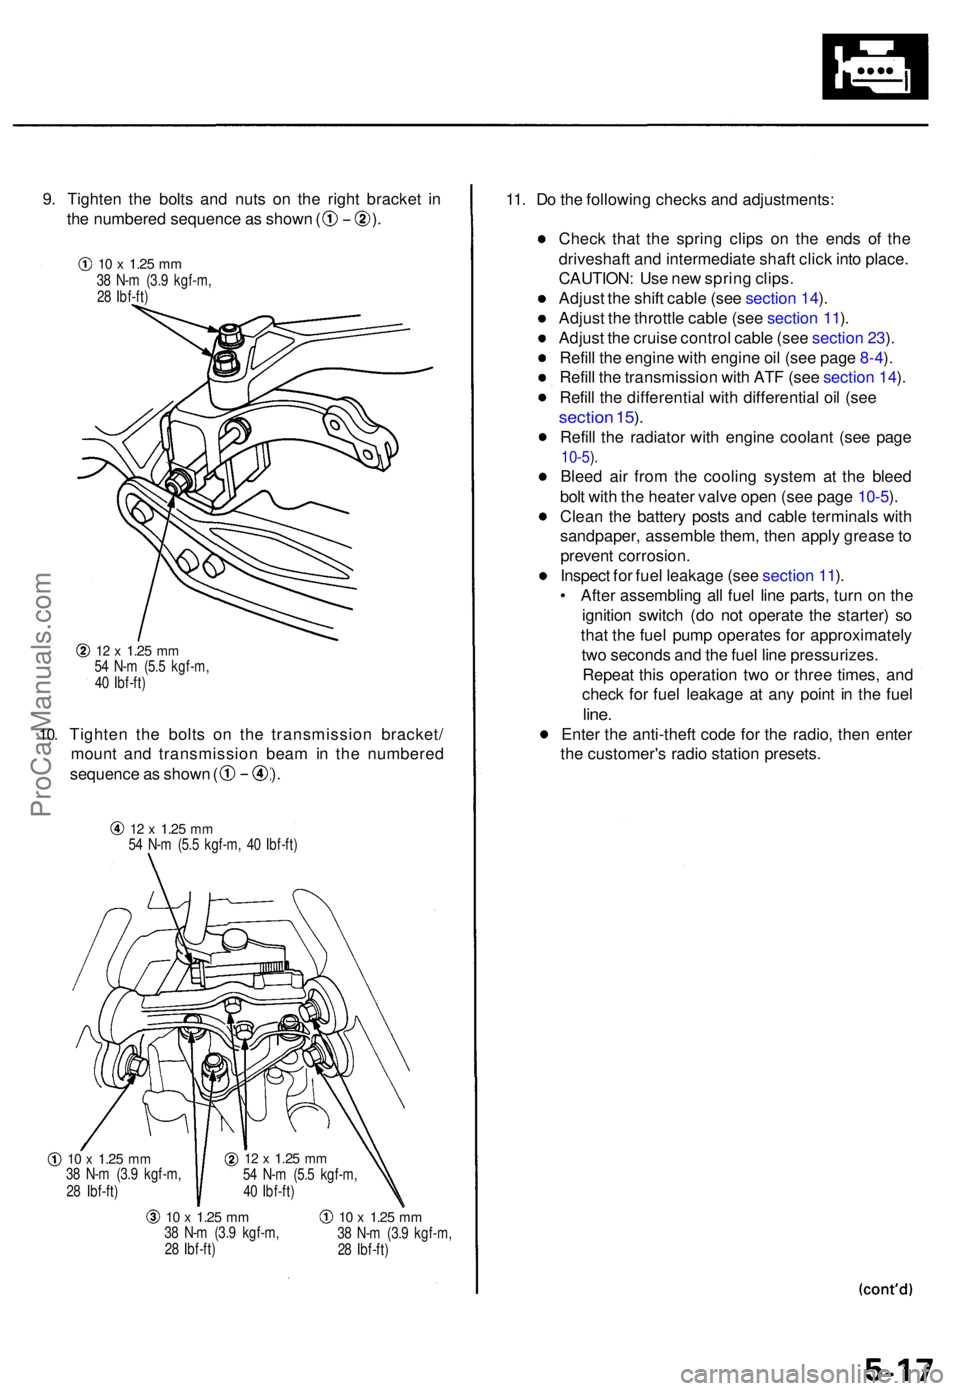
9. Tighte n th e bolt s an d nut s o n th e righ t bracke t i n
th e numbere d sequenc e a s show n ( ) .
10.
12 x 1.2 5 mm54 N- m (5. 5 kgf-m ,
4 0 Ibf-ft )
Tighte n th e bolt s o n th e transmissio n bracket /
moun t an d transmissio n bea m in th e numbere d
sequence a s show n ( ) .
12 x 1.2 5 mm54 N- m (5. 5 kgf-m , 4 0 Ibf-ft )
10 x 1.2 5 mm38 N- m (3. 9 kgf-m ,
2 8 Ibf-ft )
10 x 1.2 5 mm38 N- m (3. 9 kgf-m ,
2 8 Ibf-ft )10 x 1.2 5 mm38 N- m (3. 9 kgf-m ,
2 8 Ibf-ft )
11. D o th e followin g check s an d adjustments :
Chec k tha t th e sprin g clip s o n th e end s o f th e
driveshaf t an d intermediat e shaf t clic k int o place .
CAUTION : Us e ne w sprin g clips .
Adjus t th e shif t cabl e (se e sectio n 14 ).
Adjus t th e throttl e cabl e (se e sectio n 11 ).
Adjus t th e cruis e contro l cabl e (se e sectio n 23 ).
Refil l th e engine with engin e oi l (se e pag e 8-4 ).
Refil l th e transmissio n wit h AT F (se e sectio n 14 ).
Refil l th e differentia l wit h differentia l oi l (se e
sectio n 15 ).
Refil l th e radiato r wit h engine coolant (se e pag e
10-5).
Blee d ai r fro m th e coolin g syste m a t th e blee d
bol t wit h th e heate r valv e ope n (se e pag e 10-5 ).
Clea n th e batter y post s an d cabl e terminal s wit h
sandpaper , assembl e them , the n appl y greas e to
preven t corrosion .
Inspec t fo r fue l leakag e (se e sectio n 11 ).
• Afte r assemblin g al l fue l lin e parts , tur n o n th e
ignitio n switc h (d o no t operat e th e starter ) s o
tha t th e fue l pum p operates for approximatel y
tw o second s an d th e fue l lin e pressurizes .
Repea t thi s operatio n tw o o r thre e times , an d
chec k fo r fue l leakag e a t an y poin t i n th e fue l
line.
Ente r th e anti-thef t cod e fo r th e radio , the n ente r
th e customer' s radi o statio n presets .
12 x 1.2 5 mm54 N- m (5. 5 kgf-m ,
4 0 Ibf-ft )
10 x 1.2 5 mm38 N- m (3. 9 kgf-m ,
2 8 Ibf-ft )
ProCarManuals.com
Page 58 of 1771

Engine Removal/Installation
Installation (cont'd)
Mount and Bracket Bolts/Nuts Torque Value Specifications:
TRANSMISSION
MOUNT BRACKET
TRANSMISSION
MOUNT
12 x
1.25
mm
54 N-m (5.5 kgf-m,
40 Ibf-ft)
10 x
1.25
mm
38 N-m (3.9 kgf-m,
28 Ibf-ft)
10 x
1.25
mm
38 N-m (3.9 kgf-m,
28 Ibf-ft)
Replace.
RIGHT
MOUNT
DAMPER
8 x
1.25
mm
' 22 N-m (2.2 kgf-m,
16 Ibf-ft)
MID MOUNT
BRACKET
LEFT MOUNT
10 x
1.25
mm
38 N-m (3.9 kgf-m,
28 Ibf-ft)
Replace.
MID MOUNT
BRACKET
10 x
1.25
mm
38 N-m (3.9 kgf-m, 28 Ibf-ft)ProCarManuals.com
Page 64 of 1771
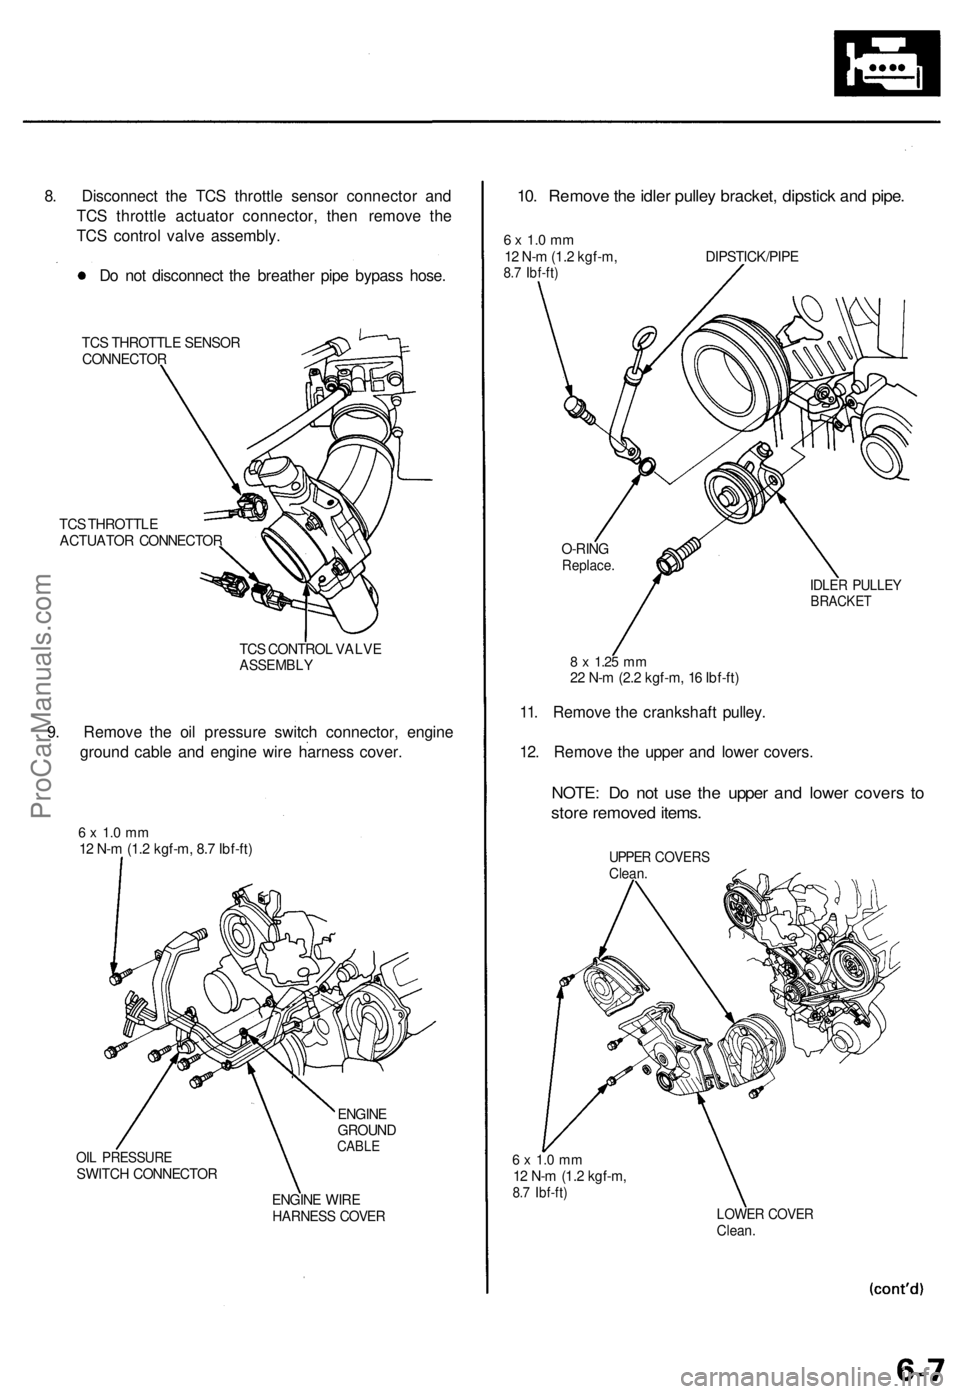
8. Disconnect the TCS throttle sensor connector and
TCS throttle actuator connector, then remove the
TCS control valve assembly.
Do not disconnect the breather pipe bypass hose.
TCS THROTTLE SENSOR
CONNECTOR
TCS THROTTLE
ACTUATOR CONNECTOR
TCS CONTROL VALVE
ASSEMBLY
9. Remove the oil pressure switch connector, engine
ground cable and engine wire harness cover.
6 x 1.0 mm
12 N-m (1.2 kgf-m, 8.7 Ibf-ft)
OIL PRESSURE
SWITCH CONNECTOR
ENGINE
GROUND
CABLE
ENGINE WIRE
HARNESS COVER
10. Remove the idler pulley bracket, dipstick and pipe.
6 x 1.0 mm
12 N-m (1.2 kgf-m,
8.7 Ibf-ft)
DIPSTICK/PIPE
8 x
1.25
mm
22 N-m (2.2 kgf-m, 16 Ibf-ft)
11. Remove the crankshaft pulley.
12. Remove the upper and lower covers.
NOTE: Do not use the upper and lower covers to
store removed items.
UPPER COVERS
Clean.
6 x 1.0 mm
12 N-m (1.2 kgf-m,
8.7 Ibf-ft)
LOWER COVER
Clean.
IDLER PULLEY
BRACKET
O-RING
Replace.ProCarManuals.com
Page 71 of 1771
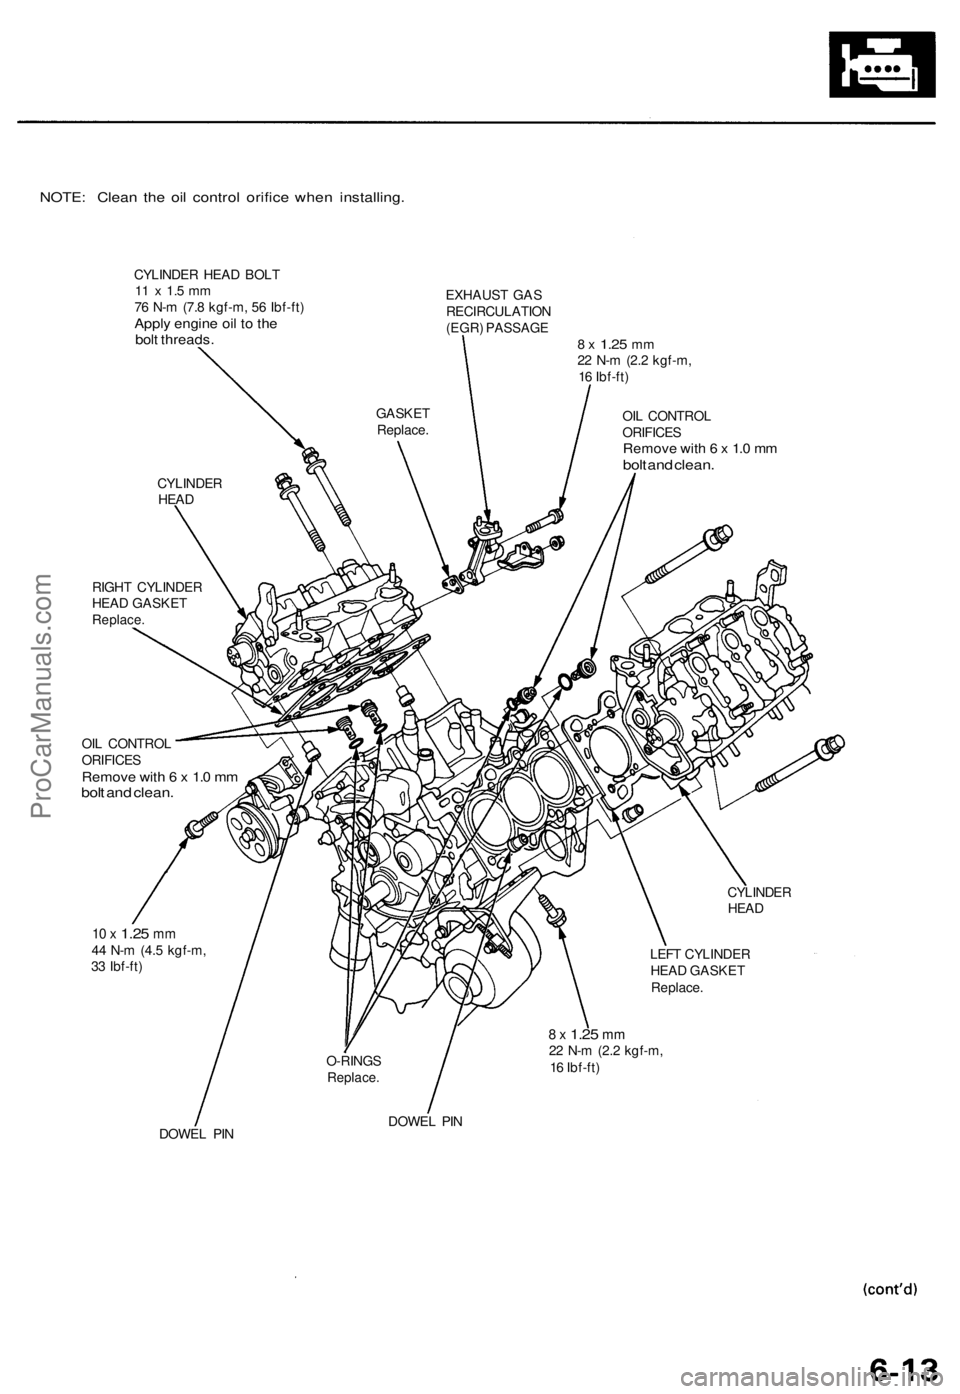
NOTE: Clean the oil control orifice when installing.
CYLINDER HEAD BOLT
11 x 1.5 mm
76 N-m (7.8 kgf-m, 56 Ibf-ft)
Apply engine oil to the
bolt threads.
EXHAUST GAS
RECIRCULATION
(EGR) PASSAGE
8 x
1.25
mm
22 N-m (2.2 kgf-m,
16 Ibf-ft)
OIL CONTROL
ORIFICES
Remove with 6 x 1.0 mm
bolt and clean.
RIGHT CYLINDER
HEAD GASKET
Replace.
OIL CONTROL
ORIFICES
Remove with 6 x 1.0 mm
bolt and clean.
CYLINDER
HEAD
10 x
1.25
mm
44 N-m (4.5 kgf-m,
33 Ibf-ft)
LEFT CYLINDER
HEAD GASKET
Replace.
8 x
1.25
mm
22 N-m (2.2 kgf-m,
16 Ibf-ft)
DOWEL PIN
DOWEL PIN
O-RINGS
Replace.
GASKET
Replace.
CYLINDER
HEADProCarManuals.com
Page 73 of 1771
Cylinder Head s
Remova l
Engine remova l i s no t require d fo r thi s procedure .
Mak e sur e jack s an d safet y stand s ar e
place d properl y an d hois t bracket s ar e attache d th e t o
correc t position s o n th e engine .
CAUTION :
Us e fende r cover s t o avoi d damagin g painte d sur -
faces .
Unplu g th e wirin g connector s carefull y whil e holdin g
th e connecto r portio n to avoi d damage .
T o avoi d damagin g th e cylinde r head , wai t unti l th e
engin e coolan t temperatur e drop s belo w 100° F (38°C )
befor e loosenin g th e retainin g bolts .
NOTE :
Mark al l wirin g an d hose s t o avoi d misconnection .
Also , b e sur e tha t the y d o no t contac t othe r wirin g o r
hoses , o r interfer e wit h othe r parts .
Inspec t th e timin g bel t befor e removin g th e cylinde r
head .
Tur n th e crankshaf t pulle y s o tha t th e No . 1 pisto n i s
a t to p dea d cente r (se e pag e 6-10 ).
1 . Mak e sur e yo u hav e th e anti-thef t cod e fo r th e
radio , the n writ e dow n th e frequencie s fo r th e
radio' s prese t buttons .
2 . Disconnec t th e batter y negativ e termina l first , the n
the positiv e terminal .
3. Drai n th e engin e coolan t (se e pag e 10-5 ).
4 . Remov e th e engin e cove r (se e pag e 5-3 ).
5 . Remov e th e intak e ai r duc t an d ai r cleane r housin g
assembl y (se e pag e 5-3 ).
6 . Remov e th e throttl e cove r (se e pag e 5-4 ).
7 . Remov e th e throttl e cabl e an d cruis e contro l cabl e
b y loosenin g th e locknuts , the n sli p th e cabl e end s
ou t o f th e accelerato r linkag e (se e pag e 5-4 ).
NOTE :
Take car e no t t o ben d a cabl e whe n removin g it .
Alway s replac e an y kinke d cabl e wit h a ne w one .
Adjus t th e throttl e cabl e whe n installin g (se e
sectio n 11 ).
Adjus t th e cruis e contro l cabl e whe n installin g
(se e sectio n 23 ). 8
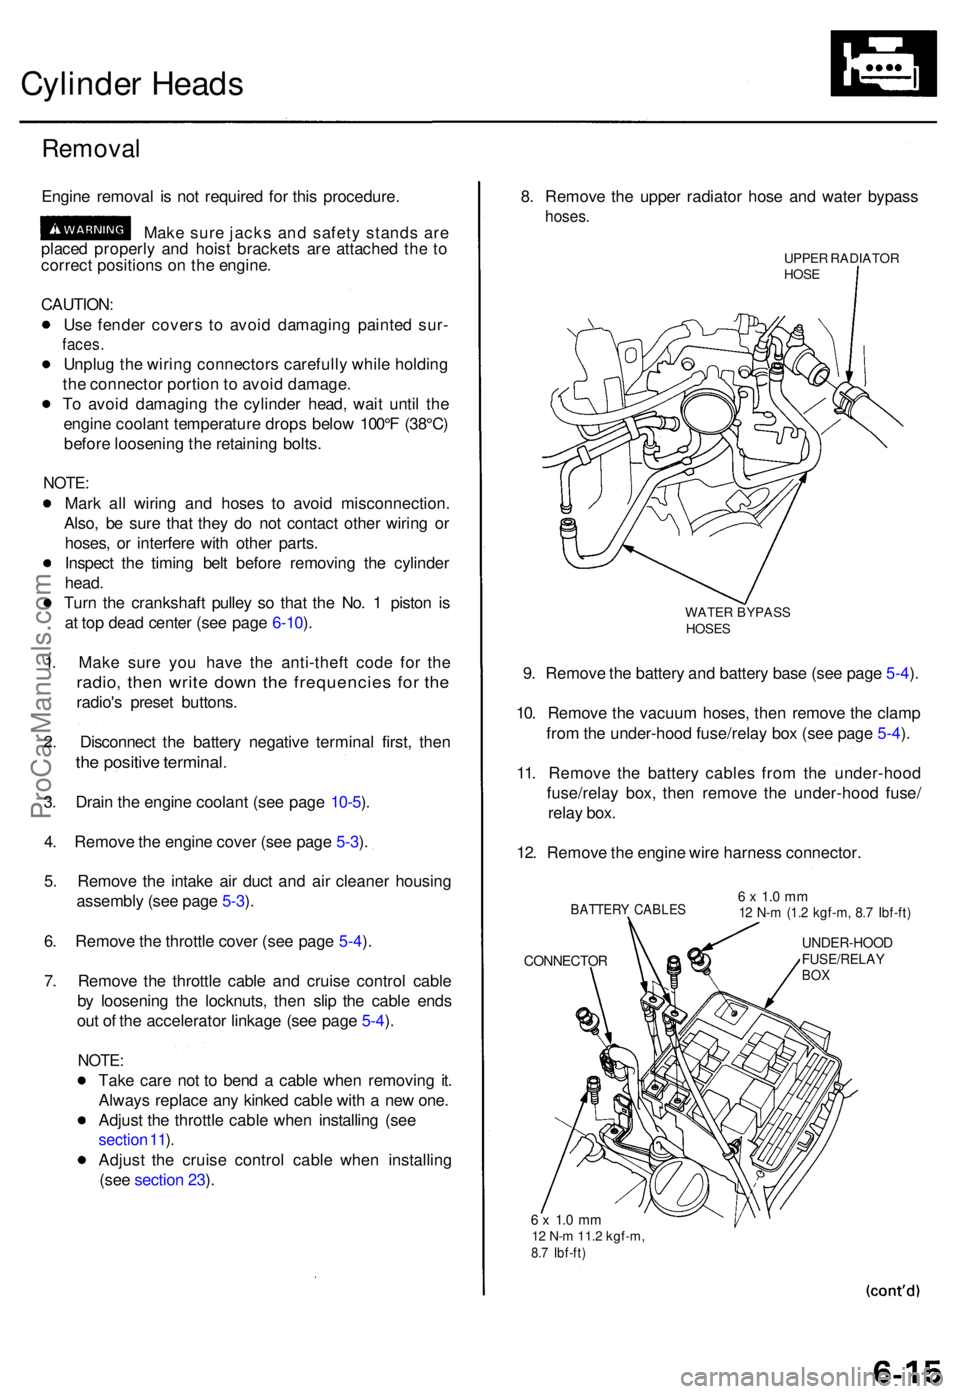
. Remov e th e uppe r radiato r hos e an d wate r bypas s
hoses.
UPPER RADIATO RHOSE
WATE R BYPAS SHOSES
9. Remov e th e batter y an d batter y bas e (se e pag e 5-4 ).
10 . Remov e th e vacuu m hoses , the n remov e th e clam p
fro m th e under-hoo d fuse/rela y bo x (se e pag e 5-4 ).
11 . Remov e th e batter y cable s fro m th e under-hoo d
fuse/rela y box , the n remov e th e under-hoo d fuse /
rela y box .
12 . Remov e th e engin e wir e harnes s connector .
BATTERY CABLE S
CONNECTO R
6 x 1. 0 m m12 N- m (1. 2 kgf-m , 8. 7 Ibf-ft )
UNDER-HOO DFUSE/RELAYBOX
6 x 1. 0 m m12 N- m 11. 2 kgf-m ,8.7 Ibf-ft )
ProCarManuals.com
Page 74 of 1771
Cylinder Head s
Remova l (cont'd )
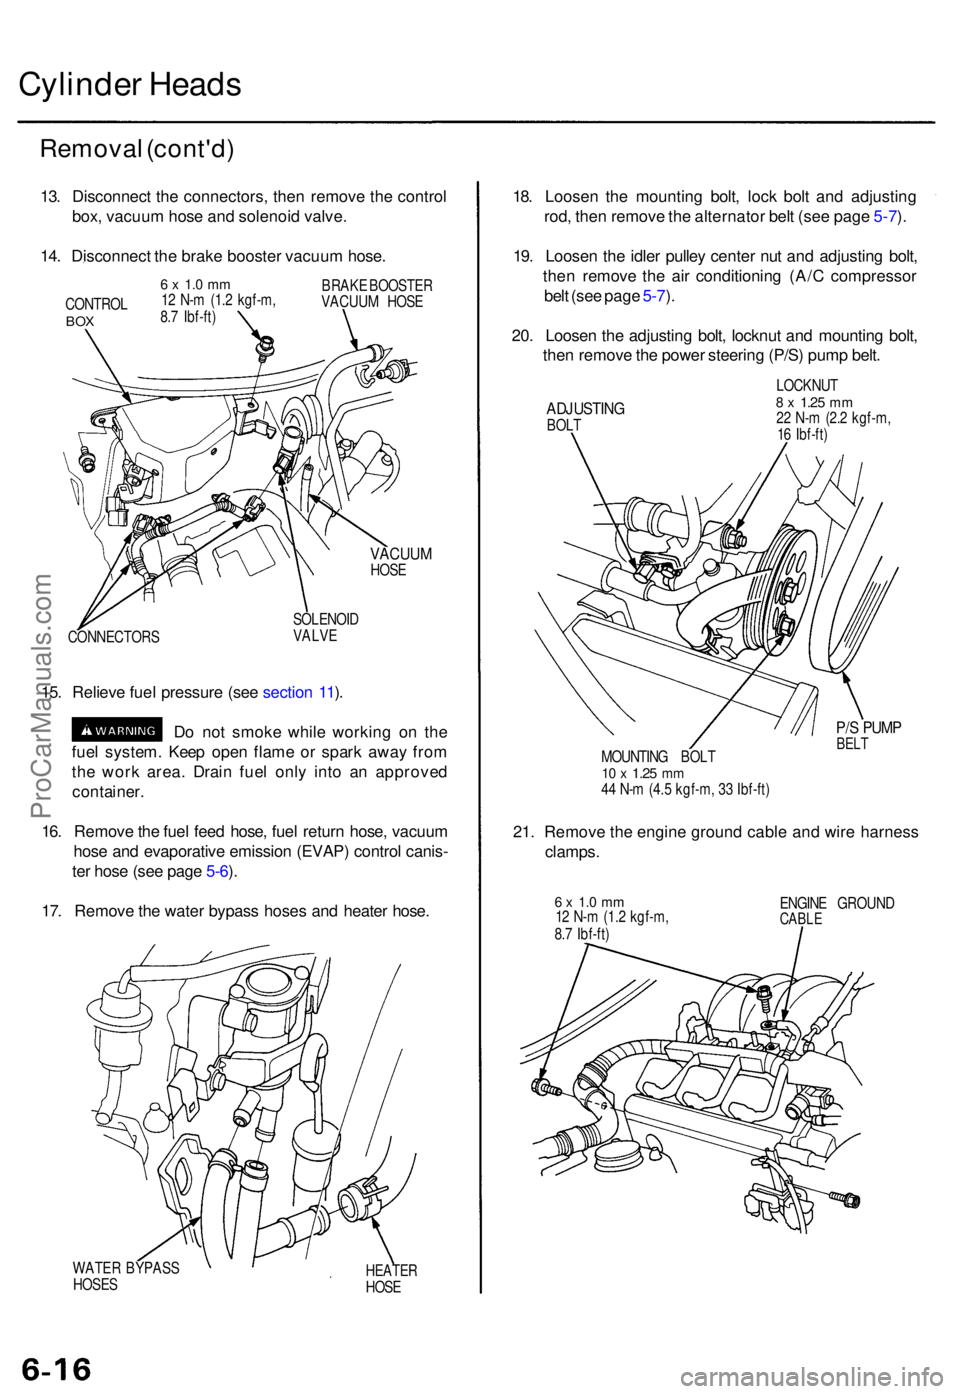
13. Disconnec t th e connectors , the n remov e th e contro l
box , vacuu m hos e an d solenoi d valve .
14 . Disconnec t th e brak e booste r vacuu m hose .
CONTRO LBOX
6 x 1. 0 m m12 N- m (1. 2 kgf-m ,
8. 7 Ibf-ft ) BRAK
E BOOSTE R
VACUU M HOS E
VACUU MHOSE
CONNECTOR S SOLENOI
D
VALVE
15. Reliev e fue l pressur e (se e sectio n 11 ).
D o no t smok e whil e workin g o n th e
fue l system . Kee p ope n flam e o r spar k awa y fro m
th e wor k area . Drai n fue l onl y int o a n approve d
container .
16 . Remov e th e fue l fee d hose , fue l retur n hose , vacuu m
hos e an d evaporativ e emissio n (EVAP ) contro l canis -
te r hos e (se e pag e 5-6 ).
17 . Remov e th e wate r bypas s hose s an d heate r hose .
WATE R BYPAS S
HOSE SHEATE RHOSE
18. Loose n th e mountin g bolt , loc k bol t an d adjustin g
rod , the n remov e th e alternato r bel t (se e pag e 5-7 ).
19 . Loose n th e idle r pulle y cente r nu t an d adjustin g bolt ,
the n remov e th e ai r conditionin g (A/ C compresso r
bel t (se e pag e 5-7 ).
20 . Loose n th e adjustin g bolt , locknu t an d mountin g bolt ,
the n remov e th e powe r steerin g (P/S ) pum p belt .
ADJUSTIN GBOLT LOCKNU
T
8 x 1.2 5 mm22 N- m (2. 2 kgf-m ,
1 6 Ibf-ft )
P/S PUM PBELTMOUNTIN G BOL T10 x 1.2 5 mm44 N- m (4. 5 kgf-m , 3 3 Ibf-ft )
21. Remov e th e engine ground cabl e an d wir e harnes s
clamps.
6 x 1. 0 m m12 N- m (1. 2 kgf-m ,
8. 7 Ibf-ft ) ENGIN
E GROUN DCABLE
ProCarManuals.com