stop start Acura ZDX 2012 Repair Manual
[x] Cancel search | Manufacturer: ACURA, Model Year: 2012, Model line: ZDX, Model: Acura ZDX 2012Pages: 370, PDF Size: 10.06 MB
Page 229 of 370
227
uuWhen Driving uAutomatic Transmission
Driving
Automatic Transmission
The following conditions caus e the engine to run at high revolutions, and increase
creeping:
• Immediately after the engine starts.
• When the climate control system is in use.
Keep the brake pedal firmly depressed when stopped.
Quickly depressing the accelerator pe dal while driving uphill may cause the
transmission to drop to a lower gear, unexpectedly increasing vehicle speed. Depress
the accelerator pedal carefully, especi ally on slippery roads and curves.
■Creeping
■Kickdown
Page 230 of 370
228
uuWhen Driving uShifting
Driving
Shifting
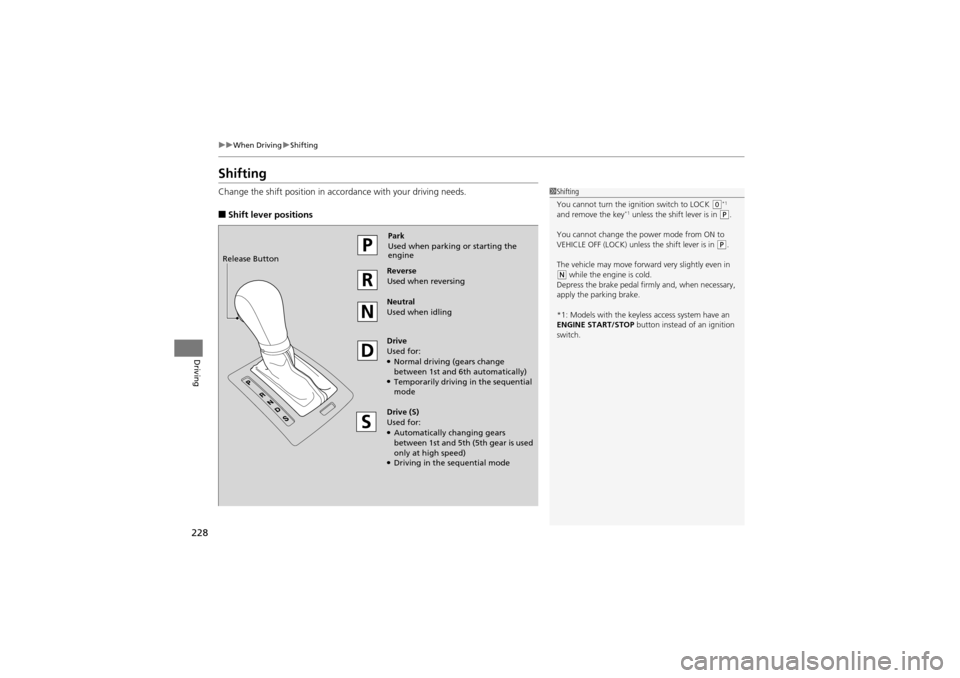
Change the shift position in accordance with your driving needs.
■Shift lever positions
1Shifting
You cannot turn the ignition switch to LOCK
(0*1
and remove the key*1 unless the shift lever is in ( P.
You cannot change the power mode from ON to
VEHICLE OFF (LOCK) unless the shift lever is in
(P.
The vehicle may move forward very slightly even in
( N while the engine is cold.
Depress the brake pedal firmly and, when necessary,
apply the parking brake.
*1: Models with the keyles s access system have an
ENGINE START/STOP button instead of an ignition
switch.
Park
Used when parking or starting the
engine
Reverse
Used when reversing
Neutral
Used when idling
Drive
Used for:
●Normal driving (gears change
between 1st and 6t h automatically)
●Temporarily driving in the sequential
mode
Drive (S)
Used for:
●Automatically changing gears
between 1st and 5th (5 th gear is used
only at high speed)
●Driving in the sequential mode
Release Button
Page 232 of 370
230
uuWhen Driving uShifting
Driving
Use the paddle shifters to change between 1st and 6th gears without removing your
hands from the steering wheel. The transmissi on will switch to the sequential shift
mode.
■When the shift lever is in D:
The vehicle will go into th e sequential shift mode mome ntarily, and the gear position
indicator will come on.
Once you start traveling at a constant speed, the sequential shift mode will
automatically switch off, and the gear position indicator will go off.
Hold the
+ paddle shifter for two second s to return to normal drive.
■When the shift lever is in S:
The vehicle will go into the sequential shift mode, and the M (sequential shift mode)
indicator and gear position indicator will come on. At speeds of 6 mph (10 km/h) or
less, the vehicle automatically shifts down into 1st gear. When you accelerate from
a stop, the transmission starts in first gear, and shifts from first to second
automatically.
You can only pull away in 1st or 2nd gear.
When switching out of the sequential shift mode, move the shift lever from
S to
D. When the sequential shift mode is canceled, the M indicator and gear position
indicator go off.
■Sequential Shift Mode
Page 246 of 370
uuWhen Driving uVSA ® (Vehicle Stability Assist), aka ESC (Electronic Stability Control), System
244
Driving
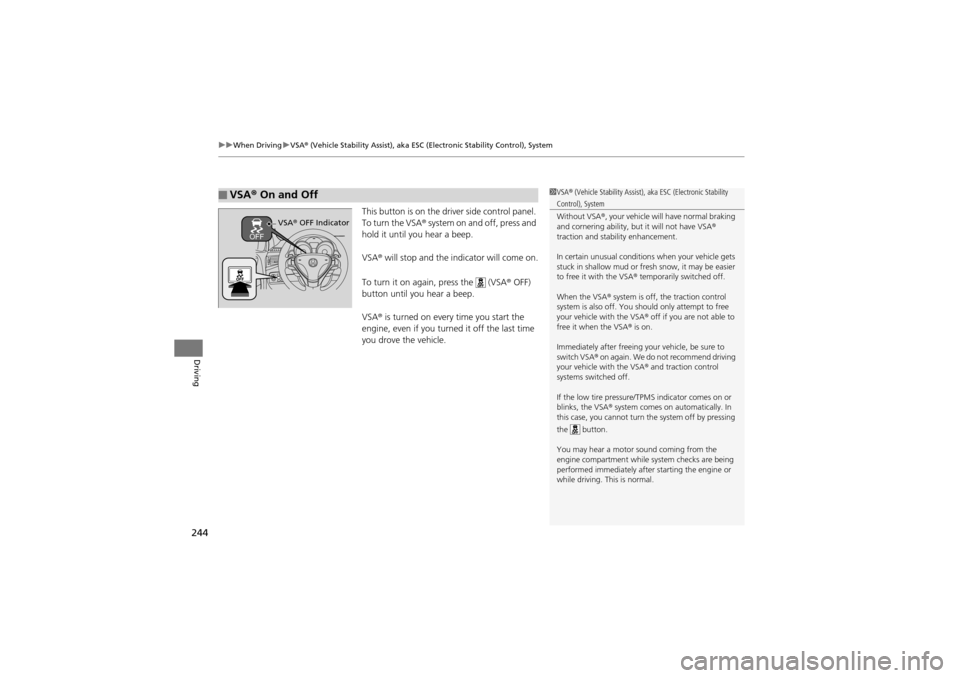
This button is on the driver side control panel.
To turn the VSA® system on and off, press and
hold it until you hear a beep.
VSA ® will stop and the indicator will come on.
To turn it on agai n, press the (VSA ® OFF)
button until you hear a beep.
VSA ® is turned on every time you start the
engine, even if you turned it off the last time
you drove the vehicle.
■VSA ® On and Off1 VSA ® (Vehicle Stability Assist), aka ESC (Electronic Stability
Control), System
Without VSA ®, your vehicle will have normal braking
and cornering ability, but it will not have VSA ®
traction and stability enhancement.
In certain unusual condition s when your vehicle gets
stuck in shallow mud or fresh snow, it may be easier
to free it with the VSA ® temporarily switched off.
When the VSA ® system is off, the traction control
system is also off. You sh ould only attempt to free
your vehicle with the VSA ® off if you are not able to
free it when the VSA ® is on.
Immediately after freeing yo ur vehicle, be sure to
switch VSA ® on again. We do not recommend driving
your vehicle with the VSA ® and traction control
systems switched off.
If the low tire pressure/T PMS indicator comes on or
blinks, the VSA ® system comes on automatically. In
this case, you cannot turn the system off by pressing
the button.
You may hear a motor sound coming from the
engine compartmen t while system checks are being
performed immediately after starting the engine or
while driving. This is normal.
VSA ® OFF Indicator
Page 250 of 370
248
uuWhen Driving uTPMS (Tire Pressure Monitoring System)
Driving
TPMS (Tire Pressure Monitoring System)
Monitors the tire pressure while you are driving. If your vehicle’s tire pressure
becomes significantly low, the low tire pressure/TPMS indicator comes on and a
message appears on the mu lti-information display.
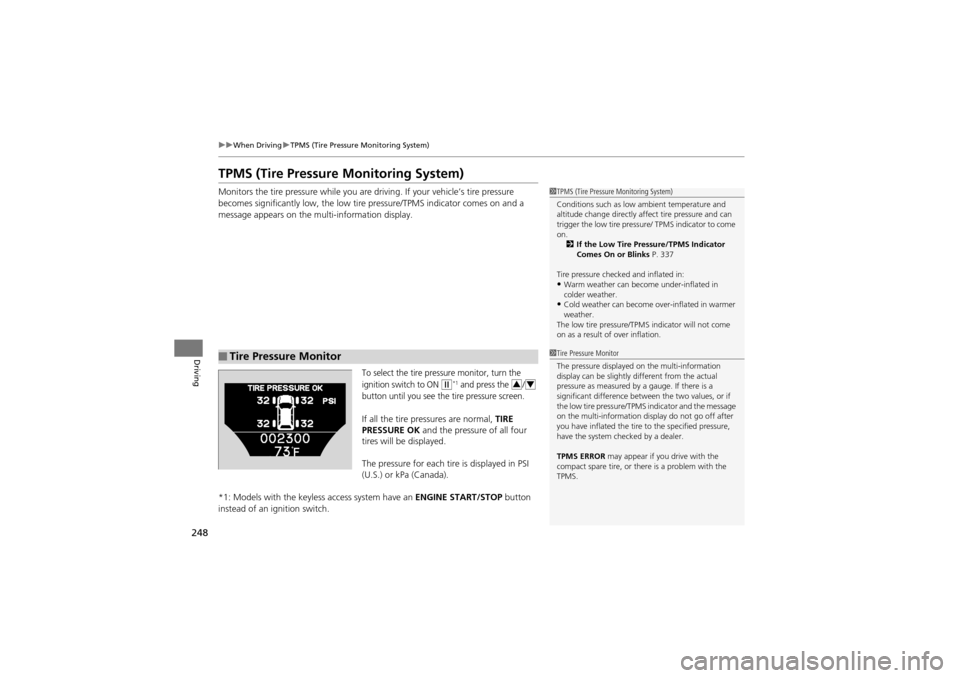
To select the tire pressure monitor, turn the
ignition switch to ON
w*1 and press the /
button until you see the tire pressure screen.
If all the tire pressures are normal, TIRE
PRESSURE OK and the pressure of all four
tires will be displayed.
The pressure for each tire is displayed in PSI
(U.S.) or kPa (Canada).
*1: Models with the keyless access system have an ENGINE START/STOP button
instead of an ignition switch.
■Tire Pressure Monitor
1 TPMS (Tire Pressure Monitoring System)
Conditions such as low ambient temperature and
altitude change directly affect tire pressure and can
trigger the low tire pressure / TPMS indicator to come
on. 2 If the Low Tire Pressure/TPMS Indicator
Comes On or Blinks P. 337
Tire pressure checked and inflated in:
•Warm weather can beco me under-inflated in
colder weather.
•Cold weather can become over-inflated in warmer
weather.
The low tire pressure/TPM S indicator will not come
on as a result of over inflation.
1 Tire Pressure Monitor
The pressure displayed on the multi-information
display can be slightly different from the actual
pressure as measured by a gauge. If there is a
significant difference between the two values, or if
the low tire pressure/TPMS indicator and the message
on the multi-information display do not go off after
you have inflated the tire to the specified pressure,
have the system checked by a dealer.
TPMS ERROR may appear if you drive with the
compact spare tire, or ther e is a problem with the
TPMS.
34
Page 255 of 370
253Continued
Driving
Braking
Brake System
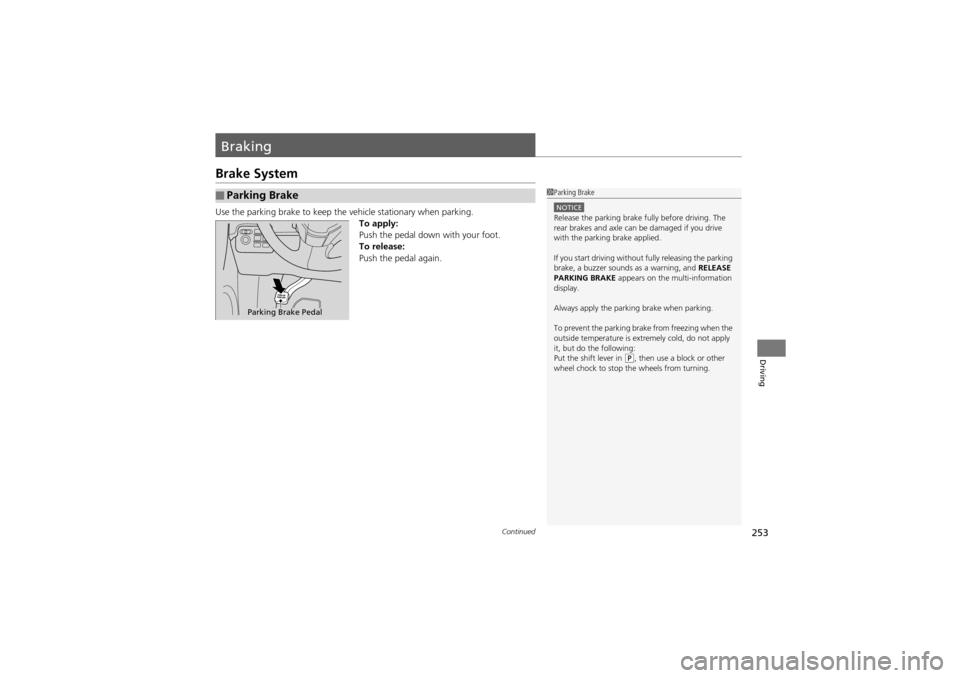
Use the parking brake to keep the vehicle stationary when parking.
To apply:
Push the pedal down with your foot.
To release:
Push the pedal again.
■Parking Brake1 Parking Brake
NOTICERelease the parking brake fully before driving. The
rear brakes and axle can be damaged if you drive
with the parking brake applied.
If you start driving without fully releasing the parking
brake, a buzzer sounds as a warning, and RELEASE
PARKING BRAKE appears on the multi-information
display.
Always apply the parking brake when parking.
To prevent the parking brake from freezing when the
outside temperature is extremely cold, do not apply
it, but do the following:
Put the shift lever in
( P, then use a block or other
wheel chock to stop the wheels from turning.
Parking Brake Pedal
Page 257 of 370
255
uuBraking uABS (Anti-lock Brake System)
Driving
ABS (Anti-lock Brake System)
Helps prevent the wheels from locking up, an d helps you retain steering control by
pumping the brakes rapidly, much faster than you.
The electronic brake distribution (EBD) sy stem, which is part of the ABS, also
balances the front-to-rear braking distri bution according to vehicle loading.
You should never pump th e brake pedal. Let the ABS work for you by always
keeping firm, steady pressure on the brake pedal. This is sometimes referred to as
“stomp and steer.”
■ABS operation
The brake pedal may pulsate slightly when the ABS is working. Keep holding the
pedal firmly down. On dry pavement, you will need to press on the brake pedal very
hard before the ABS activates. However, you may feel the ABS activate immediately
if you are trying to stop on snow or ice.
When the vehicle speed goes under 6 mph (10 km/h), the ABS stops.
■ABS1 ABS (Anti-lock Brake System)
NOTICEThe ABS may not function correctly if you use an
incorrect tire type and size.
When the ABS indicator comes on while driving,
there may be a problem with the system.
While normal braking is no t affected, there is a
possibility of the ABS not operating. Have the vehicle
checked by a dealer immediately.
The ABS does not reduce the ti me or distance it takes
to stop the vehicle. It only helps with steering control
during hard braking.
In the following cases, your vehicle may need more
stopping distance than a vehicle without the ABS:
•When driving on rough road surfaces, including
when driving on uneven surfaces, such as gravel or
snow.
•When tire chains are installed.
You may hear a motor sound coming from the
engine compartmen t while system checks are being
performed immediately after starting the engine or
while driving. This is normal.
Page 259 of 370
257
uuBraking uCMBSTM (Collision Mitigation Braking SystemTM)*
Continued
Driving
CMBSTM (Collision Mitigation Braking SystemTM)*
Can assist you when there is a possibility of your vehicle colliding with the vehicle in
front of yours. The CMBSTM is designed to alert you, then reduce your vehicle speed
when a possible collision is likely unavoidable to help minimize collision severity.
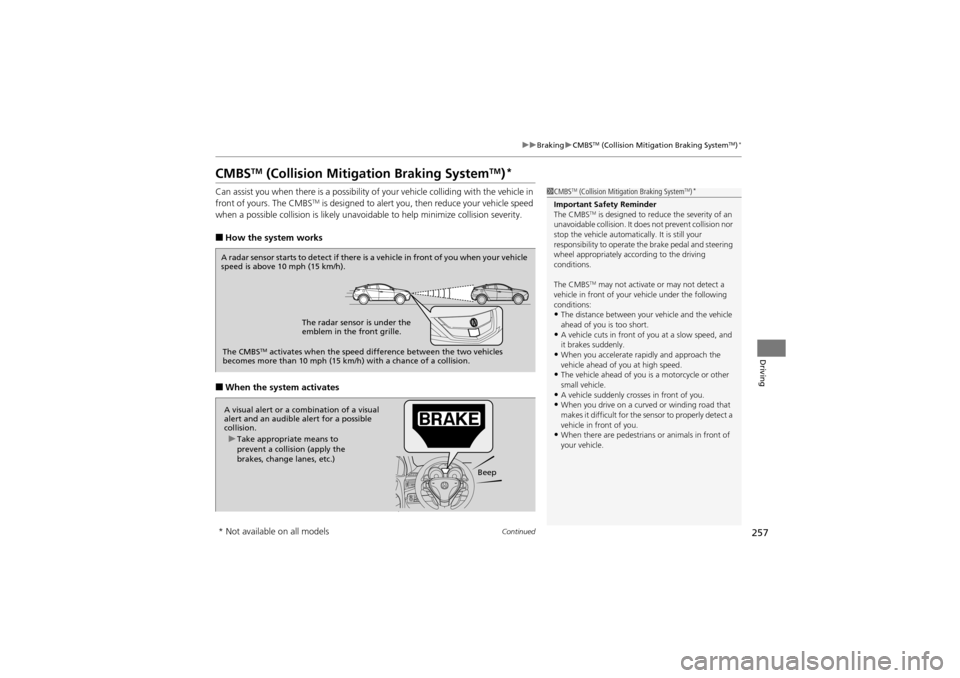
■How the system works
■When the system activates
1 CMBSTM (Collision Mitigation Braking SystemTM)*
Important Safety Reminder
The CMBSTM is designed to reduce the severity of an
unavoidable collision. It do es not prevent collision nor
stop the vehicle automatically. It is still your
responsibility to operate th e brake pedal and steering
wheel appropriately according to the driving
conditions.
The CMBS
TM may not activate or may not detect a
vehicle in front of your vehicle under the following
conditions:
•The distance between your vehicle and the vehicle
ahead of you is too short.
•A vehicle cuts in front of you at a slow speed, and
it brakes suddenly.
•When you accelerate ra pidly and approach the
vehicle ahead of you at high speed.
•The vehicle ahead of you is a motorcycle or other
small vehicle.
•A vehicle suddenly crosses in front of you.•When you drive on a curved or winding road that
makes it difficult for the se nsor to properly detect a
vehicle in front of you.
•When there are pedestrians or animals in front of
your vehicle.
A radar sensor starts to detect if there is a vehicle in front of you when your vehicle
speed is above 10 mph (15 km/h).
The radar sensor is under the
emblem in the front grille.
The CMBS
TM activates when the speed difference betw een the two vehicles
becomes more than 10 mph (15 km/h ) with a chance of a collision.
A visual alert or a combination of a visual
alert and an audible alert for a possible
collision.
Beep
u
Take appropriate means to
prevent a collision (apply the
brakes, change lanes, etc.)
* Not available on all models
Page 275 of 370
273Continued
Maintenance
Maintenance MinderTM
If the engine oil life is less than 15%, you will see the Maintenance Minder messages
appear on the multi-information display every time you turn the ignition switch to
ON
w*1. The messages notify you when to change the engine oil, or when to bring
your vehicle to a dealer for indicated maintenance services.
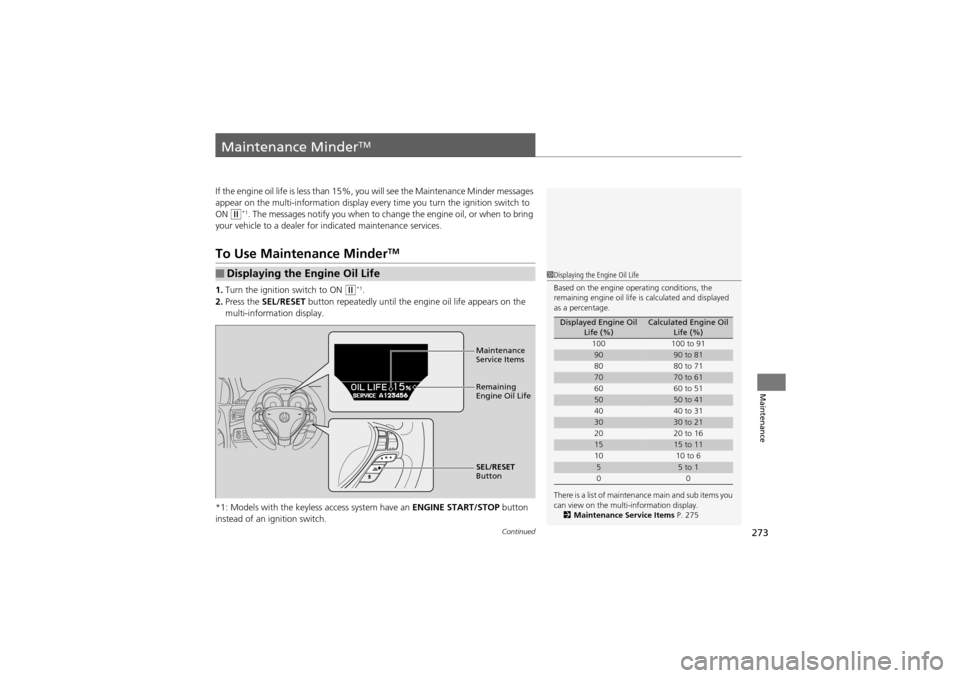
To Use Maintenance MinderTM
1.Turn the ignition switch to ON w*1.
2. Press the SEL/RESET button repeatedly until the engine oil life appears on the
multi-information display.
*1: Models with the keyless access system have an ENGINE START/STOP button
instead of an ig nition switch.
■Displaying the Engine Oil Life1Displaying the Engine Oil Life
Based on the engine operating conditions, the
remaining engine oil life is calculated and displayed
as a percentage.
There is a list of maintenance main and sub items you
can view on the multi-information display. 2 Maintenance Service Items P. 275
Displayed Engine Oil
Life (%)Calculated Engine Oil Life (%)
100 100 to 91
9090 to 81
80 80 to 71
7070 to 61
60 60 to 51
5050 to 41
40 40 to 31
3030 to 21
20 20 to 16
1515 to 11
10 10 to 6
55 to 1
00
Maintenance
Service Items
Remaining
Engine Oil Life
SEL/RESET
Button
Page 278 of 370
uuMaintenance MinderTMuTo Use Maintenance MinderTM
276
Maintenance
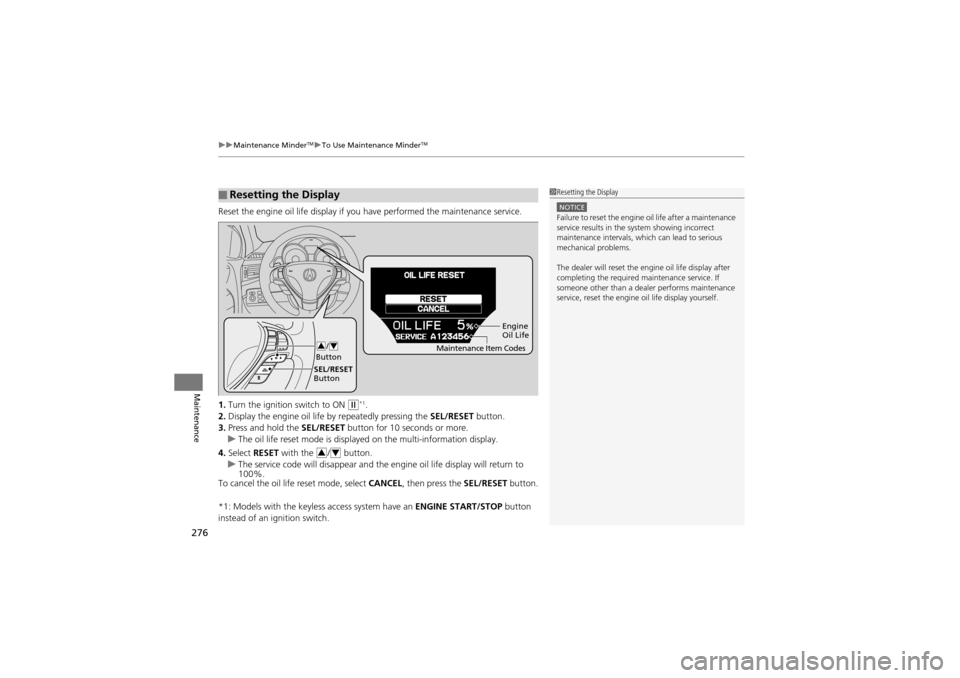
Reset the engine oil life display if y ou have performed the maintenance service.
1. Turn the ignition switch to ON
w*1.
2. Display the engine oil life by repeatedly pressing the SEL/RESET button.
3. Press and hold the SEL/RESET button for 10 seconds or more.
u The oil life reset mode is displayed on the multi-information display.
4. Select RESET with the / button.
u The service code will disappear and the engine oil life display will return to
100%.
To cancel the oil life reset mode, select CANCEL, then press the SEL/RESET button.
*1: Models with the keyless access system have an ENGINE START/STOP button
instead of an ignition switch.
■Resetting the Display1 Resetting the Display
NOTICEFailure to reset the engine oil life after a maintenance
service results in the system showing incorrect
maintenance intervals, which can lead to serious
mechanical problems.
The dealer will reset the engine oil life display after
completing the required ma intenance service. If
someone other than a dealer performs maintenance
service, reset the engine oil life display yourself.
Engine
Oil Life
SEL/RESET
Button /
Button
34Maintenance Item Codes
34