tire Alfa Romeo Giulietta 2012 Owner handbook (in English)
[x] Cancel search | Manufacturer: ALFA ROMEO, Model Year: 2012, Model line: Giulietta, Model: Alfa Romeo Giulietta 2012Pages: 297, PDF Size: 9.37 MB
Page 40 of 297
36
GETTING
TO KNOW
YOUR CAR
SAFETY
STARTING
AND DRIVING
IN AN
EMERGENCY
SERVICING AND
MAINTENANCE
TECHNICAL
SPECIFICATIONS
CONTENTS
TRIP COMPUTER
GENERAL INFORMATION
The Trip Computer displays information on car operation when
the key is turned to MAR. This function is composed by separate
trips, called “Trip A” and “Trip B” which can monitor the entire mis-
sion (journey) in a reciprocally independent manner.
Both trips can be reset (start of a new journey).
“Trip A” is used to display the figures relating to:
– Autonomy
– Distance travelled
– Average consumption
– Current consumption
– Average speed
– Travel time (driving time). With the function “Trip B” is possible to display the figures relating to:
– Distance travelled B
– Average consumption B
– Average speed B
– Journey time B (driving time).
“Trip B” may be turned off (see “Trip B on” paragraph). “Range”
and “Instant consumption” parameters cannot be reset.
Page 96 of 297
92
GETTING
TO KNOW
YOUR CAR
SAFETY
STARTING
AND DRIVING
IN AN
EMERGENCY
SERVICING AND
MAINTENANCE
TECHNICAL
SPECIFICATIONS
CONTENTS
ELECTRIC SUN ROOF
(for versions/markets, where provided)
The sun roof comprises two glass panels; the front one is mobile
and the rear one fixed. These are equipped with two sun blinds
(front and rear) that can be moved manually. With the sun roof
closed, the blinds can be placed in any position.
OPERATION
The sunroof can be operated only with the ignition key turned to
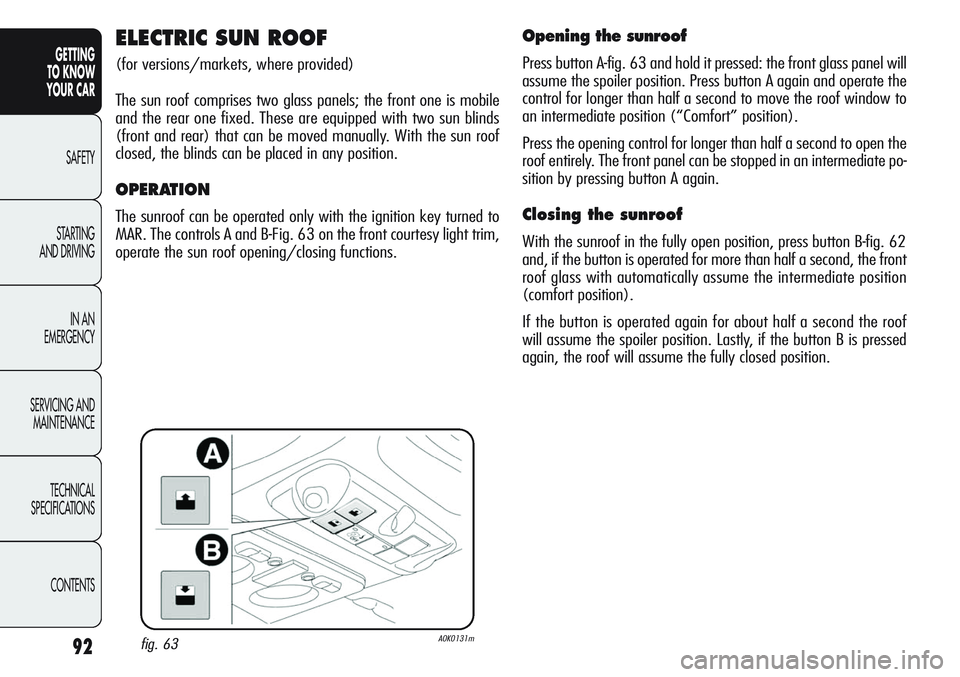
MAR. The controls A and B-Fig. 63 on the front courtesy light trim,
operate the sun roof opening/closing functions.
Opening the sunroof
Press button A-fig. 63 and hold it pressed: the front glass panel will
assume the spoiler position. Press button A again and operate the
control for longer than half a second to move the roof window to
an intermediate position (“Comfort” position).
Press the opening control for longer than half a second to open the
roof entirely. The front panel can be stopped in an intermediate po-
sition by pressing button A again.
Closing the sunroof
With the sunroof in the fully open position, press button B-fig. 62
and, if the button is operated for more than half a second, the front
roof glass with automatically assume the intermediate position
(comfort position).
If the button is operated again for about half a second the roof
will assume the spoiler position. Lastly, if the button B is pressed
again, the roof will assume the fully closed position.
fig. 63A0K0131m
Page 98 of 297
94
GETTING
TO KNOW
YOUR CAR
SAFETY
STARTING
AND DRIVING
IN AN
EMERGENCY
SERVICING AND
MAINTENANCE
TECHNICAL
SPECIFICATIONS
CONTENTS
MAINTENANCE/EMERGENCY
In case of emergency or maintenance the roof can be moved man-
ually when there is no power supply (opening/closing of the front
glass panel) by carrying out the following operations:
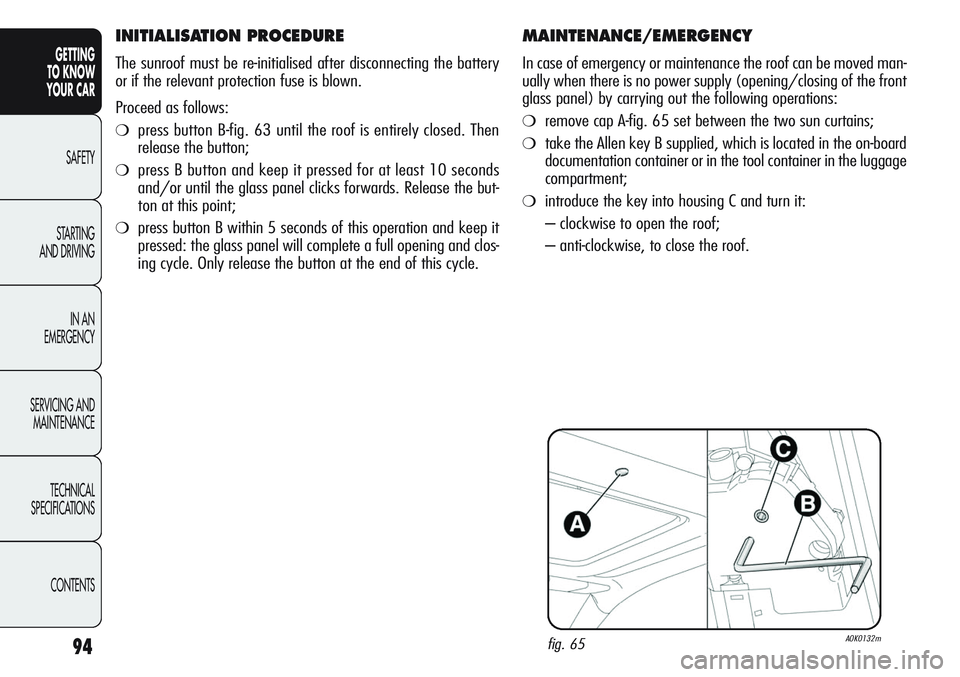
❍remove cap A-fig. 65 set between the two sun curtains;
❍take the Allen key B supplied, which is located in the on-board
documentation container or in the tool container in the luggage
compartment;
❍introduce the key into housing C and turn it:
– clockwise to open the roof;
– anti-clockwise, to close the roof.
fig. 65A0K0132m
INITIALISATION PROCEDURE
The sunroof must be re-initialised after disconnecting the battery
or if the relevant protection fuse is blown.
Proceed as follows:
❍press button B-fig. 63 until the roof is entirely closed. Then
release the button;
❍press B button and keep it pressed for at least 10 seconds
and/or until the glass panel clicks forwards. Release the but-
ton at this point;
❍press button B within 5 seconds of this operation and keep it
pressed: the glass panel will complete a full opening and clos-
ing cycle. Only release the button at the end of this cycle.
Page 132 of 297
128
GETTING
TO KNOW
YOUR CAR
SAFETY
STARTING
AND DRIVING
IN AN
EMERGENCY
SERVICING AND
MAINTENANCE
TECHNICAL
SPECIFICATIONS
CONTENTS
fig. 89A0K0115mfig. 90A0K0222m
FUEL FILLER CAP
The fuel cap is unlocked when the central locking system is released
and automatically locked when the central locking system is ap-
plied.
To open
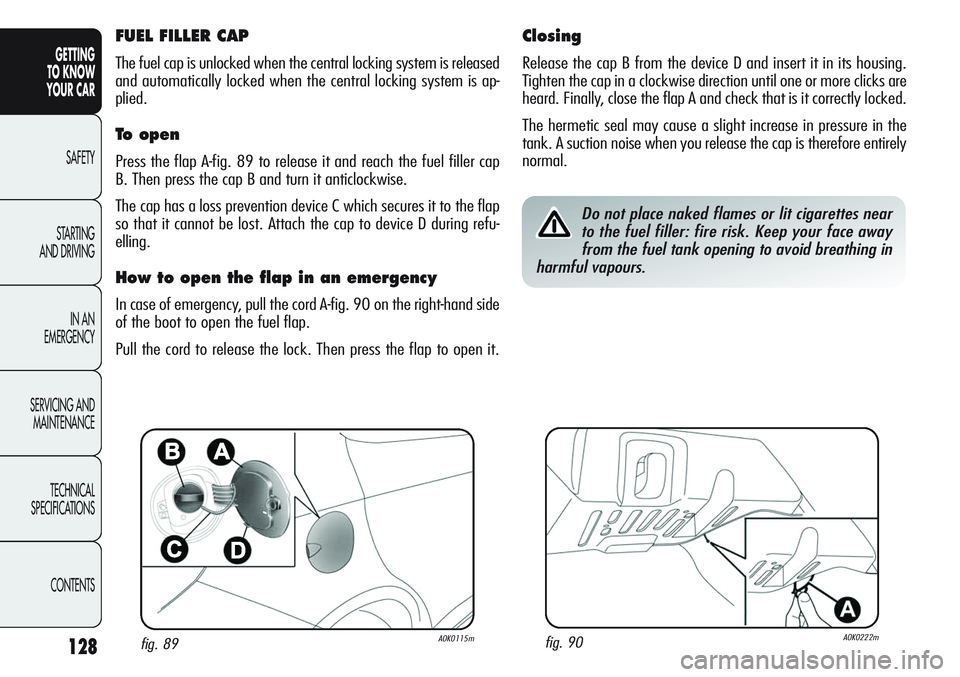
Press the flap A-fig. 89 to release it and reach the fuel filler cap
B. Then press the cap B and turn it anticlockwise.
The cap has a loss prevention device C which secures it to the flap
so that it cannot be lost. Attach the cap to device D during refu-
elling.
How to open the flap in an emergency
In case of emergency, pull the cord A-fig. 90 on the right-hand side
of the boot to open the fuel flap.
Pull the cord to release the lock. Then press the flap to open it.
Closing
Release the cap B from the device D and insert it in its housing.
Tighten the cap in a clockwise direction until one or more clicks are
heard. Finally, close the flap A and check that is it correctly locked.
The hermetic seal may cause a slight increase in pressure in the
tank. A suction noise when you release the cap is therefore entirely
normal.
Do not place naked flames or lit cigarettes near
to the fuel filler: fire risk. Keep your face away
from the fuel tank opening to avoid breathing in
harmful vapours.
Page 254 of 297
TECHNICAL SPECIFICATIONS
Maximum power: 4x30W
BASIC SYSTEM LEVEL
❍Standard level audio
Front speakers
– 2 tweeters (38 mm ø);
– 2 mid-woofer speakers (165 mm
ø).
Rear speakers
– 2 full-range speakers (165 mm ø).
❍Mid-range radio
(dual tuner)
MID-RANGE SYSTEM
❍Mid-range audio
Front speakers
– 2 tweeters (38 mm ø);
– 2 mid-woofer speakers (165 mm
ø).
Rear speakers
– 2 tweeters (38 mm ø);
– 2 mid-woofer speakers (165 mm
ø).
❍High-end radio
(dual tuner and double aerial)
BOSE HI-FI SYSTEM LEVEL
(for versions/markets,
where provided)
❍HI-FI level audio
Front speakers
– 2 tweeters (38 mm ø);
– 2 mid-woofer speakers (165 mm
ø).
– 1 mid-tweeter (Centerfill) speaker
fitted in the dashboard.
Rear speakers
– 2 tweeters (38 mm ø);
– 2 mid-woofer speakers (165 mm
ø),
– 1 amplifier (8 channels);
– 1 bass box.
❍High-end radio
(dual tuner and double aerial)The BOSE HI-FI audio system has been care-
fully designed to provide the best acoustic
performance and reproduce sound like a live
concert in all areas of the passenger com-
partment.
The system faithfully reproduces crystalline
high tones and provides full and rich bass
tones that make the loudness function su-
perfluous. The complete range of sound is
reproduced throughout the entire passenger
compartment so that the occupants are en-
veloped with the feeling of space experi-
enced when listening to live music.
The components used have been patented
and make use of the most sophisticated
technology whilst at the same time being
easy to use by even the most inexperienced
people.
SOUND SYSTEM
250
Page 276 of 297
C C
D D
P P
L L
A A
Y Y
E E
R R
INTRODUCTION
This chapter describes the variants regard-
ing the operation of the CD player: as far
as the operation of the radio is concerned,
refer to the description in the “Functions and
Adjustments” chapter.
SELECTING THE CD PLAYER
To activate the CD player built-into the equip-
ment, proceed as follows:
❍load a CD with the device switched on:
the first track will start to play;
or
❍if a CD has already been loaded, turn on
the car radio and then briefly press the
CD button to select the “CD” operating
mode: the last track listened to will start
to play.
It is advisable to use original CDs to ensure
optimum playback. If CD-R/RWs are used,
we recommend using good quality media
mastered at the slowest speed possible.
LOADING/EJECTING A CD
To load the CD, insert it gently into the slot
to activate the motorised loading system,
which will position it correctly.
The CD can be loaded with the radio
switched off and the ignition key in the MAR
position: in this case the radio will remain
off. When the car radio is turned on, the last
source listened to prior to switching off will
be activated.
When a CD is loaded the display will show
“CD-IN” and the words “CD Reading”. They
will remain displayed for the entire time re-
quired for the car radio to read the CD tracks.
When this time has elapsed the radio will
automatically start to play the first track. Press the
˚button with the car adio on to
activate the motorised ejection of the CD.
After ejection, the last audio source listened
to before playing the CD will be heard.
If the CD is not removed from the car ra-
dio, it will automatically be reloaded about
20 seconds later and the Tuner mode will
be tuned into (Radio).
The CD cannot be ejected if the car radio is
off.
If the ejected CD is loaded without having
removed it completely from the slot, the
radio will not switch to the CD source.
SOUND SYSTEM
272