blue and me Alfa Romeo Giulietta 2013 Owner handbook (in English)
[x] Cancel search | Manufacturer: ALFA ROMEO, Model Year: 2013, Model line: Giulietta, Model: Alfa Romeo Giulietta 2013Pages: 292, PDF Size: 13.06 MB
Page 19 of 292
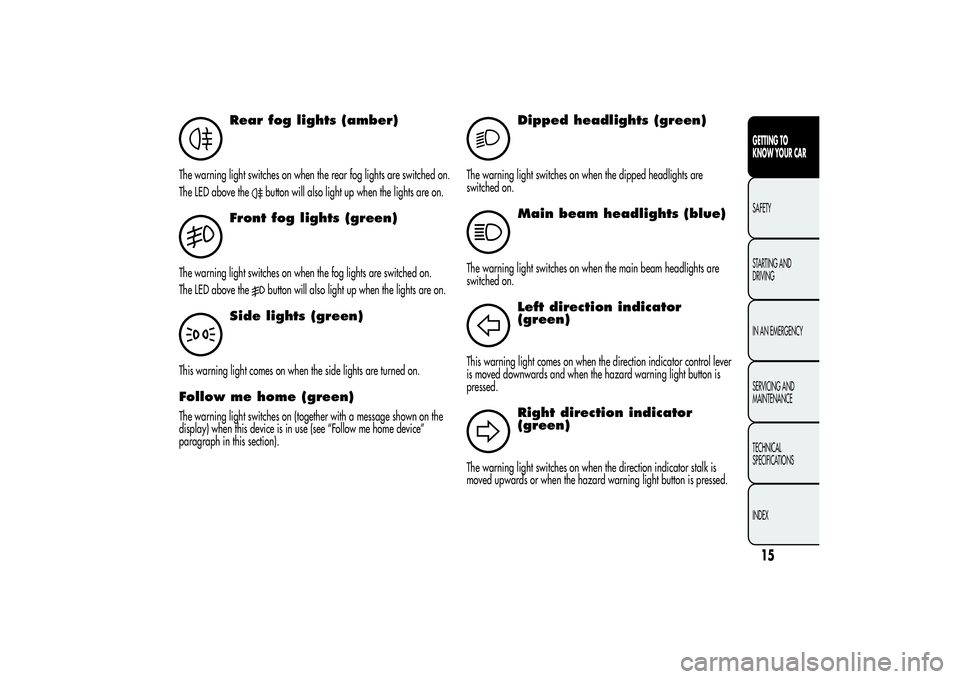
Rear fog lights (amber)
The warning light switches on when the rear fog lights are switched on.
The LED above the
button will also light up when the lights are on.
Front fog lights (green)
The warning light switches on when the fog lights are switched on.
The LED above the
button will also light up when the lights are on.
Side lights (green)
This warning light comes on when the side lights are turned on.Follow me home (green)The warning light switches on (together with a message shown on the
display) when this device is in use (see “Follow me home device”
paragraph in this section).
2
Dipped headlights (green)
The warning light switches on when the dipped headlights are
switched on.
Main beam headlights (blue)
The warning light switches on when the main beam headlights are
switched on.
Left direction indicator
(green)
This warning light comes on when the direction indicator control lever
is moved downwards and when the hazard warning light button is
pressed.
Right direction indicator
(green)
The warning light switches on when the direction indicator stalk is
moved upwards or when the hazard warning light button is pressed.
15GETTING TO
KNOW YOUR CARSAFETY
STARTING AND
DRIVING
IN AN EMERGENCY
SERVICING AND
MAINTENANCE
TECHNICAL
SPECIFICATIONS
INDEX
Page 55 of 292
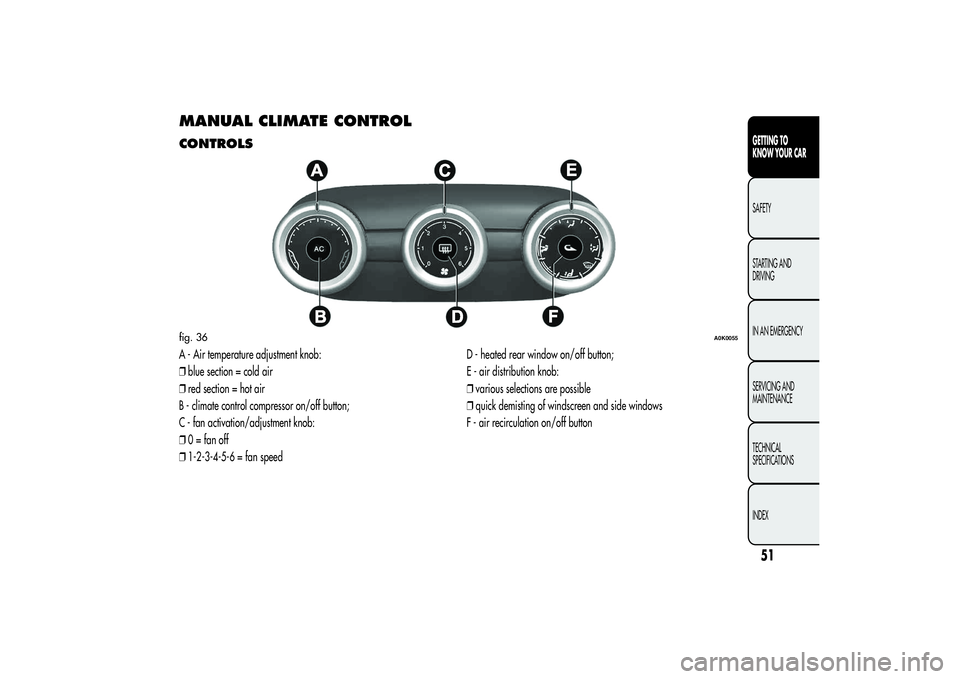
MANUAL CLIMATE CONTROLCONTROLSA - Air temperature adjustment knob:
❒blue section = cold air
❒red section = hot air
B - climate control compressor on/off button;
C - fan activation/adjustment knob:
❒0 = fan off
❒1-2-3-4-5-6 = fan speedD - heated rear window on/off button;
E - air distribution knob:
❒various selections are possible
❒quick demisting of windscreen and side windows
F - air recirculation on/off buttonfig. 36
A0K0055
51GETTING TO
KNOW YOUR CARSAFETY
STARTING AND
DRIVING
IN AN EMERGENCY
SERVICING AND
MAINTENANCE
TECHNICAL
SPECIFICATIONS
INDEX
Page 56 of 292
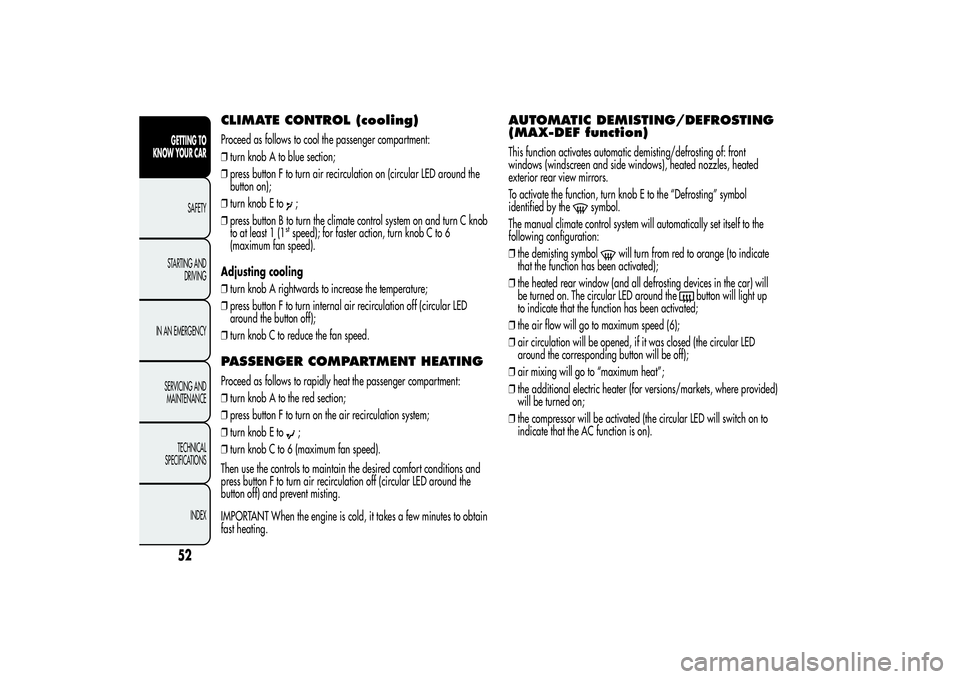
CLIMATE CONTROL (cooling)Proceed as follows to cool the passenger compartment:
❒turn knob A to blue section;
❒press button F to turn air recirculation on (circular LED around the
button on);
❒turn knob E to
;
❒press button B to turn the climate control system on and turn C knob
to at least 1 (1stspeed); for faster action, turn knob C to 6
(maximum fan speed).
Adjusting cooling
❒turn knob A rightwards to increase the temperature;
❒press button F to turn internal air recirculation off (circular LED
around the button off);
❒turn knob C to reduce the fan speed.
PASSENGER COMPARTMENT HEATINGProceed as follows to rapidly heat the passenger compartment:
❒turn knob A to the red section;
❒press button F to turn on the air recirculation system;
❒turn knob E to
;
❒turn knob C to 6 (maximum fan speed).
Then use the controls to maintain the desired comfort conditions and
press button F to turn air recirculation off (circular LED around the
button off) and prevent misting.
IMPORTANT When the engine is cold, it takes a few minutes to obtain
fast heating.
AUTOMATIC DEMISTING/DEFROSTING
(MAX-DEF function)This function activates automatic demisting/defrosting of: front
windows (windscreen and side windows), heated nozzles, heated
exterior rear view mirrors.
To activate the function, turn knob E to the “Defrosting” symbol
identified by the
symbol.
The manual climate control system will automatically set itself to the
following configuration:
❒the demisting symbol
will turn from red to orange (to indicate
that the function has been activated);
❒the heated rear window (and all defrosting devices in the car) will
be turned on. The circular LED around the
button will light up
to indicate that the function has been activated;
❒the air flow will go to maximum speed (6);
❒air circulation will be opened, if it was closed (the circular LED
around the corresponding button will be off);
❒air mixing will go to “maximum heat”;
❒the additional electric heater (for versions/markets, where provided)
will be turned on;
❒the compressor will be activated (the circular LED will switch on to
indicate that the AC function is on).
52GETTING TO
KNOW YOUR CAR
SAFETY
STARTING AND
DRIVING
IN AN EMERGENCY
SERVICING AND
MAINTENANCE
TECHNICAL
SPECIFICATIONS
INDEX
Page 112 of 292
PREPARATION TO INSTALL A
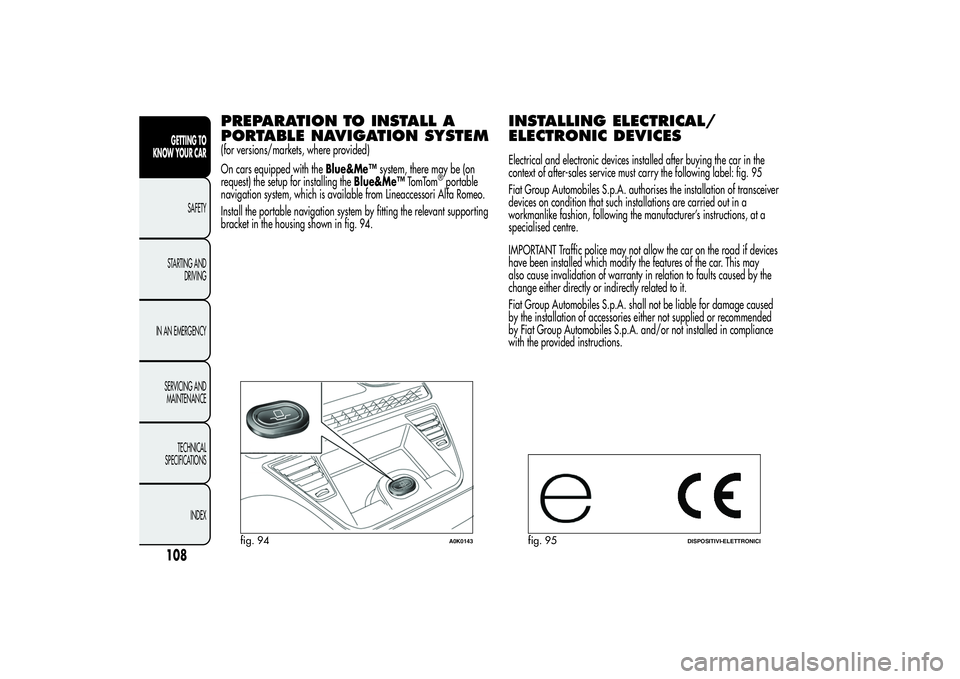
PORTABLE NAVIGATION SYSTEM(for versions/markets, where provided)
On cars equipped with theBlue&Me™system, there may be (on
request) the setup for installing theBlue&Me™TomTom
®portable
navigation system, which is available from Lineaccessori Alfa Romeo.
Install the portable navigation system by fitting the relevant supporting
bracket in the housing shown in fig. 94.
INSTALLING ELECTRICAL/
ELECTRONIC DEVICESElectrical and electronic devices installed after buying the car in the
context of after-sales service must carry the following label: fig. 95
Fiat Group Automobiles S.p.A. authorises the installation of transceiver
devices on condition that such installations are carried out in a
workmanlike fashion, following the manufacturer’s instructions, at a
specialised centre.
IMPORTANT Traffic police may not allow the car on the road if devices
have been installed which modify the features of the car. This may
also cause invalidation of warranty in relation to faults caused by the
change either directly or indirectly related to it.
Fiat Group Automobiles S.p.A. shall not be liable for damage caused
by the installation of accessories either not supplied or recommended
by Fiat Group Automobiles S.p.A. and/or not installed in compliance
with the provided instructions.
fig. 94
A0K0143
fig. 95
DISPOSITIVI-ELETTRONICI
108GETTING TO
KNOW YOUR CAR
SAFETY
STARTING AND
DRIVING
IN AN EMERGENCY
SERVICING AND
MAINTENANCE
TECHNICAL
SPECIFICATIONS
INDEX
Page 243 of 292
TABLE OF CONTENTS
INTRODUCTION ........................................................................... 241
ADVICE ..................................................................................... 241
TECHNICAL CHARACTERISTICS ................................................... 242
BASIC LEVEL SYSTEM.................................................................. 243
MEDIUM LEVEL SYSTEM .............................................................. 243
BOSE HI-FI LEVEL SYSTEM ........................................................... 243
QUICK GUIDE............................................................................... 244
GENERAL FUNCTIONS ............................................................... 245
RADIO FUNCTIONS ................................................................... 246
CD FUNCTIONS ......................................................................... 246
Media Player FUNCTIONS (only withBlue&Me™) .................... 246
STEERING WHEEL CONTROLS ...................................................... 247
GENERAL INFORMATION ............................................................. 248
FUNCTIONS AND ADJUSTMENTS ................................................. 250
SWITCHING ON THE RADIO ...................................................... 250
SWITCHING OFF THE RADIO ...................................................... 250
SELECTING THE RADIO FUNCTIONS ........................................... 250
SELECTING CD FUNCTION ......................................................... 250
AUDIO SOURCE MEMORY FUNCTION ....................................... 250
VOLUME ADJUSTMENT .............................................................. 250
MUTE/PAUSE FUNCTION (zeroing the volume) ........................... 251
AUDIO SETTINGS....................................................................... 251
TONE ADJUSTMENT (bass/treble) ............................................... 252
BALANCE ADJUSTMENT ............................................................. 252
FADER ADJUSTMENT .................................................................. 252
LOUDNESS FUNCTION .............................................................. 252
EQ FUNCTION .......................................................................... 253
USER EQ SETTINGS FUNCTION ................................................. 253
MENU ....................................................................................... 254
AF SWITCHING function ............................................................ 254TRAFFIC INFORMATION function ................................................ 255
REGIONAL MODE function ........................................................ 256
MP3 DISPLAY function ................................................................ 256
SPEED VOLUME function ............................................................ 257
RADIO ON VOLUME function ..................................................... 257
AUX OFFSET function ................................................................. 258
RADIO OFF function .................................................................. 258
SYSTEM RESET function ............................................................... 258
PHONE FUNCTION .................................................................... 259
ANTI-THEFT PROTECTION ........................................................... 259
RADIO (TUNER) ............................................................................ 261
INTRODUCTION......................................................................... 261
FREQUENCY BAND SELECTION.................................................. 261
PRESET BUTTONS ....................................................................... 261
STORING THE LAST STATION LISTENED TO.................................. 262
AUTOMATIC TUNING................................................................. 262
MANUAL TUNING ..................................................................... 262
AUTOSTORE FUNCTION ........................................................... 262
EMERGENCY ALARM RECEPTION ............................................... 263
EON FUNCTION (Enhanced Other Network) ................................ 264
STEREOPHONIC BROADCASTERS ............................................... 264
CD PLAYER ................................................................................... 264
INTRODUCTION......................................................................... 264
SELECTING THE CD PLAYER ........................................................ 264
LOADING/EJECTING A CD ........................................................ 265
DISPLAY INFORMATION ............................................................. 265
TRACK SELECTION (forward/back) ............................................. 266
TRACK FAST FORWARD/REWIND ............................................... 266
PAUSE FUNCTION...................................................................... 266
MP3 CD PLAYER ............................................................................ 267
239SOUND-SYSTEM
Page 251 of 292
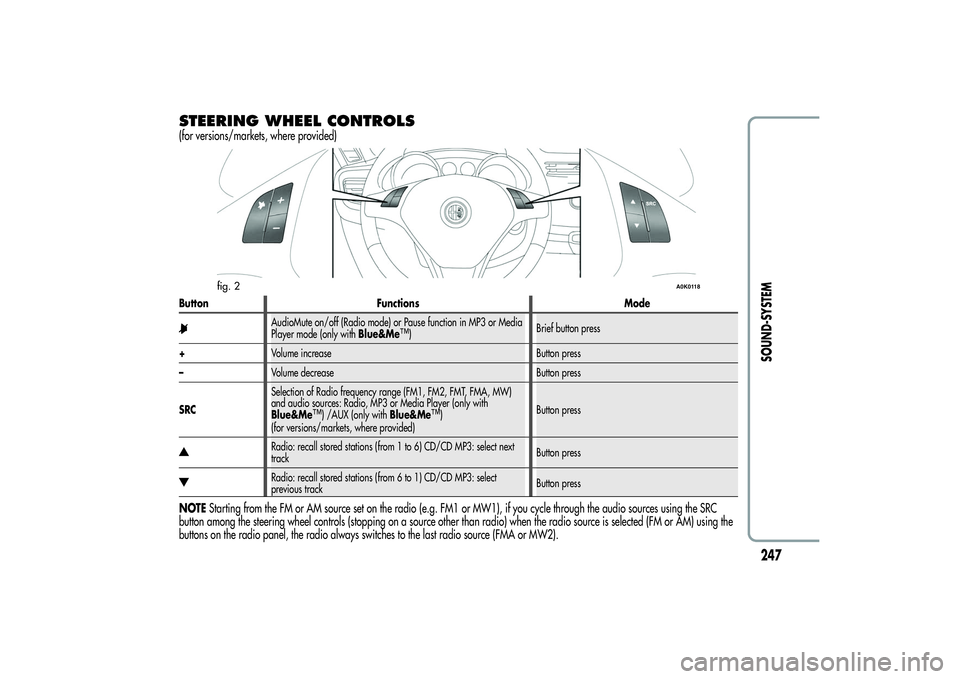
STEERING WHEEL CONTROLS(for versions/markets, where provided)Button Functions Mode
AudioMute on/off (Radio mode) or Pause function in MP3 or Media
Player mode (only withBlue&Me
™)Brief button press
+Volume increase Button press
–Volume decrease Button press
SRCSelection of Radio frequency range (FM1, FM2, FMT, FMA, MW)
and audio sources: Radio, MP3 or Media Player (only with
Blue&Me
™) /AUX (only withBlue&Me
™)
(for versions/markets, where provided)Button press
Radio: recall stored stations (from 1 to 6) CD/CD MP3: select next
trackButton pressRadio: recall stored stations (from 6 to 1) CD/CD MP3: select
previous trackButton press
NOTEStarting from the FM or AM source set on the radio (e.g. FM1 or MW1), if you cycle through the audio sources using the SRC
button among the steering wheel controls (stopping on a source other than radio) when the radio source is selected (FM or AM) using the
buttons on the radio panel, the radio always switches to the last radio source (FMA or MW2).
fig. 2
A0K0118
247SOUND-SYSTEM
Page 253 of 292
MP3 CD section
❒MP3-Info function (ID3-TAG);
❒Folder selection (previous/next);
❒Track selection (forward/back);
❒Fast advance (forward/back) through tracks;
❒MP3 Display function: display of name of folder, ID3-TAG
information, time elapsed since the start of the track, name of the
file);
❒Playing of audio or data CDs, CD-Rs and CD-RWs.
Audio section
❒Mute/Pause function;
❒Soft-Mute function;
❒Loudness function (excluding versions with Bose HI-FI system);
❒7-band graphic equaliser (excluding versions with Bose HI-FI
system);
❒Separate bass/treble adjustment;
❒Right/left channel balance.Media Player section (only with Blue&Me™)
For the Media Player functions see theBlue&Me™ supplement.
AUX section (only with Blue&Me™)
(for versions/markets, where provided)
❒AUX source selection;
❒AUX Offset function: alignment of the portable device volume
with that of the other sources;
❒Portable player playback.
249SOUND-SYSTEM
Page 255 of 292
MUTE/PAUSE FUNCTION
(zeroing the volume)Press the MUTE button briefly to activate the MUTE function. The
volume will gradually decrease and the words “RADIO Mute” (in
radio mode) or “PAUSE” (in CD mode) will be displayed.
Press the Mute button again to deactivate the MUTE function. The
volume will gradually increase until it reaches the level set
previously.
When the volume level is changed using the dedicated controls, the
Mute function is deactivated and the volume is adjusted to the new
level selected.
With the Mute function activated, it will be ignored when there is
an incoming traffic alert (if the TA function is activated), or if an
emergency alarm is received. The function will be reactivated when
the alert is over.
AUDIO SETTINGSThe functions in the audio menu differ according to the active
source: AM/FM/CD/Media Player (only withBlue&Me™) /AUX
(only withBlue&Me™) (for versions/markets, where provided).
Press the
button briefly to change the Audio functions.
After thebutton is first pressed, the display will show the bass
level value for the source activated at that time (e.g. in FM mode
the display will show the wording “FM Bass + 2”).
Use theor
buttons to scroll through the menu functions. To
change the setting of the function selected use the
or
buttons.
The current status of the function selected will be shown on the
display.
The functions managed by the Menu are:
❒BASS (adjustment of bass tones);
❒TREBLE (adjustment of high tones);
❒BALANCE (right/left balance adjustment);
❒FADER (front/back balance adjustment);
❒LOUDNESS (excluding versions with Bose HI-FI system)
(activation/deactivation of LOUDNESS function);
❒EQUALIZER (excluding versions with Bose HI-FI system)
(activation and selection of factory equalizer settings);
❒USER EQUALISER (excluding versions with Bose HI-FI system)
(personalised equaliser settings).
251SOUND-SYSTEM
Page 263 of 292
PHONE FUNCTION(telephone volume adjustment)
(only with Blue&Me™ system)
When a phone call is received, the audio passes to the car’s audio
system through the radio.
The telephone audio always arrives at a preset volume, but it is
possible to adjust it during a conversation using the left knobA
(fig. 1).
If, while using theBlue&Me™, the phone call volume is changed,
it is shown on the radio display, memorised and kept for all
following phone calls until the engine is switched off.
With the RADIO ON VOLUME function active, when the engine is
started again:
❒if the radio was switched off with aBlue&Me™ volume lower
than 12, theBlue&Me™ volume will be set to 12 automatically
for the next phone call;
❒if the radio was switched off with aBlue&Me™ volume higher
than 25, theBlue&Me™ volume will be set to 25 automatically
for the next phone call;
❒if the radio was switched off with aBlue&Me™ volume
between 12 and 25, theBlue&Me™ volume for the next
phone call will be that set previously by the user.
If, on the other hand, the RADIO ON VOLUME function is
deactivated, the radio keeps the last setting.
ANTI-THEFT PROTECTIONThe radio is equipped with an anti-theft protection system based on
the exchange of information between the radio and the electronic
control unit (Body Computer) on the car.
This system guarantees maximum safety and avoids the entry of
the secret code each time the radio power supply is disconnected.
If the check has a positive outcome, the radio will start to function,
whereas if the comparison codes are not the same or if the
electronic control unit (Body Computer) is replaced, the device will
ask the user to enter the secret code according to the procedure
described in the paragraph below.
Entering the secret code
When the radio is switched on, if the code is requested, the display
will show “Radio code” for about 2 seconds followed by four
dashes “----”.
The code is made up of four numbers from 1 to 6, each
corresponding to one of the dashes.
To enter the first digit of the code, press the corresponding button
of the pre-selected stations (from 1 to 6). Enter the other code
numbers in the same way.
If the four digits are not entered within 20 seconds, the display will
show “Enter code----”.Ifthisoccurs, it is not considered an
incorrect code entry.
After entering the fourth digit (within 20 seconds), the radio will
start to operate.
259SOUND-SYSTEM
Page 265 of 292
RADIO (TUNER)INTRODUCTIONWhen the radio is switched on, the last function selected before it
was switched off is activated: Radio, CD, CD MP3 or Media Player
(only withBlue&Me™) or AUX (only withBlue&Me™) (for
versions/markets, where provided).
To select the Radio function when another audio source is being
listened to, briefly press the FM AS or AM buttons depending on
the desired band.
Once the Radio mode has been activated, the display will show the
name (RDS stations only) and the frequency of the selected radio
station, the frequency band selected (e.g. FM1) and the preselect
button number (e.g. P1).
FREQUENCY BAND SELECTIONWith the Radio mode active, press the FM AS or AM button briefly
and repeatedly to select the desired reception band.
Each time the button is pressed the following bands are selected
cyclically:
❒By pressing the FM AS button: “FM1”, “FM2” or “FMA”;
❒By pressing the AM button: “MW1, MW2”.
Each band is highlighted by the name in the display. The last
station selected on the respective frequency band will be tuned
into.
The FM band is divided into sections: FM1, FM2 or “FMA”; the
FMA reception band is reserved for broadcasters stored
automatically using the AutoSTore function.PRESET BUTTONSThe buttons numbered from 1 to 6 are used to set the following
preset stations:
❒18 in the FM band (6 in FM1, 6 in FM2, 6 in FMT or “FMA” (on
some versions));
❒12 in the MW band (6 in MW1, 6 in MW2).
To listen to a preset station, select the desired frequency band and
then briefly press the corresponding preset button (from 1 to 6).
By pressing the preset button for more than 2 seconds, the current
station will be stored.
The storing phase is confirmed by an acoustic signal.
261SOUND-SYSTEM