battery ASTON MARTIN DB7 1997 Repair Manual
[x] Cancel search | Manufacturer: ASTON MARTIN, Model Year: 1997, Model line: DB7, Model: ASTON MARTIN DB7 1997Pages: 421, PDF Size: 9.31 MB
Page 370 of 421
^^
The Aston Martin Lagonda Diagnostic System
Installation Instructions
Step 16
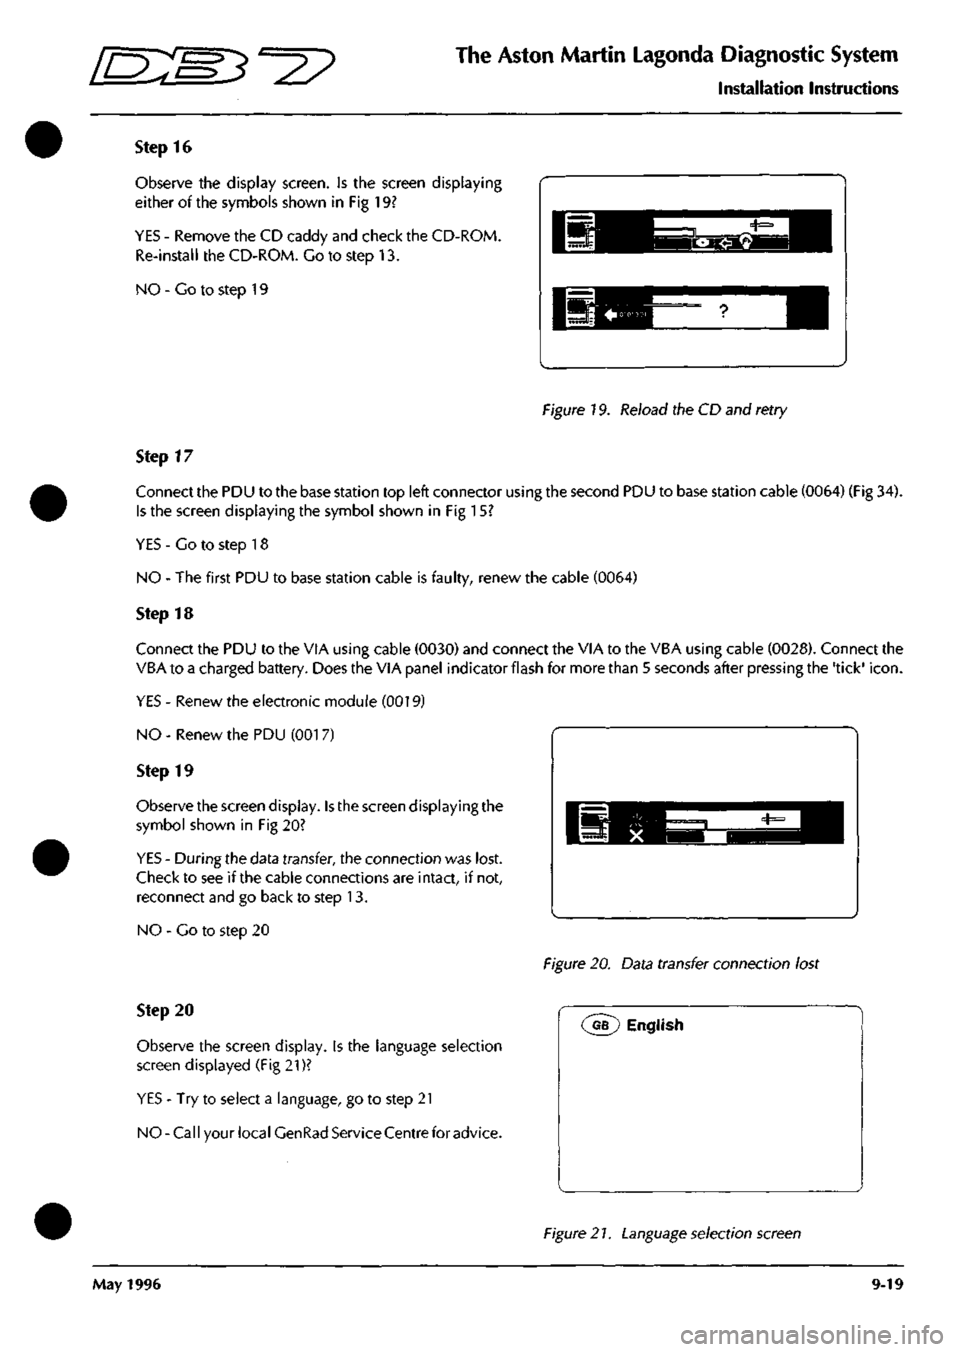
Observe the display screen. Is the screen displaying
either of the symbols shown in Fig 19?
YES - Remove the CD caddy and check the CD-ROM.
Re-install the CD-ROM. Go to step 13.
NO - Co to step 19
Figure 19. Reload the CD and retry
Step 17
Connect the PDU to the base station top left connector using the second PDU to base station cable (0064) (Fig 34).
Is the screen displaying the symbol shown in Fig 15?
YES - Go to step 18
NO - The first PDU to base station cable is faulty, renew the cable (0064)
Step 18
Connect the PDU to the VIA using cable (0030) and connect the VIA to the VBA using cable (0028). Connect the
VBA to a charged battery. Does the VIA panel indicator flash for more than 5 seconds after pressing the 'tick'
icon.
YES - Renew the electronic module (0019)
NO - Renew the PDU (001 7)
Step 19
Observe the screen display. Is the screen displaying the
symbol shown in Fig 20?
YES - During the data transfer, the connection was lost.
Check to see if the cable connections are intact, if not,
reconnect and go back to step 13.
NO - Go to step 20
Figure 20. Data transfer connection lost
Step 20
Observe the screen display, is the language selection
screen displayed (Fig 21)?
YES - Try to select a language, go to step 21
NO-Call your local GenRad Service Centre for advice.
(^G?) English
Figure 2
7.
Language selection screen
May 1996 9-19
Page 373 of 421
The Aston Martin Lagonda Diagnostic System
Installation Instructions ^=2?
Warranty
The Aston Martin Diagnostic System is covered by a one year warranty. Should any of the electrical components
fail during the warranty period, contact your local GenRad Service Centre for a replacement part. Note that the
warranty does not include physical damage.
Spare Parts
Refer to the Aston Martin Diagnostic System Users Guide for a full parts list. All spare parts should be obtained from
your local GenRad Service Centre who can advise you on current prices.
Servicing and Maintenance
CA UTION: With the exception of those parts listed in this section, there are no user serviceable parts within the
system. All servicing must be carried out by GenRad Service Centres.
Battery Testing.
The NICAD batteries fitted in the PDU are designed to be rechargeable and should normally last through many
recharge cycles. Battery life of three to five years can be expected. The capacity of new batteries improves after
several charging cycles. After extended use, they may require renewing. The following procedure will assist you to
determine when renewal is required. Do not use this procedure with new batteries or with a new PDU.
Testing Procedure
1.
Remove all cables from the PDU.
2.
Switch the PDU on and leave it until it switches off (the power on indicator will extinguish)
3. Connect the PDU to the base station for at least 12 hours charging.
4.
Remove all cables from the PDU, switch on the PDU and start timing.
5. If the PDU switches off in less than 30 minutes, the batteries should be renewed.
Changing the Battery Pack
CAUTION: Always read and follow safety warnings and instructions printed on the equipment. The rechargeable
NICAD batteries fitted to the PDU are of a special type. They must only be substituted by GenRad approved parts.
Do not substitute the batteries with any other type. Always dispose of old batteries in compliance with local
recycling regulations.
Battery Changing Procedure
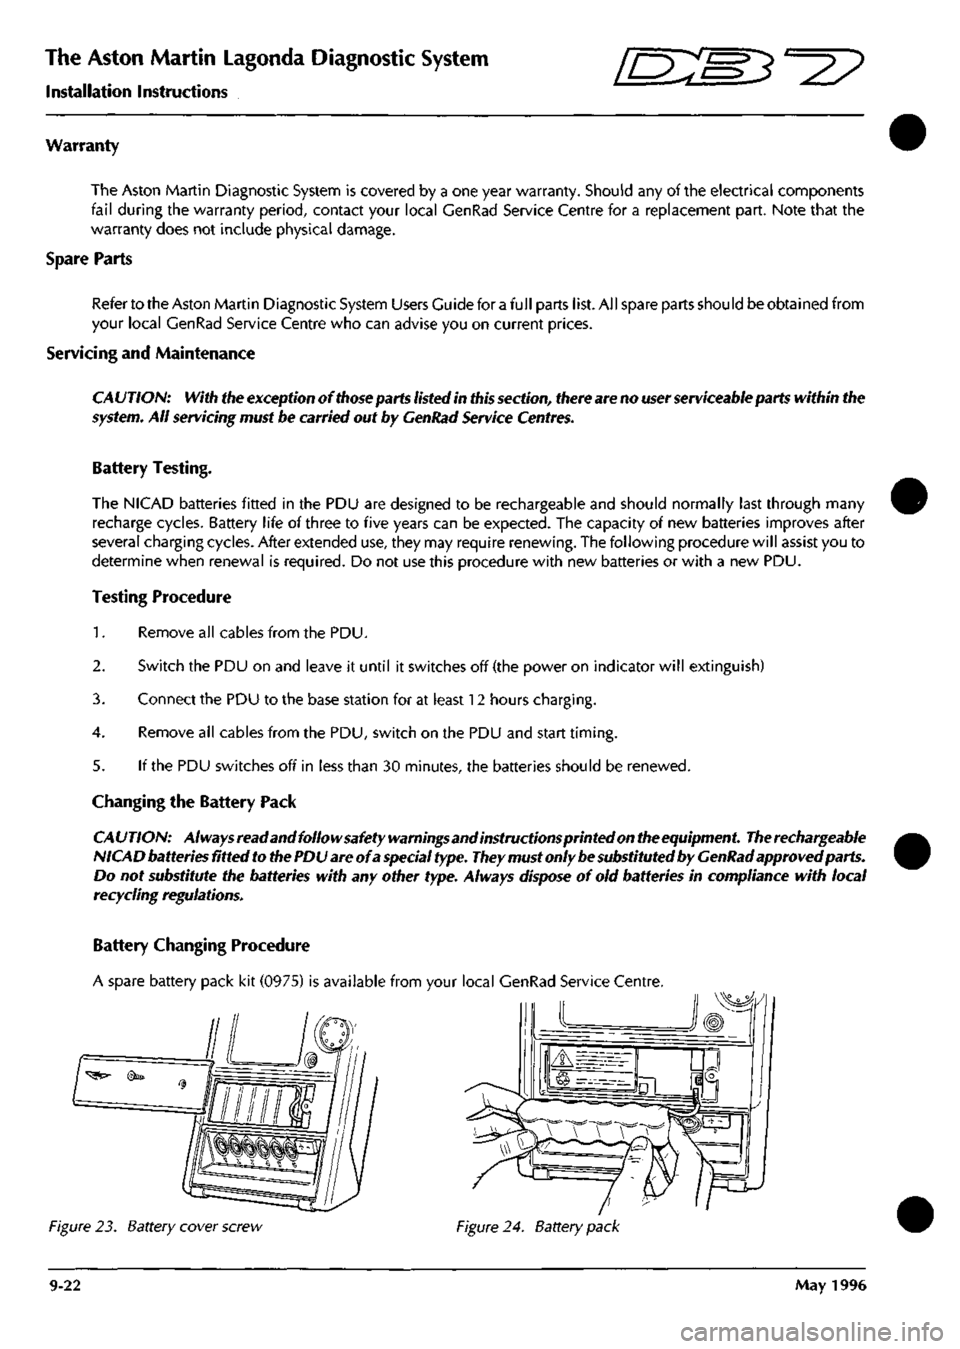
A spare battery pack kit (0975) is available from your local GenRad Service Centre.
Figure 23. Battery cover screw Figure 24. Battery pack
9-22 May 1996
Page 374 of 421
^?
The Aston Martin Lagonda Diagnostic System
Installation Instructions
1.
Switch off the PDU and remove all cables.
2.
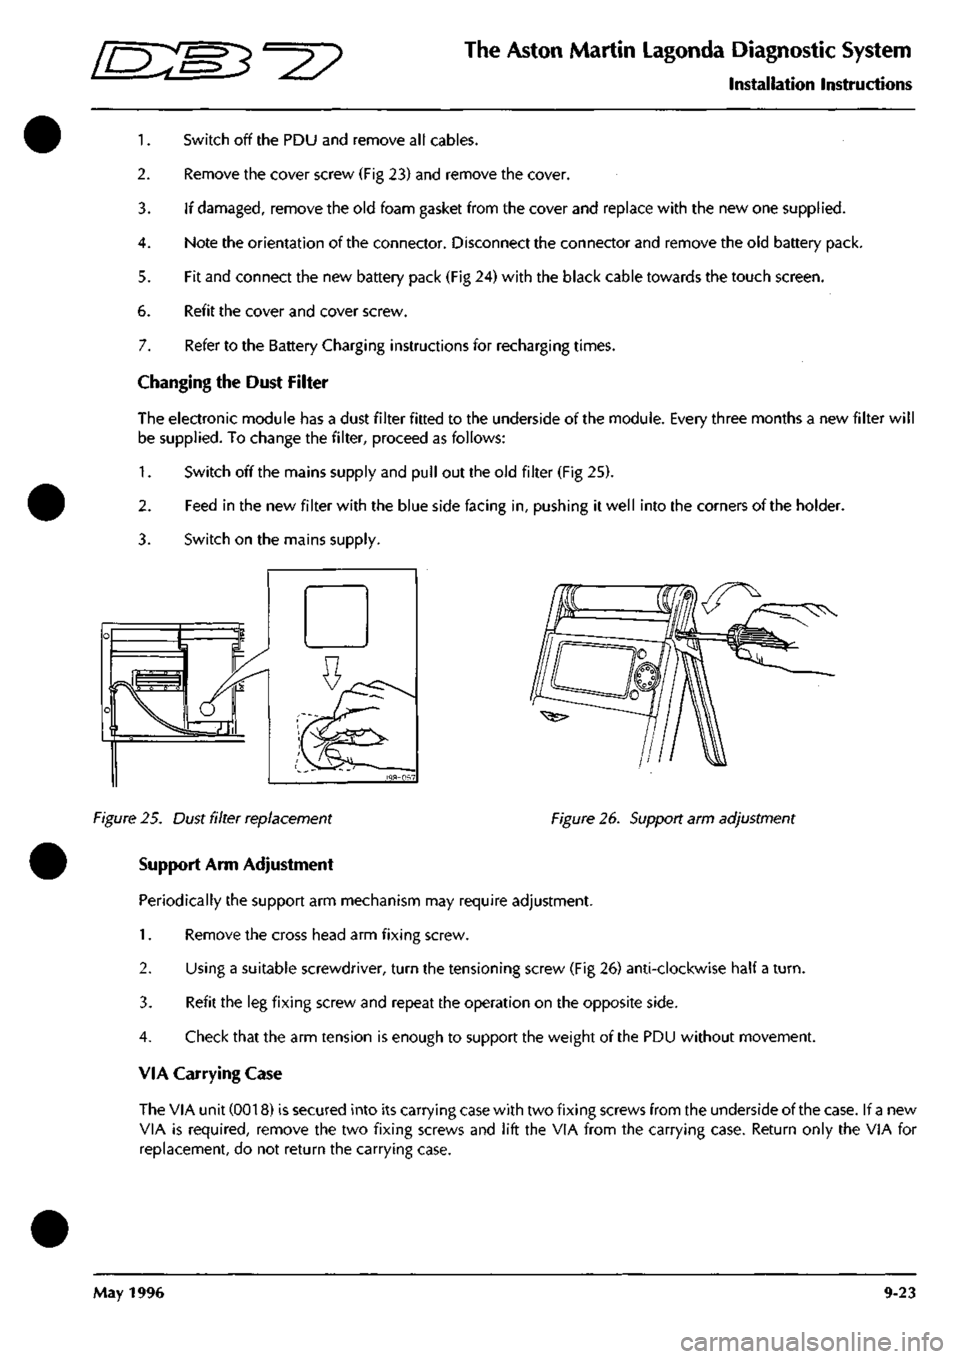
Remove the cover screw (Fig 23) and remove the cover.
3. If damaged, remove the old foam gasket from the cover and replace with the new one supplied.
4.
Note the orientation of the connector. Disconnect the connector and remove the old battery pack.
5. Fit and connect the new battery pack (Fig 24) with the black cable towards the touch screen.
6. Refit the cover and cover screw.
7. Refer to the Battery Charging instructions for recharging times.
Changing the Dust Filter
The electronic module has a dust filter fitted to the underside of the module. Every three months a new filter wil
be supplied. To change the filter, proceed as follows:
1.
Switch off the mains supply and pull out the old filter (Fig 25).
2.
Feed in the new filter with the blue side facing in, pushing it well into the corners of the holder.
3. Switch on the mains supply.
Figure 25. Dust filter replacement Figure 26. Support arm adjustment
Support Arm Adjustment
Periodically the support arm mechanism may require adjustment.
1.
Remove the cross head arm fixing screw.
2.
Using a suitable screwdriver, turn the tensioning screw (Fig 26) anti-clockwise half a
turn.
3. Refit the leg fixing screw and repeat the operation on the opposite side.
4.
Check that the arm tension is enough to support the weight of the PDU without movement.
VIA Carrying Case
The VIA unit (0018) is secured into its carrying case with two fixing screws from the underside of the case. If a new
VIA is required, remove the two fixing screws and lift the VIA from the carrying case. Return only the VIA for
replacement, do not return the carrying case.
May 1996 9-23
Page 379 of 421
The Aston Martin Lagonda Diagnostic System
Users Guide o: "3^^?
PDU Functions
The PDU main menu provides access into the following functions:
Diagnostics
Training
Digital Multimeter
User Self Test
Diagnostics
On selecting'Diagnostics'from the main
menu,
the user will be prompted to enter the features and market specification
of the vehicle to be tested. Use of the diagnostics in each of the above areas is described later in this guide.
Diagnostics Menu - 95 Model Year
Engine
Anti-Lock Braking System
Vlenu - 97 Model Year
Engine Diagnostics
OBD II Scan Tool
Airbag
Seat Belt Pretensioner
•
•
•
•
Transmission
Engine Datalogger
Climate Control
PATS System
Climate Control
Transmission
Anti-Lock Braking System
Security
Digital Multimeter
The Digital Multimeter function provides the capabilityto measure voltage, current, resistance, frequency, pulse width,
pulse period, and duty cycle. These measurements are usually made using the PDU measurement probes. Measurements
may also be made using the module pin selection function on the Teves Mk
II
braking system and on the Air Conditioning
system.
Training
An on-screen programme is provided to train new users in the use of screen icons and in the use of the digital multi
meter and datalogger functions.
User Self Test
In order to prove that the equpment is functioning correctly, a complete user self test is incorporated. The user is directed
to test the PDU and then to progressively connect each part of the PDU system which will be tested by the software.
Any fault identified during the test is notified to the user. If no faults are identified, the user is advised on the correct
functioning of the system.
PDU Power
Power for the PDU is supplied via an internal rechargeable battery pack which can keep the PDU operational for
approximately one hour when disconnected from the base station and the vehicle. In order to preserve PDU battery
charge, power to the screen backlight is automatically cut after five minutes of inactivity. The power ON indicator
remains lit, indicating that the PDU is in 'stand-by' mode. One touch of the screen will restore backlight power.
When connected to the base station, power is supplied to the PDU from the Electronic Module to recharge the PDU
battery pack as necessary.
On 95 MY vehicles, the Vehicle Battery Adaptor (VBA) is used to maintain PDU power.
On 97 MY vehicles, when connected via the MPA to either diagnostic socket on the vehicle, power is supplied via pin
4 (chassis ground) and pin 16 (battery power) to maintain PDU power at all times even when the vehicle ignition is
switched off.
On all model years, when connected to the air conditioning system using the VIA, the vehicle battery adaptor (VBA)
must also be used to maintain PDU power.
9-28 September 1996
Page 380 of 421
^=2?
The Aston Martin Lagonda Diagnostic System
Users Guide
Software
Software for the PDU system is supplied on CD ROM
discs and supports diagnosis on the following control
units:
Zytek Engine Management System (95 MY)
EEC-V Engine Management System (97 MY)
CM 4L80-E Transmission Controller
PATS - Passive Anti Theft System
Teves Mk II ABS System (95 MY)
Teves Mk IV ABS System (97 MY)
Valeo Air Conditioning System
PMC Airbag System
Megamoss Security System
Autoliv Drivers Seat Belt Pretensioner
(where fitted)
All of these systems are supported in English, French,
Italian,
German and Japanese.
In addition to the specific system software listed above,
thePDU isalsoequipped with general purpose software
to provides multimeter, printing and PDU training
options.
Software for 95 and 97 Model Year Vehicles
Software for both the 95 and 97 model year vehicles is
provided.
The PDU system requires a Vehicle Interface Adaptor
(VIA) to communicate with the control units of 95
model year vehicles.
Communication with 97 model year control units is
principally via an Aston Martin multi-protocol adaptor
to 2 inbuilt diagnostic sockets in the vehicle. Only the
air conditioning unit requires the VIA on 97 model year
vehicles.
If the multimeter function is used, the Vehicle Battery
Adaptor (VBA) will be required to provide the basic
supply and ground levels for the multimeter.
Software Loading and Selection
Ensure that the system is powered up and that the PDU is
correctly connected to the base station. Check and if
necessary load the DB7 software CD Revision 002. (see
the installation guide)
Switch 'on' the PDU which will run through two front
screens and then load the following initial PDU software.
Operating System
Main Menu
Selector
Digital Multimeter
Interactive Training
September 1996 9-29
Page 387 of 421
The Aston Martin Lagonda Diagnostic System
Users Guide ffi:S5'=2?
Engine Datalogger
The datalogger software is designed to aid the technician in identifying permanent or intermittent faults in the DB7's
electrical and electronic systems. It can provide a recorded view of selected signals over a chosen time period. This
recording may be captured in a static, rolling road or road test situation. Data recorded during such tests may then be
analysed on completion of the test or printed out for later analysis.
Datalogger operation is described using a fully worked example at the end of this PDU Users Guide.
The full list of datalogger signal names and descriptions is provided in the DB7 OBDII Diagnostic Manual and on the PDU
screen.
The following list is a summary of the PCM signals which may be monitored.
Signal Description
ACCS Air-Con Control Switch - 1 = A/C On
ACP Air-Con Pressure Sensor - 1 = A/C pressure high
ACT MAX Maximum Intake Air Temperature signal during normal running
Adap Fuel 1 Current Adaptive Fuel Correction - (% of range)
Adap Fuel 2 Current Adaptive Fuel Correction - (% of range)
ADPT1F Adaptive Fuel - Table 1 failure mode
ADPT2F Adaptive Fuel - Table 2 failure mode
AIR Air Pump On/Off - 1 = Pump On
AIRM Air Pump Monitor -1 =
high,
pump on
B+ Battery Positive - Volts
BARO Barometric Pressure
CID Cylinder Identification - Cam sensor status
CMP STAT Cam Position Sensor -1 = CID mis, not currently reliable
DRVCNT Number of OBDll Drive Cycles Completed
DSDRPM Desired engine speed (RPM)
DTCCNT Diagnostic Trouiale Codes Count (Fault codes + pending codes. MIL and non-MIL)
ECT MAX Maximum Engine Coolant Temperature signal during normal running
ECT STAT Engine Coolant Temperature - in or out of range
ECT-C Engine Coolant Temperature - "C or raw counts
ECT-V Engine Coolant Temperature - Volts or raw counts
EGR STAT EVP EGR sensor failure
ENGLOAD Engine Load (Ratio of air charge over standard)
ENGRPM Engine Speed - RPM
EPT DPFE Sensor feedback
EVAP DC Cannister Purge Duty Cycle (% on)
EVAPCVA Vapour Management Valve (VMV) fault detected
Evts HI Cumulative cylinder events total carried over from previous background logic executions
Evts LO Cumulative cylinder events total carried over from previous background logic executions
FPM Fuel Pump Monitor - 0 = pump off, 1 = pump on
FPUMP DC Desired Fuel Pump Duty Cycle - 0% or 100%
H02S12 Sensor Output - Volts
H02S21 Sensor Output - Volts
H02S22 Sensor Output - Volts
H02S1I Sensor Output - Volts
HFC High Speed Fan Status
Htrl
1
ret Highest number of retries seen on the H02S 11 heater
Htrl 2 ret Highest number of retries seen on the H02S 12 heater
Htr21 ret Highest number of retries seen on the H02S 21 heater
Htr22 ret Highest number of retries seen on the H02S 22 heater
HTRCM11 H02S n heater current
HTRCM12 H02S 12 heater current
HTRCM21 H02S 21 heater current
HTRCM22 H02S 22 heater current
9-36 September 1996
Page 397 of 421

The Aston Martin Lagonda Diagnostic System //~~^ ^?~?^ " ^ ^
Users Guide
Airbag Diagnostic Trouble Code Monitor
The following diagnostic trouble codes are supported by the Airbag Control Module:
12 Low battery voltage
13 Air bag circuit shorted to ground
14 Front inpact sensor circuit shorted to ground
21 Safing impact sensor incorrectly mounter to vehicle
22 Safing impact sensor output shorted to battery voltage
23 Safing impact sensor input feed / return open circuit
24 Safing impact sensor output feed / return open circuit
32 Driver side airbag circuit high resistance or open
33 Passenger side airbag circuit high resistance or open
34 Driver side airbag circuit low resistance or short circuit
41 Front right impact sensor feed / return open circuit
42 Front left impact sensor feed / return open circuit
44 Front right impact sensor incorrectly mounted to vehicle
45 Front left impact sensor incorrectly mounted to vehicle
51 Airbag CM internal thermal fuse - intermittent short to ground
52 Back up power supply - voltage boost fault
53 Front impact sensor circuits resistance to ground or internal Airbag CM failure
9-46 September 1996
Page 398 of 421
^^?
The Aston Martin Lagonda Diagnostic System
Users Guide
Seat Belt Pretensioner Diagnostics
(where fitted)
Description
The DB7 seat belt pretensioner system operates the
drivers seat belt pretensioner in conjunction with the
Airbag system. The seat belt pretensioner control
module is located underthe right hand seat, beside the
seat control module.
The pretensioner control module calculates changes
in vehicle speed using an input signal from an
accelerometer. When a collision is detected (Rapid
reduction in vehicle speed) the pretensioner charge is
fired using electrical energy stored in a capacitor
within the pretensioner control module. Firing of the
pretensioner charge applies additional tension to the
drivers seat belt.
The airbag and seat belt pretensioner systems share the
SRS (Airbag) warning lamp. Any fault detected by the
pretensioner control module is indicated by constant
illumination ofthe
SRS
(Airbag) warning
lamp.
Flashing
of the SRS warning lamp indicates a fault in the airbag
system.
Should both systems develop faults, the pretensioner
system will permanently illuminate the warning lamp.
This would mask the airbag system warning indication.
Therefore, rectify the pretensioner fault and then retest
for faults in the airbag system
The pretensioner control module can log up to 10
diagnostic trouble codes together with a time since
each fault was alerted to the driver. Each fault will be
identified as 'Permanent' or 'Intermittent' on the PDU
diagnostic trouble codes screen.
System Connections
The Autoliv RC5 Pretensioner Control Module has an
18 pin connector featuring six shorting bridges. The
mating halves ofthe connector may be securely locked
using a double mechanical locking system.
The following pins on the control module connector
are used in the Aston Martin seat belt pretensioner
system:
Pin 1
Pin 2
Pin n
Pin 12
Pin 14
Pin 15
Case
September 1996
Ground
SRS/Airbag Warning Lamp
Drivers airbag positive
Drivers airbag negative
Serial communications
12 volt positive feed
Ground
System Fault Strategy
No single fault may cause an unexpected deployment.
The controller will supervise the airbag/pretensioner
electrical system in order to warn the driver should a
fault occur. Any fault detected by the self diagnostics
shall cause the airbag warning lamp to be activated,
and in some cases the pretensioner control module to
enter shutdown mode. In shutdown mode, the energy
ofthe reserve capacitors shall be discharged to avoid
unintended deployment.
As the ignition is switched on, the pretensioner
controller will directly discharge theenergy capacitors.
When the start up procedure is completed without
detecting any faults, the converter will be activated
allowing the capacitors to be
charged.
The system shall
be fully active within 11 seconds after switching the
ignition on providing that no faults are detected.
All system faults monitored by the controller are filtered
in software to avoid fault warnings due to transient
electrical disturbances.
If a fault which could lead to inadvertent deployment
bedetectedbythemicroprocessor,asoftwareshutdown
will be generated. However, a leakage to an earth or
positive potential in the pretensioner output circuit
shall not cause the controller to enter shutdown mode.
If
a
permanent short of the ignition transistor occurs, a
shutdown shall be generated by the hardware circuit.
If a shutdown occurs, the system shall be unable to
deploy the pretensioner after a period of
3
seconds (i.e.
capacitors discharged to under minimum deployment
voltage).
WARNING: To avoid the possibility of personal
injury caused by accidental deployment of the
pretensioner, disconnect the vehicle battery and
wait at least 10 minutes for all voltages to fully
discharge before working on the pretensioner
system. This covers the possibility of the normal
capacitor discharge circuits being inopera tive and
failing to discharge the capacitor when instructed
to do so.
If the module enters shutdown mode, all diagnostic
functions are stopped, but the communications link
remains active. A fault code corresponding to the
cause of the problem may be read by the PDU.
9-47
Page 399 of 421
The Aston Martin Lagonda Diagnostic System
Users Guide ^?
Seatbelt Pretensioner Diagnostic Trouble Codes
050A Pretensioner squib leak to battery positive
050B Pretensioner squib leak to ground
050C Pretensioner squib high resistance
050D Pretensioner squib low resistance
0D13 Capacitor voltage error
0D14 Capacitor capacitance
0D09 Energy reserve switch
0D1E Energy shutdown switch
050E Seatbelt pretensioner switch error
0109 Accelerometer function
01OA Acceleration out of range
01
OB Accelerometer offset
0209 Safing sensor error
030A Temperature sensor error
060C Warning lamp short circuit
060D Warning lamp open circuit
060E Warning lamp driver error
OAOC Analogue voltage error
0A09 Communications error
090A EEPROM not programmed
0909 EEPROM checksum
OAOA External watchdog error
OAOB External watchdog time out
020A Safing sensor not closed
090C RAM check error
9-48 September 1996
Page 402 of 421
^^?
The Aston Martin Lagonda Diagnostic System
Users Guide
Operation
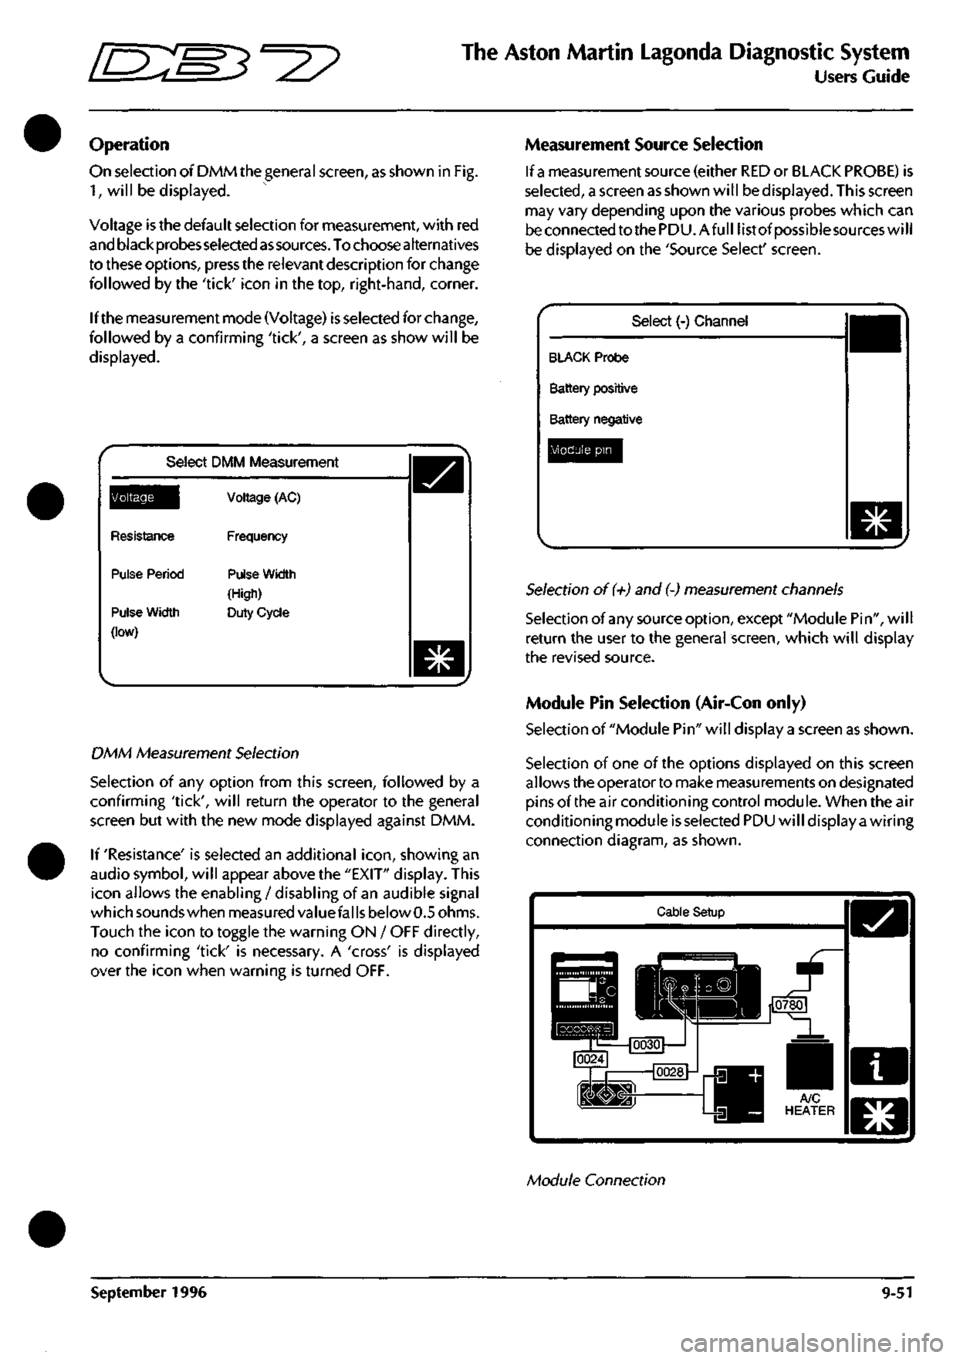
On selection of DMM the general screen, as shown in Fig.
1,
will be displayed.
Voltage is the default selection for measurement, with red
and black probes selected
as
sources.
To choose alternatives
to these options, press the relevant description for change
followed by the 'tick' icon in the top, right-hand, corner.
If the measurement mode (Voltage) is selected for change,
followed by a confirming 'tick', a screen as show will be
displayed.
Select DMM Measurement
^Q^||[
Resistance
Pulse Period
Pulse Width
(low)
Voltage (AC)
Frequency
Pulse Width
(High)
Duty Cycle
DMM Measurement Selection
Selection of any option from this screen, followed by a
confirming 'tick', will return the operator to the general
screen but with the new mode displayed against DMM.
If 'Resistance' is selected an additional
icon,
showing an
audio symbol, will appear above the "EXIT" display. This
icon allows the enabling / disabling of an audible signal
which sounds when measured valuefal
Is
below 0.5 ohms.
Touch the icon to toggle the warning ON / OFF directly,
no confirming 'tick' is necessary. A 'cross' is displayed
over the icon when warning is turned OFF.
Measurement Source Selection
If
a
measurement source (either RED or BLACK PROBE) is
selected,
a screen as shown will be displayed. This screen
may vary depending upon the various probes which can
be connected to the PDU.Afull list of possiblesources will
be displayed on the 'Source Select' screen.
Select (-) Channel
BLACK Probe
Battery positive
Battery negative
Module pin
Selection of (+) and (-) measurement channels
Selection of any source option, except "Module Pin", will
return the user to the general screen, which will display
the revised source.
Module Pin Selection (Air-Con only)
Selection of "Module Pin" will display a screen as shown.
Selection of one of the options displayed on this screen
allows the operator to make measurements on designated
pins of the air conditioning control module. When the air
conditioning module is selected PDU will display a wiring
connection diagram, as shown.
Cable Setup
Module Connection
September 1996 9-51