ESP AUDI A8 2017 User Guide
[x] Cancel search | Manufacturer: AUDI, Model Year: 2017, Model line: A8, Model: AUDI A8 2017Pages: 354, PDF Size: 88.68 MB
Page 46 of 354
Lights and Vision
detected by the light sensors. So always
switch on the headlights gD under these
weather conditions and when driving in the
dark .
- Crashes can happen when you cannot see
the road ahead and when you cannot be
seen by other motorists . Always turn on the
headlights so that you can see ahead and so
that others can see your car from the back.
- The rear fog lights should only be turned on in accordance with traffic regulation, as the
lights are bright for following traffic.
- Please observe legal regulations when using
the lighting systems described .
(D Tips
-The light sensor* for automatic dynamic
headlight range control* is located in the
rear view mirror mount . You should there
fore not apply any stickers to the windshield
in this area in order to prevent malfunctions
or failures .
- In the event of a light sensor malfunction,
the driver is notified in the instrument clus
ter display~
page 25.
- You will hear a warning tone if you open the
driver door when the exterior lights are
switched on.
- In cool or damp weather, the inside of the
headlights, turn signals and tail lights can
fog over due to the temperature difference
between the inside and outside. They will
clear shortly after switching them on. This
does not affect the service life of the light ing .
44
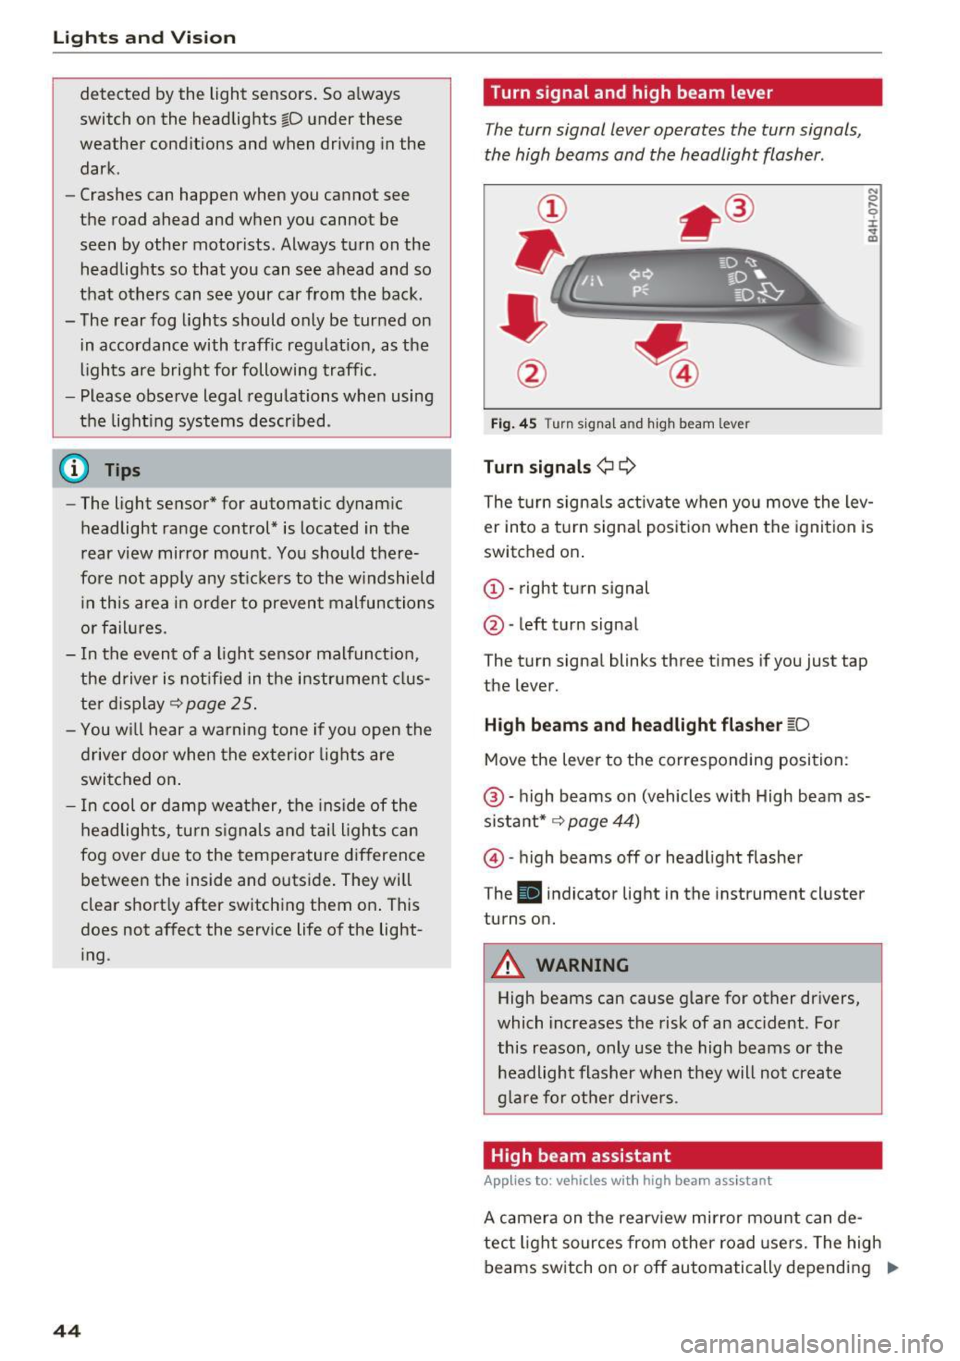
Turn signal and high beam lever
The turn signal lever operates the turn signals,
the high beams and the headlight flasher .
Fig. 45 Turn signal an d high beam leve r
Turn signals¢ Q
N 0 .... 0 :i: .. m
The turn signals activate when you move the lev
er into a turn signal position when the ignition is
switched on.
© -right turn signal
@-left turn signal
The turn signal blinks three times if you just tap
the lever.
High beams and headlight flasher ~D
Move the lever to the corresponding position:
@ -high beams on (vehicles with High beam as
sistant* ~
page 44)
@)-high beams off or headlight flasher
T he
Iii indicator light in the instrument cluster
turns on.
A WARNING
High beams can cause glare for other drivers,
which increases the risk of an accident . For
this reason, only use the high beams or the
headlight flasher when they will not create
glare for other drivers .
High beam assistant
Applies to: vehicles with high beam assistant
A camera on the rearview mirror mount can de-
tect light sources from other road users. The high
beams switch on or off automatically depending
ll>
Page 47 of 354
on the position of vehicles driving ahead and on
coming vehicles, the vehicle speed and other en
vironmental and traffic conditions.
Activating high beam assistant
Requirement: the light switch must be set to the
AUTO position and the high beam assistant must
be switched on in the Infotainment system
¢page 45.
.,. To activate the high beam assistant , tap the
lever forward @. T he
II indicator light ap
pears in the instrument cluster display and the
high beam assistant is switched on/off auto
matically. The
Ill indicator light also turns on if
the high beams are switched on.
Switching the high beams on/off manually
If the high beams did not switch on/off automat
ically as expected, you may switch them on or off
manually instead:
.,. To switch the high beams on manually, tap the
lever forward @. T he indicator light
Ill turns
on .
.,. To switch the high beams off manually, pu ll the
lever back@. The h igh beam assistant is deac
tivated.
Operating the headlight flasher
.,. To operate the headlight flasher when the high
beam assistant is activated and high beams are
switched off, pu ll the lever back @. The high
beam assistant rema ins active.
Messages in the instrument cluster display
Headlight assist: System fault!
Drive to an authorized Aud i dea le r or authorized
Aud i Service Facility immediately to have the
malfunction corrected. You can still switch the
high beams on or off manually.
Headlight assist: Unavailable No camera view
The camera view is blocked, for example by a
sticker or debris.
o The sensor is located between the interior rearco
~ view mirror and the windshield. Do not place any ,..._
~ stickers in this area on the windshield.
0 0 :c '
A WARNING
High beam assistant is only intended to assist
the driver. The driver is still respons ible for
controlling the headlights and switching
them manua lly depending on light and visibi l
it y conditions. It may be necessary to operate
them manually in situations such as:
- I n adverse weather conditions such as fog,
heavy rain, blowing snow or spraying water.
- On roads where oncoming traffic may be
pa rtia lly obscured, such as expressways.
- When there are road users that do not have
sufficient lighting, such as bicyclers or
vehicles with dirty tail lamps .
- I n tight curves and on steep hills.
- In poorly lit areas.
- W ith strong reflectors, such as signs.
- If the area of the w indshield near the sensor
is fogged over, dirty, icy or covered with a
sticker .
Adjusting the exterior lighting
The functions ore adjusted in the Infotainment
system .
.,. Select: !CAR ! function button > Car systems
control button > Vehicle settings > Exterior
lighting .
Automatic headlights
You can adjus t the following settings in the Au
tomatic headlights
menu:
Headlights activation time -you can adjust if the
headlights switch on
Early, Medium or Late ac
cording to the sensitivity of the light sensor.
Headlight assist* -you can switch the h igh beam
ass istant*
On and Off .
Daytime running lights*
USA models :
the daytime running lights can be
switched on/off. Select
On or Off.
Canada models:
this function cannot be switched
off. They activate automatically each time the ig -
nition is switched on .
ll>
45
Page 48 of 354
Lights and Vision
Coming home , Leaving home
The coming home func tion illuminates the area
outside the ve hicle when you turn the ignition off
and open the driver 's door. To t urn the f unct ion
on, s ele ct
Lights when lea ving car > On.
The leav ing home ill uminates t he area o utside
the vehicle when you unlock the vehicle . To turn
the function on, select
Lights when unlocking
car > On.
The com ing home and le aving home f unctions
only operate w hen it is dark and the light sw itch
is in the
AUTO position.
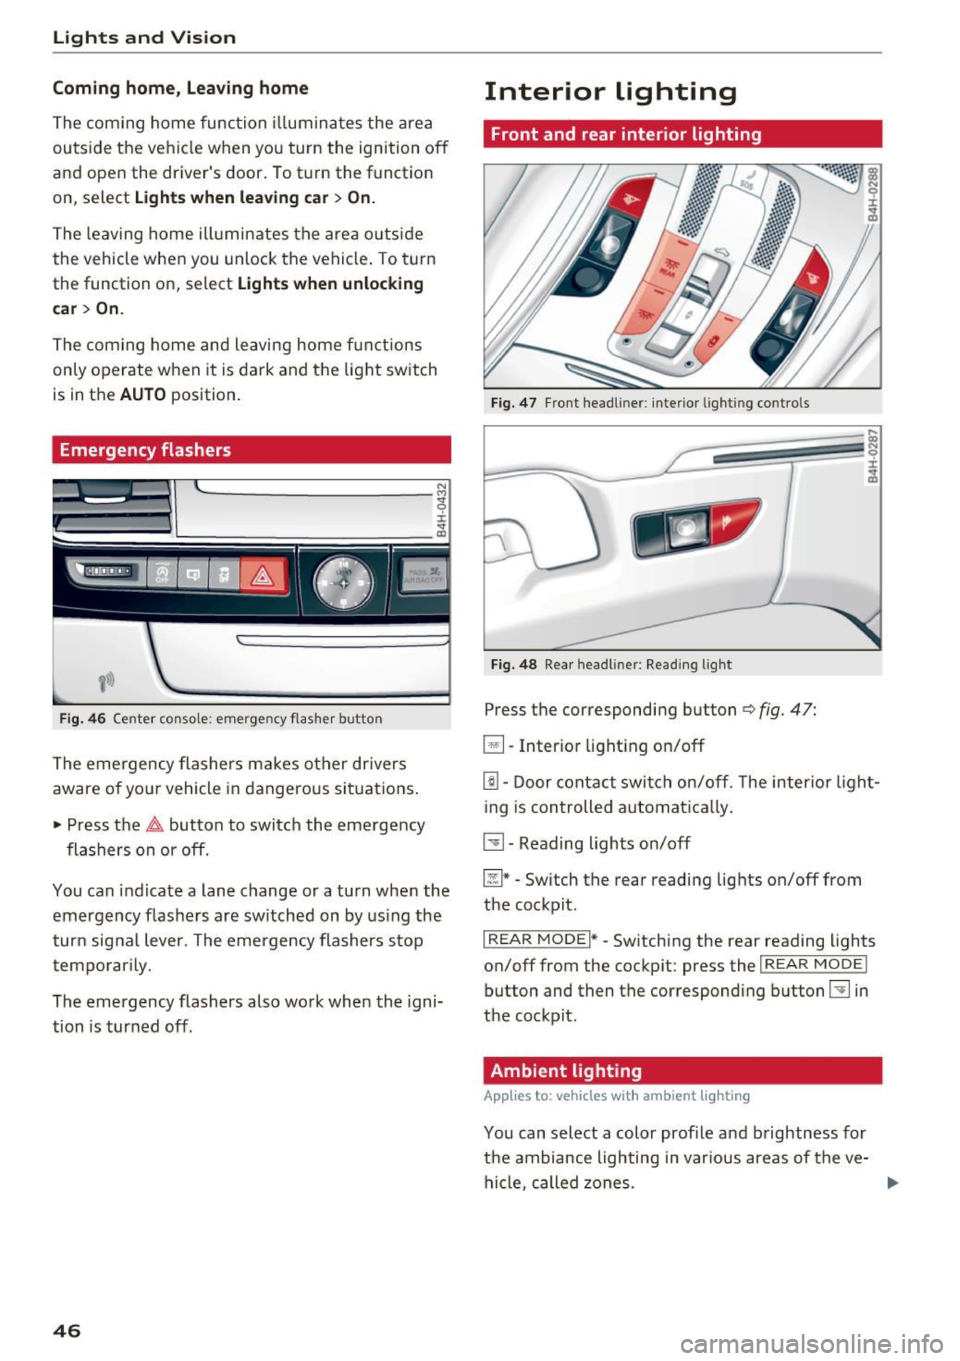
Emergency flashers
F ig. 46 Center conso le: eme rge ncy f la sh er butto n
The emergency flashers ma kes ot her drivers
aware of yo ur vehicle in dangerous si tuations .
• Press the
&,. button to switch the eme rgency
flashers on or off.
You can indicate a lane change or a turn when the
emergency flas hers are sw itched on by us ing the
t urn sig nal lever. The emerge ncy flashers stop
tempo rarily.
The emergency flashers also work when the igni
tion is turned off.
46
Interior lighting
Front and rear interior lighting
F ig . 47 Front head lin er: interio r li ghtin g co ntr ols
Fi g. 48 Rea r h eadl iner: Readi ng li ght
Press the corresponding button ¢ fig. 47:
~ - Int erio r l ight ing o n/off
[!I -Door cont act swi tc h on/off . T he inter io r li ght
i ng is controlled automa tic a lly .
~ - Reading lights on/off
~ * -Sw itch the rear reading lights on/off from
the cockpit .
I REAR MODE i* -Switching the rear reading lights
on/off from the cockp it: press the
I REAR MODE !
button and then the co rresponding button~ in
the cockpit .
Ambient lighting
Applies to: vehicles with amb ient l ig hting
You can select a color prof ile and b rightness for
the ambi ance lighting in var ious areas of the ve
hicle, called zones.
Page 50 of 354
Lights and Vision
Q/P -Adjusting the left/right exterior mirror.
Move the knob in the desired direction.
(@. -Heat ing the mirror glass depending on the
outside temperature .
9 -Folding exterior mirrors* . In the Infotain
ment system, you can select if the mirrors fold in
automatically when you lock the vehicle
¢page 32.
Front passenger's exterior mirror tilt
function*
To help you see the curb when back ing into a
parking space, the surface of the mirror tilts
slightly. For this to happen, the knob must be in
the position for the front passenger's outside
mirror.
You can adjust the tilted mi rror surface by turn
ing the knob in the desired direction. When you
move out of reverse and into another gear, the
new mirror position is stored and assigned to the
key you are using.
The mirror goes back into its original position
once you drive forward faster than 9 mph
(15 km/h) or turn the ignition off.
A WARNING
Curved mirror surfaces (aspheric or convex*)
enlarge the field of vision. However, they
make objects in the mirror appear smaller
and farther away. Your may estimate incor
rectly when you use these mirrors to gauge
your distance from the vehicles behind you
when changing lanes, wh ich increases the risk
of an accident.
(D Note
- If the mirror housing was moved by outs ide
forces (such as an impact when maneuver in g), you must use the power fold ing func
tion to fold the mirror all the way out. The
mirror housing must not be moved back in
to place by hand because this would impair
the function of the m irror mechanism.
- If you wash the vehicle in an automatic car
wash, you must fold the exterior mirrors in
to reduce the risk of damage to the mirrors.
48
Never fold power fold ing exterior mirrors by
hand . On ly fold them in and out using the
power controls.
(D Tips
- If the power adjusting function malfunc
tions, the glass in both mirrors can be ad
justed by pressing on the edge of it by hand.
- The exterior mirror settings are stored with
the memory function*¢
page 59.
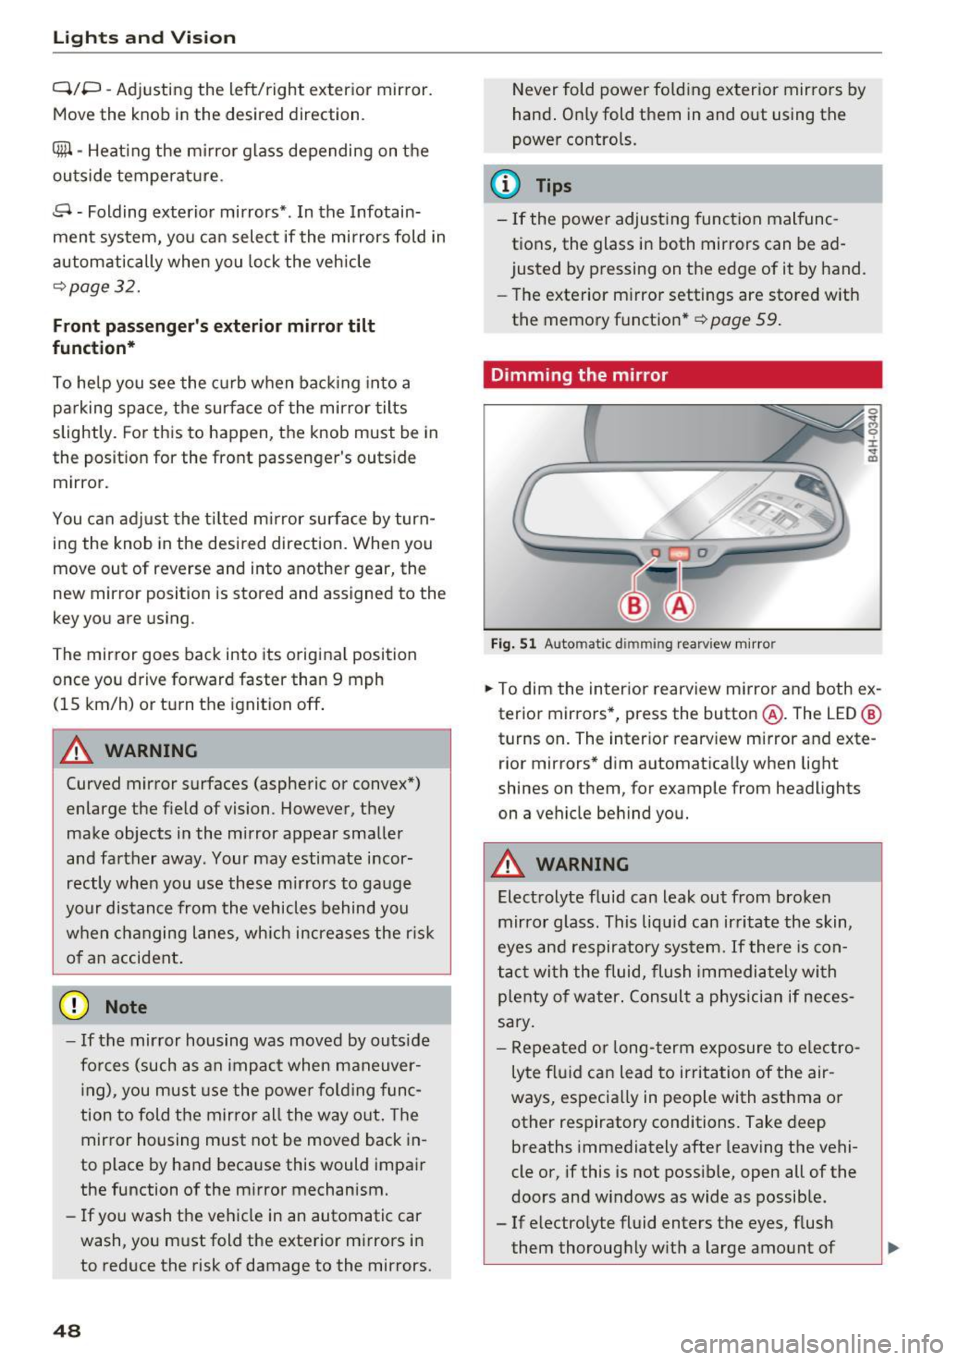
Dimming the mirror
Fig. 51 Automatic dimm ing rearv iew mirror
0
~ 0 :i:
a'i
.. To dim the interior rearview mirror and both ex
terior mirrors*, press the button @. The LED @
turns on. The interior rearv iew mirror and exte
r ior mirrors* dim automatically when light
shines on them, for example from headlights
on a vehicle behind you.
A WARNING
Electrolyte fluid can leak out from broken
mirror glass. This liqu id can irritate the skin,
eyes and respiratory system. If there is con
tact with the fluid, flush immediately with
p lenty of water . Consult a physician if neces
sary.
-
- Repeated or long-term exposure to electro
lyte fluid can lead to irritation of the air
ways, especially in people with asthma or other respiratory conditions. Take deep
breaths immediately after leaving the vehi
cle or, if this is not possible, open all of the
doors and w indows as wide as possible.
- If electrolyte fluid enters the eyes, flush
them thoroughly with a large amount of
Page 53 of 354

0 co .... N ,..... N .... 0 0 :c '
on.
C leaning the headlights. The headlight washer
system operates only when the low beam head lights are switched on.
If you move the lever to
position @, the headlights and the night vision
assist camera* are cleaned at intervals.
A WARNING
- The rain sensor is only intended to assist the
driver. The driver may still be responsible
for manually sw itching the wipers on based
on v is ibility conditions .
- The w indshield may not be treated with wa
ter-repelling windsh ield coating agents . Un
favorable conditions, such as wetness, dark ness, and when the sun is low, can cause in
creased g lare, which increases the risk of an
acc ident. W iper blade chatter is a lso poss i
ble.
- Prope rly f unction ing windsh ield wiper
blades are required fo r a clear view and safe
driving
c:> page 51, Replacing the wiper
blades.
(D Note
- If there is frost, make su re t he windshie ld
wiper blades are not fro zen to the wind
shield. Sw itching on the windshield wipers
when the blades are frozen to the wind
shield can damage the wiper blades.
- Prior to using a car wash, the windshield
wiper system must be switched
off (lever in
pos ition
@ ). This prevents the wipers from
switching on un intent ionally and causing
damage to the w indshield w iper system .
- The windshield wipers switch
off when the
i gnition is sw itched off. You can activate the
windsh ield wipers after the ign it ion is
switched back on by moving the winds hield
wiper lever to any posit ion.
- Worn o r dirty windshield wiper blades result
i n streak ing . This can affect the ra in sensor
funct ion. Check you r windshield wiper
blades regu larly.
Light s and Vision
-The washer fluid nozz les for the windshield
washer system are heated at low tempera
t u res when the ign ition is on .
- When stopping tempo rari ly, such as at a
traffic light, the speed of the windshield
w ipers automatically reduces by one level.
Cleaning the wiper blades
Clean the wiper b lades when you see w iper
streaks . Clean the wiper blades with a soft towel
and glass cleane r.
.. Place the windshie ld w iper arms in the service
position
c:> page 51.
.. Fold the windshield w iper arms away from the
w indshield .
A WARNING
Dirty windshie ld wiper b lades can impa ir vi
sion, wh ich increases the ris k of an acciden t.
Replacing the wiper blades
The service position is set in the Infotainment
system .
Fig. 57 Removing winds hield wiper b lades
Wind shi eld wiper se rvice po sition /b lade
r epl ace ment po sit ion
~
~
M 0 :i: ... m
.. Switch the ignition off and move the windshield
w iper lever to position @briefly
c::> page 50,
fig. 56. The windshield wipers move into the
serv ice position .
.. To br ing the wiper b lades back into the original
position, switch the ignition on and ope rate the
w indshield w iper lever.
You can also turn the service posit io n on or off in
the Infotainment system: ..,_
51
Page 56 of 354
Sea ts and stor age
Seats and storage
General information
A WARNING
Refer to ¢ page 207, Driving safety for im
portant information, tips, suggestions and
warnings that you should read and follow for
your own safety and the safety of you r pas
sengers.
Front seats
Controls
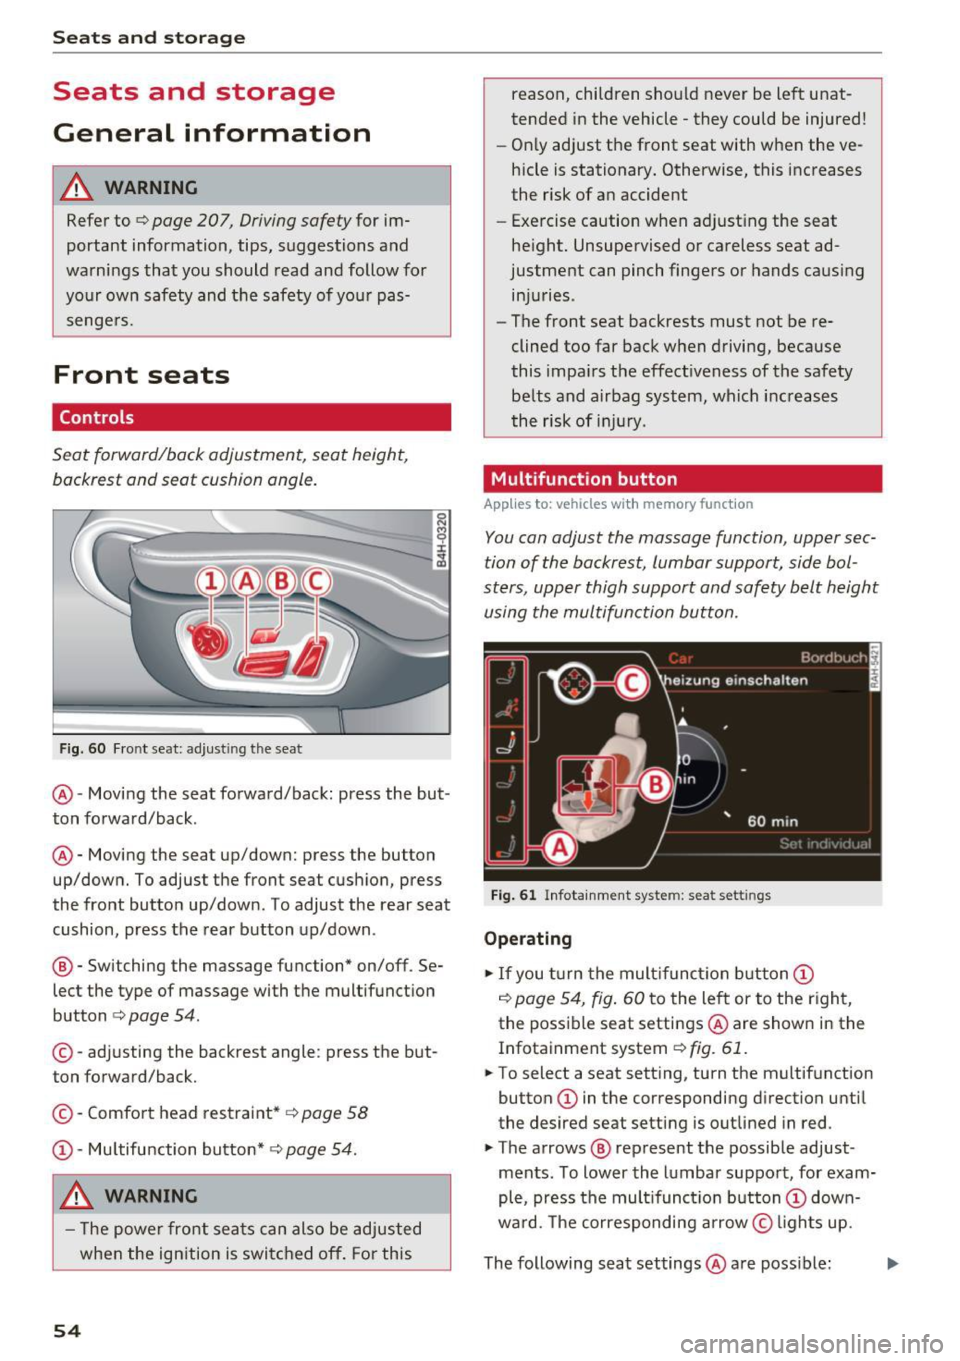
Seat forward/back adjustment, seat height, backrest and seat cushion angle.
F ig. 60 Fr ont seat: adjust ing the seat
@ -Moving the seat forward/back: press the but
ton forward/back .
@ -Moving the seat up/down: press the button
up/down. To adjust the front seat cushion, press
the front button up/down. To adjust the rear seat
cushion, press the rear button up/down .
® - Switching the massage function* on/off . Se
lect the type of massage with the multifunction
button
c:> page 54.
© - adjusting the backrest angle : press the but
ton forward/back.
© -Comfo rt head restraint*
c:> page 58
@ -Mu ltifunction button* c:> page 54.
A WARNING
- The power front sea ts can also be adjusted
when the ign ition is switc hed off . For this
54
reason, children sho uld never be left unat
tended in the vehicle - they could be injured!
- On ly adjust the front seat with when the ve
hicle is stationary. Otherwise, this increases
the risk of an accident
- Exercise caution when adjust ing the seat
height. Unsupervised or careless seat ad
justment can pinch fingers or hands causing in juries .
- The front seat backrests must not be re
clined too far back when driving, because
this impa irs the effectiveness of the safety
belts and airbag system, which increases
the risk of inj ury.
Multifunction button
App lies to: vehicles wit h memory funct ion
You can adjust the massage function, upper sec
tion of the backrest, lumbar support, side bol
sters, upper thigh support and safety belt height using the multifun ction button.
Fig . 61 Infota inment system : seat sett ings
Ope rating
.. If you turn the mult ifunct ion button @
c:> page 54, fig . 60 to the left or to the right,
the poss ible seat settings @are shown in the
Infotainment system
c:> fig. 61.
.. To select a seat setting, turn the multifunction
button @ in the corresponding direction until
the desired seat setting is outlined in red .
.. The arrows ® represent the possible adjust
ments . To lower the lumbar support, for exam
ple, press the mult ifunct ion button @ down
ward. The corresponding arrow © lights up.
The following seat settings @are poss ible: ..,_
Page 58 of 354
Seat s and sto rage
Adju st ing lumbar support
.,. To a djust the cu rvature of the lumbar support,
press the b utton @to the left/right.
.,. To adj ust the he ight of the lumbar support,
press the button @upward/downward.
Adjusting th e head rest raint angle
.,. To adjust the head restraint so t hat it is more
vertical/more ang led, press the bu tton @ for
ward/back.
Adjusting th e seat position
.,. To adjust the seat forward/back, press the but
ton © forwa rd/back.
.,. To move the seat up/down, press t he button ©
upward/downward .
Adjusting the massage function *
.,. To adjust the "pulsating"/"wave" massage
funct ion, press the button © to the left/r ight.
T he massage f unction is at i ts strongest level
when three LEDs in the butto n turn on.
.,. To reduce the massage level, press the © but
ton again .
.,. To switc h the massage function off, press the
button repeatedly until the L ED turns off.
Adju st ing th e re clining position
.,. To adjust the reclining position, press and hold
the button @ until the seat reaches its end po
sition .
.,. Applies to vehicles with reclining seat*: if you
select the reclining position, the front passeng
er's seat moves forward and the backrest re
clines. Depending on the last setting, the leg
support may fold out at the same t ime . The
front passenger 's seat can no longer be used in
the re clining posit ion ¢..&, . You can adjust the
l eg suppo rt or fold the display fo rwa rd in the
reclining position.
Selecting the standard seat position
.,. To adjust the sta ndard seat pos it ion, press and
hold the button © unt il the seat reaches its
end posit ion .
.,. Applies to vehicles with reclining seat*: if you
select the standa rd sea t position, the fron t pas
senger's seat moves back into the norma l posi-
56
tion, the head restraint moves to the upright
position and the leg support folds inward¢..&, .
Adjusting the d isplay*
.,. To t ilt the display fo rwa rd/bac k, press and hold
the left/r ight button @) until the d isp lay reach
es the des ired position .
.,. Applies to vehicles with reclining seat*: to
maintain a clear view of the road when the seat
is in the reclining pos ition, press and hold the
r ight button @) until the disp lay has folded for
ward. Make sure the driver has a clear view of
the exter ior mirrors . If so, confirm the quest io n
in the Infotainment system w ith
Ye s. If you an
swe r
No or do not respond to the q uest ion, the
disp lay w ill return to the up right pos ition.
Adju sting the leg support (vehicles with
reclining seat*)
Requirement: the reclining position must be se
l ected
¢ page 56.
.,. To fold the leg support out/in, press and hold
the left/r ight button @ until the leg support
reaches the desired pos it ion.
.,. To angle the leg suppo rt so that it is more up
r igh t/mo re reclined or to move it fo rward/back,
adj usting the front passenge r's sea t accord ing
ly .
Adjusting the front passenger 's seat
.,. Make sure that the front passenger's seat ad
jus tment is switc hed on in the Infotainment
system
¢ page 58 .
.,. To activate the front passenger's seat adjust
ment, press the button ®·
.,. To adjust the front passenger's seat forward/
back, press the button © forward/back.
.,. To move the front passenger's seat up/down,
press the button © upward/downward.
.,. To adjust the front passenger's seat backrest so
that is more upright/more recl ined, press the
button @ forward/back .
.,. App lies to ve hicles with reclin ing seat*: to ad
just the reclin ing/standard sea t position, press
and hold the b utton @!© unt il the front pas -
senger's seat reaches its end position. .,.
Page 60 of 354
Seats and storage
Comfort settings
Applies to: vehicles with comfort seats in the rear
You con also apply several settings for the rear
using the Infotainment system in the cockpit.
• Se lect in the MMI: !CAR ! function button> Car
systems
control button > Vehicle settings >
Seats > Rear seats .
Adjust to normal position -
with this function,
the outer rear seats and the front passenger's
seat are moved to the factory setting.
Easy seat entry -the Easy seat entry makes it
possible to enter and exit the rear seats comfort
ably. If the function is sw itched on, the rear seat
automatically moves all the way back when t he
corresponding door is opened .
Passenger's seat adjustment* -if the function is
switched on in the Infotainment system, the
front passenger's seat can also be adjusted from
the rear seat using the ¢
page 55, fig. 64 but
tons .
The front passenger's seat cannot be adjusted, if
- the front passenger's seat memory function is
switched off¢
page 59.
-the ~ button tur ns on in the driver's door
¢page 37.
-The right[!] button turns on in vehicles with
power child safety locks *
¢page 37.
Head restraints
Adjusting the head restraints
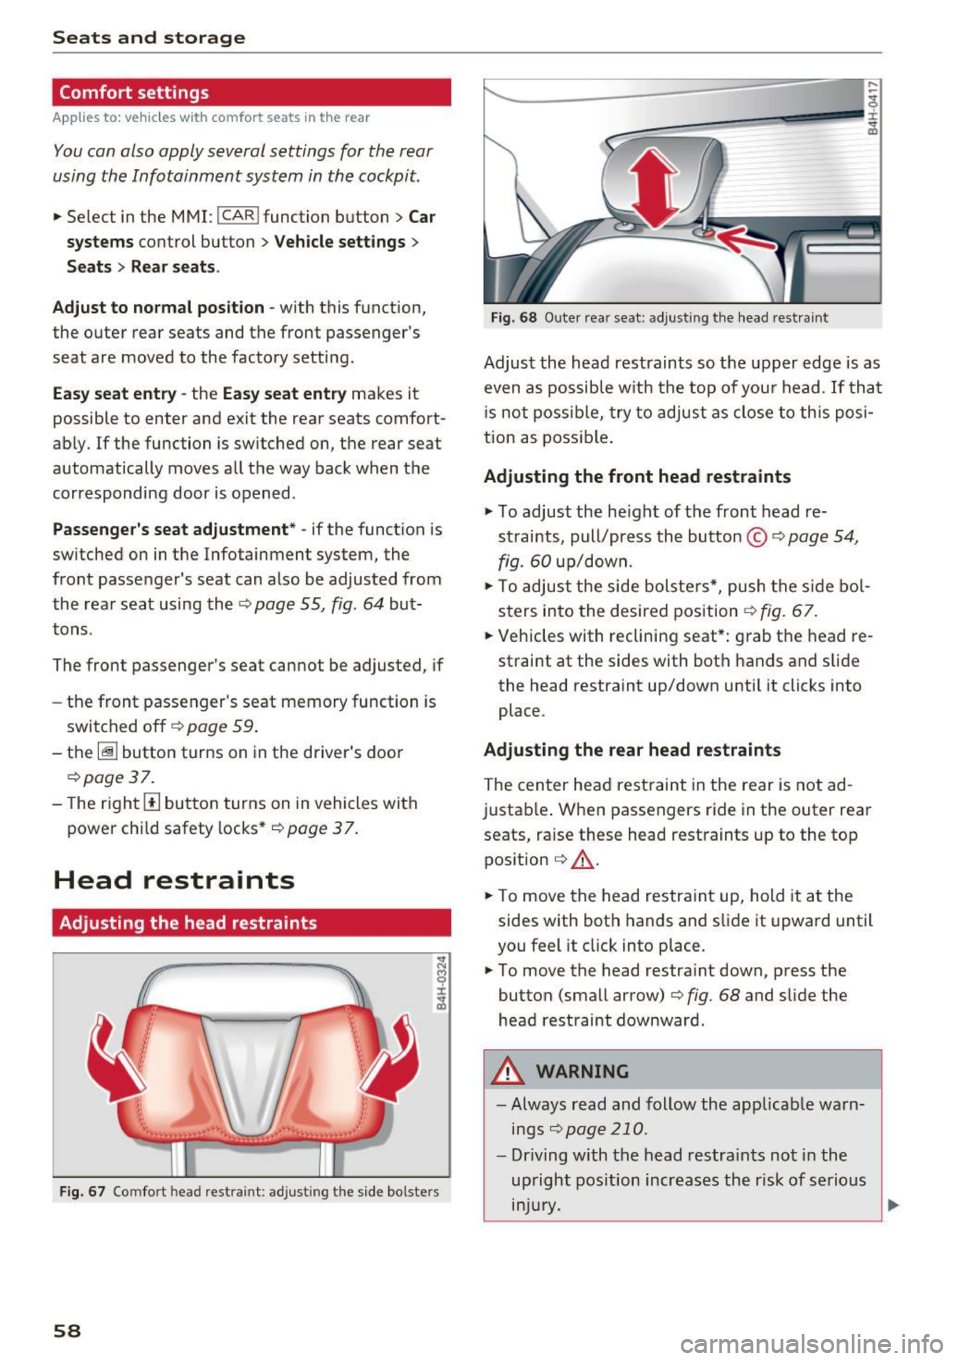
Fig. 67 Comfo rt hea d rest raint: ad just ing t he side bo lste rs
58
Fig. 68 Outer rea r seat: adjus ting the head restra int
Adjust the head restraints so the upper edge is as
even as possible with the top of you r head . If tha t
i s not possible, try to adjust as close to this posi
tion as possible.
Adjusting the front head restraints
.,. To adjust the he igh t of the front head re
straints, pull/press the button ©
9 page 54,
fig.
60 up/down.
.,. To adjust the side bolsters*, push the side bol
sters in to the desired position ¢
fig. 67.
• Vehicles with reclining seat*: grab the head re
straint at the sides with both hands and slide
the head restraint up/down until it clicks into
place .
Adjusting the rear head restraints
The center head restraint in the rear is not ad
justable. When passengers ride in the outer rear
seats, raise these head restraints up to the top position ¢
,&.
• To move the head restra int up, hold it at the
sides with both hands and slide it upward until
you feel it click into place .
.,. To move the head restraint down, press the
button (small arrow) ¢
fig. 68 and slide the
head restraint downward.
8,_ WARNING
- Always read and follow the applicab le warn
ings
¢page 210.
-Driving with the head restraints not in the
upright position increases the r isk of se rious
lnJUry .
~
Page 61 of 354
C) C0 ....
"' " "' .... 0 0 :r
To prevent the head restraints from running into the headline, they are automat ically
Memory function
Description
Appl ies to: vehicles wit h memory function
Using the memo ry funct ion, you can q uickly and
eas ily store a pe rsonal seat profile for the driver
and front passenger as we ll as for the o uter rear
seats* and recall the settings. The memory func
tion is controlled using the remote contro l key
and the memory buttons in the driver's/front
passenger's door and in the rear doors*.
The driver's seat profi le is stored again and as
signed to the remote control key each time the
vehicle is locked. When you open the door, the
seat profile is automat ically recalled. If two peo-
Remote control
key
Dr iver
Seat X
Head rest raint X
Steering wheel * X
Safety belt* X
Both exterior mirrors* X
Remote control key
Applies to: vehicles with memory function
The function must be switched on so that the
driver's seat profile will be assigned to the re
mote control key when lock ing the vehicle .
.. Se lect : the
I CAR I function button > C ar sy stem s
control button > Veh icle setting s> Driver' s
s eat > Remote control ke y> On.
(D Tips
If you do not wish to have the seat p rofile for
another driver assigned to the remote control
key, switch the memory function off in the In
fotainment system or using the
IO FFI button
~page 59.
Seats and storag e
moved forward or upward when the seat is
adjusted.
ple use the vehicle, it is recommended that each
person always uses the ir "own" remote control
key .
Two seat profiles can be stored using the memo ry buttons in the d river 's/front passenger 's door
respectively, and one seat profile can be stored in
each of the rear doors *. Once they a re stored,
these seat profi les can be se lected at any time.
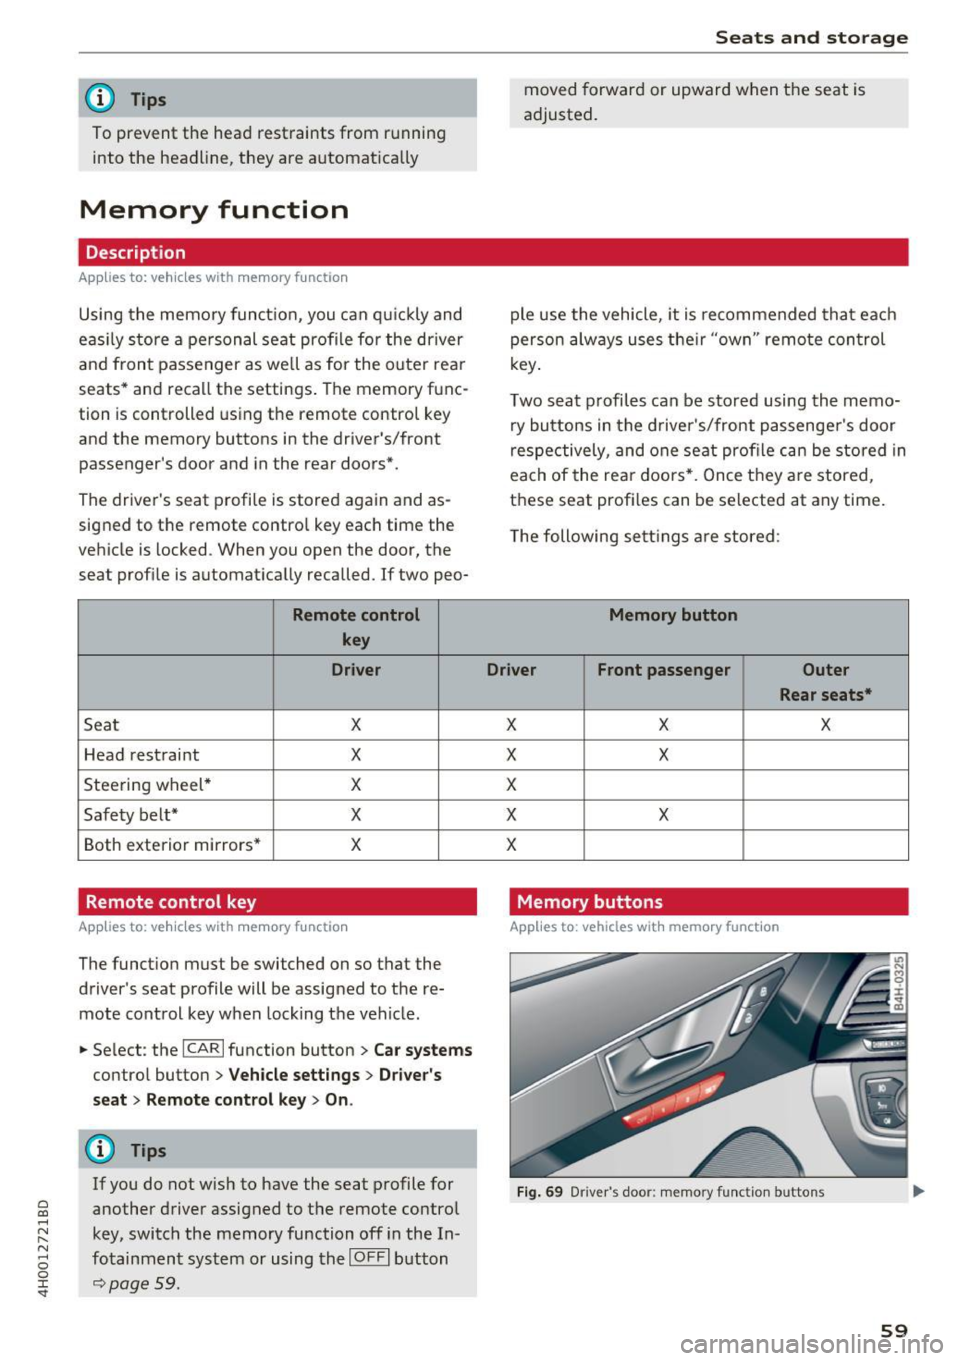
T he following sett ings a re stored :
Memory button
Driver Front passenger Outer
Rear seats*
X X X
X
X
X
X X
X
Memory buttons
Applies to: veh icles w ith memory function
F ig . 69 Dr iver 's door: memory function buttons
59
Page 66 of 354
Seats and storage
-Net in the front passenger footwell
- Glasses holder in the headliner (near the rear-
view mirror)
- Storage compartments under the center arm
rest
- Compartments* on the backrests of the front
seats
- Garment hooks above the rear doors
- Compartment behind the rear center armrest
(on vehicles without a pass-through* or refrig
erator*)
- Cell phone holder* in the right rear door
- Bag hooks* in the luggage compartment
A WARNING
- When driving, do not leave any hard objects
on the rear window shelf or allow your pet
to sit on the shelf. They could become a haz
ard for vehicle occupants in the event of
sudden braking or a crash.
- Any articles of clothing that you have hung
up must not interfere with the driver's view.
The coat hooks are designed only for light
weight clothing . Never hang any clothing
with hard, pointed or heavy objects in the
pockets on the coat hooks. During sudden
braking or in an accident -especially if the
airbag is deployed -these objects could in
jure any passengers inside the vehicle.
- To reduce the risk of personal injury in an
accident or sudden stop, always keep the glove compartment closed while driving.
- Read and follow all WARNINGS
~ page 244, Important safety instructions
on the side airbag system.
- Hang clothes in such a way that they do not
impair the driver's vision.
- The coat hooks must only be used for light
weight clothing. Do not leave any heavy or
sharp edged objects in the pockets which
may interfere with the side curtain airbag
deployment and can cause personal injury in
a crash .
- Do not use coat hangers for hanging cloth
ing on the coat hooks as this can interfere
with proper deployment of the side curtain
airbags in an accident.
64
- Do not hang heavy objects on the coat
hooks, as they could cause personal injury in
a sudden stop.
(D Note
Objects on the rear shelf that rub against the
rear window can damage the rear window de
fogger wires .
(D Tips
-A vent slot is located between the shelf and
the rear window. Do not block the vent with
any items you may place on the rear window
shelf .
- Do not place bulky items on the rear window
shelf as they could restrict or block the driv
er's vision in the rear view mirror.
Roof rack
App lies to : vehicles wit h roof rack
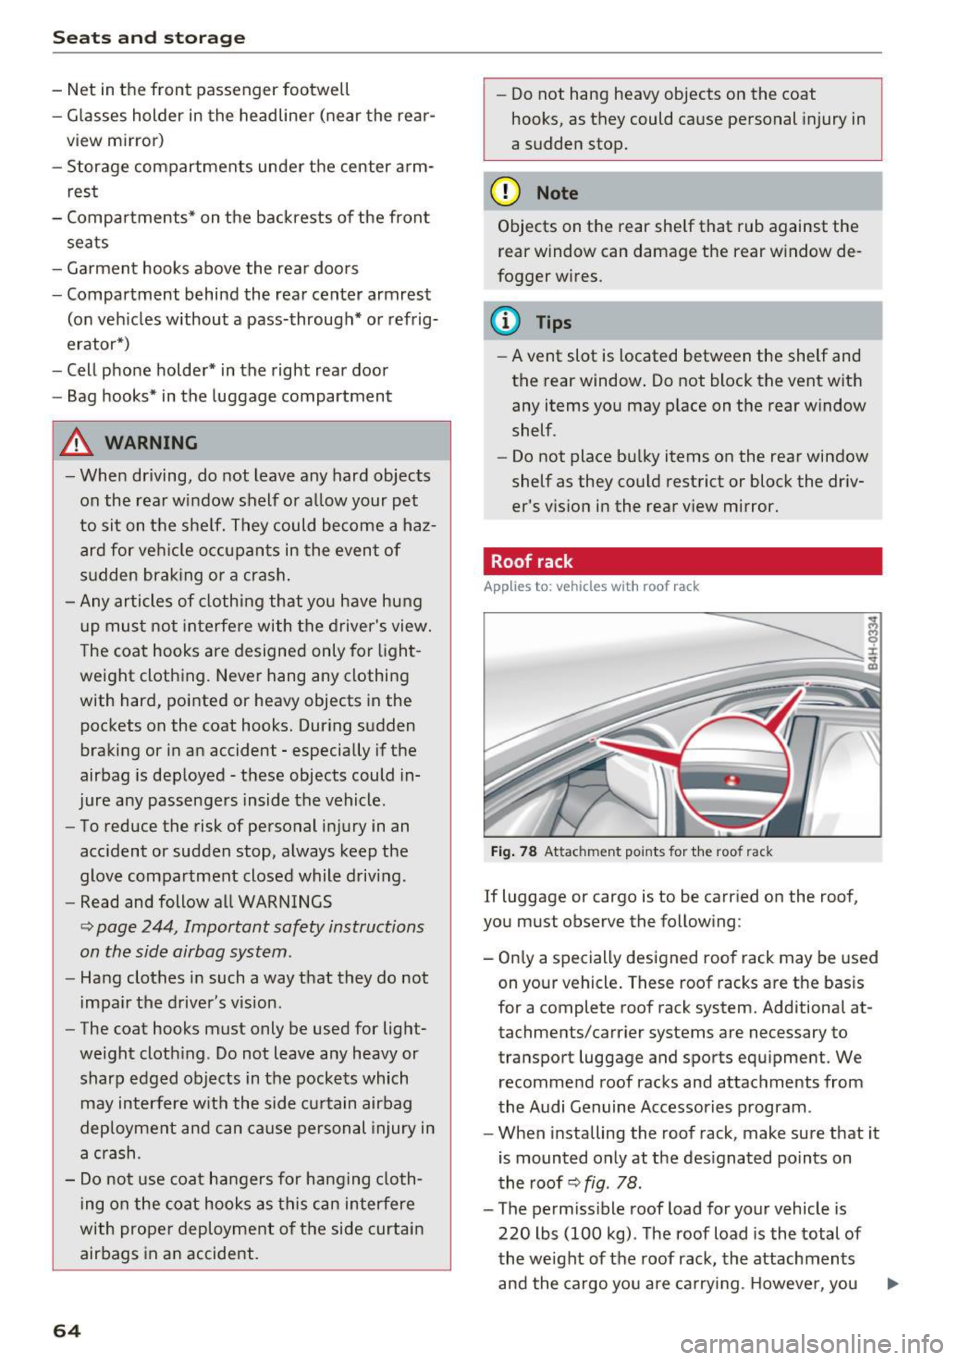
Fig. 78 Attachment po ints for the roof rack
If luggage or cargo is to be carried on the roof,
you must observe the following:
- Only a specially designed roof rack may be used
on your vehicle. These roof racks are the basis
for a complete roof rack system. Additional at
tachments/carrier systems are necessary to
transport luggage and sports equipment. We
recommend roof racks and attachments from
the Audi Genuine Accessories program .
- When installing the roof rack, make sure that it
is mounted only at the designated points on
the roof ~
fig. 78 .
-The permissible roof load for your vehicle is
220 lbs (100 kg) . The roof load is the total of
the weight of the roof rack, the attachments
and the cargo you are carrying . However, you ..,.