AUDI Q5 2014 Workshop Manual
Manufacturer: AUDI, Model Year: 2014, Model line: Q5, Model: AUDI Q5 2014Pages: 316, PDF Size: 78.41 MB
Page 51 of 316
Clear vision Lights
Switching the lights on and off
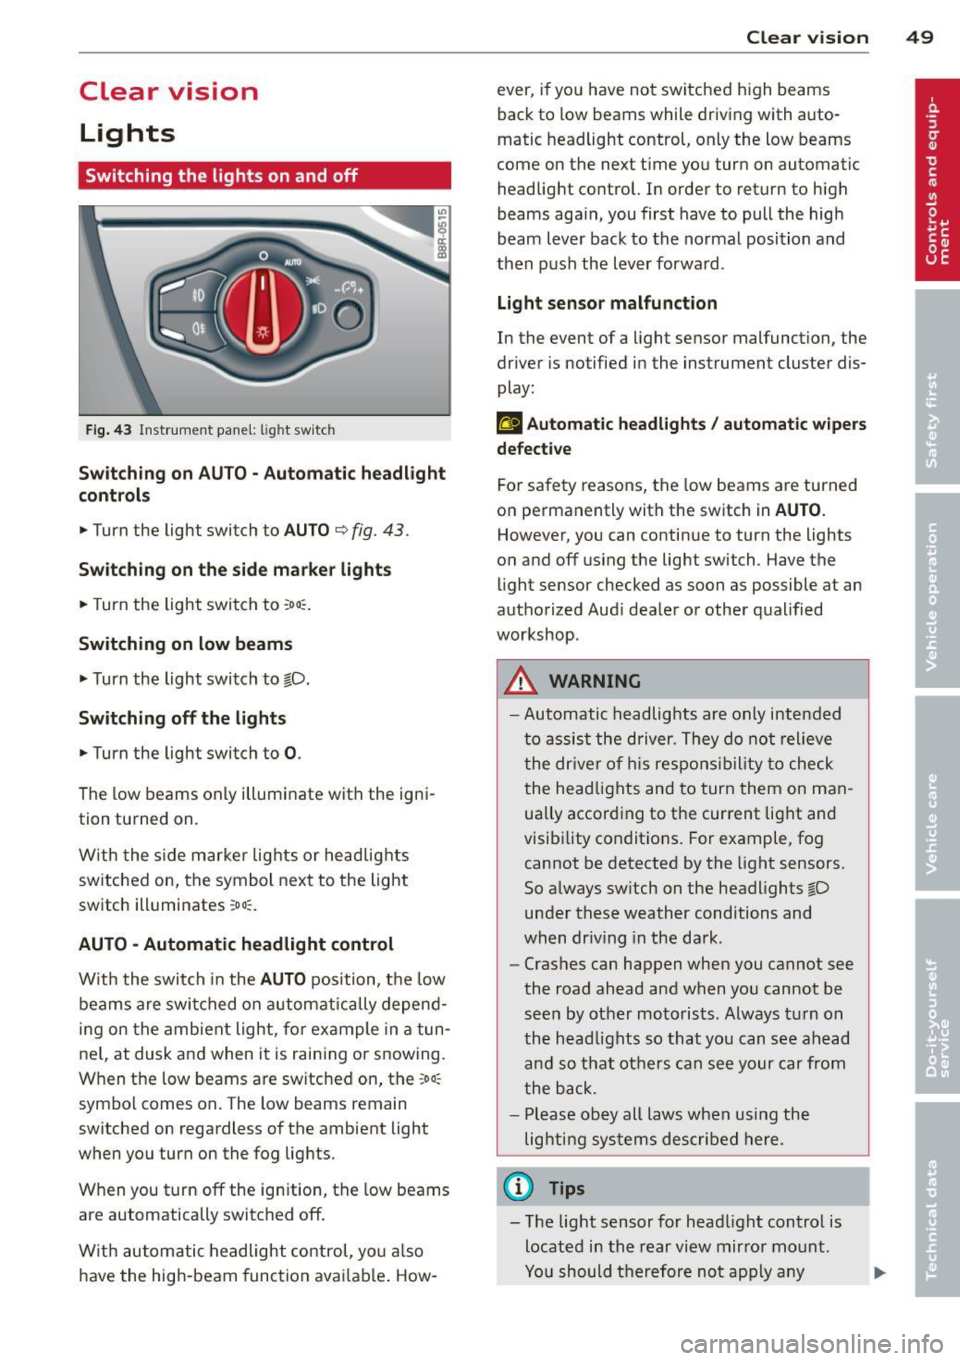
F ig . 43 Instrument pane l: light sw itch
Sw itching on AUTO - Automatic headlight
contr ols
• Turn the light switch to AUTO ¢ fig. 43.
Switchin g on the side m arker light s
• Turn the light switch to :oo:.
Switching on low beams
• Turn the light switch to @.D.
Swi tching off the lights
• Turn the light switch to 0 .
The low beams only illuminate with the igni
tion turned on.
With the s ide marker lights or headlights
switched on, the symbol next to the light
switch illuminates
:oo:.
AUTO -Automatic headlight control
With the switch in the AUTO position, the low
beams are swi tched on a utomatica lly depend
ing on the amb ient light, for example in a tun
ne l, at dusk and when it is raining or snowing.
When the low beams are switched on, the
:oo:
symbol comes on. The low beams remain
switched on regardless of the ambient light
when you turn on the fog lights.
When you turn
off the ign ition, the low beams
are automatically switched
off.
W ith automatic headlight control, yo u also
have the high-beam function avai lab le . How -
Clear vi sion 49
ever, if you have not switched high beams
back to low beams while driving with auto
matic headlight control, only the low beams
come on the next time you turn on automatic
headlight control. In order to return to high
beams aga in, you first have to pull the high
beam lever back to the normal position and
then push the lever forward .
Light sen so r malfunct ion
In the event of a light sensor malfunction, the
driver is notified in the instrument cluster dis
play :
fal Autom atic he adlights / autom ati c wi pers
defecti ve
For safety reasons, the low beams are turned
on permanently with the switch in
AUTO.
However, you can continue to turn the lights
on and
off us ing the light switch . Have the
light sensor checked as soon as possible at an
authorized Audi dealer or other qualified
workshop.
A WARNING
- Automatic headlights are only intended
to assist the driver. They do not relieve
the dr iver of h is respons ibility to check
the head lights and to turn them on man
ually accord ing to the current light and
visibility conditions. For example, fog cannot be detected by the light sensors.
So always sw itch on the headlights @.D
under these weather conditions and
when dr iv ing in the da rk .
- Crashes can happen when you cannot see
the road ahead and when you cannot be
seen by other motorists. Always tu rn on
the head lights so that you can see ahead
and so that others can see your car from
the back.
- Please obey all laws when using the
lighting systems described here.
(l'} Tips
- T he light sensor for head light control is
located in the rear view mirror mount.
Yo u should therefore not apply any
Page 52 of 316
50 Clear vis ion
stickers to the windshield in this area in
or der to prevent malfunctions or fai l
u res .
- Some exte rior lig hti ng f unctions can be
adjusted
c> page 50 .
-When yo u remove yo ur key from the igni
tion while the vehicle's lights are turned
on, a buzze r sounds as long as the driv
er's door is open .
- In coo l or damp weather , the ins ide of
the headlights, t urn signa ls and tail
li ghts can fog over due to the tempera
ture difference between the inside and
outside. They will clea r sho rtly after
switching them on . T his does not affect
the service life of the lighting .
- In the even t of a light sensor malfunc
t ion, the d river is no tified in th e inst ru
ment cluster disp lay
c> page 33.
Fog lights
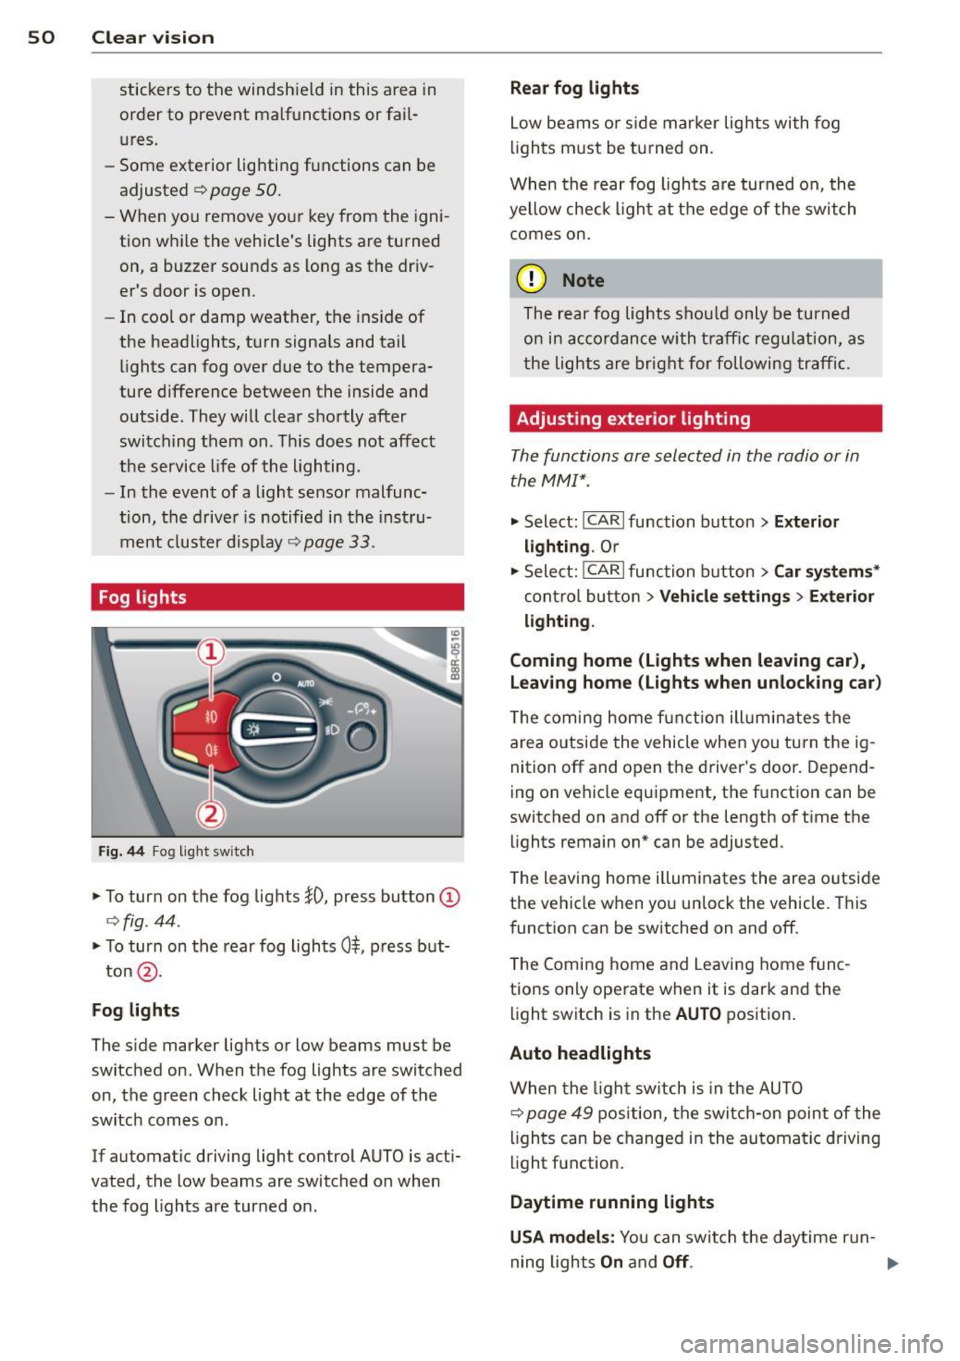
Fig . 44 Fog light sw it c h
.,. To turn on the fog lights }D, press button @
c>fig . 44 .
.,. To turn on the rear fog ligh ts 0$, p ress but-
ton @.
Fog lights
The s ide marker lig hts or low beams must be
switched on . When the fog lights a re switched
on, the green check light at the edge of the
sw itch comes on.
If automatic driving light control AUTO is act i
vated, the low beams are switched on when
the fog lights are tur ned on .
Rear fog lights
Low be ams o r sid e mar ker lig hts wi th fog
li gh ts m ust be t urned on .
When the rear fog lights a re turned on, the
yellow check ligh t a t the edge of the switch
comes on.
(D Note
The rear fog lights s houl d only b e turned
o n in acc ord ance wi th t raff ic reg ulation, a s
the lights are brig ht for following tra ffic.
Adjusting exterior lighting
The functions are sele cted in the radio or in
the MM I*.
.,. Select: I CAR I function button > Ext erior
lighting .
Or
.,. Sele ct: !CARlfunc tion button>
Car sy stem s*
contro l butto n > Vehicle setting s > Exterior
light ing .
Coming home (Lights when leaving car ),
Leaving home (Lights when unlocking car )
The coming home f unct ion ill umin ates the
are a outside the vehicle when you tu rn t he ig
nit ion off and o pen the d river's doo r. Depend
ing on vehicle equ ipment, the f unction can be
switched on and off or the length of t i me the
lights remain on* can be adjusted .
T he leaving home illum inates the area o utside
the ve hicle when you un lock the vehicle . This
funct ion can be switched on and off .
T he Comi ng home and Leaving home f unc
tio ns only ope rate when it is dark and the
light switch is in the
AUTO position .
Auto headlights
When the lig ht sw itch i s in the AU TO
c> page 49 position, the switc h-on point of the
li gh ts can be changed i n the automa tic driving
light function.
Daytime running lights
USA models: You can swi tch the daytime run-
ning lights
On and Off . .,..
Page 53 of 316
Canada models : The function cannot be
turned off.
It is activated a utomatica lly each
time the ignition is switched on.
Travel mod e (Canada models)*
The headlight beam is asymmetrical. This pro
vides stronge r illum ination on the s ide of the
road on which you are driving . If you are driv
ing in a co untry that drives on the opposite
side of the road from your own country, this
will cause glare for oncoming drivers. To pre
vent glare:
- Trave l mode must be selected in vehicles
with Xenon headlights*.
- In vehicles with halogen headlights, certain
areas of the head light lenses must be cov
ered with waterproof adhesive covers that
prevent light from passing through. For
more information, please see your author
ized Audi dealer or author ized repair facility .
@ Tips
When travel mode* is activated, a d isp lay
in the drive r information system ind icates
this each time you switch the ignit io n on .
Instrument lighting
The basic brightness of the illumination for
the instruments, the center console and the
display can be adjusted .
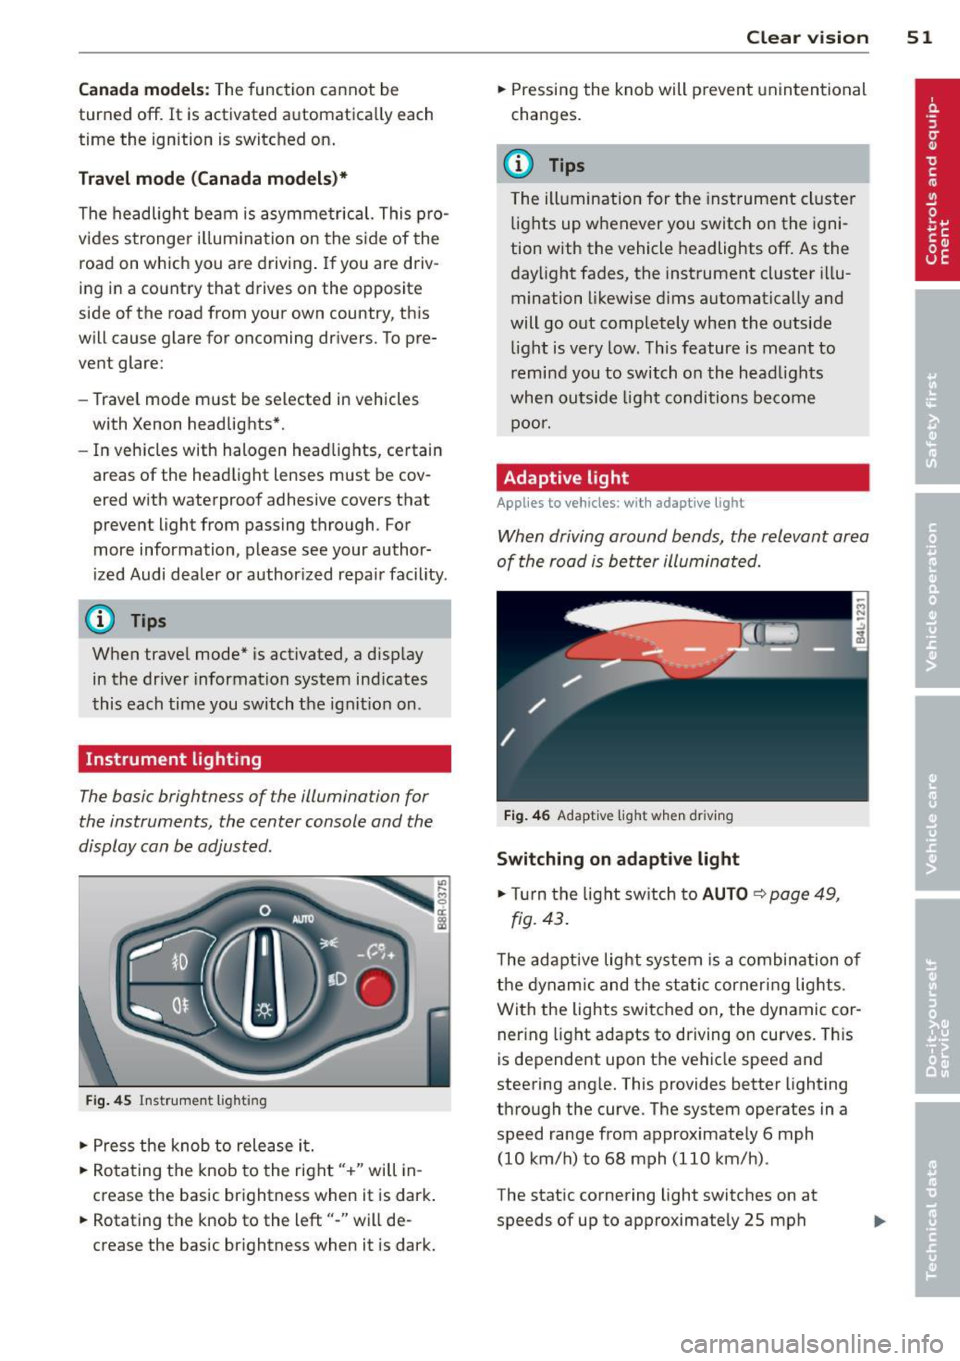
Fig. 45 Inst rume nt lighting
.. Press the knob to release it.
.. Ro ta ting t he knob to the right" +" will in
crease the basic brightness when it is dark .
.. Rotating the knob to the left"-" will de
crease the basic br ightness when it is dark. Clear vi
sion 51
.. Pressing the knob will p revent unintentional
changes.
(D Tips
T he ill umination for the inst rument cluster
lights up w henever you switch on the igni
tion with the vehicle headlights off. As the
day light fades, the instrument cluster i llu
mination likewise dims automatically and
will go out completely when the outside light is very low. This feature is meant to
r emind you to switch on the head lights
whe n outs ide light conditions become
p oor .
Adaptive light
Applies to vehicles: wi th adaptive light
Wh en driving around bends, the relevant area
of the road is be tter illuminated.
Fi g. 4 6 Adapt ive light w hen driv ing
Switching on adapt ive light
.. Tu rn the light sw itch to AUTO ~ page 49,
fig. 43 .
The adaptive lig ht system is a combin ation o f
the dynam ic and the static corneri ng lights.
Wi th the lights switched on, the dynamic cor
ner ing light adapts to driving on curves. This
is dependent upon t he vehicle speed and
steering ang le. This provides better lighting
through the curve. The system operates in a
speed range from approximate ly 6 mph
(10 km/h) to 68 mph (110 km/h) .
The static cornering light switches on at
speeds of up to approximately 25 mph
Page 54 of 316
52 Clear vis ion
(40 km/h) when a certain steer ing whee l an
g le is reached or when a turn signa l is activat
ed . The area to the side of the vehicle is illu
minated better when turning .
Emergency flashers
The emergency flashers makes other moto
rists aware that you or your vehicle are in an
emergency situation.
Fig . 4 7 Eme rg ency flashe r switc h
"" Pr ess the switch ~ ~ fig. 47 to turn the
eme rgency flas hers on or off.
~
9 a: (X) a:,
When the emergency flashers a re on, all four
turn signals blin k at the same time. The tu rn
signal in dicator lights
BB in the ins trument
cluster, as we ll as the lig ht in t he emerge ncy
fla sher swi tch ~ blink likewise . T he emerge n
cy flashers also w ork whe n the ignition is
turned off.
The emergen cy flashers w ill turn on autom ati
cally if you are in an a cci den t w here the a irba g
has de ployed .
@ Tips
You shou ld tur n on t he emerge ncy fl ashe rs
w hen :
- you are the last vehicle st anding in a traf
fi c ja m so t hat an y oth er veh icles com ing
c an see you, or when
- you r vehicle has broken dow n or yo u are
in an emerge ncy si tu ati on, or when
- you r vehi cle is bei ng towe d by a tow
truck o r if you are towi ng an othe r vehicle
b ehin d you. Turn signal and high beam lever
The lever on the left side of the steering col
umn is used to operate the turn signals and
the high beam as w
ell as the headlight flash
er.
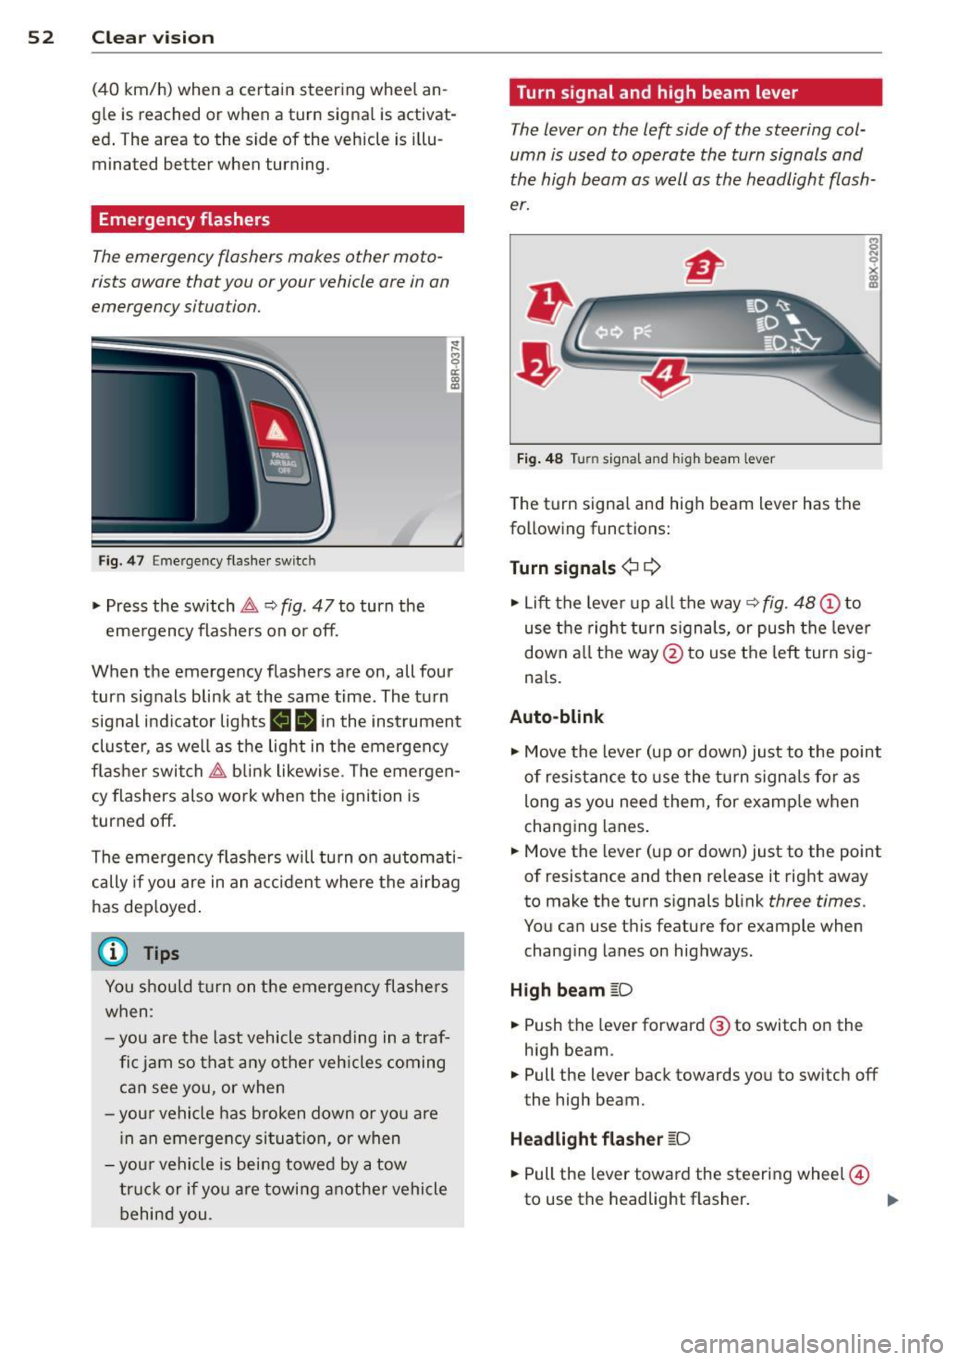
Fi g. 48 Tu rn signal and high beam lever
The turn signa l and high beam lever has the
fo llowing functions:
Turn signals ¢¢
s
"" '? X co a,
"" Lift the leve r up a ll th e way ~ fig. 48 (D to
use the right turn s ign als, or push the leve r
down a ll th e way @ to use the left tur n sig
n a ls.
Auto-blink .,. Move the lever (up or down) just to the point
of resistance t o use the tur n sign als fo r as
long as you need them, for e xamp le when
chang ing lanes .
.,. Move the lever (up or down) just to the point
of resistance and then re lease it rig ht away
to make the turn s ignals b link
three times .
You can use this featu re for example when
chang ing lanes on highways .
High beam
[D
"" Push the lever forward @ to switch o n the
high beam .
.,. Pull the lever back towards you to switch off
the high beam.
Headlight fla sher
[D
.. Pull the lever toward the steering wheel@
to use the headlight flasher .
IJJ>
Page 55 of 316
Notes o n these featur es
-The turn signals only work with the ignition
turned on. The indicator lights
II or Ill in
the instrument cluster
¢page 14 also b link.
- After you have turned a corner, the turn sig-
nal switches off automatica lly.
- The
high beam works only when the head
lights are on. The indicator light
II in th e
instrument cluster illuminates when the
high beams are on.
- The
headlight flasher wo rks only as long as
you hold the lever -even if there are no
lights turned on. The indicator light
II in
the instrument cluster illuminates when you
use the headlight flasher.
A WARNING
Do not use the high beam or headlight
flasher if you know that thes e cou ld blind
oncoming traffic.
Interior lights
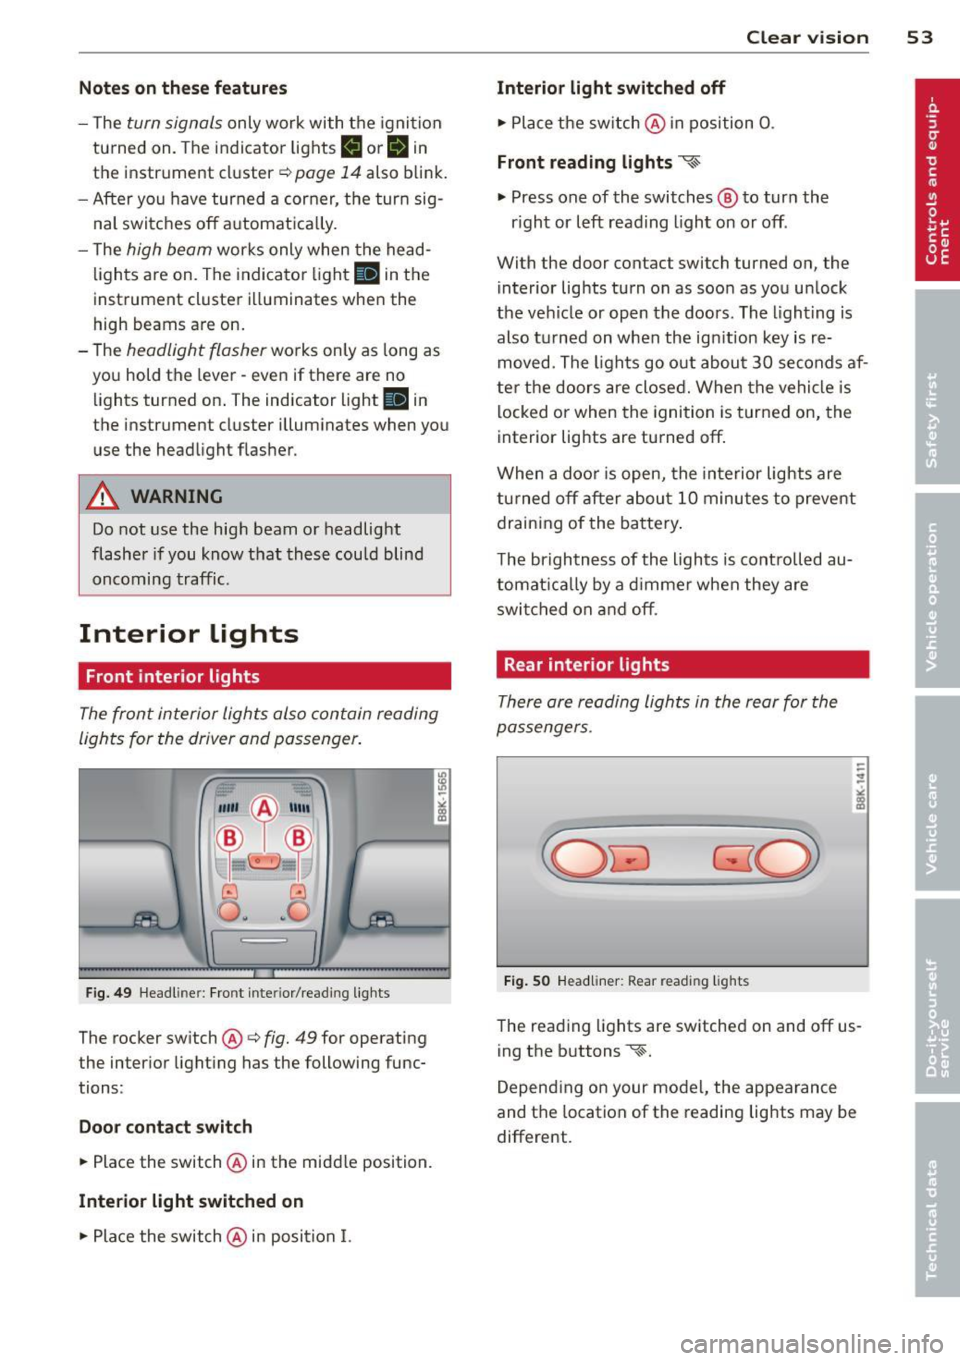
Front interior lights
-
The front interior lights also contain reading
lights for the driver and passenger .
r ,,,,, , 11111
~8 ,~
G) Gl
,o . . o
I
Fig. 49 Headliner: Fro nt inte rior/rea ding lights
The rocker switch @¢ fig. 49 for operating
the interior lighting has the following func
tions :
Door cont act swi tch
.,. Place the switch @ in the midd le position.
Interior light switched on
.,. Pla ce the switch @ in position I.
Clear vision 5 3
Interior light swit ch ed off
.,. Place the switch @ in position 0 .
Front read ing lights ~
.,. Press one of the switches@ to turn the
r ight or left reading light on or off .
With the door contact switch turned on, the
interior lights turn on as soon as you unlock
the vehicle or open the doors. The lighting is
also turned on when the ignition key is re
moved. The lights go out about 30 seconds af
ter the doors are closed. When the vehicle is locked or when the ignition is turned on, the
interior lights are turned off.
When a doo r is open, the interior lights are
tu rned off after about 10 minutes to prevent
draining of the battery .
The brightness of the lights is controlled au
tomat ica lly by a d immer when they are
swi tched on and off.
Rear interior lights
There are reading lights in the rear for the
passengers .
Fig . 50 Headliner: Rear read ing lig hts
The read ing l ights are switched on and off us
ing the buttons ~-
Depending on your model, the appearance
and the location of the reading lights may be
different .
Page 56 of 316
54 Clear vision
Vision
Sun visors
Using the sun visors makes driving safer.
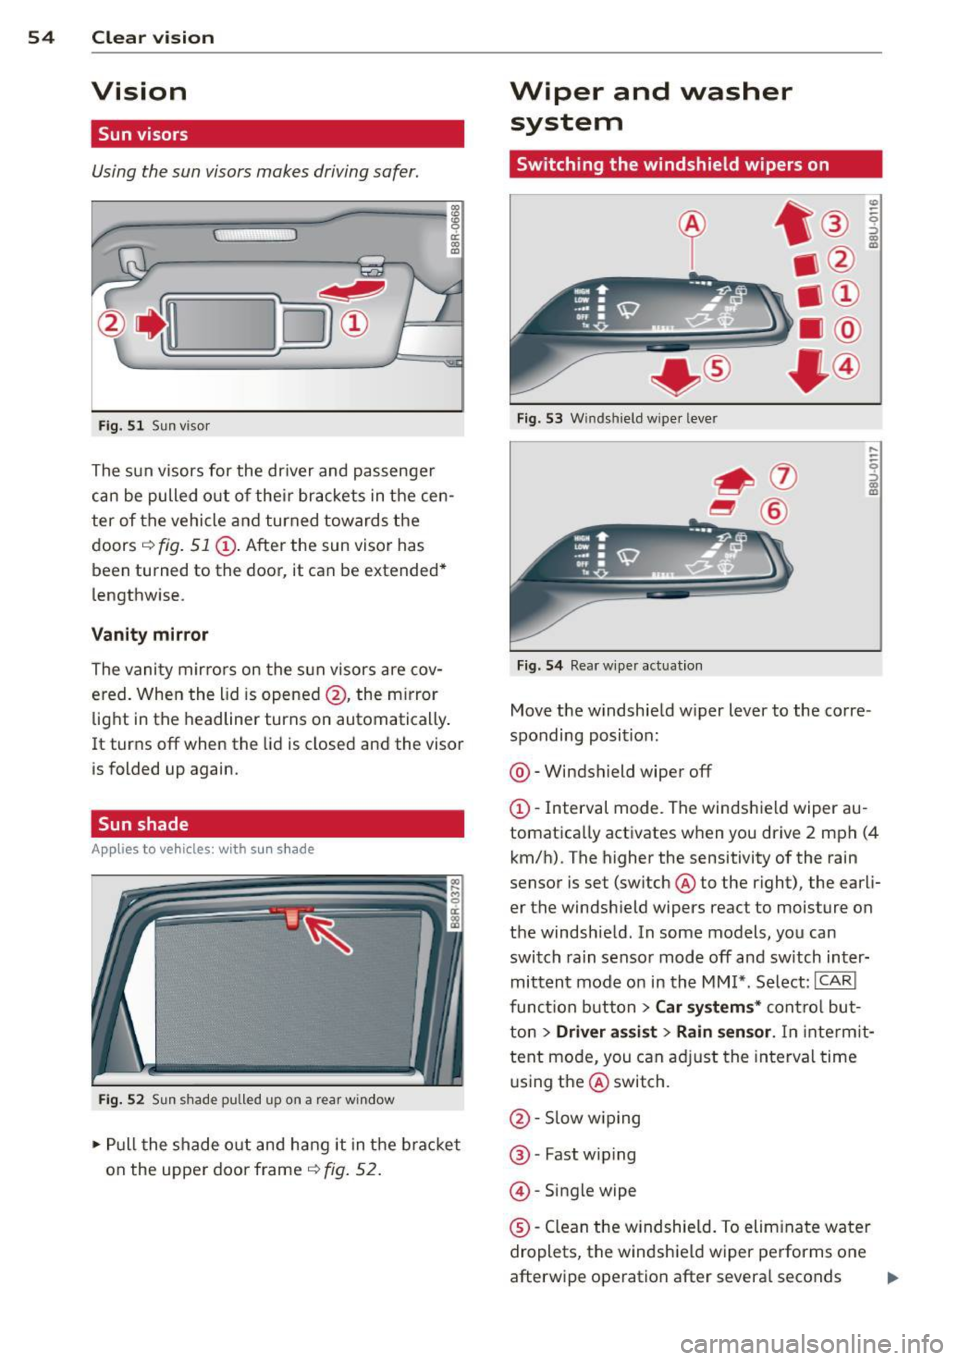
Fig. 51 Sun visor
The sun visors for the driver and passenger
can be pulled out of their brackets in the cen
ter of the vehicle and turned towards the
doors
i::> fig. 51 (D. After the sun visor has
been turned to the door, it can be extended*
lengthwise.
Vanity mirror
The vanity mirrors on the sun visors are cov
ered. When the lid is opened @, the m irror
light in the headliner turns on automatically .
It turns off when the lid is closed and the visor
is folded up again.
Sun shade
App lies to vehicles: with s un shade
Fig. 52 Sun shade pulled up on
a rear window
.. Pull the shade out and hang it in the bracket
on the uppe r door frame
i::> fig. 52.
Wiper and washer
system
Switching the windshield wipers on
+ ®
Fig . 53 Windshield w iper lever
Fig.
54 Rear w iper actuat io n
Move the windshield w iper lever to the corre
sponding position:
@ -Windshield wiper off
(D-Interval mode. The windshield wiper au
tomatically activates when you drive 2 mph (4 km/h). The higher the sensitivity of the rain
sensor is set (sw itch @to the right), the ear li
er the windsh ield wipers react to moisture on
the windshield . In some models, you can
switch rain sensor mode
off and sw itch inter
mittent mode on in the MMI*. Select:
ICAR!
function button > Car systems* control but
ton
> Driver assist > Rain sensor. In interm it
tent mode, you can adjust the interval time
using the@switch.
@ -Slow wipin g
@-Fast wip ing
@ -Single wipe
®-Clean the win dshie ld. To eliminate water
droplets, the windsh ield wiper performs one
afterwipe operation after severa l seconds
ll>-
Page 57 of 316
while driving. You can switch this function off by moving the lever to position ® within 10
seconds of the afterwipe operation. The after
wipe function is reactivated the next time the ignit ion is switched on.
The rear wiper automatically switches on
when the reverse gear is engaged and the
front w indshield wipers are on and in opera
tion .
C lea ning the headlights *. The headlight wash
er system * operates on ly when the headlights
are on. If you move the lever to pos ition ®,
the headlights are washed in interva ls .
® -Wipe the rear window. The rear wiper
moves about every 4 seconds .
0-Clean the rear window. The number of
wiping operations depends on how long the l ever is held in positio n 7.
A WARNING
-The ra in sensor is only intended to assist
the driver. The driver is still responsible
for man ually sw itching the w ipers on ac
cording to the v is ibility conditions.
- The windshie ld may not be treated w ith
water-repe lling windshie ld coat ing
agents. Unfavorable conditions, such as
wetness, darkness, low sun, can res ult in
increased glare. W iper b lade chatter is
also possible .
- Proper ly functioning w indshie ld w iper
blade s are required fo r a clear view and
sa fe dr iv ing .
(D Note
-In the case of frost, check whether the
windsh ield wiper b lades a re fro zen to
t h e windshie ld. Swit ching on the wind
s h ield wipers can d amage t he wipe r
blades!
- Prior to using a car w ash, the windshield
wipe r system m ust be swit ched off (lever
i n position 0) . This helps to prevent unin
tentiona l switching on and damage to
the windshie ld w iper system.
Clear v is ion 5 5
(D Tips
- The windshie ld w ipers are switched off
when the ign it ion is tu rned off . Act ivate
the windsh ield wipers after the ignition
is switc hed back on by moving t he wind
shield wipe r lever to any position .
- Worn or d irty windshield wiper blades
result in streaking. This ca n affect the
rai n sensor function. Check your wind
shield w iper blades regularly.
- The washer fluid nozz les of the wind
shield washe r system a re heated at low
tempe rat ures whe n the ignition is on .
- When stopping temporarily, e .g. at a
t raffic light, the set spe ed of the wind
shield wiper s is automatically reduced by
one speed.
Cleaning windshield wiper blades
C lean the w indsh ie ld w iper blades when t hey
begin to leave st reaks.
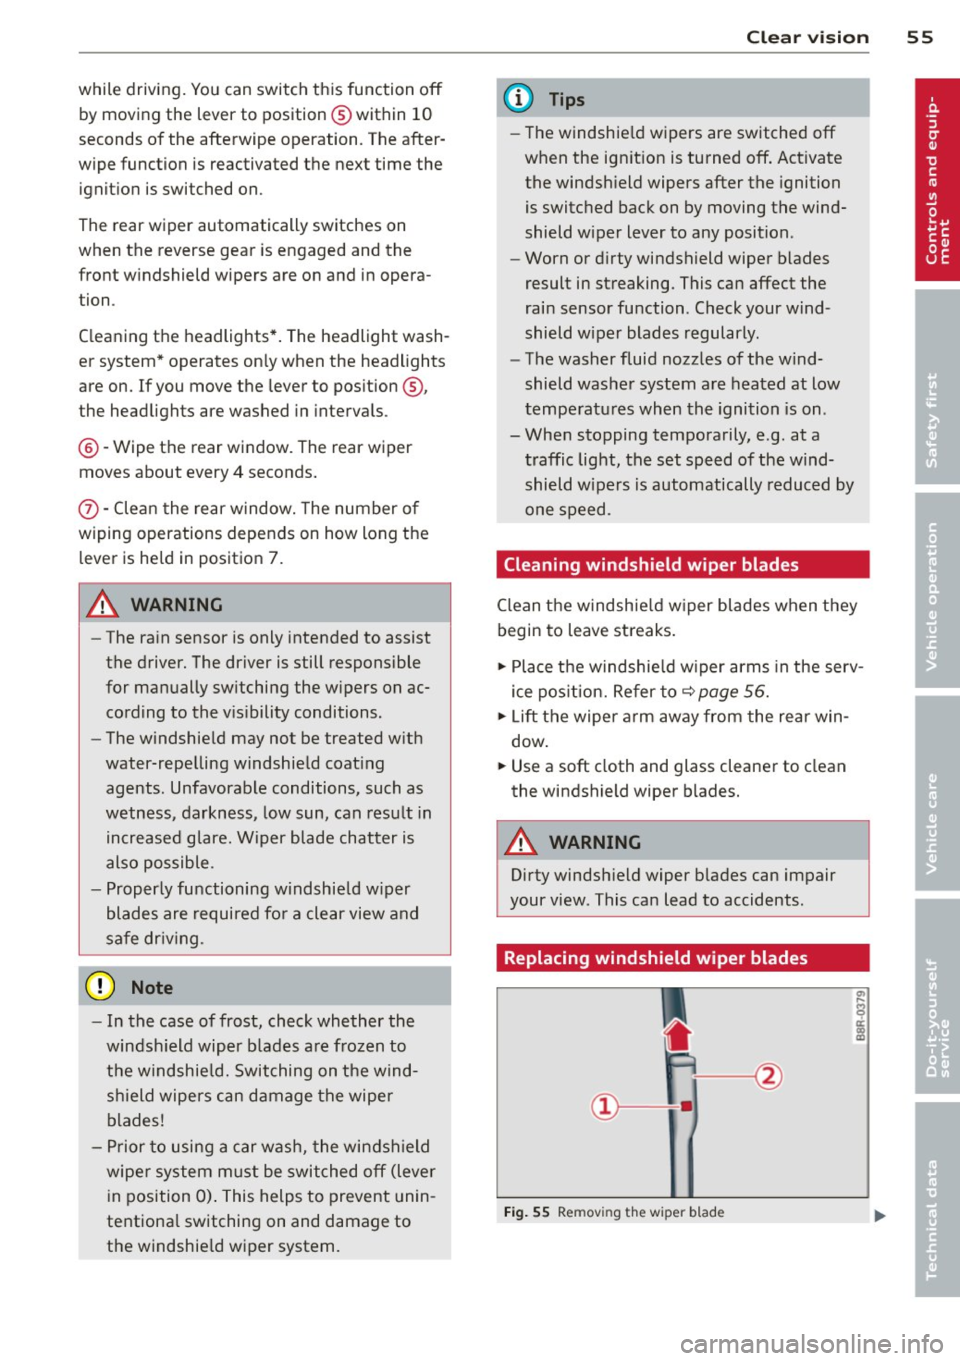
.,. Place t he w indshie ld w iper arms in the serv
ice pos ition. Re fer to ~
page 56.
.,. Lift the wiper a rm away from the rea r win
dow .
.. Use a soft cloth and glass cleane r to clean
the windshield wiper b lades.
A WARNING
Dirty windsh ield wiper b lades can impair
your view . This can lead to accidents .
Replacing windshield wiper blades
Fig. 55 Remov ing the w iper blad e
Page 58 of 316
56 Clear vis ion
Wiper servi ce po sition /blade rep lacem ent
po sit ion
• Switch the ignition
off and move the wind
shield wiper lever to position @¢
page 54,
fig. 53. The windshield wipers move into the
service position.
• To bring the wipers back into the original
pos ition, switch the ignition on and press
the windshie ld wiper lever.
You can also turn the service position on or off
in the radio or
MMI*:
• Switch the w indshield wipers off (posit ion
@ ¢page 54, fig. 53).
• Se lect : I CAR I funct ion button> Wind shi eld
wiper s > Se rvice positio n > On/Off .
Or
• Se lect :
I CAR I function button> Car sys te m s*
control button > Servicing & check s > W iper
s e rv ic e po sition > On/ Off .
Removing the wip er blade
• Lift the windshie ld wiper arm up from the
windshield .
• Press the locking knob@~
fig. 55 on the
wiper blade. Hold the wiper blade firm ly.
• Remove the wiper blade in the direction of
the arrow.
Attach ing th e wiper bl ade
• Inse rt the new wiper blade into the moun t
on the w iper arm @until you hear it latch
into place.
• Place the wiper arm back on the windshield.
• Turn the service position
off.
A WARNING
-
For your safety, you should replace the
w iper blades once or tw ice a year. See your
author ized Audi dealer for rep lacement
blades.
(D Note
- The windshield wiper blades must only
be replaced when in the service position!
Otherwise, yo u risk damaging the paint
on the hood or the w indshield wiper mo
tor. -
You should not
move your veh icle or
press the windshield wiper lever when
the wiper arms are folded away from the
windshield. The windshie ld wipers wou ld
move back into their original position
and could damage the hood and wind
shield.
- To help prevent damage to the wiper sys
tem, always loosen blades wh ich are fro
zen to the windshield before operating
w ipers.
- To help prevent damage to wiper blades,
do not use gaso line, kerosene, paint
t hinner, or o ther solven ts on o r near the
w iper blades.
- To help prevent damage to the wiper
arms o r other components, do not at
tempt to
move t he wipe rs by hand.
© Tips
- Commercial hot waxes applied by auto
matic car washes affec t the how easily
the glass surfa ce ca n be cleaned.
- Yo u can also use the se rvice position, for
examp le, if yo u want to protect the
w indshield from icing by us ing a
cover.
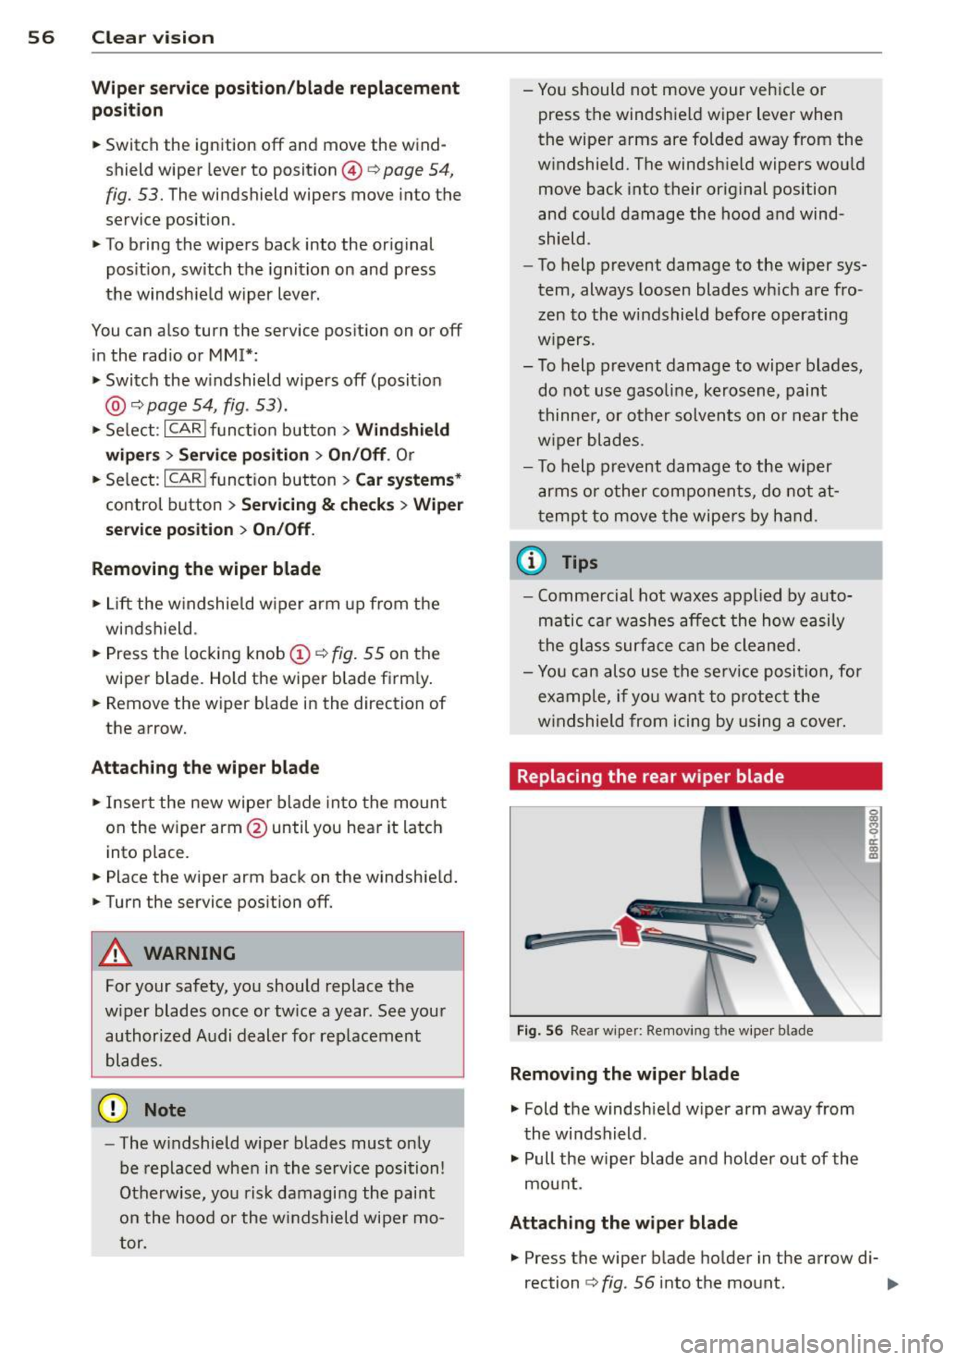
Replacing the rear wiper blade
&:
F ig . 56 Rear wiper: Removing t he wipe r blade
Removing the wiper blade
• Fold the windshie ld wiper arm away from
the windshield .
• Pull the w iper blade and holder out of the
mount.
Attaching the wipe r blade
g
8 rr. ., II)
• Press the wiper blade holder in the arrow di-
rection ~
fig. 56 into the mount. ..,.
Page 59 of 316
.. Fold the windshield wiper arm back onto the
windshield.
A WARNING
For safety reasons, the windshield wiper
blades should be replaced once or twice
each year.
Mirrors
Adjusting the exterior mirrors
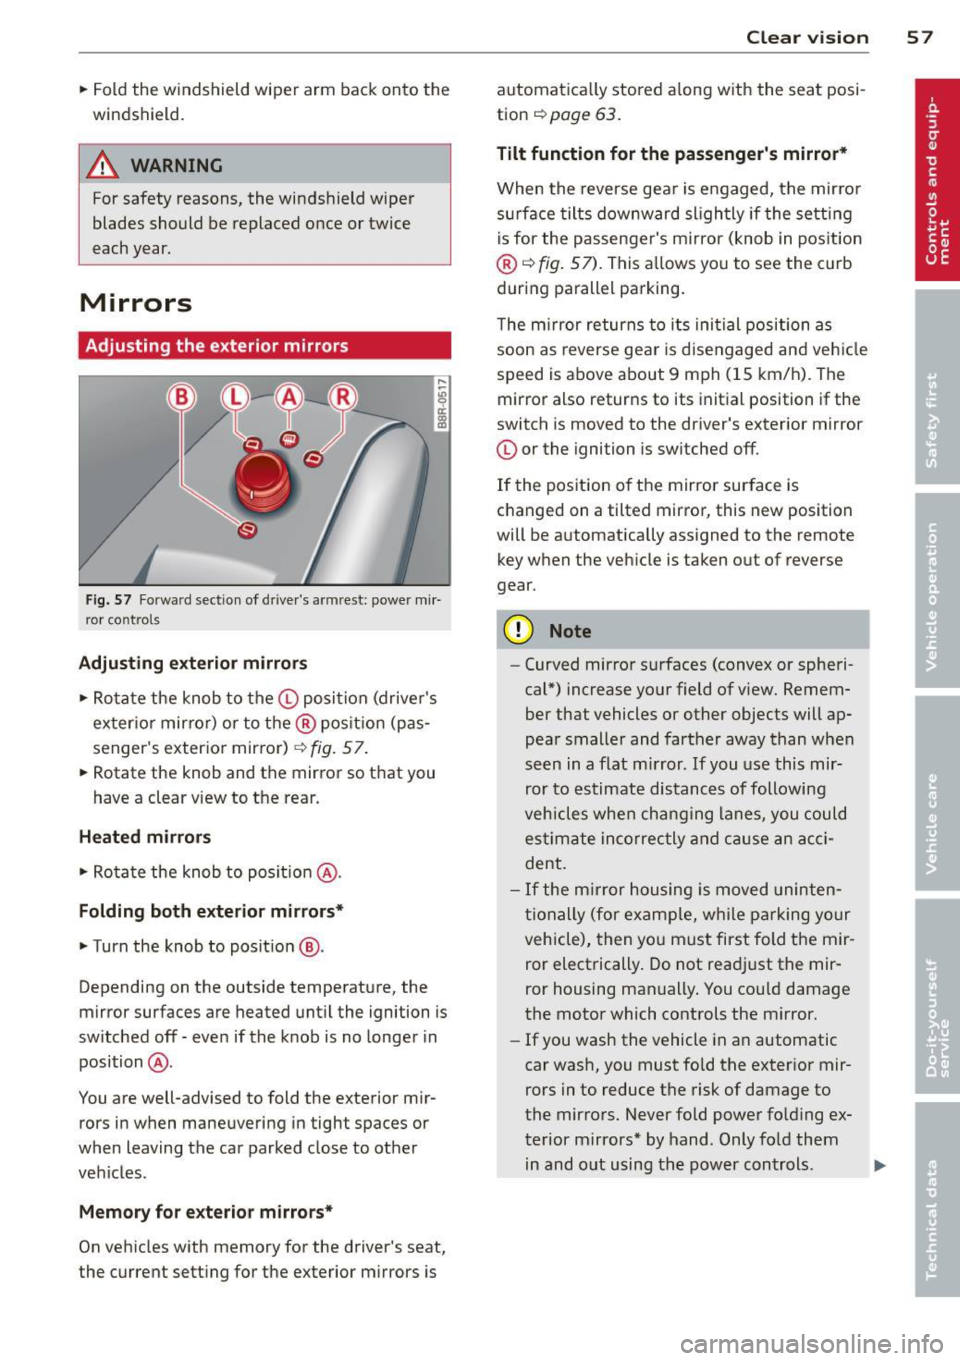
F ig. S7 Fo rwa rd sec tion of drive r's ar m rest : power mir
r or co ntro ls
Adjusting ext erior mirrors
.,. Rota te the knob to the© posi tion (drive r's
exter io r mirro r) or to the ® pos it ion (pas
senger's exter io r mirro r)
c::> fig. 57 .
.. Rotate the knob and the mirror so t hat you
have a clear view to t he rear.
Heated mirrors
.. Ro ta te the knob to pos it io n @ .
Folding both exterior mirrors*
.. Turn the knob to position @.
-
Depending on the outside temperature, the
mirror surfaces are heated unt il the ignition is
switched off -even if the knob is no longer in
position @.
You are well-advised to fold the exterior m ir
rors in when maneuveri ng in tight spaces or
when leaving the car parked close to other
vehicles .
Memory for exterior mirror s*
On vehicles with memory for the driver's seat,
the current sett ing fo r the exterior m irrors is Clear vi
sion 5 7
automatica lly stored a long with the sea t posi
tion
c::> page 63.
Tilt function for the passenger 's mirror*
When the reverse gea r is engaged, the mir ro r
s ur face tilts downward sl igh tly if the sett ing
i s for the passenge r's m irror (knob in pos it ion
®
c::> fig . 57). This a llows you to see the c urb
dur ing parallel pa rking.
T he m irror returns to its ini tial position as
soon as reverse gea r is disengaged and veh icle
s p eed is above about 9 mph (15 km/h) . The
mirror also returns to its init ial position if the
switch is moved to the dr iver's exterior m irror
© or the ignition is sw itched off.
If the position of the mirror surface is
c hanged on a tilted mirror, this new position
will be a utomatically ass igned to the remote
key w hen the veh icle is taken out of reverse
gear.
(D Note
- Curved mirror s urfaces (conve x or spheri
cal*) increase yo ur field of v iew. Remem
ber that vehicles or other objects will ap
pear smaller and farther away than when
seen in a flat m irror. If you use this mir
ror to estimate dis tances of following
vehicles whe n cha nging lanes, y ou coul d
es tim ate incorrec tly and c ause an ac ci
dent .
- I f the m irro r h ousing is moved uninten
ti onally (for e xam ple, w hile p arking yo ur
vehicle), then yo u must first fold the mir
ror elect rically . Do not read just the mir
ror housing man ually . You cou ld damage
the motor which controls the mirror.
- If you wash the vehicle in an automatic
car was h, you must fold the exterior mir
rors in to reduce the risk of damage to
the mirrors . Never fold power fo lding ex
terior mirrors* by hand . Only fo ld them
in and o ut using th e power controls .
liJl,
Page 60 of 316
58 Clear vis ion
@ Tips
If there shou ld be a malfunction in the
electrical system, you can still adjust the
exterior mirrors by pressing the edge of
the mirror .
Dimming the mirrors
N
..
-
" ~==============~ l8
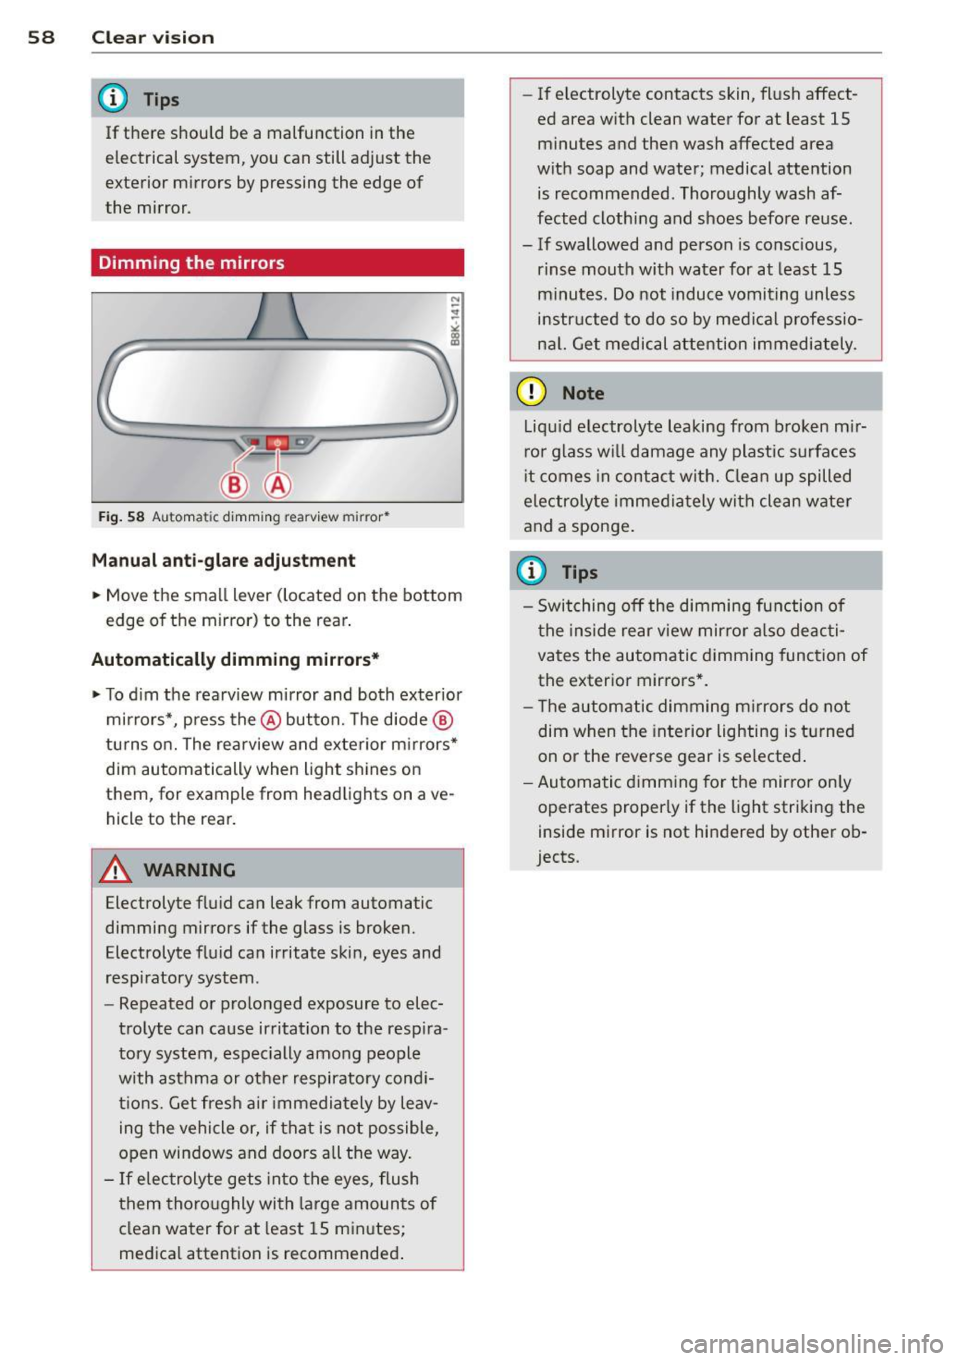
Fig. 58 A ut oma tic d imm ing re arview mirror*
Manual anti -glar e adju stm ent
.. Move the small lever (located on the bottom
edge of the mirror) to the rear .
Automatically dimming mirrors*
.. To d im the rearv iew mirror and both exterior
mirrors*, press the @button. The diode ®
turns o n. The rearview and exterior m irrors*
dim automatically when light shines on
them, for example from headlights on ave
hicle to the rear.
A WARNING
Electrolyte flu id can leak from automatic
dimming mirrors if the glass is broken.
Electrolyte fluid can irritate skin, eyes and
respiratory system .
- Repeated or prolonged exposure to elec
trolyte can cause irritation to the resp ira
tory system, espec ially among people
with asthma or other respiratory cond i
t ions. Get fres h air immedia tely by leav
ing t he vehicle or, if that is not possible,
open windows and doors all the way.
- If electrolyte gets in to the eyes, flush
them thoro ughly with large amounts of
clean water for at least 15 minutes;
medica l attention is recommended .
-If electrolyte contacts skin, flush affect
ed area with clean water for at least 15 minutes and then wash affected area
with soap and water; medical attention is recommended . Thoroughly wash af
fected clothing and shoes before reuse.
- If swallowed and person is conscious,
rinse mouth with water for at least 15
minutes. Do not induc e vomiting unless
instructed to do so by medi cal professio
na l. Get medical attention immediately .
(D Note
Liquid electrolyte leaking from b roken m ir
ror glass w ill damage any plastic surfaces
i t comes in contac t with. Clean up spilled
electrolyte imme diately with clean water
and a sponge .
(D Tips
-Switching off the dimming function of
the inside rear view mirror also deacti
vates the automatic dimming func tion of
the exterior mirrors * .
- The automatic dimming m irrors do not
dim when the interior lighting is turned
on or the reverse gear is selected .
- Au toma tic d imm ing for the mirror on ly
operates properly if the light striking the
inside mirror is not hindered by othe r ob
jects .