AUDI Q5 2014 Owners Manual
Manufacturer: AUDI, Model Year: 2014, Model line: Q5, Model: AUDI Q5 2014Pages: 316, PDF Size: 78.41 MB
Page 91 of 316
-When starting on inclines, the starting as
sist prevents the vehicle from unintentional
ly rolling back. The braking force of the
parking brake is not released until sufficient
driv ing force has been built up at the
wheels .
Emergency brake function
An emergency brake ensures that the vehicle
can be slowed down even if the
normal brakes
fa il
c::> page 90, Emergency braking.
Indicator light s
-If the parking brake is closed with the igni
tion
s witched on the indicator lights come
on . (USA mode ls)/ . (Canada mode ls) in
the instrument cluster and the switch.
- If the parking brake is closed with the igni
tion
s witched off the indicator lights come
on . (USA mode ls)/ . (Canada mode ls) in
the instrument cluster and the switch for
about 20 seconds.
A WARNING
If a drive range is engaged with the veh icle
stat iona ry and the engine running, you
must in no instance accele rate ca re lessly.
Otherw ise the vehicle will sta rt to move
immediately -risk of an accident .
(D Note
If the symbo l. in the display or the ind i
cato r light .. (USA models) . (Cana
da mode ls) in the instrument clus ter flash
es, the re is a malfunction in the brake sys
tem . By pressing the
ISETI button, you can
bring up a driver message which explains
the malfunction in more detail.
If the driv
er message
Parking brake system fault!
See owner's manua l
appears, there is an
operating malfunction in the park ing brake
which you should have repaired immedi ately by an author ized Audi dealer or other
qua lified workshop
c::> page 29.
@ Tips
- You can apply the pa rking brake at any
time -even w ith the ignition switched
'
On th e ro ad 89
off. The ignition must be turned on and
the brake pedal must be pressed in order
to release the parking b rake .
- Occasional noises w hen the parking
brake is app lied and released are normal
and are not a cause for concern.
- When the vehicle is pa rked, the parking
brake goes through a self -test cycle at
regu lar inte rva ls. Any associated noises
are normal.
Parking
"' Press the brake pedal to stop the veh icle.
"' Pull the sw itch
c::> page 88, fig. 100 to set
the parking b rake.
"' Move the selector lever to P.
"' Tu rn the engine off
c::> ,&. .
"'When on inclines or decl ines, turn the steer
ing wheel so that the vehicle will roll into
the cu rb if it begins to move.
A WARNING
-When you leave your vehicle -even if on
ly briefly- always remove the ignition
key. T his app lies particularly whe n chil
dren remain in the vehicle. Otherwise the
children could start the eng ine, release
the par king brake or operate elect rical
eq uipment (e.g. power w indows). The re
is the risk of an acc ident.
- When the veh icle is locked, no one -par
ticularly not children should rema in in
the vehicle. Locked doors make it more difficult for emergency workers to get in
to the vehicle -putting lives at risk.
Starting from rest
The starting assist function ensures that the
parking brake is released automatically upon
starting .
Stopping and applying parking brake
"' Pull the sw itch to app ly the parking b rake. .,.
Page 92 of 316
90 On the road
Startin g and automati cally r ele a s ing the
p ark ing b rake
.. When you start to drive as usua l, the park
ing brake is automatically re leased and your
vehicle begins to move.
When stopping at a traffic signa l or stopping
in city traffic on vehicles with an automatic
transmission, the park ing brake can be ap
plied. The vehicle does not have to be held
with the footbrake. The park ing brake elimi
nates the tendency to creep with a drive range
engaged . As soon as you dr ive off as usual,
the park ing brake is released automatically
and the veh icle starts to move .
Starting on slopes
When starting on incline s, the start ing ass ist
prevents the vehicle from unintentionally roll
ing back. The braking force of the parking
b rake is not released until sufficient dr iving
fo rce has been bu ilt up at the whee ls.
(D Tips
For safety reasons, the park ing brake is re
leased automatically only when the dr iv
er 's safety belt is engaged in the bu ck le.
Starting off with a trailer
To prevent rolling back unintentionally on an
incline, do the following:
.. Keep the switch pulled and depress the ac
celerator. The parking brake stays applied
and prevents the vehicle from ro lling back
ward.
.. You can release the switch once you are sure
th at you are developing enough driving
force at the wheels by depressing the accel
erator.
Depending on the weight o f the rig (vehicle
and trai ler) and the severity of the incline , you
may roll backwards as you start . Yo u can pre
vent roll ing backwards by holding the parking
brake switch pulled out and acce lerat ing -just
as you would when starting on a h ill with a
conventional hand brake .
Emergency braking
In the event that the conventional brake sys
tem fails or locks .
.. In an emergency, pull the switch and contin
ue to pull it t o slow your vehicle down with
the parking brake .
.. As soon as you release the switch or acceler-
ate, the b rak ing process stops .
If you pull the switch and ho ld it above a
speed of about 5 mph (8 km/h), the emergen
cy brak ing f unct ion is init iated . T he veh icle is
braked at all fou r whee ls by activating the hy
draulic brake sys tem. The brake performance
is similar to making an emergency stop~&. .
In order not to act ivate the emergency brak
ing by mis take, an audib le warning tone (buz
zer) sounds whe n the switch is pulled. As soon
as the switch is re leased, or the accelerator
peda l is depressed, emergency braking stops.
A WARNING
Emergency braking should only be used in
an emergency, when the norma l foot brake
has fa iled or the brake pedal is obstructed.
Using the park ing brake to perform emer
gency braking will s low your veh icle down
as if you had made a full brake application .
The laws of phys ics cannot be suspended
even with ESC and its asso ciated compo
nents (ABS, ASR, EDS). In corners and
when road or weather cond itions are bad,
a full brake application can ca use the vehi
cle to skid or the rear end to break away -
risking an accident .
Driver messages in the instrument
cluster
Caution: Vehicle parked too steep
This message appears when the parking brake
is app lied on a n incline that exceeds about
30% .
In this case the braking power of the park ing
brake may
not b e adequate to prevent the ve-
hicle from ro lling un intent io na lly. ...
Page 93 of 316
Press brake pedal to release parking brake
This driver message appears when the switch
to release the parking brake was pressed. The
parking brake can only be released if yo u step
on the brake pedal and at the same time press
the switch or you automatically re lease the
parking brake with the starting assist
<=>page 89.
fpii Parking brake malfunction!
This driver message appears together with
the yellow
rm symbol when there is a parking
brake malfunction.
Start-Stop-System
Descript ion
A ppl ies to vehicles: with Sta rt-Stop-System
The Start-Stop -System can help increase fuel
economy and reduce CO
2 emissions.
In the Start-Stop-mode, the eng ine shuts off
automatically when the vehicle is stopped,
such as at a traffic light. The ignition remains
sw itched on during this stop phase. The en
gine will be automatically restarted when
needed.
The last Start-Stop-System setting (o n/off us
ing the button
lr.;, .. I) will be restored when the
ignition is turned on. The LED in the
1r.;, .. 1 but
ton turns on when the Start-Stop-System is
switched off manually.
Basic requirements for the Start-Stop
mode
- The driver's door is closed .
- The driver's seat belt is latched.
- The hood is closed.
- The vehicle must have been driven faster
than 2.5 mph (4 km/h) since the last stop .
- A tra iler is not hitched to the veh icle .
A WARNING
- Never turn off the engine before the ve
hicle has come to a complete stop. The
full function of the brake booster and the
power steering is not guaranteed. You
On the road 91
must use more force to turn or brake if
necessary. Because you cannot steer and
brake as you usually would, this could
lead to crashes and ser ious injuries.
- To reduce the risk of injuries, make sure
that the Start-Stop-System is turned off
when working in the engine compart
ment
c:> page 93.
(D Note
Always switch off the Start-Stop-System
when driving through water
c:> page 93.
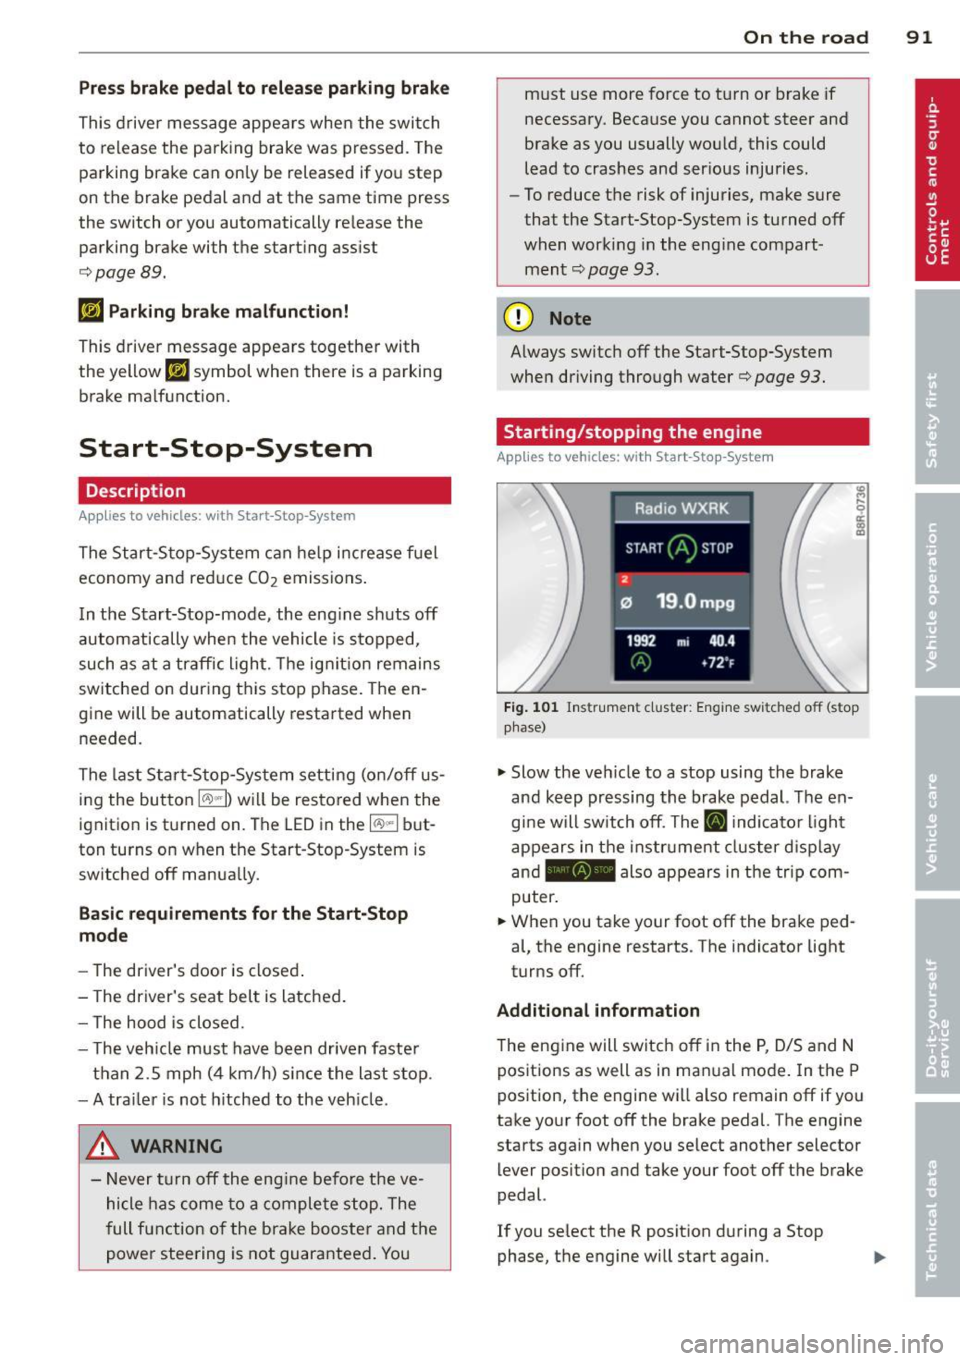
Starting /stopping the engine
App lies to vehicles: wit h Start -Stop -System
Fig. 101 Instrum ent cluster: Engine switched off (stop
phase)
.,. Slow the veh icle to a stop using the brake
and keep pressing the brake pedal. The en
gine will switch off. The
ti] indicator light
appears in the instrument cluster disp lay
and - also appears in the trip com
puter .
.,. When you take your foot off the brake ped
al, the engine restarts . The indicator light
turns off.
Additional information
T he engine will switch off in the P, D/S and N
positions as well as in ma nual mode. In the P
position, the engine will also remain off if you
take your foot off the brake pedal. The engine
starts again when you select another selector lever position and take your foot off the brake
pedal.
If you se lect the R position during a Stop
phase, the engine will start again .
Page 94 of 316
92 On the road
Shift from D/S to P quickly to prevent the en
gin e from starting unintentionally when shift
ing through R.
You can dete rm ine fo r yoursel f if the eng ine
will stop or not by reducing o r increasing the
amo unt of force you use to press th e brake
pedal. For example, if you only lightly press
on the brake pedal in stop-and and -go traffic
o r when turning , the engine will not switch off
when the vehicle is stationary . As soon as you
press the brake down harder , the eng ine will
switch off.
(D Tips
- Press the brake pedal during a stop
phase to keep the vehicle from rolling .
- The ign ition will turn off if you press the
I S TART ENGINE STOP I* button dur ing a
stop phase .
- The image in the display is slightly differ
ent in some mode ls .
General information
App lies to vehicles: with Start -Stop -System
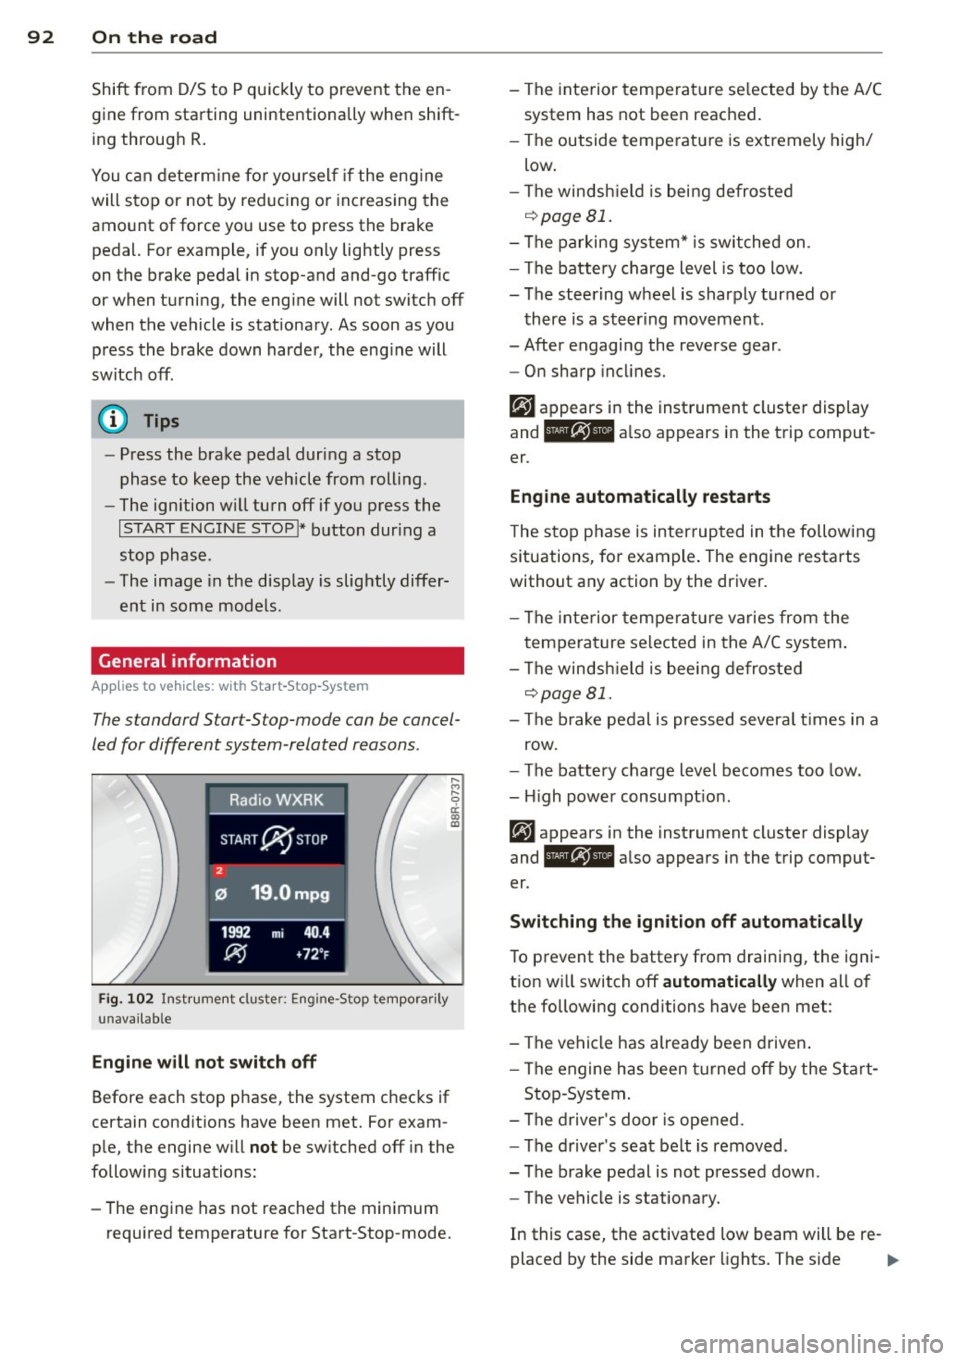
The standard S tar t-S top-mode can be cancel
led for different system -related reasons .
Fig. 1 02 Ins trument clust er: E ngin e-S top tempo rari ly
una va ilabl e
Engine w ill not switch off
Before each stop phase, the system checks if
ce rt a in cond itions have been met. For exam
ple, the engine w ill
not be sw itched off in the
following situations:
- The engine has not reached the min imum
required temperatu re for Start -Stop-mode. - The interior temperat
ure se lected by the A/C
system has not bee n reached.
- The outside tempe rature is extremely high/
low .
- The winds hield is being defroste d
o::::>pageBl.
-The parking sys tem* is switched on .
- The battery charge level is too low.
- The steering wheel is sharply turned or
there is a steer ing movement .
- After engaging the reverse gear .
- On sharp incl ine s.
er .
Eng ine automat ically r estarts
T he stop phase is interrupted in the follow ing
situations, fo r example . The engine restarts
without any action by the driver.
- The interior temperat ure varies from the
temperature se lected in the A/C system .
- The winds hield is bee ing defrosted
o::::> page 81.
- The b rake pedal is pressed severa l times in a
row.
- The battery charge level becomes too low .
- High power consumpt ion.
er .
Switching the ign ition off automatically
To p revent the battery from draining, the ign i
t ion w ill switch off
automatic ally when all of
the following conditions have been met :
- The vehicle has already been d riven .
- The engine has been turned off by the Sta rt-
Stop -System .
- The d river 's doo r is opened .
- The d river 's seat belt is removed .
- The brake pedal is not pressed down .
- The vehicle is stationary.
In this case, the activated low beam will be re-
placed by the side marker lights. The s ide ..,.
Page 95 of 316
marker lights will switch off after approxi
mately 30 minutes or when you lock the vehi
cle.
If the Start-Stop-System has not turned off
the engine or if you have switched the Start
Stop-System off manually, the ignition will
not be automatically switched off and the en
g ine will continue to run
i::> &. .
A WARNING
Never allow the engine to run in confined
spaces -danger of asphyxiation .
@ Tips
If you shift into the D/S or N positions af
ter shift ing into reverse, the vehicle must
be driven faster than 6 mph (10 km/h) in
order for the engine to switch off again .
Switching the Start-Stop-System on/off
manually
Applies to vehicles: with Start-Stop-System
If you do not wish to use the system, you can
switch it off manually.
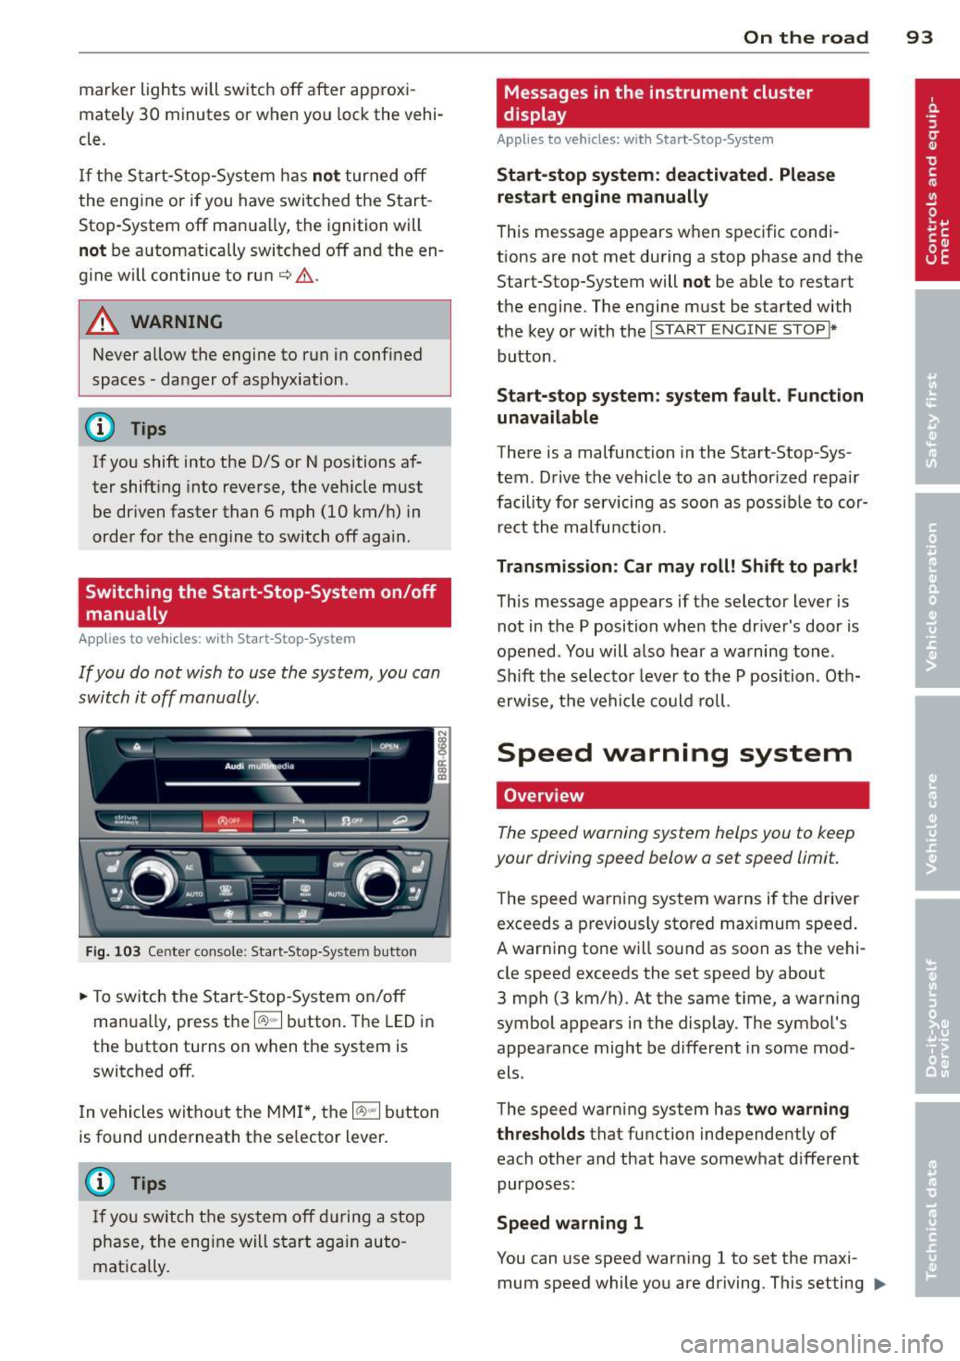
Fig. 103 Ce nter con sole : Star t-Stop-Sy stem butto n
.. To switch the Start -Stop-System on/off
manua lly, press the
1/A) "'I button. The LED in
the button turns on when the system is
switched off.
In vehicles witho ut the MMI *, the
1/A) "'I b utton
is found underneath the se lector lever.
(D Tips
If you switch the system off during a stop
phase, the engine will start again auto
matically.
On the road 93
Messages in the instrument cluster
display
Appl ies to vehicles: with Start-Stop-System
Start-stop system: deactivated. Please
restart engine manually
This message appears when specific condi
tions are not met during a stop phase and the
Start-Stop-System will
not be able to restart
the engine. The engine mus t be started with
the key or with the
I START ENGIN E STOP !*
button .
Start-stop system: system fault. Function
unavailable
There is a malfunction in the Start -Stop -Sys
tem . Drive the vehicle to an author ized repair
facility for servicing as soon as possible to cor
rect the malfunction .
Transmission: Car may roll! Shift to park!
This message appears if the selector lever is
not in the P position when the driver 's door is
opened . You will also hear a warning tone.
Sh ift the selector lever to the P position. Oth
erwise, the vehicle could roll.
Speed warning system
Overview
The speed warning system helps you to keep
your driving speed below a set speed limit.
T he speed warning system warns if the driver
exceeds a previous ly stored maximum speed.
A warning tone will sound as soon as the vehi
cle speed exceeds the set speed by about
3 mph (3 km/h) . At the same time, a warning
symbol appears in the display . The symbol 's
appearance might be different in some mod
els .
The speed warning system has
two warning
thresholds
tha t function independen tly of
each other and that have somewhat different
purposes :
Speed warning 1
You can use speed warning 1 to set the m axi
mum speed while you are driving . This setting ..,.
Page 96 of 316
94 On the road
will remain in effect until you turn off the igni
tion, assuming that you have not changed or reset the setting .
The speed warning symbol. (USA models)/
• (Canada mode ls) in the warning 1 display
appears when you exceed the maximum
speed. It goes out when the speed falls below
the stored maximum speed.
The speed warning symbol wi ll also go out i f
the speed exceeds the stored maximum speed
by more than about
25 mph (40 km/h) for at
least
10 seconds. The stored maximum speed
is deleted.
Setting speed warning
1 9 page 94.
Speed warn ing 2
Sto ring warning 2 is recomme nded if you al
ways
want to be reminded of a certa in speed,
for example when yo u are traveling i n a cou n
try that has a general maximum speed limit,
or if you do not want to exceed a specified
speed for winter tires.
The speed warning
2 symbol ,. (USA mod
e ls)/ . (Canada models) appears in the dis
p lay when you exceed the stored speed limit.
Unlike warning
1, it will not go out until the
vehicle speed drops below the stored speed limit.
Setting speed warning
2 9 page 94.
(D Tips
Even tho ugh your vehicle is equipped with
a speed warning system, you shou ld still
watch the speedomete r to make sure you
are not driving faster than the speed lim it.
Speed warning 1: setting a speed limit
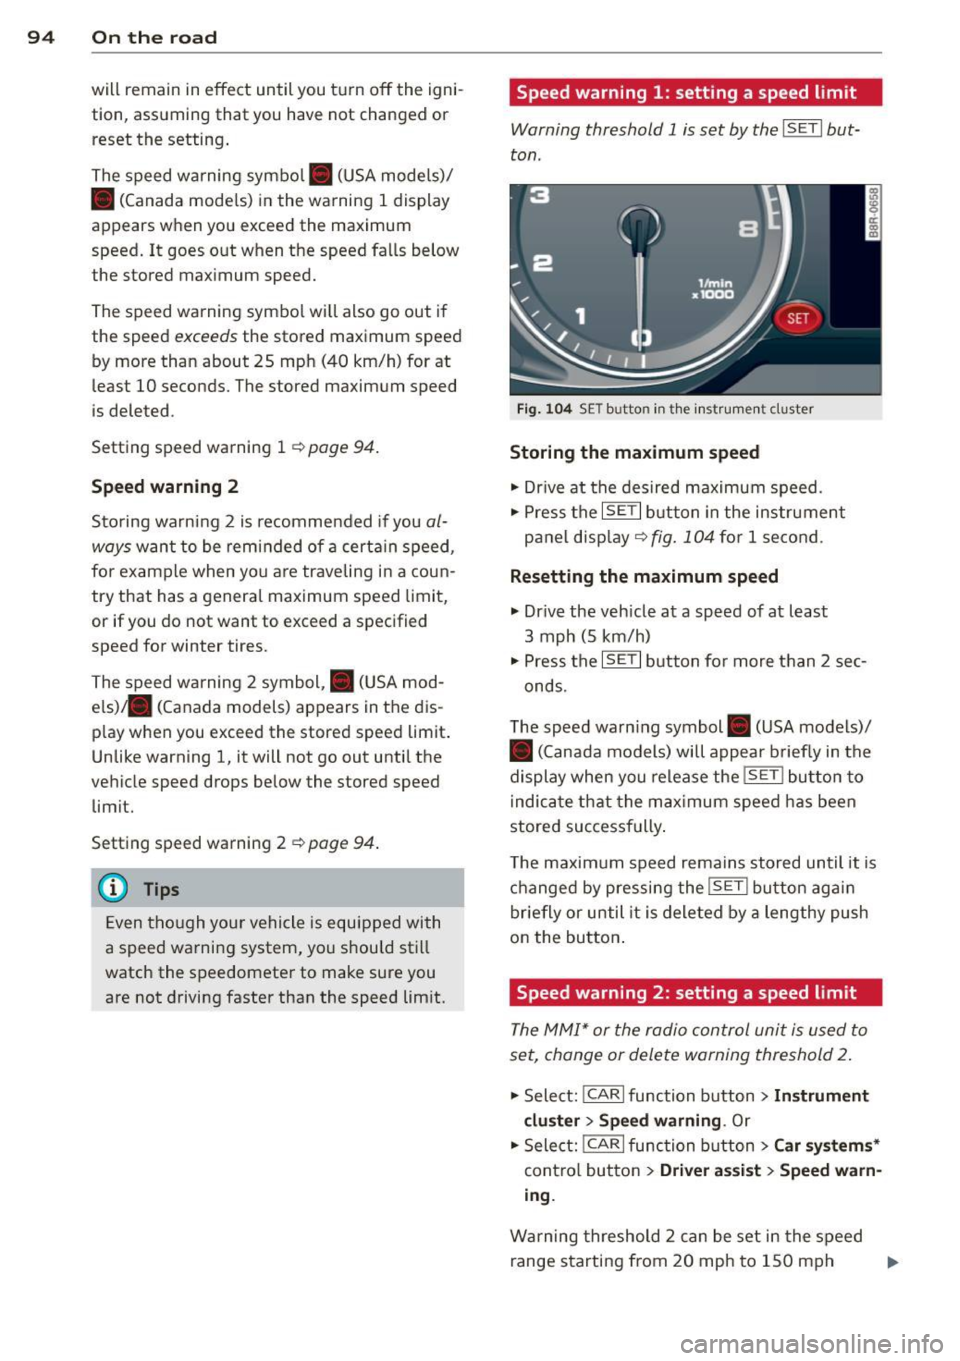
Warning threshold 1 is set by the I SET I but
ton .
Fig . 1 04 SET butto n in th e ins trume nt cluster
Storing the maximum speed
• Drive at the desired maximum speed.
• Press the
ISE TI b utton in the instrument
panel display ~
fig. 104 for 1 second .
Resett ing the m aximum spe ed
• Drive the vehicle at a speed of at least
3 mph (5 km/h)
• Press the
IS ET I button for more than 2 sec-
onds.
T he speed warn ing symbol . (USA models)/
• (Canada models) will appear b riefly in the
display when you release the
! SE T! bu tton to
i ndica te that the max imum speed has been
stored successfully .
T he maximum speed remains stored until it is
changed by pressing the
! SE T! bu tton aga in
briefly or until it is deleted by a lengthy push
on the button .
Speed warning 2: setting a speed limit
The MM!* or the radio control unit is used to
set, change or delete warning threshold 2.
• Select: !CARlfunction button>
In strum ent
cl us te r > Spee d warning .
Or
.. Select: !CAR I function button> C ar sys te m s*
contro l button > Dri ver a ssist > Speed w arn
i n g .
Warning threshold 2 can be set in the speed
range starting from
20 mph to 150 mph ..,.
Page 97 of 316
(30 km/h to 240 km/h). Settings can each be
adjusted in intervals of
5 mph (10 km/h) .
Cruise control
Switching on
The cruise control sys tem makes it possible to
drive at a constant speed starting at 20 mph
(30 km/h) .
0
f
®t
0
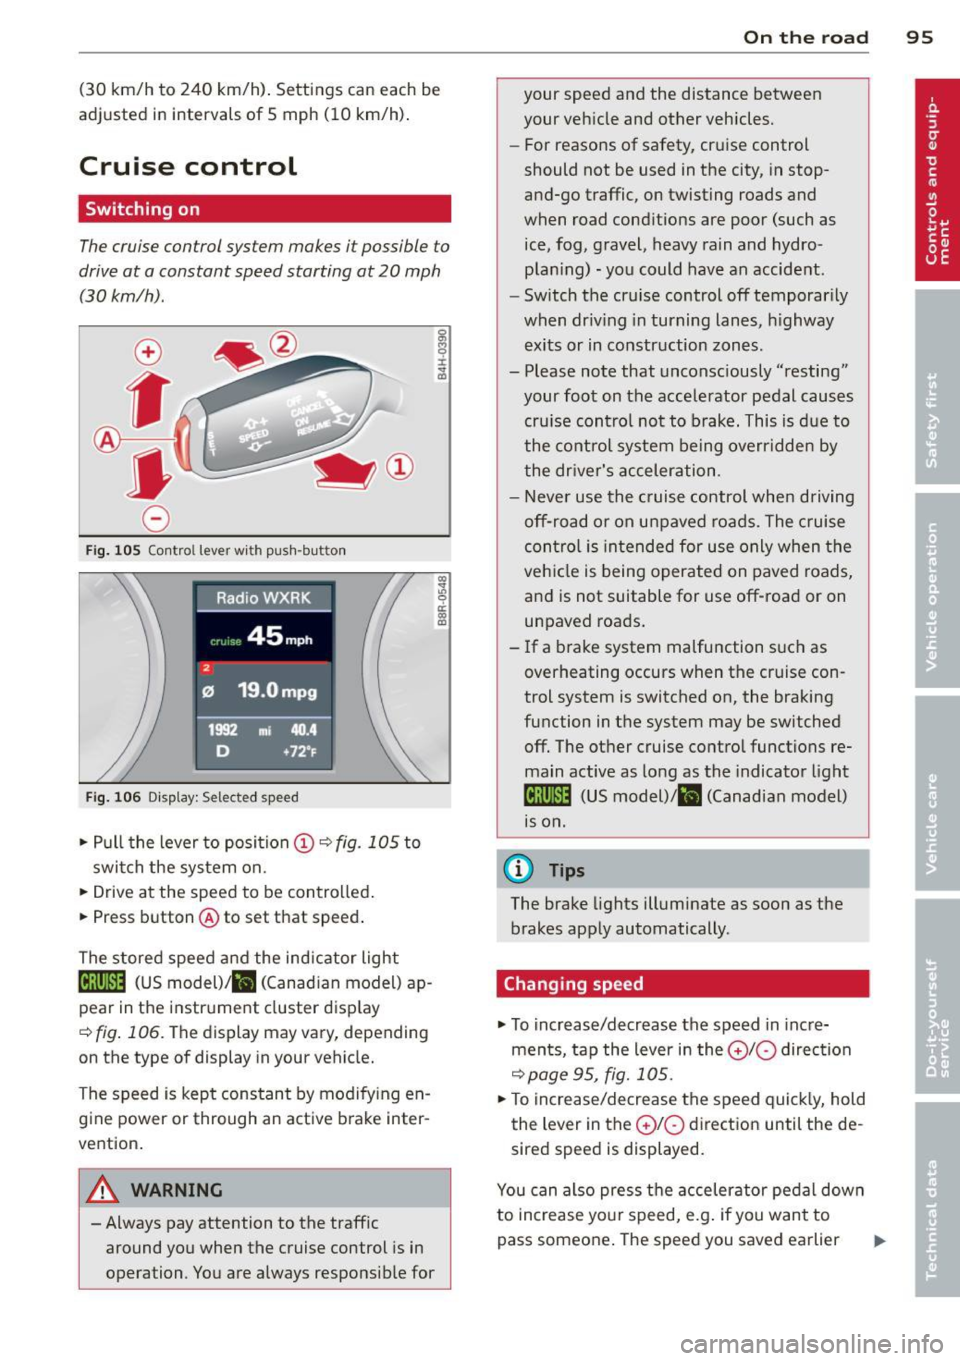
Fig. 10S Contro l lever wi th push -bu tton
Fig. 106 Di splay: Selec ted speed
.. Pull the lever to position (D c:? fig . 105 to
switch the system on .
.. Drive at the speed to be contro lled.
.. Press button @to set that speed .
The stored speed and the ind icator light
Bll!lm (US model)/ il (Canad ian model) ap
pear in the instrument cluster disp lay
<=> fig . 106. The display may vary, depending
on the type of display in your vehicle.
The speed is kept constant by modify ing en
gine power or through an active brake inter
vention.
A WARNING
- Always pay attention to the traffic around you when the cruise control is in
operation . You are always responsible for
c:o ;:g 0 ci: c:o al
On th e road 95
your speed and the distance between
your vehicle and other vehicles.
- For reasons of safety, cruise control
should not be used in the city, in stop
and-go traffic, on twisting roads and
when road conditions are poor (such as
ice, fog, gravel, heavy rain and hydro
plan ing) - you could have an accident.
- Switch the cruise control off temporarily
when dr iv ing in turning lanes, h ighway
exits or in construction zones .
- Please note that unconsciously "resting" your foot on the accelerator pedal causes cru ise contro l not to brake. This is due to
the control system be ing overridden by
the driver's acceleration.
- Never use the cruise control when driving off-road or on unpaved roads. The c ruise
con tro l is intended for use only when the
vehicle is being operated on paved roads,
and is not suitable for use off-road or on
unpaved roads.
- If a brake system malfunction such as overheating occurs when the cruise con
trol system is switched on, the braking
function in the system may be switched off. The other cruise control functions remain active as long as the indicator light
IR;\1 )~14 (US model)/ fil (Canadian model)
1s on .
(D Tips
The brake lights illuminate as soon as the
brakes apply automatically .
Changing speed
.. To increase/decrease the speed in incre
ments, tap the lever in the
0 10 direction
<=> page 95, fig. 105 .
.. To increase/decrease the speed quickly, hold
the lever in the
0 10 direction until the de
sired speed is displayed.
You can also press the accelerator pedal down
to increase your speed, e.g . if you want to
pass someone. The speed you saved earlier
Page 98 of 316
96 On the road
will resume as soon as you let off o f the
accelerator peda l.
I f , however, yo u exceed you r saved speed by
5 mph (10 km/h) for longer than 5 min utes,
the cruise cont ro l will be turned off tempo ra
rily. The green symbol in the display turns
white, the saved speed is retained.
Pre-selecting speed
You con pre-select your desired speed while
the vehicle is not moving .
.,. Turn on the igni tion .
... Pull lever into position@¢
page 95,
fig . 105 .
... Press the lever in the 0 or O direction to
increase or decrease your speed .
... Let go of the lever to save that speed.
This function makes it possible, for example, to save the speed yo u want before driving on
the hig hway . Once on the highway, activate
the cruise control by pulling the lever toward
@ .
Switching off
Temp orary deactivation
... Step on the brake pedal, or
... Press the lever into pos ition @ (not clicked
i nto place)
r:::;, page 95, fig. 105, or
.,. Drive for longer than 5 minutes at more
than 5 mph (10 km/h) above the s to red
speed.
Switching off compl etel y
... Press lever into position @(clicked into
place), o r
... Switch the ign ition off.
The speed you saved w ill be retained if the
cru ise control has bee n sw itched off tempora
r ily. To resume the saved speed, let up on the
b rake and pull the lever to position @.
The saved speed will be erased after turn ing
the ign ition off.
A WARNING
You shou ld only resume the saved speed if
i t is not too high for ex isting traffic cond i
tions. Otherwise you r isk an acc ident .
Page 99 of 316
Hybrid
Hybrid drive
Introduction
Applies to vehicles: with hybri d dr ive
General information
The hybrid drive is a combined drive concept
that automat ically switches between combus
tion engine and e lectric dr ive types or com
b ines them.
All work on h igh voltage systems is intended
only for high voltage technicians and may only
be performed by authorized service facilities
in accordance with Audi regulations.
The high voltage system is composed of the
following h igh voltage components : the high
voltage battery, the power electronics, the
e lectric motor, the high voltage A/C compres
sor and the orange high voltage wiring.
High voltage battery
The high voltage battery is located in the lug
gage compartment underneath the cargo
floor. You do not need to perform any mainte
nance work on the high voltage battery . Addi
tional information about the high voltage bat
tery can be found under
r=> page 105.
The high voltage battery serv ice plug is a lso
found underneath an orange cover under the
cargo floor. The service plug is provided on ly
for use by service personnel and must not be
removed by others who are not trained to use
it .
A WARNING
The voltage in the high voltage system is
life-threatening. Touching a damaged high
voltage component can result in a fatal
electric shock. The components in the high
voltage system are marked with a warn ing
label which warns against the high volt
age.
- Never perform work on orange high volt
age cables or on high voltage compo
nents . On ly authorized repair facilities
Hybr id 97
that are certified may perform work on
the high voltage system.
- Never open or remove the service plug
cover in the center of the cargo floor.
- Never damage, alter or remove the or
ange high voltage cable or disconnect it
from the high voltage system.
- Audi regulations must be followed dur
ing all work performed on the high volt
age system and high voltage compo nents.
A WARNING
While in electric drive mode, the vehicle
produces considerably less idling, driving
and operat ing noise than when the com
bustion engine is running. This may make
it difficult or impossible for others such as
pedestrians and children to hear and no
tice the vehicle when it is in electrical drive
mode. This can lead to co llisions and inju
ries, for examp le in low traffic areas, when
maneuvering or when driving in reverse.
A WARNING
-
-
Never leave the vehicle unattended while
in the drive ready mode. The vehicle could
begin moving if the accelerator pedal is
pressed, even if the combustion engine is
switched off . This may cause collisions and
severe or fata l injuries. When the vehicle
enters drive ready mode, the status mes
sage
ybr I P cl, appears briefly in the in
strument cluster disp lay and the needle in
the power meter points to
READY
r=> page98 .
-When exiting the vehicle, make sure the
selector lever is in the P position, the ig
nition is switched off and the hybrid sys
tem is deactivated .
(D Note
-The high voltage system can be damaged
if the vehicle underbody comes into con
tact with the ground . Immediate ly drive
your vehicle to an authorized repair fa cility and have it inspected.
Page 100 of 316
98 Hybrid -Do not transport fluids in open contain
ers in the luggage compartment. Spilled
fluids can seep underneath the cargo
floor. This can damage the high voltage
system.
Starting the vehicle
App lies to vehicles: with hybrid drive
The vehicle is started and turned off either
with the ignition key~
page 83 or with the
I START ENGIN E STOP ! button* ~ page 86 in
the same way as a conventional vehicle .
When starting the vehicle, the needles in the instrument cluster move upward briefly .
When the vehicle enters drive ready mode,
the status message
hybrid ready appears
briefly in the instrument cluster display and
the needle in the power meter points to
READY ~ page 98.
Depending on the operation mode of the hy
brid system, there are two possible drive
ready modes after the vehicle has been start
ed:
Power meter overview
Applies to vehicles: with hybrid dr ive
Drive ready mode with combustion engine
If the operating requirements~ page 100 for
electric drive mode are
not met, the combus
tion engine starts the vehicle as usual. You can start driving as usual.
Drive ready mode with the electric motor
If the operating requirements~ page 100 for
the electric drive mode are met, the combus
tion engine remains off after starting the ve
hicle.
(0 Tips
To prevent the 12 volt battery from dis
charging, never leave the vehicle parked in
the drive ready mode. Remove the key
from the ignition or press the
I START ENGINE STOP! button* . When
leaving the vehicle always take the key
with you.
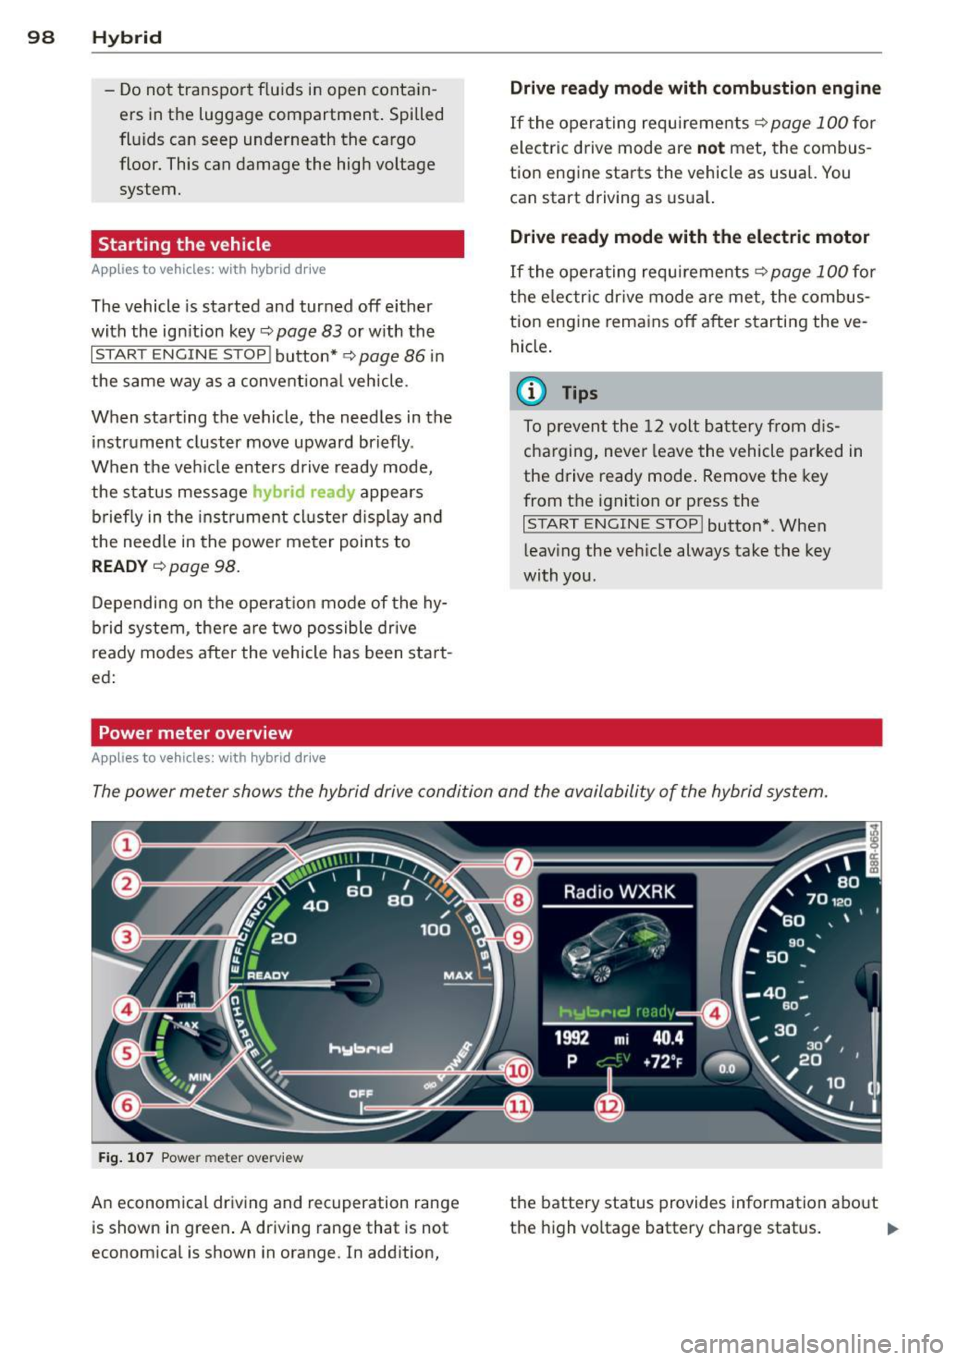
The power meter shows the hybrid drive condition and the availability of the hybrid system.
Fig. 107 Power meter overv iew
An economical driving and recuperation range
is shown in green. A driving range that is not
economical is shown in orange. In addition, the battery status
provides information about
the high voltage battery charge status.
lill-