display AUDI Q5 2017 Workshop Manual
[x] Cancel search | Manufacturer: AUDI, Model Year: 2017, Model line: Q5, Model: AUDI Q5 2017Pages: 296, PDF Size: 74.43 MB
Page 122 of 296
Audi side assist
-Improper reliance on the side assist system
can cause collisions and serious personal in
jury:
- Never rely only on side assist when chang
ing lanes.
- Always check rear view mirrors to make
sure that it is safe to change lanes.
- Side assist cannot detect all vehicles under
all conditions -danger of accident!
- Please note that side assist indicates there
are approaching vehicles, or vehicles in your blind spot, only after your vehicle has
reached a driving speed of at least 19 mph
(30 km/h).
- In certain situations, the system may not
function or its function may be limited. For
example:
- if vehicles are approaching or being left
behind very quickly . The display may not
turn on in time .
- in poor weather conditions such as heavy
rain, snow or heavy mist .
- on very wide lanes, in tight curves or if
there is a rise in the road surface . Vehicles
in the adjacent lane may not be detected
because they are outside of the sensor
range.
(D Note
The sensors can be displaced by impacts or damage to the bumper, wheel housing and
underbody . This can affect the system . Have
your authorized Audi dealer or authorized
Audi Service Facility check their function.
(D Tips
-If the window glass in the driver's door or
front passenger's door has been tinted, the
display in the exterior mirror may be misin
terpreted.
- For Declaration of Compliance to United
States FCC and Industry Canada regulations
c::> page 2 79.
120
Activating and deactivating
Applies to : vehicles wit h Audi side ass ist
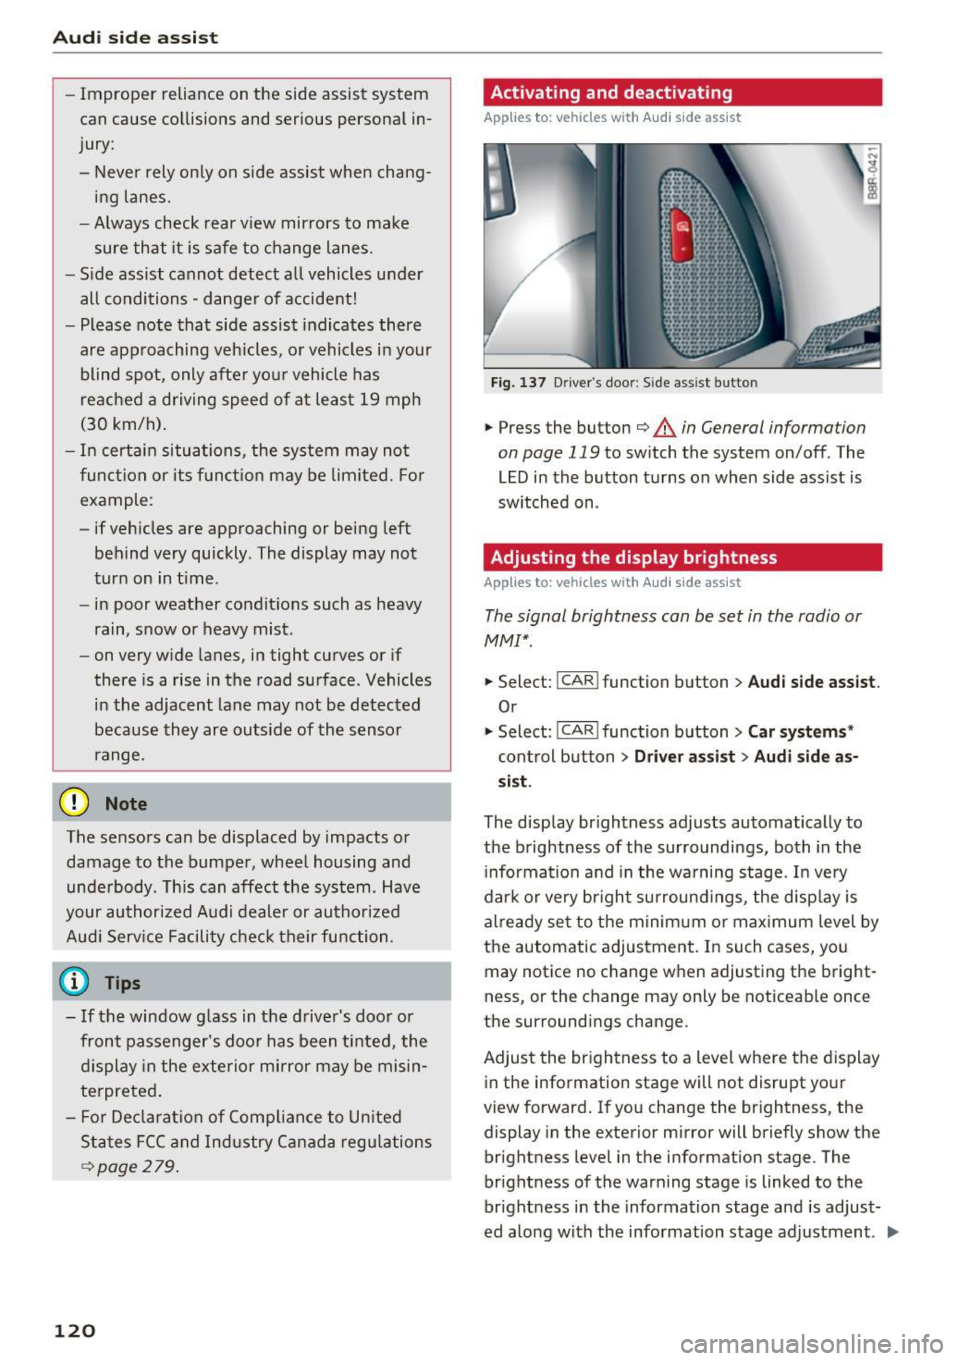
Fig. 137 D riv er's doo r: Side ass ist butto n
.,.. Press the button c::> &. in General information
on page 119
to switch the system on/off . The
LED in the button turns on when side assist is
switched on .
Adjusting the display brightness
Applies to: vehicles wit h Aud i side ass ist
The signal brightness can be set in the radio or
MMI* .
.,.. Select: I CAR I function button > Audi side assist.
Or
.,.. Select: I CAR I function button > Car systems*
control button > Driver assist> Audi side as
sist.
The display brightness adjusts automatically to
the brightness of the surroundings, both in the
information and in the warning stage. In very
dark or very bright surroundings, the display is
already set to the minimum or maximum level by
the automatic adjustment. In such cases, you may notice no change when adjusting the bright
ness, or the change may only be noticeable once
the surroundings change.
Adjust the brightness to a level where the display
in the information stage will not disrupt your
view forward. If you change the brightness, the
display in the exterior mirror will briefly show the
brightness level in the information stage . The
brightness of the warning stage is linked to the
brightness in the information stage and is adjust
ed along with the information stage adjustment . .,,.
Page 125 of 296
a,
a,
..... N r-N ..... 0 0
0:
co
Selecting the driving mode
App lies to: vehicles wit h Audi drive select
You con choose between Comfort, Auto, Dynam
ic and Individual* modes .
«>
~ 9
c:=====::::;: ~ a,
drive I I r.,. select _ - ~
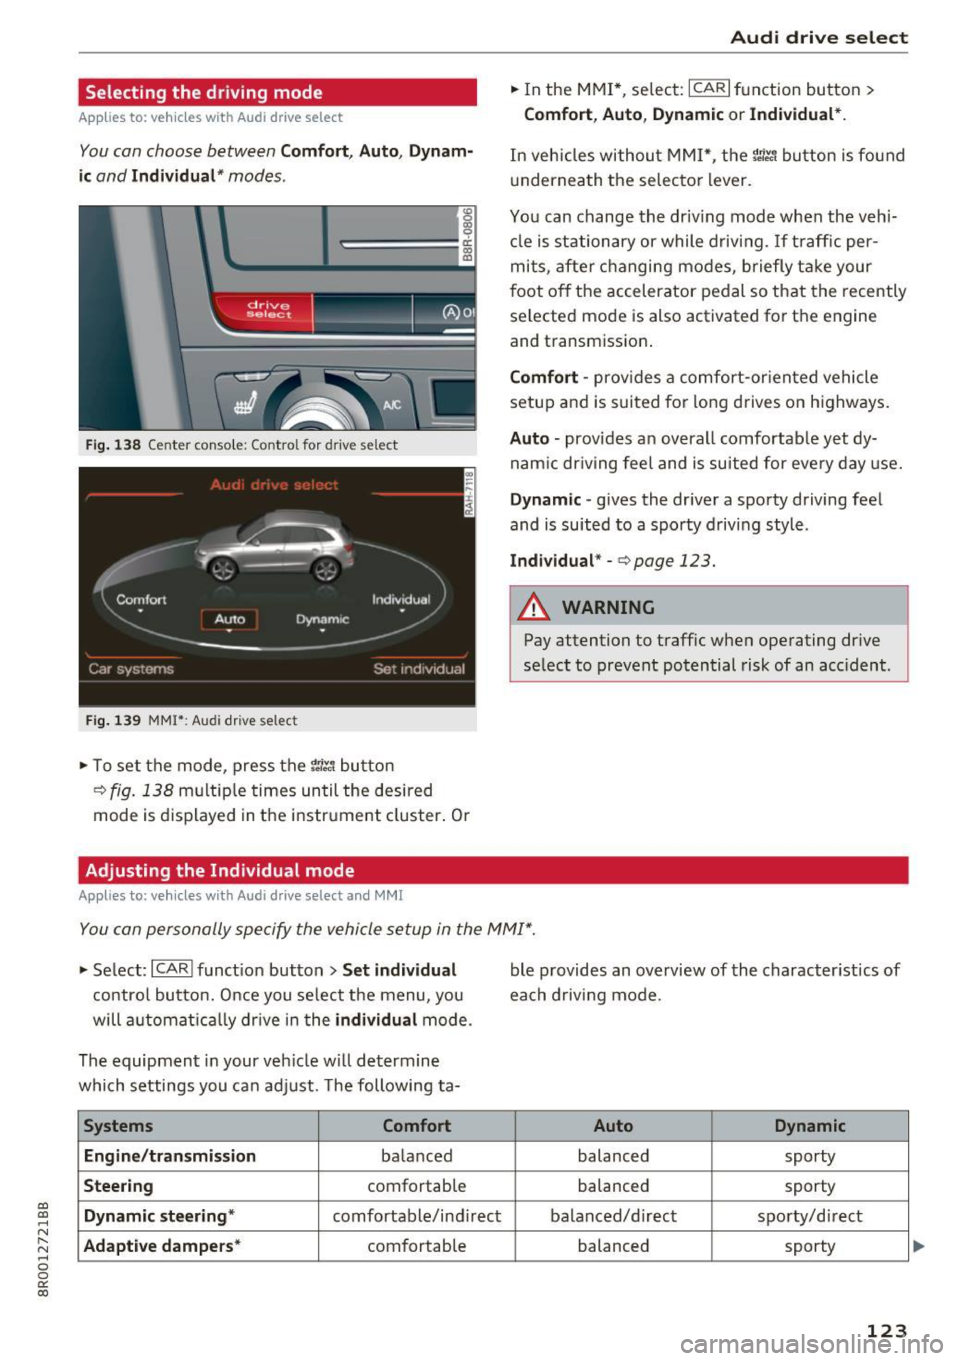
Fig. 138 Center conso le: Co ntrol for drive se lect
Fig. 139 MMI*: Audi drive select
... To set the mode, press the r:i~ button
c>fig. 138 multip le times until the desired
mode is displayed in the instrument cluster. Or
Adjusting the Individual mode
Applies to: vehicles with Audi drive select and MMI
Audi drive select
... In the MMI*, select: ICARlfunction button>
Comfort , Auto , Dynamic or Individual*.
In vehicles without MMI*, the rn~, button is found
underneath the selector lever.
You can change the driving mode when the veh i
cle is stationary or while driving.
If traff ic per
mits, after changing modes, briefly take your
foot off the accelerator pedal so that the recently
selected mode is also activated for the engine
and transmission .
Comfort -provides a comfort-or iented vehicle
setup and is suited for long drives on highways.
Auto -provides a n overal l comfortab le yet dy
namic driving feel and is suited for every day use.
Dynamic -gives the driver a sporty driving feel
and is suited to a spo rty driving style .
Individual* -c> poge 123.
A WARNING
-Pay attention to traffic when operating drive
se lect to prevent potential risk of an acc ident.
You can personally specify the vehicle setup in the MMI" .
... Se lect: I CARI function button > Set individual
control button. Once you se lect the menu, you
will automatically drive in the
individual mode .
The equipment in your vehicle will determine
which settings you can adjust. The following ta-
Systems Comfort
Engine/transmission
ba lanced
Steering comfortab le
Dynamic steering* comfortable/ind irect
Adaptive dampers * comfortable ble
provides an overview of the character istics of
each driving mode.
Auto Dynamic
balanced sporty
balanced sporty
balanced/d irect sporty/direct
balanced sporty
123
Page 128 of 296
Parking aid
Rearview cam era cov erage area
The MM I display shows the area covered by the
rearview camera
c:> fig . 142 @. Objects that a re
not in the area covered @are not shown on the
MMI disp lay.
We recommend th at yo u pract ice pa rking with
the rearview camera in a traffic-free location or
parking lot to become familiar with the system,
the orientation lines, and their function . When
doing this, there should be good light and weath
er cond itions .
I n the MMI disp lay, objects or vehicles appear
closer or further away if :
- yo u are driving in reverse ge ar from a level su r
f ace onto an incl ine, or a downward s lope,
- yo u are d rivi ng in reverse gea r toward protr ud
ing obje cts,
- the ve hicl e is ca rry ing too much load in the
rear.
The accuracy of the orientation lines and b lue
surfaces d imin ishes if:
- the rearv iew camera does not provide a reliab le
image, for example, in poor visibility cond itions
or if the lens is d irty,
- the image on the screen is not visib le due to
sun glare and reflection .
Caring for the rearview camer a lens
The rearview camera is located above the rear li
cense plate bracket. For the parking system to
operate, the lens
c:> fig. 143 must be kept clean:
- Dampen the lens with a househo ld alcoho l-
based glass cleaner, and then wipe the lens
clean with a dry cloth
i::> (!).
-Remove snow with a hand br ush and ice pref
erab ly with a de -icing spray
i::> (!) .
A WARNING
-The parking system ca nnot replace the dr iv
er's attention . The dr iver alone is responsi
ble for parking a nd s imilar dr iv ing mane u
vers.
- Sensors have blind spots in wh ich objects
cannot be detected . Pay spec ial atten tion to
126
sma ll children and anima ls because the sen
sors cannot a lways detect them.
- Always keep your eyes on the vehicle's sur
roundings, us ing the rearv iew mirror as
wel l.
- Do not allow yourself to be dist racted from
traffic by the rearview camera pictures.
- If the position and the installation angle of
the camera has changed, for example, after
a rea r end co llision, do not continue to use
the system for safety reasons. Have it
checked by a q ualified dealership .
(D Note
-Low obstacles a lready signa led by a warning
can disappear from the system's detect ion
range as they are approached and w ill not
cont inue to be signaled . Objects such as
barrier cha ins, tra iler draw bars, t hin paint
ed vertical po les or fences may not be de
tecte d by the system, posi ng ris k of dam
age.
- Never use wa rm o r hot wate r to remove
s now or ice from the rearview came ra le ns ·
this could cause the lens to c rack!
- Whe n cleani ng the lens, never use products
tha t are abr asive .
Page 129 of 296
Switching on and off
Applies to: vehicl es wit h Aud i parking system p lus w ith rear
view came ra
The rearview camera switches an automatically
together with the acoustic and visual park assist
when you put the vehicle in reverse.
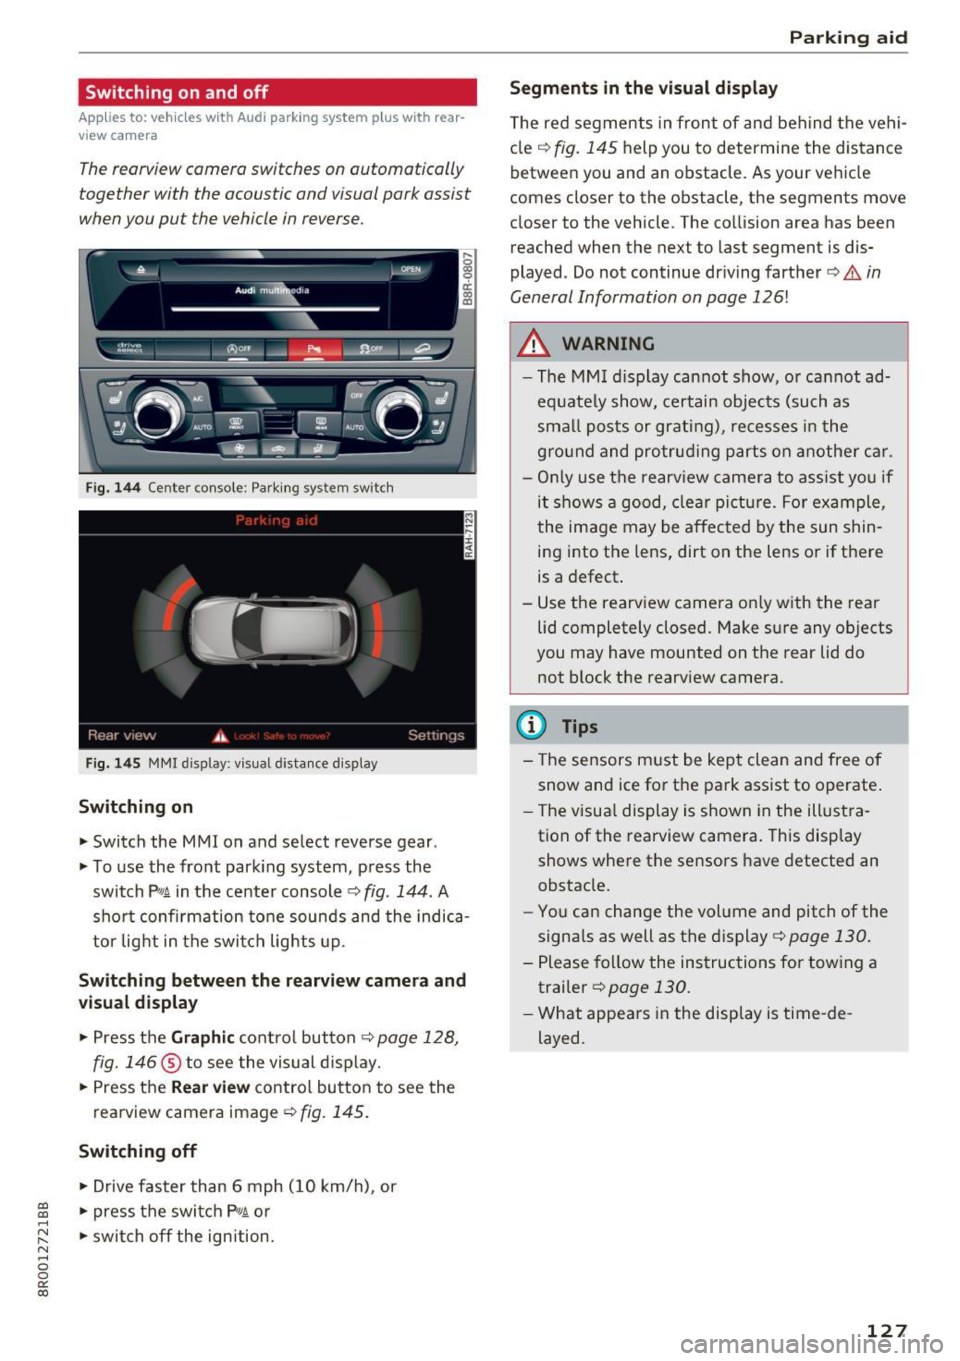
Fig. 144 Center console: Park ing system switch
Fig . 1 45 MMI display: visual distance display
Switching on
.. Switch the MMI on and select reverse gear .
.. To use the front park ing system, press the
switch
p,, 1A in the center console c::> fig . 144. A
sho rt confirmation tone sounds and the indica
tor light in the switc h lights up.
Switching between th e re arview came ra and
vi sual displa y
.. Press the Graphi c co ntrol button c::>page 128,
fig. 146
® to see the visual d isplay .
.. Press the
Rear view contro l butto n to see the
rearview camera image
¢fig. 145.
Switching off
.. Drive faster than 6 mph ( 10 km/h), or
~ .. press the switch P'#A or .....
~ .. switch off the ign ition. N ..... 0 0
0:
co
P ark ing aid
Segments in the visual di splay
T he red segments in front of and behind the vehi
cle
c:::> fig. 145 help you to determine the distance
between you and an obstacle. As your vehicle
comes closer to the obstacle, the segments move
closer to the vehicle. The collision area has been
reached when the next to last segment is dis
played . Do not continue dr iving farther
c:::> .&. in
General Information on page
126!
A WARNING
-- The MM I display cannot show, o r cannot ad-
equate ly show, certain objects (such as
smal l posts or grating), recesses i n the
g ro und and protruding parts on another car.
- On ly use the rearv iew camera to ass ist yo u if
it shows a good, clea r pi ctu re. For example,
the image may be affected by the sun shin
ing into the lens, dirt on the lens or if there
is a defect.
- Use the rearv iew camera on ly w ith the rea r
lid completely closed. Make sure any objects
you may have mounted on the rear lid do
not block the rearv iew camera.
(D Tips
- The sensors must be kept clean and free of
snow and ice for t he park ass ist to operate .
- The visua l display is shown in the illust ra
tion of the rearview camera. This display shows where the sensors have detected an
obstacle.
- You can change the volume and pitch of the
signa ls as well as the display
c:::> page 130.
- Please fol low the instructions for tow ing a
trailer
c:::> page 130.
- What appears in the display is time -de
layed.
127
Page 130 of 296
Parking aid
Reverse Parking
Applies to: vehicles w ith Aud i park ing system p lus w ith rear
view c amera
Parking mode 1 con be used when parking in a
garage or into a parking space.
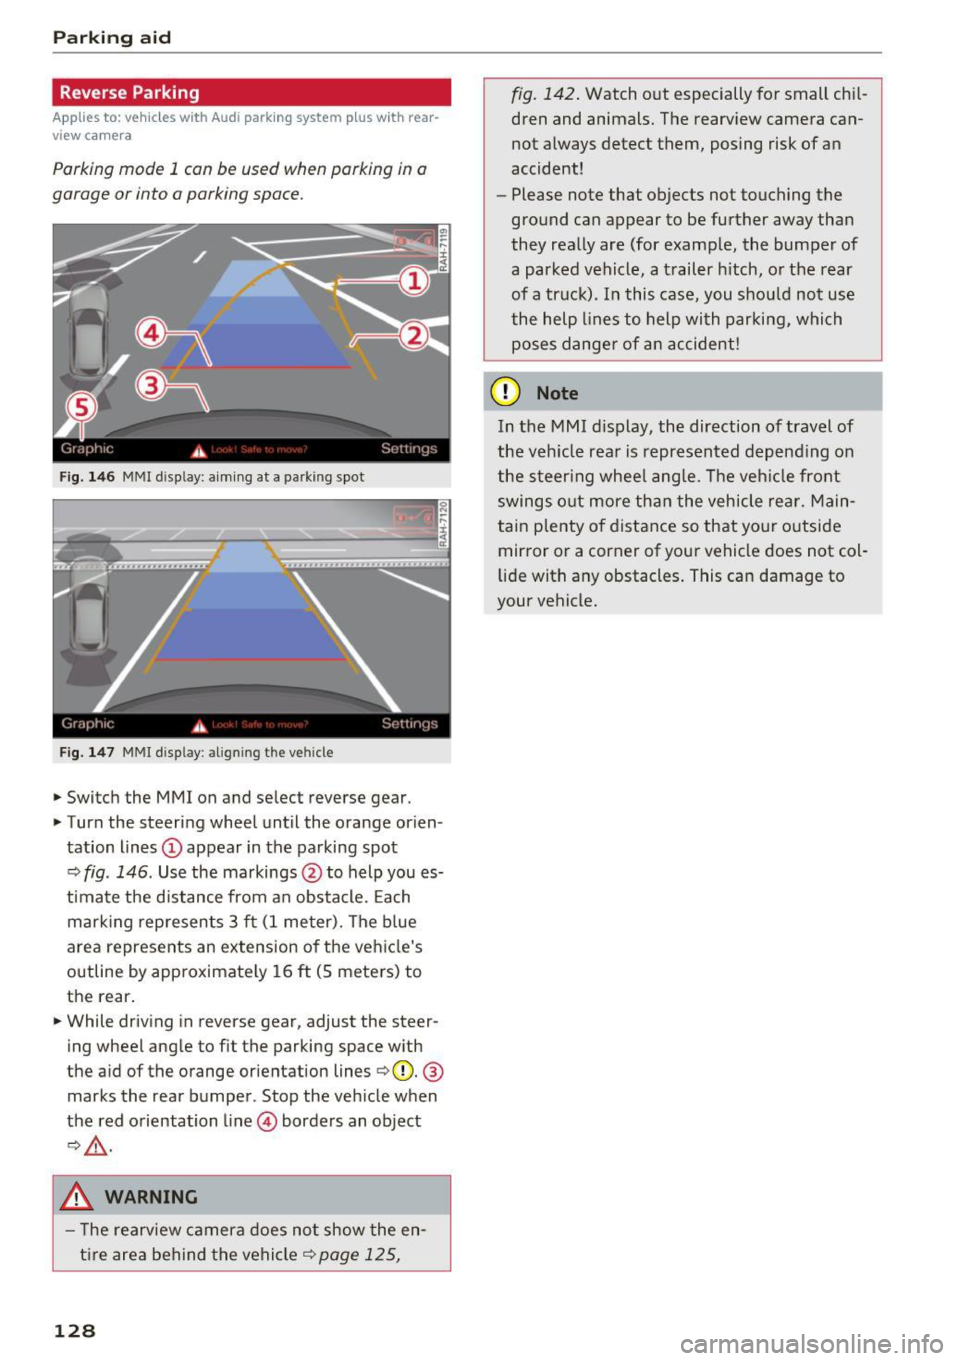
Fig. 146 MMI disp lay: a iming at a parking spot
Fig. 147 MMI disp lay: align ing the vehicle
.,. Switch the MMI on and se lect reverse gear .
.,. Turn the steering wheel until the orange orien
tation lines
(D appear in the parking spot
¢ fig . 146. Use the markings @to help you es
timate the distance from an obstacle. Each
marking represents 3 ft (1 meter). The blue
area represents an extension of the vehicle's
outline by approximately 16
ft (S meters) to
the rear .
.,. While driving in reverse gear, adjust the steer
ing wheel angle to fit the parking space with
the a id of the orange orientation lines ¢(D.
®
marks the rear bumper . Stop the vehicle when
the red orientation line© borders an object
¢,&. .
.&_ WARNING
- The rearview camera does not show the en
tire area behind the vehicle¢
page 125,
128
fig. 142. Watch out especially for small chil
dren and animals. The rearview camera can
not always detect them, posing risk of an
accident!
- Please note that objects not touching the
ground can appear to be further away than
they really are (for example, the bumper of
a parked vehicle, a trailer hitch, or the rear
of a truck). In this case, you should not use
the help lines to help with parking, which
poses danger of an accident!
(D Note
In the MMI display, the direction of travel of
the vehicle rear is represented depending on
the steering wheel angle. The vehicle front
swings out more than the vehicle rear. Main
tain plenty of distance so that your outside
mirror or a corner of your vehicle does not col
lid e with any obstacles. This can damage to
your vehicle.
Page 131 of 296
a,
a,
..... N ,....
N ..... 0 0
0:
co
Parallel Parking
Applies to: vehicles with Aud i parking system plus with rear
view camera
Use parking mode 2 to help you porollel pork
along the side of a street.
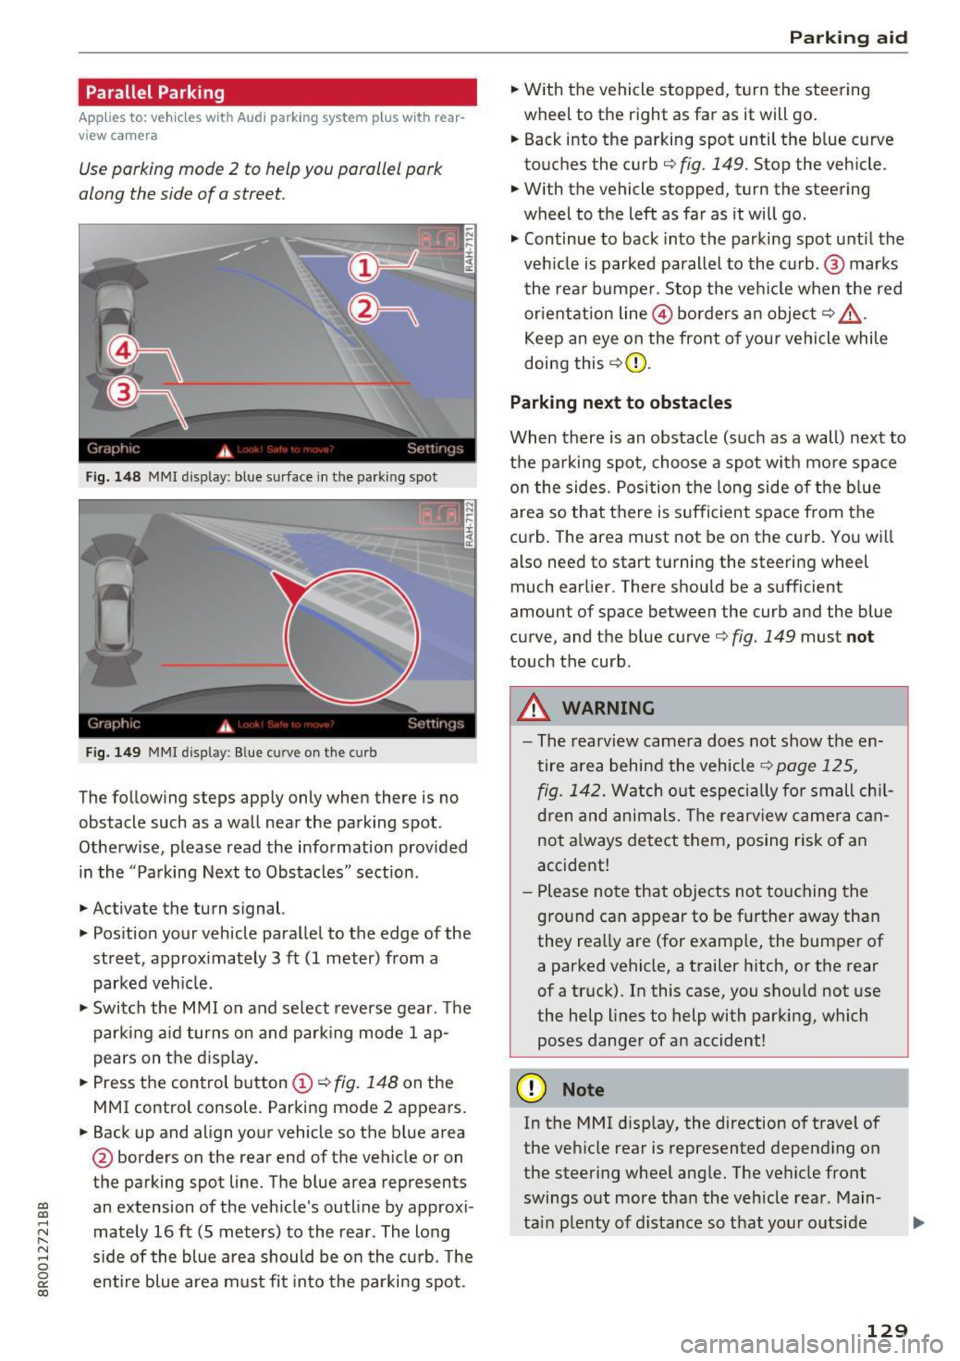
Fig. 148 MMI display: blue surface in the parking spot
Fig. 1 49 MMI display : Blue curve on the curb
The following steps apply only when there is no
obstacle such as a wall near the parking spot.
Otherwise, please read the information prov ided
in the "Parking Next to Obstacles" sect ion.
.,. Activate the turn signal.
.,. Pos ition your vehicle paralle l to the edge of the
street, approx imately 3 ft (1 meter) from a
parked veh icle.
.,. Swi tch the M MI on and se lect reverse gear. The
park ing a id turns on and park ing mode 1 ap
pears on the d isplay .
.,. Press the control button
(D ¢ fig. 148 on the
MMI control console. Parking mode 2 appears.
.,. Back up and align yo ur vehicle so the b lue area
@ borders on the rear end of the vehicle or on
the parking spot line. The blue area represents
an extension of the vehicle's outline by approxi
mately 16 ft (S meters) to the rear. The long
s ide of the blue area should be on the curb. The
en tire blue area must fit into the parki ng spot.
P ark ing aid
.,. With the vehicle stopped, turn the steering
wheel to the right as far as it will go.
.,. Back into the parking spot until the b lue curve
touches the curb¢
fig. 149. Stop the vehicle.
.,. With the vehicle stopped, turn the steering
wheel to the left as far as it will go .
.,. Continue to back into the parki ng spot unt il the
veh icle is parked parallel to the c urb. @ marks
the rear bumpe r. Stop the ve hicle when the red
orientat ion line @ borders an object¢
&
Keep an eye on the front of yo ur vehicle while
doing this ¢(D.
Parking next to obstacles
When there is an obstacle (such as a wall) next to
th e parking spot, choose a spot with mo re space
o n t he sides. Pos ition the long side of the b lue
area so that there is sufficient space from the
curb. The area must not be on the curb. You wi ll
also need to start turning the steering wheel
much earlier. There should be a sufficient
amount of space between the curb and the blue
curve, and the blue curve¢
fig. 149 must not
touch the curb.
A WARNING
-The rearview camera does not show the en
tire area behind the vehicle¢
page 125 ,
fig. 142.
Watch o ut especially fo r small ch il
d ren and animals. The rearview came ra can
not a lways detect them, posing risk of an
accide nt!
- P lease note that o bjects no t touching the
g ro und can appear to be further away tha n
they rea lly are (for e xamp le, the bumper of
a parked vehicle, a trailer h itch, or the rear
of a truck). In this case, you shou ld not use
the help lines to help with parking, which poses danger of an accident!
(D Note
In the M Ml d is play, the direction o f travel of
the veh icle rear is represented depend ing on
the steer ing whee l ang le. The ve hicle front
swings o ut more tha n the vehicle rea r. Main
ta in plenty of distance so that your o utside
129
Page 132 of 296
Parking aid
mirror or a corne r of your veh icle does not col
lide with any obstacles. This can damage to
your vehicle.
(D Tips
The left or right orientation lines and surfaces
will be displayed, depending on the turn sig
nal being used .
Adjusting the display
and warning tones
A pp lies to : ve hicles w ith Audi park ing system plus w ith rea r
view ca mera
The display and warning tones can be adjusted in
the MMI.
~ Select: ICARlfunction button> Parking system.
Or
~ Select: I CARI funct ion button > Car systems*
control button > Driver assist> Parking aid .
Display
-Off -when the parking system is switched on,
only audible signals are g iven.
- On -when the parking system is switched on,
either the visual disp lay or the picture from the
rearview camera is displayed .
Warning tones
-Front volume -front sensor volume
-Front frequency -front sensor frequency
- Rear volume -rear sensor volume
-Rear frequency -rear sensor frequency
-In -car entertainment fader/Music volume
while parking -
when the parking system is
switched on, the volume of the active audio
source is lowered .
The newly adjusted value is briefly heard from
the signal generator.
(D Tips
- The warning tones can also be adjusted di
rectly by the v isual disp lay or the picture
from the rearview camera. S imply press the
Settings control button.
- Changed settings are act ivated when park
in g system is switched on again .
130
-Th e settings are automatically stored and
assigned to the remote control key.
Trailer hitch
Applies to : vehicles wi th Audi parking sys te m plus wi th rear
v iew camera an d tra il er hitc h
For vehicles with a factory installed trailer hitch,
o r a trailer hitch installed according to factory
spec ifications, the parking system rear sensors
do not come on whenever you shift into reverse
gear or when you press the
p, qA switch. Remem
ber, there is no warning for distances to the rear.
The front sensors remain activated. The visual
display switches to the trailer tow ing mode. The
picture from the rearview camera w ill not show
the or ientat ion lines nor the blue surfaces .
If you install a hitch yourself, this function may
not work.
Error messages
App lies to: vehicles wi th Audi parking sys te m plus with rear
v iew camera
There is an error in the system if the LED on the
PJJJA switch is blinking and you hear a continuous
alarm for a few seconds after switching on the parking system or when the parking system is al
ready activated . Have your authorized Audi dealer
correct the error.
(D Tips
If the error is not corrected before you switch
off the ign ition, when you switch on the park
ing system again, the LED in the
Pw.o. switch
will blink.
Page 162 of 296
Airbag syste m
seat positions. Have the airbag system inspect
ed by your authorized Audi dealer immediately .
- move the chi ld to a rear seat position and make
sure that the child is properly restrained in a
child restraint that is appropriate for its size
and age .
The
P ASSE NGER AIR BAG O FF light shou ld NOT
come on when the ignition is on and an adult is
sitting in a proper seating position on the front passenger seat. If the
P AS SENGER AIR BAG OFF
light comes on and stays on or flashes for about
5 seconds while driving, under these circumstan
ces, make sure that:
- the adu lt on the front passenger seat is proper
ly seated on the center of the seat cushion with
his or her back up aga inst the backrest and the
backrest is not recl ined
r=> page 132, Correct
passenger seating positions,
- the adult is not taking weight off the seat by
holding on to the passenger assist handle
above the front passenger door or supporting
their we ight on the arm rest,
- the safety belt is be ing properly worn and that
there is not a lot of slack in the safety belt web bing,
- accessory seat covers or cushions or other
th ings that may cause an inco rrect read ing o r
imp ression on the weight-sens ing mat under
the upho ls tery of the seat have been removed
from the front passenger seat,
- a safety be lt extende r has not been left in the
sa fety belt latch for the front passenge r seat .
I n addition to the
PASS ENGER AIR BAG OFF
light in the center of the inst rument panel, the
message
PA SSENGER AIR BAG OFF or PA SSEN
GER AIR BAG ON
wi ll briefly appear in the inst ru
ment cluster display. This is to inform the driver
of the current front passenger airbag status.
Important safety instructions on
monitoring the Advanced Airbag System
_& WARNING
An airbag system that is not funct ion ing prop
er ly cannot provide supplemental p rotection
in a frontal crash.
160
- If the airbag indicator light r=> page 13
comes when the veh icle is being used, have
the system inspected immediately by your
author ized Audi dealer. It is possible that
the airbag will inflate when it is not sup
posed to, or wi ll not inflate when it should.
_& WARNING
I f the front a irbag inflates, a ch ild without a
chi ld restraint, in a rea rward-facing chi ld safe
ty seat or in a forward -fac ing chi ld restrain t
that has not been proper ly ins talled will be
seriously injured and can be killed .
- Even tho ugh you r vehicle is equipped with
an Advanced A irbag System, make certain
that a ll children, espec ia lly 12 years and
younger, always ride on the back seat prop erly restrained for their age and size.
- Always install forward or rear-facing child
safety seats on the rear seat -even with an
Advanced A irbag System.
- If you must insta ll a rearward-facing child
safety seat on the front passenger seat be
cause of exceptional circumstances and the
PA SSEN GER AIR BA G OFF light does not
appear and stay on, immediately install the
rear-facing child safety seat in a rear seat ing
position and have t he a irbag system in
spected by yo ur autho rized Aud i dea le r.
- A t ight tether or other strap on a rearward
facing chi ld restraint attached to the front
passenger sea t can put too much pressure
on the weight-sensing mat in the seat and
register more weight than is actually on the
seat. The heavier weight registered can
make the system work as though an adu lt
were on the seat and deploy the Advanced
Airbag when it must be suppressed causing
serious or even fatal injury to the child.
- If, in exceptional circumstances, you must
install a forward-facing child restraint on
the front passenger seat, always move the
seat into its rearmost position in the seat 's
fore and aft ad justment range, as far away
from the airbag as poss ible. The back res t
m ust be adjus ted to an upr ight position.
Make sure that the
PASSENGER AIR BAG
Page 190 of 296
Inte llig ent Techn olo gy
Hill descent assist
The hill descent assist makes it possible to drive
down an incline at a constant speed .
~~,·~ ('l)ofF ___ P..1 --- fl~ IIL..~
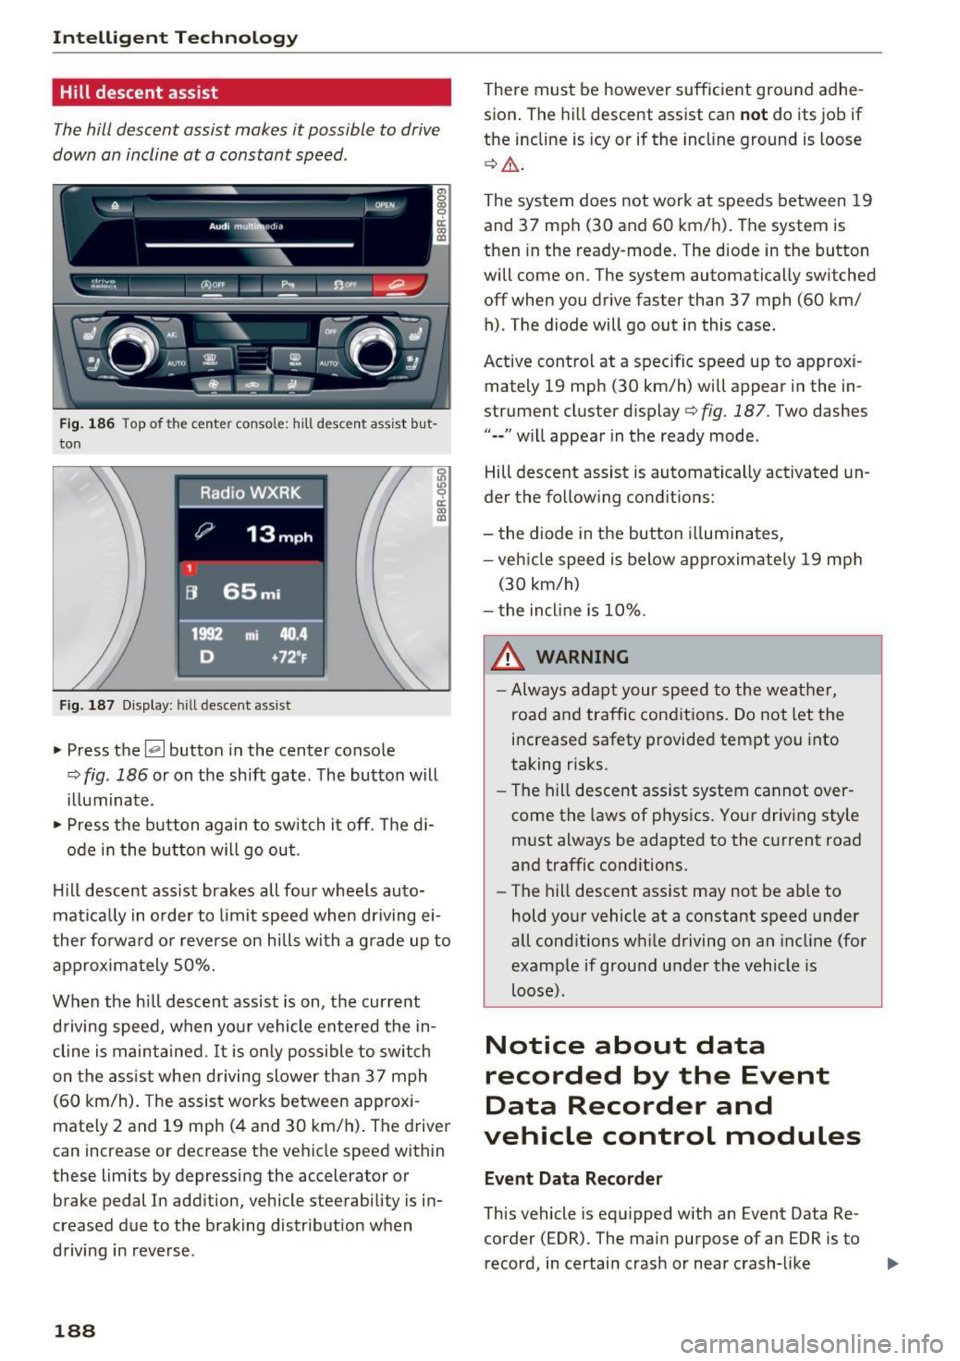
---
Fig. 186 Top of the center conso le: hill descent assist but
ton
Fig. 187 Display: hill descent assist
.. Press the~ button in the center console
¢ fig . 186 or on the shift gate . The button will
illuminate .
" Press the button again to switch it off. The di-
ode in the button will go out .
H ill descent ass ist brakes all four wheels auto
matically in order to limit speed when driving ei
ther forwa rd o r reverse on hills with a grade up to
approx imately 50%.
When the hill descent assist is on, the current
driving speed, when your vehicle entered the in
cline is maintained.
It is only possible to switch
on the assist when driving slower than 37 mph
(60 km/h). The assist works between app roxi
mately 2 and 19 mph (4 and 30 km/h) . The driver
can increase or decrease the vehicle speed within
these limits by depressing the accelerator or
brake pedal In addition, vehicle steerability is in
creased due to the braking distribution when
driving in reverse .
18 8
There must be however sufficient ground adhe
sion . The hill descent assist can
no t do its job if
the incline is icy or if the incl ine ground is loose
¢ &.
The system does not work at speeds between 19
and 37 mph (30 and 60 km/h). The system is
then in the ready-mode. The diode in the button
will come on . The system automatically sw itched
off when you drive faster than 37 mph (60 km/ h) . The diode will go out in this case .
Active control at a specific speed up to approxi
mately 19 mph (30 km/h) will appear in the in
strument cluster display
c:> fig. 187 . Two dashes
" •• " w ill appear in the ready mode .
Hill descent assist is automatically activated un
der the following conditions:
- the diode in the button ill uminates,
- veh icle speed is below approximately 19 mph
(30 km/h)
- the incl ine is 10%.
& WARNING
- Always adapt your speed to the weather,
road and traffic cond itions. Do not let the
increased safety provided tempt you into
taking risks.
-
-The hill descent assist system cannot over
come the laws of phys ics. Your driving style
must always be adapted to the current road
and traffic conditions.
- The hill descent assist may not be ab le to
hold your vehicle at a constant speed under
all cond itions wh ile driving on an incline (for
example if ground under the vehicle is
loose).
Notice about data
recorded by the Event
Data Recorder and
vehicle control modules
E ven t Data R eco rde r
This vehicle is equipped with an Event Data Re
corder ( EDR). The main purpose of an EDR is to
record, in certain crash or near crash-like .,,_
Page 193 of 296
CD
CD
.... N ,-... N ..... 0 0 C<'. 00
-Before descending a steep grade , reduce
speed and shift transm iss ion into a lower
gear or lower driving range. Do not ride the
brakes or hold the pedal down too long or
too often . This could cause the brakes to get
hot and d iminish brak ing efficiency .
- Do not "r ide the brakes" by resting your foot
on the pedal when you do not intend to
bra ke. This may cause the bra kes to over
heat , premat ure wea r and increased stop
ping distance.
- Under certa in climat ic and operating condi
tions su ch as p assing thro ugh w ater, dr iving
in heavy ra in or after washing the vehicle,
the ef fectiveness of the brakes can be re
duced. In winter, ice can acc umulate on the
brake pads, linings, discs and drums . Care
fully apply b rakes for a test. Brakes wi ll dry
and ice coatings wi ll be cleaned off after a
few careful brake applications .
- Driv ing for an extended period of time on
salt-covered roads without using your
bra kes can also affect bra king efficiency .
Clean off accumulated sa lt coating from
bra ke discs and pads with a few caref ul
bra ke appl ic a tion s.
- If you damage the front spoiler, or if yo u in
sta ll a differen t spoi le r, be sure the air flow
to the front br akes is not o bstru cte d. O the r
wise the br ake system could over heat reduc
ing the e ffec tiveness of the entire brake sys
tem.
- Failure of one brake circuit will imp air the
brak ing capability resulting in an increased
stopping distance . Avoid driving the vehicle
and have it towed to the nearest a uthorized
Audi dealer or qualif ied workshop.
- Never let the vehicle roll to a stop with the
engine shut off .
- If the brake booster is not wor king, the
brake pedal m ust be pressed considerably
harder to make up for the lack of booster
assistance .
Intelligent Technology
Electromechanical power
assist, Dynamic steering
The electromechanical power assist helps the
driver when steering .
Power steering adap ts elec tronically based on
the vehicle speed .
Indicator lights and message s
• Steering defecti ve! Do not drive vehicle!
If this indi ca to r li ght tur ns on and st ays on and
t hi s message appea rs, the powe r steering may
have failed.
Stop t he vehi cle in a safe location as soon as pos
s ible. Do
not cont inue drivi ng. See yo ur author
ized Audi dea ler or o ther qualif ied repa ir facility
for assistance .
l;rij Dynamic steering : Sy stem fault! You can
continue driving
If the indicator light turns on and the message
appea rs , the steer ing may be more diffic ult to
move o r more sensitive than usu a l. Th e steering
m ay also be at an angle when dr iving st raig ht.
D rive slowly to your a uthorized Aud i dea le r or
qualified wo rksh op to have t he malfunct io n cor
rec ted .
'Iij Dynamic steering: Initializing
Aud i drive select* : if the indicato r light blinks and
the driver message appears, the dynamic steer
ing* is re init ia liz ed . After sta rting the engine , the
steering wheel will move slig htly . Re -initializa
t io n m ight be necessary if the steer ing whee l was
moved hard to t he left and r ight wh ile the veh icle
was not mov ing. The display turns off if the initi
aliza tion was successful.
(D Tips
- If the . or l~ij indicato r light only stays on
for a shor t time, you m ay cont inue drivi ng.
- The dynam ic stee ring* sta bility systems
r=;, page 186 are no t ava ilable in the event of
a system mal func tio n.
- For add itiona l information on dy namic
steering*
r=;, page 122 .
191