display AUDI Q5 2017 Repair Manual
[x] Cancel search | Manufacturer: AUDI, Model Year: 2017, Model line: Q5, Model: AUDI Q5 2017Pages: 296, PDF Size: 74.43 MB
Page 210 of 296
Care and cleaning
avoid scratches, move the scraper on ly in
one direction and not back and forth.
- Never remove snow or ice from door win
dows and mirrors using warm or hot water
because this could cause cracks to form .
- To avoid damage to the rear w indow de
fogger, do not apply any stickers on the
heating wires on the inside of the window .
-Decorative parts /trim
- Never use chrome care or cleaning prod-
ucts.
-Paint
-To red uce the risk of scratches, the vehicle
must be free of dirt and dust before pol
ishing or waxing .
- T o prevent pa int damage, do not polish or
wax the veh icle in direct sunlight.
- To red uce the risk of pa int damage, do not
polish away rust spots.
- Remove cosmetics and sunscreen immedi
ately -these could damage the paint.
- Di spla ys
- To avoid scratches, do not use dry cleaning
methods on displays .
-Controls
- Make sure that no fluids enter the con-
trols, because this could cause damage.
- Safety belts
- Do not remove the safety belts to clean
them.
- Never clean safety belts o r th eir compo
nents chemically or with cor rosive fl uids
or so lvents and neve r al low sha rp objects
t o come into con ta ct w ith the safe ty belts.
T his could cause damage to the belt web
bing .
-If there is damage to the webbing, the
connections, the retractors or the buckles,
have them replaced by an author ized Audi
dealer or authorized Audi Service Facility.
- Textiles /artificial leather/ Alcantara
- Never treat artificia l leather/ Alcantara
w ith leather care products, so lvents, floor
polish, shoe polish, spot remove or similar
prod uct s.
- Have a specialist remove st ubborn stains
to prevent damage.
208
- Never use steam cleaners, brushes, hard
sponges, etc . when cleaning .
- D o not turn on the seat heating* to dry the
seat.
- Objects w ith sharp edges, such as zippe rs
or rivets on clothing or belts, can cause
damage to the surface .
- Open hook and loop fasteners, fo r exam
p le on clothing, can damage seat covers.
Make sure hook and loop fastene rs are
closed.
- Natural leather
- Never treat leather with solvents, floor
polish, shoe polish, spot remover or sim i
lar p roducts .
- Objects w ith sharp edges, such as zippers
or rivets on clothing or belts, can cause
damage to the surface.
- Never use steam cleaners, brushes, hard
sponges, etc. when cleaning.
- Do not turn on the seat heating * to dry the
seat.
- To he lp prevent the leather from fad ing,
do not leave the vehicle in d irect sunlight
for long periods of time . If leav ing the ve
h icl e parked fo r long pe riods of time, you
should cove r the leathe r to pro te ct it from
d irec t sunlight.
{D Tips
- Insects are easier to remove from paint that
has been freshly waxed.
- Regular waxing can prevent rust spots from
forming.
Placing your vehicle out
of service
If you would like to take your vehi cle out of serv
ice for a longer period of time, contact an author
ized Audi dealer or authorized Audi Service Facili
ty. They will adv ise you of important measures,
such as corrosion protect ion, serv ice and storage
procedures . Also follow the information about
the battery ~
page 225.
Page 216 of 296
Fuel and Refueling
"'Loosen the strap from its bracket and pu ll on it
¢
fig. 191 . Now you can open the fuel filler flap
as usual.
Selective catalytic reduction (AdBlue/DEF)
General information
Applies to: veh icles w ith selective catalyt ic reduction
In vehicles with selective catalytic reduction, a
urea solution (Ad B lue/DEF) is injected into the
exhaust system before a nitrogen oxide catalytic
converter to reduce nitrogen emissions. The urea
solution is known as Ad Blue or DEF (Diesel Ex
haust Fluid) . AdBlue is used in the following.
The AdBlue is carried in a separate tank in the ve
hicle. The Ad Blue usage accounts for approxi mately 0 .5% to 2.5% of the diesel fuel that is
used.
When a message about refilling the Ad Blue ap
pears in the instrument cluster display, you must
refill the Ad Blue yourself or have it refilled by an
authorized Audi dealer or authorized Audi Service
Facility ¢ page 215.
(D} Tips
-The display indicates the distance remaining
that can be driven¢
page 214. If the Ad Bl
ue tank is completely empty, the engine will
not start again after the ignition is switched
off.
-Ad Blue is required by law to operate this ve
hicle.
Messages in the instrument cluster display
Applies to: vehicles with selective catalytic reduction
The display indicates if the Ad Blue level is low or
if there is a system malfunction.
AdBlue level low
You will be informed if the Ad Blue in the tank
drops below a certain level.
Ad Blue /9 Refill Ad Blue. See owner's manual
214
This message appears when there is only enough
Ad Blue left to drive the distance indicated in the
i nstrument cluster. Fill the Ad Blue.
AdBlue /9 Refill Ad Blue! No restart in x mi
(x km)! See owner's manual
This message appears when there is only enough
Ad Blue left to dr ive the distance indicated in the
i nst rument cluster. Fill the Ad Blue. Otherw ise
the engine will not start again if you stop it once
the distance indicated has been driven.
Refill Ad Blue! No restart! See own
er's manual
This message appears when the Ad Blue tank is
empty . Fill the Ad Blue. Otherwise you will not be
able to start the engine again once you stop it.
The Ad Blue must be refilled when the amount in
the tank has reached the minimum leve l
¢ page 215, Filling AdBlue .
Incorrect filling/system malfunction
A message appears if the Ad Blue tank was filled
with a flu id other than Ad Blue and the system
has detected that the tank was filled incorrectly,
or if there is a system malfunction .
Ad Blue -I' AdBlue: Fault! No restart in x mi
(x km)! See owner's manual
This message appears when it is on ly possible to
drive the distance indicated in the instrument
cluster. Drive to the nearest authorized Audi
dealer or authorized Audi Service Facility to have
the malfunct ion corrected. Otherw ise the eng ine
will not start again if you stop it once the dis
tance indicated has been driven.
AdBlue: System fault No restart!
See owner's manual
This message appears if the system has detected
that the tank was filled incorrectly or that there
is a malfunction . Drive immediately to the near
est authorized Audi dealer or authorized Audi
Service Facility to have the malfunction correct
ed . Otherwise you will not be able to star t the en
gine again once you stop it.
Page 217 of 296
a,
a,
..... N r-N ..... 0 0
0:
co
Filling AdBlue
Applies to: vehicles with selective catalytic reduction
Fig. 192 Right rear side of the vehicle : remov ing the AdBl
ue cap
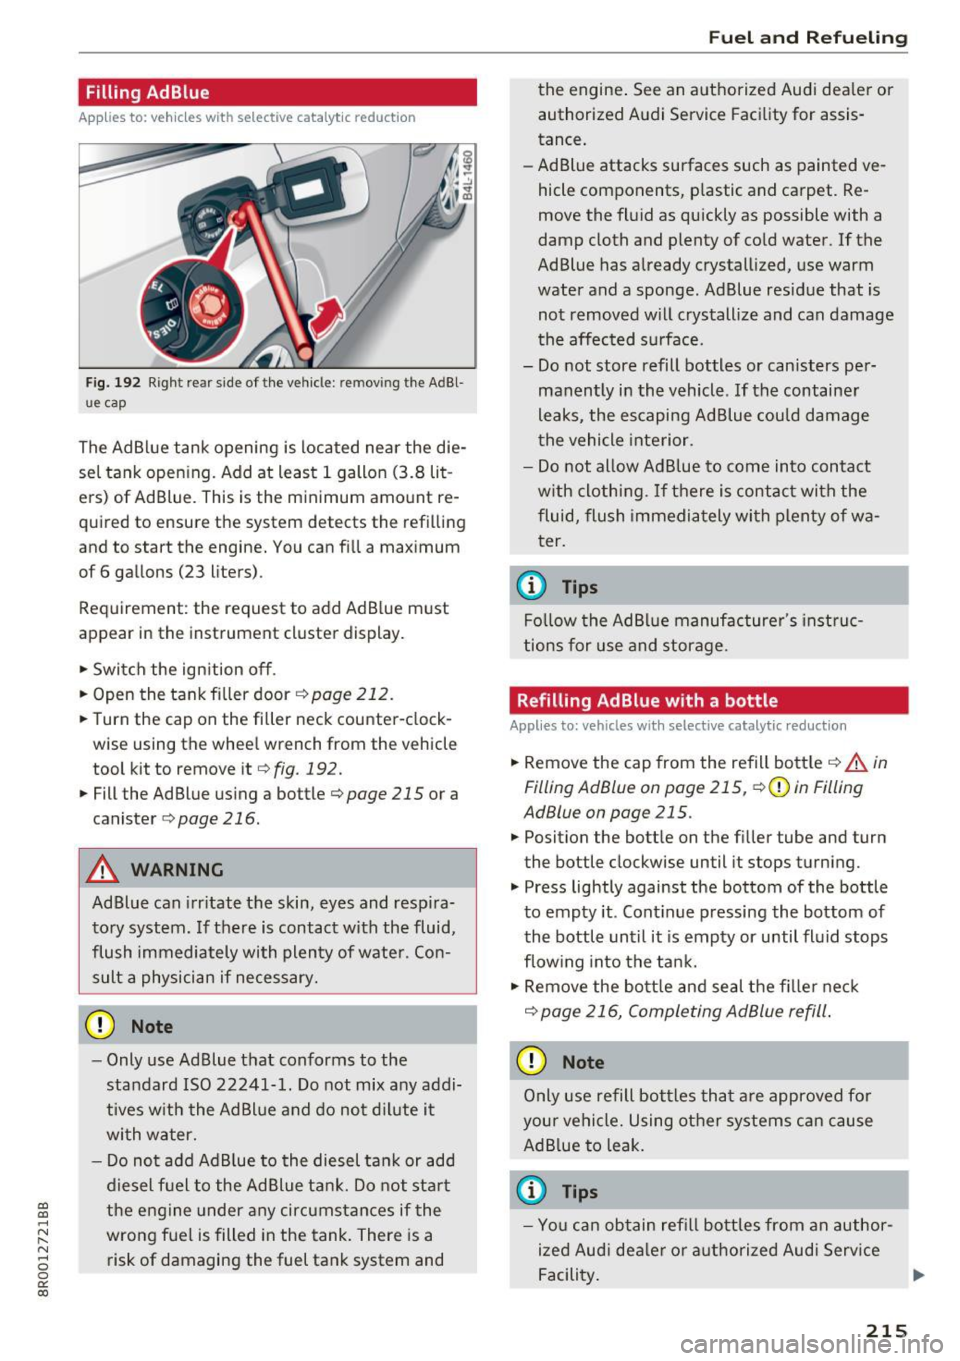
The Ad Blue tank opening is located nea r the die
sel tank open ing. Add at least 1 gallon (3.8 lit
e rs) of Ad Blue. This is the minimum amount re
quired to ensure the system detects the refilling
and to start the engine. You can fill a maximum
of 6 gallons (23 liters) .
Requirement: the request to add Ad Blue must
appear in the instrument cluster display.
• Switch the ignition off.
• Open the tank fi ller door ¢
page 212.
• Turn the cap on the filler neck counter-clock
wise using the whee l wrench from the vehicle
tool kit to remove it¢
fig . 192.
• Fill the Ad Blue using a bottle¢ page 215 or a
canister
c> page 216.
A WARNING
Ad Blue can irr itate the skin, eyes and resp ira
tory system. If there is contact with the fluid,
flush immediately with plen ty of wate r. Con
sult a physician if necessary.
CD Note
- Only use Ad Blue that conforms to the
standard ISO 22241-1. Do not mix any addi
tives w ith the Ad Blue and do not d ilute it
with water.
- Do not add Ad B lue to the diesel tank or add
diesel fuel to the Ad Blue tank. Do not start
the engine under any circumstances if the
wrong fuel is filled in the tank. There is a
risk of damaging the fuel tank system and
Fue l an d Re fuelin g
the engine . See an authorized Audi dea ler or
authorized Audi Service Facility for assis
tance.
- Ad Blue attacks surfaces such as painted ve
hicle components, p lastic and carpet. Re
move the fluid as quickly as possible with a
damp cloth and plenty of cold water . If the
Ad Blue has already crystallized, use warm
water and a sponge. Ad Blue residue that is not removed w ill crystallize and can damage
the affected surface.
- Do not store refill bottles or canisters per
manently in the vehicle . If the container
leaks, the escaping Ad Blue could damage
the vehicle interior.
- Do not al low Ad Blue to come into contact
w ith clothing.
If there is contact with the
fluid, flush immediately with plenty of wa
ter.
© Tips
Fo llow the AdBl ue manufacturer's instruc
tions for use and storage.
Refilling AdBlue with a bottle
Applies to: vehicles wit h selective catalytic reduction
• Remove the cap from the refill bott le ¢ A in
Filling AdBlue on page 215,
c> (D in Filling
AdBlue on page 215.
• Position the bottle on the filler tube and turn
the bottle clockwise until it stops turning.
• Press lightly against the bottom of the bottle
to empty it . Cont inue pressing the bottom of
the bottle until it is empty or until fluid stops
f low ing into the tank.
• Remove the bott le and seal the f iller neck
¢ page 216, Completing AdBlue refill .
CD Note
Only use refill bottles that are approved for
your vehicle. Using other systems can cause AdB lue to leak.
(0 Tips
- You can obtain refill bo ttles from an author
ized Aud i dea le r or authorized Audi Serv ice
Facility.
215
Page 218 of 296
Fuel and Refueling
-A permitted refill bott le contains approxi
mately 0 .5 gallons (1.9 liters) of Ad Blue.
Refilling Ad Blue with a canister
A ppl ies to: ve hicles w ith select ive ca talyt ic reduction
®
+®
F ig. 193 Canister wit h attac hab le hose
N
~ 0 :::, a:, m
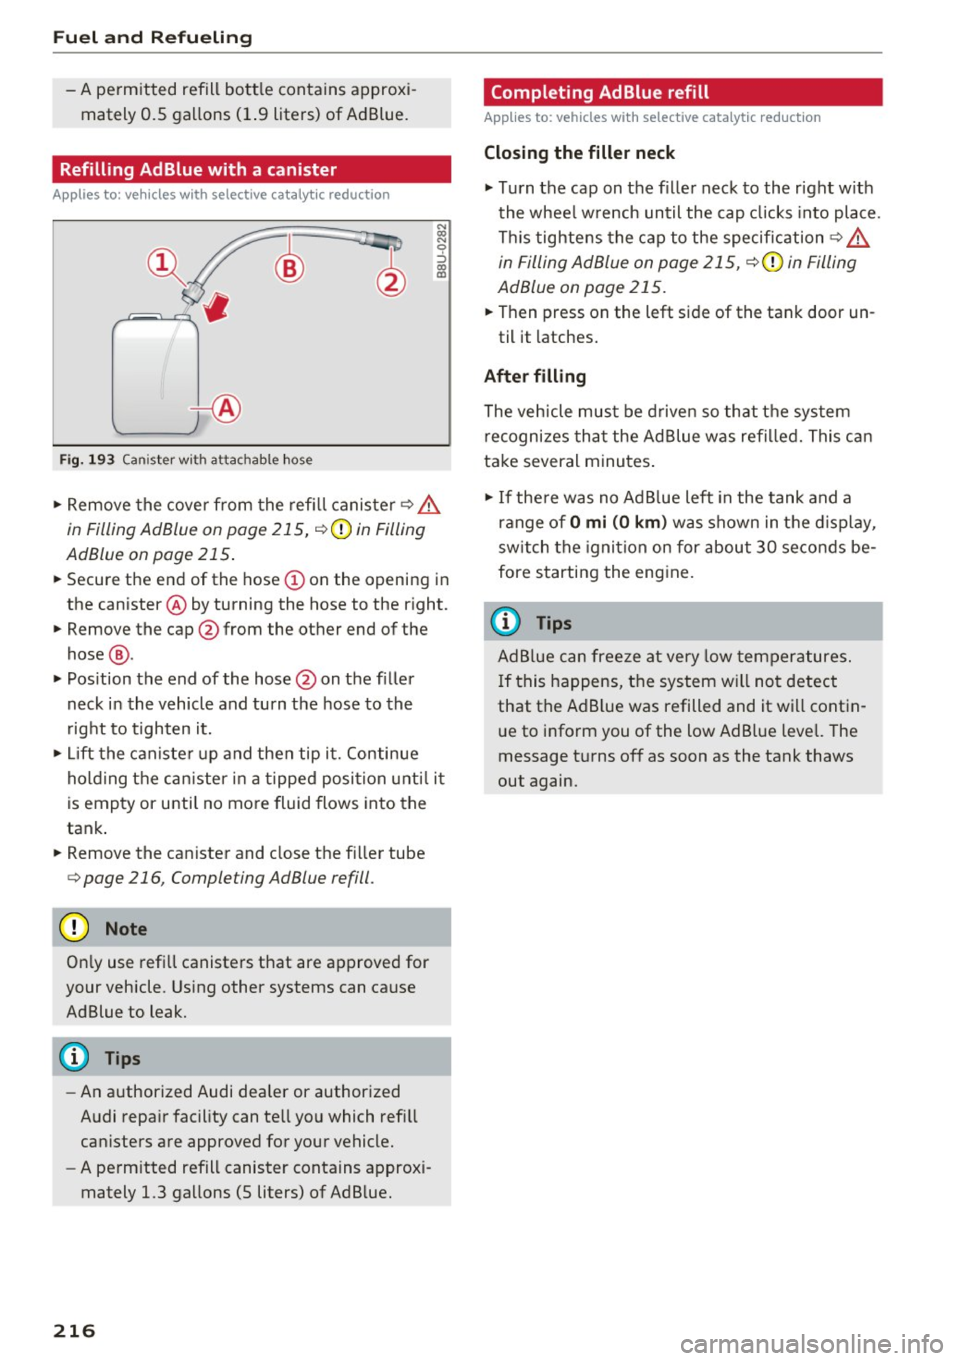
.., Remove the cover from the refill canister~ A
in Filling AdBlue on page 215, c>(D in Filling
AdBlue on page 215 .
... Secure the end of the hose (Don the opening in
the canister @ by turning the hose to the right.
... Remove the cap @from the other end of the
hose @.
"' Pos ition the end of the hose@ on the f iller
neck in the vehicle and turn the hose to the
right to tighten it.
.., Lift the canister up and then tip it. Continue
holding the can ister in a tipped position unti l it
is empty or until no mo re fluid flows into the
tank .
... Remove the canister and close the fi ller tube
c> page 216 , Completing AdBlue refill .
(D Note
Only use refill canisters that are approved for
your vehicle. Using other systems can cause
Ad Blue to leak.
@ Tips
- An authorized Audi dealer or authorized
Audi repair facility can tell you which refill
can isters are approved for your vehicle.
- A permitted refill canister contains approxi
mately 1.3 gallons (5 liters) of Ad B lue.
216
· Completing AdBlue refill
App lies to : vehicles with selective cata lyt ic re du ction
Closing the filler neck
... Turn the cap on the filler neck to the right w ith
the wheel w rench until the cap clicks into place .
This tightens the cap to the specification ~
A
in Filling AdBlue on page 215, c>(D in Filling
AdBlue on page 215 .
... Then press on the left side of the tank door un-
til it latches.
After filling
The vehicle must be driven so that the system
recognizes that the Ad Blue was refilled. This can
take several minutes .
.., If there was no AdB lue left in the tank and a
range of
O mi (0 km ) was shown in the display,
sw itch the ignition on for about 30 seconds be
fore starting the engine .
(D Tips
Ad Blue can freeze at very low temperatures.
If this happens, the system will not detect
that the Ad B lue was refilled and it will contin
ue to inform you of the low Ad Blue level. The
message turns off as soon as the tank thaws
out again.
Page 221 of 296
a,
a,
..... N r-N ..... 0 0
0:
co
Checking and Filling
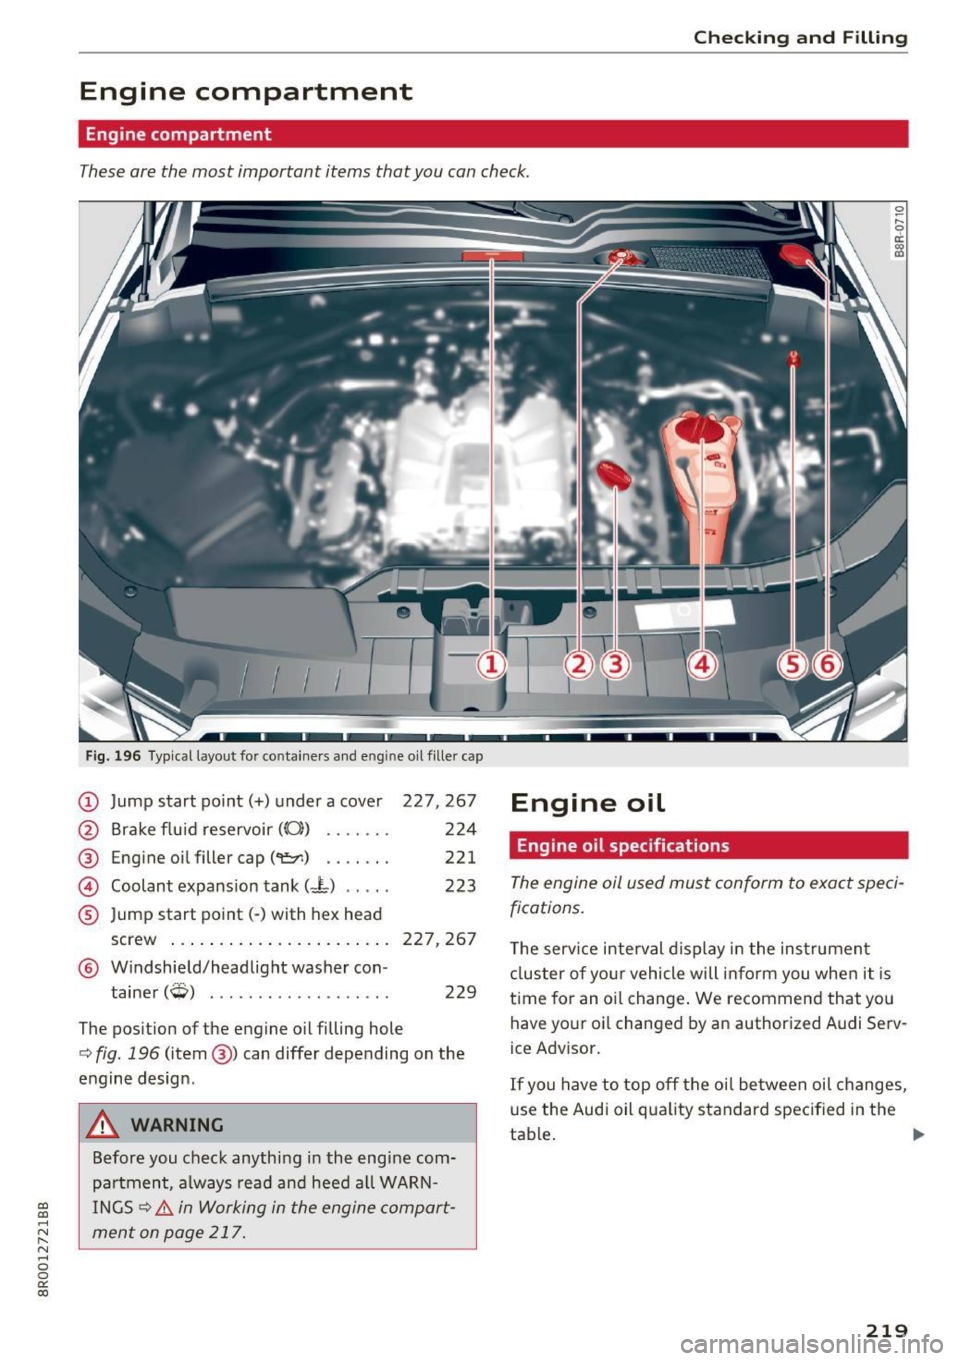
Engine compartment
Engine compartment
These are the most important items that you can check.
Fig. 196 Typical layout for containers and e ngin e oil fille r cap
(D Jump start po int(+) under a cover 227,267
@ Brake fluid reservoir (CO)) . . . . . . . 224
@ Engine oil filler cap(~) . . . . . . . 221
@ Coolant expansion tank (- L) . . . . . 223
® Jump start point( -) with hex head
screw . . . . . . . . . . . . . . . . . . . . . . . 227, 267
@ Windshield/headlight washer con -
tainer
(W) . . . . . . . . . . . . . . . . . . . 229
The position of the engine oil filling hole
c:> fig. 196 (item@) can differ depending on the
engine design .
A WARNING
Before you check anything in the engine com
partment, always read and heed a ll WARN
INGS
c:> &. in Working in the engine compart
ment on page 217.
Engine oil
Engine oil specifications
The engine oil used must conform to exact speci
fications.
T he serv ice interval display in the instrument
cluster of your vehicle will inform you when it is
time for an oi l change . We recommend that you
have your oi l changed by an authorized Audi Serv
ice Advisor.
If you have to top off the oil between oil changes,
use the Audi oil quality standard specified in the
tab~ .
~
219
Page 223 of 296
CD
CD
.... N ,-... N .... 0 0 C<'. 00
(D Note
Driving with an insufficient oil leve l is likely to
cause severe damage to the engine .
@ Tips
-The oil pressure warning display. is not
an indicator of the oil level. Do not rely on
it. Instead , check the oil level in your en
gine at regular intervals, preferably each
time you refuel, and always before going
on a long trip.
- If yo u have the impression your engine con
sumes excessive amounts of oil, we recom
men d that you cons ult an autho riz ed Au di
dealer to hav e the ca use of your conce rn
properly diagnosed. Keep in mind that the
a ccu ra te measurement of oil consump tion
r equi re s gre at care and m ay ta ke some
time. An a uthorized Audi de aler has instr uc
tions about how to measure oil consump
tion acc urately.
Checking the engine oil level
Read oil level
"' Park your vehicle so that it is hor izonta lly level.
"' Shu t the engine off when it is at operat ing tem-
perature.
"' Switch only the ignition back on .
"' Wai t approx. two mi nutes .
"' Se lect:
I CARI funct ion button > Oil lev el. Or
"' Se le ct:
ICARI f u n ct ion butto n> Car sy stem s*
contro l button > Servicing & checks > Oil level.
"' Read the oil level in the r adio or M MI* Disp lay.
Add engine oil if the ba r of the o il level indica
tor is near "Min"
¢ page 221.
The o il level needs to be c heck ed at reg ular i nter
va ls. The bes t times to do this are w henever you
refuel and pr io r to long trips .
D epending on t he way t he ve hicle is dr iven and
the operat ing cond itions, o il cons umption can be
up to a 1 /2 q uart per 600 m iles ( O.S li ter per
1,000 km) . Cons umption may be hig he r within
the first 3,000 miles (5,000 km).
Checking and Filling
{!) Tips
The oil leve l indicator in t he radio o r MMI*
D isp lay is only an i nfo rmation disp lay. If the
oi l level is too low, a minimum o il wa rning ap
pears in the instrument cl uster. Add oil
¢ page 221. If the hood has been o pened ,
t he cur rent oi l level is show n in the inst ru
ment clust er the n ext time t he igni tion is
swi tched o n.
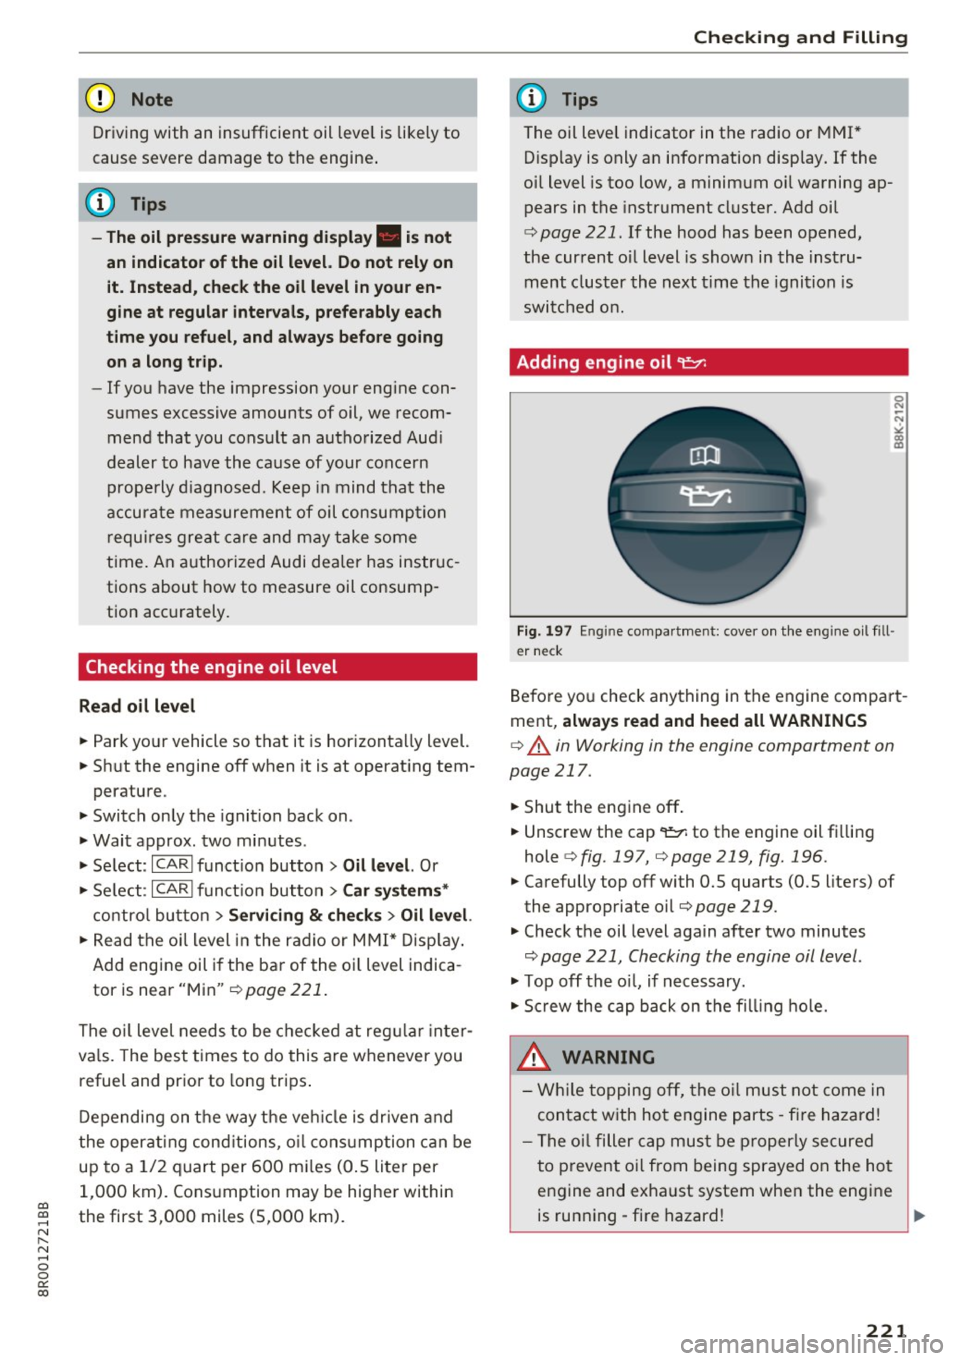
Adding engine oil~
Fig. 197 En gin e co mpa rt m ent: cove r o n th e eng ine o il fill
e r neck
Befo re yo u check any thing in the engine compa rt
ment,
always read and heed all WARNINGS
¢ A in Working in the engine compartment on
page 217.
"' Shu t the eng ine off .
"' Unscrew the cap
9=;1: to the engine oil f illing
hole
¢ fig.197, ¢page 219, fig.196 .
"'Carefully top off with 0.5 quarts (0. 5 liters) of
the appropriate oil¢
page 219.
"' Check the oil level again after two minutes
~ page 221, Checking the engine oil level .
"'Top off th e oil, if nec essary.
"' Scr ew the cap ba ck on the fi lling hole.
_&. WARNING
- Whi le toppin g off , the o il mus t no t come in
con tact w ith ho t en gine parts -fir e hazard !
- Th e oi l filler c ap must b e pr oper ly sec ure d
t o p reve nt o il from being spraye d on t he ho t
e ngine an d exha ust system whe n the engi ne
-
is run ning -fi re hazard ! Ill>-
221
Page 250 of 296
Wheels
check your tires as soon as possible, and inflate
them to the proper pressure. Driving on a signifi
cantly under-inflated tire causes the tire to overheat and can lead to tire failure. Under-inflation
also reduces fuel efficiency and tire tread life,
and may affect the vehicle's handling and stop
ping ability.
Please note that the TPMS is not a substitute for
proper tire maintenance, and it is the driver's re
sponsibility to maintain correct tire pressure,
even if under-inflation has not reached the level
to trigger illumination of the TPMS low tire pres
sure telltale.
Your vehicle has also been equipped with a TPMS malfunction indicator to indicate when the sys
tem is not operating properly. The TPMS mal
function indicator is combined with the low tire pressure telltale. When the system detects a
malfunction, the telltale will flash for approxi
mately one minute and then remain continuously
illuminated. This sequence will continue upon
subsequent vehicle start-ups as long as the mal
function exists .
When the malfunction indicator is illuminated,
the system may not be able to detect or signal low tire pressure as intended . TPMS malfunctions
may occur for a variety of reasons, including the
installation of replacement or alternate tires or
wheels on the vehicle that prevent the TPMS from functioning properly . Always check the
TPMS malfunction telltale after replacing one or
more tires or wheels on your vehicle to ensure
that the replacement or alternate tires and
wheels allow the TPMS to continue to function
properly.
248
· If the Tire Pressure Monitoring System
indicator appears
Applies to: vehicles with Tire Pressure Monitoring System
The tire pressure indicator in the instrument
cluster informs you if the tire pressure is too low
or if there is a system malfunction.
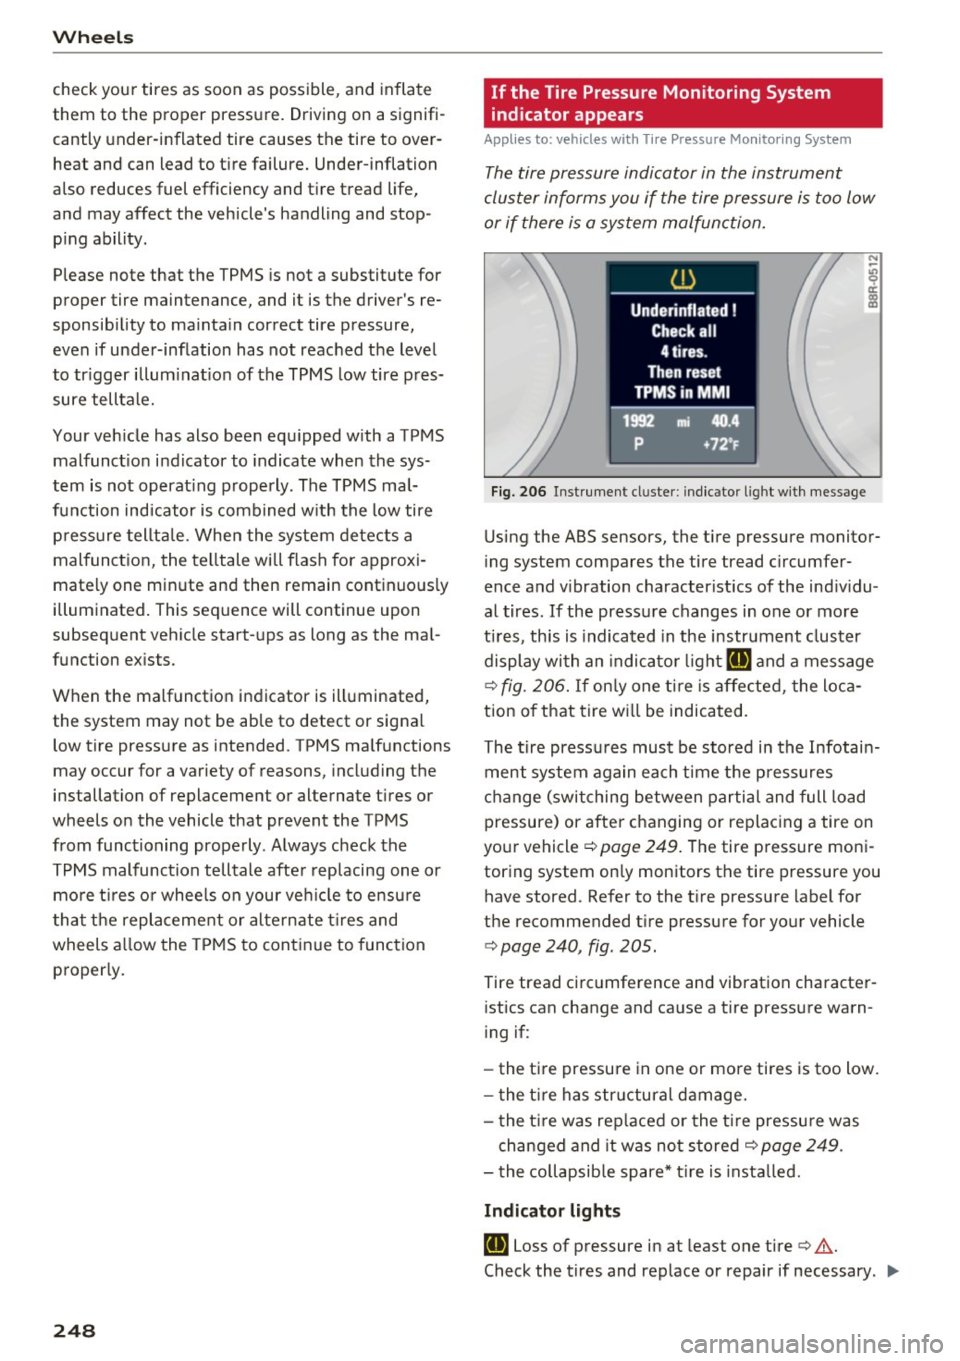
Fig. 206 Instrument cl uster: i ndic ator ligh t with message
Using the ABS sensors, the tire pressure monitor
ing system compares the tire tread circumfer
ence and vibration characteristics of the individu
al tires . If the pressure changes in one or more
tires , this is indicated in the instrument cluster
display with an indicator light
IE and a message
c>fig. 206. If only one tire is affected, the loca
tion of that tire will be indicated.
The tire pressures must be stored in the Infotain
ment system again each time the pressures
change (switching between partial and full load
pressure) or after changing or replacing a tire on
your vehicle
c> page 249. The tire pressure moni
toring system only monitors the tire pressure you have stored. Refer to the tire pressure label for
the recommended tire pressure for your vehicle
c> page 240, fig . 205.
Tire tread circumference and vibration character
istics can change and cause a tire pressure warn
ing if:
- the tire pressure in one or more tires is too low.
- the tire has structural damage.
- the tire was replaced or the tire pressure was
changed and it was not stored
c> page 249 .
-the collapsible spare* tire is installed.
Indicator lights
IE Loss of pressure in at least one tire c> &.
Check the tires and replace or repair if necessary . .,.
Page 251 of 296
CD
CD
.... N ,-... N .... 0 0 C<'. 00
Check/correct the pressures of all four tires and
store the pressure again in the Infotainment sys
tem ¢
page 249.
ffim (T ire Pressure Monitoring System) T ire
pressu re : S ys tem malfunction !. If ffim
appears
after switching the ignition on or whi le driving
and the
[I] indicator light in the instrument clus
ter blinks for approximate ly one minute and then
stays on, there is system malfunction. Try to
store the correct tire pressures¢
page 249. If
the ind icator light does turn off or turns on again
after a short period of time, dr ive to an author
i zed A udi dealer o r authorized Audi Service Fac ili
ty immediately to have the malfunc tion correct
ed .
& WARNING ,___ -
- If the tire pressure indicator appea rs in the
display, reduce your speed immed iate ly and
avoid any hard steer ing or braking maneu
vers. Stop as soon as possib le and check the
t ires and their pressure.
- The driver is responsib le for maintaining the
correct tire pressure. You must check the
t ire pressure regu larly.
- Under certa in conditions (such as a sporty
driv ing style, winter cond itions or unpaved
roads), the tire p ressure monitoring system
indicator may be delayed.
{D) Tips
- The t ire pressure monitoring system can al
so stop work ing when there is an ESC mal
funct ion.
- Using snow chains may result in a system
malfunction.
- The t ire pressure monitoring system in your
Audi was calibrated with "Audi Orig inal
Tires"
¢ page 23 7. We recommend that you
use these t ires.
Wh eel s
Storing tire pressures
App lies to : veh icles w ith Tir e Pressure Mo nito rin g Syste m
If the tire pressure changes or a tire is replaced,
it must be confirmed in the Infotainment sys
tem .
.,.. Make sure before storing t hat the t ire pressures
of all four tires meet the specified values and
are adapted to the load
¢ page 240 .
.,.. Switch the ignit ion on.
.,.. Select: the
I CAR ! funct io n key> Tire pre ssure
monitoring
> Ye s, store now . Or
.,.. Sele ct: the
I CAR I funct ion but ton > Car Sys
tem s*
control b utton > Service & check s > Tire
pressu re monitoring
> Store tire pre ssure >
Yes, store now.
@ Tips
Do not store the tire pressures if snow chains
are installed.
249
Page 282 of 296
Index
A
A/C (climate control) . . . . . . . . . . . . . . . . . . . 78
Accessories . . . . . . . . . . . . . . . . . . . . . . . . . . 278
Active lane assist
Cleaning the camera area . . . . . . . . . . . . . 205
Adaptive cruise control. . . . . . . . . . . . . . . . . 109
Cleaning the sensor . . . . . . . . . . . . . . . . . . 205
Indicator lamp . . . . . . . . . . . . . . . . . . . . . . 111
M essages . . . . . . . . . . . . . . . . . . . . . . . . . . 116
Request for driver intervention . . . . . . . . . 114
Setting the distance............... ... 113
Setting the driving program . . . . . . . . . . . 114
Adaptive dampers . . . . . . . . . . . . . . . . . . . . . 122
Adaptive light .. .. ............. .... .. .. 51
Defective . . . . . . . . . . . . . . . . . . . . . . . . . . . 31
AdBlue .... .. .. .... ........... ....... 214
Messages . . . . . . . . . . . . . . . . . . . . . . . . . . 214
Opening the tank door ............... . 215
Refilling . .. .. .... ........... .... ... 215
Adding Engine oil .......................... 221
Windshield washer fluid . . . . . . . . . . . . . . 229
Additional accessories
Additives 278
Engine oil . . . . . . . . . . . . . . . . . . . . . . . . . . 221
Adjusting Air distribution (climate control) . . . . . . . . 78
Instrument illumination . . . . . . . . . . . . . . . 53
Steering column manually . . . . . . . . . . . . . 81
Temperature (climate control) . . . . . . . . . . 78
Airbag . . . . . . . . . . . . . . . . . . . . . . . . . . . . . . 148
Airbag system . . . . . . . . . . . . . . . . . . . . . . . . 164
Advanced Airbag-System . . . . . . . . . . . . . . 152
Advanced Airbag System components . . . 154
Care . . . . . . . . . . . . . . . . . . . . . . . . . . . . . . 161
Children . . . . . . . . . . . . . . . . . . . . . . . . . . . 169
Child restraints . . . . . . . . . . . . . . . . . . . . . 170
Components (front airbags) . . . . . . . . . . . 154
Danger of fitting a child safety seat on the
front passenger seat . . . . . . . . . . . . . . . . . 149
Disposal . . . . . . . . . . . . . . . . . . . . . . . . . . . 161
Front airbags . . . . . . . . . . . . . . . . . . . 152, 153
How do the front airbags work? . . . . . . . . 156
How many airbags does my vehicle have? 154
How the Advanced Airbag System compo-
nents work together . . . . . . . . . . . . . . . . . 156
280
Important information . . . . . . . . . . . . . . . 148
Monitoring . . . . . . . . . . . . . . . . . . . . . . . . . 158
PASSENGER AIR BAG OFF light . . . . . . . . . 159
Repairs . . . . . . . . . . . . . . . . . . . . . . . . . . . . 161
Safety instructions . . . . . . . . . . . . . . . . . . . 160
Side airbags . . . . . . . . . . . . . . . . . . . . . . . . 162
Side curtain airbags . . . . . . . . . . . . . . . . . . 165
Warning/indicator lights . . . . . . . . . . . . . . . 13
Warning/Indicator lights . . . . . . . . . . . . . 158
Weight-sensing mat . . . . . . . . . . . . . . . . . 170
When must the system be inspected? . . . 158
Air transport . . . . . . . . . . . . . . . . . . . . . . . . . 108
All-wheel drive ....................... 192
Selective wheel torque control . . . . . . . . . 186
All season tires
Alternator 245
Malfunction . . . . . . . . . . . . . . . . . . . . . . . . . 25
Anti-lock brake system Warning/indicator lights . . . . . . . . . . . . 13, 14
Anti-Lock Braking System . . . . . . . . . . . . . . 186
Anti-slip regulation Warning/indicator lights . . . . . . . . . . . . . . . 13
Anti-Slip Regulation . . . . . . . . . . . . . . . . . . . 186
Anti-theft alarm warning system . . . . . . . . . 35
Electronic immobilizer . . . . . . . . . . . . . . . . . 35
Approach/departure angle....... ..... .. 198
Ashtray . . . . . . . . . . . . . . . . . . . . . . . . . . . . . . 73
Audi braking guard
refer to Braking guard 115
Audi drive select Indicator light . . . . . . . . . . . . . . . . . . . . . . 191
also refer to Drive select . . . . . . . . . . . . . . 122
Audi parking system plus with rearview cam-
era . . . . . . . . . . . . . . . . . . . . . . . . . . . . . . . . . 125
Adjusting the display . . . . . . . . . . . . . . . . . 130
Adjusting the warning tones . . . . . . . . . . . 130
Rearview camera -parking mode 1 . . . . . . 128
Rearview camera -parking mode 2 . . . . . . 129
Safety precautions . . . . . . . . . . . . . . . . . . . 125
Switching on and off . . . . . . . . . . . . . . . . . 127
Trailer hitch . . . . . . . . . . . . . . . . . . . . . . . . 130
Audi Service Repair Manuals and Literature 276
Auto-Check Control . . . . . . . . . . . . . . . . . . . . 24
Auto locking . . . . . . . . . . . . . . . . . . . . . . . . . . 35
Automatic belt retractor . . . . . . . . . . . . . . . 143
Automatic driving light control . . . . . . . . . . . 49
Automatic Shift Lock (ASL) . . . . . . . . . . . . . . 95
Page 284 of 296
Index
Child safety . . . . . . . . . . . . . . . . . . . . . . . . . . 168
Important safety instructions for using child
safety seats . . . . . . . . . . . . . . . . . . . . . . . .
171
Installing a child restraint using the LATCH
system . . . . . . . . . . . . . . . . . . . . . . . . . . . .
182
Mounting and releasing the anchorage
hook
. ... .. .. .. ... ... ... .... .. .. .. . 182
Tether anchors .. ................ ... . 183
Tether straps ... .... ......... .... .. . 183
Child safety locks
Rear doors . . . . . . . . . . . . . . . . . . . . . . . . . . 42
Child safety seats
Booster seats . . . . . . . . . . . . . . . . . . . . . . .
176
Convertible child seats . . . . . . . . . . . . . . . 175
Danger of using child restraints in the front
seat ..... .. .... .......... ...... ... .
149
How do I properly install a child safety seat
. h' l ? in myve 1c e .... ................ ... . 171
Infant seats . . . . . . . . . . . . . . . . . . . . . . . . 17 4
L ATCH system . . . . . . . . . . . . . . . . . . . . . .
182
Lower anchorages ............ .... .. .
Safety instructions .................. .
Unused safety belts on the rear seat ... .
Ch ild seats 182
171
173
174
Securing . . . . . . . . . . . . . . . . . . . . . . . . . . . 178
Cigarette lighter . . . . . . . . . . . . . . . . . . . . . . . 73
Cleaning . . . . . . . . . . . . . . . . . . . . . . . . . . . 204
Cleaning/removing ice from windows . . . . .
206
Cleaning Alcantara . . . . . . . . . . . . . . . . . . . . 207
Clean ing artificial leather. . . . . . . . . . . . . . . 207
Cleaning carbon parts . . . . . . . . . . . . . 206, 207
Cleaning controls . . . . . . . . . . . . . . . . . . . . . 206
Clean ing decorative parts/trim . . . . . . . . . . 206
Cleaning displays . . . . . . . . . . . . . . . . . . . . . 206
Cleaning exhaust tail pipes . . . . . . . . . . . . . 205
Cleaning plastic parts . . . . . . . . . . . . . . . . . . 206
Cleaning rims 205
Clean ing textiles . . . . . . . . . . . . . . . . . . . . . . 207
Climate control
Air vents . . . . . . . . . . . . . . . . . . . . . . . . . . . .
79
Automatic recirculation . . . . . . . . . . . . . . . . 79
Operation . . . . . . . . . . . . . . . . . . . . . . . . . . . 78
Setup . . . . . . . . . . . . . . . . . . . . . . . . . . . . . . 79
Supplementary . . . . . . . . . . . . . . . . . . . . . . . 80
Synchronizing . . . . . . . . . . . . . . . . . . . . . . . . 79
Climate control system . . . . . . . . . . . . . . . . . 77
Climatized cupholder . . . . . . . . . . . . . . . . . . .
72
282
Clock 10
Closing
Panoramic sliding sunroof. . . . . . . . . . . . . . 44
Coat hooks . . . . . . . . . . . . . . . . . . . . . . . . . . .
76
Compass mirror . . . . . . . . . . . . . . . . . . . . . . . 58
Compliance . . . . . . . . . . . . . . . . . . . . . . . . . . 279
Consumer information . . . . . . . . . . . . . . . . . 276
Consumer Information . . . . . . . . . . . . . . . . . 138
Contacting NHTSA . . . . . . . . . . . . . . . . . . . . 138
Convenience
Closing . . . . . . . . . . . . . . . . . . . . . . . . . . . . . 44
Opening . . . . . . . . . . . . . . . . . . . . . . . . . . . . 44
Convenience key . . . . . . . . . . . . . . . . . . . . . . . 3 7
Indicator lights . . . . . . . . . . . . . . . . . . . . . .
85
Locking and unlocking vehicle . . . . . . . . . . . 37
Starting engine (START ENGINE STOP but-
ton) . . . . . . . . . . . . . . . . . . . . . . . . . . . . . . . .
84
Stopping the engine (START ENGINE STOP
button) . . . . . . . . . . . . . . . . . . . . . . . . . . . . .
85
Switching on ignition . . . . . . . . . . . . . . . . . . 84
Convertible child safety seats . . . . . . . . . . . 175
Convertible locking retractor
Activating . . . . . . . . . . . . . . . . . . . . . . . . . .
180
Deactivating . . . . . . . . . . . . . . . . . . . . . . . . 180
Using to secure a child safety seat . . . . . . 180
Cooled cupholder . . . . . . . . . . . . . . . . . . . . . . 72
Cooling box in glove compartment . . . . . . . . 75
Cooling mode (climate control) . . . . . . . . . . . 78
Cooling system
Adding coolant . . . . . . . . . . . . . . . . . . . . . .
223
Coolant . . . . . . . . . . . . . . . . . . . . . . . . . . . . 223
Coolant level checking . . . . . . . . . . . . . . . . 223
Cornering light . . . . . . . . . . . . . . . . . . . . . . . . 51
Cruise control
Changing speed . . . . . . . . . . . . . . . . . . . . . .
93
Preselect speed . . . . . . . . . . . . . . . . . . . . . . 93
Switching off . . . . . . . . . . . . . . . . . . . . . . . . 93
Switching on . . . . . . . . . . . . . . . . . . . . . . . . . 92
Warning/indicator lights . . . . . . . . . . . . . . . 14
Cruising range . . . . . . . . . . . . . . . . . . . . . . . . . 19
(upholders . . . . . . . . . . . . . . . . . . . . . . . . 71, 73
Heated and cooled . . . . . . . . . . . . . . . . . . . . 72
D
Data recorder
Date display 188
10