fuel AUDI Q7 2012 Owner´s Manual
[x] Cancel search | Manufacturer: AUDI, Model Year: 2012, Model line: Q7, Model: AUDI Q7 2012Pages: 342, PDF Size: 86.42 MB
Page 35 of 342
~ Contact your authorized Audi dea ler fo r as -
sistance if necessary.
If the engine coolant level is co rrect, then the
radiato r fan may be the cause of the malfunc
tion.
If the . warning symbo l (alternator mal
f u nction) a lso l ights up on the instr ument
panel ¢
page 31, then the fan belt may be
damaged .
A WARNING
- If your vehicle should break down for
mechanica l or other reasons, park at a
safe distance from moving traffic, turn off the engine and turn on the hazard
warning lights¢
page 60, Emergency
flasher.
-
- Never open the hood if you see or hear
steam o r coolant escap ing from the en
gine compartment - you risk being scald
ed. Wait until you can no longe r see or
hear steam or coo lant escaping.
- The e ngine compartment of any ve hicle
is a da ngerous a rea. Before you perform
any wor k in the engine compar tment,
t ur n o f the eng ine and allow it to cool.
Follow the warning stickers¢
page 248,
Engine compartment .
(D Note
Do not cont in ue d riving if the . symbol
illuminates. There is a malf unct ion in the
engine cooling system -you co uld damage
your eng ine.
9=:7-Engine oil pressure malfunction
The red engine oil pressure warning symbol
requires immediate service or repair. Driving
with a low-oil -pressure indication is likely to
inflict severe damage to the engine.
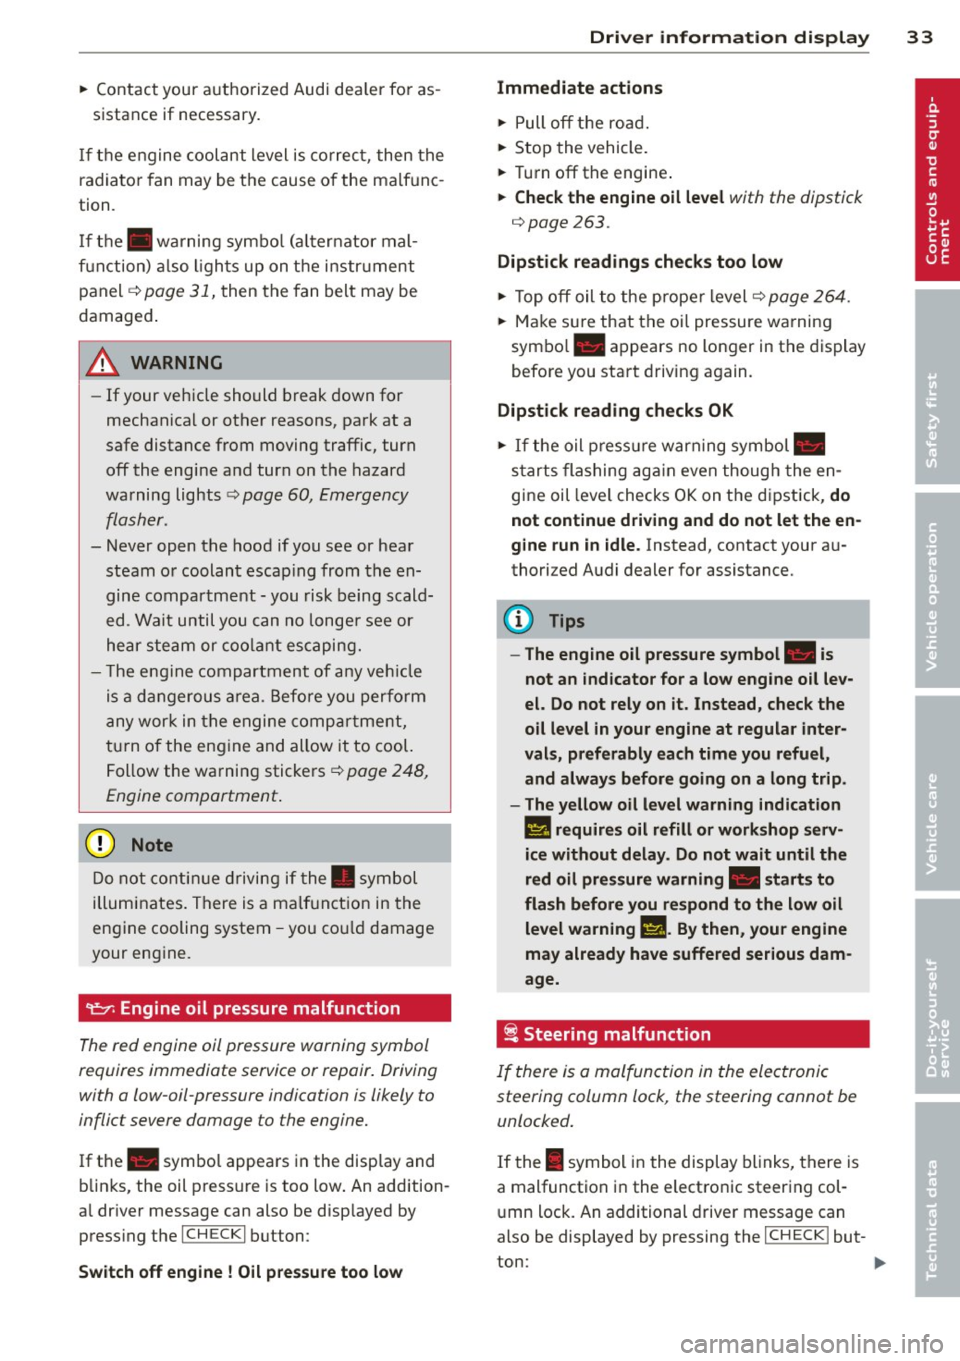
If the . symbo l appears in the disp lay and
b links, the oil press ure is too low . An addition
a l dr iver message can also be disp layed by
press ing the
I CH ECKi button:
Switch off engine! Oil p ressure too low
Dri ver information di spla y 33
Immediate act ions
~ Pull off the road.
~ Stop the vehicle.
~ T ur n off the engine .
~ Check the engine oil le vel with the dipstick
¢ page 263.
Dipstick readings check s too low
~ Top off oil to the proper level¢ page 264.
~ Make s ure that the oil pressure wa rning
symbo l. appears no longer in the display
before you start driving again.
Dipstick read ing checks OK
~ If the oil p ress ure warn ing symbol .
s t arts flashing aga in even though the en
gine oil level checks OK on t he d ipstick,
do
not continue d riving and do not let the en
gine run in idle .
Instead, contact your au
thorized Audi dealer for assistance.
(D Tips
- The engine oil pressure symbol. is
not an indic ator for a low engine oil lev
el. Do not rely on it . Instead, check the
oil level in your engine at regular inter
vals, preferably each time you refuel,
and always before going on a long trip .
- The yellow oil lev el warn ing indication
1111 requires oil refill or workshop s erv
ice without delay . Do not wait until th e
red oil pre ssure warning . start s to
flash before you r espond to the low oil
level warning
Ill . By then , your engine
may already have suffered serious dam
age.
i Steering malfunction
If there is a malfunction in the electronic
steering column lock, the steering cannot be
unlocked .
If the I symbol i n the display blinks, there is
a malfunction in the electronic steering col
u mn lock. An additional driver message can
a lso be displayed by pressing the
ICHECK I but-
ton:
~
Page 36 of 342

34 Driver information display
Do not drive vehicle: steering defective
• Contact you r nearest authorized Audi dea le r
or qualified workshop.
• Do
not tow yo ur vehicle .
& WARNING
-
Your vehicle must not be towed in the
event of a malfunction in the electronic
steering column lock because it cannot be
steered due to the locked steering. If it is
towed w ith the steering locked, there is
the risk of an accident .
~ Ignition lock malfunction
A malfunction in the ignition lock must be re
paired immediately.
If the . symbo l in the display blinks, there is
a ma lfunction in the electronic ignition lock.
An addit ional driver message ca n also be d is
played by pressing the
! CHECK I button:
Ignition lock defective. Contact workshop !
• Do not turn the eng ine off.
• Drive immediately to an authorized Audi
dealer to have the ma lf u nction corrected.
If there is a ma lfunction in the e lectronic igni
tion lock, the ignition cannot be turned off.
Drive immediately to an authorized Audi dea l
er to have the cause of the ma lfunction cor
rected.
On vehicles with Convenience key*, the engine
should not be switched off using the
! STOP !
button beca use the engine ca nnot be sta rted
again after the ignition is switched off.
' Yellow symbols
A yellow symbol means WARNING.
Fig . 26 Display: low fuel level warning (priority 2)
Yellow symbo ls indicate a priority 2 malfunc
t ion - Warning!
When a yellow war ning symbol appears,
one
warning tone sounds . A driver message ap
pears as well to explain the malfunction in
more de tail. The driver warning goes out after
about 5 seconds, but it can be brought up
again at any time by pressing the
! CHECK I but
ton .
Check the displayed function as soon as possi
ble. If
more than one priority 2 ma lf u nction is
detected, all symbols will appear one after
the other for about 2 seconds .
Yellow symbols mean:
"
Convenience key"
Key not in vehicle
c> page 108
•
USA models: Defective
brake light
c>pa ge 23
[fl
Canada models: Defective
brake light
c> page 23
~:)
Defective light bulb
c>page 23
raa
light/rain sensor defective
c> page35
~
Windshield washer fluid Lev-
el low
c>page3 5 1 ...
Page 37 of 342
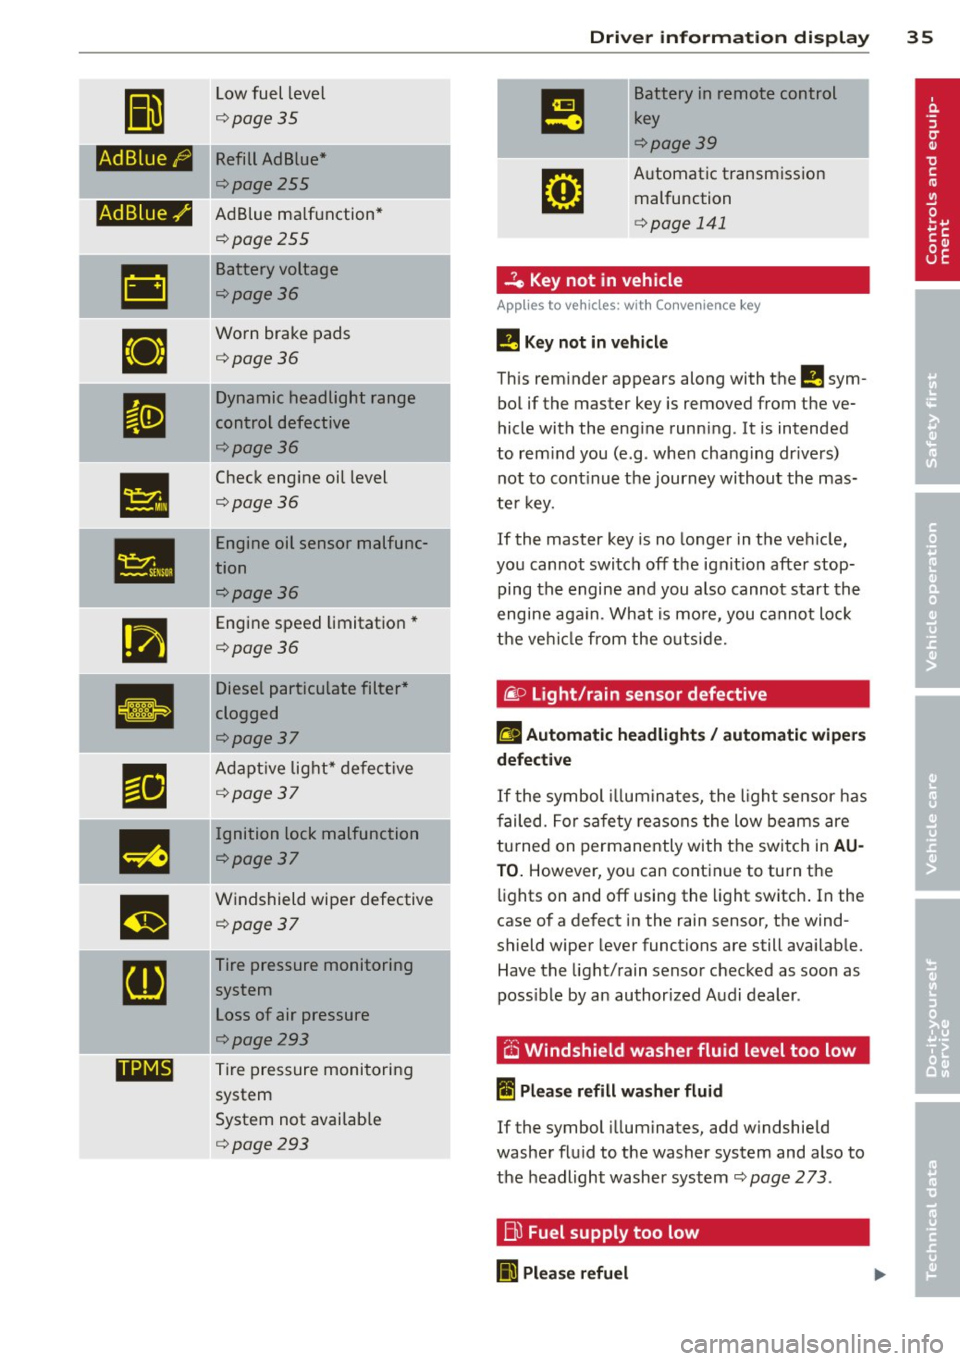
II
Low fuel level
¢page 35
fi.fl1::jfl1-j Kefill Ad Blue*
¢page255
-Ad Blue,/'
•
•
•
••NI@
AdBlue ma lfunction*
¢poge255
Battery voltage
¢poge36
Worn brake pads
¢poge36
Dy namic headlight range
control defective
¢poge36
Check eng ine oil level
¢poge36
Engine oil sensor malfunc
tion
¢poge36
Engine speed limitat ion*
¢poge36
Diesel particulate filter *
clogged
¢poge37
A dapt ive lig ht* defec tive
¢poge37
-Ignition lock malfunction
¢poge37
W indshield wiper defective
¢poge37
Tire pressure monitoring
sys tem
Loss of air pressure
¢poge293
T ire pressure monitoring
system
System not availab le
¢poge293
Dri ver information di spla y 35
Battery in remote control
key
¢poge39
A utomat ic transm iss ion
malfunction
¢ page 141
...?c, Key not in vehicle
Applies to vehicles: with Convenience key
!!I Key not in vehicle
This reminder appears along with the !!I sym
bol if the master key is removed from the
ve
hicle with the engine runn ing. It is intended
to rem ind you (e .g. whe n cha ng ing dr ive rs)
not to cont inue the journey without the mas
te r k ey.
If the master key is no longer in the ve hicle ,
you cannot swi tch off t he ig nit io n after stop
ping the engine an d you also cannot start the
engine aga in. What is mo re, you cannot lo ck
t he ve hicl e from the o utsi de.
@. D Light/rain sensor defective
fll Automatic headlights/ automatic wipers
defective
If t he symbol illumina tes, the l ight se nsor has
f ailed. For safe ty rea sons the low beams are
tu rned on permanently with t he switc h in
AU
TO. However , yo u can cont inue to tu rn the
li g hts on and off using the light switch . In the
case of a defect in the rain sensor, t he wind
shield wiper lever functions are still availab le.
Have the light/rain senso r ch ecked as soon as
poss ible by an author ized Audi dealer .
6 Windshield washer fluid level too low
~ Please refill washer fluid
If the symbol illuminates, add w indshie ld
washe r fl ui d to the washer system and also to
t h e headlight washer system
¢ page 2 73 .
Bl Fuel supply too low
II Please refuel
Page 38 of 342

36 Driver in formation d isplay
When this symbo l (I illuminates for the f irst
time, the fuel reserve in your vehicle is sti ll
between 2 .6 and 3 .2 gallons (10- 12 liters) .
Refue l as soon as possib le
¢ page 252.
If the symbol lights up, even when there is
ample fuel in the tank, and the text
T a nk sys
tem malfunct ion! Cont act wor kshop
appears
in the display, there is a fault in the system.
Contact a qualified workshop to have the fau lt
rectified.
t::l Battery voltage
If the battery's state of charge is not in the
optimal range, the
f• ) symbol is shown in the
d isplay and the dr iver message
Low battery
c harge : battery will be charg ed while driving
appears.
Wh ile this dr iver not ificat io n is displayed, you
have to be p repared for lim ited start ing capa
b ili ty.
Driv er m essage appears and goes out
again
I f t his driver message appears after the igni
tion is turned o n or wh ile driving and it goes
out again after a while, the battery has been
adequately recharged .
Driver message app ears and does not go
out again
If th is driver notification appears after the ig
nition is turned on or while driving and does
not go out again, the battery's state of charge
is not in the opt imal range. Starting capability
is restricted. Have the battery checked by an
author ized Audi dealer as soon as poss ible .
{0 : Worn brake pads
El Brake pads !
If the warn ing light illum inates, immediately
contact your authorized Audi dealer or quali
fied workshop to have all brake pads inspect
ed . On USA models the wa rning light
El
l ) - : USA mod els only
comes on together with the warning light
- · Both sets of bra ke pads on an ax le
must a lways be rep laced at the same time.
A WARNING
=
Driving w it h bad brakes can cause a colli-
sion and ser ious personal in jury.
- If the warn ing light
El and the warning
light
11111> with the message Brake
pads!
comes o n in the inst rument cluster
d isp lay, immediately contact your au
thor ized Audi dealer or qualified wo rk
shop to have all b rake pads checked or
re placed if ne cessa ry.
~(i) Headlight range control
II He adlight range control defective !
-
If the symbol illuminates, the dynamic head
li ght rang e control is no longer work ing prop
erly. Have the system checked and repa ired at
yo ur aut horized Aud i dea le r.
~ -Engine oil level
l!I Plea se check oil level
When the symbol illuminates, check the en
gine o il leve l as soon as possible
¢ page 263.
T op off t he oil at your ear liest opportu nity
¢ page 264 .
't::r.~ Engine oil sensor defective
II Oil level ! Sensor defective
If the symbol illum ina tes, contact yo ur au
thorized Aud i dea le r and have the oil sensor
inspected. Unti l yo u have this done, check t he
oi l level each time you refue l just to be on the
safe s ide
¢ page 263.
!?) Engine speed limitation
Applies to vehicles: wit h engine speed limitatio n
II! Do not e xceed ma x. engine speed of X XXX
rpm .,,.
Page 44 of 342
42 Openin g and clo sing
readiness light, located in the upper part of
the driver's door panel, will start to blink.
- T he vehicle interior lights turn off.
Unlocking and l ocking with Conven ience
k ey*
On vehicles which a re equipped w ith the C o n
ve nience k ey*
authorization system, the
doors are unlocked without a key by means of
a proximity sensor in the door handle. The
doors are simi larly locked without a key using
the locking button. Each door has a proximity
sensor and a locking button .
Automatic l ock ing
The automatic locking feature locks all the ve
hicle doors and the rear lid when you drive
faster than 9 mph (15 km/h). This function can be turned on and off in the MMI
C entr al
lo cking
Menu c:> page 44.
You can un lock the vehicle from the inside by :
- removing the key from the ign it ion sw itch
(the vehicle will automat ica lly unlock itself)
or
- pressing the unlock part of the power lock
switch @or
- pull ing the door handle (twice to open the
rear doors).
Unintent ionall y locking yourself out
In the following cases there safeguards to
prevent you locking your remote master key in
the vehicle :
- The veh icle does not lock with the power
locking sw itch
c:> page 44 if the driver's
door is open.
- On vehicles with Convenience key* , if the
most recently used master key is in the lug
gage compartment, the rear lid is automati
cal ly unloc ked aga in after it is closed.
Do not lock your vehicle with the
r e mot e m as
t e r k ey or Convenienc e key*
until all doors
and the rea r lid are closed. In t his way you
avoid locking yourse lf out accidenta lly.
A WARNING
- When you lock your vehicle from outside,
nobody- espec ially children -should re
main inside the vehicle . Remember,
when you lock the vehicle from the out
side the windows cannot be opened from
the inside.
- When you leave the veh icle, always re
move the ignition key and take it with
you . This will prevent passengers (chil
dren, for example) from accidentally be
ing locked in the vehicle should they acci
dentally press the power locking switch
in the front doors.
- Do not leave children inside the vehicle
unsupervised. In an emergency it would
be imposs ible to open the doors from
the outside without the key.
(D Tips
- In the event of a crash with airbag de
ployment all locked doors will be auto
matically unlocked to give access to the
vehicle occupants from the outside.
- If the power locking system sho uld mal
function, you can lock each door individ
ually using the vehicle key
c:> page 45 .
-If the power locking system shou ld fa il,
you can still open the fuel tank flap in an
emergency
c:> page 2 55 .
-You are well advised not to keep va lua
bles inside an unattended vehicle, v is ible
or not. Even a properly locked vehicle
cannot p rov ide the secur ity of a safe .
Page 68 of 342
66 Clear vis ion
Headlight washer system
Applies to vehicles: with headlight washer system
The headlight washer system cleans the
headlights .
.. Operate the windsh ield wiper/washer sys
tem
c:> page 63, fig. 65 ® with the head
lights turned on by holding the lever for lon
ger than one second.
The washer jets extend forward out of the fro nt bumper driven by water pressure to
spray the front headlights with water .
You should inspect the headlights regularly (for example when refueling) and clean off
any solid dirt or insects from the lenses .
To ensure the system works properly in winter ,
keep the washer jets free of snow and remove
any ice using a de- ic ing spray.
Service position
The wiper blades can only be changed in the
service position.
.. If the wiper blades are not frozen to the
windshield , bring the windshield wiper lever
to the basic position@c:>
page 63 , fig. 65 .
.. Select : Function button ICARI > Control but-
ton
Syst ems* > W indshie ld wip ers > Ser vice
po sition .
Or
.. Se lect : Funct ion button
ICARI > Contro l but
ton
C ar sys tem s* > Servicing & check s >
Wip er service po sition .
- On -
changing the windsh ie ld w iper blades
can on ly be done if you bring the wiper a rms
to the se rv ice position. You wi ll also avoid
paint damage to the hood when wo rking on
t h e wipers in this pos ition.
- Off -the w indshield wipers a re moved to
their initial pos ition aga in.
(D Note
Never maneuve r your vehicle with the
front windshield wipe r arms ra ised since
they will a utomat ica lly be moved back to the
ir basic position above a speed of 3
mph
(6 km/h) and can scratch the hood.
(D Tips
- Yo u ca n al so use the se rvice posi tion, for
example, if you want to protect the
w indshield from icing by using a cover .
- T he service posit ion automatically
switches to
Off when you operate the
w indshield wiper lever, o r speed exceeds
3 mph (6 km/h) .
Replacing windshield wiper blades
Wiper blades in good condition help keep the
windshield clear.
®
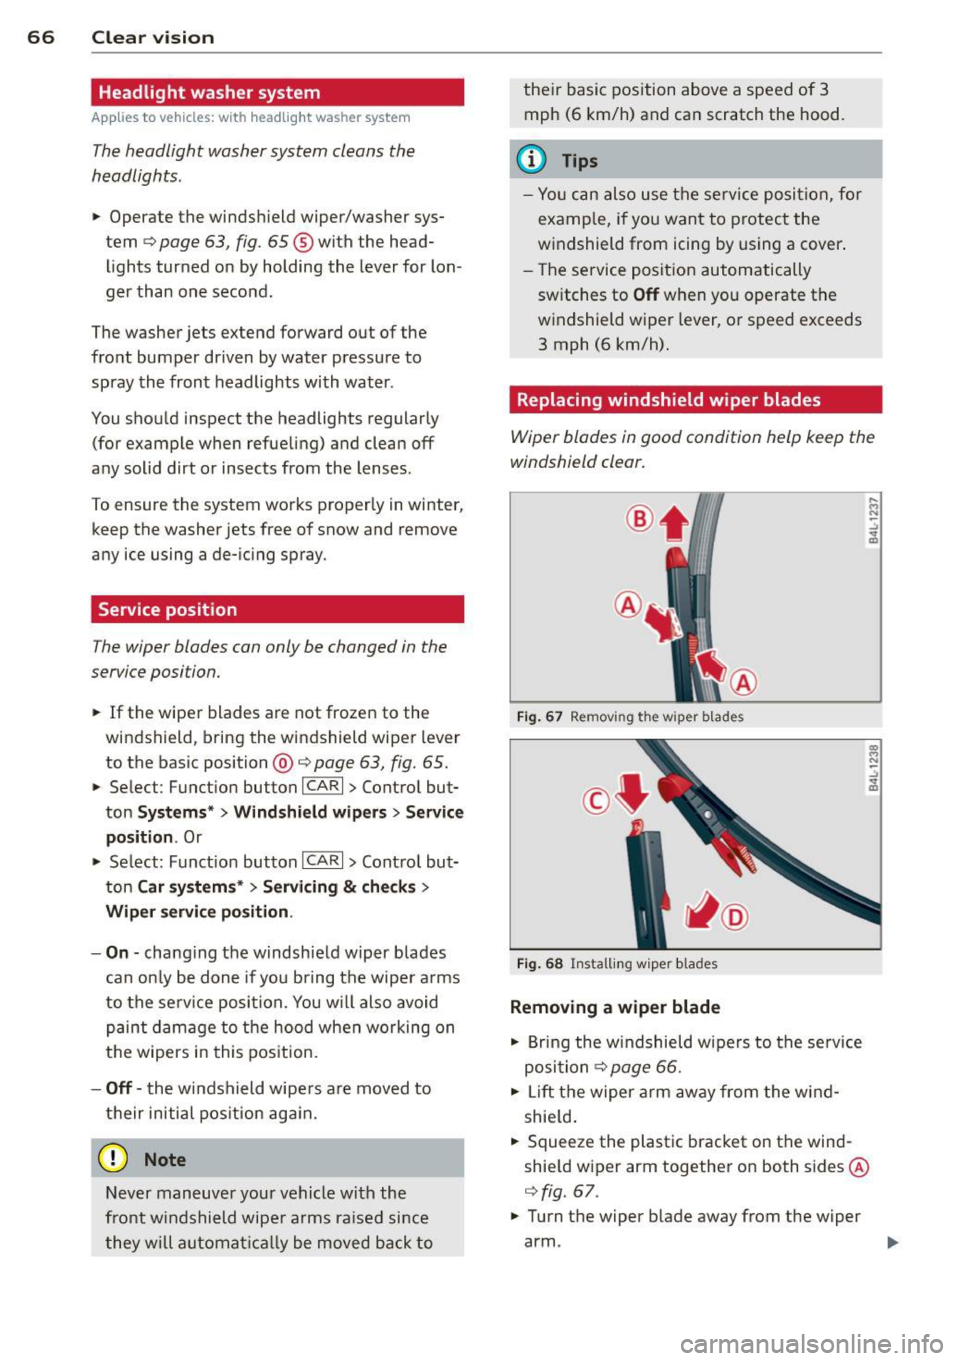
F ig . 67 R emoving th e w ip er b lades
F ig . 68 Ins ta llin g w iper b la d es
Removing a wiper blade
.. Bring the w indshield wipe rs to the se rvice
posi tion
c:> page 66.
.. Lift the wiper arm away from the wind
shie ld .
.. Squeeze the plast ic bracket on the wind
shie ld wiper arm together on both sides @
c:>
fig. 67 .
.. Turn the wiper blade away from the wiper
arm . ..,.
Page 85 of 342
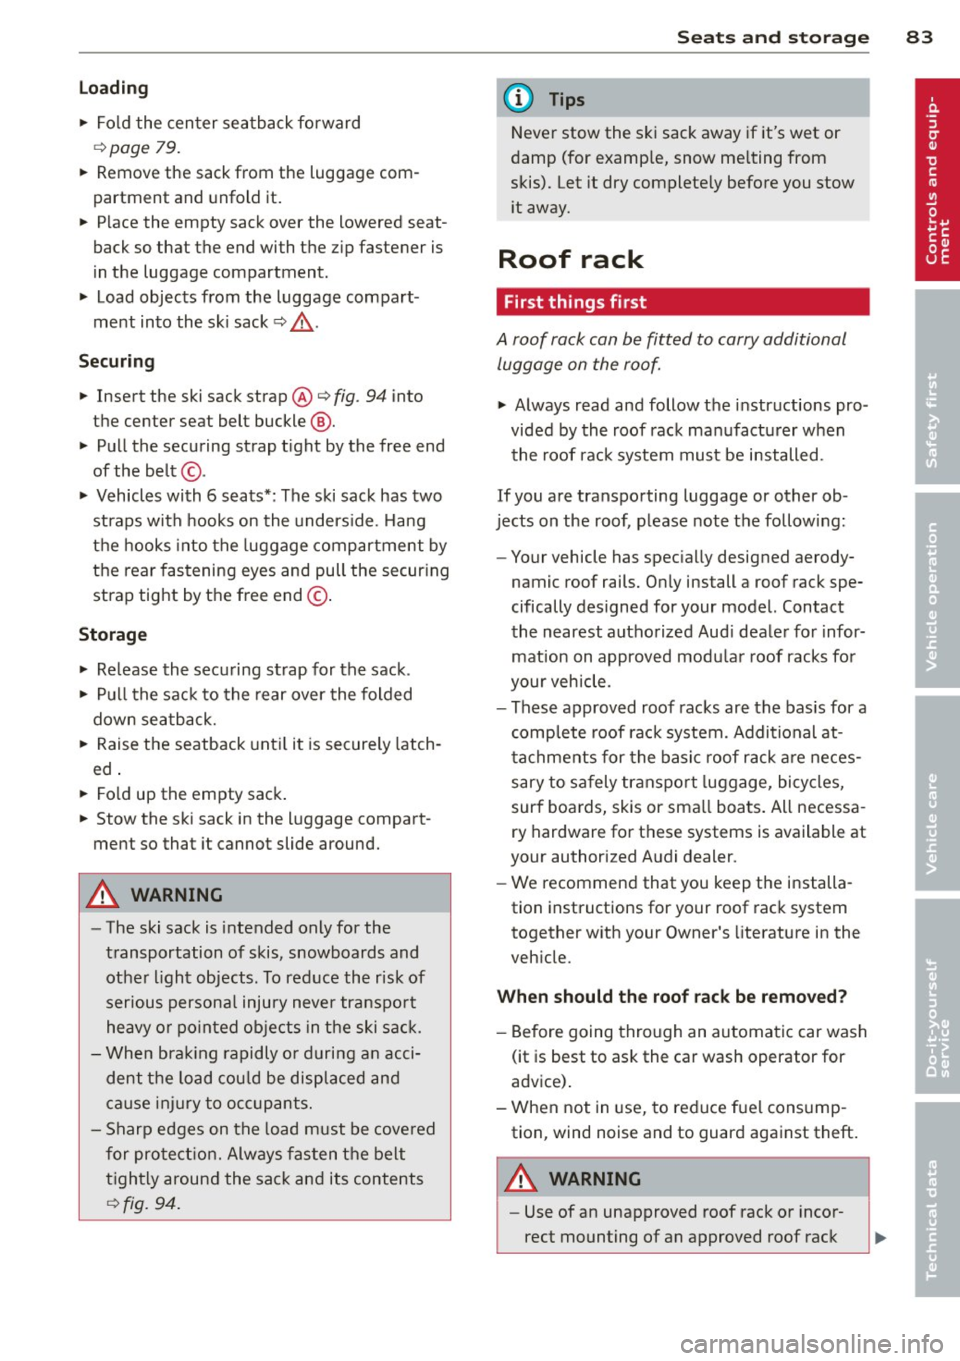
Lo adin g
"' Fo ld the center seatback forward
r=> page 79.
"' Remove the sack from the luggage com
partment and unfold it.
"' Place the empty sack over the lowered seat
back so that the end wi th the z ip fastener is
i n the luggage compartment.
"' Load objects from the luggage compart
ment into the sk i sack
r=> &, .
Securin g
"' Insert the ski sack strap @ r=> fig. 94 into
the center seat belt buckle @.
"' Pull the securing strap t ight by the free end
of the belt @.
"' Vehicles with 6 seats* : The ski sack has two
straps with hooks on the unders ide . Hang
the hooks into the luggage compartment by
the rear fastening eyes and pull the secur ing
strap tight by the free end @.
Storage
"' Re lease the securing strap for the sack .
"' Pull the sack to the rear over the folded
down seatback.
"' Raise the seatback unti l it is securely latch
ed .
"' Fo ld up the empty sack.
"' Stow the ski sack in the luggage compart
ment so that it cannot slide around.
_&. WARNING
-
- The ski sack is intended only for the
transportation of skis, snowboards and
other light objects. To reduce the risk of
serious persona l injury never transport
heavy or po inted ob jects in the ski sack .
- When bra king rapidly o r during an acci
dent the load cou ld be displaced and
ca use inj ury to occupants.
- Sharp edges on the load must be cove red
for protect ion. Always fas ten the belt
t igh tly around the sack and its contents
r=> fig. 94. S
eat s an d sto rage 8 3
(D Tips
Never stow the ski sack away if it's wet or
damp (for examp le, snow me lting from
skis). Let it dry complete ly before you stow
i t away.
Roof rack
First things first
A roof rack can be fitted to carry additional
luggage on the roof.
"' Always read and follow the instructions pro
vided by the roof rack manufacturer when the roof rack system must be installed .
If you are transporting luggage or other ob
jects on the roof, p lease note the following:
- Your vehicle has spec ially designed aerody-
namic roof rails. Only install a roof rack spe
cifically designed for your model. Contact
the nearest authorized Aud i dealer fo r infor
mation on approved modu lar roof racks for
your vehicle.
- These approved roof racks are the bas is for a
complete roof rack system. Additional at
t achments for the basic roof rack a re neces
sary to safely transpo rt luggage, bicycles,
surf boards, skis or sma ll boats. All necessa
ry hardware for these systems is available at
your authorized Audi dealer.
- We recommend that you keep the installa
tion instructions for your roof rack system
together with your Owner's literature in the
veh icle.
When sh ould the roof rac k be remov ed?
- Before going through an automatic car wash
(it is best to ask the car wash operator for
advice) .
- When not in use, to reduce fuel cons ump
tion, wind noise and to guard against theft.
_&. WARNING
- Use of an unapproved roof rack or incor
rect mounting of an approved roof rack
Page 87 of 342
maneuvers when transporting cargo on
the roof of your vehicle.
- Never exceed the maximum permissible
load carrying capacity of the roof of your
vehicle, the permissible axle weights and
the permissible total weight of your vehi cle¢
page 314, Weights.
CD Note
Make sure that the opened rear lid does
not come in contact with the cargo on the
roof.
@ For the sake of the environment
As a resu lt of the increased wind resist
ance created by a roof rack, your vehicle is
using fuel unnecessarily. So remove the
roof rack after using it.
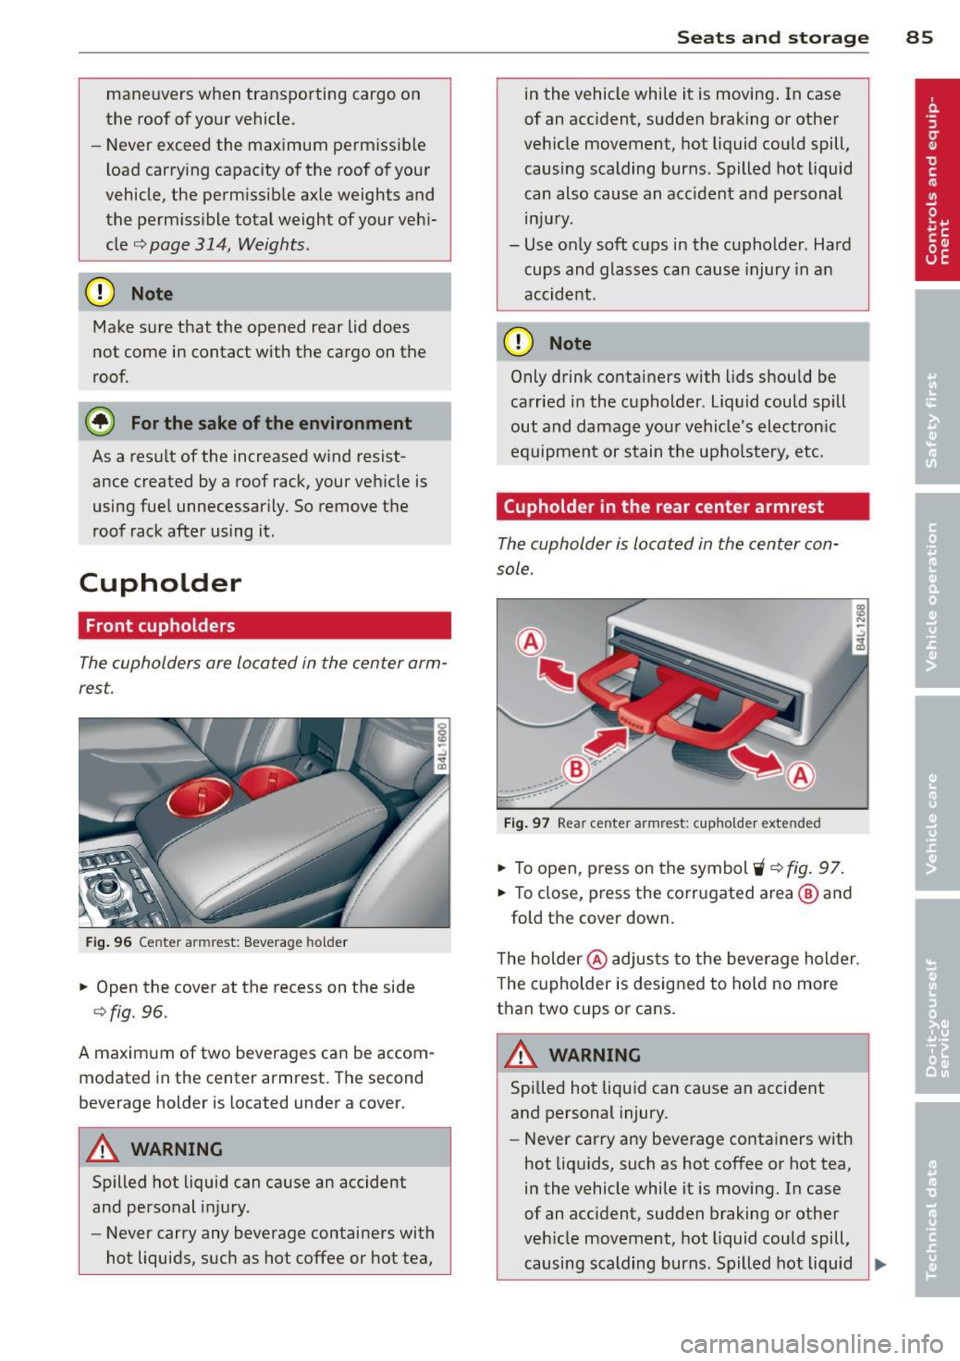
Cupholder
Front cupholders
The cupholders are located in the center arm
rest.
Fig. 96 Center armrest: Beverage holder
.. Open the cover at the recess on the side
¢fig. 96.
A maximum of two beverages can be accom
modated in the center armrest. The second
beverage holder is located under a cover.
A WARNING
Spilled hot liquid can cause an accident
and personal injury.
- Never carry any beverage containers with
hot liquids, such as hot coffee or hot tea,
Seats and storage 85
in the vehicle while it is moving . In case
of an acc ident, sudden braking or other
vehicle movement, hot liquid could spill,
causing scalding burns. Spilled hot liquid
can also cause an accident and personal injury.
- Use only soft cups in the cupholder. Hard cups and glasses can cause injury in an
accident.
CD Note
Only drink containers with lids should be
carried in the cupholder. liquid could spill
out and damage your vehicle's electron ic
equipment or stain the upholstery, etc.
(upholder in the rear center armrest
The cupholder is located in the center con
sole.
Fig. 97 Rear center armrest: cupholder extended
.. To open, press on the symbol 'i ¢fig. 97 .
.. To close, press the corrugated area @ and
fold the cover down.
The holder @adjusts to the beverage holder.
T he cupholder is designed to hold no more
than two cups or cans.
A WARNING
Spilled hot liqu id can cause an accident
and personal injury.
-
-Never carry any beverage containers with
hot liquids, such as hot coffee or hot tea,
in the vehicle while it is moving. In case
of an acc ident, sudden braking or other
veh icle movement, hot liquid could spill,
causing scalding burns. Spilled hot liquid ..,.
Page 95 of 342
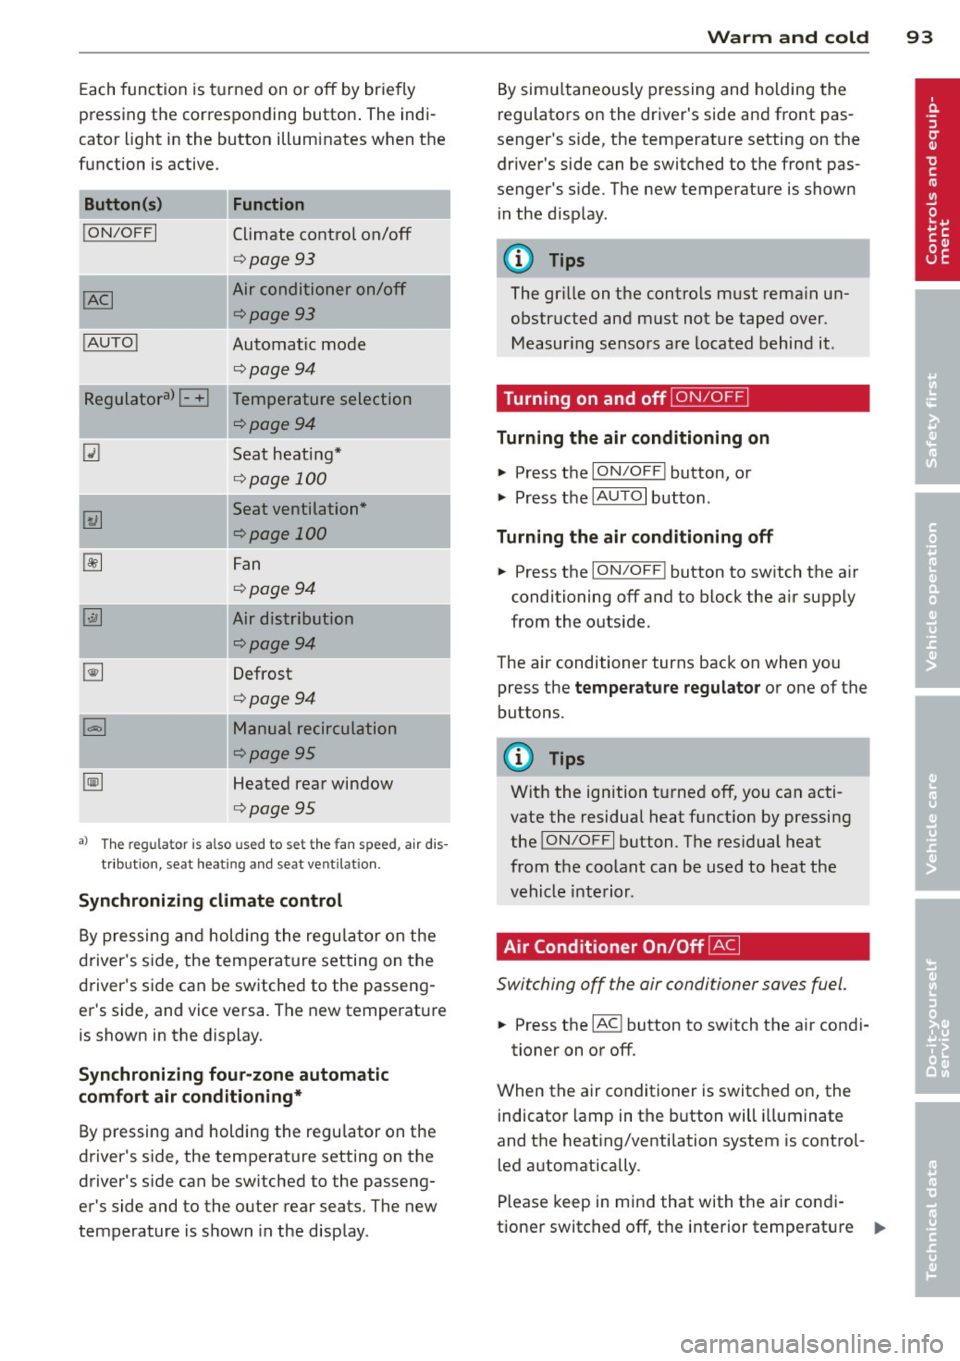
Each function is turned on or off by briefly
pr essing the corresponding button . The indi
cator light in the button illuminates when the
func tion is ac tive.
Button (s )
!ON/OFFI
! AUTO !
Function
Climate control on/off
<=>page 93
Air conditioner on/off
<=>page 93
Automatic mode
<=>page94
-~~~,--
Regulatora) G Temperature selection
~
I
<=>page94
Seat heating*
<=> page 100
Seat ventilation*
<=>page 100
Fan
<=> page94
Air distribution
<=>page94
Defrost
<=>page94
Manual recirculation
¢page95
Heated rear window
<=>page95
al Th e regulat or is also used to set t he fa n speed, air dis
tributio n, seat he ating and sea t ve ntilat io n.
Synchronizing climate control
By pressing and holding the regu lator on the
d river's side , the tempera ture setting on the
d river's side can be switched to the passeng
er's side, and vice versa . The new temperature
is shown in the display.
Synchroniz ing fou r-zone automatic
comf ort air c ond iti oning*
By pressing and holding the regu lator on the
drive r's side, the temperature setting on the
drive r's s ide can be sw itched to the passeng
er's side and to the ou ter rear seats. The new
temperature is shown in the display .
Warm and c old 93
By sim ultaneously pressing and holding the
regulators on the driver 's s ide and front pas
senger 's s ide, the temperat ure setting on the
driver's side can be switched to the front pas
senge r's s ide. T he new temperature is shown
in the d isp lay .
@ Tips
The gr ille on the controls must rema in un
obstructed and must not be taped over.
Measur ing senso rs are located behind it .
Turning on and off~
Turning the air conditioning on
"' Press the ION/O FF! button, or
"' Press the
IAUTO I button.
Turning the air conditioning off
"' Press the ION/O FF! button to sw itch the a ir
conditioning off and to block the air supply
from the ou tside.
The air conditioner turns back on when yo u
press the
temper atu re regulator or one of the
buttons.
(D Tips
Wit h the ignition t urned off, you can acti
vate the residual heat funct ion by pressing
the
! ON/O FF I button . The res idual heat
from the coolant can be used to heat the
vehicle interior .
Air Conditioner On/Off~
Switching off the air condi tioner saves fuel .
"' Press the IAC ! button to sw itch the a ir condi-
tioner on or off .
When the air conditioner is switc hed on, the
indicator lamp in the b utton will illuminate
and the heat ing/venti lation system is control
led automatically .
Please keep in mind that with the air condi
tione r switc hed off, the interior temperat ure
1JJ>
Page 97 of 342
~ Press the~ button again, or press the
IAUTOI button to turn it off.
Temperature is controlled automatically. The
maximum amount of air flows main ly from
the vents below the windshield.
To defog the rear side windows, the air ve nts
i n the door pillars shou ld be open and d irect
ed at the windows.
Manual air recirculation ~
Air recirculation prevents exhaust fumes or
other pollution from entering the vehicle.
Tu rning on air r ecircul ation
~ Press the 1.,..,1 button ~ .&
Tu rning off air recircul ation
~ Press the~ button again, or
~ press the IAUTO I button, or
~ press the~ button.
In the air recirculation mode, the air in the
passenger compartment is recirculated and
filtered to prevent exhaust fumes and other
pollution from entering the vehicle . We rec
ommend that you use the manual air recircu lation under the following conditions:
- when driving through tunnels
- in a traffic jam.
A WARNING
Do not use the air recirculation mode for
extended per iods of t ime. The windows
could fog up since no fresh a ir can enter
the vehicle.
If the windows fog up, press
the air recirculation button again immed i-
,
Warm and c old 95
ately to switch off the air recirculation
f u nction or select defrost.
Rear window defogger~
The rear window defogger clears the rear win
dow of condensation .
~ Press the QW button to turn the rear window
defogger on and
off.
T he rear window defogger wo rks only when
the engine is runn ing. The light in the sw itch
will i lluminate when the defogger is on.
T he rear window defogger w ill sw itch
off au
tomat ica lly after a short t ime. The t ime the
rear w indow defogger remains on w ill vary de
pending on the outside temperature.
At very low outs ide temperatures, the rear
window defogger can be sw itched on continu
o usly by pushing the
QW button for more than
2 seconds . This remains stored until the igni
tion is switched
off.
A rea r w indow defogger that was switched on
also remains stored for 15 m inu tes after the
ignition is switched
off . If the engine is re
started within these 15 min utes, the rear win
dow defogger is a lso activated, depending on
outside temperature. With a vehicle that is
parked for a short time, the rear window de
fogger does not need to be manually activat ed again.
@ For the sake of the environment
Turn the defogger off when the rear win
dow is clear. When you save electric ity, you
save fuel.