door AUDI Q7 2013 Owner´s Manual
[x] Cancel search | Manufacturer: AUDI, Model Year: 2013, Model line: Q7, Model: AUDI Q7 2013Pages: 348, PDF Size: 87.72 MB
Page 107 of 348
Ignition lock and ignition switch
Ignition key positions
The engine con be started or turned off with
the ignition key.
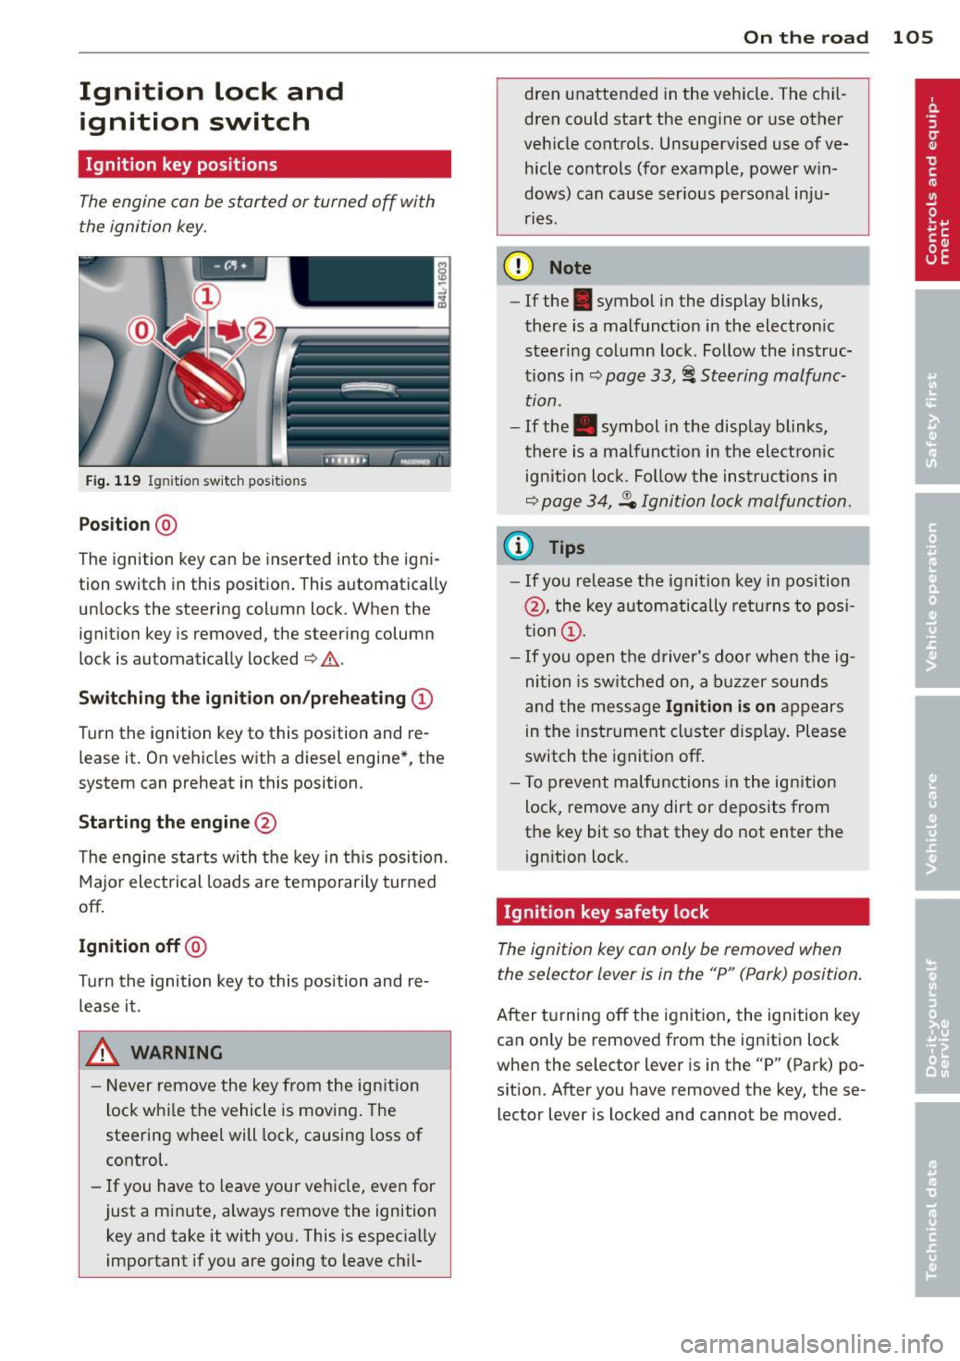
Fig. 119 Igni tion switch pos it io n s
Position @
The ignition key can be inserted into the igni
tion switch in this position . This automatically
unlocks the steering column lock . When the
ignition key is removed, the steering column
lock is automatically locked
Q .&. .
Switching the ignition on/preheating (D
Turn the ignition key to this position and re
lease it. On vehicles with a d iesel engine*, the
system can preheat in this position .
Starting the engine@
The engine starts with the key in this position.
Major electrical loads are temporarily turned
off.
Ignition off@
Turn the ignition key to this position and re
lease it.
A WARNING ,~ ~
- Never remove the key from the ign ition
lock whi le the vehicle is moving. The
steering wheel will lock, causing loss of
control.
- If you have to leave your vehicle, even for
just a minute, always remove the ignition key and take it with you. This is especially
important if you are going to leave chil-
On the road 105
dren unattended in the vehicle. The chil
dren could start the engine or use other
vehicle controls. Unsupervised use of ve
hicle controls (for example, power win
dows) can cause ser ious personal inju
ries.
(D Note
- If the . symbol in the display blinks,
there is a malfunction in the electronic
steering column lock . Follow the instruc
tions in
Q page 33, i Steering malfunc
tion .
-If the . symbol in the display blinks,
there is a malfunction in the electronic
ignition lock . Fol low the instructions in
Q page 34, .P. Ignition lock malfunction.
a) Tips
-If you release the ignition key in position
@, the key automatically returns to posi
tion (!).
- If you open the driver's door when the ig
nition is sw itched on, a buzzer sounds
and the message
Ignition is on appears
in the instrument cluster display. Please
switch the ignition off.
- T o prevent malfunctions in the ign ition
lock, remove any dirt or deposits from
the key bit so that they do not enter the
ignition lock.
Ignition key safety lock
The ignition key con only be removed when
the selector lever is in the "P" (Pork) position.
After turning off the ignition, the ignition key
can only be removed from the ignition lock
when the selector lever is in the "P" (Park) po
sition. After you have removed the key, these lector lever is locked and cannot be moved.
Page 110 of 348
108 On the road
reached operating temperat ure -other
wise yo u risk engine damage.
- The eng ine cannot be sta rted by pushing
or towing the vehicle.
@ For the sake of the environment
Do not allow the engine to warm up with
t he vehicle stationary. Start driving righ t
away . In th is way you avoid unnecessa ry
emissio ns.
@ Tips
If you open the drive r's door when the ig
nition is switched o n, a buzze r sounds and
the message
Ignition is on appears i n the
instrument cluster disp lay. Please switch
the ignition off.
Switching engine off with the~
button
App lies to vehicles: with Convenience key
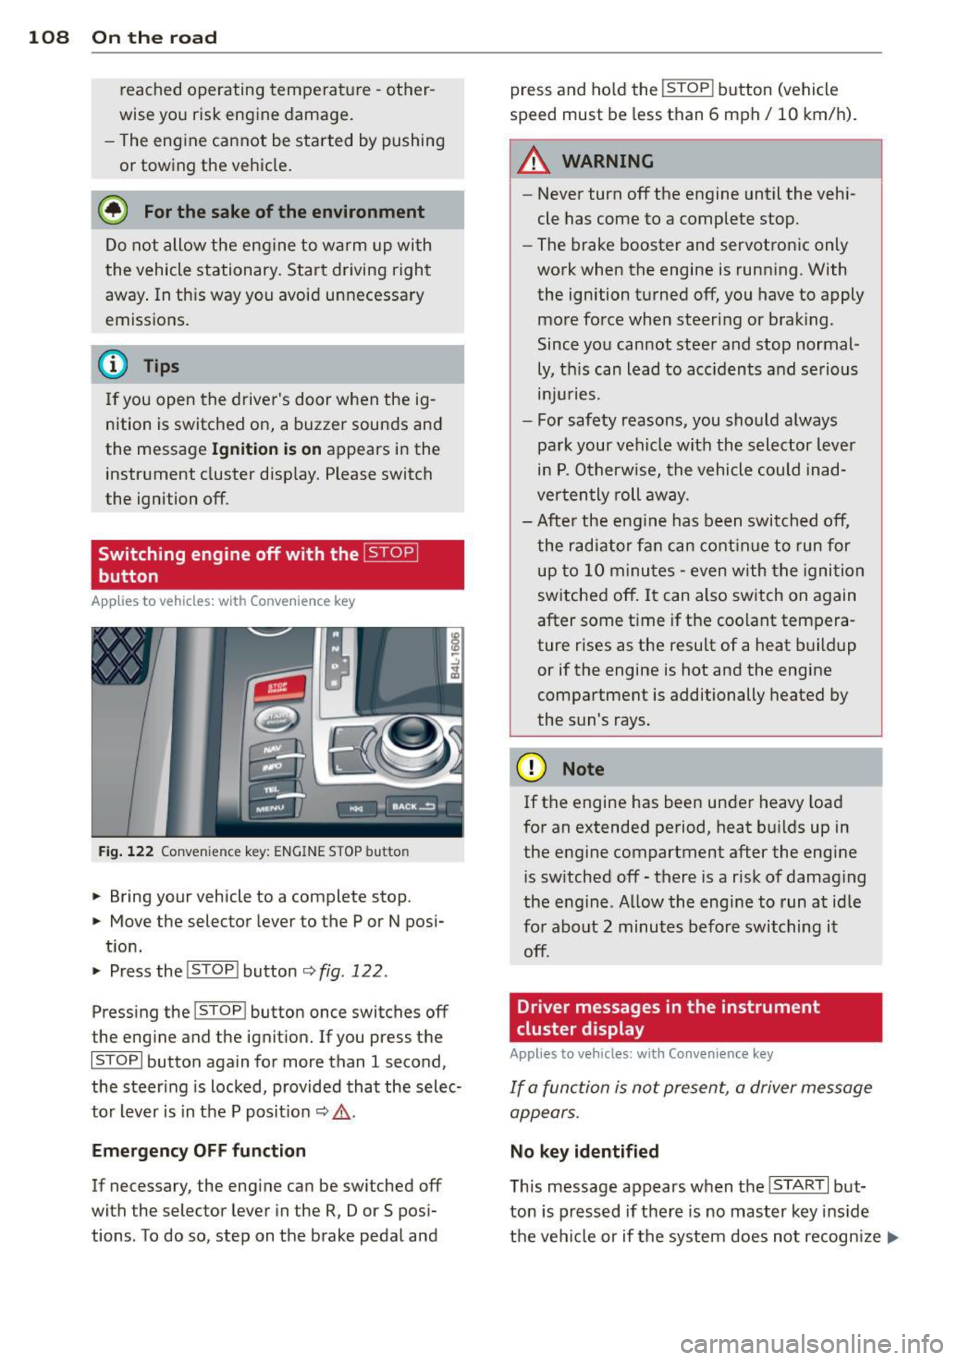
Fig. 122 Convenience key: ENGINE STOP butto n
.. Bring your vehicle to a complete stop.
.. Move the selector lever to the P or N posi-
t ion.
.. Pressthe !STOP !button
¢fig.122.
Press ing the I STOP I button once switches off
the engine and the ignition. If you press the
ISTOPI button again for more than 1 second,
the steering is locked, provided that the selec
tor lever is in t he P pos it ion
¢ & .
Emergency OFF function
If necessary, the engine can be switched off
with the selector lever in the
R, Dor S posi
tions . To do so, step on the brake peda l and press and ho
ld the !STOP ! b utton (vehicle
speed must be less than 6 mph/ 10 km/ h).
.&_ WARNING
-
- Never turn off the engine until the vehi-
cle has come to a complete stop.
- The brake booster and servotronic only
work when the engine is running. With
the ignition turned off, you have to apply mo re force when steeri ng or brak ing.
Since you cannot steer and stop normal
ly, t his can lead to acc idents and se rious
. . . in Juries.
- For safety reasons, you sho uld a lways
pa rk your vehi cle wit h the selector lever
i n P. O therwise, the vehicle could inad
ver ten tly roll aw ay.
- Afte r the eng ine has been switch ed off,
t he r adi at or f an can co ntinu e to run f or
up to 10 minu tes -even with the igni tion
switched off . It can also switch on again
after some t ime if the coolant tem pera
ture rises as the resu lt of a heat b uildup
or if the engine is hot and the engine
compa rtment is additionally heated by
the sun's rays.
(D Note
If the engine has been under heavy load
for an extended pe rio d, heat b uilds up in
the engine compartment after the engi ne
i s sw itched off -there is a r isk of damag ing
the e ng in e. A llow th e engi ne to run a t id le
fo r abo ut 2 minutes befor e switching it
off .
Driver messages in the instrument
cluster display
Applies to vehicles: with Co nvenience key
If a func tion is not present, a driver message
appears .
No key identified
This message appears when t he I STAR T I but-
ton is pr essed if there is no master key ins id e
the vehi cle or if t he system does not recogn ize
IJ,-
Page 111 of 348
it. For example, the master key cannot be rec
ognized if it is covered by an object (e.g. alu
minum brief case) which
screens the radio s ig
nal. Electronic devices such as cell phones can
also interfere with the radio signal.
Press brake pedal to start engine
This message appears if you press the I START !
button to start the engine and do not depress
the brake pedal. The engine can only be start
ed if the brake pedal is depressed .
Engage Nor P to start engine
This message appears when the engine is
started if the selector lever for the automatic
transmission is not in the P or N position. The
engine can only be started with the selector in
these posit ions.
B Key not in vehicle
This message appears along with the B sym
bol if the master key is removed from the ve
hicle with the engine r unning .
It is intended
to remind you (e .g. when changing drivers)
not to continue the journey without the mas
ter key .
If the master key is no longer in the vehicle,
you cannot sw itch off the ignition after stop
ping the engine and you also cannot start the
engine again. Moreover, you cannot lock the
vehicle from the outside with the key.
Shift to P otherwise vehicle can roll away.
Doors do not lock if you are not in P.
This message appears for safety reasons
along w ith a warning buzzer if the selector
lever for the automatic transmission is not in
the P pos ition when the ignit ion is switched
off with the
ISTOPI button and the dr iver's
door is opened. Move the se lector lever to the
P position, otherwise the vehicle is not se
cured against rolling away . You a lso cannot
lock the vehicle using the lock ing button on
the door hand le or using the remote key.
On the road 109
To engage steering lock, press and hold
STOP button
This message appears for safety reasons if the
engine and the ignition have been switched
off by pressing the
I STOPI button once, and
then the driver's door is opened. In this in
stance, the steering is not locked . The steer
ing is locked:
- If you press the
IS TOPI button again for
more than 1 second.
- If you close the driver's door and lock your
veh icle from the outside.
Parking brake
Operation
The parking brake replaces the handbrake .
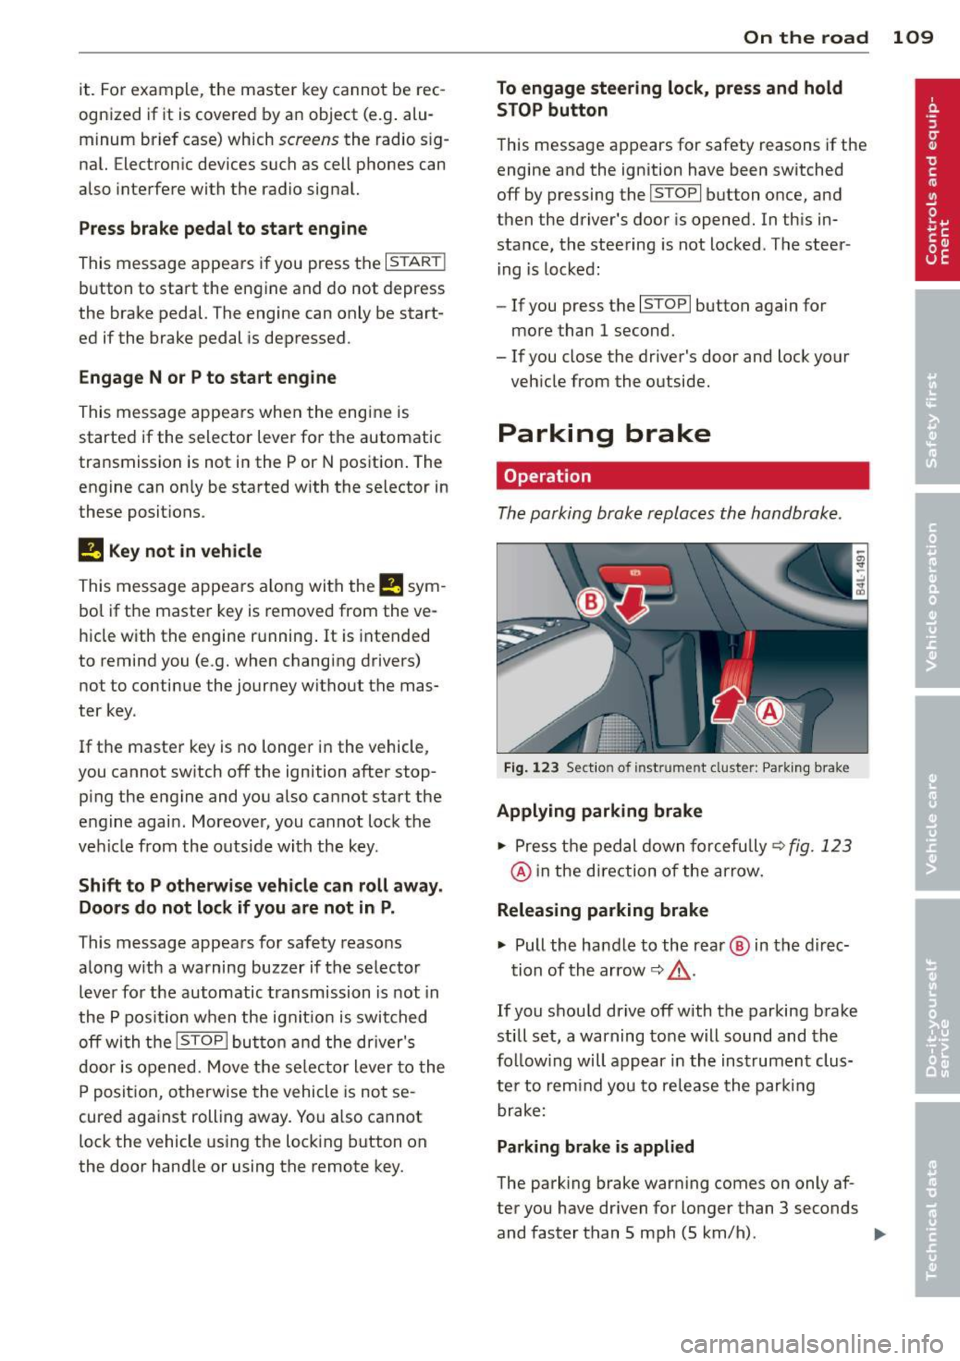
Fig. 123 Section of inst rume nt clust er: Pa rking brake
Applying parking brake
.,.. Press the pedal down forcefully~ fig. 123
@ in the direction of the arrow.
Releasing parking brake
.,.. Pull the hand le to the rear @ in the direc-
tion of the arrow
~ _&. .
If you should drive off with the parking brake
still set, a warning tone will sound and the
fo llow ing will appear in the instrument clus
te r to remind you to release the parking
brake:
Parking brake is applied
The park ing brake warning comes on only af
ter you have dr iven for longer than 3 seconds
and faster than 5 mph (5 km/h) . .,._
Page 112 of 348
110 On the road
The parking brake warning light. (USA)/ .
(CON) illuminates when the parking brake is
set and you switch on the ignition.
A WARNING
-
Always release the parking brake com
pletely. A partially engaged brake will
overheat the rear brakes, reduce their ef
fectiveness and cause excessive wear. This could lead to brake failure and an accident .
(D Note
Only after the vehicle has come to com
plete stop, should you firmly set the park
ing brake and
move the selector lever into
"P".
Parking
When you park your vehicle, do the
following
• Stop the vehicle using the brake pedal.
• Apply the parking brake firmly.
• Move the selector lever into the P position
c:>A .
• Switch off the engine and remove the igni-
t ion key from the ignition lock.
When you park your vehicle on hills, do
the following
• Stop the vehicle using the brake pedal.
• Apply the parking brake firmly.
• If you are parking headed
downhill, turn
the front wheels
toward the curb.
• If you are parking headed uphill, turn the
front wheels
away from the curb.
• Move the selector lever into the
P position.
• Switch off the engine and remove the igni
tion key from the ignition lock.
A WARNING
This is how you can reduce the risk of in
jury when leaving your vehicle.
- Never park the vehicle where it can come
in contact with dry grass, spilled fuel or
any other flammable materials. -
When parking on hills, always turn the
wheels so that the front wheels will first roll into the curb, if the vehicle should
start to roll.
- Never allow anyone - especially small
children - to remain in the vehicle when
it is locked. Locked doors make it more
difficult for rescuers to access the pas
senger compartment in the event of an
emergency. Danger to life!
- Never leave children unsupervised in the
vehicle. Children could release the park
ing brake or
move the gearshift lever out
of gear. The vehicle could start to roll
away and cause an accident.
- No matter what the season is, the tem
perature in a parked vehicle can reach
dangerous levels.
(D Note
- Please exercise care when you park your
vehicle in parking areas with parking bar riers or curbs. Parking barriers and curbs
vary in height and could damage your
bumper and related components as the
front of your vehicle moves
over a barrier
or curb that is too high, as you park or as
you back out of a parking spot. In order
to be sure that no such damage can oc
cur, you may wish to stop short of having
the front tires of your car touch the park
ing barrier or curb.
- Please also exercise exceptional care
when you drive up or down steep ramps
or drive over curbs or other obstacles, for
which the vehicle is not designed, be
cause components of the vehicle close to
the ground, such as bumper covers, spoilers and suspension and exhaust sys
tem components, may become dam
aged.
Starting on hills
Hill Hold makes it easier to start on hills.
The system is activated when the brake pedal is depressed
for a few seconds. For this, the ll-
Page 160 of 348
158 Adapti ve Air Suspens ion
fi lled out, the vehicle is at high level 2 and has
the greatest amount of ground clearance pos
sib le.
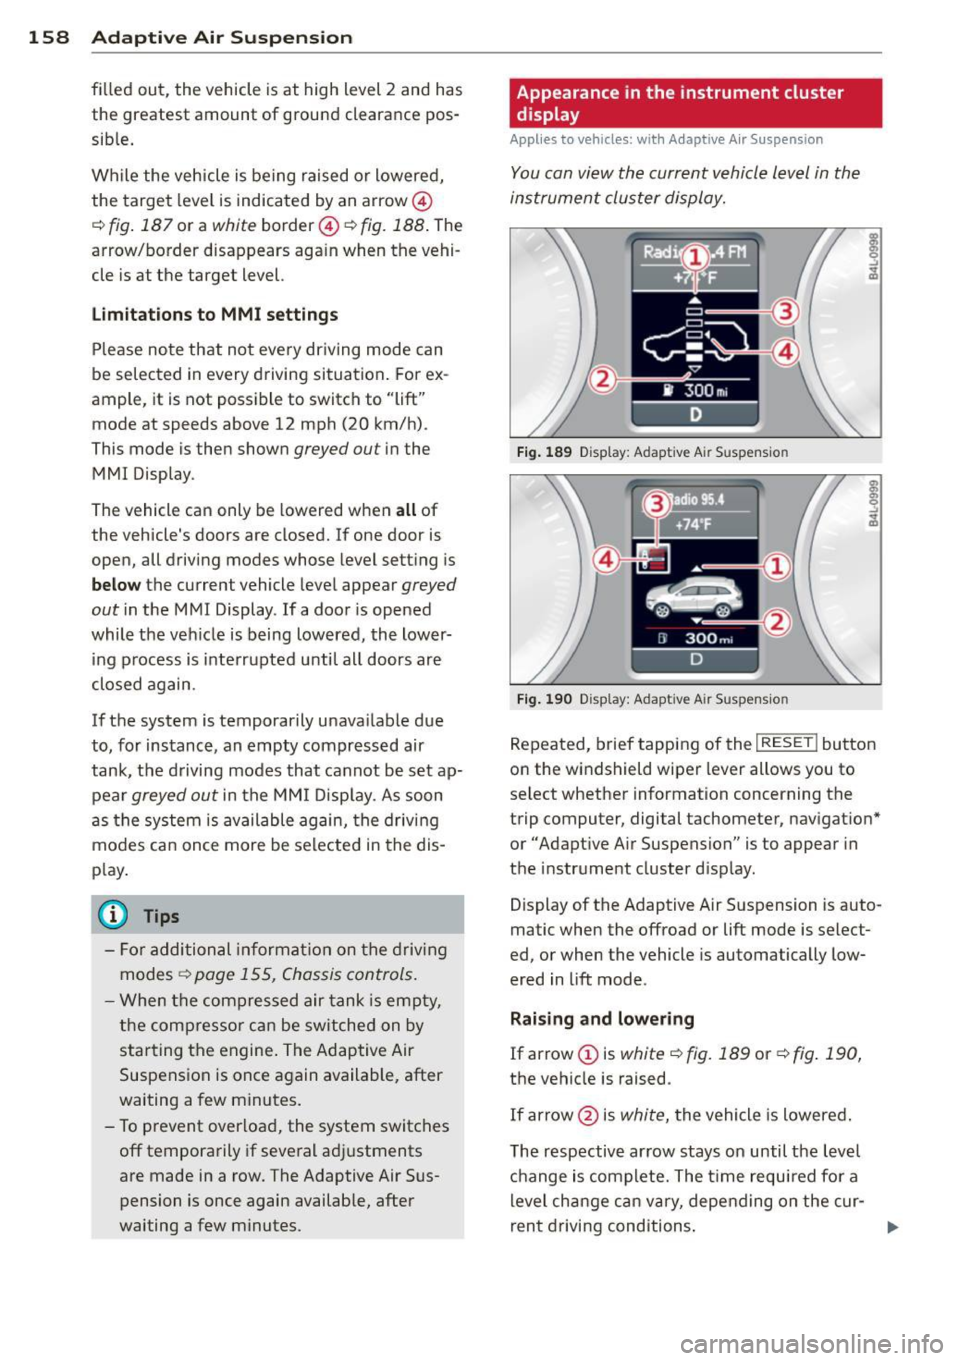
While the vehicle is being raised or lowered,
the target level is indicated by an arrow@
c::> fig. 187 or a white border @ c::> fig. 188 . The
arrow/border disappears aga in when the vehi
cle is at the target level.
Limitations to MMI s etting s
Please note that not eve ry dr iving mode can
be selected in every d riving situation . For ex
ample, it is not possible to switch to "lift"
mode at speeds above 12 mph (20 km/h) .
This mode is then shown
greyed out in the
MMI Display.
The vehicle can only be lowered when
all of
the vehicle's doors are closed. If one door is
open, all driving modes whose level sett ing is
belo w the current vehicle level appear
greyed
out
i n the MMI Display. If a door is opened
while the veh icle is being lowered, the lower
ing p rocess is interrupted u ntil all doors are
closed again .
If the system is temporar ily unava ilable due
to, for instance, an empty compressed air
tank, the driving modes that cannot be set ap pear
greyed out in the MM I Disp lay. As soon
as the system is available again, the driv ing
modes can once more be selected in the dis
p lay .
(D} Tips
- Fo r addition al in forma tion on the driv ing
modes
c:;> page 155, Chassis controls.
- When the compressed air tank is empty,
the compressor c an be switched on by
starting the engine . The Adaptive Air
Suspension is once again available, after
waiting a few minutes .
- To prevent over load, the system switches
off tempera rily if seve ral adj ustments
are made in a row. The Adaptive Air Sus
pension is once again available, after
waiting a few minutes. Appearance in the instrument cluster
display
Applies to veh
icles: w ith Adapt ive A ir Suspens ion
You can view th e current vehicle l evel in the
instrument cluster display.
Fi g. 1 89 Display: Adaptive Air Suspension
F ig . 190 Display: Adaptive Air Suspension
Repeated, brief tapping of the I RESET ! button
on the windshield wiper lever allows you to
se lect whether information concerning the
trip computer, digital tachometer, nav igat ion*
or "Adapt ive A ir Suspension" is to appear in
t h e instrument cluster d isp lay .
Display of the Adaptive A ir S uspension is auto
matic when the offroad or lift mode is select
ed, or when the vehicle is automatically low
ered in lift mode.
Rai sing and lowe ring
If arrow
(J) is white c::> fig. 189 or c::> fig . 190,
the vehicle is raised.
If arrow @is
white, the vehicle is lowered .
The respective arrow stays on until the level ch ange is complete. The time requ ired fo r a
level change can vary, depending on the cur-
ren t drivi ng conditions . ..,_
Page 162 of 348
160 Adapti ve Air Su spen sion
this mode. If the suspension is switched from
this mode to another mode, dynamic mode
cannot be re-selected .
(D Tips
-For vehicles with a factory installed tow
ing hitch or a trailer hitch that was in
stalled later accord ing to factory specifi
cations, the system recognizes "Trailer
tow ing mode" and activates this specia l
mode automatically, as soon as the elec
trical connection on the trailer socket is
connected. The mode ceases a utomat i
ca lly when the elect rical connection to
t h e trai ler socket is d isconnected.
- If the tra iler towing mode has been acti
vated, the vehicle will not drop to the
l ow or highway level.
Cargo mode
Applies to vehicles: with Adapt ive Air Suspe nsio n
The rear of the vehicle can be lowered to
make it easier to load.
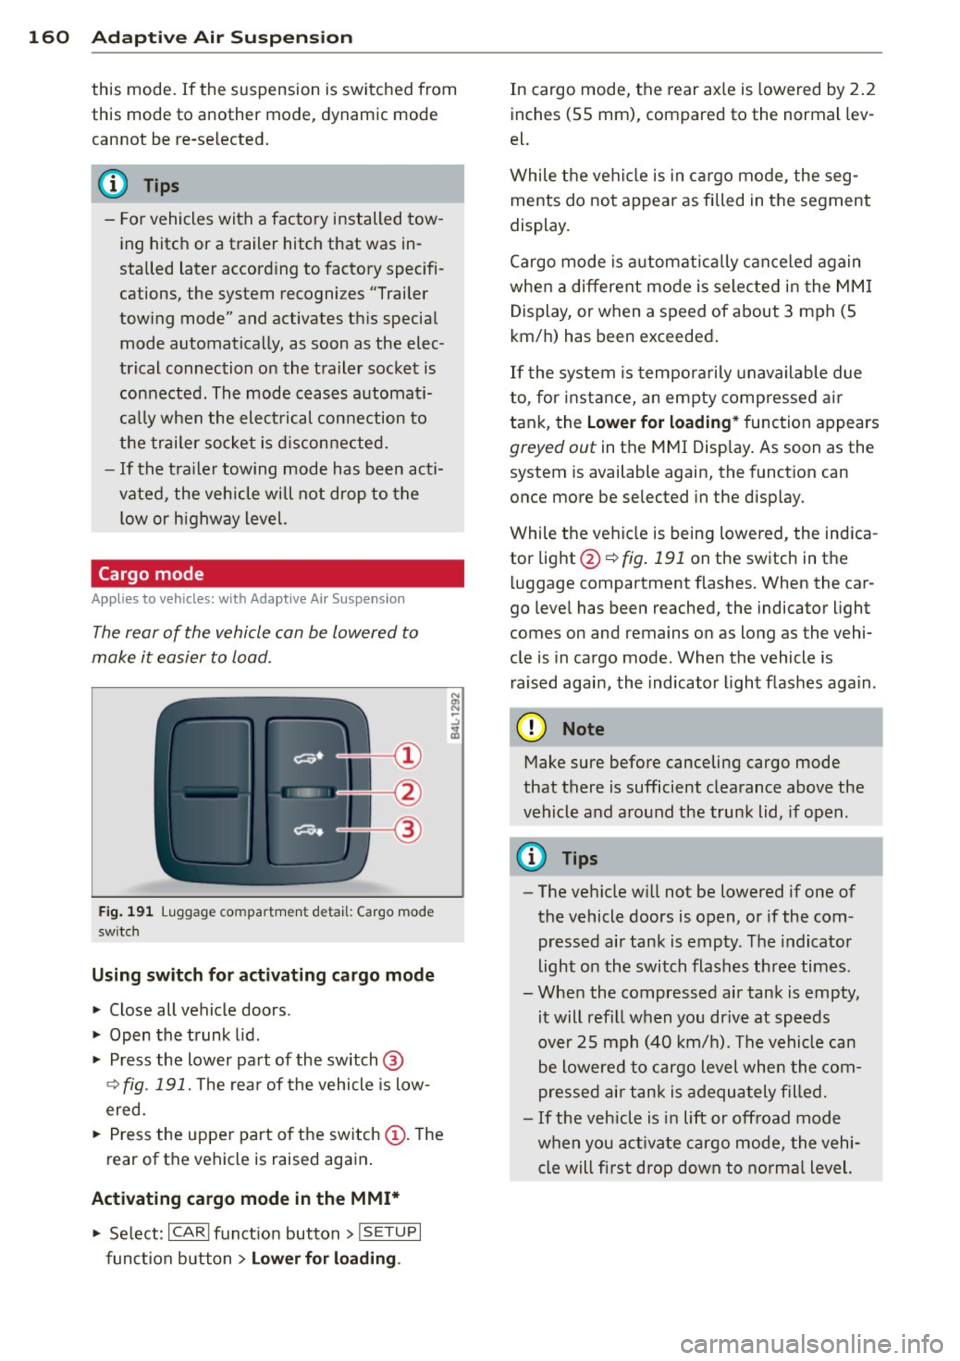
Fig. 191 Luggage compa rtment detail: Cargo mode
sw itch
Using switch for activating c argo mode
.. Close all vehicle doors .
.. Open the trunk lid.
.,. Press the lower part of the sw itch ®
~ fig. 191. The rea r of the vehicle is low
ered.
.. Press the uppe r part o f the sw itch
(D . The
rear of the vehicle is raised again.
Activating cargo mode in the MMI*
.. Se lect: ICARI funct ion button> I SE TUP I
func tion button > Lower for loading .
In cargo mode, the rear ax le is lowered by 2 .2
inches (55 mm), compared to the normal lev
el.
While the veh icle is in ca rgo mode, the seg
ments do not appear as filled in the segment
display.
Cargo mode i s automatic ally c an ce le d again
when a different mode is selected in the MM I
Display, or when a speed of about 3 mph (5
km/ h) has been exceeded.
If the system is tempora rily unavailable due
to, for instance, an empty compressed air
tank, the
Lower for loading * function appears
greyed out in the MMI Display. As soon as the
system is available again, the funct ion can
once more be selected in the disp lay.
While the vehicle is being lowered, the indica
tor light @~
fig. 191 on the switch in the
l uggage compartment flashes. When the car
go leve l has been reached, the indicator light
comes on and remains on as long as the vehi
cle is in cargo mode. When the vehicle is
r aised agai n, the indicator light flashes again.
(D Note
M ake sure before canceling cargo mode
that there is sufficient clearance above the
vehicle and a round the trunk lid, if open.
(D Tips
- The vehicle w ill not be lowered if one of
the vehicle doors is open, or if the com
pressed air tank is empty. The indicator
light on the switch flashes three times.
- Whe n the compressed air tank is empty,
it will refill when you drive at speeds
over 25 mph (40 km/ h). The vehicle can
be lowered to cargo level whe n the com
pres sed air tan k is a dequately filled.
- If the vehicle is i n lift or off road mode
when you act ivate cargo mode, the vehi
cle will fi rst drop down to no rma l level.
Page 163 of 348
Homelink®
Universal remote
control
General information
Appl ies to vehicles: with Horne Link® universal rem ote
control
The Homelink ® feature can learn up to three
radio frequency codes for most current trans
mitters used for operating garage doors, es
tate gates, home or outdoor lighting sys·
tems, and other devices.
You must first program the Homelink ® trans·
mitter before you can use the system
¢ page 162, Programming the HomeLink®
transmitter.
In order to program the Homelink® transmit·
ter for devices utilizing rolling code , a second
person on a ladder who can safe ly reach the
garage door opener motor is recommended.
It is also necessary to locate the "learn" but
ton on your garage door opener motor . Refer
to the operat ing instruct ions for the opener,
as the location and color of this button may
vary by manufacturer.
You can still use the origina l remote control
for the device at any time.
A WARNING
-
- Never use the Homelink® transmitter
with any garage door opener that does
have not the safety stop and reverse fea
ture as requ ired by federal safety stand
ards . Th is includes any garage door open·
er model manufactured before April 1,
1982.
- A garage door opener which cannot de·
tect an object, signaling the door to stop
and reverse does not meet current feder
al safety standards. Using a garage door
opener without these features increases
risk of serious injury or death.
- For safety reasons never release the
parking brake or start the engine while
anyone is stand ing in front of the vehicle .
Homelink® 161
-A garage door or an estate gate may
sometimes be set in motion when the
Homelink ® remote control is being pro·
grammed . If the device is repeatedly ac·
tivated, th is can overstrain motor and
damage its electrical components -an
overheated motor is a fire hazard!
- To avoid possible injuries or property
damage, please always make abso lutely
certain that no persons or objects are lo·
cated in the range of motion of any
equ ipment being ope rated.
(D Tips
- If you would like more information on
Homelink ®, where to purchase the
Homel ink ® compatible products, or
would like to purchase the Homelink ®
Home Lighting Package, please call toll
free: 1-800-355-3515 .
- For Declaration of Compliance to United
States FCC and Industry Canada regu la
tions ¢
page 328 .
Page 164 of 348
162 Homelink®
Programming the Homelink ®
transmitter
Applies to vehicles: with Homelink® unive rsal remote
control
The transmitter is programmed in two phas
es. For rolling code transmitters, a third
phase is also necessary .
-
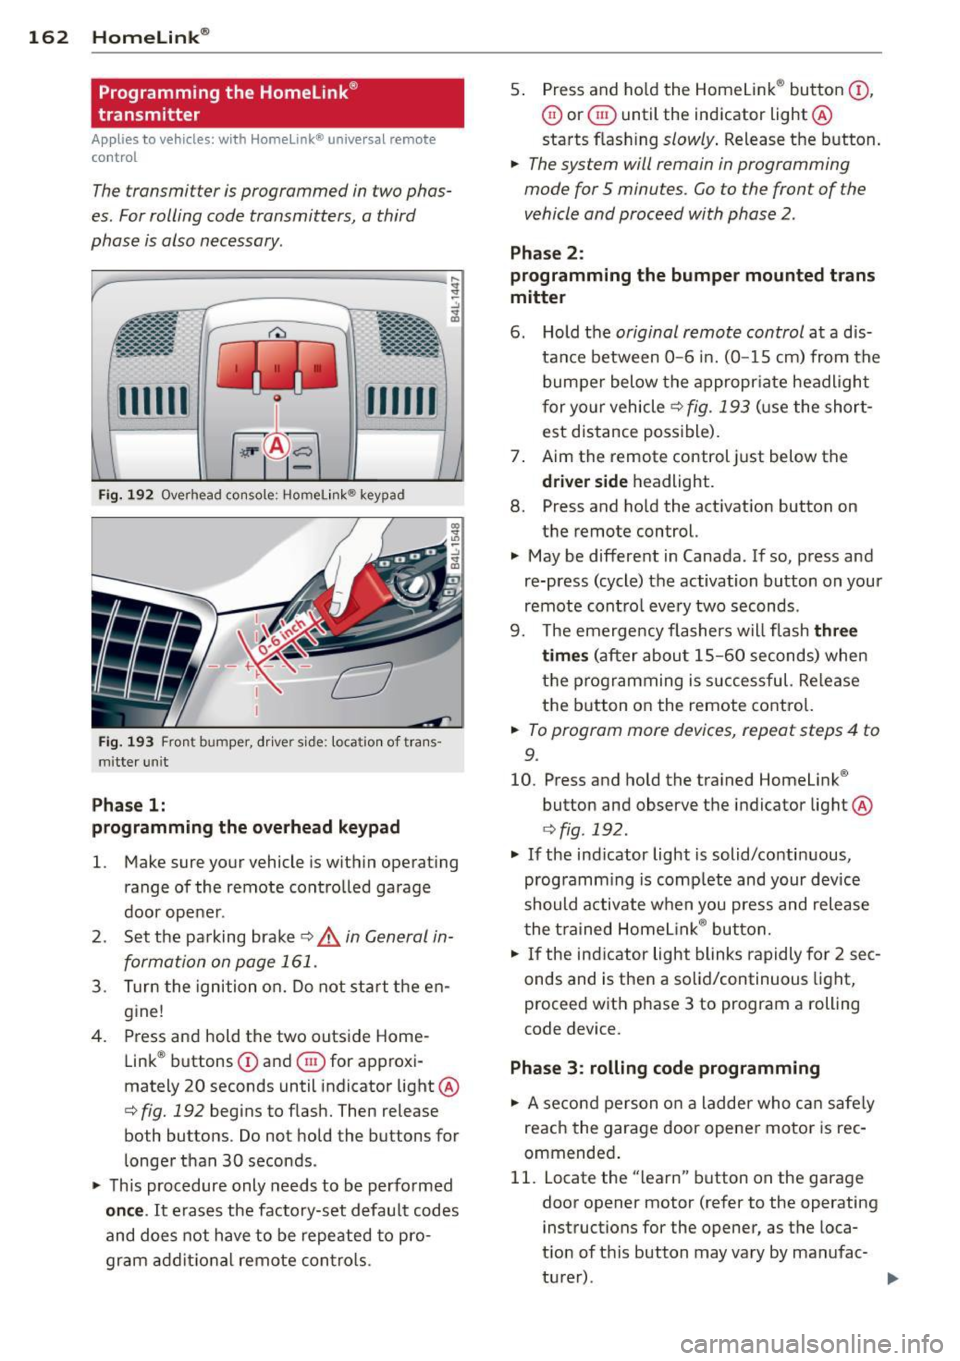
Fig. 192 Overhead co nsole ; Homelink ® keypad
Fig. 193 Front bumper, d rive r side: loca tion of trans ·
m itterun it
Pha se 1:
programming the o verhead k eypad
1. Make sure your vehicle is w ithin operat ing
range of the remote controlled garage
door ope ner .
2 . Set the parking brake~,&.
in General in
formation on page 161.
3 . Turn the ignition on. Do not start the en
g ine!
4 . Press and hold the two outside Home
Link ® buttons
CD and @for approxi
mately 20 seconds until indicator light ®
c::> fig. 192 begins to flash. Then release
both buttons . Do not hold the buttons for
l onger than 30 seconds .
.,. This procedure only needs to be performed
on ce . It erases the factory-set defau lt codes
and does not have to be repeated to pro
gram addit ional remote contro ls. 5
. Press and ho ld the Homelink ® button
(D ,
@ or @ until the indicator light®
starts flashing
slowly . Release the b utton.
.,. The system will remain in programming
mode for 5 minutes. Co to the front of the
vehicle and proceed with phase 2 .
Phase 2:
programming the bum per mounted trans
mitte r
6. Hold the original remote control at a dis
tance between
0 -6 in. (0 -15 cm) from the
bumper below the appropr iate headlight
f or yo ur vehicle
~ fig. 193 (u se the short
est distance possible) .
7 . Aim the remote control just below the
dri ver s ide headlight.
8. Press and hold the act ivat ion button on
the remote control.
.,. May be different in Canada . If so, press and
re-press (cycle) the activation button on your
remote cont ro l every two seconds .
9. The emerge ncy flashers will flash
thre e
tim es
(after about 15-60 seconds) when
t h e programming is successful. Re lease
the b utton o n the remote control.
.,. To program more devices, repeat steps 4 to
9.
10. Press and hold the trained Homelink ®
button and observe the indicator light ®
¢fig . 192 .
.,. If the ind icator light is solid/co nti nuous,
programm ing is comp lete and your device
should a ctivate w hen you press and release
t he t rained Homelink ® button.
.,. If the ind icator light blinks rapidly fo r 2 sec
onds and is then a solid/continuous light,
proceed w ith phase 3 to program a rolling
code device.
Phase 3 : rolling code programming
.,. A second person on a ladder who ca n safe ly
reach the garage door opener motor is rec
ommended .
11. Locate the "learn" button on the garage
door opener motor (refer to the operating instructions for the opener, as the loca
t ion of t his button may vary by manufac-
turer) .
~
Page 165 of 348
12. Press and release the learn button on the
garage door opener motor.
.. Note : once the button is pressed, there are
30 seconds in which to initiate the next
step .
13. On the Homel ink® keypad inside the vehi
cle, firmly press and hold the Homelink ®
button previously programmed in phases
1 and 2 for two seconds and release. Re
peat this sequence
twice .
.. Some vehicles may requ ire the press/hold/
release sequence up to three times to com
plete the training process .
.. Homelink ® should now activate your rolling
code equipped device.
If the 5 minute time limit is exceeded, the
emergency flashers will flash one time to in
d icate that the process has been terminated.
In this case, repeat steps 4 through 9 .
If the emergency flashers do not flash
three
times (after about 15-60 seconds), program
ming was not successful. In this case, repeat
steps 4 through 9.
Remote control units for garage door openers
in Canada are set to stop transmitting radio
frequency s ignals after two seconds. This time
may not be sufficient for the Homelink ® sys
tem to learn the radio frequency s ignal. Per
form all other steps as described above .
Operating the Homelink ® transmitter
Applies to vehicles: with Home link® universa l remote
control
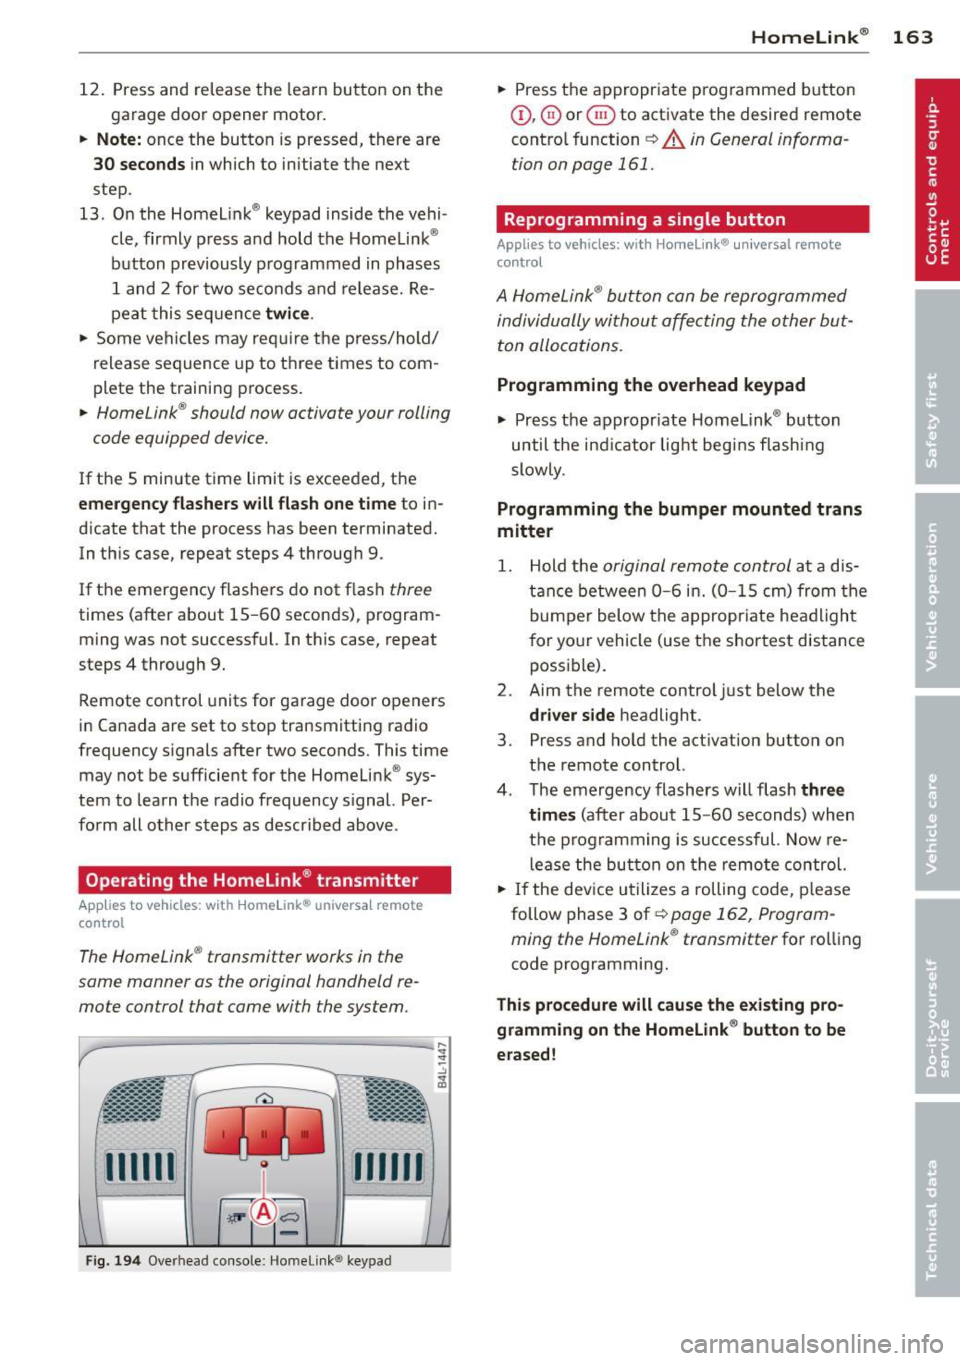
The Homelink ® transmitter works in the
some manner as the original hondheld re
mote control that come with the system.
mm
-
Fi g. 194 Overhead co nsole: Home link ® keypad
Homelink ® 163
.. Press the appropriate programmed button
Q), @) or @ to activate the desired remote
contro l function
~ A in General informa
tion on page 161 .
Reprogramming a single button
Applies to vehicles: with Homelink® universal remote
control
A HomeLink ® button can be reprogrammed
individually without affecting the other but
ton allocations.
Programming the overhead keypad
.. Press the appropr iate Homelink ® button
until the ind icator light begins flashing
slowly .
Programming the bumper mounted trans
mitter
1. Hold the original remote control at a dis
t anc e between
0-6 in. (0 -15 cm) from the
bumper below the appropriate headlight
for your vehicle (use the shortest distance
possible).
2. Aim the remote control just below the
driver side headlight.
3. Press and hold the act ivation button on
the remote control.
4. The emergency flashers will flash
three
times
(after about 15 -60 seconds) when
the programming is successful. Now re
lease the button on the remote control.
.. If the device utilizes a rolling code, please
follow phase 3 of¢
page 162, Program
ming the Homelink ® transmitter
for rolling
code programming.
This procedure will cause the existing pro
gramming on the Homelink ® button to be
erased!
Page 173 of 348
Stowing luggage
Loading the luggage compartment
All luggage and other objects must be prop
erly stowed and secured in the luggage com
partment.
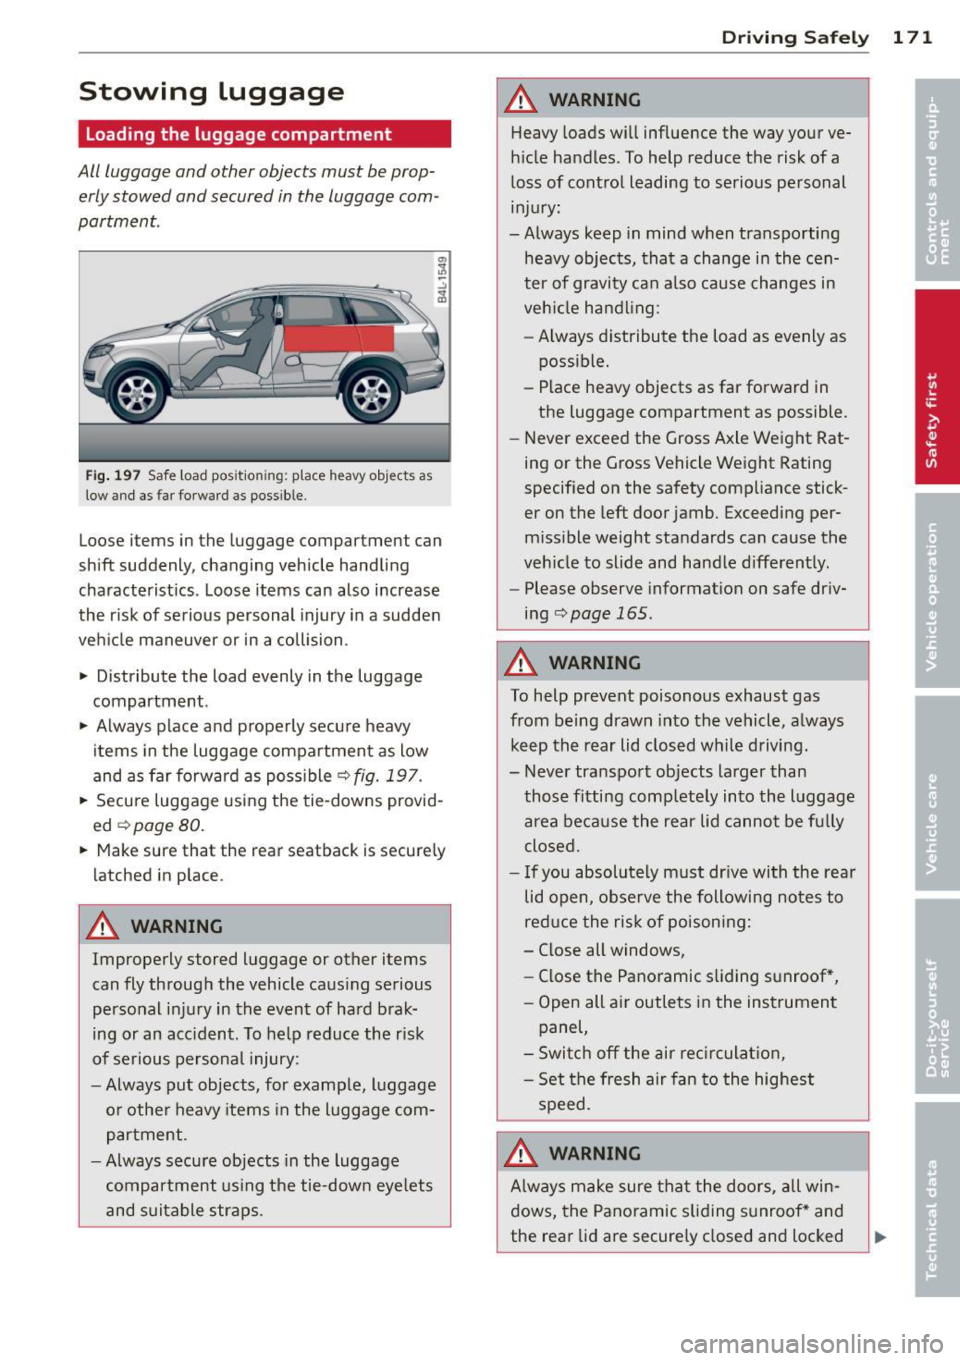
Fig . 197 Safe load pos ition ing: place heavy objects as
low and as far forward as possible.
Loose items in the luggage compartment can
shift suddenly, changing vehicle handling
characteristics . Loose items can also increase
the risk of serious personal injury in a sudden
veh icle maneuver or in a collision .
.. Distribute the load evenly in the luggage
compartment.
.. Always place and properly secure heavy
items in the luggage compartment as low
and as far forward as possible
<=>fig. 197.
.. Secure luggage using the tie-downs provid
ed
¢ page 80.
.. Make sure that the rear seatback is secure ly
latched in place.
A WARNING
Improperly stored luggage or other items
can fly through the vehicle causing serious
personal injury in the event of hard brak
ing or an acc ident. To help reduce the risk
of serious personal injury:
- Always put objects, for example, luggage
or other heavy items in the luggage com
partment.
- Always secure objects in the luggage
compartment us ing the tie-down eye lets
and suitable straps .
Drivin g Sa fely 1 71
A WARNING
Heavy loads will influence the way your ve
hicle handles. To help reduce the risk of a
loss of control leading to serious personal
injury:
-Always keep in mind when transporting heavy objects, that a change in the cen
ter of gravity can also cause changes in
veh icle handling:
- Always distribute the load as evenly as
possible.
- Place heavy objects as far forward in
the luggage compartment as possible.
- Never exceed the Gross Axle Weight Rat
ing or the Gross Vehicle Weight Rating
specified on the safety compliance stick
er on the left door jamb. Exceeding per
missible weight standards can cause the
veh icle to slide and handle differently.
- Please observe information on safe driv
ing
<=>page 165 .
A WARNING
To help prevent poisonous exhaust gas
from being drawn into the vehicle, a lways
keep the rear lid closed while driving.
- Never transport objects larger than
-
those fitting comp letely into the luggage
area because the rear lid cannot be fu lly
closed .
- If you absolutely must dr ive with the rear
lid open, observe the following notes to
reduce the risk of poisoning:
- Close all windows,
- Close the Panoramic sliding sunroof *,
- Open all air outlets in the instrument panel,
- Switch off the air rec irculat ion,
- Set the fresh a ir fan to the highest
speed.
A WARNING
A lways make sure that the doors, all win
dows, the Pano ramic s liding sunroof* and
the rear lid are securely closed and locked