door AUDI Q7 2013 Owner´s Manual
[x] Cancel search | Manufacturer: AUDI, Model Year: 2013, Model line: Q7, Model: AUDI Q7 2013Pages: 348, PDF Size: 87.72 MB
Page 213 of 348
Child safety seats
Infant seats
Babies and infants up to about one year old
and 20 lbs. or 9 kg need special rearward -fac
ing child restraints that support the back,
neck and head in a crash.
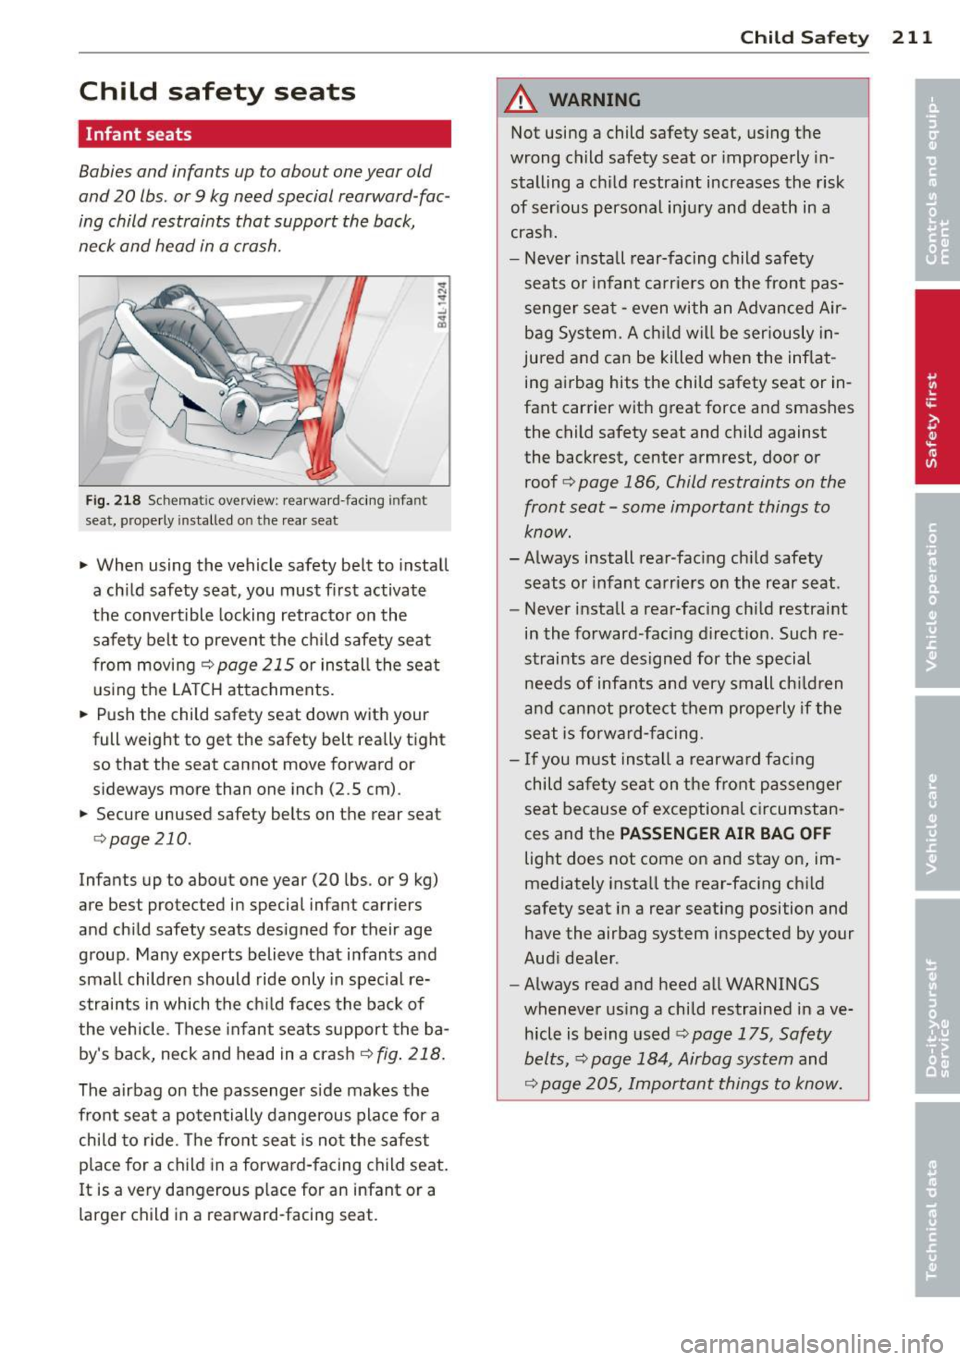
Fig . 218 Sche matic overv iew: rearward-fac ing infant
seat, properly installed o n the rear seat
.,. When using the vehicle safety belt to install
a ch ild safety seat, you must first activate
the convertible locking retracto r on the
safety be lt to prevent the child safety seat
from moving
¢ page 215 or install the seat
using the LA T CH attachments.
.,. Push the child safety seat down with your
full weight to get the safety belt rea lly tight
so that the seat cannot move forward or
sideways more than one inch (2.5 cm).
.,. Secure unused safety belts on the rear seat
¢page 210.
Infants up to about one year (20 lbs. or 9 kg)
are best protected in special infan t carriers
and child safety seats designed for their age
group . Many experts believe that infants and
small children should ride only in spec ial re
straints in which the ch ild faces the back of
the vehicle. These infant seats support the ba
by's back, neck and head in a crash
¢fig . 218.
The airbag on the passenger side makes the
front seat a po tentially dangerous place for a
child to r ide . The front seat is not the safest
p lace for a child in a forward -facing child seat.
It is a very dangerous p lace for an infant or a
l arger ch ild in a rearward-facing seat.
Child Safety 211
A WARNING
Not using a child safety seat, using t he
wrong child safety seat or improperly in
stall ing a ch ild restraint increases the risk
of ser ious personal injury and death in a
crash.
- Never install rear-facing child safety
seats or infant ca rr ie rs on the front pas
senger seat -even with an Advanced Air
bag Sys tem. A ch ild will be ser iously in
jured and ca n be killed when the inflat
ing airbag hits the child safety seat or in
fant carrier with great force and smashes the child safety seat and child against
the backrest, center armrest, door or
roof ¢
page 186, Child restraints on the
front seat- some important things to
know .
-Always install rear-fac ing ch ild safety
seats or infant carriers on the rear seat .
- Never install a rear-fac ing ch ild restraint
in the forward-fac ing d irect ion. Such re
straints are designed for the special needs of infants and very small ch ild ren
and cannot prote ct them properly if the
seat is forward- facing.
- If you mus t insta ll a rearward fac ing
child sa fety seat on the fro nt passenger
seat because of exceptiona l circumstan
ces and t he
PASSENGER AIR BAG OFF
light does not come on and stay on, im
mediately insta ll the rear -fac ing ch ild
safety seat in a rear seating position and
have the airbag system inspected by your
Aud i dea ler .
- Always read and heed all WARNINGS
wheneve r us ing a child restrained in ave
hicle is being used¢
page 175 , Safety
belts,
¢ page 184, Airbag system and
¢ page 205, Important things to know.
Page 214 of 348
212 Child Safety
Convertible child safety seats
Properly used convertible child safety seats
can help protect toddlers and children over
age one who weigh between
20 and 40 lbs. (9
and 18 kg) in a crash.
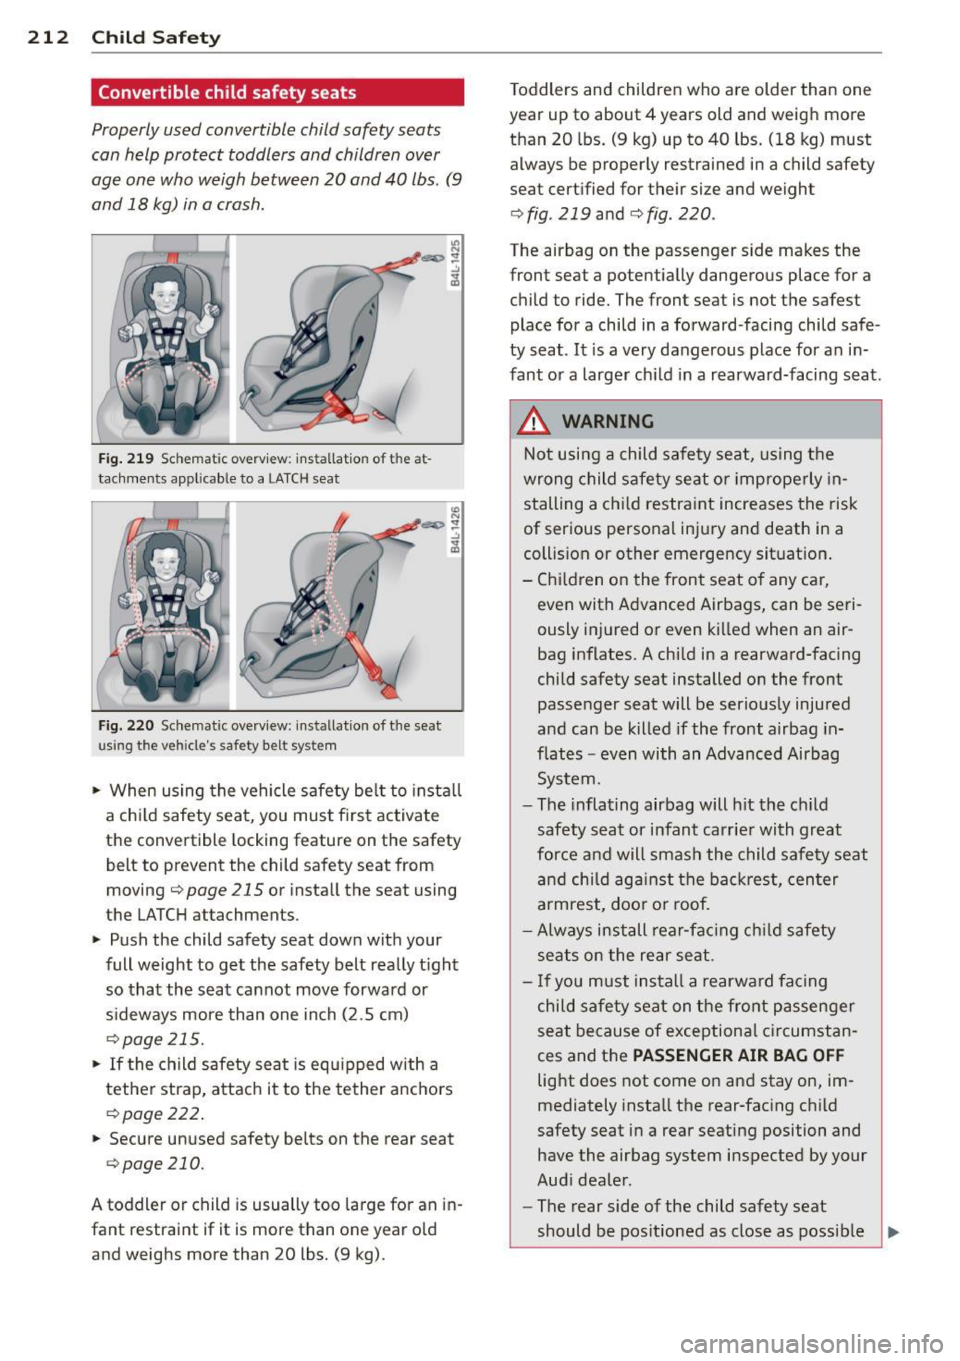
Fig. 219 Schematic overv iew : ins tallat ion of t he at
ta chments applicable to a LATCH seat
Fig. 220 Sche matic overview: insta llation of th e sea t
us ing t he veh icle's safety be lt system
.. When using the vehicle safety belt to install
a chi ld safety seat, you must f irst activate
the convertible locking feature on the safety
belt to prevent the child safety seat from
moving ¢
page 215 or install the seat using
the LATCH attachments .
.. Push the child safety seat down with your
full weight to get the safety belt really t ight
so that the seat cannot move forward or sideways more than one inch (2.5 cm)
¢page 215.
.. If the child safety seat is equ ipped with a
tether strap, attach it to the tether anchors
¢page 222.
.. Secure unused safety belts on the rear seat
¢page 210.
A toddler or child is usually too large for an in
fant restra int if it is more than one year o ld
and weighs more than 20 lbs. (9 kg). T
oddlers and children who are older than one
year up to about 4 years old and weigh more
than 20 lbs. (9 kg) up to 40 lbs. (18 kg) must
always be properly restrained in a child safety
seat certified for their size and weight
¢ fig . 219 and ¢ fig. 220 .
The airbag on the passenger side makes the
front seat a potentia lly dangerous place for a
child to ride. The front seat is not the safest
place for a child in a forward-facing child safe
ty seat . It is a very dangerous place for an in
fant or a larger child in a rearward-facing seat.
_&. WARNING
Not using a child safety seat, using the
wrong child safety seat or improp erly in
stalling a chi ld restraint increases the risk
of serious personal injury and death in a
collision or other emergency situation .
- Children on the front seat of any car,
-
even with Advanced Airbags, can be seri
ously injured or even killed when an air bag inflates . A chi ld in a rearward-facing
child safety seat installed on the front passenger seat will be serious ly injured
and can be killed if the front airbag in
f la tes -even with an Advanced Airbag
System .
- The inflating airbag will hit the child
safety seat or infant carrier with great
force and will smash the child safety seat
and child against the backrest, center
armrest, door or roof.
- Always install rear-facing child safety
seats on the rear seat .
- If you must install a rearward facing
child safety seat on the front passenger
seat because of exceptiona l circumstan
ces and the
PASSENGER AIR BAG OFF
light does not come on and stay on, im
mediately insta ll the rear-facing child
safety seat in a rear seating position and
have the airbag system inspected by your
Aud i dealer.
- The rear side of the child safety seat
should be pos itioned as close as possible ..,.
Page 218 of 348
216 Child Safety
and child against the backrest, center
armrest, door or roof.
- Always install rear-facing child safety
seats or infant carriers on the rear seat.
- Forward-facing child safety seats or in
fant carriers installed on the front pas
senger's seat may interfere with the de
ployment of the airbag and cause serious
injury to the child.
- It is safer to install a forward-facing
child safety seat on the rear seat.
- Always read and heed all WARNINGS whenever using a child restrained in ave
hicle is being used
c::> page 205 . Special
precautions apply when installing a child
safety seat on the front passenger seat
c::> page 186, Child restraints on the front
seat -some important things to know.
A WARNING
Always take special precautions if you
must install a forward or rearward-facing
child restraint on the front passenger's
seat in exceptional situations:
- Whenever a forward or rearward-facing
child restraint is installed on the front
passenger seat, the
PASSENGER AIR
BAG OFF
light must come on and stay on
whenever the ignition is switched on.
- If the
PASSENGER AIR BAG OFF light
does not come on and stay on, perform
the checks described
<=:> page 195, Moni
toring the Advanced Airbag System.
- Take the child restraint off the front pas
senger seat and install it properly at one
of the rear seat positions if the
PASSEN
GER AIR BAG OFF
light does not stay on
whenever the ignition is switched on.
- Improper installation of child restraints
can reduce their effectiveness or even
prevent them from providing any protec
tion.
- An improperly installed child restraint
can interfere with the airbag as it de
ploys and seriously injure or even kill the
child. -
Always carefully follow the manufactur
er's instructions provided with the child
safety seat or carrier.
- Never place additional items on the seat
that can increase the total weight regis
tered by the weight-sensing mat and can
cause injury in a crash .
A WARNING
-Forward-facing child restraints:
- Always make sure the forward-facing
seat has been designed and certified by its manufacturer for use on a front seat
with a passenger front and side airbag .
- Never put the forward-facing child re straint up, against or very near the in
strument panel.
- Always move the passenger seat into its
rearmost position in the seat's fore and
aft adjustment range, as far away from
the airbag as possible before installing
the forward-facing child restraint. The
backrest must be adjusted to an upright
position.
- Make sure that the PASSENGER AIR BAG
OFF
light comes on and stays on all the
time whenever the ignition is switched
on .
A WARNING
Rearward-facing child restraints:
- A child in a rearward-facing child safety
seat installed on the front passenger
seat will be seriously injured and can be killed if the front airbag inflates -even
with an Advanced Airbag System .
- The inflating airbag will hit the child
safety seat or infant carrier with great
force and will smash the child safety seat
and child against the backrest, center
armrest, door or roof.
- Always be especially careful if you must
install a rearward facing child safety seat
on the front passenger seat in exception-
al circumstances.
~
Page 226 of 348
224 Child Saf ety
Re leas ing th e te th er str ap
.. Loosen the tension following the child re
stra int manufacturer's instructions.
.. Depress the spring catch on the hook and
release it from the anchorage .
.. Fo r t he seco nd ro w of se ats: Push the floor
ing forward into place again.
.. For the th ird r ow of seats :* Replace the
plast ic cover cap .
(D Note
If you leave the child restraint with the
tether strap firmly installed for several
days, this could leave a mark on the up
holstery on the seat cushion and backrest
in the area whe re the tether strap was in
stalled. The uphols tery would a lso be per
manently stretched around the tether
strap . This applies especially to leather
seats .
Using tether straps on rearward-facing
child restraints
Currently , few rear -facing child restraint sys
tems come with a tether . P lease read and
heed the child restraint system manufactur
e r's instructions caref ully to determine how to
p roperly insta ll the tethe r.
& WARNING
A child in a rearward -facing child safety
seat insta lled on the front passenger seat
w ill be seriously injured and can be ki lled if
the front a irbag inflates - even with an Ad
vanced Airbag System.
- The inflating airbag will hit the child safety seat or infant carrier with great
force and w ill smash the ch ild safety seat
and child against the backrest, center
armrest, or door .
- A tight tether or other strap on a rear
ward-facing child restra int attached to
the front passenger seat can put too much pressure on the weight-mat in the
seat and register a heavier weigh t in the
Advanced Airbag System. The heav ier weight registered can make the system
work as though an adult were on the seat
and deploy the Advanced Airbag when it must be suppressed causing ser ious or
even fatal injury to the ch ild.
- If you must install a rearward fac ing
child safety seat on the front passenger
seat because of exceptional c ircumstan
ces and the
PASSENGER AIR BAG OFF
light does not come on and stay on, im
mediately insta ll the rear-fac ing ch ild
safety seat in a rear seating position and have the airbag system inspected by your
Audi dea ler.
Additional Information
Sources of information about child
restraints and their use
T here are a number of sou rces of add itiona l
information about child restraint se lection, in
sta llation and use:
N HT SA advises that the best chi ld safety seat
is the one that fits your ch ild and fits in you r
vehicle, and that yo u will use correct ly and
consistently.
T ry before yo u buy!
U. S Nat ional Highw ay Traffi c Safety Admin
i s trat ion
Tel.: 1-888-327-4 236 (TIY: 1-800-424-9153)
http://www.nhtsa.gov
N ati onal SAFE KID S Camp aign
Tel.: (202) 662-0600
http://www.safekids .o rg
S af ety Belt Saf e U. S.A
T el.: (800) 7 45 -SAFE (Eng Lish)
Tel.: (800) 747-SANO (Span ish)
http://www.ca rseat.org
T ranspo rt Ca nad a Info rmation Centre
Tel.: 1-800 -333-0371 or call
1-613-998-8616 if you are in the Ottawa area
http://www.tc.gc.ca/eng/ roadsafety/
menu.htm
Aud i Cu stom er R elation s
Tel.: (800) 822-2834
Page 248 of 348
24 6 Cl eaning and protec tio n
Automatic car wash
The vehicle can be washed in almost any
modern automatic car wash .
The vehicle paint is so durable that the vehicle
can normally be washed without problems in
an automatic car wash. However, the effect on
the paint depends to a large extent on the de
sign of the facility, the filtering of the wash
water, the type of wash and care mater ial , etc.
I f the pa int has a dull appearance afte r going
through the car wash or is scratched, bring
this to the attention of the operator immedi
ately. If necessary, use a different car wash.
Before going through a car wash, be sure to
take the usual precautions such as closing the
windows and the Panoramic sliding s unroof.
Factory installed antennas must not be re
moved.
I f you have installed additional accessories on
the vehicle - such as spoilers, roof rack, etc. -
it is best to ask the car wash operator if these
should be removed.
A WARNING
Please take note of the following po ints
before going through an automatic car
wash with your vehicle, so that you can avoid damage to your vehicle .
- Compare the track of your vehicle with the distance between the gu ide rails of
the fac ility- there is a risk of damage to
the whee ls and t ires.
- Compare the height and w idth of your
vehicle with the height and width of the
tunnel at the facility.
- Fold the exte rior mirrors flat - there is a
risk of damag ing the exte rior m irrors.
Power folding exterior mirrors* mus t not
be folded in or out by hand. Use the pow
er function!
- Do not al low the wiper blade to fall onto
the windshield after the vehicle is dried -
there is a risk of damag ing the paint on
the hood.
- Always read and heed all WARNINGS and other information ¢
page 245.
Washing the vehicle by hand
A lot of water is needed when washing a vehi
cle by hand .
.,. Before you start washing, make sure you
have read and understood the WARNINGS
¢ .&. in General information on page 245 .
.,. First soak all dried d irt unt il it is soft, then
r inse it off .
.,. As you clean you r vehicle , start w it h the
roof and work your way down to the bottom,
using a sponge, a sponge g love or a clean
brush.
.,. Rinse the sponge or the sponge glove often,
flushing it clean each time.
.,. Use spec ial car shampoo only for very per
sistent d irt .
.,. Rinse the car thoroughly wit h water .
.,. Use a chamo is leather to gently w ipe the ex-
ter ior d ry.
Use a separate sponge for cleaning the
wheels, door s ills and other regions exposed
to road dirt . In this way, you will not scratch
the pa int with coarse pa rticles imbedded in
the sponge the next time you wash the car.
A WARNING ~ -
- Do not clean the underside of the chas
sis, fenders, wheel covers , or other ha rd
to reach pa rts without protect ing your
hands and arms . You may cut yourself on
sharp-edged metal parts.
- Always read and heed a ll WARNINGS and
other information ¢
page 245.
(D Note
- Never try to remove dirt, mud or dust if
the surface of the ve hicle is dry . Never
use a dry cloth or sponge, s ince this
co uld scratch your vehicle's paint or win
dows .
- Never wash your car in bright s unlight.
Drops of water act as magn ifying lenses
and may damage your paint .
- When you wash your car in the winter: if you rinse your vehicle with a hose, be careful not to aim the stream of water
Page 249 of 348

directly at locks, or at door or hatch
openings -they can freeze shut.
- Never use sponges designed to remove
insects , or any kitchen scouring sponges
or similar products. They can damage
your paint finish .
- You should remove debris (such as in
sects) from the headlight lenses on a
regular basis, for example when refuel
ing your vehicle. Never use a dry cloth or
sponge to clean the headlights . Only use
wet cloths or sponges to prevent
scratches . It is best to use soapy water .
@) For the sake of the environment
In the interest of the environment, the ve
hicle should only be washed in special
wash bays .
Washing your vehicle with a power
washer
Cleaning the exterior of your car with a high
pressure power washer is safe as long as you observ e a few simple rules.
" Before using the power washer , make sure
you have read and understood the WARN
INGS ~.&.
in General information on
page 245.
" Always follow the operating instructions for
the pow er wash er.
" Make su re that the jet on the spray hose
produces a "fan shaped spr ay" .
" Do
not hold the spray nozzle too close to
soft materials .
When cleaning the vehicle with a power wash
er
always follow the operating ins truc tions.
T his applies particularly to the
operating
pressure
and the spraying distance. Maintain
a sufficient distance to soft materials such as
rubber hoses and sound/vibration deadening
materials (particularly on the underside of the
engine hood). Do not use a jet which sprays
water in a
direct stream or one that has a ro
tating
jet.
Water temperature should not exceed 140 °F
(60 °().
Cleaning and protection 247
A WARNING
Never wash tires with a jet that sprays wa
ter in a direct stream . This could cause in
visible damage to the tires and weaken
them, even if the spray is from a relatively
long distance and for a short time . Dam
aged and weakened tires can fail and cause
accidents and personal injury.
(D Note
To avoid damaging your vehicle, always make sure that there is sufficient distance
between the spray head and soft materials
like rubber hoses, plastic parts and sound
deadening materials. Never aim the spray
head at the same point for a long time.
This also applies to cleaning headlights
and painted bumpers. Remember : the
closer the nozzle is to the surface of the
material, the greater the stress on the ma
terial.
Sensors and camera lenses
- Remove snow with a hand brush and remove
ice with a de-icing spray that does not con
tain solvents.
- Clean the sensors (adaptive cruise control*,
parking system*) with a cleaning solution
that does not contain solvents and a soft
cloth.
- Dampen the camera lens with a household
alcohol-based glass cleaner, and then wipe
the lens clean with a dry cloth.
(D Note
- If you wash your vehicle with a pressure
washer,
- make sure there is enough distance to
sensors in the rear bumper .
- do not clean the camera lenses and the
area around them with the pressure
washer .
- Never use warm or hot water to remove
snow or ice from the camera lens. This
could cause the lens to crack .
•
•
Page 253 of 348
Your authorized Audi dealer can provide cleaning products that have been tested and ap
proved for your vehicle .
Care of interior
MMI display
"' Clean the MMI disp lay with a soft clean
cloth and an LCD cleaner .
The MMI display can be cleaned with a profes sionally available "LCD cleaner". The cloth
should be s light ly dampened with the clean
ing f lu id to clean the display.
(D Note
To avo id scratching the MM I display, you
should never clean it d ry.
MMI control console
"' First clean the MMI control console with a
brush to remove dust from the housing.
"' Then wipe the MMI contro l conso le with a
clean, soft, slightly damp cloth .
The MM I control console shou ld be cleaned
with a brush first so that no dirt is trapped be
tween the buttons and the housing. We rec ommend giv ing the MMI control console a fi
nal w ipe with a cloth mo istened with water
and d ish washing detergent.
Cl) Note
To prevent damage, make sure that no flu id ever gets into the MMI control console.
Aluminum trim
Use only neutral-pH products to remove spots
and depos its from alum inum surfaces .
C hr ome ca re produ cts and alkaline cleaners
will attac k alum in um s urfaces and can dam
age them ove r time.
A WARNING
Always read and heed a ll WARNINGS and
other information
~ page 245 .
Cleaning and protec tion 25 1
Fabrics and fabric coverings
Fabr ics and fab ric cover ings (e.g. seats, door
trim pa ne ls, etc.) sho uld be cleaned at regular
intervals w ith a vacuum cleaner . This removes
s u rface dirt particles which could become em
bedded in the fabric throug h use. Steam
cleaners should not be used, because the
steam tends to push the dirt deeper into the
fabric and lock it there.
No rmal cl ean ing
Generally, we recommend using a soft sponge
or a lint-free microfiber cloth to the clean fab ric . Brushes shou ld only be used for carpets
and floor mats, since other fabr ic surfaces
could be harmed by brushes.
Normal s urface stains can be cleaned using a
commerc ially available foam cleaner. Spread
the foam on the surface of the fabric with a
soft sponge and work it in gently. Do not satu
rate the fabric. Then pat the foam dry us ing
absorbent, dry cloths (e.g. m icrofiber cloth)
and vacuum it after it has dried completely.
Cleaning sta in s
Stains caused by beverages (e.g. coffee, fruit
juice, etc.) can be treated with a mild deter gent solution . Apply the detergent solution
with a sponge . In the case of stubborn stains,
a dete rgent paste can be applied directly to
the stain and worked into the fabric . After
wards, use copious amoun ts of clean wa ter to
remove the rema ining de tergent. App ly the
water with a damp cloth or sponge and pat
the fabric dry with an absorbent, dry clot h.
Stains from choco late or ma keup sho uld have
detergent paste (e.g . ox-gall soap) rubbed in
to them. Afterwards, remove the soap with
water (damp sponge) .
A lcohol can be used to treat sta ins from
grease, o il, lipstick or a ballpoint pen. Melted
grease or dye must be patted off using ab
sorbent mater ial. It may be necessary to re
treat the areas with detergent paste and wa
ter.
•
•
Page 261 of 348
container meets industry standards (ANSI/
ASTM F852 -86).
(D Note
Never drive yo ur vehicle unt il the fuel tank
is complete ly empty. The irregular supply
of fuel can cause misfiring . Gasoline could
enter the exhaust system and damage the
catalyt ic converter.
Refuelling
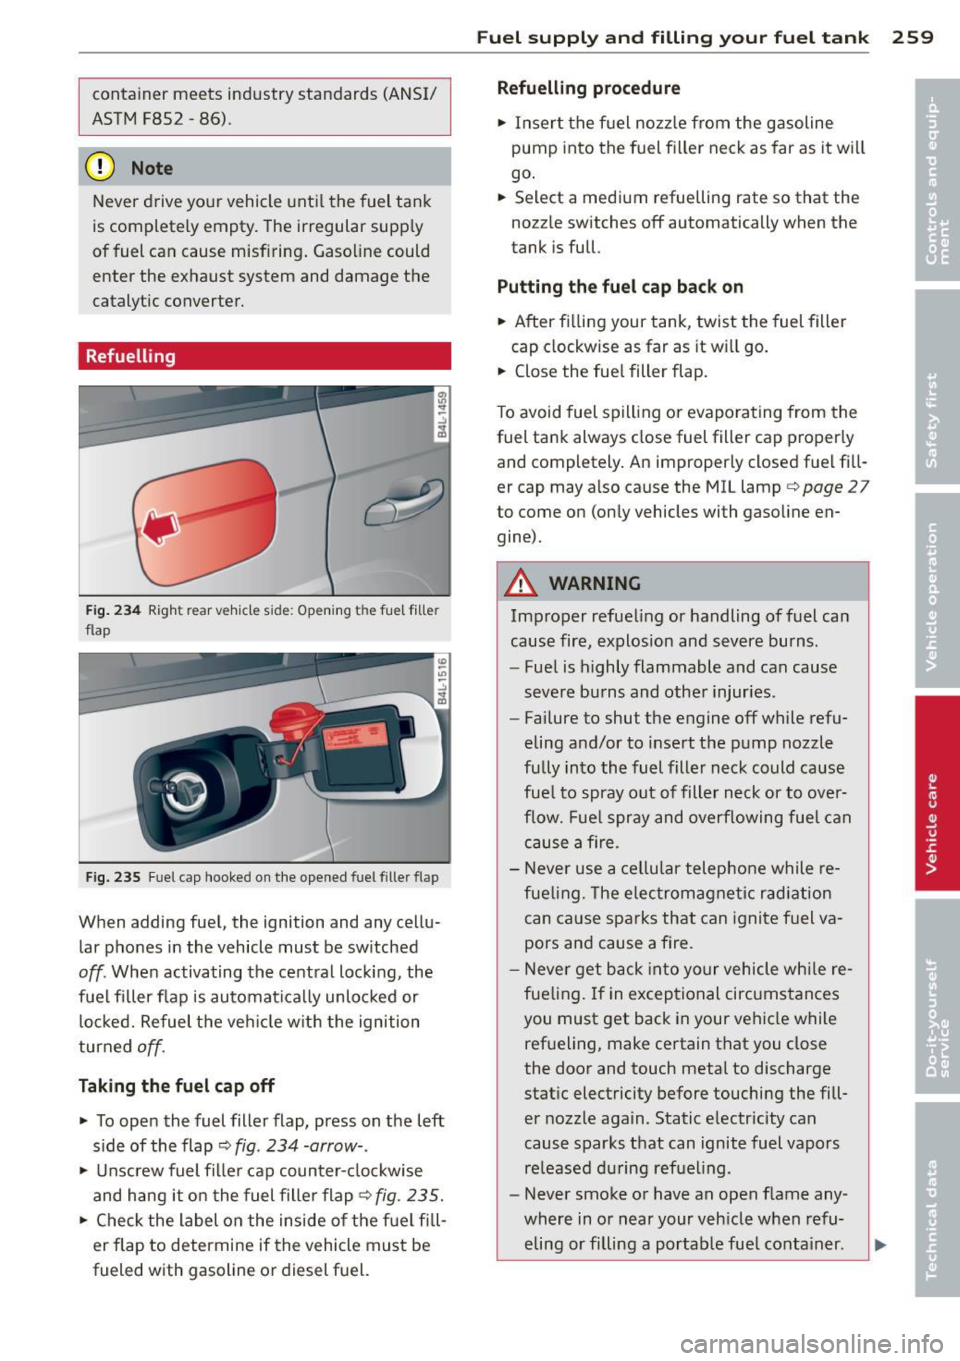
F ig. 234 Righ t rear vehicle side: Opening th e fue l fill er
flap
F ig. 235 Fu el cap hooked on the opened fuel filler flap
When adding fuel, the ignition and any cellu
lar phones in the vehicle must be sw itched
off. When activating the central locking, the
fuel filler flap is automatica lly unlocked or
locked. Refuel the ve hicle w ith the ignition
turned
off.
Tak ing th e fu el cap off
• To open the fuel filler flap, press on the left
s ide of the flap¢
fig. 234 -arrow- .
• Unscrew fuel fil ler cap counter-clockwise
and hang it on the fuel fille r flap ¢
fig. 235.
• Check the label on the inside o f the f uel fill
er flap to determine if the vehicle must be
fueled with gasoline or diesel fuel.
Fuel suppl y and filli ng your fuel t ank 259
Refuelling p ro cedur e
• Insert the fuel nozz le from the gasoline
pump into the fuel fi ller neck as far as it wi ll
go .
• Select a medi um refue lling rate so that the
nozz le switches off automatically when the
tank is full.
Pu tting th e fuel cap bac k on
• After fi lling your tank, twist the fuel filler
cap clockwise as far as it wi ll go.
• Close the fue l filler flap.
T o avoid fuel spill ing or evaporating from the
fuel tank always close fuel filler cap proper ly
and completely. An improperly closed fuel fill
er cap may also cause the MIL lamp¢
page 2 7
to come on (only vehicles with gasoline en
gine).
A WARNING
Improper refueling or handling of fuel can
cause fire, explosion and severe burns.
- Fuel is highly flammable and can cause
severe burns and other injur ies.
- Failure to shut the engine off wh ile refu
eling and/or to insert the pump nozzle
fully into the fuel filler neck could cause
fue l to spray out of filler neck or to over
f low. Fue l spray and overflowing fue l can
cause a fi re.
- Never use a cel lu lar telephone while re
fueling. The electromagnetic rad iation
can cause sparks that can ignite f uel va
pors and cause a fire.
- Never get back into your vehicle whi le re
fueling. If in exceptional circumstances
you must get back in your vehicle while
refueling, make certain that you close
the door and touch metal to discharge
stat ic electricity before touching the fill
er nozzle again. Static e lectricity can
cause sparks that can ignite fuel vapors re leased du ring refuel ing .
- Never smoke or have an open flame any
where in or near your veh icle when refu-
eling or filling a portab le fue l conta iner.
ll>
Page 266 of 348
264 Checking and filling
Checking and filling
Engine hood
Releasing the engine hood
The engine hood is released from inside the
vehicle.
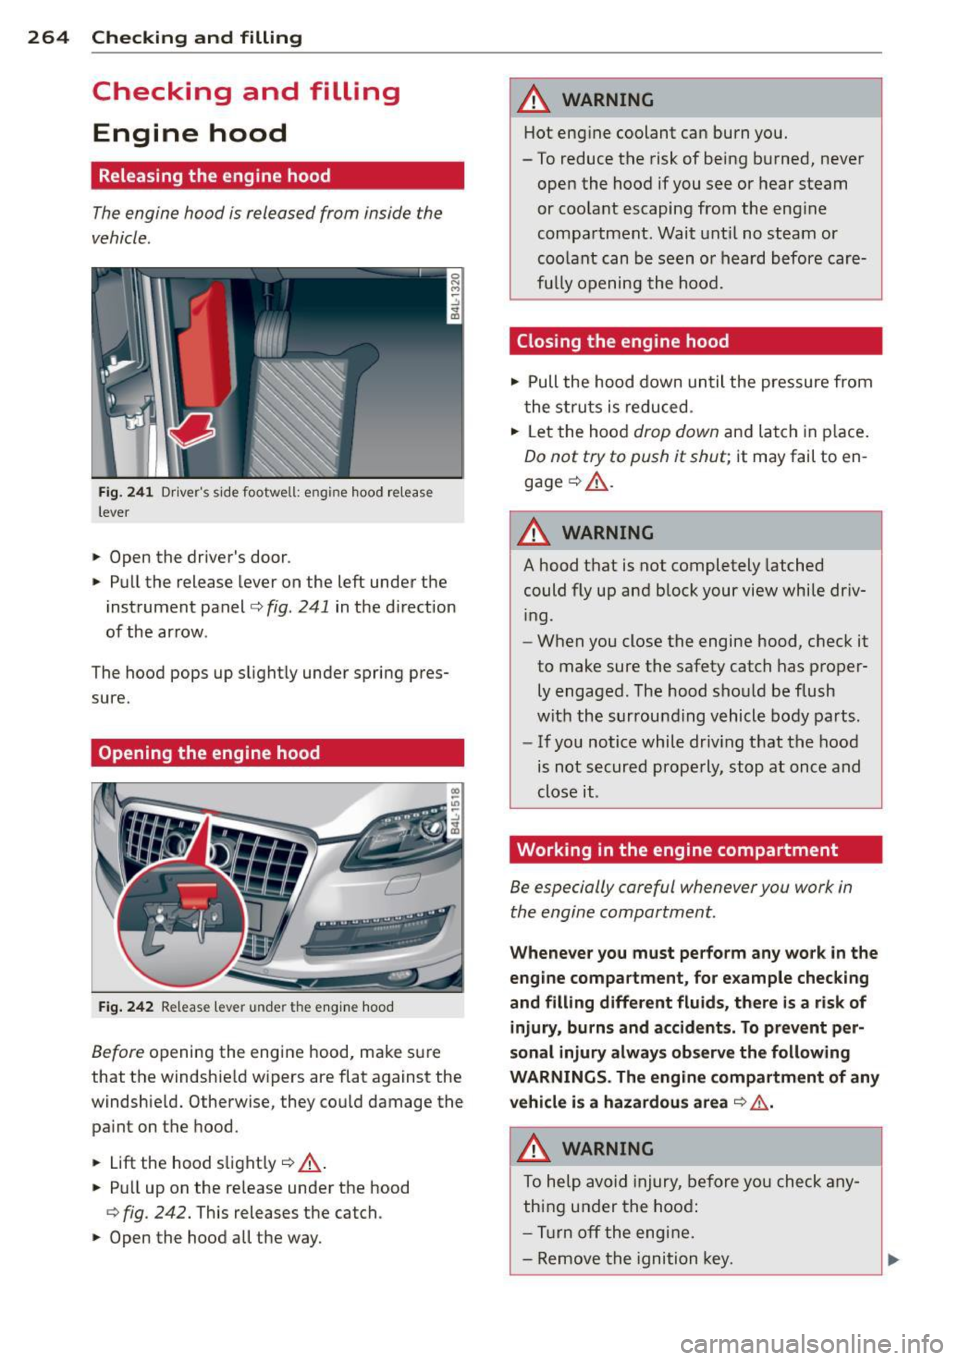
F ig . 2 41 Driver's side footwell: engine hood re lease
lever
.. Open the driver's door.
.. Pull the release lever on the left under the
inst rument panel
c> fig. 241 in the d irect ion
of the ar row .
The hood pops up s light ly under spring pres
sure.
Opening the engine hood
Fig. 242 Re lease lever under the eng ine hood
Before opening the engine hood, make s ure
that the windshie ld wipers are flat against the
windshie ld. Otherwise, they co uld damage the
pa int on the hood.
.. Lift the hood s light ly
c> _& .
.. Pull up on the release under the hood
¢ fig. 242. This releases the catch.
.. Open the hood all the way.
A WARNING
-Hot eng ine co olant can burn you.
- To reduce the risk of being b urned, never
o pen the hood if you see or hear steam
or coo la nt escaping from the eng ine
compa rtment. Wait unt il no steam or
coo lant can b e seen o r heard before care
fu lly openi ng the ho od.
Closing the engine hood
.. Pull the hood down un til the pressure from
t he stru ts is reduced .
.. Let the hood
drop down and la tch in p lace.
Do not try to push it shut; it may fail to en
gage
c> _& .
A WARNING
--
A ho od t hat is not completely latched
could fly up an d block your vi ew while dr iv
i ng.
- W hen you close the engine hood, c heck it
to make sure the safety catch has p roper
ly engaged . The hood sho uld be flush
wit h the surrou nding vehicle body parts.
- If you notice while dr iv ing t hat t he hood
is not s ecured properly, stop at once and
close it.
Working in the engine compartment
Be especially careful whenever you work in
the engine compartment .
Whenever you must perform any wo rk in the
engine compartment, for example checking
and filling different fluids, th ere is a risk of
injury, burns and accidents. To pr event per
sonal injury alway s observe the following
WARNINGS. The engine compartm ent of any
vehicle is a hazardous area
c> &, .
A WARNING
To he lp avo id i njury, before yo u check any
thi ng under the hoo d:
- Tu rn off the eng ine .
- Remove the igni tion key.
Page 297 of 348
The relative perform a nee of ti res depends
upon the actua l conditions of their use, how
ever, and may depart sign ificantly from the
norm due to var iat ions in dr iving habits, serv
ice practices and differences in road character
istics and climate .
Trac tion
The traction grades, from highest to lowest,
are AA, A, Band
C. Those grades represent the
tire's ability to stop on wet pavement as measured under controlled cond itions on
specified government test surfaces of asphalt
and concrete . A tire marked C may have poor
traction performance ¢,&. .
Temp erature
The temperature grades are A (the h ighest),
B, and
C, representing the t ire's resistance to
the generat ion of heat and its ability to dissi
pate heat when tested under controlled condi
tions on a specified i ndoor laboratory test
wheel.
Sustained high temperature can cause the
materia l of the tire to degenerate and reduce
tire life, and excessive temperature can lead
to sudden ti re fa ilu re ¢ ,&. .
The grade
C corresponds to a level of perform
ance which all passenger car tires must meet
u nder the Federa l Moto r Veh icle Safety Stand
a rd No.
1 09. G rades Band A represent h igher
l eve ls of perfo rmance on the laboratory tes t
wheel than the m inimum required by law .
A WARNING
The traction grade assigned to this ti re is
based on stra ight-ahead b raking t raction
tests, and does not include acceleration,
cornering, hydrop lan ing or peak traction
character istics.
A WARNING
The temperature grade for this t ire is es
tablished for a t ire that is p roperly inflated
and not overloaded. Excessive speed, un
derinflation, or excessive loading, either
-
Tire s an d wheel s 295
separately or in combinat ion, can ca use
heat bui ldup and possible tire failure.
Winter tires
Winter tires can improve vehicle handling on
snow and ice. At temperatures below 45 °F (7 °C) we recommend changing to winter
tires.
In some heavy snow areas, local governments
may require true winter o r "snow" tires, those
with very deeply cut tread. These tires should
o nly be used in pairs and be installed o n all
four wheels . Make sure you purchase snow
t ires that are the same size and construction
type as the other tires on you r vehicle.
Your vehicle is equipped with all-wheel drive,
th is w ill improve traction during winter driv
i ng, even with the standa rd tires . However, we
strong ly recommend that you always equip all
fo ur wheels on you r vehicle wit h corre ct ly fit
ted winter tires or all-season t ires, when win
te r road cond itions are expected . This also im
proves the veh icle's braking per formance and
reduces stopping dista nces.
Summe r tires provide less grip on i ce and
snow.
Winter tires (snow tires) must always be fitted
o n all fo ur wheels .
Ask your authorized Audi dealer or qualified
workshop for permitted
winter tire size s. Use
o nly rad ial w inter t ires.
Winter tires lose their effectiveness when the
tread is worn down to a depth of
0 .157 inch
(4 mm) .
Only drive w ith w inter t ires under w inter con
dit ions. Summer t ires handle better when
there is no snow or ice on the roads and the
temperature is above 45 °F (7 °() .
If you have a flat tire, see notes on spare
whee l
¢page 291.
Please a lways remember that winter tires may
have a lowe r speed rating than the tires o rigi -
nally installed on your vehicle at the time it .,.
•
•