ignition AUDI R8 SPYDER 2012 Repair Manual
[x] Cancel search | Manufacturer: AUDI, Model Year: 2012, Model line: R8 SPYDER, Model: AUDI R8 SPYDER 2012Pages: 236, PDF Size: 59.24 MB
Page 164 of 236
162 Cleaning and protection
use and are not an indication of material
deterioration.
(U;) Note
- Never use chemical solvents (e.g. lighter
fluid , turpentine), waxes, shoe polish or
similar products on Alcantara ® surfaces.
- To avoid damage, have stubborn stains
removed by a commercial cleaning spe
cialist.
- Do not use brushes, stiff sponges or sim ilarly abrasive cleaning aids.
Safety belts
Heavily soiled safety belts may not retract
properly.
• Keep belts clean.
• For cleaning, use a mild soap and water sol
ution. Let belts dry thoroughly and away
from direct sunlight.
• Do not allow inertia reel safety bel ts to re
tract before they are completely dry.
• Check the condition of your safety belts
reg
ularly .
_& WARNING
Damaged safety belts can break in a crash.
- Anything that might damage your safety
belts could mean that you and your pas
sengers would not be adequately pro
tected in an accident.
- Safety belt performance depends on cor
rect installation. Never remove belts
from the vehicle to clean them.
- Do not use chemical cleaning agents,
bleach or dyes. They have corrosive prop
erties which weaken the webbing.
- When cleaning your safety belts, inspect
them for damage. If you discover dam
age, see your authorized Audi dealer.
- Always read and heed all WARNINGS and
the information
¢page 153.
1) Use o nly the co rrect cle anin g so lu ti on s. Never use gas
o lin e or die se l fuel.
Engine compartment
Be especially careful when cleaning the en
gine compartment.
Corrosion protection
The engine compartment and transmission
have been corrosion-protected at the factory.
Good anti-corrosion treatment is very impor
tant, particularly in the winter.
If the vehicle
is frequently driven on salt treated roads, the
entire engine compartment and plenum panel
should be thoroughly cleaned at the end of
winter and retreated to prevent salt damage .
At the same time, the underside of the vehicle should be washed as well.
If the engine compartment is cleaned at any
time with grease removing solutions
1> , or if
you have the engine washed, the anti-corro sion treatment is almost always removed as
well.
It is therefore essential to have a long
lasting corrosion protection reapplied to all
surfaces, seams, joints and components in the
engine compartment.
A WARNING
Be aware: The engine compartment of any
motor vehicle is a potentially hazardous
area.
- Before working in the engine compart
ment, be sure to read the information
¢page 169.
-Before reaching into the front plenum
panel, always remove the ignition key .
Otherwise, the windshield wiper system
could unintentionally be switched on,
possibly causing personal injury from the
moving wiper linkage.
- Never reach into the area around or
touch the radiator fan. The auxiliary fan
is temperature controlled and can switch
on suddenly- even when the ignition is
off.
Page 168 of 236
166 Fuel suppl y and filli ng your fuel t ank
transport fue l to use for your lawn mower,
snow blower, etc., be very careful and al
ways observe local and state laws regard
ing the use, transportat ion and storage of
such fuel containers. Make certain the con
tainer meets industry standards (ANSI/
AS TM F852 -86).
(D Note
Never drive your vehicle until the fuel tank
is completely dry. The irregular supply of
fuel can cause misfir ing. Gasoline cou ld
e nte r into the exhaust system and damage
the cata lytic conve rter.
Refueling
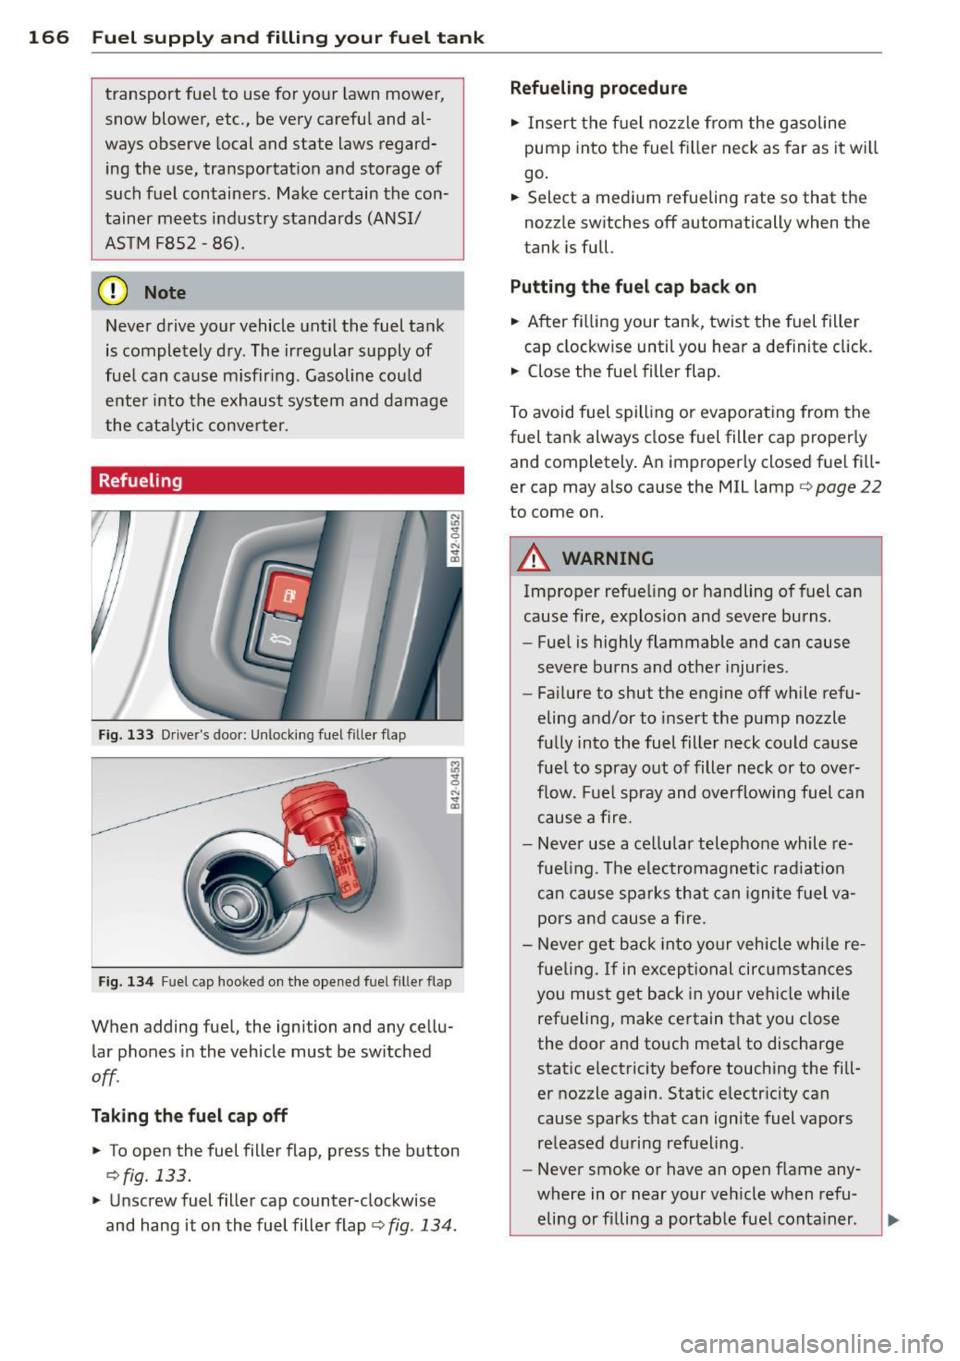
Fig. 133 D river 's doo r: Unlocki ng fuel filler flap
Fig. 134 Fuel cap hooked on the opened fuel filler flap
When adding fuel, the ignition and any cellu
lar phones in the vehicle must be sw itched
off .
Tak ing th e fuel cap off
• To open the fuel filler flap, press the button
9fig. 133.
• Unscrew fuel filler cap counter-clockwise
and hang it on the fuel filler flap ¢
fig. 134 .
Refueling procedure
• Insert the f uel nozzle from the gasoline
pump into the fuel fi ller neck as far as it wi ll
go .
• Select a med ium refueling rate so that the
nozzle switches off automatically when the
tank is full.
Putting th e fu el cap bac k on
• After fi lling your tank, twist the fuel filler
cap clockwise until you hear a definite click.
• Close the fue l filler flap.
T o avoid fuel spilling or evaporating from the
fuel tank always close fuel filler cap properly and completely. An improperly closed fuel fi ll
er cap may also cause the MIL lamp¢
page 22
to come on.
A WARNING
Improper refue ling or handling of fuel can
cause fire, explosion and severe burns.
- Fuel is highly flammable and can cause
severe burns and other injuries.
- Fai lure to shut the engine off while refu
eling and/or to insert the pump nozzle
fully into the fuel filler neck could cause
fuel to spray out of filler neck or to ove r
flow. F ue l spray and overflowing fuel can
cause a fire.
- Never use a ce llular telephone while re
fue ling. The electromagnet ic rad iat io n
can cause spa rks that can igni te fuel va
pors and cause a fire.
- Never get back into your vehicle whi le re
fue ling.
If in exceptio nal circumstances
you must get back in your vehicle while
ref ueling, make certain that you close
the door and touch metal to discharge
static electricity before touching the fill
er nozzle again. Static electricity can
cause sparks that can ignite fuel vapors
re leased d uring refueling .
- Never smoke or have an open f lame any
where in o r near your veh icle when refu
eling or filling a portable fue l conta iner.
Page 171 of 236
Checking and filling Engine compartment
lid
Working in the engine compartment
Be especially careful whenever you work in the engine compartment!
Whenever you must perform any work in the
engine compartment, for example checking
and filling the different fluids, there is a risk
of injury, burns and accidents. To prevent per
sonal injury always observe the following
WARNINGS. The engine compartment of any
vehicle is a ha zardous area!
¢ &. .
_&. WARNING
To help avoid injury, before you check any
thing under the engine compartment lid:
- Switch off the engine.
- Remove the ignition key.
- Apply the parking brake.
- Move selector lever of R tronic to "N"
(Neutral); put manual transmission in
Neutral.
- Always let the engine cool down. Hot
components will burn skin on contact.
- To reduce the risk of being burned, never
open the engine compartment lid if you
see or hear steam or coolant escaping
from the engine compartment. Wait un
til no steam or coolant can be seen or heard before carefully opening the en
gine compartment lid.
- Keep children away from the engine com
partment .
- Never spill fluids on hot engine compo
nents. They can cause a fire.
- Never open the coolant reservoir cap
when the engine is still warm. The cool
ant system is pressurized and hot cool
ant could spray out .
- Protect your face, hands and arm from
steam or hot engine coolant by placing a
thick rag over the cap when you open the
coolant reservoir .
Checking and filling 169
-If work on the fuel system or the electri
cal system is necessary:
- Always disconnect the battery.
- Never smoke or work near heaters or open flames . Fluids in the engine com
partment could start a fire.
- Keep an approved fire extinguisher im
mediately available .
- To avoid electrical shock and personal in
jury while the engine is running or being started, never touch:
- Ignition cables
- Other components of the high voltage
electronic ignition system.
- If you must perform a check or repair
with the engine running:
- First, fully apply the parking brake,
move selector lever of R tronic to "N"
(Neutral); put manual transmission in
Neutral.
- Always use extreme caution to prevent clothing, jewelry, or long hair from get
ting caught in the radiator fan, V-belts
or other moving parts, or from contact
ing hot parts. Tie back hair before
starting, and wear no clothing that will
hang or droop into the engine.
- Minimize exposure to emission and
chemical hazards¢& .
A WARNING
California Proposition 65 Warning:
- Engine exhaust, some of its constituents,
and certain vehicle components contain
or emit chemicals known to the State of
California to cause cancer and birth de
fects and reproductive harm. In addition,
certain fluids contained in vehicles and
certain products of component wear con
tain or emit chemicals known to the State of California to cause cancer and birth defects or other reproductive harm.
- Battery posts, terminals and related ac
cessories contain lead and lead com
pounds, chemicals known to the State of
California to cause cancer and reproduc
tive harms. Wash hands after handling.
•
•
Page 172 of 236

1 7 0 Che cking and filling
(D Note
When adding fluids, a lways make sure that
they are poured into the proper container or filler opening, otherwise serious dam
age to veh icle systems will occur.
@ For the sake of the environment
To detect leaks in time, inspect the vehicle
floor pan from underneath regu larly . If
you see spots from oil or other vehicle flu ids, have your vehicle inspected by an au
thorized Audi dealer.
Releasing the engine compartment lid
The engine compartment lid is released from
inside the vehicle .
Fig. 137 Driver's side: releasing t he engine co mpart
ment lid
Requirement : The ignition must be switched
on.
... Make sure the rear spoiler is retracted
¢page 144 .
... Pull the button @. The eng ine compart
ment lid opens slightly .
... Open the engine compartment lid
c> ,& .
A WARNING
-
Hot engine coo lant can burn you . To re
duce the risk of being bu rned, never open
the engine compartment lid if yo u see or
hear steam or coolant escaping from the
eng ine compartment. Wait until no steam
or coolant can be seen or heard before
carefully opening the engine compartment
lid.
(D Note
To prevent damage to the vehicle, on ly
open the engine compartment lid when
the convert ible top storage bay lid is
closed.
(D Tips
An emergency re lease can be used if the
engine compartment lid cannot be re
leased with the button
® ¢ page 171.
Closing the engine compartment lid
... Make sure that the rear spoiler is retracted
Qpage 144.
.,. Pull the eng ine compartment lid down unti l
the pressure from the struts is reduced .
... Press the engine compartment lid closed
Q&. .
A WARNING
A engine compartment lid that is not com
plete ly latched could fly up and b lock your
view wh ile driving.
- When you close the engine compartment
lid, check it to make sure the safety catch
has properly engaged. The engine com
partment lid should be flush with the
surrounding vehicle body parts.
- If you notice while driving that the en
gine compartment lid is not secured
properly, stop at once and close it.
Page 178 of 236
1 7 6 Che cking and filling
your cooling system and could result in
damage not covered by your New Vehicle Limited Warranty .
Checking the engine coolant level
Proceed carefully when checking the coolant.
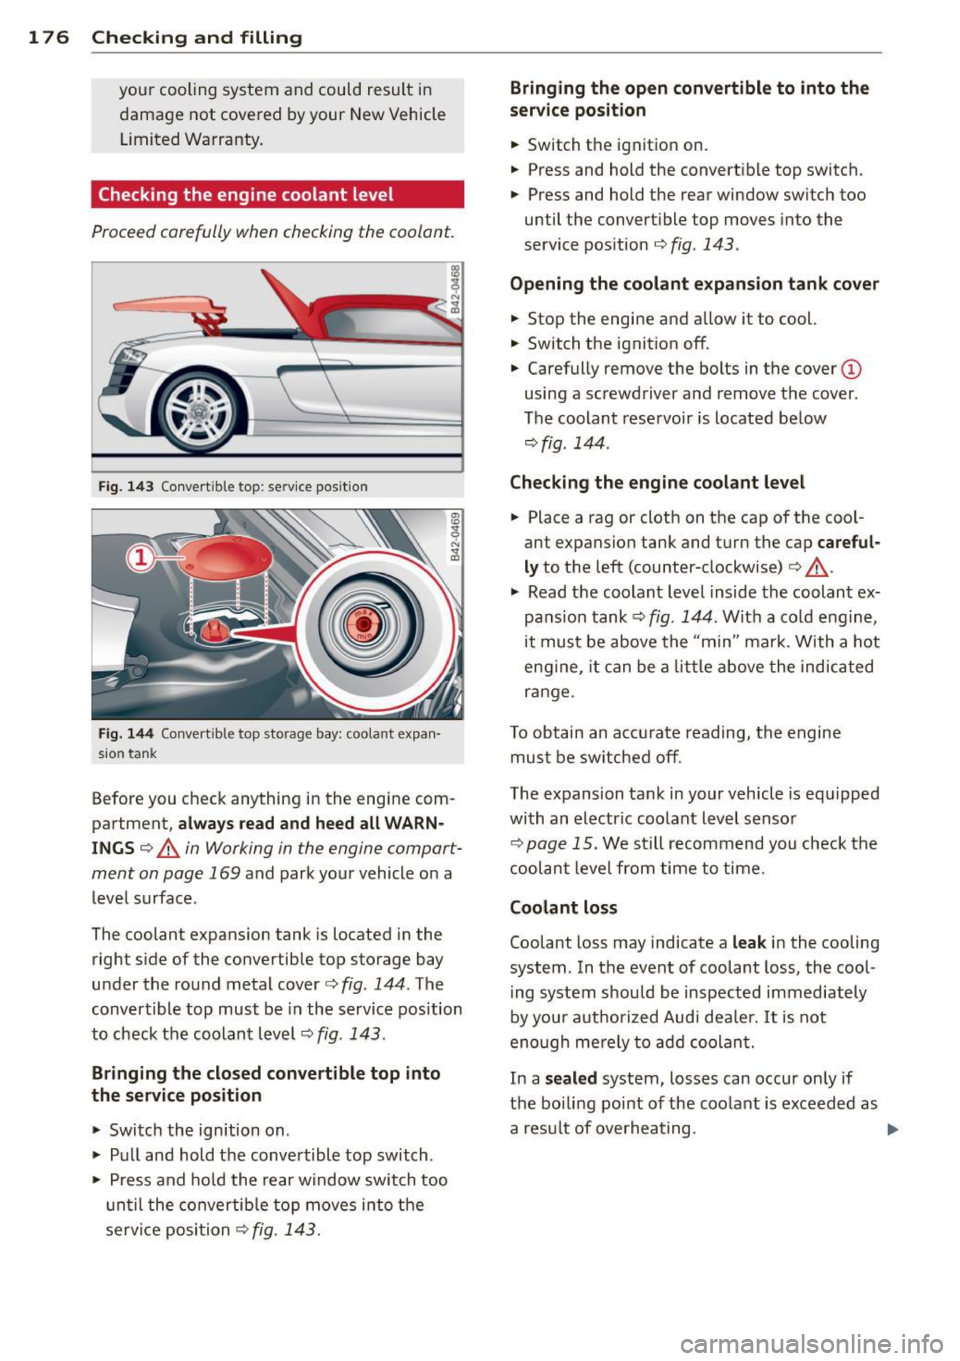
Fig . 1 43 Co nvert ible top: se rv ice pos it ion
F ig . 14 4 Convert ib le top storage bay: coolant expan·
sio n tank
Before you check anything in the engine com
partment,
a lwa ys r ead and heed all WARN
INGS ¢.&.. in Working in the engine compart
ment on page
169 and park your vehicle on a
level surface .
The coolant expansion tank is located in the right s ide of the convertible top storage bay
under the round metal cover¢
fig. 144 . The
convertible top must be in the service position
to check the coolant leve l
¢fig . 143 .
Bringing the closed con ve rtible top into
th e s ervic e position
~ Switch the ignition on .
~ Pull and hold the convert ible top switch .
~ Press and hold the rear window switch too
u nti l the convertib le top moves into the
service position¢
fig. 143.
Bringing the op en conv ertible to into the
service position
~ Switch the ignition on.
~ Press and hold the convertible top switch.
~ Press and hold the rear window switch too
until the convertible top moves into the
service position¢
fig . 143 .
Opening the coolant e xpan sion tank cover
~ Stop the engine and allow it to cool.
~ Switch the ignition off.
~ Carefully remove the bolts in the cover (D
using a screwdriver and remove the cover.
The coolant reservoir is located below
¢fig. 144.
Chec king the engine cool ant level
~ Place a rag or cloth on the cap of the cool
ant expansion tank and turn the cap
careful
ly
to the left (counter-clockwise) ¢ .&_.
~ Read the coolant level inside the coolant ex
pans ion tank ¢
fig. 144 . With a co ld engine,
it must be above the "min" mark. With a hot
eng ine, it can be a little above the indicated
range.
T o obtain an accu rate reading, the engine
must be switched off.
The expansion ta nk in your vehicle is equ ipped
with an electric coo lant level sensor
¢page 15. We still recommend you check the
c oolant level from time to time.
Coolant loss
Coolant loss may indicate a leak in the cooling
system . In the event of coolant loss, the cool
i ng system shou ld be inspected immediately
by your aut horized Audi dea ler. It is not
eno ugh me rely to add coolant.
In a
s ea le d system, losses can occur on ly if
the boiling point of the coo lant is exceeded as
a resu lt of overheating.
Page 181 of 236
Winter operation
The cold time of year places a special strain on
the battery, resulting in reduced starting pow
er. So before the cold weather starts, have the battery inspected and charged as necessary.
A WARNING
-All work on the battery requires technical knowledge. Please contact an authorized
Audi dealer or another authorized facility
for questions about the battery -danger
of acid burns and explosion hazard!
- The battery must not be opened! Do not try to change the battery's liquid level,
otherwise detonating gas will escape
from the battery- explosion hazard!
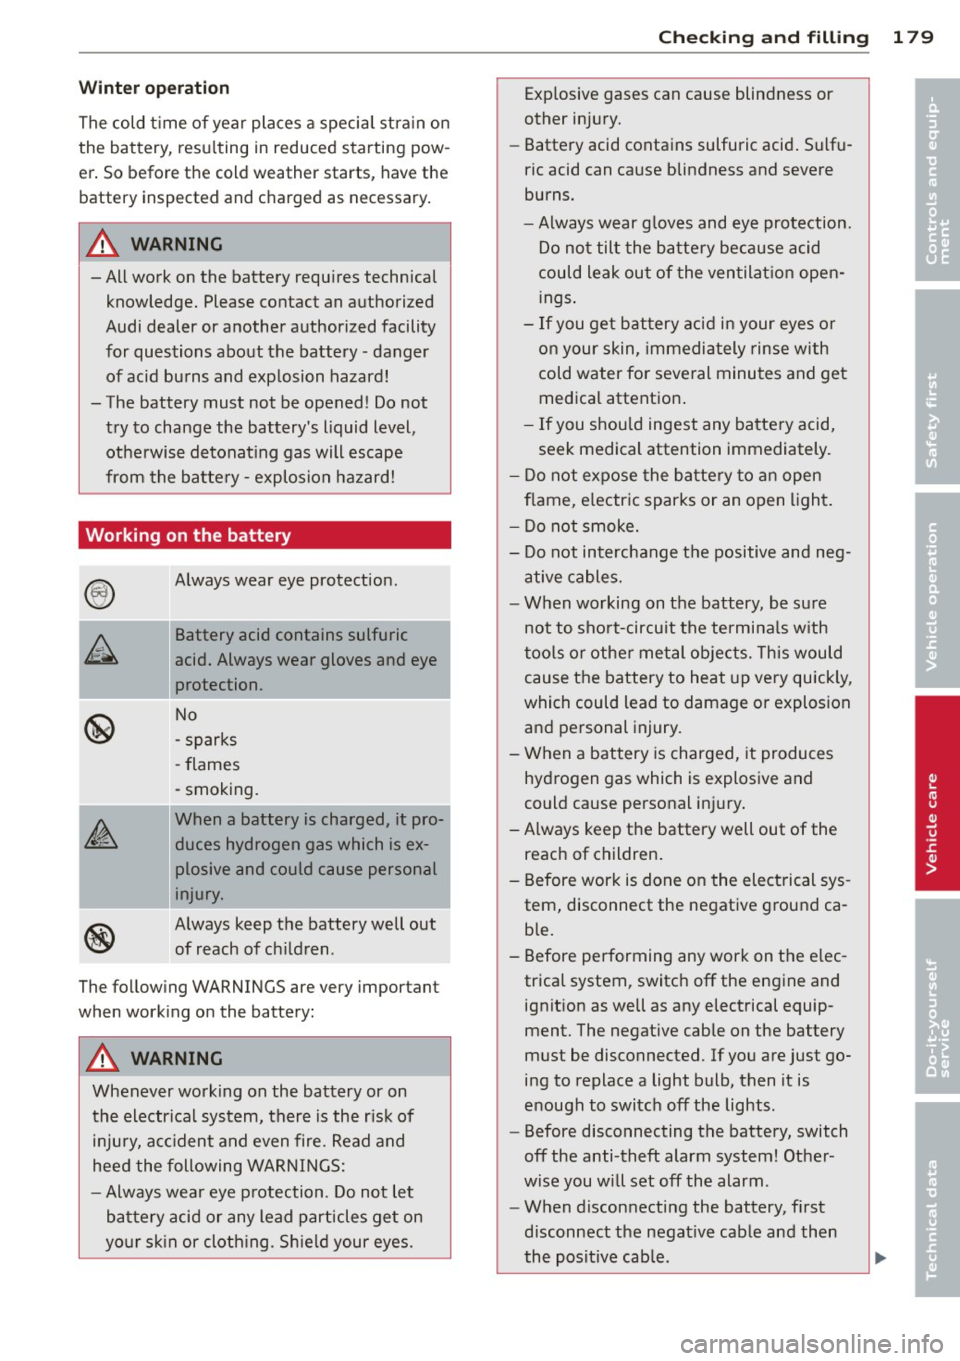
Working on the battery
®
~
I
@
®
Always wear eye protection.
Battery acid contains sulfuric
acid. Always wear gloves and eye
protection.
No
- sparks
- flames
- smoking.
When a battery is charged, it pro
duces hydrogen gas which is ex plosive and could cause personal
injury.
Always keep the battery well out
of reach of children.
The following WARNINGS are very important
when working on the battery:
A WARNING
Whenever working on the battery or on
the electrical system, there is the risk of injury, accident and even fire. Read and
heed the following WARNINGS:
- Always wear eye protection . Do not let
battery acid or any lead particles get on
your skin or clothing. Shield your eyes.
Checking and filling 179
Explosive gases can cause blindness or
other injury.
- Battery acid contains sulfuric acid. Sulfu
ric acid can cause blindness and severe
burns.
- Always wear gloves and eye protection.
Do not tilt the battery because acid
could leak out of the ventilation open
ings.
- If you get battery acid in your eyes or
on your skin, immediately rinse with
cold water for several minutes and get medical attention.
- If you should ingest any battery acid,
seek medical attention immediately.
- Do not expose the battery to an open
flame, electric sparks or an open light.
- Do not smoke.
- Do not interchange the positive and neg-
ative cables.
- When working on the battery, be sure
not to short-circuit the terminals with
tools or other metal objects. This would
cause the battery to heat up very quickly,
which could lead to damage or explosion
and personal injury.
- When a battery is charged, it produces
hydrogen gas which is explosive and
could cause personal injury.
- Always keep the battery well out of the
reach of children.
- Before work is done on the electrical sys
tem, disconnect the negative ground ca
ble.
- Before performing any work on the elec trical system, switch off the engine and ignition as well as any electrical equip
ment. The negative cable on the battery
must be disconnected. If you are just go
ing to replace a light bulb, then it is
enough to switch off the lights.
- Before disconnecting the battery, switch
off the anti-theft alarm system! Other
wise you will set off the alarm.
- When disconnecting the battery, first
disconnect the negative cable and then
the positive cable.
•
•
Page 182 of 236
180 Checking and filling
- Before reconnecting the battery, make
sure all electrical consumers are switch ed off. Reconnect the positive cable first
and then the negative cable. Never inter
change the cables -th is could start a fire!
- Never charge a frozen or a thawed-out
battery . It could explode! If a battery has
frozen, then it must be rep laced. A dis
charged battery can freeze over at 32 °F
(0 °C).
- Make su re the vent hose is always attach
ed to the opening on the side of the bat
t ery.
- Never use batteries which are damaged.
Dange r of explos ion! A lways rep lace a
damaged batte ry.
& WARNING
C alifornia Propos ition
65 Warning:
- Battery posts, te rm inals and related ac
c essories cont ain le ad and lead com
pounds, chemicals known to the State of
California to ca use cancer and re produc
t ive p roblems . Wash hands after han
dling.
(D Note
- Do no t disconnect the vehi cle bat tery
when the ignition is switched on or when
t h e engine is running, otherwise, you will
damage e lectronic components in the
electrical system.
- If your vehicle is go ing to stand for a
l ong period of time witho ut being driven,
protect the battery from "free zing", ot h
erwise it w ill be damaged and w ill then
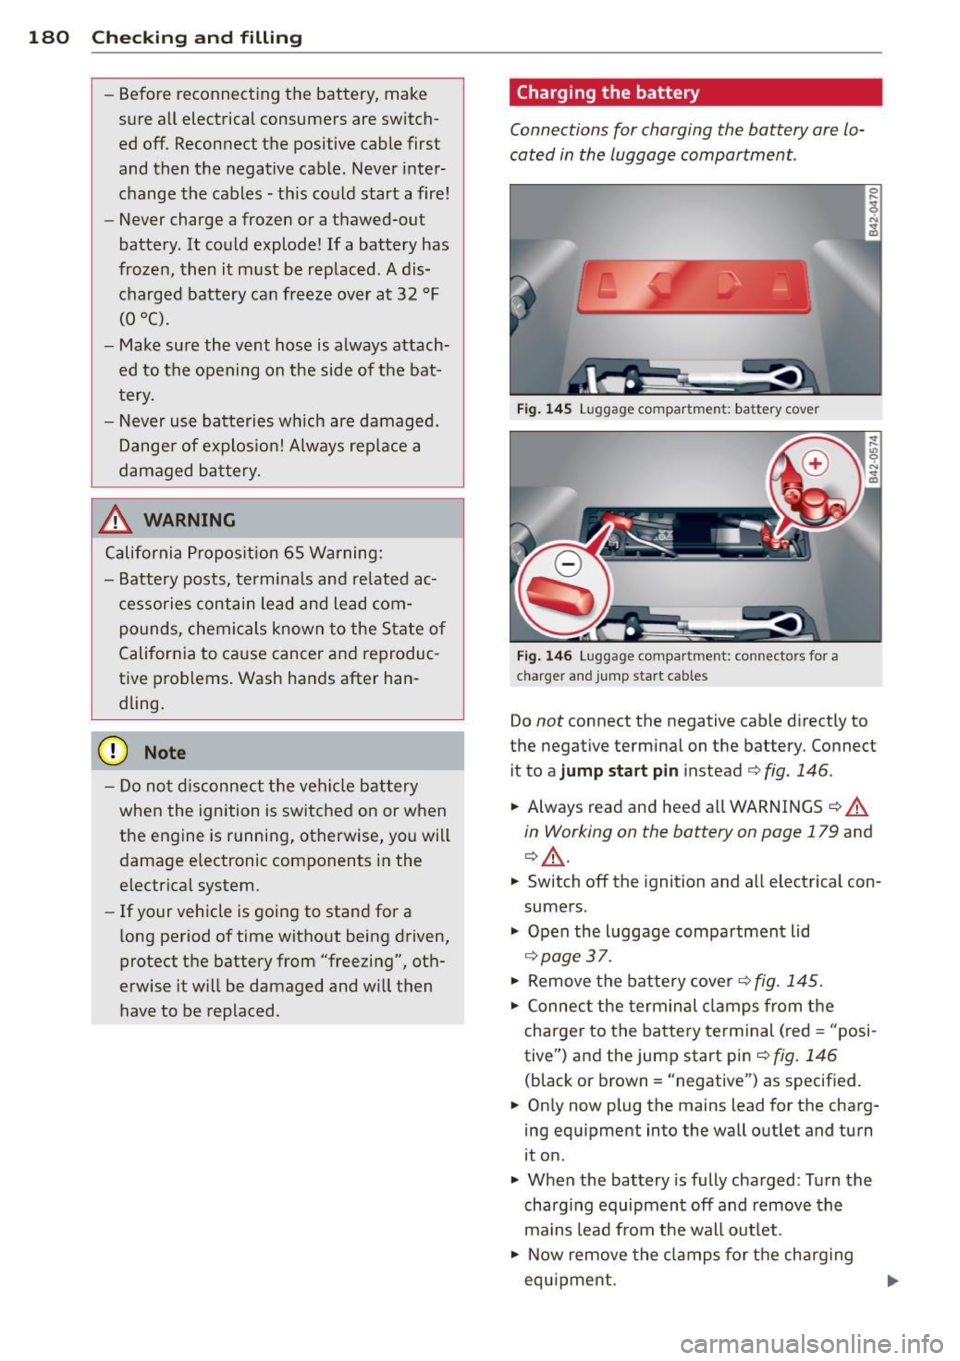
have to be replaced . Charging the battery
Connec
tions for charging the battery are lo
cated in the luggage compartment.
F ig . 14 5 Lugg age co mpar tment : ba ttery cove r
Fig. 146 Lu ggage co mpa rtm en t: c onn ecto rs fo r a
c h arger a nd ju mp start c ables
Do not connect the negative c able direct ly to
the negative terminal on the battery . Connect
it to a
jump sta rt p in instead c:, fig . 146 .
.,. Always read and heed a ll WARNINGS c;, .&.
in Working on the battery on page 179 and
¢ .&_ .
.,. Switch off the ignition and all electrical con
sumers .
.,. Open the luggage compa rtment lid
c:> page37 .
.,. Remove the batte ry cove r c:, fig. 145.
.,. Connec t the terminal clamps from t he
charger to the batte ry te rminal (red = "posi
tive") and the jump start pin
c:, fig . 146
(black or brown= "negative") as specified .
.,. On ly now plug the mains lead for the charg
ing equ ipment into the wa ll outlet and turn
it on .
.,. When the battery is fully cha rged : Turn the
charg ing equipment off and remove the
ma ins lead from the wall out let .
.,. Now remove the cla mps fo r the ch arg ing
equ ipment.
Page 215 of 236
Fuses and bulbs
Electrical fuses
Replacing fuses
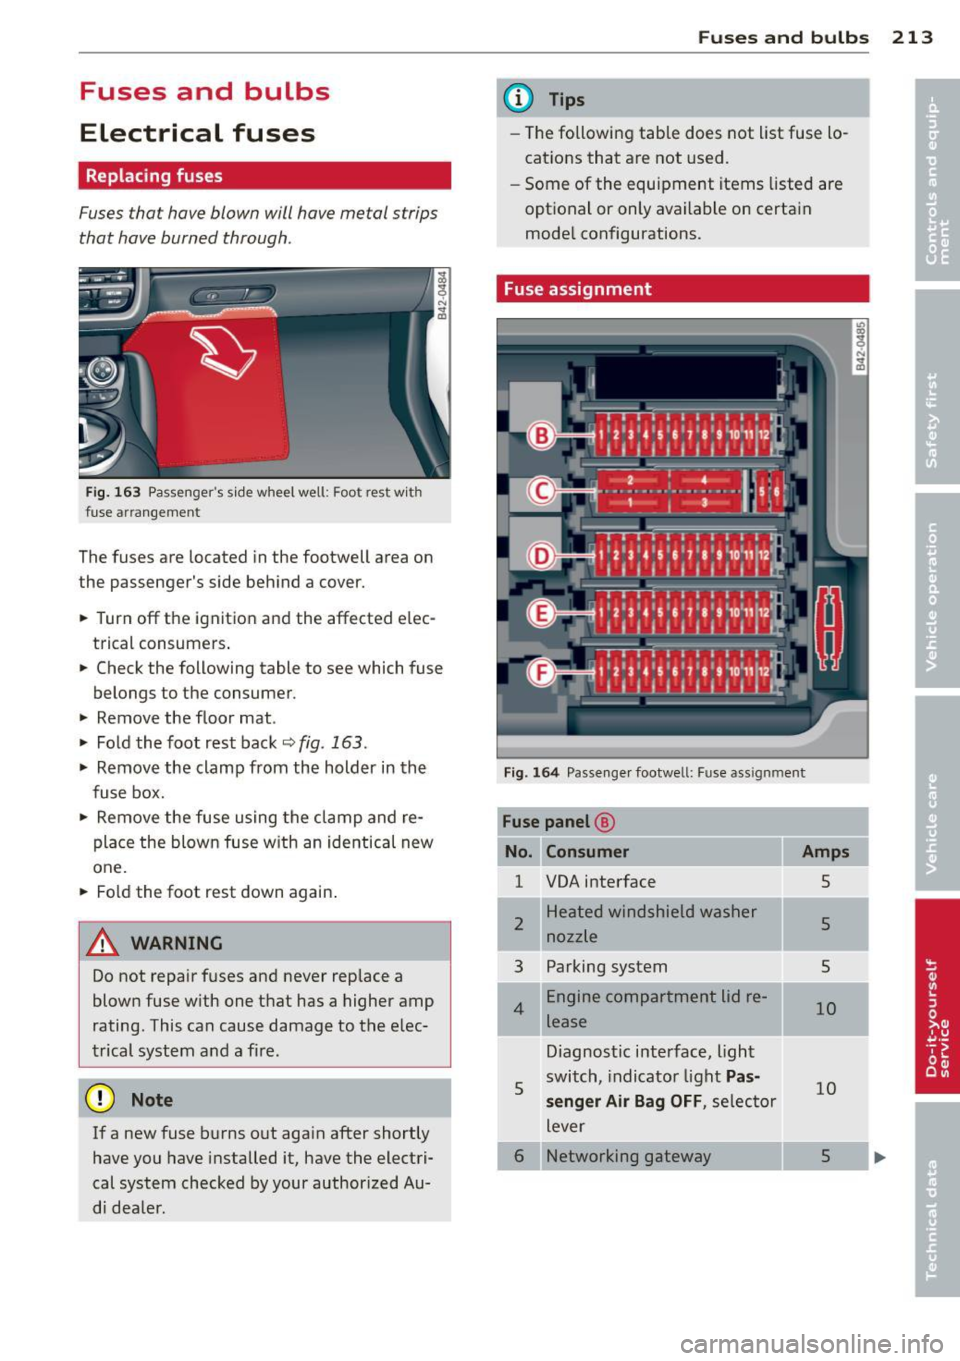
Fuses that have blown will have metal strips
that have burned through.
Fig. 163 Passenger's s ide wheel well: Foot rest w ith
fuse arrangement
The fuses are located in the footwell area on
the passenger's side behind a cover.
• Turn off the ignition and the affected e lec
trical consumers .
• Check the following table to see which fuse
belongs to the consumer.
• Remove the floor mat .
• Fold the foot rest back
¢ fig. 163.
• Remove the clamp from the holder in the
fuse box.
• Remove the fuse using the clamp and re
place the blown fuse w ith an identical new
one.
• Fo ld the foot rest down again .
A WARNING
Do not repair fuses and never replace a
blown fuse with one that has a higher amp
rating. This can cause damage to the elec
trical system and a fire.
(D Note
If a new fuse burns out again after shortly
have you have installed it, have the electri
cal system checked by your authorized Au
d i dealer.
Fu se s and bulb s 213
@ Tips
-The following table does not list fuse lo
cations that are not used.
- Some of the equipment items listed are
optional or only available on certain
mode l configurations.
Fuse assignment
Fig. 164 Passenge r footwell: Fuse assignment
Fuse panel @
Con sumer
1 VOA interface
2
3
4
5
Heated windshield washer
nozzle
Parking system
Engine compartment lid re
lease
Diagnostic interface, light
switch, indicator light
Pa s
se nger Air Ba g OF F,
selector
lever
6 Networking gateway
Amp s
5
5
5
10
10
5
Page 217 of 236
General information Explanation of
technical data
Som e of t he technical data listed in this man
ual require further explanation.
The technical data for your vehicle are listed in
the charts starting on
Q page 217. This chap
t e r p rovides general informa tion, notes and
r estr ictions wh ich app ly to these data .
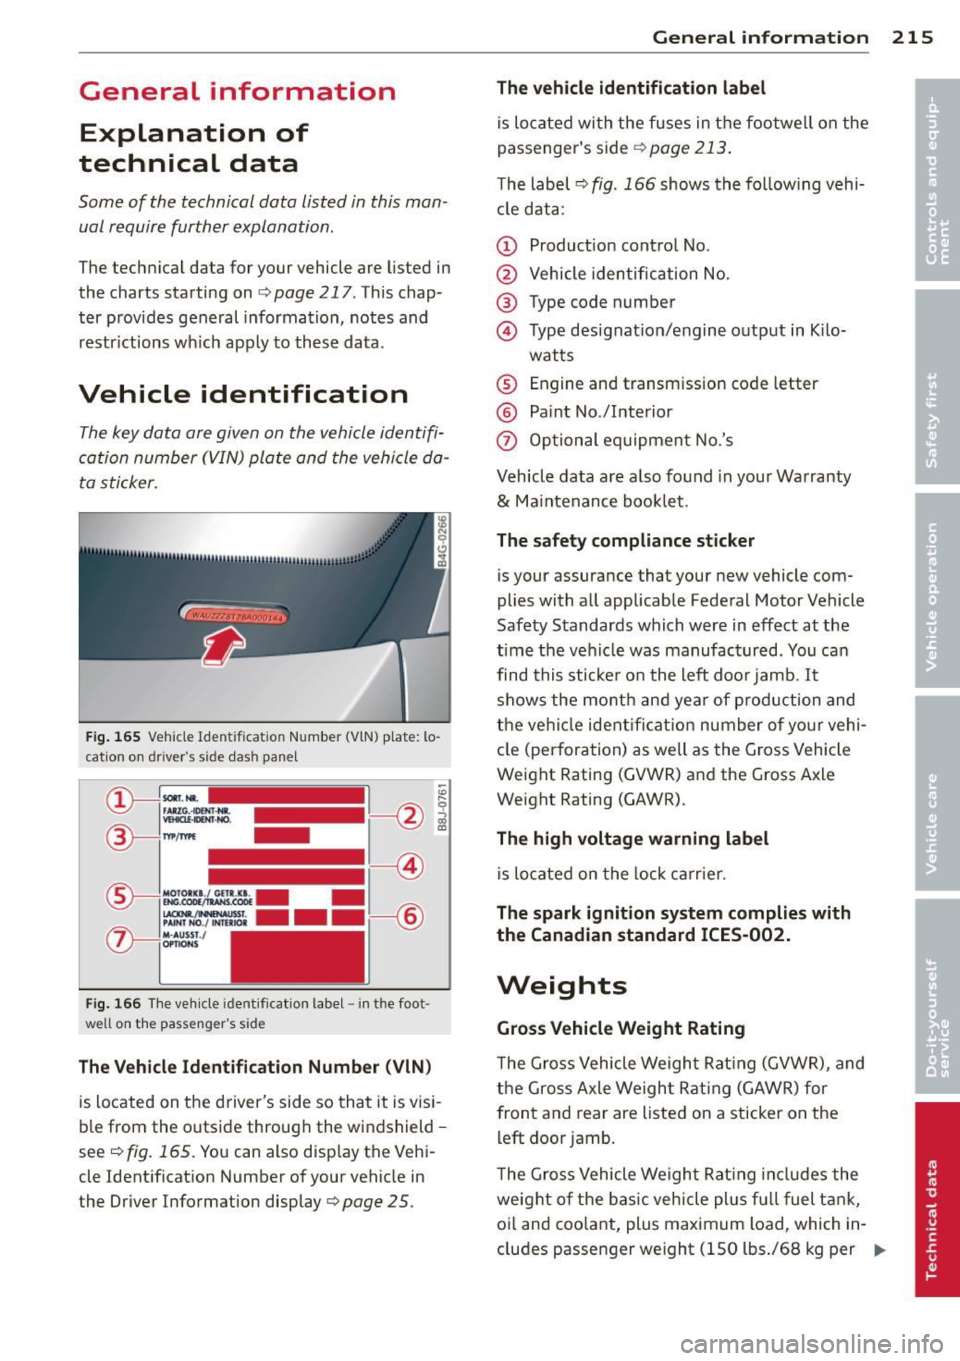
Vehicle identification
The key data are given on the vehicle identifi
cat io n number
(V IN) pla te and the vehicle da
ta sticker.
Fig. 1 65 Vehicle I dent ificat ion Num ber {VlN) p la te: lo
cation o n driver's side dash pa nel
Fi g. 16 6 The ve hicle identi fication label -in the foot
well on the passenger's side
The Vehicle Identification Number (VlN)
is located on the d river's side so tha t it is v is i
b le from the outsi de throug h the windshield -
see
c!) fig. 165. You can also disp lay the Vehi
cle Ident ificat ion Number of your vehicle in
the Driver Information display
Q page 25.
General inform ation 215
The vehicle identification label
is lo cated wi th the fuses in t he footwe ll on the
passenger 's side
Q page 213 .
The label c!) fig. 166 shows th e fo llow ing vehi
cl e data :
(D Product ion cont ro l No .
@ Vehicle identific ation No.
@ Type code number
© Type designat ion/engine o utput in K ilo-
wat ts
® Engine and transm ission code letter
® Pa int No./lnterior
0 Option al eq uipment No.'s
Vehicle data are al so fo und in your Wa rranty
& Ma intenance boo klet .
The safety compliance sticker is your assurance that your new vehicle com
plies with all applicable Fede ral Motor Vehicle
Safety Standards which were in effect at the
time the ve hicle was manufactur ed . You can
find this sticke r o n the left doo r jamb.
It
sh ows the month an d ye ar of pro duction and
t he ve hicl e ident ifi cat io n number of yo ur vehi
cle (perforation) as well as the G ross Vehicle
Weight Rating (GVW R) and the Gross Axle
Weight Rating (GAWR).
The high voltage warning label
i s lo cate d on the lock ca rrie r.
The spark ignition system complies with
the Canadian standard ICES-002.
Weights
Gross Vehicle Weight Rating
T he Gro ss Vehicle Weigh t Rat ing (GVWR), and
t he Gross Axle We igh t Rati ng (GAWR) for
fron t and rear are listed on a sticker on the
l eft door jamb .
T he Gro ss Vehicle Weigh t Rat ing incl udes the
weight of the bas ic vehicle plus f ull fuel t ank,
oi l and coo lant, plus maximum load, which in
cludes passen ger we ight (150 lbs./68 kg per .,..
Page 222 of 236
220 Consumer Inf ormation
steadi ly reduced the scope of maintenance
and repairs which can be carried out by vehicle
owners.
Als o, sa fe ty a nd en vir onm ent al con
cerns place very strict limits on the nature of
repairs and adjustments to engine and trans
miss ion parts which an owner can perform .
Maintenance, adjustments and repa irs usua lly
require special tools, testing devices and oth
er equipment available to specially trained
workshop personnel in order to assure proper pe rformance, reliab ility and safety of the vehi
cle and its many systems.
Improper maintenance, adjustments and re
pa irs can impair the operation and reliab ility
of your vehicle and even void your vehicle war
ranty. Therefore, proof of servic ing in accord
ance w ith the ma intenance schedule may be a
condition for upholding a poss ible warranty
claim made within the warranty period.
Above all, operational safety can be adversely
affected, c reating unnecessary risks for you
and your passengers.
If in doubt about any se rv icing, have it done
by your author ized Audi dealer or any other
p roperly equipped and qualified workshop.
We strong ly urge you to give yo ur autho rized
Audi dealer the opportunity to perfo rm all
schedu led maintenance and necessary repairs.
Your dea ler has the facilities, original parts
and trained specialists to keep your vehicle
running properly.
Performing limit ed m aint enance yours elf
The following pages describe a limited num
ber of proced ures which can be performed on
your vehicle with ordinary too ls, shou ld the
need arise and trained personnel be unavaila
ble. Before performing any of these proce
dures, always thoroughly read all of the app li
cable text and carefully follow the instruc
tions given . Always rigorously obse rve the
WARNINGS p rovided.
Before you ch eck anything in th e eng ine
co mpartm ent , alway s re ad and h eed all
WA RNINGS
c::> .&. and c::> ..&. in Working in the
engine compartment on page 169.
A WARNING
- Serious personal injury may occur as a re
sult of improperly performed mainte
nance, adjustments or repa irs.
- Always be extremely careful when work
ing on the vehicle. Always follow com
monly accepted safety pract ices and gen
eral common sense. Never r is k personal
injury.
- Do not attempt any of the maintenance,
checks or repairs descr ibed on the fol
lowing pages if you are not fu lly fam iliar
with these or other procedures with re
spect to the vehicle, or are uncertain how
to proceed .
- Do not do any work without the proper
too ls and equipment. Have the necessa ry
work done by your author ized A udi deal
er or another proper ly equipped and
qualified workshop.
- Always remove the ignition key before
anyone gets under the vehicle.
- Always support your veh icle with safety
stands if it is necessary to work under
neath the vehicle. The jack* is not ade
quate for this purpose and cou ld collapse
causing ser ious personal inju ry.
- If you must work underneath the vehicle
with the wheels on the ground, a lways
make sure the vehicle is on level ground,
that the wheels a re a lways secure ly
b locked and that t he engine cannot be
s tarted.
- Always make sure the transmission se
lec to r l ever is in
"N" (Neut ral) (R t ron ic)
or Neutral (manual transmission) and
the hand bra ke is f irmly app lied.
@ For the sake of the environment
- Changing the engine sett ings will ad
verse ly affect emission leve ls. Th is is det
r imental to the environment and increas
es fuel consumpt ion .
- Always observe environmenta l regu la
tions when disposing of old eng ine oil,
used brake flu id, dirty engine coo lant,
spent batteries or worn out tires.