AUDI RS7 SPORTBACK 2016 Owners Manual
Manufacturer: AUDI, Model Year: 2016, Model line: RS7 SPORTBACK, Model: AUDI RS7 SPORTBACK 2016Pages: 282, PDF Size: 70.78 MB
Page 241 of 282
Emergency assistance
Equipment
Warning triangle
Applies to: ve hicles with warning triangle
D
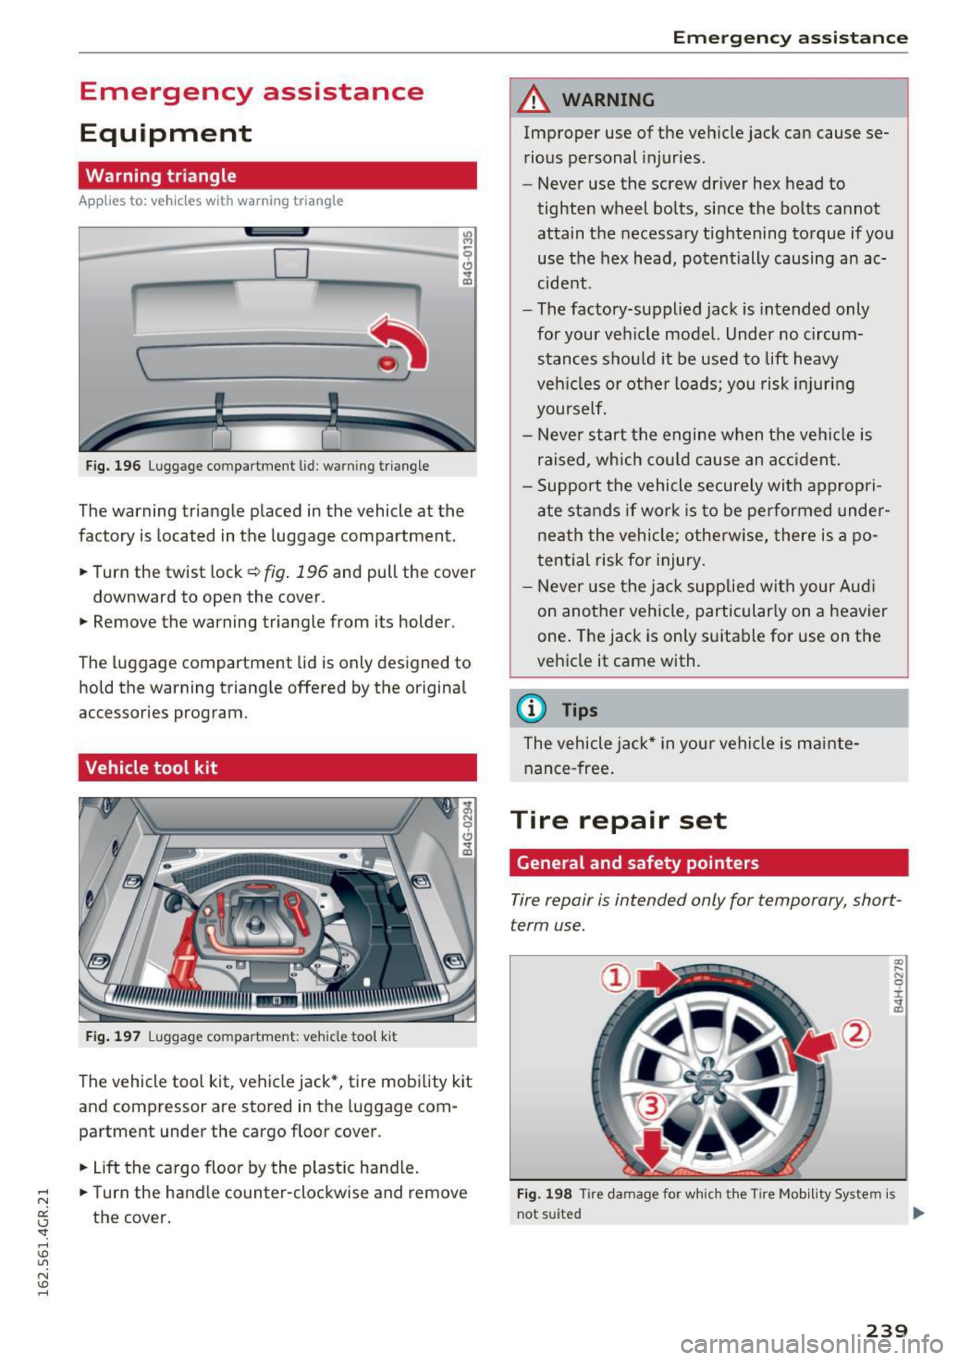
Fig. 196 Luggage co mpa rtment lid : w arnin g tria ngle
The warning triangle placed in the vehicle at the
factory is located in the luggage compartment.
• Turn the twist lock ¢
fig. 196 and pull the cover
downward to open the cover .
• Remove the warning triangle from its holder.
The luggage compartment lid is only designed to hold the warning triang le offered by the original
accessories program.
Vehicle tool kit
F ig. 197 Luggage co mpa rtment : veh icle tool kit
The vehicle tool kit , vehicle jack*, tire mobi lity kit
and compressor are stored in the luggage com
partment under the cargo floor cover .
• Lift the cargo floor by the plastic handle.
• Turn the handle counter-clockwise and remove
the cover .
Emergen cy a ssis tanc e
A WARNING
-Improper use of the veh icle jack can cause se-
rious pe rsonal injuries.
- Never use the screw driver hex head to
tighten wheel bolts, since the bolts cannot
attain the necessary tightening torque if you
use the hex head, potentially causing an ac
cident.
- The factory-supplied jack is intended only
for your veh icle model. Under no circum
stances s hou ld it be used to lift heavy
veh icles o r othe r loads; you risk in juring
yourse lf .
- Neve r start the engine when the ve hicle is
raised, which co uld cause an acciden t.
- Support the vehicle securely with appropri
ate stands if work is to be pe rformed under
neath the vehicle; otherwise, there is a po
t ential risk for injury .
- Neve r use the ja ck supplied w ith your Aud i
on anot her vehicle, particularly on a heavier
one. The jack is only s uitable for use on the
vehicle it came with.
(D Tips
The vehicle jack* in your vehicle is m ainte
nance -free .
Tire repair set
General and safety pointers
Tire repair is intended only for temporary, short
term use.
F ig. 198 Tire damage for wh ich the Tire Mob ility Sys tem is
not s uited
IIJI,
239
Page 242 of 282
Emerg enc y assis ta nc e
Your vehicle is equipped with a tire repair kit, the
Tire M obil ity Syste m (TMS ).
In the event of a tire fa il u re, the TMS is in the
luggage compartment under the floor.
It con
sists of the tire sealant and an electric air pump.
Using
TMS , tire damage caused by foreign bod ies
up to about
0 .1 6 inch (4 mm ) in diameter can be
sealed re liably.
The foreign object can stay in the tire.
The tire se a lant must not be used :
- for cuts or punctures in the tire which are larger
th an 0.16 inch (4 mm)
c> fig. 198 (i)
- for damage to the rim@
- if you have been driving with very low tire pres-
sures or tires with no air @
Using the
TMS is described i n the section
c> page 241, Preliminary steps.
TMS can be used at temperatu res down to -4 ° F
(- 20 °().
/i\, WARNING
Take the following precautions after repair ing
the tire :
- Do not drive faster than SO mph (80 km/ h)!
- Avoid full-throttle accelerat ion, heavy b rak-
i ng and fast cornering.
- The veh icle's road behavior can be affected .
- Tires sealed with
TM S are intended only for
te mpor ary , s hort-term use .
- After using the tire sealant the t ire pressure
monitoring system may no longer work
properly . Drive carefully to the next profes
sional repair fac ility.
- TMS must NOT be used,
- for cu ts or punctures in the tire wh ich are
larger than 0 .16 inch (4 mm)
- for damage to the rim
- if you have been dr iving with very low t ire
p ressures or t ires with no a ir
- Seek professional assistance if it is not pos
sible to repa ir the tire with the tire sealant.
240
A WARNING ,_
The tire sealant must not come into contact
with skin, eyes or clothing .
- lfyou get any tire sealant in your eyes or
come into contact w ith it, rinse the affected
area thoroughly with clean water . Find a
phys ician immediately!
- Change any clothing contaminated w it h tire
sealant immediately .
- Do not inhale the vapor!
- If you have swallowed tire sea lant, r inse
your mouth thoroughly right away and drink plenty of water .
- Do not induce vom it in g! Find a physician
i mmediately !
- I f you have allergic rea ctions, find a physi
cian immediate ly .
- Keep the ti re sealant away from children.
- In vehicles with a tire pressure monitoring
system, using t ire sealant can resu lts in an
incor rect d isp lay or a system malfunction.
Dr ive carefully to the nearest a utho rized
Audi dea ler o r qualified workshop .
(D Note
Do not use commercially ava ilable tire sea l
ants. The e lectrical components of the t ire
pressure monitoring system will no longer
work prope rly .
@ For the sake of the environment
Used sealant bottles ca n be dropped off at a
recycl ing facility.
(D Tips
- If sea lant has run out, allow it to dry. Then
you can pee l it off.
- Have the tire sealant rep laced every 4 years
at a dea le rship.
- Radio reception may be impaired when the
electric a ir pump* is in use .
Page 243 of 282
Preliminary steps
Some preliminary steps are necessary for tire re
pair.
• If you have a flat tire, park the vehicle as far as
poss ible from moving traffic.
• Apply the
parking brake firmly .
• Move the
selector lever to the P position .
• Check whether a repair using the Tire Mobility
System is possible ¢
page 239, General and
safety pointers.
• Have all passengers leave the vehicle and stay
away from the danger zone
~ _& .
• Take the sealant bottle and the electric air
pump from the luggage compartment under
the floor
¢page 239, fig. 197 .
• Remove the "max . SO mph" (80 km/h) sticker
from the sealant bottle and affix it to the in
strument cluster in the dr iver's view .
..&, WARNING
- Turn the hazard flashers on and set up the
warning triangle* if you have a flat tire in
moving traffic. In this way you protect your
self and other road users.
- Make sure that all passengers are in a safe
place, out of the danger zone (for example,
behind a guard rail).
(D Note
Particular care is necessary if you are making
a tire repair on a steep incline.
{i) Tips
Obey all laws .
Emergency assistance
Making a tire repair
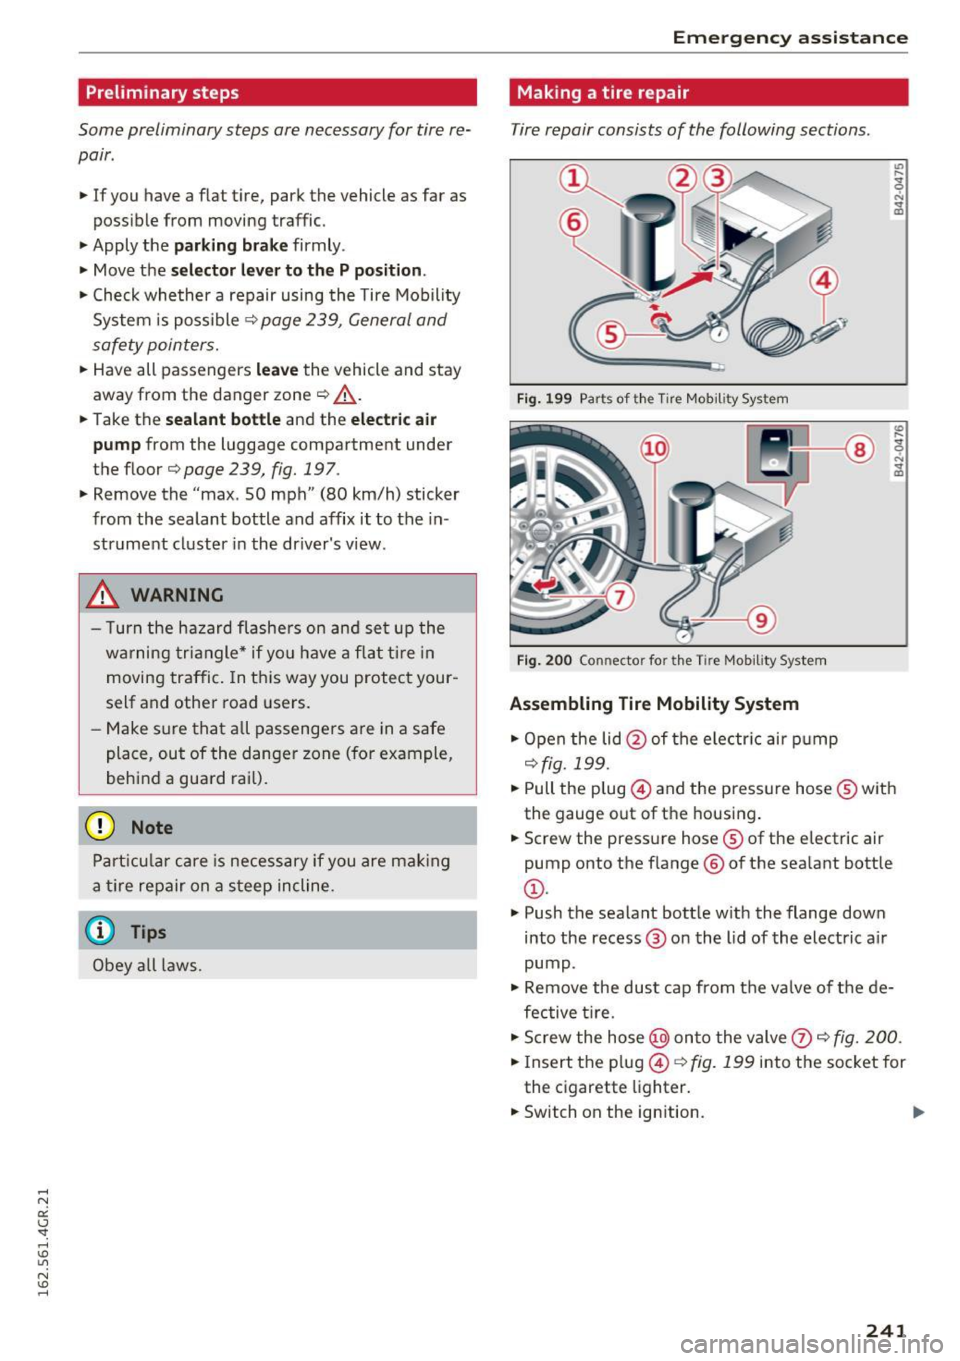
Tire repair consists of the following sections .
Fig. 199 Parts of th e Tire Mobility System
Fig. 200 Con necto r fo r t he Tire Mobi lity System
Assembling Tire Mobility System
• Open the lid@ of the electr ic air pump
¢fig. 199 .
• Pull the p lug @ and the pressure hose® with
the gauge out of the housing.
• Screw the pressure hose® of the electric air
pump onto the f lange ® of the sealant bottle
@.
• Push the sealant bottle w ith the flange down
into the recess @ on the lid of the electric a ir
pump .
• Remove the dust cap from the va lve of the de
fective ti re.
• Screw the hose@) onto the valve
(J) ~ fig. 200.
• Ins ert the plug @¢ fig. 199 into the socket for
the cigarette lighter.
• Switch on the ign ition.
241
Page 244 of 282
Emergency assistance
Inflating tire
.,. Move the switch@¢ fig. 200 on the e lectric air
pump
ll to position I. After S minutes, tire
pressure must have reached at least 1.8 bar.
.,. Switch the electric air pump off- switch in posi
tion
0. If the required tire pressure of at least
1.8 bar has not been reached, follow the in
structions in the section
Re-inflating tire.
Re-inflating tire
.,. Remove the hose from the va lve and pu ll the
plug out of the socket.
.,. Drive the vehicle slowly 33 feet (10 meters)
backward or forward . This helps to distribute
the sealant better .
.,. Remove the empty inflation bottle and screw
the hose ®~
fig. 199 from the electric pump
directly onto the
valve.
.,. Inse rt the plug ©~ fig. 199 into the socket for
the cigarette lighter.
.,. Switch on the ignition .
.,. Move the switch @¢
fig. 200 on the electric air
pump
ll to posit ion I. After S minutes, tire
pressure must have reached at least 1.8 bar.
.,. Switch the electric air pump off- switch in posi
tion
0. If the required tire pressure of at least
1.8 bar has not been reached, it is not possible
to make a repair with the tire sea lant . Seek p ro
fessional assistance.
Disassembling Tire Mobility System
.,. Remove the hose from the valve and pull the
plug out of the socket .
.,. Screw the dust cap onto the
valve.
.,. Place the empty sealant bottle back in the orig
inal packaging and clip it in place under the
floor so that no tire sealant can ru n out into the
vehicle.
.,. Place the electric air pump in the luggage com
partment for the time being.
.,. Start driving right away so that the sealant is
distributed in the tire.
l ) The electric air pu m p sho uld never r un for lo ng er than 6
m in ute s.
242
A WARNING ,_ -
- Follow the manufacturer's safety instruc
tions on the decal for the air pump and the
sealant bottle .
- If a tire pressure of 1.8 bar cannot beach
ieved after pumping for S minutes, the tire
is too severely damaged . Do not continue to
drive .
- Seek professional assistance if it is not pos
sible to repair the tire with the tire sealant .
(D Tips
-Do not operate the e lectr ic air pump for
more than 6 minutes without stopping, oth
erwise it can overheat . When the air pump
has cooled down, you can continue to use it.
- If sealant has escaped, allow it to dry, then
you can peel it off .
· Final check
After driving for a short distance , tire
pressure must be checked
.,. After driving for about 10 minutes, stop and
check the tire pressure.
.,. If tire pressure is sti ll at least 1.3 bar, inflate
the t ire to specified pressure (see drivers side
B-pillar), drive to the next repair shop and have
the tire and the sealant bottle replaced.
.,. If tire pressure is less than 1.3 bar, the tire is
too severely damaged . Do not continue to
drive . Seek profess ional assistance .
A WARNING
If tir e pressure is less than 1.3 bar after driv
in g for 10 minutes, the tire is too severely
damaged. Do not continue to drive. Seek pro
fessional assistance.
(D Tips
After a tire repair , have the sealant bottle re
placed at a dealership. This restores full func
tionality to the Tire Mobility System.
Page 245 of 282
Replacing wheels
Before changing a wheel
Observe the following precautions for your own
and your passenger's safety when changing a
wheel.
.,. After you experience a tire failure, pull the car
well away from moving traffic and try to reach
level ground before you stop¢.,&..
.. All passengers should
leave the car and move
to a safe location (for instance, beh ind the
guardrail)¢ .,&. .
.,. Engage the
parking brake to prevent your vehi
cle from rolling unintentionally¢ .,&..
.. Move
selector lever to position P ¢ .,&. .
.. Take the
jack out of the luggage compartment
c:>page 239.
A WARNING
You or your passengers could be injured while
chang ing a wheel if you do not follow these
safety precautions:
- If you have a flat tire, move a safe distance
off the road. Turn off the engine, turn the
eme rgency flashers on and use other warn
ing devices to alert other motorists.
- Make sure that passengers wait in a safe
place away from the vehicle and well away
from the road and traffic.
- To help prevent the vehicle from moving
sudden ly and possibly slipping off the jack,
always fully set the parking brake and block
the wheel diagonally opposite the wheel be
ing changed . When one front wheel is lifted
off the ground, placing the Automatic
Transmission in P (Park) will
not prevent the
vehicle from moving.
- Before you change a wheel, be sure the
ground is level and firm. If necessary, use a
sturdy board under the jack.
- Always store the veh icle tool k it, the jack
and the replaced tire in the luggage com
partment
c> page 124.
(D Note
If you are changing the whee l on a steep in
cline, use a rock or similar object to b lock the
Emergency assistance
opposite wheel to prevent the vehicle from
moving.
(D Tips
- Before changing the wheel, you must acti
vate the jacking mode, so that the automat
ic controls for the Adaptive Air Suspension*
do not make it more difficu lt to lift the vehi
cle with the jack
c> page 245.
- Obey all laws .
Changing a wheel
When you change a wheel, follow the sequence
described below step-by-step and in exactly thot
order .
1. Activate the vehicle jack mode* c> page 245.
2. Remove the
wheel bolt caps*. For more de
tails see also
¢ page 244, Wheels with
wheel bolt caps.
3. Loosen the wheel bolts c:> page 244.
4. Locate the proper mounting point for the
jack and align the jack below that point
~page 245.
5. Raise the car with the jack c:> page 245.
6. Remove the
wheel with the flat tire and then
install the other whee l¢
page 246.
7. Tighten all whee l bolts lightly.
8.
Lower the vehicle with the jack.
9. Use the wheel bolt wrench and
firmly tighten
all wheel bolts
c> page 244.
10. Replace the
wheel bolt caps*.
11. Deact ivate the vehicle jack mode* in the
MMI:
I CARI funct ion button> (C ar )* systems
contro l butto n > Servicing & checks > Air
susp.: jack mode >
Off.
The vehicle jack mode* switches off automat ical
ly at speeds above 6 mph (10 km/h) .
A WARNING
-
Always read and follow all WARNINGS and in-
formation
¢ .&. in Raising the vehicle on
page
245 and ¢ page 247.
243
Page 246 of 282
Emerg ency assis ta nce
After changing a wheel
A wheel change is not complete without the do
ing the following.
• Always store the vehicle tool kit, the jack* and
the replaced tire in the luggage compartment
<=>page 124.
• As soon as possible, have the tightenin g tor
qu es
on all whee l bolts checked with a torque
wrench. The correct tightening torque is 90 ft lb (120 Nm).
• Have the flat tire
replac ed as soon as possible.
(D Tips
- If yo u notice that the whee l bolts are cor
roded and difficu lt to turn wh ile changing a
tire, they should be replaced before you
check the tightening torque.
- Drive at reduced speed until you have the
tightening torques checked .
- After changing a w heel, the tire pressure in
a ll four tires must be checked/corrected and
the tire pressure monitoring indicator must be stored in the MMI
c> page 23 7.
Wheels with wheel bolt caps
A ppl ies to: ve hicles w ith whee l bolts w it h ea ps
The caps must be removed first from the wheel
bolts before the bolts can be unscrewed .
Fig. 201 Chang ing a wheel : removing the whee l bo lt caps
Removing
• Push the
pla stic clip (provided with the veh icle
tool kit) over the wheel bolt cap unt il the inner
retainers on the clip align wit h the edge of the
cover.
244
• Remove the cap with t he pla stic clip (vehicle
tool kit)
c> fig. 201.
Refitt ing
• Place t he caps over the wheel bolts and push
them back on.
The caps are to protect and keep the wheel bo lts
clean.
Loosening and tightening the wheel bolts
The wheel bolts must be loosened before raising
the vehicle .
Fig. 202 Chang ing a whee l: loosening the wheel bolts
Lo ose ning
• Slide the
w hee l w ren ch onto the wheel bo lt as
far as it will go.
• Take tight hold of the
end of the wrench hand le
and turn the wheel bolts
count er-clo ckwis e
about one single turn in the direction of arrow
¢fig. 202.
Tightening
• Slide the wheel wrench onto the wheel bo lt as
far as it will go.
• Take tight hold of the
end of the wrench handle
and turn each wheel bolt
clockwis e until it is
seated .
_&. WARNING
- Do not use force or hurry when changing a
wheel -you can cause the veh icle to slip off
the jack and cause serious persona l injuries.
- Do not loosen the wheel bo lts more than
one turn
before you raise the veh icle w ith
the jack. -You r is k an injury.
Page 247 of 282

@ Tips
-Never use the hexagonal socket in the han
dle of the screwdriver to loosen or tighten
the wheel bo lts .
- If a whee l bolt is very tight, you may find it
easier to loosen by carefully pushing down
on the end of the wheel bolt wrench with
one foot only . As you do so, hold on to the
car to keep your balance and take care not
to s lip.
Raising the vehicle
The vehicle must be li~ed with the jack first be
fore the wheel can be removed .
Fig. 203 S ill pane ls: markin gs
a,
"' ~ 9
---~,.----~ a,
Fig . 204 S ill : posit io ning th e vehi cle ja ck
.. Activate the vehicle jack mode* in the MMI:
I CAR ! function button > (C ar)* sys tems contro l
button
> Serv icing & checks> Air s usp. : jac k
mod e> On.
.. Engage the par king br ake to preven t your vehi
cle from roll ing unintentionally .
.. Move the
selector lever t o position P .
.... N .,. Find the cover on the si ll that is nearest the a::
~ wheel that will be changed¢ fig. 203. Under
~ the cover, there is a liftin g point on the sill for U"I
~ the vehicle jack .
......
Em ergen cy a ssis tanc e
.. Remove the cover from the sill before lift ing
the vehicle with a vehicle jack¢
page 246 .
.. Turn the vehicle ja ck located under the lifting
point on the sill to raise the jack unt il its arm ®
¢
fig. 204 is located under the designated plas
tic mount ¢
.&,¢(D .
.. Alig n the jack so that its arm@¢ fig. 204 en
gages in the designated lifting point in the door
sill and the movable base @ lies flat o n the
gro und . The base @ must be
vertical unde r the
lifting point @ .
.. Wind the jack up further until the f lat tire
comes off the ground¢_&. .
Pos ition the vehicle jack
only under the des igna t
ed lift ing points on the sill
¢ fig. 203. There is ex
actly
one l ocation for each whee l. The jack must
not be posit ioned at any other location¢ & ¢0 .
An
un stable surfa ce under the jack can cause the
vehicle to slip off the jack . Always provide a f irm
base for the jack on the ground. If necessary
place a sturdy board o r similar support under the
jack. On
ha rd, slipper y surfa ce s (such as tiles)
use a rubbe r mat or similar to prevent the jack
from slipping ¢& .
A WARNING
-You o r your passengers could be inj ured
while changing a wheel if you do not fo llow
these safety precautions :
- Position the vehicle jack only at the des ig
nated lift ing po ints and align the jack.
Otherwise, the vehicle jack could slip and
cause an injury if it does not have suffi
c ient hold on the vehicle .
- A soft or unstable surface under the jack
may cause the veh icle to slip off the jack .
Always provide a firm base for the jack on
the g round . If necessary, use a sturdy
boa rd unde r the jack.
- On hard, slippery surface (s uch as t iles)
u se a rubber mat or sim ilar to prevent the
ja ck from s lipping.
- To help prevent injury to yourse lf and your
passengers:
- Do not raise the vehicle until you are sure
the jack is securely engaged.
245
Page 248 of 282

Emergency assistance
-Passengers must not remain in the vehicle
when it is jacked up.
- Make sure that passengers wait in a safe
place away from the vehicle and well away
from the road and traffic.
- Make sure jack posit ion is correct, adjust
as necessary and then continue to raise
the jack.
- Changes in temperature or load can affect
the height of the vehicle.
(D Note
Do not lift the vehicle by the sill. Position the
vehicle jack only at the designated lifting
points on the sill. Otherwise, your vehicle will
be damaged.
@ Tips
The vehicle jack mode* switches off automati
cally at speeds
above 6 mph (10 km/h).
Removing and installing the sill extension
cover
Applies to: vehicles w ith sil l extension
Fig. 205 Sill: removing the cover
.,. Pull the cover down to remove it. c:> fig. 205
.,. To install the cover, insert i t in the mount and
press it upward until it clicks into place. The
cover must be flush with the surface of the sill
extension .
1
> A pp lies to vehicles wit h c eramic brake ro tor s*: Use a sec
on d alig nment pin* (sto re d in th e spare w hee l w ell mold
in g) fo r the lower hole, foll ow in g t he descrip tion for the
firs t alig nm ent pin.
246
@ Tips
Some models may also have a cover for the
rear vehicle lift point.
Taking the wheel off/installing a wheel
Follow these instructions step -by-step for chang
ing the wheel.
Fig. 206 Changing a wheel : using the sc rewdr iver han d le
(wi th t he blade re m oved) to turn the bol ts
Fig. 207 Changing a wh eel: alignment pin in side the t op
ho le
After you have loosened all wheel bolts and
raised the vehicle off the ground,
remove and re
place the wheel as follows:
Removing the wheel
.,. Use the hexagonal socket in the screwdriver
handle
to completely remove the topmost
wheel bolt and set it aside on a
clean surface
c::> fig. 206.
.,. Sc rew the threaded end of the alignment pin
from the tool kit hand-t ight into the empty bolt
hole
¢ fig . 2011>. .,.
Page 249 of 282
~ Then remove the other wheel bolts as described above.
~ Takeoff the wheel leaving the a lignment pin in
the bolt ho le ¢ (D.
Putting on th e oth er w heel
~ Lift the whee l and carefully slide it over the
alignment pin to guide it in place ¢(D.
~ Use the hexagonal socket in the screwdriver
handle to screw in and tighten all whee l bolts
sligh tly.
~ Remove the alignment pin and insert and tight
en the remaining wheel bolt slightly like the
rest .
~ Turn the jack handle counter-clockwise to lower
the vehicle until the jack is fu lly re leased.
~ Use the wheel bolt wrench to tighten all wheel
bolts firmly ¢
page 244 . Tighten them cross
wise,
from one bolt to the (approximately) op
posite one, to keep the whee l centered .
When removing or installing the whee l, the
rim could hit the brake rotor/ceramic brake
rotor* and damage the rotor. Work carefully
and have a second person help you.
(D Tips
Never use the hexagonal socket in the handle
of the screwdriver to loosen or tighten the
wheel bo lts.
- Pu ll the reversible blade from the screwdriv
er before you use the hexagonal socket in
the handle to turn the wheel bo lts.
- When mounting tires w ith
u nidirectio nal
tre ad design
make sure the tread pattern is
po inted the r ight way ¢
page 247.
-The wheel bolts should be clean and easy to
turn . Check for d irt and corrosion on the
mating surfaces of both the wheel and the
hub . Remove all dirt from these surfaces be
fo re remo unt ing the wheel.
Em ergenc y ass is tanc e
Tires with unidirectional tread design
Tires with unidirectional tread design must be
mounted with their tread pattern pointed in the
right direction .
Using a repl acement t ire w ith a tread pattern
intend ed for use in a sp ecific direction
When using a rep lacement tire with a tread pat
tern intended for use in a spec ific d irection ,
please note the follow ing:
- The direction of rotation is marked by an arrow
on the side of the tire .
- If the replacement tire has to be installed in
the incorrect direction, use the replacement tire only temporarily s ince the t ire w ill not be
ab le to achieve its optimum perfo rmance char
acter istics with rega rd to aquap lan ing, no ise
and wear.
- We recommend that you pay pa rt icu lar atten
tion to th is fact d uring wet weather and that
you adjust your speed to match road cond i
tions .
- Rep lace the flat tire w ith a new one and have it
installed on your veh icle as soon as possib le to
restore the hand ling advantages of a unidirec
tional tire.
Notes on wheel changing
Please read the information ¢ page 225, New
tires or wheels
if you a re go ing to u se a replace
ment t ire wh ich is different from the t ires on
you r vehicle .
After you change a tire:
- Check the tire pre ssure on the r epl acement
tire immed iatel y afte r in st a llat ion .
- Have th e whe el bolt tight ening torqu e
c hecked with a torque w rench as s oon as pos
s ible b y your authorized Audi de aler o r a
qualified ser vice st ation.
- With steel and allo y wheel rim s, the wheel
bolt s are co rr ectl y ti ghtened at a torque of 90
ft lb
( 1 20 Nm) .
-If you notice that the wheel bolts are corroded
and diffi cult to turn while changing a ti re ,
the y should be r eplaced before you chec k the
tightening torque. ..,.
247
Page 250 of 282
Emerg enc y assis ta nc e
-Repl ace th e flat tire with a ne w one and have
it in st a lled on you r vehicl e as s oon as poss i
ble . R emount the wheel co ve r.
Until th en, driv e with extr a care and at r educe d
s peeds .
A WARNING
-If you are going to equip your vehicle w ith
t ires or rims which differ from those which
were factory installed, then be sure to read
the informat ion¢
page 225, New tires or
wheels.
- Always make sure the damaged wheel or
even a flat tire and the jack and tool kit are
properly secured in the luggage compart
ment and are not loose in the passenger
compartment.
- In an accident or sudden ma neuver they
could fly forward, injuring anyone in the ve
hicle.
- Always store damaged wheel, jack and too ls
sec urely in the luggage compartment. Oth
erwise, in an accident or s udden maneuver
they could fly forward, causing injury to pas
sengers in the vehicle.
(D Note
Do not use commercia lly available t ire seal
ants . Otherwise , the electrical components of
the t ire pressure monito ring sys tem wi ll no
longer work properly and the sensor for the
tire press ure monitoring system will have to
be replaced by qualified workshop .
248
-