AUDI S3 2009 Owners Manual
Manufacturer: AUDI, Model Year: 2009, Model line: S3, Model: AUDI S3 2009Pages: 324, PDF Size: 76.02 MB
Page 271 of 324
__________________________________________ T_i_re _ p =----r_e _s _ s_ u_ r_e _ m_ o_n_ i_ t _o _r_ i_n -=g =-- s....: y:.... s_ te_ m_ * __ lfll
• Vehicle care I t •
Page 272 of 324
1111...__W_ h_ a _ t_d_ o_ l _d _o_ n_ o_ vv_ ? ______________________________________________ _
What do I do now?
Jack, tools and spare wheel
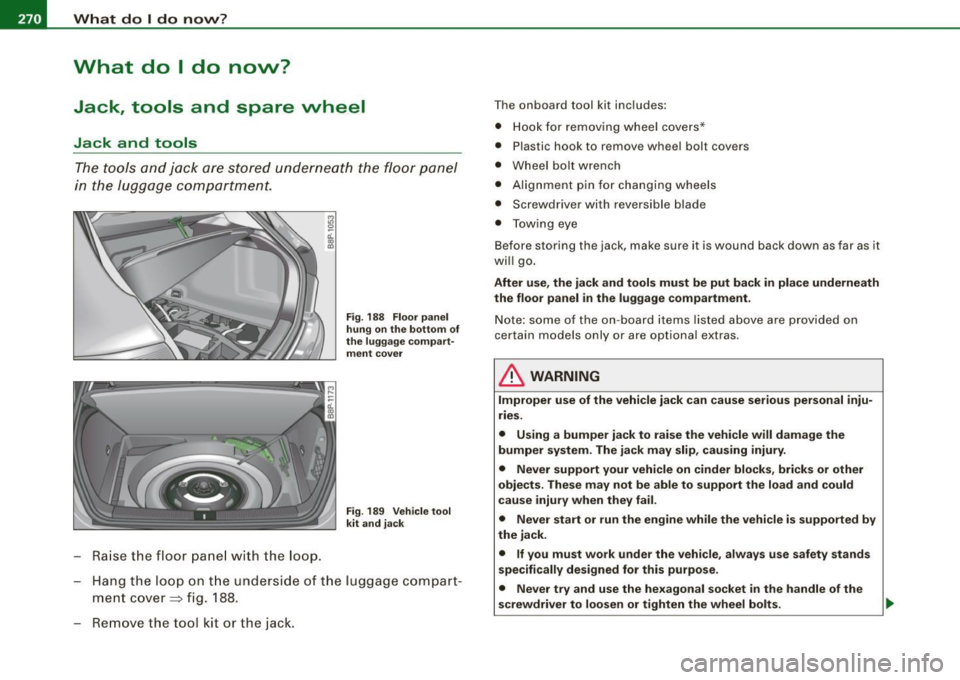
Jack and tools
The tools and jack are stored underneath the floor panel
in the luggage compartment.
Raise the floor panel with the loop.
Fig. 188 Floor panel
hung on the bottom of
the luggage compart
ment cover
Fig . 189 Vehicle tool
kit and jack
- Hang the loop on the underside of the luggage compart
ment cover ~ fig. 188.
Remove the tool kit or the jack.
The onboard tool kit includes:
• Hook for removing wheel covers*
• Plasti c hook to remove wheel bolt covers
• Wheel bolt wrench
• Alignment pin for changing wheels
• Screwdriver with reversible blade
• Towing eye
Before storing the jack, make sure it is wound back down as far as it
will go.
After use, the jack and tools must be put back in place underneath
the floor panel in the luggage compartment.
Note: some of the on-board items listed above are provided on
certain models only or are optional extras.
& WARNING
Improper use of the vehicle jack can cause serious personal inju
ries.
• Using a bumper jack to raise the vehicle will damage the
bumper system. The jack may slip, causing injury.
• Never support your vehicle on cinder blocks, bricks or other
objects. These may not be able to support the load and could
cause injury when they fail.
• Never start or run the engine while the vehicle is supported by
the jack.
• If you must work under the vehicle, always use safety stands
specifically designed for this purpose.
• Never try and use the hexagonal socket
in the handle of the
screwdriver to loosen or tighten the wheel bolts.
Page 273 of 324
What do I do now? -
------------------
& WARNING !continued)
• Always make sure the spare tire and even a flat tire are secured
in place and not loose, otherwise they could fly forward, causing
personal injury to passengers in the vehicle in an accident or
sudden maneuver .
• Never use the jack supplied with your Audi on another vehicle,
particularly on a heavier one. The jack is only suitable for use on
the vehicle it came with. •
Ap plies to vehicles: w ith compact spare wheel
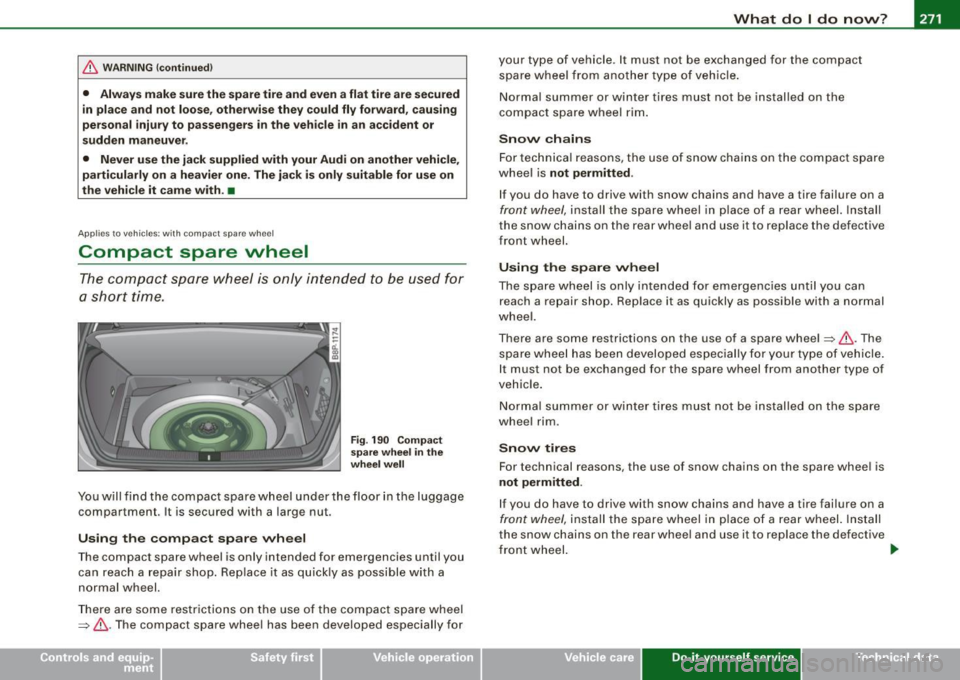
Compact spare wheel
The compact spare wheel is only intended to be used for
a short Nme.
Fig . 190 Compact
spare wheel in the
wheel well
You will find the compact spare wheel under the floor in the luggage
compartment. It is secured with a large nut.
Using the compact spare wheel
The compact spare wheel is only intended for emergencies until you
can reach a repair shop. Replace it as quickly as possible with a
normal wheel.
There are some restrictions on the use of the compact spare wheel
=>
& -The compact spare wheel has been developed especially for your type of vehicle
. It must not be exchanged for the compact
spare wheel from another type of vehicle.
Normal summer or winter tires must not be installed on the
compact spare wheel rim.
Snow chains
For technical reasons, the use of snow chains on the compact spare
wheel is
not permitted .
If you do have to drive with snow chains and have a tire failure on a
front wheel, install the spare wheel in place of a rear wheel. Install
the snow chains on the rear wheel and use it to replace the defective
front wheel.
Using the spare wheel
The spare wheel is only intended for emergencies until you can
reach a repair shop. Replace it as quickly as possible with a normal
wheel.
There are some restrictions on the use of a spare wheel =>& .The
spare wheel has been developed especially for your type of vehicle.
I t must not be exchanged for the spare wheel from another type of
vehicle.
Normal summer or winter tires must not be installed on the spare
wheel rim .
Snow tires
For technical reasons , the use of snow chains on the spare wheel is
not permitted .
If you do have to drive with snow chains and have a tire failure on a
front wheel, install the spare wheel in place of a rear wheel. Install
the snow chains on the rear wheel and use it to replace the defective
front wheel.
t,.
Vehicle care Do-it-yourself service irechnical data
Page 274 of 324
-L___:W:..:..:. h.:.: a::.. t:...:: d:.:o:::....:. l..: d::. O ::::....: n:..:.:: O:..:W :.:..:. ? ____________________________________________ _
& WARNING
Always store jacking equipment, spare wheel in the luggage
compartment. Tighten screw for the spare wheel securely. Under
no circumstances should you store the spare wheel or jack and
tools unsecured in the passenger compartment. This could cause
serious personal injury to passengers in the vehicle in case of a
collision.
• The compact spare tire is for temporary use only and is so
marked on the sidewalls.
• Do not drive at speeds exceeding 50 mph (80 km/hi with the
compact spare wheel mounted. Also rapid acceleration, hard
braking and hard cornering must be avoided to help prevent loss
of vehicle control.
• Any continuous road use of the compact spare tire may result
in tire failure, loss of vehicle control and injury to vehicle occu
pants.
• Do not put a snow chain on your compact spare tire. Due to the
smaller tire size, the chain will not fit properly and can thus
damage your vehicle. You could also lose the chain, as well as
control of the vehicle .
• If you have a flat front tire in road conditions which require
snow chains, first remove the undamaged rear wheel and mount
the compact spare wheel in its place. Then remove the damaged
front wheel, take the snow chains off it and attach them to the
wheel taken from the rear. This wheel can now be mounted on the
front with its snow chains. Check and adjust tire pressure promptly.
• Never use two or more compact spare tires at the same time.
0 Note
When using the compact spare wheel, note the following: •
After installing the compact spare wheel, the tire inflation pres
sure should be checked and, if necessary, increased to 60 psi (4 .2
barl.
• The load carrying capacity is marked on the tire sidewal ls and
must not be exceeded .
• After installing the compact spare wheel, make sure that you
remount the flat tire in its storage area properly .
• The compact spare tire should be properly remounted in its
storage area as soon as the standard road tire can be replaced.
• Because the compact spare tire was specifically designed for
your vehicle, it must not be used on any other vehicle . Likewise,
compact spare wheels from other vehic les must not be used on your
vehicle.
• The compact spare tire must not be mounted on any other
wheels, nor must standard tires, snow tires, wheel covers or trim
rings be used with the compact spare wheel. If such use is
attempted, damage to these items or other vehicle components
may occur.
[ i] Tips
Check the inflation pressure of the compact spare tire (60 psi/4 .2
bar) periodically to keep the tire ready for use .•
Wheel change
Before changing a wheel
Observe the following precautions for your own and your
passenger's safety when changing a wheel.
- After you experience a tire failure, pull the car well away
from moving traffic and try to reach level ground before
you stop
~ & . ~
Page 275 of 324
What do I do now? -__________________ __;__:....:....:..:: __ _
•
-All passengers should leave the car and move to a safe
location (for instance, behind the guardrail)~& .
- Apply the
parking brake firmly ~& .
- Move
selector lever to position Pon an automatic trans-
miss ion; put manual transmission in
first gear ~& .
-If you are towing a trailer : unhitch the trailer from your
vehicle.
- Take the
tool and the spare tire~ page 270 out of the
luggage compartment.
& WARNING
You or your passengers could be injured while changing a wheel if
you do not follow these safety precautions:
• If you have a flat tire, move a safe distance off the road. Turn off
the engine, turn the emergency flasher on and use other warning
devices to alert other motorists.
• Make sure that passengers wait
in a safe place away from the
vehicle and well away from the roadway and traffic.
• To help prevent the vehicle from moving suddenly and possibly
slipping off the jack, always fully set the parking brake and block
the wheel diagonally opposite the wheel being changed. When one
front wheel is lifted off the ground, placing the automatic trans
mission in "P" (Park), or engaging a gear in a manual transmission
will
not prevent the vehicle from moving.
• Before you change a wheel, be sure the ground is level and firm.
If necessary, use a sturdy board under the jack.
• After installing the spare wheel, make sure that you remount
the flat tire/wheel in its storage area properly and tighten the
knurled retaining screw securely. •
Changing a wheel
When you change a wheel, follow the sequence described
below step-by-step and exactly in that order.
1. Remove the decorative wheel cover*. For more details
see also
~ page 274, "Decorative wheel covers" or
~ page 275, "Wheels with cap-covered wheel bolts".
2. Loosen the
wheel bolts ~ page 276.
3. Locate the proper mounting point for the jack and align the jack below that point~
page 276.
4. Lift the car with the jack~ page 276.
5. Take the flat wheel off and then put the spare on
~ page 278.
6. Tighten all wheel bolts lightly .
7.
Lower the vehicle with the jack .
8. Use the wheel bolt wrench and
firmly tighten all wheel
bolts
~ page 276.
9. Put the decorative wheel cover* back on.
& WARNING
Always read and head all WARNINGS and information ::} & in
"Raising the vehicle" on
page 276 and ~ page 279. •
After changing a wheel
A wheel change is not complete without the following
actions.
- Store and secure the replaced wheel in the spare wheel
well. .,._
Do-it-yourself service
Page 276 of 324
llffl.___W_ h_ a_t _d_ o_ l _d _o_ n_ o_ vv_ ? ______________________________________________ _
- Put the tool case and the jack back in p lace in the luggage
compartment.
- Check the tire pre ssure on the spare whee l immediately
after mounting it.
- As soon as possible, have the tightening torque s on all
wheel bo lts checked with a torque wrench . The correct
tightening torque is 90 ft lb (120 Nm) .
- Have the flat tire replaced as soon as possible.
[ i ] Tip s
• If you notice while changing a tire that the wheel bolts are
corroded and difficult to turn, then they should be replaced before
you check the tightening torque .
• Drive at reduced speed until you have the tightening to rques
checked .a
Ap plies to ve hicles: w it h full whee l co vers
Full wheel covers
The wheel covers must be removed to access the wheel
bolts.
Remo va l
- Pull the full wheel cov er off manually.
Inst alla tion
- First press the full wheel cove r onto the rim at the cut -out
prov ided for the valve. Then engage the outer edge of the
f ull whe el cover in the steel rim. •
Applies to vehi cles : w it h deco ra tiv e wh eel co vers
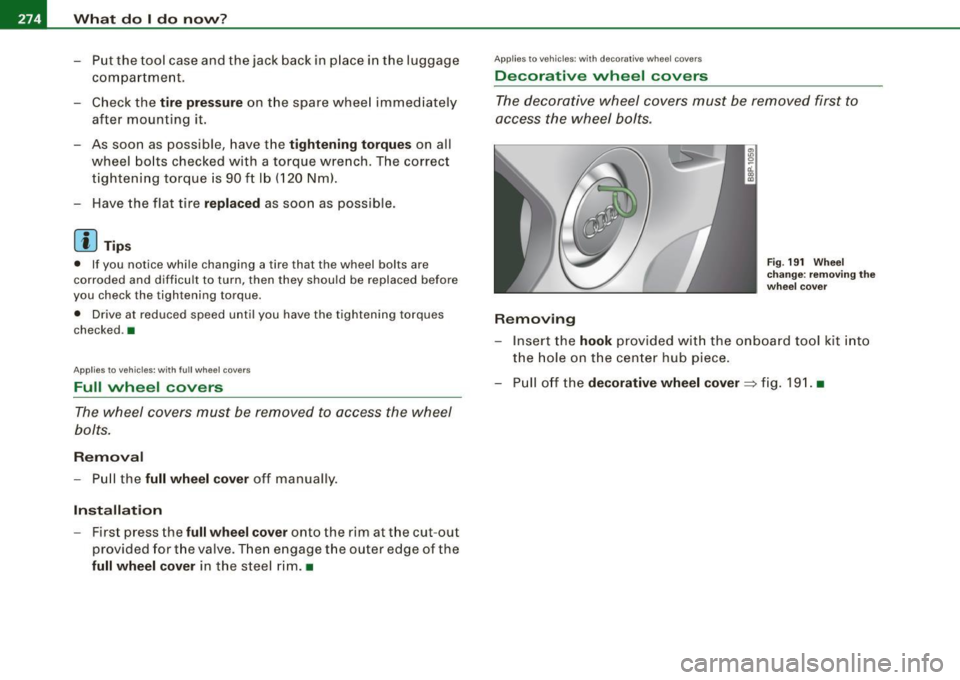
Decorative wheel covers
The decorative wheel covers must be removed first to
access the wheel bolts .
Removing
Fig. 19 1 Whee l
ch ange : remov in g th e
w hee l cover
- Inse rt the hook provid ed with the onboard tool kit into
t h e hole on the cen ter hub piece .
- P ull off the decorative wheel cover => fig . 19 1. •
Page 277 of 324
What do I do now ? -
------------------
Applies to vehicle s: with cap-covered wheel bolts
Wheels with cap-covered wheel bolts
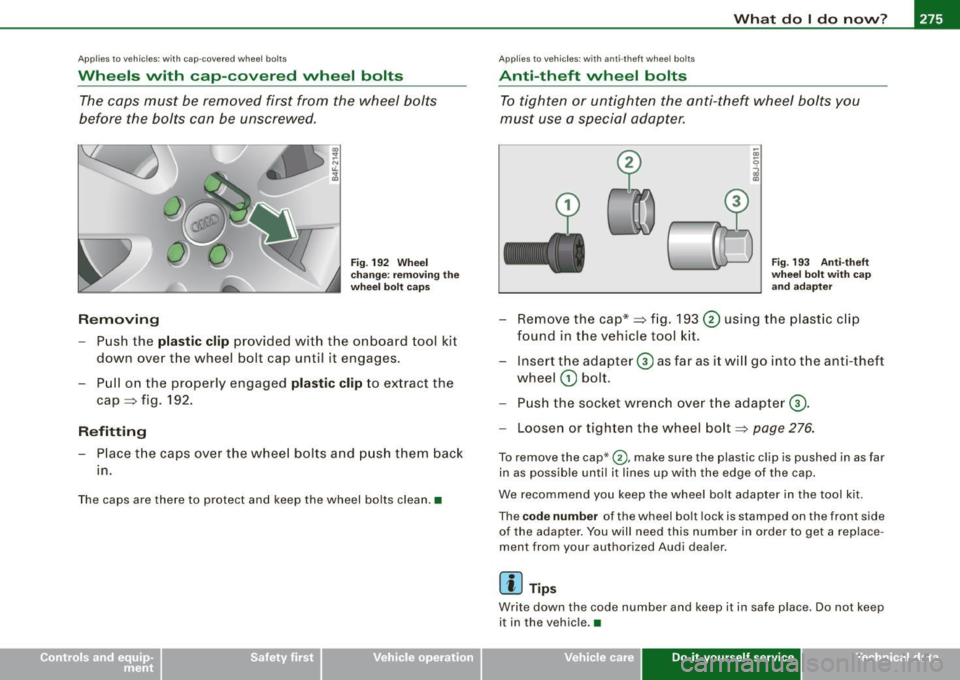
The caps must be removed first from the wheel bolts
before the bolts can be unscrewed.
Removin g
Fig. 19 2 W hee l
c h ange : remov in g th e
whee l bolt ca ps
- Push the plastic clip provided with the onboard tool kit
down over the wheel bolt cap unti l it engages.
- Pull on the properly engaged plastic clip to extract the
cap
~ fig . 192.
R efitting
- Place the caps over the whee l bo lts and p ush them back
1n.
The caps are there to protect and keep the wheel bo lts clean .•
Ap plies to vehicles: with anti-theft wheel bo lts
Anti-theft whee l bolts
To tighten or untighten the anti-theft wheel bolts you
must use a special adapter.
....
(
V"
..
Fi g. 193 Anti-t heft
whee l bolt wit h ca p
a n d ada pter
- Remove the cap*~ fig. 193 0 using the plastic clip
found in the vehicle tool kit.
- Insert the adapter
0 as far as i t wi ll go into the anti-theft
wheel
G) bolt.
- Push the socket wre nch over t he adap ter
0 -
- Loosen or tighten the wheel bolt~ page 276.
To remove the cap* 0, make sure the plastic clip is pushed in as far
in as possib le until it lines up wi th the edge of the cap .
We recommend you keep the wheel bo lt adapter in the tool kit.
The
c od e numb er of the wheel bolt lock is stamped on the front side
of the adap ter. You will need this number in orde r to get a replace
ment from your author ized Audi dealer.
[ i ] Tip s
Write down the code number and keep it in safe place . Do not keep
it in the vehicle. •
Vehicle care Do-it-yourself service Technical data
Page 278 of 324
llffl.,___W_ h_ a _ t_d_ o_ l _d _o_ n_ o_ vv_ ? ______________________________________________ _
Loosening and tightening the wheel bolts
The wheel bolts must be loosened before raising the
vehicle.
~ a'.. ., m
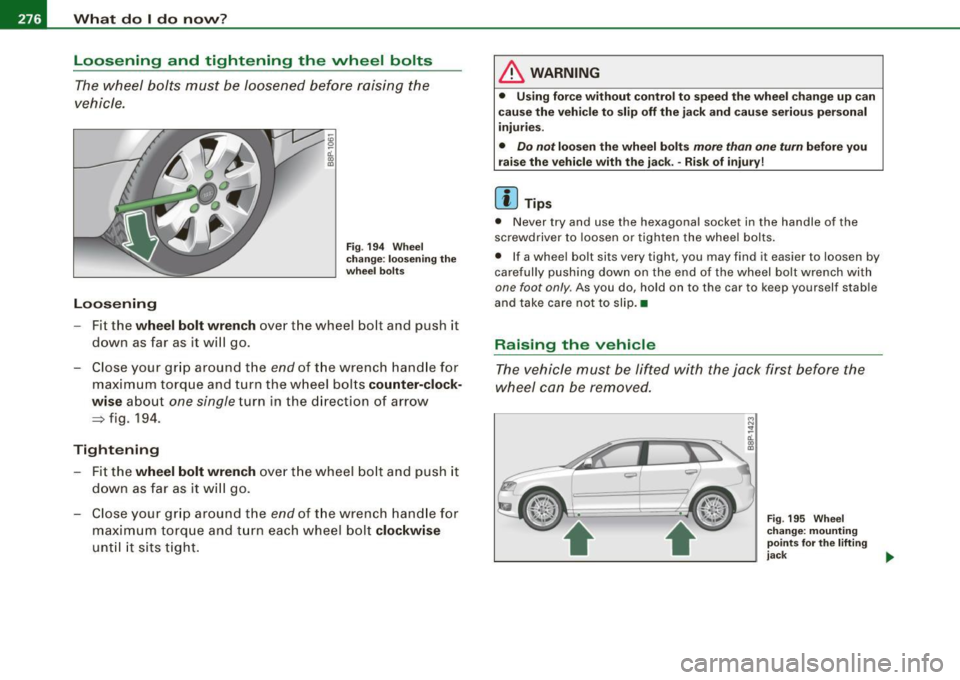
Loosening
Fig . 194 Wheel
change: loosening the
wheel bolts
-Fit the wheel bolt wrench over the wheel bolt and push it
down as far as it will go .
- Close your grip around the
end of the wrench handle for
maximum torque and turn the wheel bolts
counter-clock
wise
about one single turn in the direction of arrow
~ fig. 194.
Tightening
- Fit the wheel bolt wrench over the wheel bolt and push it
down as far as it will go.
- Close your grip around the
end of the wrench handle for
maximum torque and turn each wheel bolt
clockwise
until it sits tight.
& WARNING
• Using force without control to speed the wheel change up can
cause the vehicle to slip off the jack and cause serious personal
injuries.
• Do not loosen the wheel bolts more than one turn before you
raise the vehicle with the jack. -Risk of injury!
[ i ] Tips
• Never try and use the hexagonal socket in the handle of the
screwdriver to loosen or tighten the wheel bolts.
• If a wheel bolt sits very tight, you may find it easier to loosen by
carefully pushing down on the end of the wheel bolt wrench with
one foot only . As you do, hold on to the car to keep yourself stable
and take care not to slip. •
Raising the vehicle
The vehicle must be lifted with the jack first before the
wheel can be removed.
Fig . 195 Wheel
change: mounting
points
for the lifting
jack ..
Page 279 of 324
_____________________________________________ W_ h_ a_t _d_ o_l _ d_o _ n_o_ w_ ? _ __._
Fig. 196 Close- up:
prope r po sit io ning of
lifting ja c k
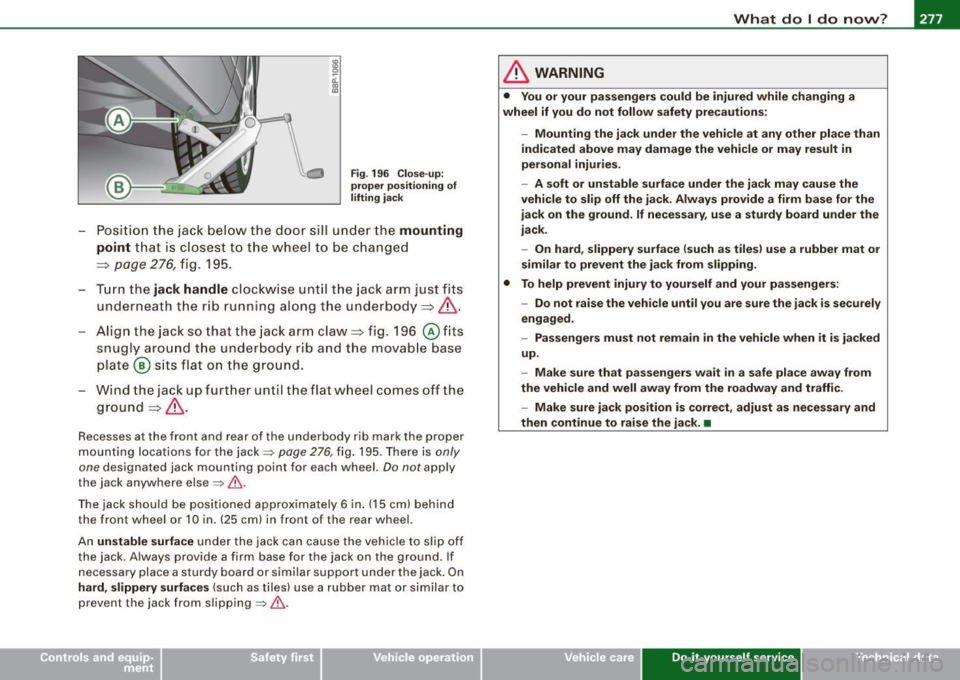
- Posi tion the jack bel ow the doo r sill u nder t he mounting
point
t ha t is clos est to the w hee l to be ch an ged
==> page 2 76, fi g. 19 5.
- Tur n the
jack handle cl ockwise un til the ja ck arm jus t fit s
un derne ath th e r ib runni ng a lo ng the und erbo dy ==:> & .
- Align t he jack so tha t the ja ck a rm claw ==:> fig. 196
© fits
snugl y aro un d t he un derb od y r ib an d t he mov ab le base
p lat e@ sit s fla t on t he grou nd.
- Win d the jac k up furt her until t he flat wheel comes off the
groun d==:> & .
Recesses a t the front and rear of the underbody rib mark the proper
m ounti ng lo ca tions for the jack=>
page 276, fig . 195. There i s only
one
designated jac k mounting po int for each wheel. Do not app ly
the jack anywhe re e lse
=> & .
The jac k sh o uld be pos it ioned appro ximat ely 6 in. (15 cm) b ehind
the front wheel or 10 in. (25 cm) in front o f the rear whee l.
An unstable surface und er the jack can cause the veh icle to s li p o ff
the jack. A lways provide a firm base for the jack on the ground . If
n ece ssary place a s turd y b oa rd or sim ila r su p po rt und er the jack . On
hard , slippery surfaces (such as t ile s) use a rubber mat or s imilar to
pr even t the jack fr om slip ping =>& .
& WARNING
• You or your passengers could be injured wh ile changing a
wheel if you do not follow safety precautions:
-Mounting the jack under the vehicle at any other place than
indicated above may damage the vehicle or may result in
per sonal injuries.
- A soft or unstable surface under the jack may cause the
vehicle to slip off the jack . Always provide a firm base for the
j ack on the ground. If necessary , use a sturdy board under the
jack.
- On hard, slippery surface (such as tiles ) use a rubber mat or
similar to prevent the jack from slipping .
• To help prevent injury to yourself and your passengers:
-Do not raise the vehicle until you are sure the jack is securely
engaged.
- Passengers must not remain in the vehicle when it is jacked
up.
- Make sure that passengers wait
in a safe place away from
the vehicle and well away from the roadway and traffic .
- Make sure jack position is correct, adjust as necessary and
then continue to rai se the jack. •
Vehicle care Do-it-yourself service Technical data
Page 280 of 324
11111...__W_ h_ a _ t_d_ o_ l _d _o_ n_ o_ vv_ ? ______________________________________________ _
Taking the wheel off /putt ing the spare on
Follow these instructions step-by-step for changing the
wheel
M
"' ;;; u.
1li
Fig . 197 Wheel
change : using the
screwdriver handle
(with the blade
removed) to turn the
bolts
Fig . 198 Wheel
change: alignment pin
inside the top hole
After you have loosened all wheel bolts and jacked the
vehicle off the ground, perform the following steps to
remove and replace the wheel:
Removing the wheel
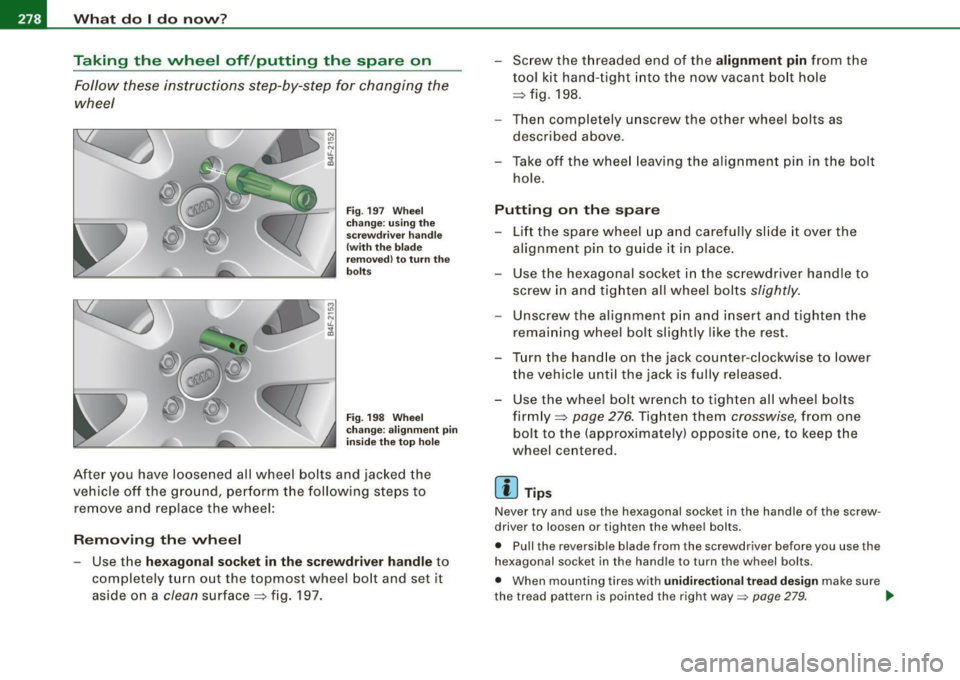
- Use the hexagonal socket in the screwdriver handle to
completely turn out the topmost wheel bolt and set it
as ide on a
clean surface ~ fig. 197. - Screw the threaded end of the
alignment pin from the
tool kit hand-tight into the now vacant bolt hole
~ fig. 198.
- Then completely unscrew the other wheel bolts as
described above.
Take off the wheel leaving the alignment pin in the bolt
hole.
Putting on the spare
- Lift the spare wheel up and carefully slide it over the
alignment pin to guide it in place.
- Use the hexagonal socket in the screwdriver handle to
screw in and tighten all wheel bolts
slightly.
Unscrew the alignment pin and insert and tighten the
remaining wheel bolt slightly like the rest.
- Turn the handle on the jack counter -clockwise to lower
the vehicle until the jack is fully released.
- Use the wheel bolt wrench to tighten all wheel bolts firmly ~
page 276. Tighten them crosswise , from one
bolt to the (approximately) opposite one, to keep the
wheel centered.
[ i ] Tips
Never try and use the hexagonal socket in the handle of the screw
driver to loosen or tighten the wheel bolts.
• Pull the reversible blade from the screwdriver before you use the
hexagonal socket in the handle to turn the wheel bolts.
• When mounting tires with
unidirectional tread design make sure
the tread pattern is pointed the right way=>
page 279. ~