AUDI S3 2015 Workshop Manual
Manufacturer: AUDI, Model Year: 2015, Model line: S3, Model: AUDI S3 2015Pages: 310, PDF Size: 76.15 MB
Page 51 of 310
....,
N
0 > co
rl I.O
"' ....,
"' rl
Daytime running lights*
USA models:
The day time running lights can
be switched on or off using the MMI. Select
on or off .
Canada models :
This function can be switched
off. They activate automatically each time the
ignition is switched on. This menu item is
shown with a "gray background".
Travel mode*
The headlight beam is asymmetrical. This pro
v id es s tronger illum inati on on the side of the
road on which you are driving. In vehicles with
Xenon headlights* with turning light* or LED
headlights* ,
you must adjust the headlights
when you are driving in a country where the
traffic direction is opposite from your own
country. Otherwise, oncom ing traff ic w ill be
blinded by the glare from the headlights. An
adjustment is not needed in vehicles with Xe
non head lights without turning lights .
To prevent glare:
- Trave l mode must be activated in vehicles
with Xenon headlights* and turning light * or
LED headlights*. Select: the
I MENU I button
> Car > Systems * control button > Vehicle
settings
> Exterior lighting > Light for driv
ing on left,
for example.
After you have adjusted the headlights, the
following message will appear:
la Headlight converter active for driving on
left. Range reduced!
(D Tips
When travel mode is activated, a display in
the driver information system indicates
this each time you switch the ignit ion on .
Lights and Vision 49
Interior Lighting
Front and rear interior lighting front
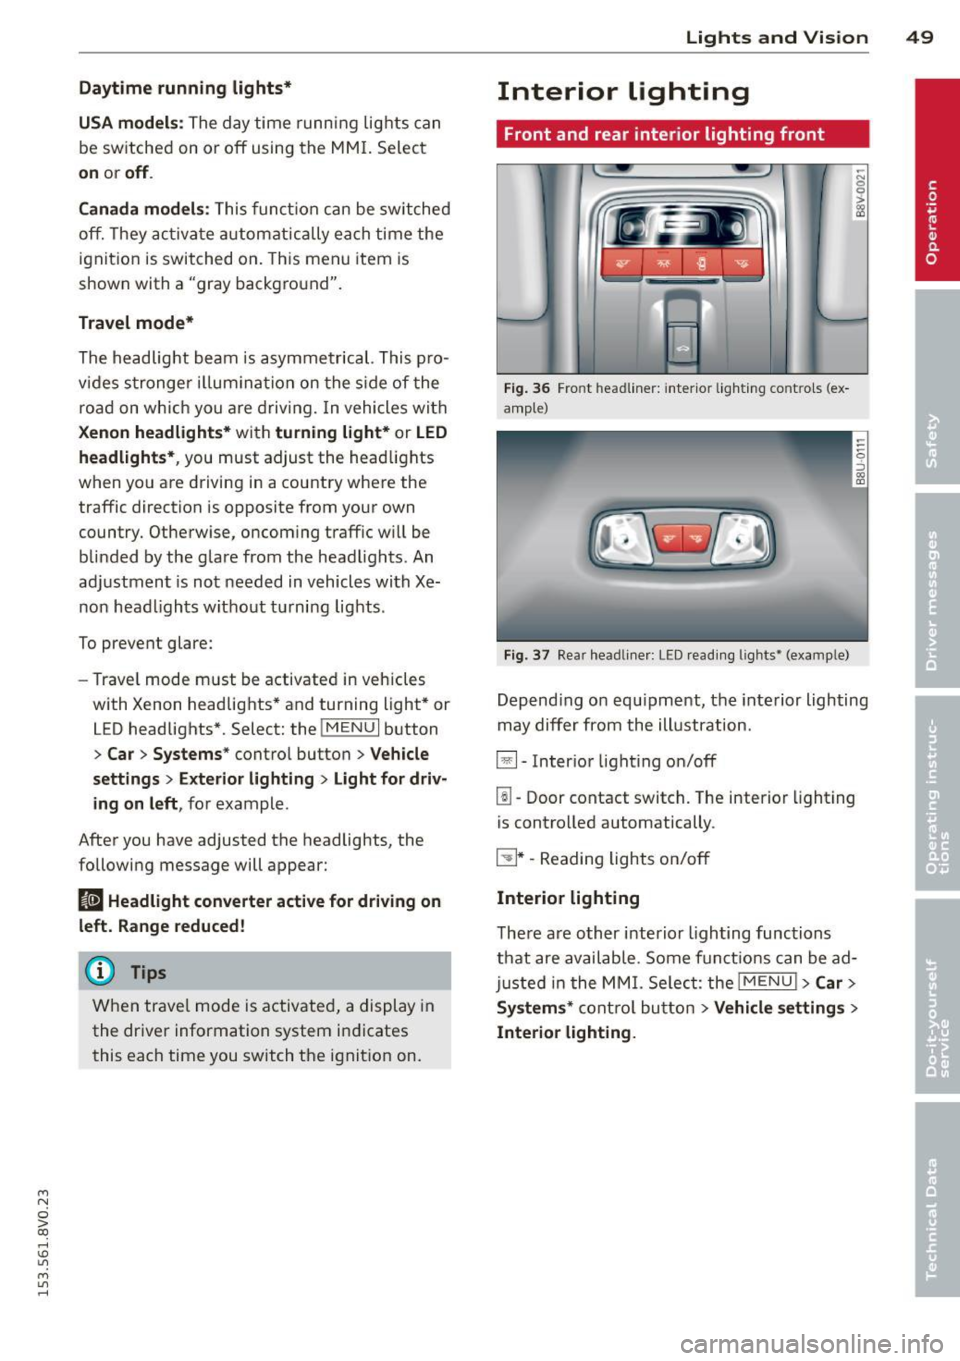
Fig. 36 Front headline r: inter ior light ing co ntrols (ex
ample)
Fig . 37 Rear headline r: LE D read ing lights• (examp le)
-N 0
0
> gg
Depend ing o n equipment, the interior lighting
may differ from the illustration.
~- Inter ior lighting on/off
[!I-Door contact switch. The interior lighting
is controlled automatically .
~ * -Reading lights on/off
Interior lighting
There are other interior lighting functions
that are available . Some functions can be ad
just ed in the MMI. Select: the
!ME NUI >Car >
Systems*
control button > Vehicle settings >
Interior lighting.
Page 52 of 310
50 Lights and Vision
Instrument illumination
The brightness of the instrument cluster and
the center console can be adjusted.
"' 0 0
'
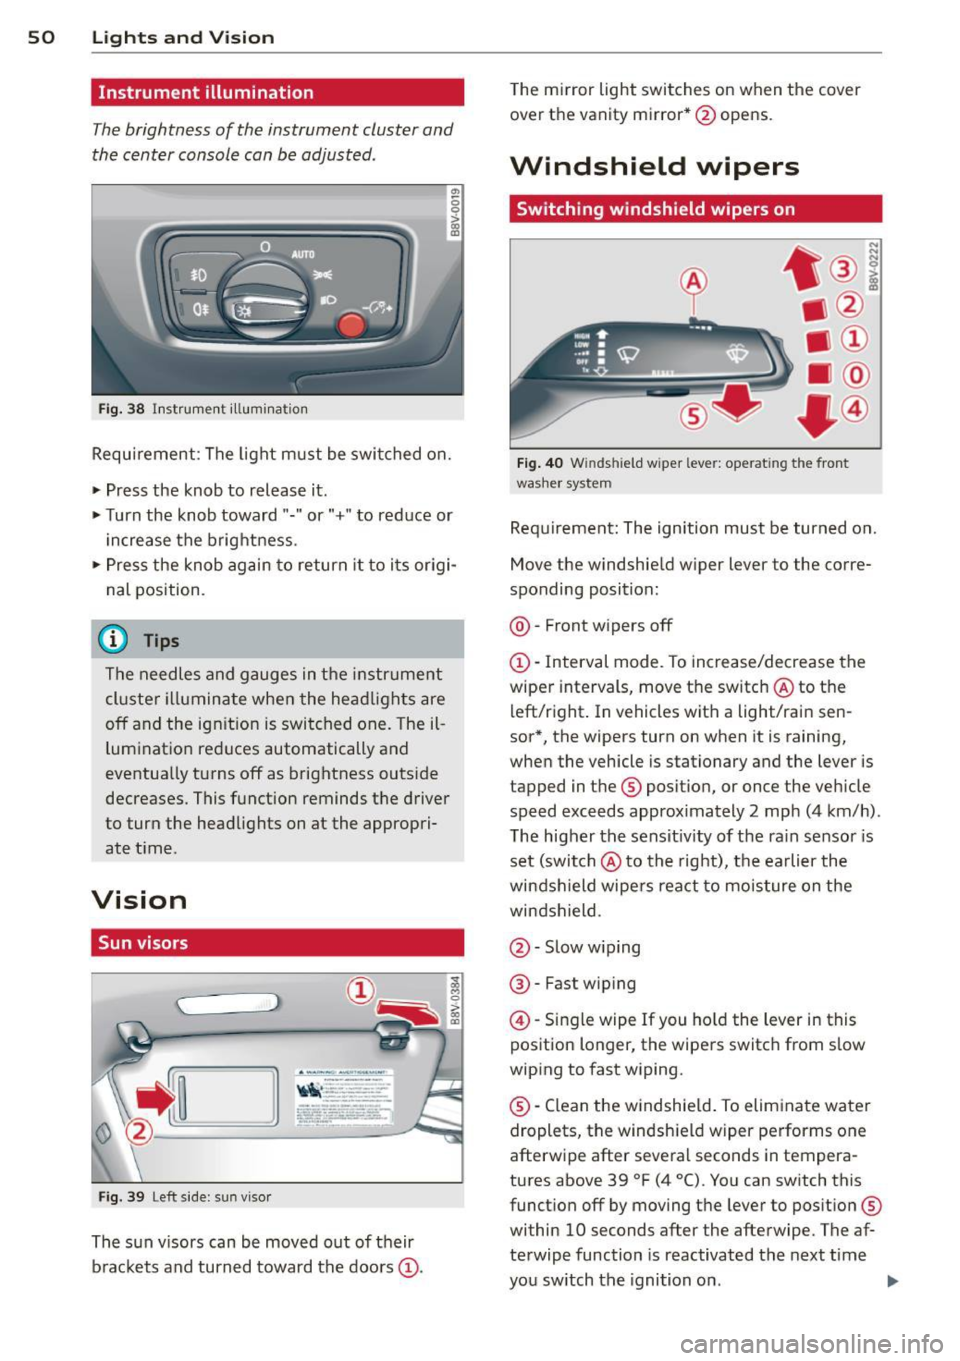
Fig. 38 Instrument illumination
Requirement : The light must be switched on.
.. Press the knob to release it .
.. Turn the knob toward"." or"+" to reduce or
increase the brightness.
.. Press the knob again to return it to i ts origi
nal position.
¢j) Tips
The needles and gauges in the instrument
cluster illuminate when the headlights are
off and the ignition is switched one. Theil
lumination reduces automatically and
eventually turns off as brightness outside
decreases. This function reminds the driver
to turn the headlights on at the appropri
ate t ime.
Vision
Sun visors
( ___ _____ )
Fig . 39 Left s ide: sun visor
The sun v isors can be moved out of their
brackets and turned toward the doors@.
i 0 > 00 a,
The mi rror light switches on when the cover
over the vanity mirror* @opens .
Windshield wipers
Switching windshield wipers on
Fig. 40 Winds hield w iper leve r: ope rat ing the front
washer system
Requ irement: The ignition must be turned on.
Move the windshield w iper lever to the corre
sponding position:
@ -Front wipers off
@ · Interval mode. To increase/decrease the
wiper intervals, move the switch @ to the
left/right . In vehicles with a light/rain sen
sor*, the wipers turn on when it is raining,
when the vehicle is stationary and the lever is
tapped in the ® position, or once the vehicle
speed exceeds approximately 2 mph (4 km/h) .
T he higher the sensit iv ity of the ra in sensor is
set (switch @ to the right), the earlier the
windshield wipers react to moisture on the
windshield.
@ · Slow w iping
@ -Fast wip ing
@ · Single wipe If you ho ld the lever in this
position longer, the wipers switch from slow
wiping to fast wiping.
® ·Clean the windshield . To eliminate water
droplets, the windsh ield wiper performs one
afterwipe after several seconds in tempera
tures above 39 °F (4 °() . You can switch this
funct ion off by moving the lever to position ®
within 10 seconds after the afterwipe. The af
terwipe function is reactivated the next time
you sw itch the ignition on . ..,
Page 53 of 310
M N
0 > co ,...., \!) ..,.,
M ..,., ,....,
A WARNING
-The ra in sensor is only intended to assist
the driver. The driver is still responsible
for manually sw itching the w ipers on ac
cording to the v is ibility conditions.
- The windshield may not be treated w ith
water-repe lling windshield coat ing
agents. Unfavorable conditions, such as
wetness, darkness o r low sun, can result
in increased glare. W iper blade chatter is
also possible.
- Properly functioning windshie ld w iper
blades are requi red fo r a clear view and
safe driving~
page 51, Replacing
front windshield wiper blades .
(D Note
-In case of frost, make sure the wind
shield wiper b lades are not frozen to the
windsh ield . Sw itching on the windshield
wipers when the blades are frozen to the
windsh ield can damage the wiper blades.
- Prior to using a car wash, the windshield
wipe r system must be switched
off (lever
in position 0). This prevents unintention
al sw itching on and damage to the wind
s h ield wiper system.
- Do not use the wipers to remove ice from
the windows. Using windshie ld w ipers as
i ce scrapers destroys the wiper b lades.
(D Tips
- The windshield wipe rs switch off when
t h e ignit ion is turned
off. You can acti
vate the windshield wipers after the igni
tion is switched back on by moving the
windsh ield wiper leve r to any pos ition.
- Worn or dirty windsh ie ld w iper blades
r esult in streak ing. This can affect the
r ain senso r funct ion. Check your wind
s hi eld wipe r blades regularly.
- The washer fluid nozzles in the w ind
s hi eld washer system are heated* at low
temperatures when the ig nit ion is on.
- When stopping temporar ily, e.g. at a
traff ic light, the se t speed of the w ind- Light
s and Visi on 5 1
shield w ipers is automatically reduced by
one speed.
- In vehi cles w ith an MMI, you can switch
the rain senso r or
off in the Driver assi s
tance
menu.
Cleaning windshield wiper blades
Clean the wiper b lades when you see w iper
streaks . Use a soft clot h and a glass cleaner .
.,. Place the windshie ld wiper arms in the serv
ice pos ition
~ page 51.
.,. Fold the windshie ld w iper arms away from
the windshield.
A WARNING
Di rty windsh ield wiper b lades can impair
v ision, which increases the r isk of an acci
dent.
(D Note
If you see streaks again after clean ing the
wiper blades, the blades must be replaced
~page 51.
Replacing front windshield wiper blades
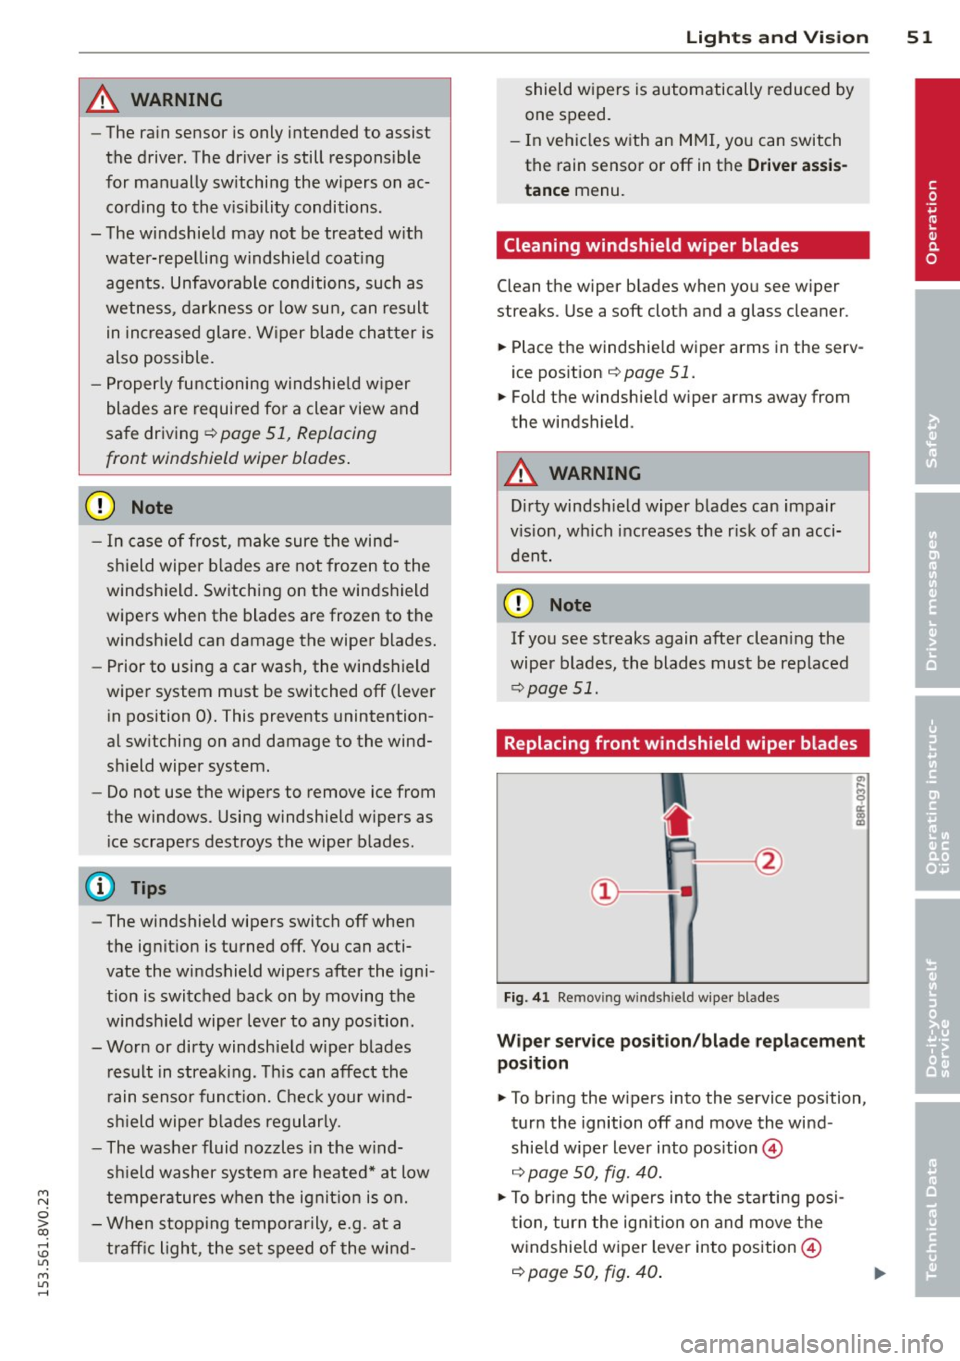
Fig. 41 Remov ing w indsh ie ld wipe r blades
Wiper servic e posit ion /bl ade repl ace ment
position
.,. To bri ng the w ipers into the service position,
tur n the ignition
off and move the wind
shield w iper lever into pos ition @
~ page 50, fig. 40.
.,. To bring the w ipers into the starting posi
t ion, tur n the ig nition on and move t he
w indshie ld w iper lever into position @
~ page 50, fig. 40 .
•
Page 54 of 310
52 Lights an d Vi sion
Removing the wip er blad e
.,. Fold the w indshield wiper arm away from
the windshie ld .
.,. Press the locking knob
(D ¢ fig. 41 on the
wip er blade . Hold th e wiper blade f irm ly.
.,. Remove the wipe r blade in the direction of
t he arrow.
In stall ing t he wip er blade
.,. Inse rt the new wipe r blade into the mount
on the w iper arm @ until you hear it latch
into place .
.,. Place the wiper arm back on the windshie ld.
.,. Tu rn the serv ice position off.
_& WARNING
For safety reasons, the windshield wiper
blades should be replaced once or twice
each year.
Q) Note
- The w indshield wiper blades must only
be folded away when in the serv ice posi
tion . Otherw ise, you risk damag ing the
paint on the hood or the windshield wip
er motor.
- You should not drive your veh icle or
press the w indshield w iper lever when
the wiper arms are folded away from the
winds hield. The w indshie ld w ipers would
move back into their original position
and could damage the hood and wind
shield.
- To prevent damage to the windshield
washer system, always loosen wiper
blades that have frozen to the wind
s h ield before turning the wipers on.
- To prevent damage to the wiper blades,
do not apply gasoline, petroleum, thin
ning agents or other solvents on the wip
er blades or near them.
- To prevent damage to the wipe r arms or
other components, do not try to move
the windshie ld w ipers by hand .
-
(D Tips
-Commercial hot wax such as the types
used by car washes make it more d ifficult
to clean the windshie ld.
- You can also use the service position, for
example, if you want to protect the
w indshield from icing by using a cover.
- Yo u cannot activate the serv ice position
when the hood is open .
Outside mirror
Adjusting the exterior mirrors
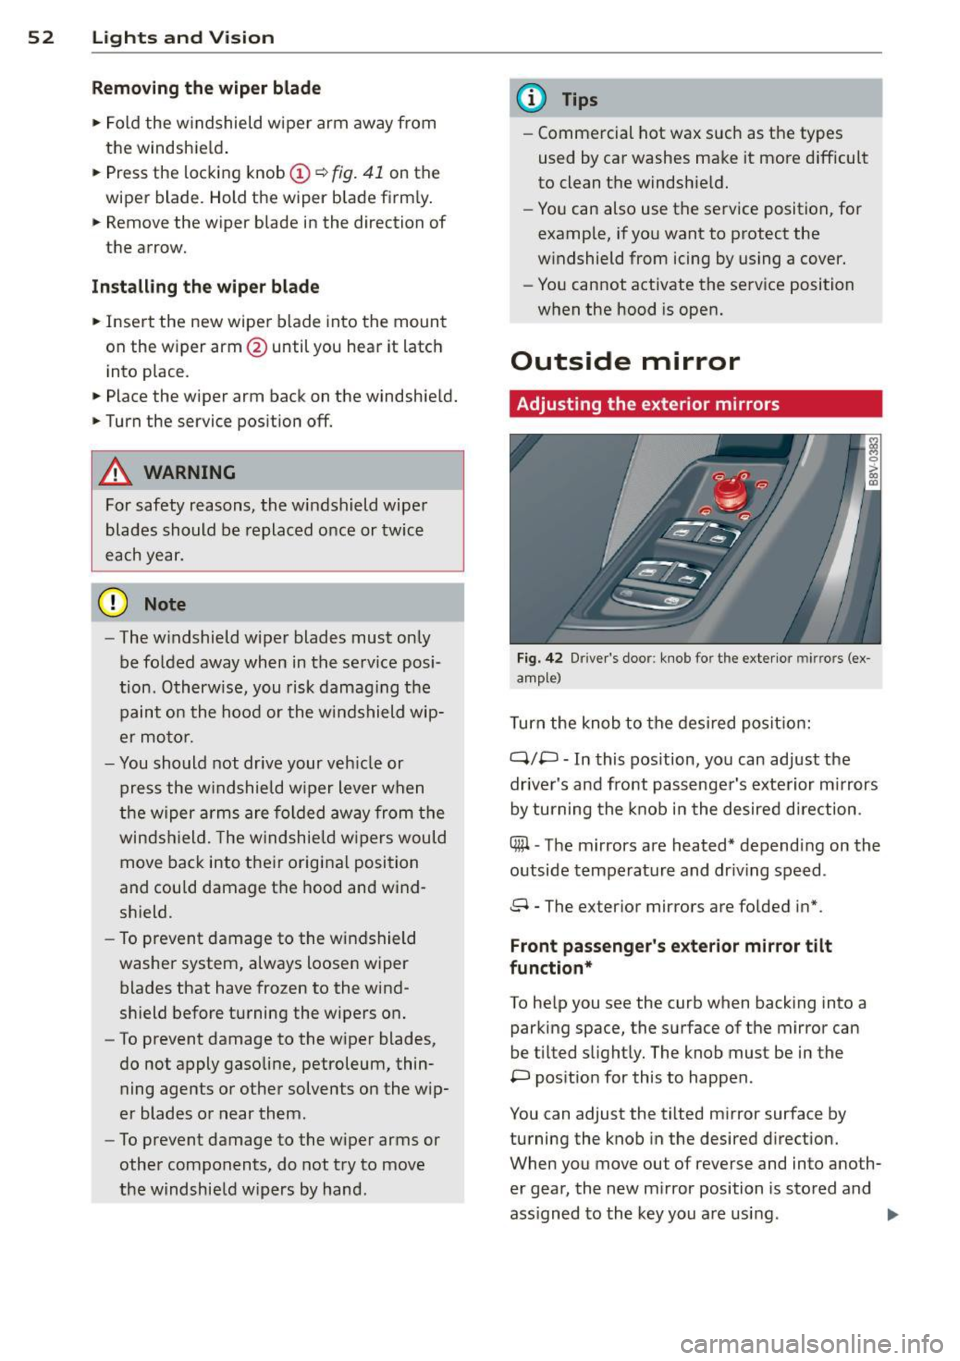
F ig. 42 Drive r's doo r: kno b fo r th e exte rior mir rors (ex
amp le)
T urn the knob to the des ired posit ion:
q;p -In this pos ition, yo u can adjust the
dr iver's and front passenger's exterior m irrors
by turning the knob in the desired direction .
Cffil -The mirrors are heated* depend ing on the
outside temperature and dr iv ing speed .
8 - The ex ter ior m irrors are folded in*.
Front passenge r's ex terior mirror tilt
function*
To he lp you see the curb when backing into a
parking space , the surfa ce of the mirror can
be tilted s light ly. The knob mus t be in the
P pos ition for this to happen .
You can adjust the tilted mir ror surface by
turning the knob in the desired direction.
When you move ou t of reverse and into ano th
er gear, the new m irror position is stored and
ass igned to the key you are using. .,.
Page 55 of 310
....,
N
0 > co
rl I.O
"' ....,
"' rl
The mirror goes back into its original position
once you drive forward faster tha n 9 mph
(15 km/h) or turn the ign ition
off .
Folding mirr ors in and out
To fold the mirrors i n w ith the knob, turn the
knob in the
&l pos it ion .
To fold the m irrors out, turn the knob in the
q or
P or O position.
You can set in the MMI if the mirrors should
fold in when locking the vehicle or not
~ page 40 . When you lock the vehicle, the
m irrors fold in . When you start the ignit ion,
the mirrors fold out .
_& WARNING
Curved mirror surfaces (convex or asphe
ric*) enlarge the field of vision. However,
they make objects in the mirror appear sma ller and farther away. Your may est i
mate incorrectly when you use these m ir
rors to gauge your d istance from the
vehicles behind you when changing lanes -
accident risk!
(D Note
- For vehicles with power folding exterior
mirrors*: If the m irror housing was
moved by outside forces (such as an im
pact when maneuvering), you must use
the power folding function to fold the mir ror a ll the way out. You will hear a
l oud noise when the mi rrors are latched
back in place. The mirror housing must
not be moved back into place by hand
because this would affect the mirror
mechan ism.
- Applies to vehicles witho ut power fold
i ng exterior mirro rs:
If the mirror hous
ing was moved by outside forces (s uch as
i n impact d uring maneuvering), you
must move the mirror housing back into
place by hand.
- If you wash the vehicle in an automatic
car wash, you must fold the exterior m ir
rors in to reduce the r isk of damage to
the mi rrors. Never fold power foldi ng ex-
-
Ligh ts and Visi on 5 3
terior mirrors by hand . On ly fold them in
and out using the power controls.
a) Tips
If t h e power ad justmen t fa ils, bot h mir
rors can be adjusted by hand by pressing
on the edge of the mirror surface.
Dimming the mirrors
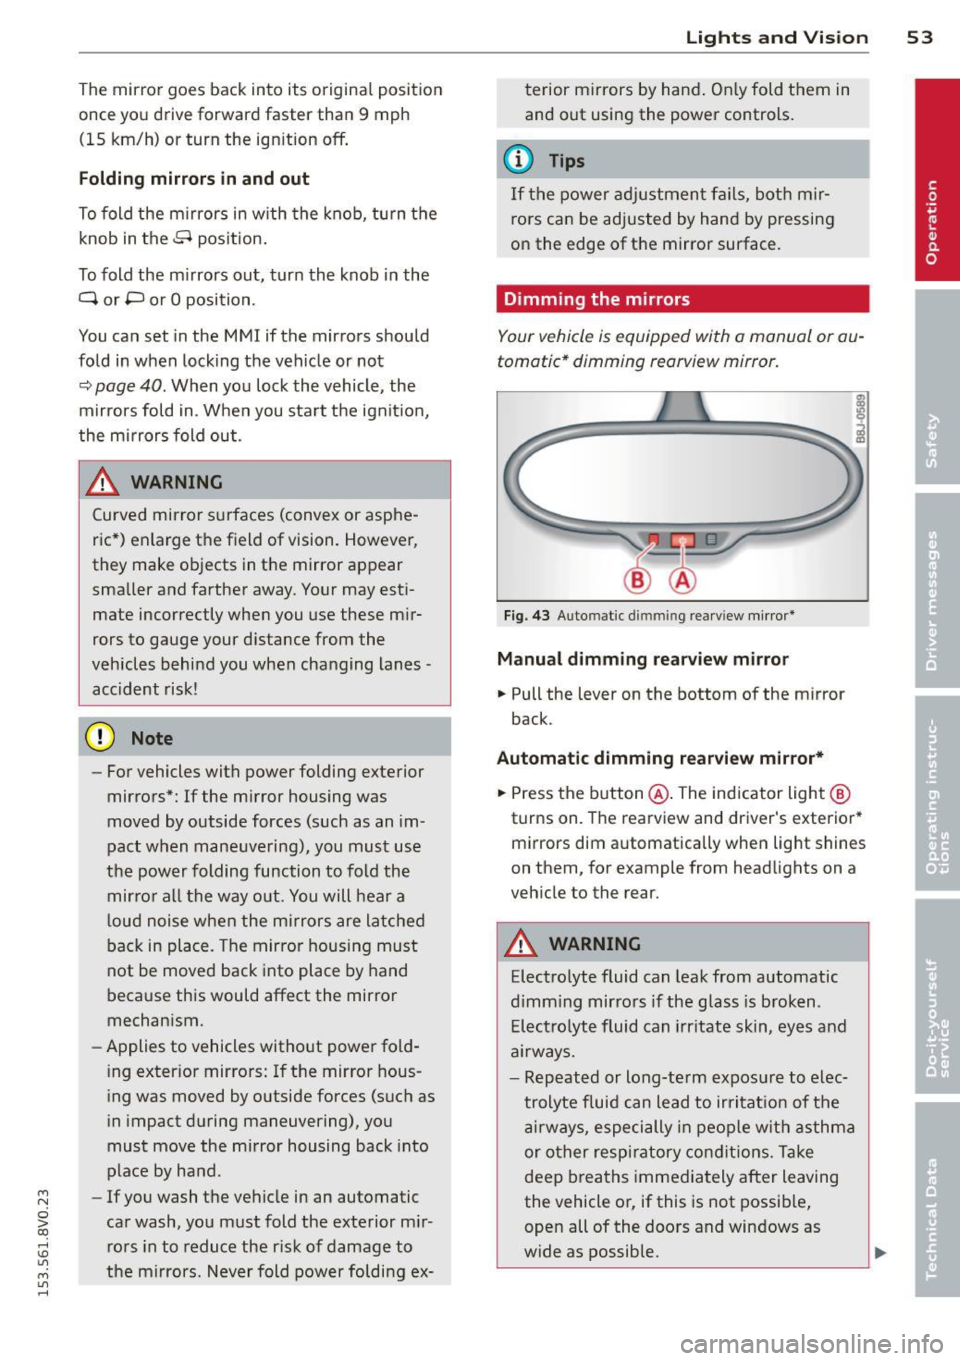
Your vehicle is equipped with a manual or au
tomatic* dimming reorview mirror.
F ig. 43 Auto mat ic d immin g rea rv iew mi rror *
Manu al dimming rear view mirror
.,. Pull the lever on the bottom of the mirror
back.
Automat ic dimming rearview mirror*
.,. Press the b utton @. The indicator light @
turns on. The rearview and driver 's exterior*
m irrors dim automatically when light shines
on them, for example from headlights on a
veh icle to the rear.
A WARNING
Elect ro lyte fluid can leak from automatic
d imm ing mirro rs if the glass is b roken .
E lec tro lyte fluid can irr itate skin, eyes and
a ir ways.
- Repeated or long-te rm expos ure to elec
trolyte fluid can lead to irritat io n of the
a irways, especially in peop le w it h asthma
or other resp iratory co ndit ions . T a ke
deep breaths immediately after leaving
the vehicle or, if this is not possib le,
open all of the doors and windows as
wide as possible.
Page 56 of 310

54 Lig hts an d Vi sion
- If electrolyte fluid enters the eyes, f lush
them thoroughly with a large amo unt of
clean water for at least 15 m inutes and
then seek medical attention .
- If electrolyte fluid comes into contact
with the skin, flush the affected area
with clean water for at least 15 m inutes
and then clean with soap and water and
seek medical attention. Clean affected
cl othing and shoes thoroughly before
wearing aga in.
- If the fluid was swallowed and the per
son is co nscious, f lush the mou th wi th
water for at least 1 5 minu tes. Do not in
duce vomiting unless this is recommend
ed by medical professionals . Seek medi
cal attention immediately .
(D Note
If the glass o n an automatic dimming m ir
ror breaks, electrolyte can leak o ut. This
liquid damages plastic surfaces . Clean this
liquid as quickly as poss ible with a wet
sponge.
@ Tips
- If the light reac hing the rearview mirror
i s obstructed, the automatic dimming
mirror will not function correctly,
- The automatic dimming mirrors do not
dim when the interior lighting is turned
on or the reverse gear is selected.
Digital compass
Switching the compass on and off
Appl ies to vehicles: with digital compass
Fig. 44 Rearv iew m irro r: d ig ital compass activated
.,. To turn the compass on o r off, press the but
ton @until the compass in the mirror ap
pears or disappears.
T he dig ita l compass on ly works when the igni
tion is turned on. The d irections are indicated
with abbrev iations:
N (north), NE (northeast),
E (east), SE (southeast), S (south), SW (south
west),
W (west), NW (northwest).
You must recalibrate the compass if it does not display t he correct direction
~ page 55,
Calibrating the compass.
(D Tips
To prevent inaccurate compass readi ngs ,
do not bring any remote cont ro ls, e lectri
ca l devices or metallic objects near the
mirror.
Adjusting the magnetic zone
Applies to vehicles: wit h digita l compass
The magnetic zone must be adjusted correctly
for the compass to read accurately.
®
F ig. 4 5 North A merica: Magnetic zone map
.,. Press and hold the button @ q page 54,
fig . 44
until the number of the magnetic
zone appears in the rearv iew mirror .
Page 57 of 310
M N
0 > co ,...., \!) ..,.,
M ..,., ,....,
~ Press the button@repeated ly to select the
correct magnetic zone. The selection mode
turns off after a few seconds.
Calibrating the compass
Applies to vehicles: with dig ital compass
You must recalibrate the compass if it does
not display the correct direction .
~ Press and hold the button @ ~page 54,
fig . 44
until a C appears in the rearview mir
ror.
~ Drive in a circle at about 5 mph ( 10 km/h)
unti l a direction is displayed in the rearview
mirror.
A WARNING
- To avoid endanger ing you rself and other
dr ivers, calibrate the compass in an area
whe re the re is no traff ic.
- The dig ital compass should only be used
as an or ientat ion aid . If you want to
check the compass while dr iving, you
must still pay atten tion to traff ic, the
road, the weather and any other possible
hazards.
Light s and Visi on 55
•
Page 58 of 310
56 Seat s a nd s tor ag e
Seats and storage
General information
Important information
& WARNING
Refer to the chapter Driving Safely
r::!>poge 125, Driving safety for important
information, t ips, suggestions and warn
ings that you should read and follow for
your own safety and the safety of your pas sengers.
Why is your seat adjustment so important?
The safety belts and the airbag system con
only provide maximum protection if the front
seats ore correctly adjusted.
There are various ways of adjusting the front
seats to provide safe and comfortable support
for the driver and the front passenger. Adjust
your seat properly so that :
- you can easily and quickly reach all the
switches and controls in the instrument
panel
- your body is properly supported thus reduc
ing physical stress and fatigue
- the safety belts and airbag system can offer
maximum protection
r::!> page 144 .
In the following sections, you will see exactly
how you can best adjust your seats .
There are special regulations and instructions
for insta lling a child seat on the front pas
senger's seat. Always follow the information regarding child safety provided in
r::!> page 170, Child Safety .
& WARNING
Incorrect seating position of the dr iver and
all other passengers can result in serious
personal in jury.
- Always keep your feet on the f loor when
the vehicle is in motion - never p ut your
feet on top of the instrumen t panel, out of the window or on top of the seat c
ush
ion. This applies espec ially to the passen
gers. If your seating position is incorrect,
you increase the risk of injury in the case
of sudden braking or an accident .
If the
airbag inflates and the seating position is incorrect, this could result in pe rsonal
inj ury or even death.
- It is important for both the drive r and
front passenger to keep a distance of at least 10 inches ( 25 cm) between them
selves and the steering wheel and/or in
strument panel. If you're sitting any
closer than this, the airbag system can not protect you properly. In addition, the
front seats and head restraints must be
adjusted to your body height so that they
can give you max imum protect ion.
- Always try to keep as much distance as
possible between yourself and the steer
ing wheel o r instrument panel.
- Do not adjust the driver's or front pas
senger's seat whi le the vehicle is moving.
Your seat may move unexpectedly, caus
ing sudden loss of veh icle cont ro l and
pe rsonal injury. If you adjust yo ur seat
while the veh icle is moving, yo u are ou t
of posit ion .
Driver's seat
The correct seat position is important for safe
and relaxed driving.
We recommend that you adjust the dr iver's
seat in the fo llow ing manne r:
.. Adjust the seat in fore and aft direction so
that you can easily push the peda ls to the
floor wh ile keeping your knees sl ightly bent
c::> &. in Why is your seat adjustment so im
portant? on page 56.
.. Ad just the bac krest so tha t when you sit
w ith your back against the backrest, you can
still grasp the top of the steering wheel.
.. For adjustab le head restraints: adjust the
head restra int so the upper edge is as even
as poss ible with the top of your head. If that
is not possible, try to adjust the head ..,.
Page 59 of 310
....,
N
0 > co
rl I.O
"' ....,
"' rl
restraint so that it is as close to this position
as possible
q page 59 . Move the head re
stra int so that it is as close to the back of
the head as possible .
A WARNING
Never place any objects in the driver's foot
well. An object could get into the pedal
area and interfere with pedal function. I n
case of sudden braking or an accident, you
would not be ab le to brake or acce lerate.
Front passenger's seat
Always move the front passenger seat into
the rearmost position.
To avoid contact with the airbag while it is de
ploying, do not sit any closer to the instru
ment panel than necessary and always wear
the three -point safety belt provided adjusted
correctly . We recommend that you adjust the
passenger's seat in the following manner :
• Bring the backrest up to an (almost) upright
pos ition.
D o not ride w ith the seat reclined.
• For adjustable head restraints : adjust the
head restraint so the upper edge is as even
as possib le with the top of your head. If that
is not possible, try to adjust the head re
straint so that it is as close to this position
as possible
q page 59 . Move the head re
straint so that it is as close to the back of
the head as possible.
• Place your feet on the floor in front of the
passenger's seat .
Sea ts a nd s to rage 57
Front seats
Manual seat adjustment
App lies to vehicles: with manually adjustab le seats
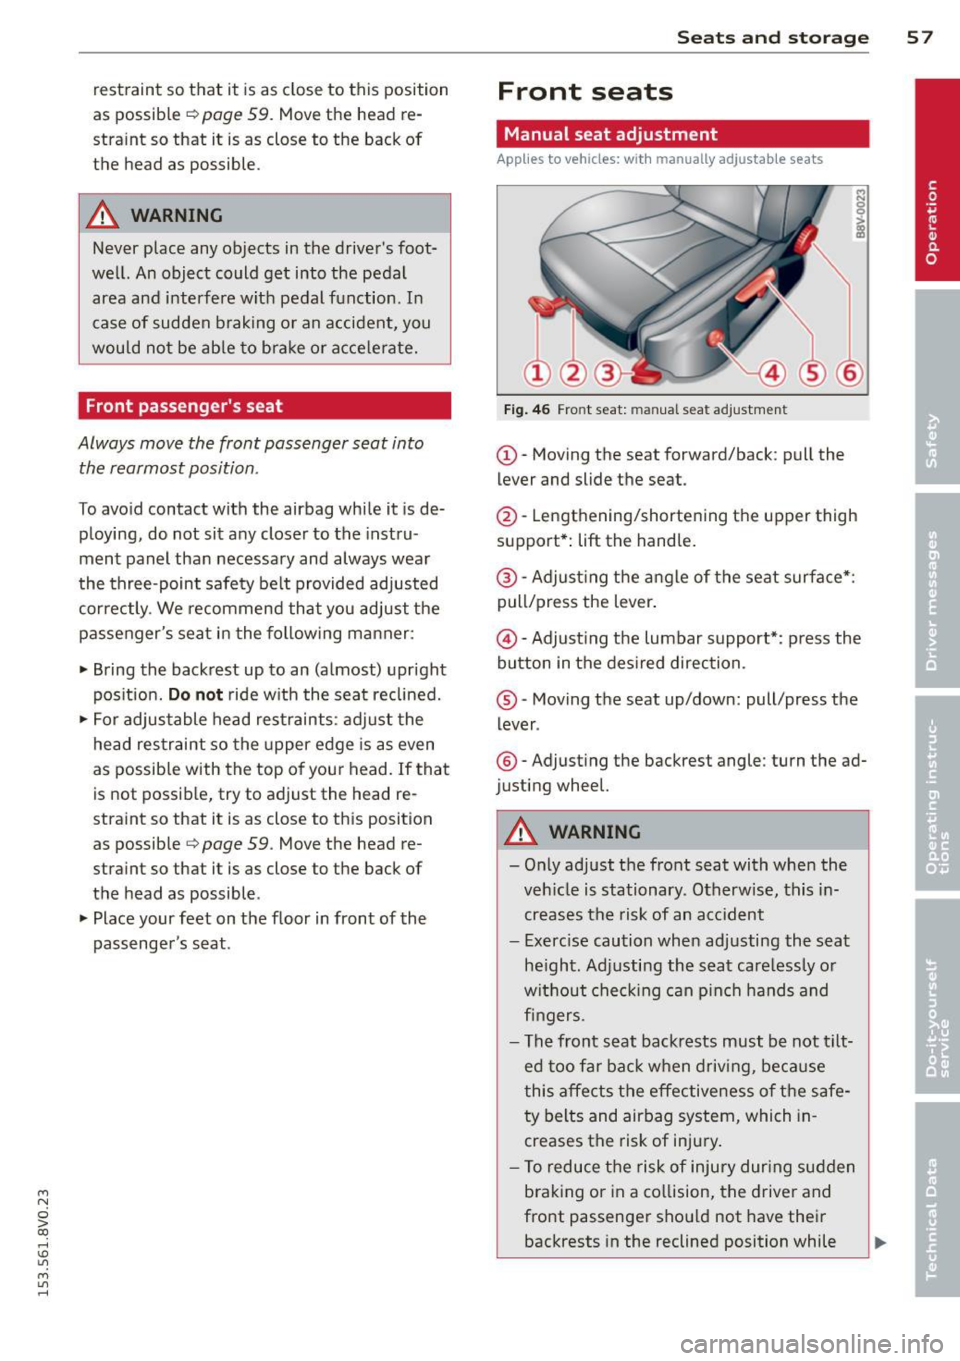
Fig . 46 Fro nt seat: man ual seat adjustment
(D-Moving the seat forward/back : pull the
lever and slide the seat.
@-Lengthening/shortening the upper thigh
support*:
lift the handle.
@ -Adjust ing the a ngle of the seat surface*:
pull/press the lever.
@ -Adjusting the lumbar support*: press the
button in the des ired direction.
® -Moving the seat up/down: pull/press the
lever .
®-Adjust ing the backrest angle : turn the ad
justing wheel.
A WARNING
-Only adjust the front seat with whe n the
veh icle is stationary. Otherwise, this in
creases the risk of an accident
- Exerc ise caution when adjusting the seat
he ight. Ad justing the seat care lessly or
without check ing can p inch hands and
fingers .
- The front seat backrests must be not tilt
ed too far bac k when driving, because
this affects the effective ness of the safe
ty belts and airbag system, which in
creases the risk of injury.
- To reduce the risk of injury dur ing sudden
braking or in a co llision, the driver and
front passenger shou ld not have their
backrests in the reclined position while ..,.
Page 60 of 310

58 Seats and storage
dr iving or rid ing . The safety belts and air
bag system can prov ide the greatest pro
tection possible when the backrests are
in the upright posit ion a nd the safety
belts are worn correct ly. The more a
backrest is reclined, the greater the risk
of injury due to an incorre ct seating posi
t ion an d safety be lt position .
Power seat adjustment
Applies to vehicles: with power adjustable seats
Fig. 47 Fr ont se at: power se at adju stm en t
@ -Adju sting the lumbar suppor t: press the
button in the desired d irect ion .
@-Moving the seat up/down : press the but
ton up/down. To adju st the front seat cushion ,
press the front button up/down . To adjust the
rear seat cushion, press the rear button up/
down .
@-Moving the sea t forward/back: press the
bu tton forward/back.
© -Adjusting the backrest angle : press the
button forward/back.
@ -Lengthening/shortening the upper thigh
support *: lift the handle.
A WARNING
- Only adjust the front seat w ith when t he
vehicle is stationary. Otherwise, th is in
creases the risk of an accident
- The power adjustment for the front seats
also works with the ignition switched off
or with the ignition key removed. For this
reason, c hildren should never be left un
attended in t he veh icle -they could be in
jured! -
Exerc ise caution when adjusting the seat
he ight. Unsupervised or careless seat ad
justment can pinch fingers or hands
causing injuries .
- W hile the vehicle is mov ing, the seat
backs of the front seats must not be in
clined too far to the rear because the ef
fectiveness of the safety be lts and the
airbag sys tem is seve rely comp romised -
there is a risk of injury.
- To r educe the risk of injury dur ing s udden
b ra ki ng or in a co llision, the drive r and
front p assenge r sh ould not have the ir
backrests in the recline d posi tion while
driving or r iding. The safety be lts and a ir
bag system can provide the greatest pro
tect ion possible when the backrests are
in the upr ight position and the safety
be lts are worn correctly. The more a
backrest is reclined, the greater the r isk
of injury due to an inco rrect seating posi
tion and saf ety belt pos it ion.
Front center armrest
Applies to vehicles: wit h front center armrest
The cen ter armrest can be adjusted to several
levels .
Fig. 48 Armrest betwee n the drive r's /fro nt pa ssenger' s
seats .
.,. To adjust the ang le, raise the armres t
¢ fig. 48 notch by notch.
.,. To bring the armrest back down, ra ise it out
of the top notch and fold it back down . Then
lift the a rmrest to the desired position, if
necessary .
Please note that the dr iver's ab ility to move
his or a rm may be restricted when the armrest
Iii>