AUDI S6 2008 Owners Manual
Manufacturer: AUDI, Model Year: 2008, Model line: S6, Model: AUDI S6 2008Pages: 390, PDF Size: 88.42 MB
Page 341 of 390
-------------------------------------------~W~h~a~t~d~o~l ~d~o~n~o~w~ ?::__fflll
•
& WARNING (continued)
front wheel is lifted off the ground, placing the Automatic Trans
mission in "P" {Park) will
not prevent the vehicle from moving.
• Before you change a wheel, be sure the ground is level and firm.
If necessary, use a sturdy board under the jack.
• After installing the spare wheel, make sure that you replace the
flat tire/wheel in its storage area properly and tighten the knurled
retaining screw securely. •
Changing a wheel
When you change a wheel, follow the sequence described
below step-by-step and in exactly that order.
1. Activate the vehicle jack mode (only vehicles with Adap
tive Air Suspension)~
page 184.
2. Remove the decorative wheel cover*. For more details
see also ~
page 340, "Decorative wheel covers" or
~ page 340, "Wheels with wheel bolt caps".
3. Loosen the
wheel bolts~ page 341.
4. Locate the proper mounting point for the jack and align
the jack below that point~
page 341.
5. Lift the car with the jack ~ page 341.
6. Remove the wheel with the flat tire and then install the
spare
~ page 343.
7. Tighten all wheel bolts lightly.
8.
Lower the vehicle with the jack.
9. Use the wheel bolt wrench and
firmly tighten all wheel
bolts~
page 341 .
10. Replace the decorative wheel cover*.
11. Deactivate the vehicle jack mode (only vehicles with
Adaptive Air Suspension)~
page 184.
& WARNING
Always read and follow all WARNINGS and information => & in
uRaising the vehicle" on
page 341 and=> page 344. •
After changing a wheel
A wheel change is not complete without the doing the
following.
- Store and secure the wheel you replaced in the spare
wheel well.
- Replace the tools and the jack in their proper location.
- Check the tire pressure on the spare wheel immediately
after mounting it.
- As soon as possible, have the
tightening torques on all
wheel bolts checked with a torque wrench. The correct
tightening torque is 90 ft lb (120 Nm).
- Have the flat tire
replaced as soon as possible.
[ i] Tips
• If you notice that the wheel bolts are corroded and difficult to
turn while changing a tire, they should be replaced before you check
the tightening torque.
• Drive at reduced speed until you have the tightening torques
checked .•
Do-it -yourself service
Page 342 of 390
11111...__W_ h_ a _ t_d_ o_ l _d _o_ n_ o_ vv_ ? ______________________________________________ _
App lies to veh ic les : w ith deco rative whee l covers
Decorative wheel covers
The decorative wheel covers must be removed first to
access the wheel bolts.
Removing
Fig . 249 Changing a
wheel: Removing the
wheel cover
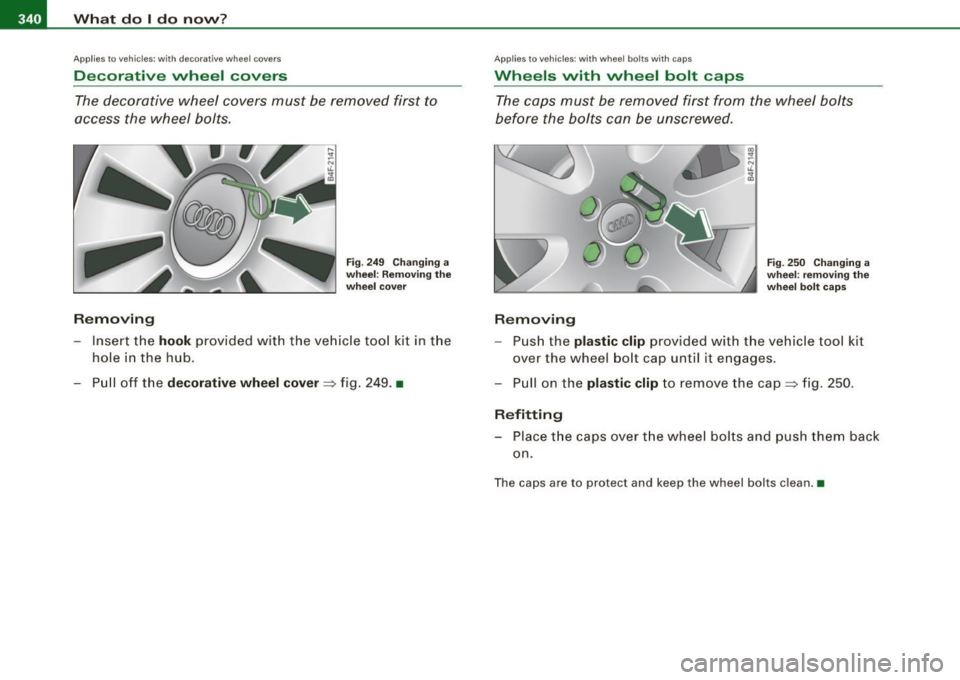
- Insert the hook provided with the vehicle tool kit in the
hole in t he hub.
- Pull off the
decorative wheel cover=> fig. 249. •
Applies to veh ic les: w ith whee l bolts w ith ca ps
Whee ls vvith wheel bolt caps
The caps must be removed first from the wheel bolts
before the bolts can be unscrewed .
Removing
Fig. 250 Changing a
wheel: removing the
wheel bolt caps
-Push the plastic clip prov ided w ith the vehicle tool kit
ov er the wheel bolt cap unt il it engages .
- Pull on t he
plastic clip to remove the cap=> fig. 250 .
Refitting
-Place the caps over the wheel bolts and push them back
on .
The caps are to pro tect and keep the wheel bolts clean. •
Page 343 of 390
_______________________________________________ W_ h_ a _ t_d_ o_ l _d _o_ n_ o_ w_ ? _ __._
Loosening and tightening the wheel bolts
The wheel bolts must be loosened before raising the
vehicle .
Loosening
Fig . 25 1 Chan ging a
w he el: lo os en ing th e
whe el bolt s
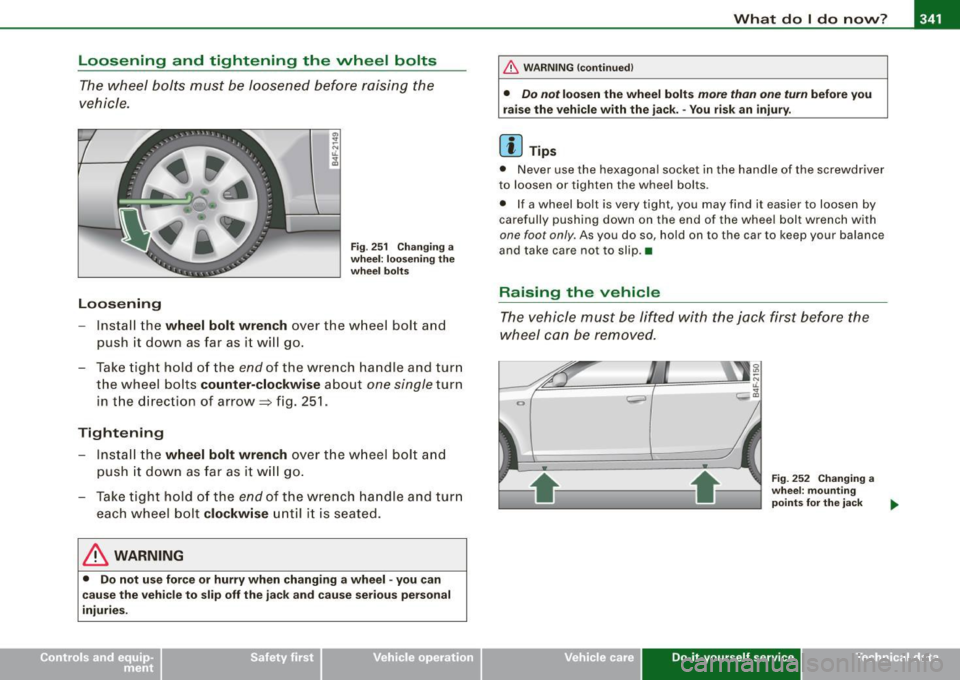
- Install the wheel bolt wrench over the wheel bolt and
push it down as far as it will go.
- Take tight hold of the
end o f the wrench handle and turn
the wheel bolts counter-clockwise about
one single turn
in the direction of arrow =} fig. 251 .
Tightening
-Insta ll the wheel bolt wren ch ov er the w heel bolt a nd
push it down as far as it wi ll go.
- Take tight hold o f the
end of the wrench ha ndle and tur n
each wheel bolt clockwise until i t is sea ted.
& WARNING
• Do not u se for ce or hu rry w hen changing a wheel -you c an
ca use the vehi cle to slip off the j ack a nd cause se rio us perso nal
injurie s.
& W ARNING (continued )
• Do n ot loo sen the wh eel bolt s more than one turn before y ou
rais e the vehicle with the jack . - You ri sk an injur y.
[ i ] Tip s
• Never use the hexagona l socke t in the handle of the screwdriver
to loosen or tighten the wheel bolts .
• If a wheel bolt is
very tight, you may find it easier to loosen by
carefully pushing down on the end of the whee l bolt wrench with
one foot only . As you do so , hold on to the car to keep your balance
and take care not to slip .•
Raising the veh ic le
The vehicle must be lifted with the jack first before the
wheel can be removed .
Vehicle care
Fig. 252 Cha nging a
w he el: m oun ting
poi nts for the jack ..
Do-it-yourself service irechnical data
Page 344 of 390
lllftl.,___W_ h_ a _ t_d_ o_ l _d _o_ n_ o_ vv_ ? ______________________________________________ _
Fig. 253 Close-up:
proper positioning of
jack
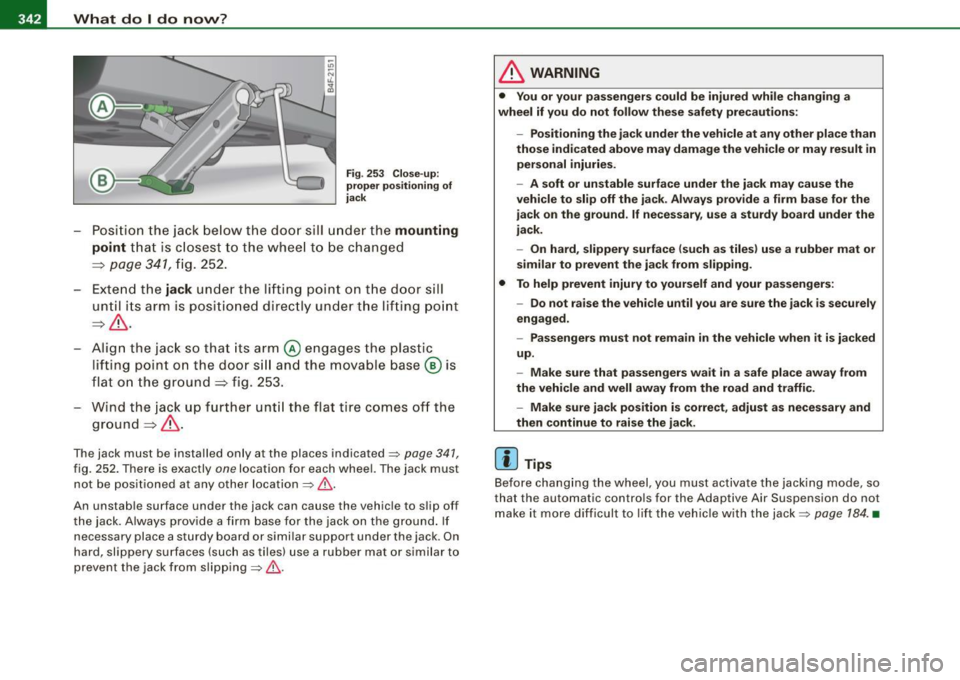
- Position the jack below the door sill under the mounting
point
that is closest to the wheel to be changed
:::::, page 341 , fig. 252.
Extend the
jack under the lifting point on the door sill
until its arm is pos itioned d irectly under the lifting point
:::::,& .
- Align the jack so that its arm @ engages the plastic
l ifting point on the door sill and the movable base@ is
flat on the ground :::::, fig. 253.
Wind the jack up further until the flat tire comes off the
ground :::::,& .
The jack must be installed only at the places indicated~ page 341,
fig. 252. There is exactly one location for each wheel. The jack must
not be positioned at any other location~&.
An unstable surface under the jack can cause the vehicle to slip off
the jack. Always provide a firm base for the jack on the ground. If
necessary place a sturdy board or similar support under the jack . On
hard, slippery surfaces (such as tiles) use a rubber mat or similar to
prevent the jack from slipping~&.
& WARNING
• You or your passengers could be injured while changing a
wheel if you do not follow these safety precautions:
-Positioning the jack under the vehicle at any other place than
those indicated above may damage the vehicle or may result in
personal injuries.
- A soft or unstable surface under the jack may cause the
vehicle to slip off the jack . Always provide a firm base for the
jack on the ground. If necessary, use a sturdy board under the
jack.
- On hard, slippery surface {such as tiles) use a rubber mat or
similar to prevent the jack from slipping.
• To help prevent injury to yourself and your passengers:
-Do not raise the vehicle until you are sure the jack is securely
engaged.
- Passengers must not remain in the vehicle when it is jacked
up.
- Make sure that passengers wait in a safe place away from
the vehicle and well away from the road and traffic.
- Make sure jack position is correct, adjust as necessary and
then continue to raise the jack.
[ i ] Tips
Before changing the wheel, you must activate the jacking mode, so
that the automatic controls for the Adaptive Air Suspension do not
make it more difficult to lift the vehicle with the jack ~
page 184. •
Page 345 of 390
_____________________________________________ W_ h_ a_t _d_ o_l _ d_o _ n_o_ w_ ?_--J IIIII
Taking the wheel off /installing the spare
Follow these instructions step-by-step for changing the
wheel
N
"' ;; u.
al
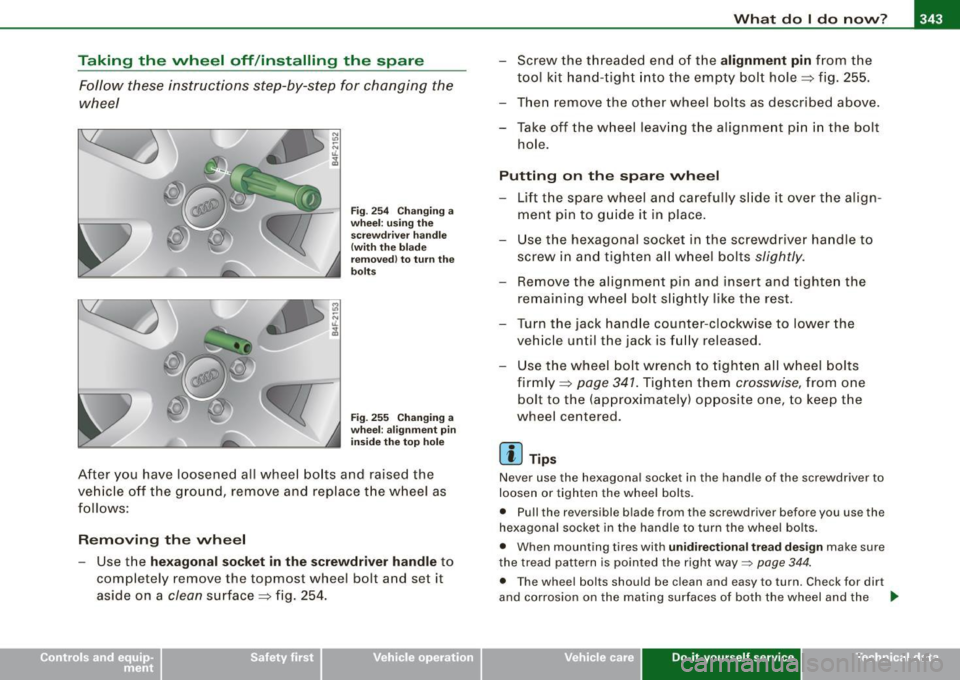
Fig . 254 Changing a
wheel: using the screwdriver handle
!with the blade
removed) to turn the
bolts
Fig . 255 Changing a
wheel: alignment pin
inside the top hole
After you have loosened all wheel bolts and raised the
vehicle off the ground, remove and replace the wheel as
follows:
Removing the wheel
- Use the hexagonal socket in the screwdriver handle to
completely remove the topmost wheel bolt and set it
aside on a clean surface => fig. 254. - Screw the threaded end of the
alignment pin from the
tool kit hand-tight into the empty bolt hole=> fig. 255.
- Then remove the other wheel bolts as described above.
- Take off the wheel leaving the alignment pin in the bolt
hole.
Putting on the spare wheel
- Lift the spare wheel and carefully slide it over the align
ment pin to guide it in place.
- Use the hexagonal socket in the screwdriver handle to
screw in and tighten all wheel bolts slightly.
- Remove the alignment pin and insert and tighten the
remaining wheel bolt slightly like the rest.
- Turn the jack handle counter-clockwise to lower the
vehicle until the jack is fully released .
- Use the wheel bolt wrench to tighten all wheel bolts
firmly => page 341. Tighten them crosswise, from one
bolt to the (approximately) opposite one, to keep the
wheel centered .
[ i] Tips
Never use the hexagonal socket in the handle of the screwdriver to
loosen or tighten the wheel bolts.
• Pull the reversible blade from the screwdriver before you use the
hexagonal socket in the handle to turn the wheel bolts.
• When mounting tires with
unidirectional tread design make sure
the tread pattern is pointed the right way~
page 344.
• The wheel bolts should be clean and easy to turn. Check for dirt
and corrosion on the mating surfaces of both the wheel and the ..
Vehicle care Do-it-yourself service irechnical data
Page 346 of 390
-L___:W:..:..:. h.:.: a::.. t:...:: d:.:o:::....:. l..: d::. O ::::....: n:..:.:: O:..:W :.:..:. ? ____________________________________________ _
hub. Remove all dirt from these surfaces before remounting the
wheel. •
Tires with unidirectional tread design
Tires with unidirectional tread design must be mounted
with their tread pattern pointed in the right direction.
Using a spare tire with a tread pattern intended for use
in a specific direction
When using a spare tire with a tread pattern intended for use in a
specific direction, please note the following:
• The direction of rotation is marked by an arrow on the side of the
tire .
• If the spare tire has to be installed in the incorrect direction, use
the spare tire only temporarily since the tire will not be able to
achieve its optimum performance characteristics with regard to
aquaplaning, noise and wear.
• We recommend that you pay particular attention to this fact
during wet weather and that you adjust your speed to match road
conditions.
• Replace the flat tire with a new one and have it installed on your
vehicle as soon as possible to restore the handling advantages of a
unidirectional tire. •
Notes on wheel changing
Please read the information~ page 325, "New tires and replacing
tires and wheels " if you are going to use a spare tire which is
different from the tires on your vehicle.
After you change a tire:
• Check the tire pressure on the spare immediately after installa
tion . •
Have the wheel bolt tightening torque checked with a torque
wrench as soon as possible by your authorized Audi dealer or a qualified service station .
• With steel and alloy wheel rims, the wheel bolts are correctly
tightened at a torque of 90 ft lb (120 Nml.
• If you notice that the wheel bolts are corroded and difficult to
turn while changing a tire, they should be replaced before you check
the tightening torque.
• Replace the flat tire with a new one and have it installed on your
vehicle as soon as possible. Remount the wheel cover.
Until then, drive with extra care and at reduced speeds .
& WARNING
• If you are going to equip your vehicle with tires or rims which
differ from those which were factory installed, then be sure to read
the information
~ page 325, "New tires and replacing tires and
wheels".
• Always make sure the damaged wheel or even a flat tire and
the jack and tool kit are properly secured in the luggage compart ment and are not loose in the passenger compartment.
• In an accident or sudden maneuver they could fly forward,
injuring anyone in the vehicle .
• Always store damaged wheel, jack and tools securely in the
luggage compartment . Otherwise, in an accident or sudden
maneuver they could fly forward, causing injury to passengers in
the vehicle .
0 Note
Do not use commercially available tire sealants. Otherwise, the elec
trical components of the tire pressure monitoring system* will no
longe r work properly and the sensor for the tire pressure moni
toring system will have to be replaced by a qualified workshop. •
Page 347 of 390
_________________________________________________ F_ u_ s_ e_s _ a_n _d_ b_ u _ lb_ s _ __.1111
Fuses and bulbs
Fuses
Replacing a fuse
A problem in the electrical system may be caused by a
blown fuse.
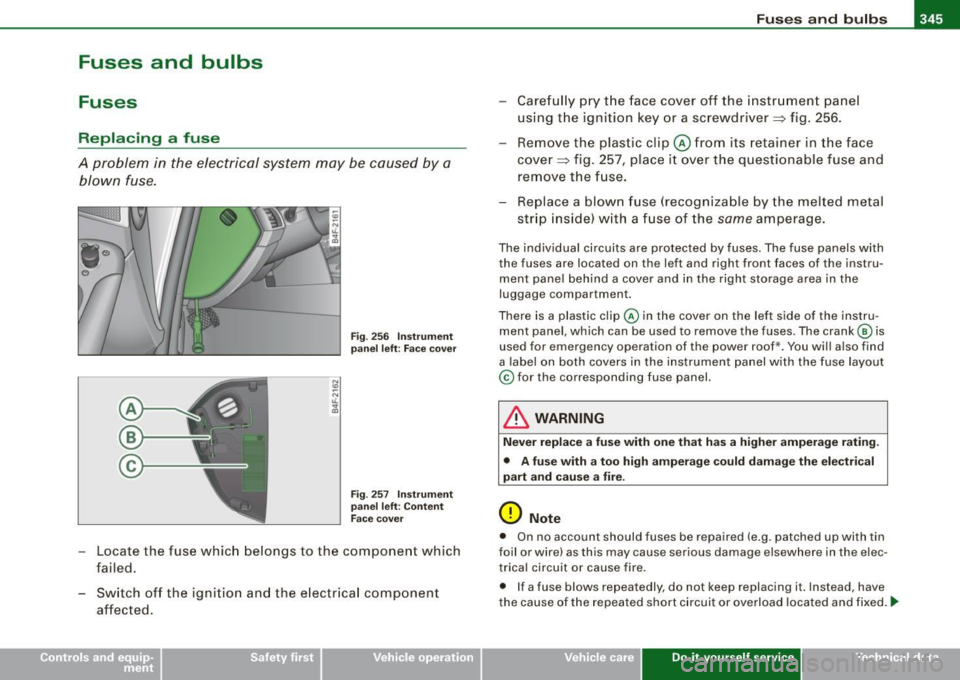
Fig . 256 Ins trumen t
pa nel left: Face c over
F ig . 257 I nst rume nt
pa nel left: Co ntent
F ac e cover
- Locate the fuse which belongs to the component which
failed.
- Switch off the ignition and the e lectr ica l component
affected. - Carefully p
ry t he face cover off the instr umen t pane l
using the ignition key or a screwdriver~ fig. 256.
- Rem ove the plastic clip @ from i ts retainer in the face
cove r~ fig. 257, p lace i t over the questionable fuse and
remove the fuse.
- Replace a blown fuse (recognizable by the melted metal
str ip inside) wi th a f use of the
same amperage.
The individual circuits are protected by fuses. T he fuse panels with
the fuses are located on the left and right front faces of the instru
ment pane l behind a cover and in the right storage area in the
luggage compartment.
There is a plastic clip @ in the cover on the lef t side of the instru
ment pane l, which can be used to remove the fuses . The crank © is
used for emergency operation of the power roof*. You will also find
a label on both covers in the instrument panel with the fuse layout
© for the corresponding fuse panel.
& WARNING
Nev er r eplac e a fuse with one that ha s a high er amperag e rati ng.
• A fu se w ith a to o high ampe rage co uld d amag e the ele ctr ical
pa rt a nd cau se a fire .
0 Note
• On no account should fuses be repaired (e .g. patched up wi th tin
foil or wire) as this may cause serious damage elsewhere in the e lec
trica l circuit o r cause fire.
• If a fuse blows repeatedly, do not keep replacing it. Instead , have
the cause of the repea ted short circuit or overload located and fixed.
ti>
Vehicle care Do-it-yourself service Technical data
Page 348 of 390
llft!I Fuses and bulbs ..._ __________________________________________ _
[ i J Tip s
You are wel l advised to keep a supply of spare fuses in your vehicle .
Fuses with the proper ampere ratings are availab le at your Audi
dea ler. •
Fuse Location , Instrument Panel left
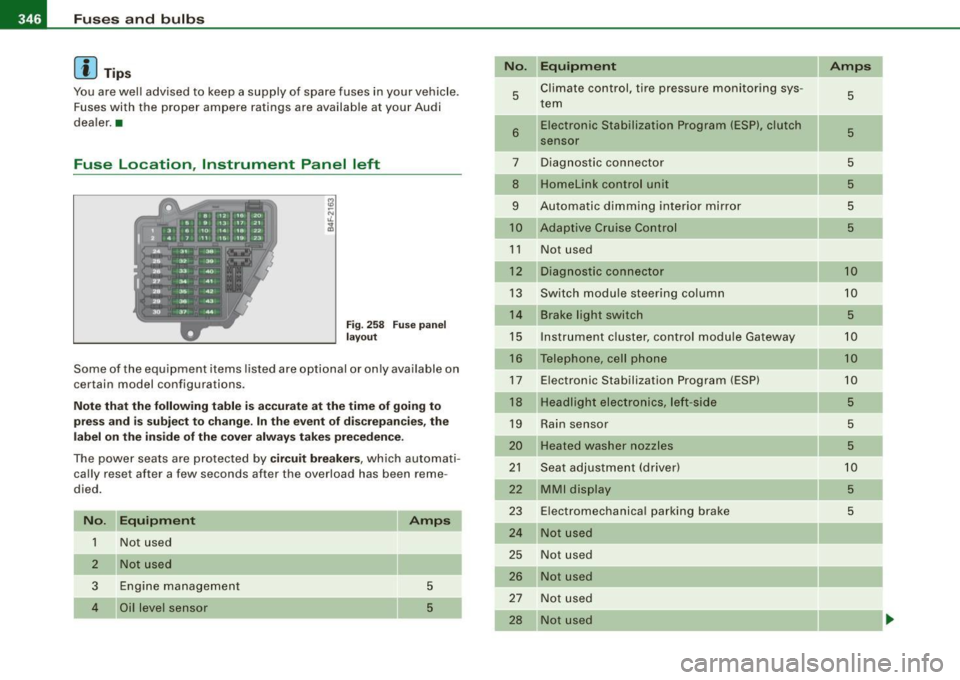
Fig . 258 Fuse pa nel
l ayo ut
Some of the equipment items listed are optional or only ava ilable on
certain model configurations .
Note th at t he fo llo wi ng t able i s acc urat e at th e time of goin g to
pr ess and is subject t o ch ang e. In th e eve nt of d iscrep ancie s, th e
labe l on th e in side of th e cover always ta kes prece de nce .
The power seats are protected by cir cuit br eaker s, which automati
cally reset after a few seconds after the overload has been reme
died.
N o. Equipm ent
1 Not used
2
3
4
Not used
Engine management
Oil level sensor Amps
5
5
No
.
5
6
..
7
8
9
10
1 1
12
13
14
15
16
17
18
19
20
21
22
23
24
25
26
27
28
Equipm ent
Climate cont rol , tire pressure monitoring sys
tem
Electronic Stabilization Program (ESP), clutch
sensor
Diagnostic connector
Homelink control unit
Automa tic dimming interior mirror
Adaptive Cruise Control
Not used
Diagnostic connector
Switch modu le steering column
Brake light switch
I nstrument c luster, control module Ga teway
Telephone, cell phone E lectronic Stabilization Program (ESP)
Headlight electronics, left -side
Rain sensor
Heated washer nozzles
Seat adjustment (driver)
MMI display
E lectromechanica l parking brake
Not used
Not used
Not used
N ot used
Not used Amps
5
5
5
5
5
5
10
10
5
10
10
10
5
5
5
10
5
5
-
Page 349 of 390
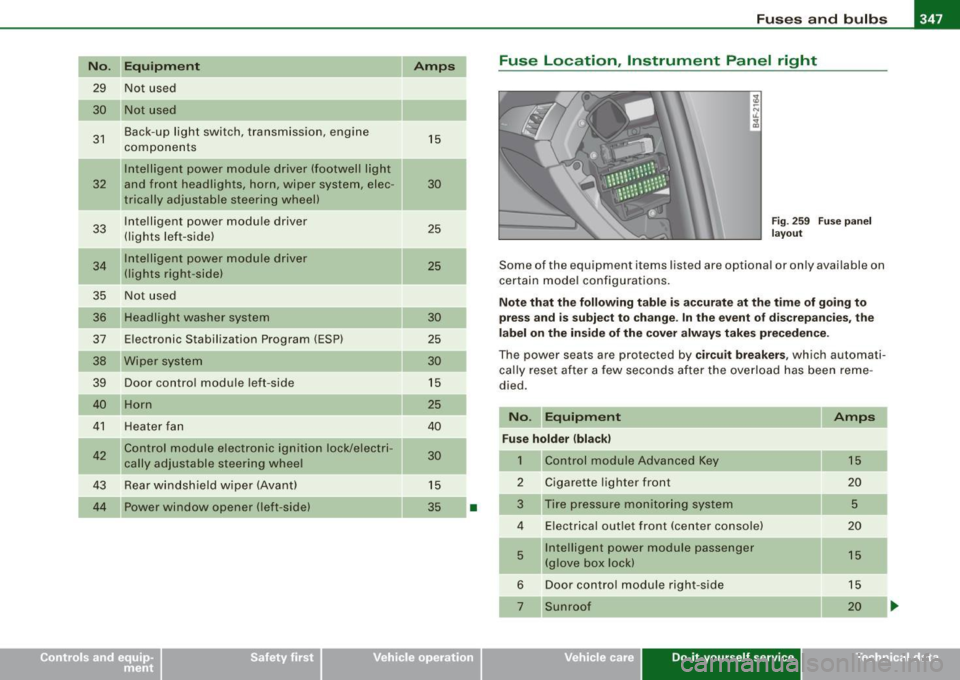
_______________________________________________ F_ u_ s...:....... e...;.s _ a_ n_d :.:.....:.: b:...: u:...: l:.:.: b :...:s:...___,J
No . Equipm ent
29 Not used
30 Not used
31 Back-up light swi
tch, transmission , engine
components
Intelligent power mo dule driver (footwell l ight
32 and front headlights , horn, wiper system, elec
tr ically adjusta ble steering wheel)
33 I
ntelligent power modu le driver
(lights left -side)
---,--
34
35
36
37
38
39 I
nte lligent power modu le driver
(lights right -side)
Not used
Headlight washer system
E lectronic Stabilization Program (ESP)
Wip er system
Door control module left -side
Horn
41 Heater fan
42 Control module electronic ignition lock/electri
cally adjustable steering wheel
43 Rear windsh iel d wiper (Avant)
4 4 Power window opener (left-side)
Amps
15
30
25
25
30 25
30
15
25
40
30
15
35
-
•
Fuse Location , Instrument Panel right
Fig . 2 59 F use p an el
la yo ut
Some of the equipm ent items lis ted are op tional or on ly available on
certain m ode l configu rations.
Note that the following table is ac curate at the time of g oing to
press and is subject t o change . In the ev ent of d iscrepan cies , th e
l a b el on t he in side of the cover alw ay s take s prec eden ce.
Th e power seats are pr otected by circuit breaker s, which automa ti
ca lly reset after a few seconds a fter the ove rload has been reme
died .
No. Equipment Amps
Fu se holder (bla ck )
1 Control module Advanced Key 15
2 Cigarette
lighter front
20
3 Tire pressure moni tor ing system
5
4 E lectrica l outlet front (center conso le) 20
5 Intellige
nt power module passenger
15
(glove box lock)
6 Door control module right -side 15
Sunroof 20
Vehicle care Do-it-yourself service irechnical data
Page 350 of 390
111!1 Fuses and bulbs ..._ ____ .;__...;_;,;_ _______________________________ _
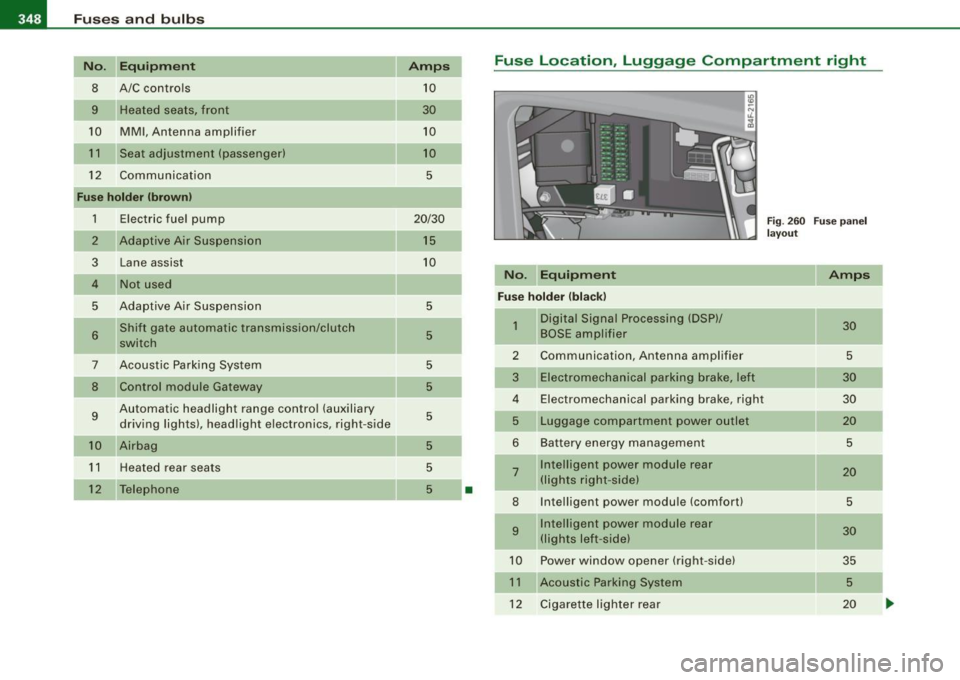
No. Equipm ent Amps
8 A/C controls 10
9 Heated seats, front 30
10
MMI , Antenna amplifier 10
11
Seat adjustment (passenger) 10
12
Communication 5
Fu se holder (b rown )
1 Electric fuel pump 20/30
2
Adaptive Air Suspension 15
3
Lane assist 10
4 Not used
5 Adaptive Air Suspension 5
6 Shift gate automatic transmission/clutch 5 switch
-
7 Acoustic Park ing System 5
8 Control module Gateway 5
9 Automatic headlight range contro l (auxiliary 5 driving lights), head light electronics, right -side
10 Airbag 5
11
Heated rear seats 5
12
Telephone 5 •
Fuse Location, Luggage Compartment r ight
No . Equipm ent
Fuse hold er (bl ack)
1 Digital Signal Processing (DSP)/
BOSE ampl ifier
2 Communication , Antenna amplifier
3 Electromechanical parking brake, l eft
4 Electromechanical parking brake, right
5 Luggage compartment powe r outlet
6 Bat tery energy management
7 Intelligent power module rear
(lights right -si de)
8 Intelligent power module (comfort)
9 Intelligent power module rear
(lights le ft-side)
10 Powe r window opener (right-side)
11 Acoustic Parking System
12 Cigarette lighter rear
Fig . 260 F use pa nel
l ay ou t
Amps
30
5
30
30
20
5
2 0
5
30
35 5
20
-