AUDI TT COUPE 2016 Owners Manual
Manufacturer: AUDI, Model Year: 2016, Model line: TT COUPE, Model: AUDI TT COUPE 2016Pages: 322, PDF Size: 52.86 MB
Page 271 of 322
Downloaded from www.Manualslib.com manuals search engine Storing tire pressures
If the tire pressure changes or a tire is replaced,
it must be confirmed in the Infotainment sys
tem .
.,. Make sure before storing that the tire pressures
of all four tires meet the specified values and
are adapted to the load~ page 258 .
.,. Switch on the ignition .
.,. Select in the I nfo tainment system: the I MENU I
button > Vehicle > left control bu tton > Service
& checks > Tire pressure monitor.
(D Tips
Do not store the tire pressures if snow chains
are installed .
Wheels
269
Page 272 of 322
Downloaded from www.Manualslib.com manuals search engine Care and cleaning
Care and cleaning
General information
Regular, proper care helps to maintain your vehi
cle's value.
It can also be a requirement when
submitting warranty claims for corrosion damage
and
paint defects on the body .
The necessary care products
can be obtained
from your authorized Audi dealer. Read and fol
low the instructions for use on the packaging.
A WARNING
-Using cleaning and care products incorrectly
can be dangerous to your health.
-Always store cleaning and care products out
of reach of children to reduce the risk of po i
so
ning.
@ For the sake of the environment
- Preferably use environmentally-friendly
products when buying cleaning agents.
-
Do not dispose of leftover cleaning and care
products
with household trash.
Car washes
The longer that deposits remain on the vehicle,
the more the surface may be damaged. High
temperatures such
as those caused by sunlight
increase the damag ing effect.
Before washing, ri
nse off heavy deposits with
plenty of water.
Stubb orn depos its such
as bird droppings or tree
sap are best removed with plenty of water and a
microfiber cloth.
Also, wash
the underside of your vehicle once
road
salt stops being used for the season.
Pressure washers
When washing your vehicles with a pressure
washer, always
follow the operating instructions
provided
with the pressure washer. This is espe
cially
important in regard to the pressure and
spraying distance.
Do not direct the stream of
cleaning solution directly onto the side window
seals, doors, luggage
compartment lid or hood,
270
tires, rubber hoses, insulating material or sen
sors *.
Keep a distance of at least 16 in (40 cm).
Do not remove snow and ice with a pressure
washer.
Never use rotary nozzles
or high pressure noz
zles.
The
water temperature must not be above 140 °F
(60 °().
Automatic car washes
Spray off the vehicle before washing.
M a
ke su re that the windows are closed and the
windshield wipers a re off. Follow instructions
from the car was h operato r, espec ially if there
a re accessories attached
to your vehicle.
If possible, use car washes that do not have
b rushes.
Washing by hand
Clean the vehicle starting from the top and work
ing down using a soft sponge or cleaning brush.
Use solvent-free cleaning products.
Washing vehicles with matte finish paint by
hand
To avoid damaging the paint when washing, first
remove dust and large particles from your vehi
cle. Insects, grease spots and fingerprints are
bes t removed
with a special cleaner for matte
finish paint.
Apply th e p roduct using a microfiber cloth. To
avoid damagin g t he paint surface, do not use too
much pressu re.
Rinse the vehicle thorough ly with water. Then
cl e
an using a neutral shampoo and a soft micro
fiber cloth .
R i
nse the vehicle thoroughly again and let it air
dry. Remove any water residue using a shammy.
A WARNING
-Only wash the vehicle when the ignition is
off and follow the instructions from the car
wash operator
to reduce the risk of acci
dents.
Page 273 of 322
Downloaded from www.Manualslib.com manuals search engine -To reduce the risk of cuts, protect yourself
from sharp metal components when wash
ing th e underbody or the inside of the wheel
housings.
- After
washing the vehicle, the brak ing effect
may be delayed due to moisture on the
brake rotors or ice in the w inter. The brakes
must be dried first w ith a few careful brake
applications.
CD Note
-If you wash the vehicle in an automatic car
wash, yo u must retract the extendable rear
spoiler* if necessary, and fold the exterior
mirrors in to red uce the risk of damage.
Power folding exterior mirrors* must on ly
be fol
ded in and ou t u sing the power folding
function.
-
To p reve nt paint d amage, d o not wash th e
vehicle in dir
ect sunlight.
Care and cleaning
- To red uce the risk of damage to the surface,
do
not use insect removing sponges, kitchen
sponges or s imilar items.
-
Matte finish painted veh icle components:
-To reduce the risk of damage to the sur-
face, do not use polishing agents or hard
wax.
- Never u
se protective wax. It can destroy
the matte finish effect.
-
Do not place any stickers or magnetic
signs on vehicle parts painted with matte
finish paint. The paint could be damaged
when the stickers or magnets are re
moved .
@ For the sake of the environment
Only wash the vehicle in facilities sp ec ia ll y de
signed for that pu rpose. This will reduce the
risk of dirty water contamina ted with oil from
entering the sewer sys tem.
Cleaning and care information
When cleaning and ca ring for individua l vehicle
components, refer to the follow ing tables. The
information contained there is simply recom
mendations. For q uestions or for components
that are not listed, consult an authoriz e d Audi
de a
ler or authorized Audi Service Facility. Also
f o ll
ow the informa tion found in~.&..
Ext erior cleaning
Component Situation Solution
Windshield wiper Deposits ~poge42
blades
Headlights /
Deposits Soft sponge with
a mild soap solutiona)
Tail lights
Sensors
Deposits soft cloth with solvent-free clean ing solution
Snow/ice Hand brush/solvent
-free de-icing spray
Wheels Road salt Water
Brake dust Acid-free special cleaning sol u tion
E x haust tail p ipes Road salt Water, clean ing solution suitable for stainless steel, if nee -
essary
Decorative parts/ Deposits Mild soap solution a>, a cleaning solution suitable for stain-
trim less steel, if necessary
271
Page 274 of 322
Downloaded from www.Manualslib.com manuals search engine Care and cleaning
Component Situation Solution
P a int
Paint damage Refer to the paint number on the vehicle data label, repair
with touch up paint¢ page 298
Spilled fuel R inse with water immediately
Surface rust Rust remover, then protect with hard wax; for questions,
consult an authorized Audi dealer or authorized Audi Serv-
ice Facility.
Corrosion Have it removed by an authorized Audi dealer or author-
ized Audi Service Facility.
Water no longer Protect with hard wax (at least twice per year)
beads on the surface
of clean paint
No shine even though Treat with suitable polish; then apply paint protectant if
paint has been pro-the polish that was used does not contain any protectant
tected/paint looks
poor
Deposits such as in-Dampen with water immediately and remove with a micro-
sects, bird droppings, fiber cloth
tree sap and road salt
Grease -based con- Remove immediately with a mild soap solution al and a
taminants such as soft cloth
cosmetics or sunblock
Carbo n part s Deposits clean the same way as painted parts ¢page 2 70
a) Mild soap solution: maxim um two tablespoons of neutral soap in 1 quart (1 liter) of water
Int ernal cleaning
Component Situation Solution
Windows Deposits Glass cleaner, then w ipe dry
Decorat iv e parts/ Deposits Mild soap solutional
trim
Plasti c parts Deposits Damp cloth
Heavier
deposits Mild soap solution al, detergent-free plasti c clean-
ing
solution, if necessary
Dis plays/instr u-Deposits Soft cloth with LCD cleaner; dust deposits in the
ment cluste r lower area of the instrument cluster can be re-
moved using a soft brush.
Contro ls Deposits Soft bru sh, then a soft cloth with a mi ld soap solu-
tional
Safety be lts Deposits Mild soap solution al, allow to dry before letting
them retract
272
Page 275 of 322
Downloaded from www.Manualslib.com manuals search engine Care and cleaning
Component Situation Solution
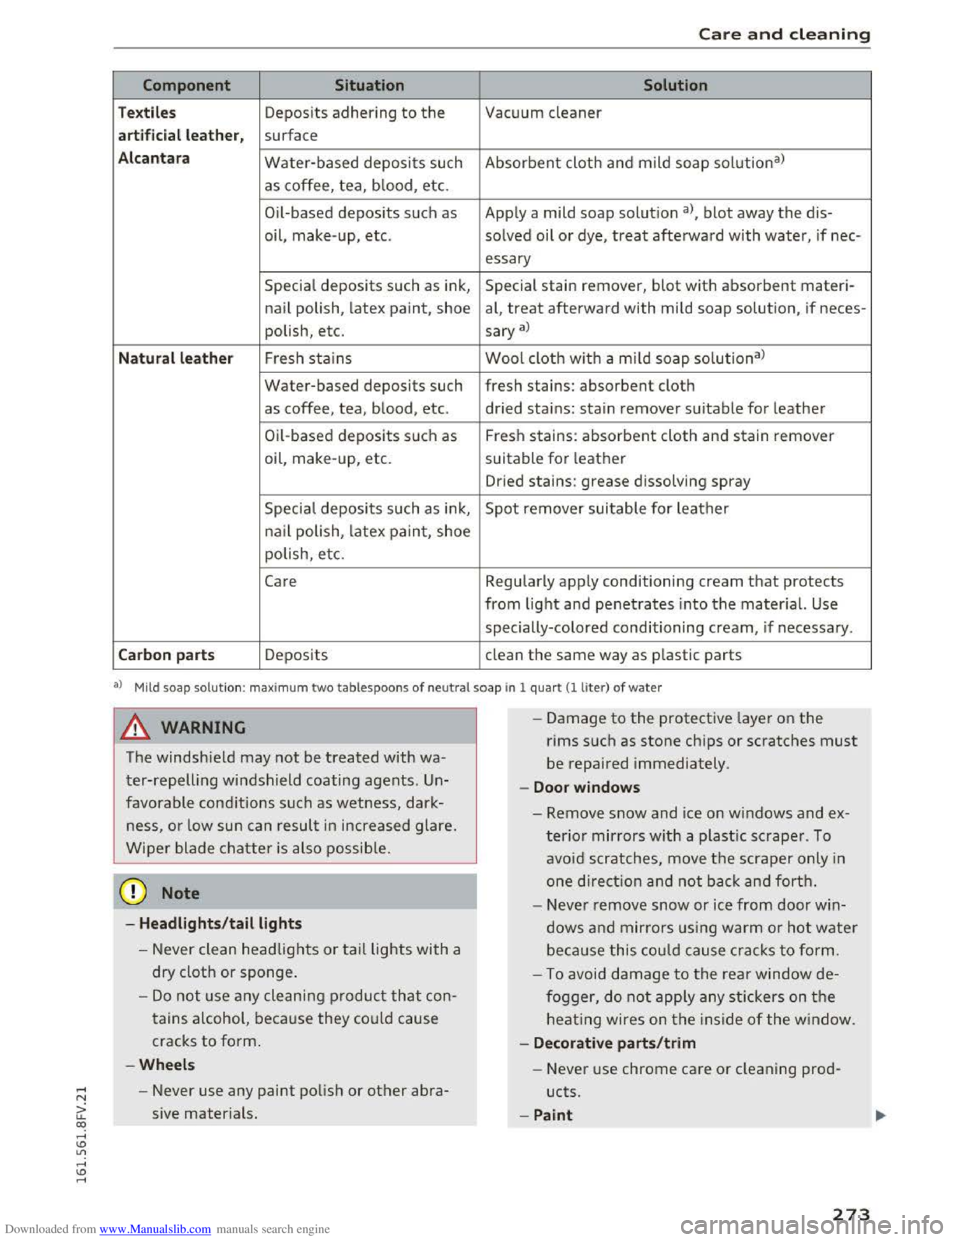
Textiles Deposits adhering to the Vacuum cleaner
a rt ificial leat her , surface
Alc an tara Water-based deposits such Absorbent cloth and mild soap solu tion3>
as coffee, tea, b lood, etc.
O il-based
deposits such as Apply a mild soap solutio n a), blot away the dis-
oil,
make- up, etc. solved oil or dye, treat afterward with water, if nee-
essary
Special deposits such as ink, Special stain remover, blot with absorbent materi-
nail polish, latex paint, shoe al, treat afterward with mild soap solution, if neces-
polish, etc.
sary a)
Natural leather Fresh stains Wool cloth w ith a mild soap solutiona )
Water-based deposits such fresh stains: absorbent cloth
as coffee, tea, blood, etc. dried stains: stain remover suitable for leather
Oil-based deposits su ch as Fresh stains: absorbent cloth and stain remover
oil, make-up, etc. suitable for leather
Dried stains: grease dissolving spray
Specia l deposits such as ink, Spot remover suitable for leather
na il polish, latex paint, shoe
polish, etc.
Care Regularly apply conditioning cream that protects
from light and penetrates into the material. Use
specially-colored conditioning cream, if necessary .
Carbon parts Deposits clean the same way as plastic parts
al M ild soap sol u tion: max im um two tablespoons of ne u tra l soap in 1 quart(! liter) of water
A WARNING
The windshield may not be treated with wa
ter-repelling windshield coating agents. Un
favorable conditions such as wetness, dark
ness, or low sun can result in increased glare.
Wiper blade chatter is also possib le.
@ Note
-Headlights /tail lights
-Never clean headlights or tail lights with a
dry
cloth or sponge.
-Do not use any cleaning product that con
tains a lcohol, because they could cause
cracks to form.
-Wheels
- Never use any paint polish or other abra-
sive materials.
- I
-Damage to the protective layer on the
rims such as stone chips or scratches must
be repaired immediately.
-Doo r window s
-Remove snow and ice on windows and ex-
terior mirrors with a plastic scraper. To
avoid scratches, move the scraper only in
one direction a nd not back and forth.
- Neve r remove snow or ice from door win
dows and mirrors us ing warm o r hot water
beca u
se this could cause cracks to form.
- To avoid damage to the rear window de
fogger, do not apply any stickers on the
heating wires on the inside of the window.
- De corati ve parts/trim
- Never use chrome care or cleaning prod-
ucts.
-Paint
273
Page 276 of 322
Downloaded from www.Manualslib.com manuals search engine Care and cleaning
-To red uce the risk of scratches, the vehicle
must be free of dirt and dust before pol
ishing
or waxing .
- To
prevent pa int damage, do not polish or
wax the vehicle in direct sunlight.
-To red uce the risk of pa int damage, do not
polish away rust spots.
-Remove cosmetics and sunscreen immedi
ately-these could damage the paint.
-In strument cluster
- Make sure that the instrument cluster is
switched off and has cooled off before
cleaning it.
- The
instrument cluster and the trim sur
round ing
it must not be cleaned with dry
cleaning
methods because they could get
sc ratched.
- Make
sure no fluids enter the spaces be
tween the instrument cluster and the
trim, because that could cause damage.
-Controls
- Make sure that no fluids enter the con-
trols, because this could cause damage.
-Safety belts
-Do not remove the safety belts to clean
them.
-Never clean safety belts or their compo
nents chemically or with corrosive fluids
or
solvents and never allow sharp objects
to come into contact with the safety belts.
This could cause damage to the belt web
bing.
-
If there i s damage to the webbing, the
connections, the retractors or the buckles,
have
them replaced by an authorized Audi
dealer or authorized Audi Service Facility.
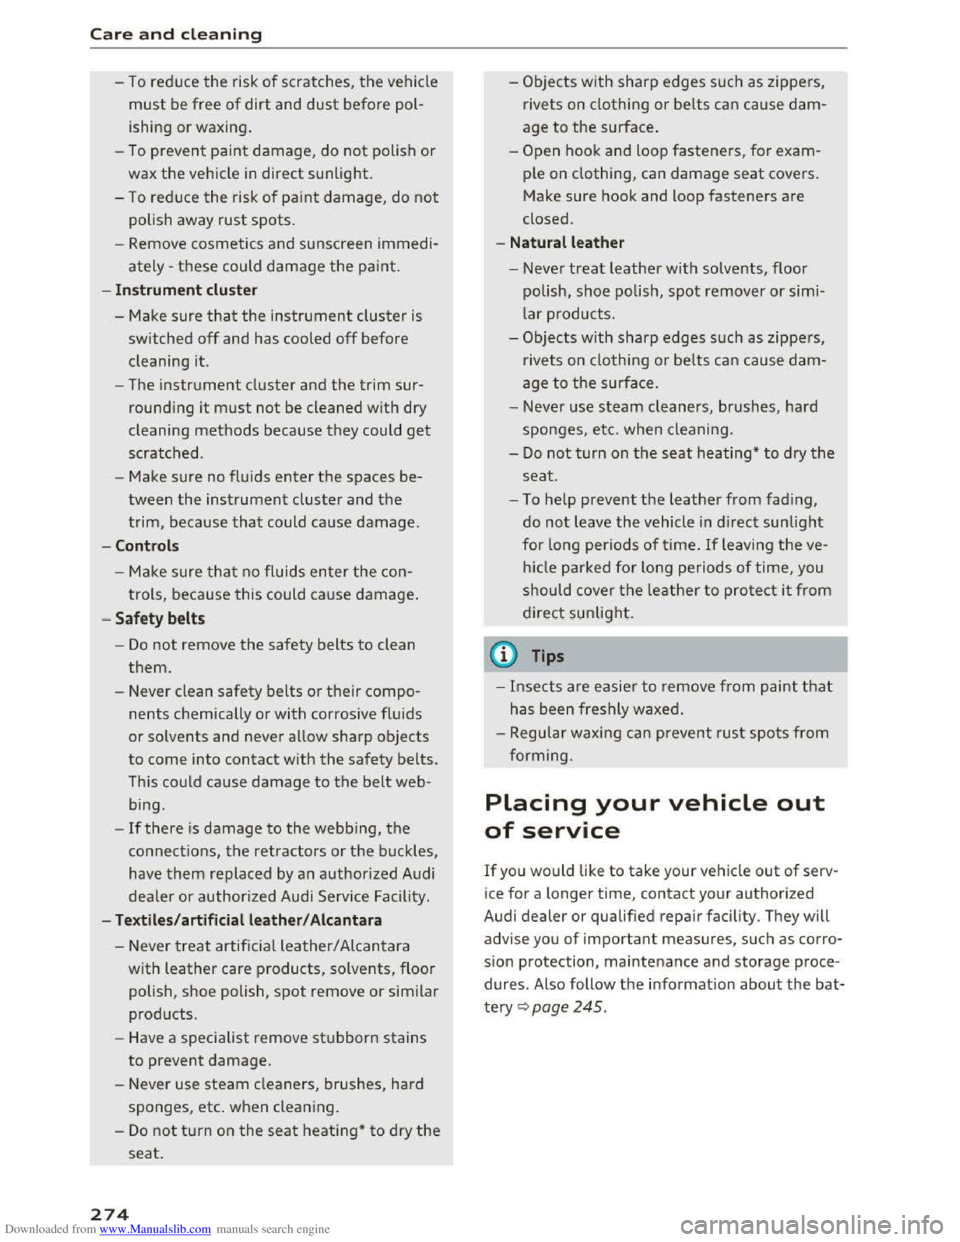
-Textiles /artificial le ather / Alcantar a
-Never treat artificia l leather/ Alcantara
with
leather care products, solvents, floor
polish,
shoe polish, spot remove or similar
prod ucts.
- Have a specialist remove
stubborn stains
to prevent damage.
- Never use steam cleaners, brushes, hard
sponges, etc. when cleaning.
-
Do not turn on the seat heating* to dry the
seat.
274
-Objects w ith sharp edges su ch as zippers,
rivets on clothing
or belts can cause dam
age to the surface .
-
Open hook and loop fasteners, for exam
ple on clothing, can damage seat covers.
Make
sure hook and loop fasteners are
closed.
-Natural leather
-Neve r treat leather with solvents, floor
polish,
shoe polish, spot remover or simi
lar pr
oducts.
-Objects w ith sharp edges such as zippers,
rivets on clothing
or belts can cause dam
age to the surface.
- Never use
steam cleaners, brushes, hard
sponges, etc. when cleaning.
-
Do not turn on the seat heating* to dry the
seat.
-To he lp prevent the leather from fading,
do not leave the vehicle in d irect sunlight
for long periods of time. If leaving the ve
h icl e parked for long periods
of time, you
should cover
the leather to pro te ct it from
direct sunlight.
(D Tips
-Insects are easier to remove from paint that
has been freshly waxed.
- Regular waxing can
prevent rust spots from
forming.
Placing your vehicle out
of service
If you would like to take your vehicle out of serv
ice for a
longer time, contact your authorized
Audi
dealer or qualified repair facility. They will
advise you
of important measures, such as corro
s i
on protection, maintenance and storage proce
dures. Also follow the in formation about the bat
tery <=>page 245.
Page 277 of 322
Downloaded from www.Manualslib.com manuals search engine ..... N
a: CX)
.....
"' U"I
.....
"' .....
Emergency assistance
General information
"'Park th e vehicle as far as possible from moving
traffic in the event of a flat tire. In the event of
a flat tire, park the vehicle on a level surface. It
you are on a steep incline, be especially careful.
"'Set the parking brake.
"'Place the selector lever in the P position.
"'Switch the emergency flashers on.
"'Have the passengers exit the vehicle. They
should move to a safe place, for example be
hind a
guard rail.
A WARNING
Follow the steps given above. This is for your
protection and the for the safety of other driv
ers.
Equipment
Vehicle tool kit/tire mobility kit/
compressor
Fig. 196 Luggage compartment: cargo floo r closed
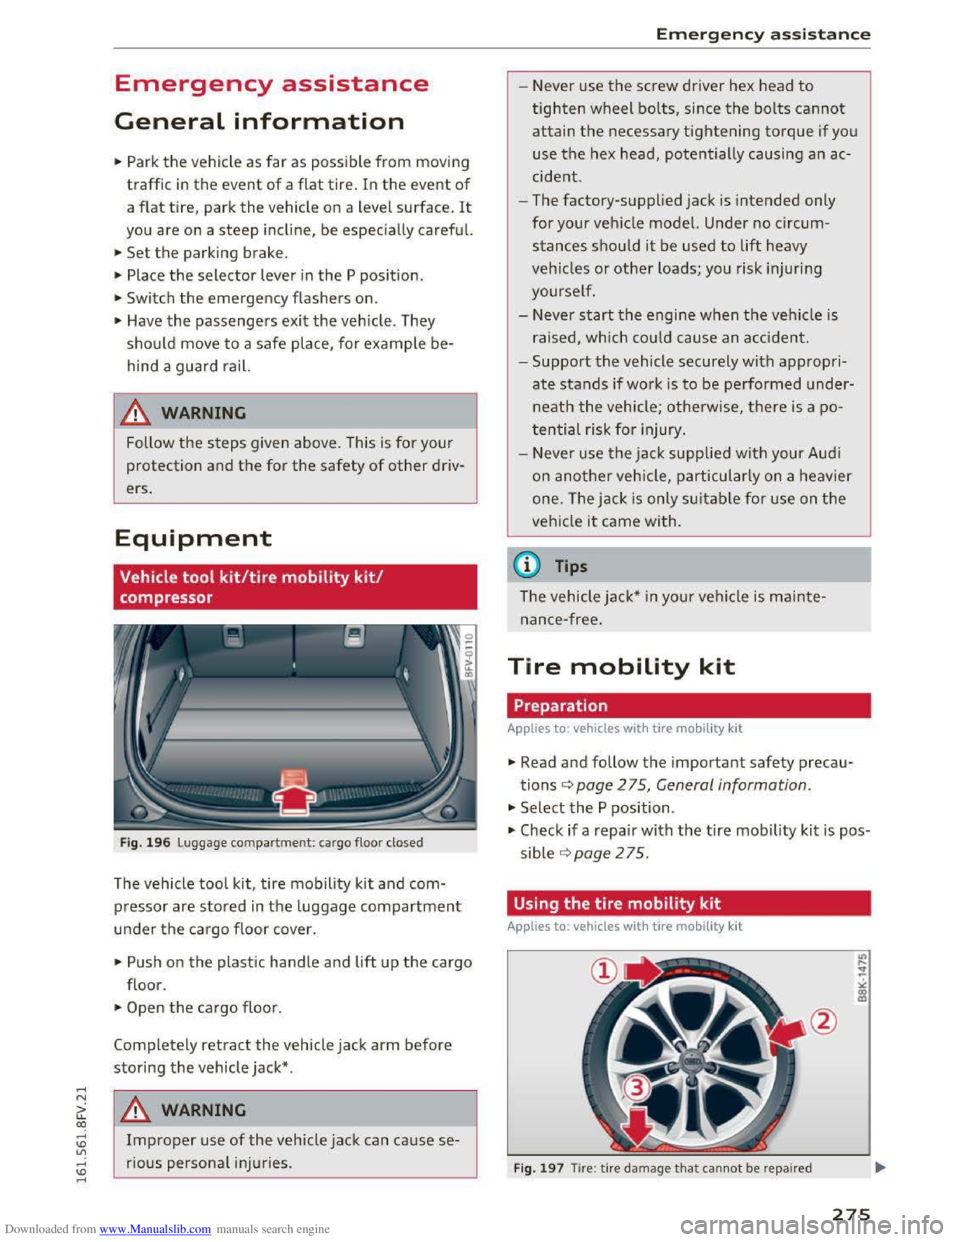
The vehicle tool kit, tire mobility kit and com
pressor are stored in the luggage compartment
u nder the ca rgo floor cover.
"'Push on the plastic handle and lift up the cargo
floor.
"'Open the cargo floor.
Completely retract the vehicle jack arm before
storing the vehicle jack* .
A WARNING
Improper use of the vehicle jack can ca use se
rious personal inju ries .
Emergency assistance
- Never use the screw driver hex head to
tighten wheel bolts, since the bolts cannot
attain the necessary tightening torque if you
use the hex head, potentially causing an ac
cide nt.
- The
factory-supplied jack is intended only
for your vehicle model. Under no circum
stances should it be used to lift heavy
vehicles or other loads; you risk injuring
yourself.
- Never
start the engine when the vehicle is
raised, which could cause an accident.
-Support the vehicle securely with a ppropri
ate stands if wo rk is to be performed under
neat h the vehicle; otherwise, there is a po
tential risk for injury.
- Never
use the jack supplied with your Audi
on another veh icle, particularly on a heavier
one. The jack is only suitable for use on the
vehicle it came with.
(D Tips
The vehicle jack* in your vehicle is mainte
nance-free.
Tire mobility kit
Preparation
Applies to: vehicles with tire mobili ty kit
"' Read and follow the important safety precau
tions<=> page 2 75, General information.
"' Select the P position .
"' Check if a repair with the tire mobility kit is pos
sible ¢page 275.
Using the tire mobility kit
Applies to: vehicles with tire mobility k it
F
ig. 1 97 Tire : tire damage that cannot be repaired
275
Page 278 of 322
Downloaded from www.Manualslib.com manuals search engine Emergency assistance
The tire repair is only meant for temporary use.
Change the spare tire as soon as possible ¢.&..
If the tire is pierced by an object such as a nail ,
do not remove the object from the tire.
The
tire mobility kit is able to be used at temper
atures as low as - 4 °F (-20 °C).
The tire mobility kit may not be used:
-
If the t ire has cuts or punctures that are larger
than 0 .1 6 in (4 mm) CD¢ fig. 197.
-if the rim is damaged@ .
- if you drove
with very Low tire pressure or with-
out air in the tire@.
See an authorized Audi dealer or authorized Audi
Service Facility for
assistance in these situations.
& WARNING
- Please
note that the tire mobility kit cannot
be used i n all situations, and that it may on
ly be used temporarily.
- The
tire sealant must not come in contact
with skin, eyes, or clothes.
-If tire sealant gets in your eyes or on your
skin, thoroughly rinse the affected area im
mediately w ith clean water.
-Do not inhale the fumes.
-If you swallow any of the tir e sealant, thor-
oughly rinse your mouth immediately and
drink a lot of water. Do not induce vomiting.
Seek medical attention immediately.
-
Change your clothes immediately if they get
tire sealant on them.
-If an allerg ic reaction occurs, seek immedi
ate medical attention.
-Keep the tire sealant away from children .
@ Tips
-
If sealant Leak s, allow it to dry in place. You
can then peel it off like a sticker.
- Note
the expiration date on the sealant bot
tle. Replace the tire sealant at an author
ized Audi dealer or authorized Aud i Service
Facility.
- Radio reception
can be interrupted when
operating the compressor*.
-
Obey all laws.
276
Repairing tires
Applies to: vehicles with tire mobility kit
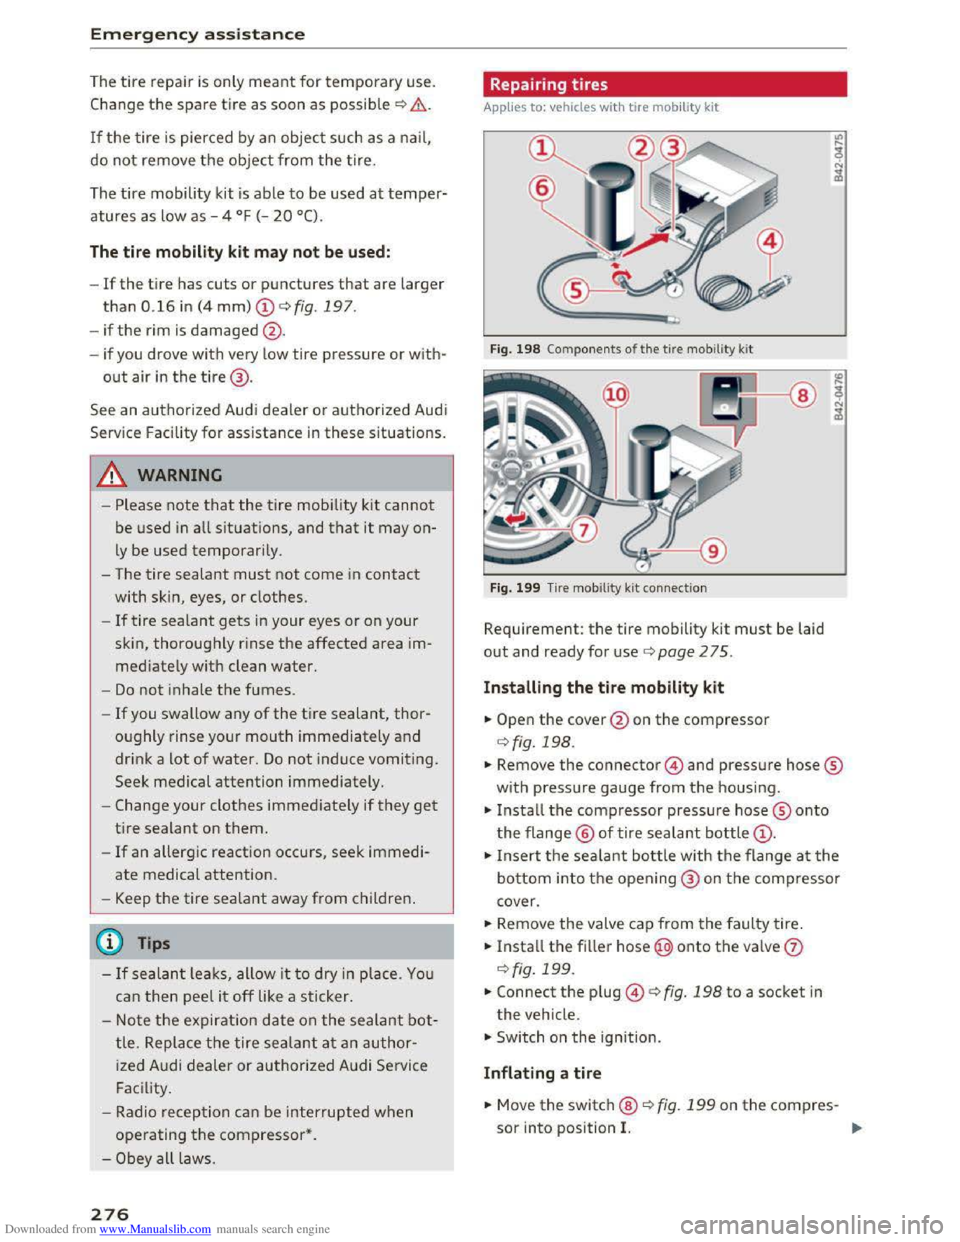
Fig. 198 Compo nents of the tire mobility kit
Fig. 199 Tire mobility ki t connection
Requirement: the tire mobility kit must be laid
out and ready for use ¢page 2 75.
Installing the tire mobility
kit
... Open the cover @ on the compressor
¢fig. 198.
... Remove the connector© and pressure hose®
with
pressure gauge from the housing.
... Install the compressor pressure hose® onto
the flange@ of tire sealant bottle@ .
.,. Insert the sealant bottle with the flange at the
bottom into the opening @ on the compressor
cover .
... Remove the valve cap from the faulty tire.
... Install th e fille r hose@onto the valve (j)
¢ fig. 199.
... Connect the plug ©<=> fig. 198 to a socket in
the vehicle .
.,. Switch on the ignition .
Inflating a tire
... Move the switch @ ¢fig. 199 on the compres-
sor into position I. ..,.
Page 279 of 322
Downloaded from www.Manualslib.com manuals search engine ...... N
G'. CX)
..... ID IJ' ..... ID .....
.,. Inflate the tire to between 29 psi (200 kPA)
and 36 psi (2SO kPA) and read the pressure on
the gauge.
... If this tire pressure is not reached, remove the
filler hose. Drive slowly approximately 33 ft
(!Om) forward or in reverse so that the sealant
can be distributed in the tire. Pump up the tire
again Q ,&..
A WARNING
-Read and follow the manufacturer's safety
precautions on the compressor and in
the
instructions on the bottle of sealant.
-If a tire pressure of 29 psi (200 kPA) cannot
reached
after inflating for 6 minutes, then
the
tire i s too severely damaged . Do not
continue driving.
-If the tire cannot be repaired with the tire
sealant, see an authorized Audi dealer or au
thorized Audi Service Facility
for assistance .
(D Tips
Do not operate the compressor for more than
6 minutes continuously, or it can overheat.
Once the compressor has cooled, you can con
tinue
to use it.
Completing
Applies to: vehicles with tire mobility kit
.,. Adhere the sticker that says "max. SO mph
(max. 80 km/h)" that is provided with the tire
mobility kit within the driver's field of vision .
.,. Stop the vehicle after driving for about 10 mi
nutes and check th e tire pressure.
.,. If the ti re pressure is lower than 19 psi (130
kPA), then the tire is too severely damaged. Do
not continue driving.
A WARNING
If the tire pressure is less than 19 psi
(130 kPA) after 10 minutes of driving, then
the tire is too severely damaged. Do not con
tinue driving.
See an authorized Audi dealer
or authorized Audi Service Facility for assis
tance.
Emergency assistance
A WARNING
"" Pay attention to the following after repairing
the tire:
-Do not drive faster than SO mph (80 km/h).
- Avoid hard acceleration, braking sharply,
and
fast cornering.
- The vehicle may become more
difficult to
control.
-
If the tire is too severely damaged, see an
authorized Audi dealer or authorized Audi
Service Facility
for assistance.
@ For the sake of the environment
You can give the used tire sealant bottle to an
authorized Audi deale r or authorized Audi
Service
Facility for disposal.
(D Tips
Remember to obtain a new bottle of sealant
from an authorized Audi dealer or authorized
Audi Service Facility
after repairing a tire.
Replacing wheels
Before changing a wheel
Observe the following precautions for your own
and
your passenger 's safety when changing a
wheel.
.,. After you experience a tire failure, pull the car
well away from moving traffic and try to reach
level ground before you stop Q .&_.
.,. All passengers should leave the car and move
to a safe location (for instance, behind the
guardra il)
Q & .
... Engag e the parking brake to prevent your vehi
cle
from rolling unintentionally Q ,&..
... Move selector lever to position P Q ,&..
.,. Take the jack Q page 2 75 and the spare tire
Q page 283 out of the luggage compartment.
A WARNING
You or your passengers could be injured while
changing a wheel
if you do not follow these
safety precautions:
-
277
Page 280 of 322
Downloaded from www.Manualslib.com manuals search engine Emergency assista nce
-If you have a flat tire, move a safe distance
off the road. Turn off the engine, turn the
emergency flashers on and use other warn
ing devices to alert other motorists.
-Make sure that passengers wait in a safe
place away from the vehicle and well away
from the road and traffic.
-
To help prevent the vehicle from moving
suddenly and possibly slipping off the jack,
always fully
set the parking brake and block
the wheel diagonally opposite the wheel be
ing changed. When one front wheel is lifted
off the ground, placing the Automatic
Transmission in P (Park) will not prevent the
vehicle from moving.
- Before you
change a wheel, be sure the
ground is level and firm. If necessary, use a
sturdy board under the jack.
- Always
store the veh icle tool k it, the jack
and the replaced tire in the luggage com
partment¢ page 176.
Changing a wheel
When you change a wheel, follow the sequence
described
below step-by-step and in exactly that
order .
1. Remove the decorative wheel co ver*. For
more de tails see also¢ page 2 78, Decora
tive wheel covers or c::> page 2 79, Wheels
with wheel bolt caps.
2. Loosen the wheel bolts ¢page 2 79.
3. Locate the proper mounting point for the
jack and align the jack below that point
c::>page280.
4. Raise the car with the jack c::> page 280.
5. Remove the wheel with the flat tire and then
install the s pare ¢ page 281.
6. Tighten all wheel bolts lightly.
7.
Lower the veh icle with the jack .
8. Use the wheel bolt wrench and firml y tighten
all wheel bolts ¢page 279.
9. Replace the decorative wheel cover*.
278
A WARNING
Always read and follow all WARNINGS and in
formation c::> .& in Raising the vehicle on
page
280 and c::>page 282.
After changing a wheel
A wheel change is not complete without the do
ing the following.
.. Always store the vehicle tool kit, the jack* and
the replaced tire in the luggage compartment
c::>page 176.
.. Check the tire pressu re on the spare wheel im
mediately after mounting it.
.,. As soon as possib le, have the tightening tor
que s on all wheel bolts checked with a torque
wrench. The correct tightening torque is 90 ft
lb (120 Nm).
.. Have the flat t ire replac ed as soon as possible .
(0 Tips
-If you notice tha t the wheel bolts are cor
roded and difficult to turn while changing a
t ire,
they s hou ld be replaced before you
check
the tightening torque.
- Drive
at reduced speed unti l yo u have the
tightening torques checked.
-
After changing a wheel, the tire pressure in
all four tires must be checked/corrected and
the tire pressure monitoring indicator must
be stored in the Infotainment c::> page 269.
Decorative wheel covers
Gilt for: with decorative wheel covers
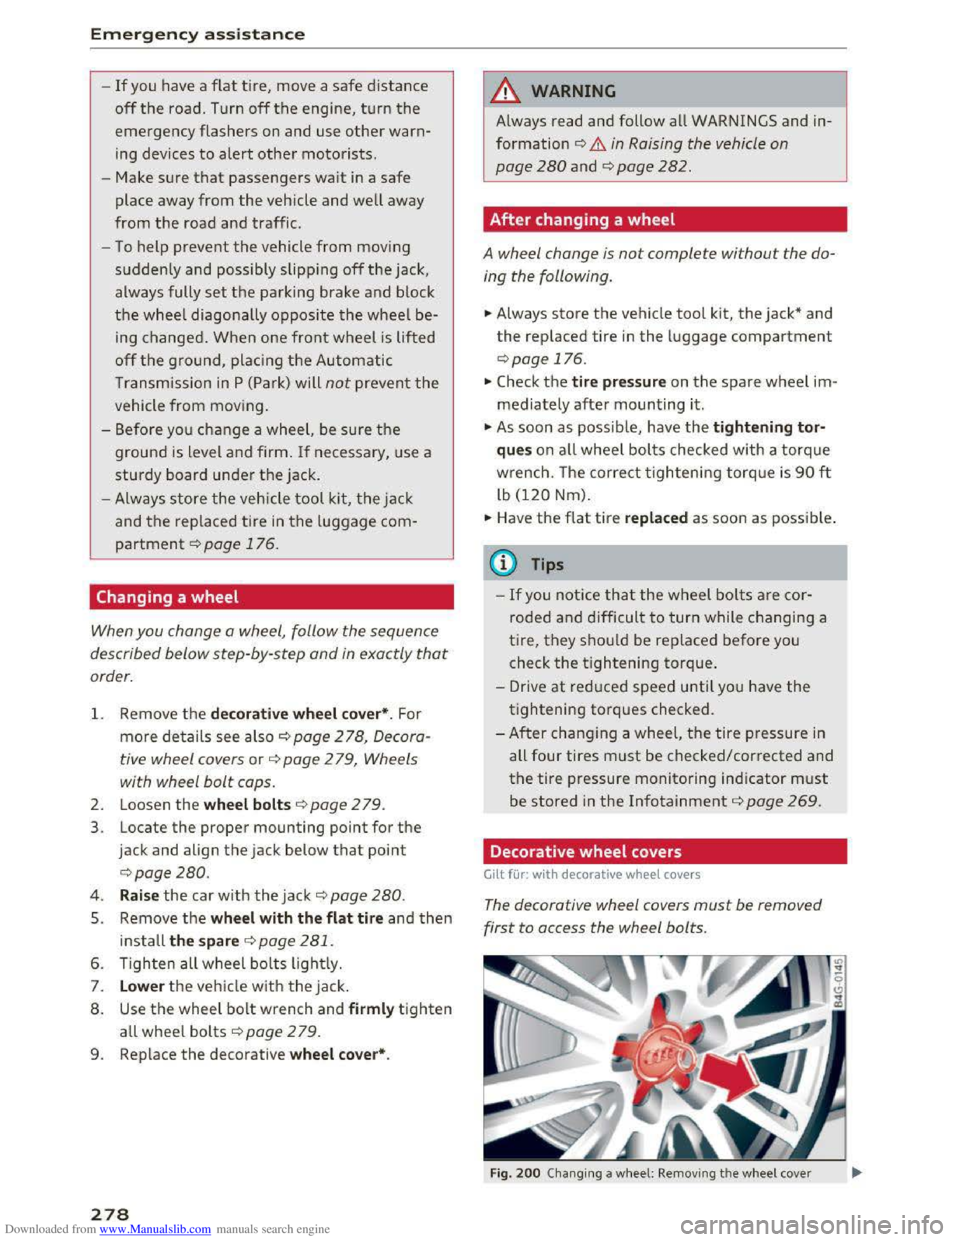
The decorative wheel covers must be removed
first to access the wheel bolts.
Fig. 200 Changing a w heel: Removing th e w heel cover