AUDI TT COUPE 2017 Owners Manual
Manufacturer: AUDI, Model Year: 2017, Model line: TT COUPE, Model: AUDI TT COUPE 2017Pages: 322, PDF Size: 79.73 MB
Page 241 of 322
co
co
.... N
" N .... 0
0
Vl c:o
~ Guide the upper tether strap into the rear cargo
area
r::!>fig. 181.
~ Slide the tether strap hook over the anchor
bracket.
~Pullon the tether strap hook so that the spring
catch of the hook engages .
~ Tighten the tether strap firmly follow ing the
child restraint manufacturer's instruct ions .
Releasing the tether strap
~ Loosen the tension following the child restraint
manufacturer's instructions.
~ Depress the spring catch on the hook and re
lease it from the anchorage .
(D Note
If you leave the child restraint with the tether
strap firmly installed for several days, this
could leave a mark on the upholstery on the
seat cushion and backrest in the area where
the tethe r strap was installed. The upholstery
wou ld also be permanently stretched around
the tether strap. This applies especially to
leather seats.
Using tether straps on rearward-facing
child restraints
Currently, few rear -facing child restraint systems
come w ith a tether . Please read and heed the
child restraint system manufacturer's instruc
tions carefully to determine how to properly in
stall the tether.
_& WARNING
A child in a rearward -facing chi ld safety seat
installed on the front passenger seat will be
seriously injured and can be killed if the front
airbag inflates - even w ith an Advanced A irbag
System.
- The inflating airbag wi ll hit the child safety
seat or infant carrier with great force and
will smash the ch ild safety seat and chi ld
against the backrest, center armrest, or
doo r.
- If you must install a rearward fac ing ch ild
safety seat on the front passenger seat be
cause of except ional circumstances and the
Child safety
PASSENGER AIR BAG OFF~; light does not
come on and stay on, immediately install
the rear-facing child safety seat in a rear
seating position and have the a irbag system
inspected by your Audi dealer.
Additional information
Sources of information about child
restraints and their use
There are a number of sources of additional in
format ion about ch ild restraint selection, instal
lation and use :
NHTSA advises that the best child safety seat is
the one that fits your child and fits in your vehi cle, and that you will use correctly and consis
tently .
Try before yo u buy!
U.S National Highway Traffic Safety Administra
tion
Tel.: 1 (888) 327-4236 (TTY: 1 (800) 424-9153)
www .nhtsa .gov
National SAFE KIDS Campaign
T el.: 1 (202) 662-0600
www.safekids.org
Safety BeltSafe U.S .A
Tel.: 1 (800) 745-SAFE (English)
T el.: 1 (800) 747-SANO (Spanish)
www.carseat.org
Transport Canada Information Centre
Tel.: 1 (800) 333-0371 or call 1 (613) 998-8616
if you are in the Ottawa area
http://www.tc.gc.ca/ eng/ roadsafety/men u. htm
Audi Customer Relations
Tel.: 1 (800) 822-2834
239
Page 242 of 322
Check ing and F illing
Checking and Filling
Fuel
Gasoline grade
The correct gasoline grade is stated on the inside
of the fuel filler door .
The vehicle is equipped with a catalytic converter
and must only be driven w ith
unleaded gasoline .
Audi recommends using TOP TIER Detergent Gas
oline. Additional information on TOP TIER Deter
gent Gasoline can be found on the offic ial web
site (www .toptiergas.com) .
The individua l gasoline grades are differentiated
by
octane ratings . This value is given with (R +M)/
2 equating to AKI or in RON.
The fo llow ing headings match the correspond ing
sticker in the fue l filler door.
UNLEADED FUEL ONLY MIN. (R+M) /2 87
Regula r/ MIN. RON
91 Regular
Use regu la r gaso line with minim um 87 AKI/
91
RON ~ 0 .
The max imum eng ine powe r is only reached if
p rem ium gaso line 91 A KI/ 95 RON is used.
UNLEADED FUEL ONLY PREMIUM MIN . (R
+M)/2
91 / SUPER MIN. RON 95
Using premium gasoline with m inim um 91 AKI/
95 RON is recommende d.
If premium gasoline is not available, you can also
use reg ula r gaso line 87 A KI/ 91 RON . Howeve r
this does reduce t he e ngine powe r slight ly.
(D Note
- Fill ing the tank just one time with leaded
fuel or other meta llic additives will cause
permanent de te riorat io n to the catalyt ic
conve rter func tion.
- Whe n gasol ine with an oc tane r ati ng that is
too low is used, high speeds o r heavy engi ne
l o ad can lead to engi ne d amage.
240
(D Tips
The vehicle may be filled with fuel that has a
h igher octane rating than what is requi red by
the eng ine.
Blended gasoline
Use of gasoline containing alcohol or MTBE (methyl tertiary butyl ether)
You may use unleaded gasoline blended with al
cohol o r MT BE (commonly referred to as oxygen
ates) if the blended m ix tu re meets t he fo llow ing
c rit er ia:
Blend of gasoline m ethano l (wood alcohol or
methyl alcohol)
- Anti-knock index must be 87 AKI or h igher.
- Blend must contain no more than 3% metha-
nol.
- Blend must contain more tha n 2% co-solvents.
Blend of gasoline and ethanol (grain alcohol or
ethyl alcohol)
- Anti-k noc k index mus t be 87 AK I or higher.
- Blend must not conta in mo re than 15% etha-
nol.
Blend of gasoline and MTBE
- Anti -knock index must be 87 AKI or higher.
- Blend mus t contain no t mo re than 15% MT BE.
Seasonally adjusted gasoline
Many gasoline grades are blended to perform es
pecially well for w inter or s umme r dr iv ing . Dur
i ng seasonal change-ove r, we s ugges t that yo u
fill up a t busy gas stat ions w here the seasona l
adjus tment is mo re li kely to be made in t ime .
(D Note
-Metha nol fuels which do not meet these re
quirements may cause cor rosion and dam
age to plas tic and rubber com ponen ts i n t he
fue l system.
- Do not use f ue ls that fa il to meet the speci
fie d cr iteri a in th is chap ter.
Page 243 of 322
co
co
.... N
" N .... 0
0
Vl c:o
-If you are unable to determine whether or
not a particular fuel blend meets the speci
ficat ions, ask your service station or its fuel
supplier.
- Do not use fuel for which the contents can
not be identified.
- Fuel system damage and performance prob
lems resulting from the use of fue ls diffe r
ent from those specified are not the respon
s ibility of Audi and are not covered under
the New Veh icle or the Emiss ion Control
System Warrant ies .
- If you experience a loss of fue l economy or
driveability and pe rformance problems due
to the use of one of these fuel blends, we r ecommend that you switch to unblended
fuel.
Gasoline additives
A ma jor concern among many auto manufactur
ers is carbon deposit build-up ca used by the type
of gasoline yo u use.
A lt hough gasoline grades d iffer from one manu
facturer to another, they have cer tain things in
common . A ll gasoline grades contain substances
that can cause deposits to collect on vita l engine
parts, such as fue l injectors and intake valves. Al
though most gasoline brands include additives to
keep engine and fuel systems clean, they are not
equally effective .
Aud i recommends using TOP TIER Detergent Gas
oline. For more informat ion on TOP TIER Dete r
gent Gasoline, please go to the official website
(www.toptiergas .com) .
After an extended period of using inadequate
fuels, carbon deposit build-ups can rob your en
g ine of peak performance.
CD Note
Damage or malfunction due to poor fuel q ual
ity is not covered by the Aud i New Vehicle
Limited Warranty.
Ch eck ing and Filling
Refueling
Fuel filler neck
The fue l filler neck is located on the rig ht rea r
s ide panel behind the fuel fille r flap .
If the power lock ing system shou ld fail, yo u can
st ill open the flap manually -fo r detailed instruc
tio ns see
9 page 243.
You can find the fuel tank capacity of your vehicle
i n
c::;, page 299.
The label on the inside of the f uel fi ller flap tells
you the correct fuel for your vehicle. For more in
f ormat ion about fuel spec ificat ions, see
9 page 240.
Your vehicle fuel tank has an onboard refue lling
vapor recovery system. This feature helps to pre
vent fuel vapors from escaping from the tank and
polluting the environme nt wh ile you refue l yo ur
vehicle . In order to fill the tank p roper ly w hile
pro tect ing t he e nvir onment, p lease follow t his
r efue ling p rocedure ca refully.
_& WARNING
Un der normal opera ting co nd it io ns, neve r car
r y additional f uel con tainers in your car. Gas
canisters and other containers used to trans
port fue l can be dange rous. Such containe rs,
f ull or empty, may leak and could cause a fire
i n a co llision. If you must transpo rt fuel to
use for your lawn mower, snow blower, etc .,
be ve ry careful and always observe local and
sta te laws rega rding the use, transportation
and storage of su ch f uel con tainers. Make cer
t ai n t he co ntain er meets industry standards
(ANSI/AS TM F8S2 -86).
CD Note
Neve r drive your veh icle until the fue l tank is
complete ly empty. The irreg ular s upply of
f u el can cause misfiring. Gasol in e c ould enter
the e xhaust sys tem an d damage the cat aly tic
conve rter.
241
Page 244 of 322
Checking and Filling
Fueling procedure
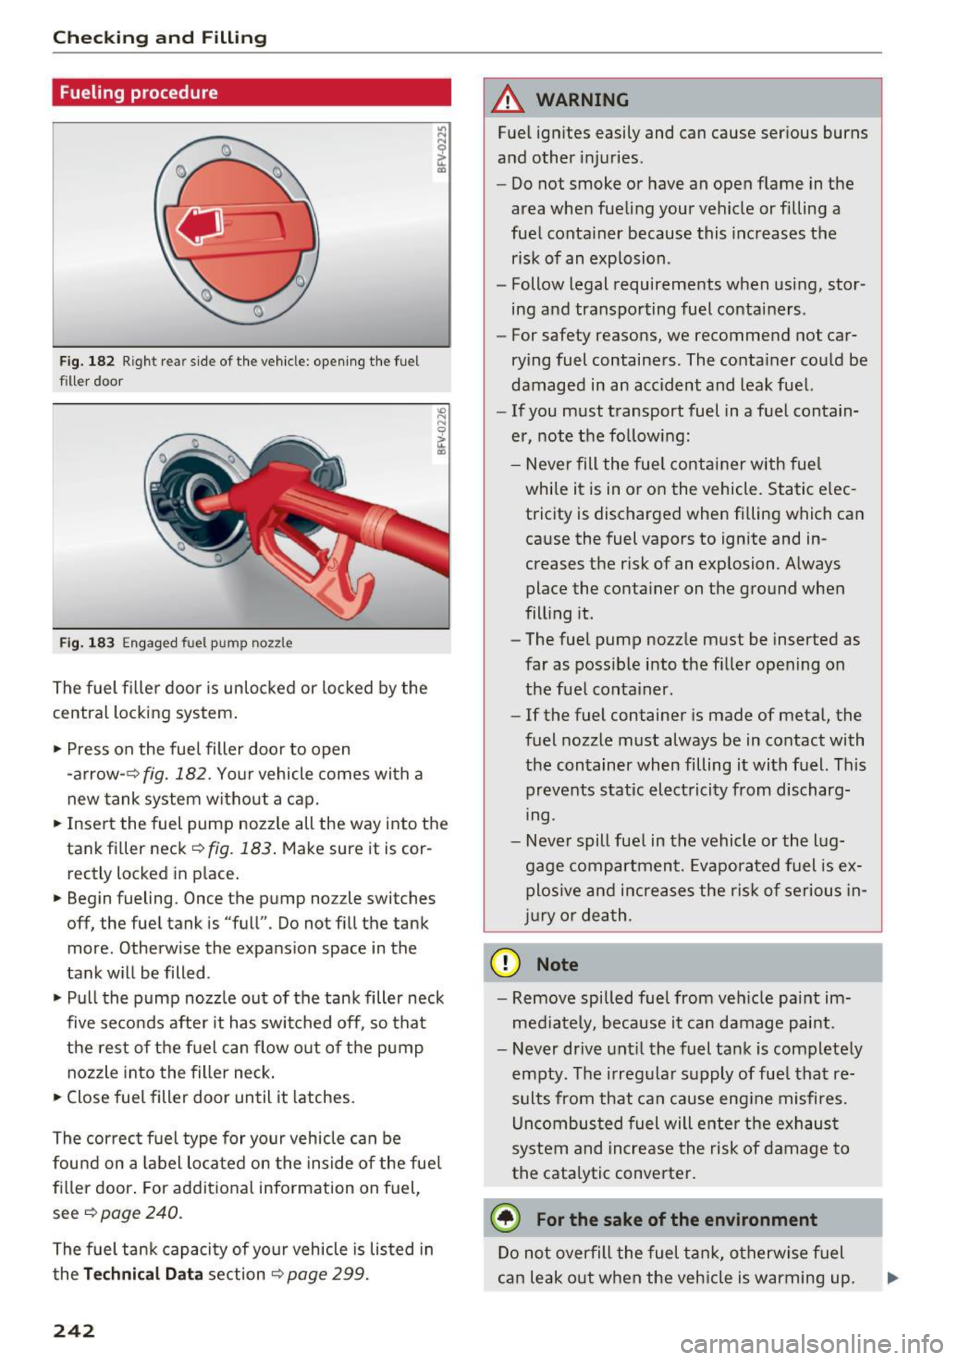
Fig. 182 Right rear side of the vehicle: opening the fue l
filler door
Fig . 183 Engaged f uel pu mp noz zle
The fuel filler door is unlocked or locked by the
central locking system .
• Press on the fue l filler door to open
-arrow- ~fig.182. Your vehicle comes with a
new tank system witho ut a cap.
• Inse rt the fuel pump nozz le all the way into the
tank fi ller neck
~ fig . 183. Make sure it is cor
rectly locked in place.
• Begin fueling. Once the pump no zzle switches
off, the fuel tank is "full" . Do no t fill the tank
more . Otherwise the expansion space in the
tank w ill be filled .
• Pu ll the pump nozz le out of the tank filler neck
five seconds after it has switched off, so that
the rest of the f uel can flow o ut of the pump
nozzle into the filler neck .
• Close fuel filler door until it latches.
The correct f uel type for your vehicle can be
found on a label located on the inside of the fue l
fi ller door. For additiona l info rmation on fuel,
see
~ page 240.
The f uel tank capacity of yo ur vehicle is listed in
the
Te chnical Data section ~ page 299.
242
A WARNING
Fuel ignites easily and can cause serious burns
and other injuries.
- Do not smoke or have an open flame in the
area whe n fueling your vehicle or filling a
fuel conta iner because this increases the
risk of an explosion .
- Follow legal requirements when using, stor
ing a nd transporting fuel containers .
- For safety reasons, we recommend not car
rying fuel containers. The conta iner could be
damaged in an accident and leak fuel.
- If you must transport fuel in a fuel contain
er, note the following:
- Never fill the fuel container with fue l
while it is in or on the vehicle. Static e lec
tricity is discharged when fi lling which can
cause the fuel vapors to ignite and in
creases the risk of an exp losion. A lways
place the conta iner on the ground when
fill ing it .
- The fuel pump nozzle must be inserted as
far as possible into the filler opening on
the fuel container .
- If the fuel container is made of metal, the
fuel nozzle must always be in contact with
the container when filling it with f uel. Th is
prevents static electricity from discharg
ing .
-Never spill fuel in the vehicle or the l ug
gage compartment. Evaporated fuel is ex
plosive and increases the ris k of se rious in
ju ry o r dea th .
(D Note
- Remove spilled fue l from veh icle pa int im
media tely, because it ca n damage paint .
- Never drive unt il the fuel tank is completely
empty . The irregular supply of fue l that re
sults from that can cause eng ine misfires.
Uncombus ted fuel will ente r the exh aus t
system and increase the risk of damage to
the cata lytic converter.
@) For the sake of the environment
Do not overfill the fuel tan k, otherwise f uel
can leak o ut when the veh icle is warming up.
Page 245 of 322
CD
CD
.... N
" N ...... 0
0
Ill co
(D Tips
If adverse weather conditions cause the fuel
filler door to freeze shut, press on the center
of the f iller door with the hee l of yo ur hand
and then try opening it again.
(D Tips
- Your vehicle is equipped with a misfueling
guard. It allows the veh icle to be fueled on
l y w ith the correct fuel pump nozzle .
- A worn or damaged nozzle or a nozz le that
i s too sma ll may not be ab le to open the
diesel misfueling guard. If this is the case,
try turning the nozzle before insert ing it in
the fue l filler neck, use a different fuel
pump, o r see an autho rized Aud i dea ler or
a uth o riz ed Aud i Serv ice F acili ty fo r ass is
tan ce.
- The misfueling g uard does not open when
adding fue l from a f ue l conta iner. When re
fueling with a reserve can iste r, you mus t
use the funne l sto red in the luggage com
partment¢
page 243, fi g. 184.
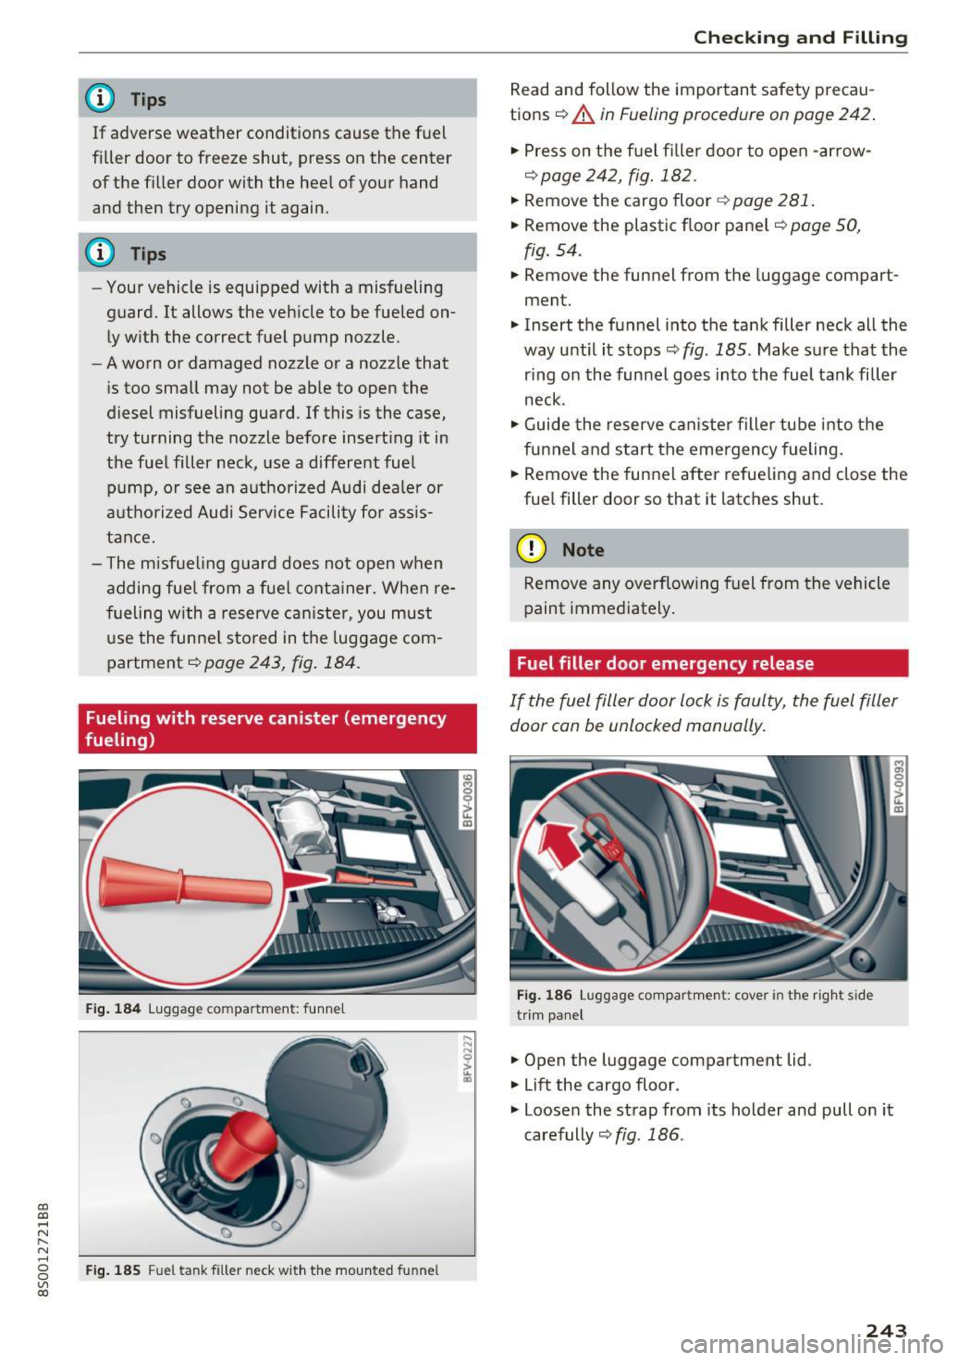
Fueling with reserve canister (emergency
fueling)
Fi g. 184 Luggage co mpa rtment: f unnel
Fig. 185 Fuel tank filler neck w it h th e mo unted fu nne l
Checking and Filling
Read and follow the impor tan t safety precau
tions¢
A in Fueling procedure on page 242 .
" Press on the f uel fi ller door to ope n -ar row-
¢ page 242, fig.182.
" Remove the cargo floor ¢ page 281.
" Remove the plastic f loor pane l¢ page 50,
fig. 5 4.
" Remove the funnel from the luggage compart
ment.
" Insert the funnel into the tank filler neck all the
way u ntil it stops
¢fig . 185. Make su re that the
r ing on the fun ne l goes into the fuel t ank filler
neck .
" Guide the reserve ca niste r filler tube into t he
fu nnel and s tart the eme rgency fueling.
" Remove the funnel afte r refueling and close the
fue l filler door so that it latches shut.
(D Note
Remove any overflow ing fuel from the vehicle
p aint immediately .
Fuel filler door emergency release
If the fuel filler door lock is faul ty, the fuel filler
door con be unlocked manually.
Fig. 1 86 Luggage co mpa rt m ent: cove r in the right sid e
trim pa nel
" Open the luggage compartment lid .
" Lift the cargo floor.
" Loose n the st rap from its ho lder and pull on it
carefully¢
fig. 186 .
243
Page 246 of 322
Check ing and F illing
Engine compartment
Working in the engine compartment
Special care is required if you are working in the
engine compartment
Fo r wo rk in th e engine compa rtmen t su ch as
c h ec kin g and filli ng flu id s, th ere is a risk of in
j u ry, sc aldin g, ac cide nts, a nd b urn s. For this
rea son, foll ow all the warning s and gener al
s a fe ty p recaution s pr ov ided in the f ollow ing in·
f o rm ation . Th e en gine c omp artmen t is a dan
ger ous are a.
¢ ,&.
_& WARNING
- T urn the engine off.
- Switch the ign ition off .
- Set the parking brake .
- Place the selector lever in the P pos ition.
- let the engine cool down.
- Never open the hood when there is steam or coolant escaping from the engine compart
ment, because there is a risk that you could
be burned . Wait until no steam or coolant is
escaping .
- Keep ch ildren away from the engine com
partment .
- Never spill flu ids on a hot engine. These flu
ids (such as the freeze protection contained
in the coolant) can catch fire .
- Avoid short circu its in the electrical system,
especially to the battery .
- When working in the engine compartment,
remember that the rad iator fan can sw itch
on even if the ign ition is switched off, which
increases the risk of pe rsonal injury .
- Never open the cap on the coolant expan sion tank when the eng ine is warm. The
cooling system is under pressu re .
- To protect your face, hands, and arms from
hot steam or coolant, cover the cap with a
large cloth when opening.
- Do not remove the engine cover under any
circumstances. This increases the risk of
burns.
- If tests need to be performed w ith the en
gine running, there is additional danger d ue
244
to moving components (such as the ribbed
be lt, alternator and rad iator fan) and from
the high voltage ignition system.
- Do not press the acce lerator pedal inadver
tently if a gear is selected when the vehicle
is stationary and the engine is running. Oth
erwise, the vehicle will start to move imme
diately and this could result in an accident .
- Pay attent ion to the following warnings list
ed when work on the fuel system or on the
electrical equipment is required.
- Do not smoke .
- Never work near open flames .
- Always have a working fire extinguisher
nearby
- All work on the battery or elect rical system
in your vehicle can result in injuries, chemi
cal b urns, acc idents or burns . Because of
this, all work must be performed
onl y by an
authorized Audi dealer or authorized Audi
Service Facility.
- To reduce the risk o f electric shock and in
jury, never touch the following components
when the engine is running or is being start•
ed:
- Ign ition cable
- Other components in the electronic high -
vo ltage ign ition system
- If you must check or perform work on the
engine while it is running:
- Set the parking brake and place the selec
tor lever in the P (park) position first .
- Always proceed w ith extreme caution so
that clothing, jewelry or long hair do not
become caught in the radiator fan, fan
belt or other moving components or do
not come into contact with hot compo
nents. Tie back long hair before beginn ing
work and do not wear clothing that can hang down into the engine .
- Lim it your exposure to exhaust and chemi
cals to as short a time as possible
¢ .&. .
A WARNING
California Proposition 65 Warning:
Page 247 of 322

CD
CD
.... N
" N .... 0
0
Ill co
-Engine exhaust, some of its constituents,
and certain vehicle components contain or
emit chemicals known to the State of Cali
fornia to cause cancer and birth defects and
reproductive harm. In addition, certain flu
ids contained in vehicles and certain prod
ucts of component wear contain or emit
chemicals known to the State of California
to cause cancer and birth defects or other
reproductive harm.
- Battery posts , terminals and related acces
sories contain lead and lead compounds,
chemicals known to the State of California
to cause cancer and reproductive harms.
Wash hands after handling.
(D Note
When filling fluids, be sure not to mix the flu
ids up. Otherwise severe ma lfunctions and en
gine damage will occur.
@ For the sake of the environment
You shou ld regularly check the ground under
your vehicle in order to detect leaks quickly. If
there are visible spots from oil or other fluids, bring your vehicle to an authorized Audi deal
er or author ized Audi Service Facility to be
checked.
Opening/closing the hood
The hood is released from inside the vehicle.
Fig. 187 Sect ion from the driver 's side footwell: release
lever
Checking and Filling
Fig. 188 Unlocked hood : lever
Make sure the wiper arms are not raised up from
the windshield. Otherwise the paint could be
damaged .
Opening the engine compartment lid
"With the driver's doo r open, pull the lever be-
low the instrument panel in the direction of the
arrow
q fig. 187.
" Raise the hood slightly ¢.&_ .
" Press the lever
qfig. 188 in the direct ion of the
arrow. This releases the hooks .
"O pen the hood .
Closing the engine compartment lid
" Push the hood down until you override the
force of the struts.
" Let the hood fall lightly into the latch .
Do not
press it in. ¢.&_ .
A WARNING ,..___
-Never open the hood when there is steam or
coo lant escaping from the engine compart
ment, because there is a risk that you could
be burned. Wait until no steam or coolant is
escaping.
- For safety reasons, the hood must always be
closed securely while driving. Because of
this, always check the hood after closing it
to make sure it is latched correctly. The
hood is latched if the front corners cannot
be lifted.
- If you notice that the hood is not latched
while you are driving, stop immediately and
close it, because this increases the risk of an
accident .
245
Page 248 of 322
Checking and Filling
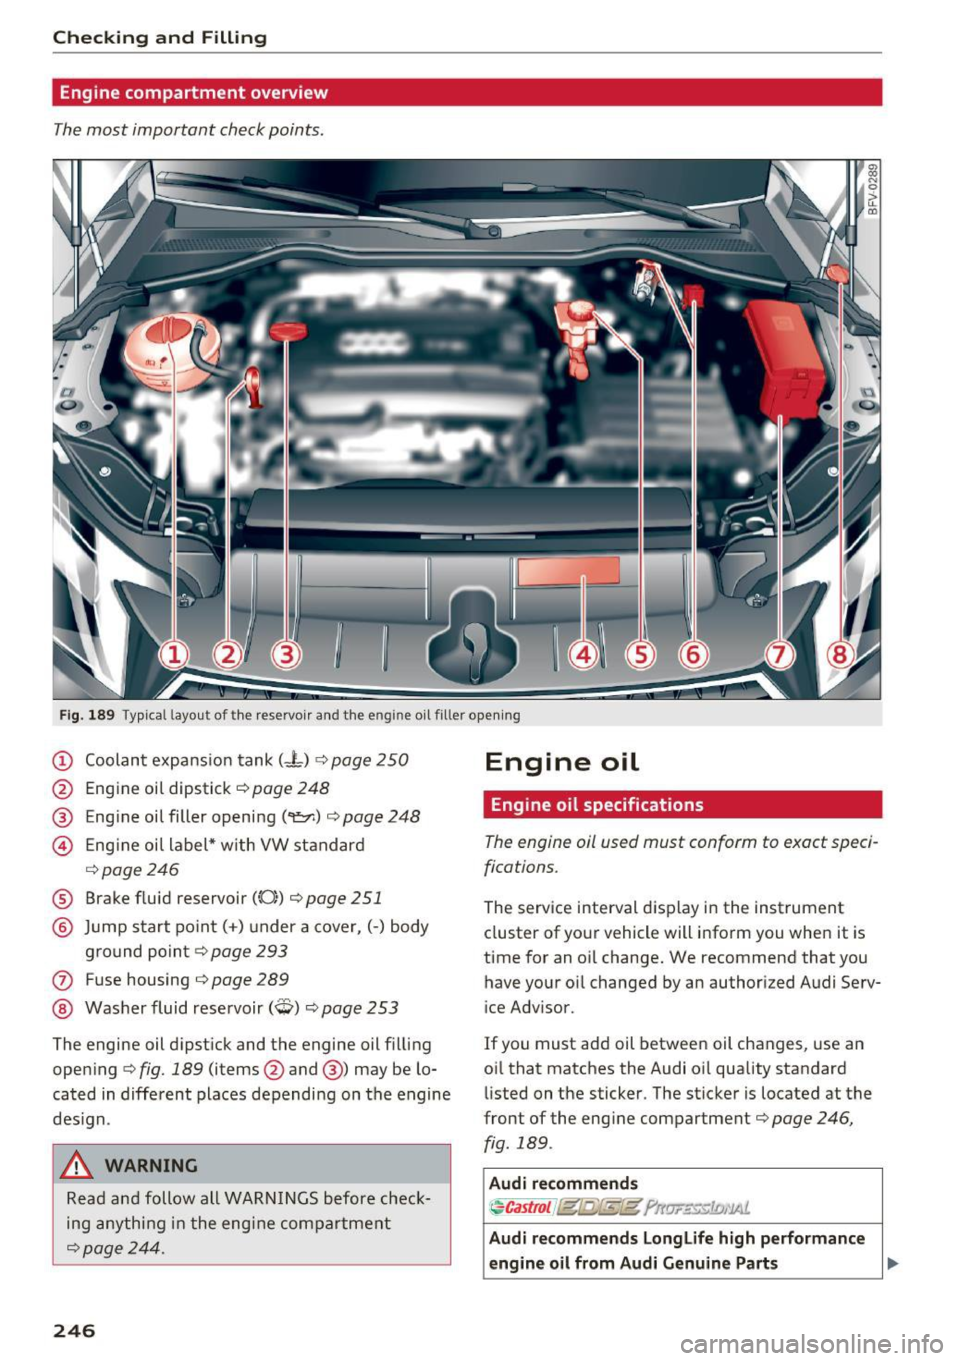
Engine compartment overview
The most important check points.
Fig. 189 Typ ical l ayout of the reservoir and the engine o il filler opening
(D Coolant expansion tank (- t) ¢ page 250
@ Engine oil dipstick¢ page 248
® Engine oil filler opening (
¢ page246
® Brake fluid reservoir ((0)) ¢ page 251
@ Jump start point( +) un der a cover, (-) body
ground point ¢page 293
0 Fuse housing ¢ page 289
@ Washer fluid reservoir (W) ¢ page 253
The engine oil dipstick and the engine oil filling
opening ¢ fig. 189 (items@and @) may be lo
cated in different places depending on the engine
design.
A WARNING
Read and follow all WARNINGS before check
ing anything in the engine compartment
¢page 244.
246
Engine oil
Engine oil specifications
The engine ail used must conform to exact speci
fications.
The serv ice interval d isplay in the instrument
cluster of your vehicle will inform you when it is
time for an oil change. We recommend that you
have your oil changed by an authorized Audi Serv
ice Adv isor.
If you must add oil between oil changes, use an
oil that matches the Audi oi l quality standard
listed on the sticker. The sticker is located at the
front of the eng ine compartment¢ page 246,
fig. 189 .
Audi recommends
~Castrol J@t@fkl!t ?llw..::~c:1£;,'lAl.
Audi recommends Longlife high performance
engine oil from Audi Genuine Parts .,..
Page 249 of 322
Using the proper engine oil is important for the
functionality and s ervice life of the engine. Your
engine was factory-filled with a high -quality oil
which can usually be used throughout the entire
year .
Note
Your Limited New Vehicle Warranty does not
cover damage or malfunctions due to failure
to follow recommended maintenance and use
requirements as set forth in the Audi Owner's Manual and Warranty & Maintenance booklet .
- Use only a high quality engine oil that ex-
pressly complies with the Aud i oil quality
standard specified for your vehicle's engine.
Using any o ther oil can cause serious engine
damage.
- Do not mix any lubricants o r other additives
into the engine oil. Doing so can cause en
gine damage.
@ Tips
If you need to add oil and there is none availa
ble that meets the Audi o il quality standard
your eng ine requ ires, you may add a total of
no more than 0 .5 qt (0,5 l) of a h igh-quali ty
"synthet ic"oil that meets the following speci
fications.
- ACEA A3 or API SM with a v iscosity grade o f
SAE OW-30, SAE SW -30 or SAE SW-40.
- Fo r more information abou t engine o il t ha t
has been approved for your vehicle, please
contact either your authorized Audi dea ler
or Audi Custome r Relat ions at
1 (800) 822-2834 or visit our web site at
www.audiusa.com or www.audican ada.ca .
Engine oil consumption
T he engine in your vehicle depends on an ade
qua te amoun t of oil to lubricate and cool all of
i t s moving par ts.
In order to provide effective lub rication and coo l
ing of in te rnal engine components, a ll internal
~ combustion engines consume a cer tain amount
;:::: of oil. Oil consumption varies from engine to en-
" ~ gine and may change sign ificantly over the life of 0
~ the eng ine . Typically, eng ines with a spec ified c:o
Ch eck ing and Filling
break-in period (see ¢ page 55) consume more
oi l during th e break-in period than they consume
after oil consumption has stabilized.
Under normal cond itions, the rate of oil con
sumption depends on the q uality and viscos ity o f
the oil , the RPM (revolutions per minut e) at
which the engine is operated, the amb ient tem
perature and road condit ions. Further factors are
the amount of oil dilution from w ater condensa
tion or fuel resid ue and the oxidation level of the
o il. As any engine is subject to wear as mileage
builds up, the oi l consumption may increase ove r
t ime unt il repla cement of worn components may
become necessary.
With al l these variables coming into play, no
standard rate of o il consumption can be estab
l ished or spec ified . T he re is no alte rnative to reg
u la r and fre quent chec king of the o il level , see
Note .
If the yellow engine oil level warning symbo l II
in the instrument cluster lights up , you sho uld
check the o il level as soon as possible
¢
page 248 . Top off the o il at your earliest con
venience ¢
page 248.
A WARNING
Before you check anything in the engine com
partment, always read and heed all WARN
INGS¢
page 244 .
(D Note
Driving with an insufficient oil level is likely to
cause severe damage to the engine.
(D Tips
- The oil pressure warning display. is not
an indicator of the oil le vel. Do not rely on
it . Instead, check the oil level in your en·
gine at regular intervals , preferabl y each
time you refuel, and always befo re going
on a long trip.
- If you have the impression your engine con
sumes excessive amounts of oil, we recom
mend that you consult an author ized Audi
dea ler to have the cause of your concern
prope rly diagnosed . Keep in mind that the .,,.
247
Page 250 of 322
Checking and Filling
accurate measurement of oil consumption
requires great care and may take some
time. An author ized Audi dealer has instruc
tions about how to measure oil consump
tion accurately.
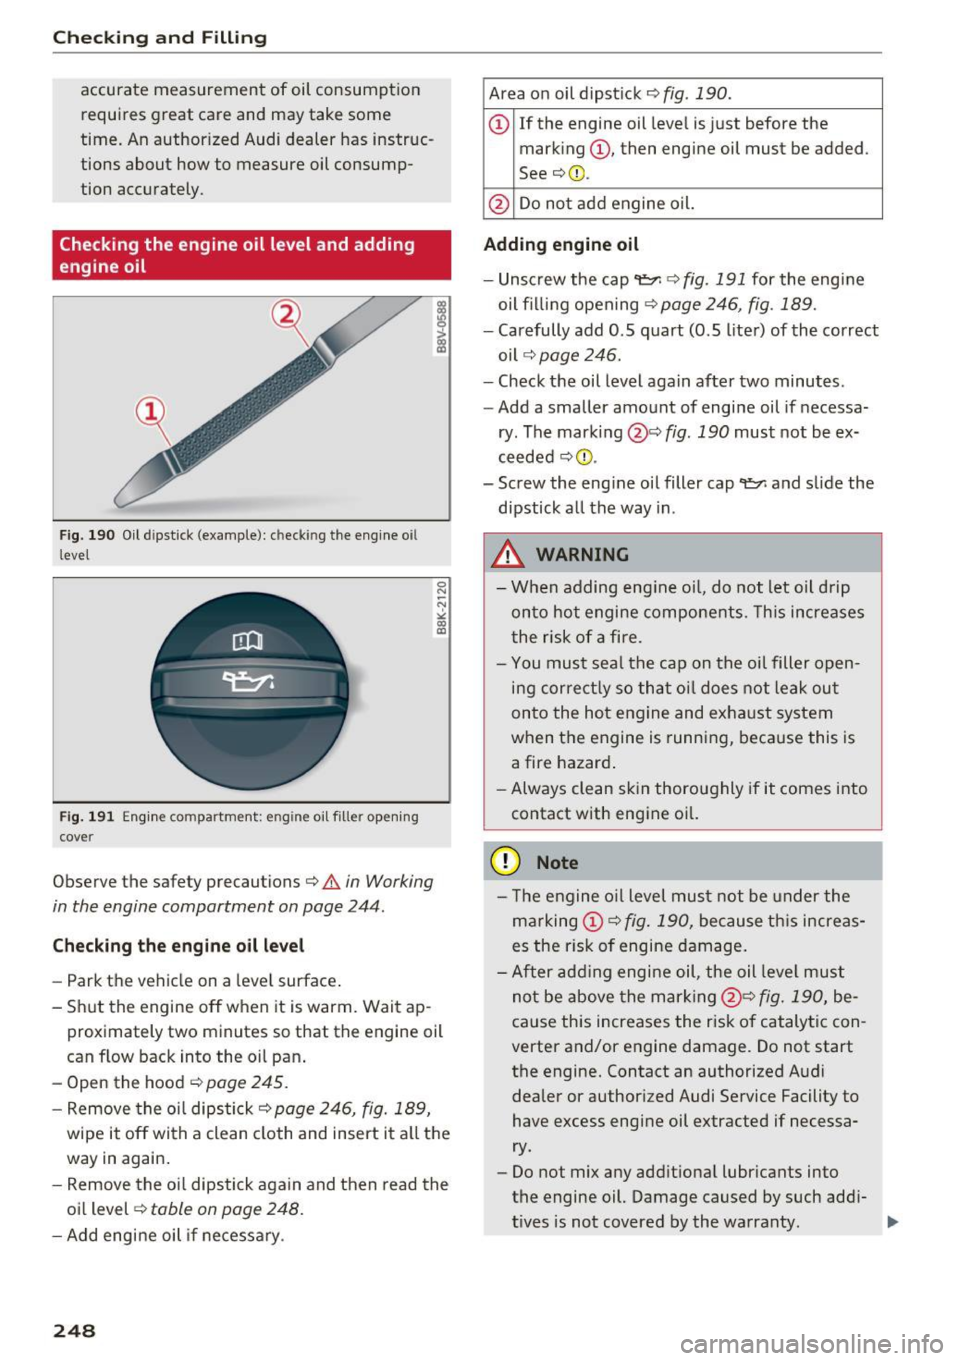
Checking the engine oil level and adding
engine oil
F ig. 190 O il d ipstick (example): c heck ing the eng ine o il
l evel
Fig . 191 Engine compartment: eng ine oi l fille r opening
cove r
Observe the safety precautions¢.& in Working
in the engine compartment on page 244 .
Check ing th e engin e oil l evel
-Park the vehicle on a level surface .
- Shut the engine off when it is warm. Wait ap-
0 N
-~
"' a, co
proximately two minutes so that the engine oil
can flow back into the oi l pan .
- Open the hood¢
page 245.
-Remove the oi l dipstick¢ page 246, fig. 189,
wipe it off with a clean cloth and insert it all the
way in again.
- Remove the oi l dipstick again and then read the
oi l level ¢
table on page 248.
- Add engine oil if necessary .
248
Area on oil dipstick ¢ fig. 190.
(D If the engine oil leve l is just before the
marking
(D , then engine oil must be added .
See¢ @.
@ Do no
t add engine oil.
Adding engine oil
- Unscrew the cap 't'::71 ¢ fig. 191 for the engine
oil fil ling open ing¢
page 246, fig . 189.
- Carefully add 0 .5 quart (0.5 liter) of the correct
oil ¢
page 246.
-Check the oil level again after two minutes .
- Add a smaller amount of engine oil if necessa-
ry . The marking @¢ fig. 190 must not be ex
ceeded ¢Cl).
- Screw the engine oil filler cap
't'::71 and slide the
dipstick all the way in .
.&, WARNING
-When adding eng ine oi l, do not let o il d rip
on to hot engine components. Th is increases
t he risk of a fire.
- You must sea l the cap on the oi l filler open
ing correct ly so that oi l does not leak out
onto the hot engine and exha ust system
when the engine is running, beca use this is
a fire hazard .
- Always clean skin thoroughly if it comes into
contact with engine oi l.
(D Note
- The engine o il level mus t not be under the
marking
(D ¢ fig. 190, because th is increas
es the risk of engine dam age .
- After add ing engi ne oil, the oil leve l must
not be above the marking @¢
fig. 190, be
cause this increases the risk of catalytic con
verter and/or engine damage. Do not start
the engine. Contact an authorized Audi dealer or authorized Audi Service Facility to
have excess engine oil extracted if necessa
ry.
- Do not mix any add itional lubr icants into
the engine oil. Damage caused by such add i-
t ives is not covered by the warranty.
Ill>