AUDI TT COUPE 2017 Owners Manual
Manufacturer: AUDI, Model Year: 2017, Model line: TT COUPE, Model: AUDI TT COUPE 2017Pages: 322, PDF Size: 79.73 MB
Page 291 of 322
CD
CD
.... N
" N ...... 0
0
Ill co
Fuses and bulbs
Electrical fuses
Replacing fuses
A fuse that has blown will have metal strips tha t
have burned through .
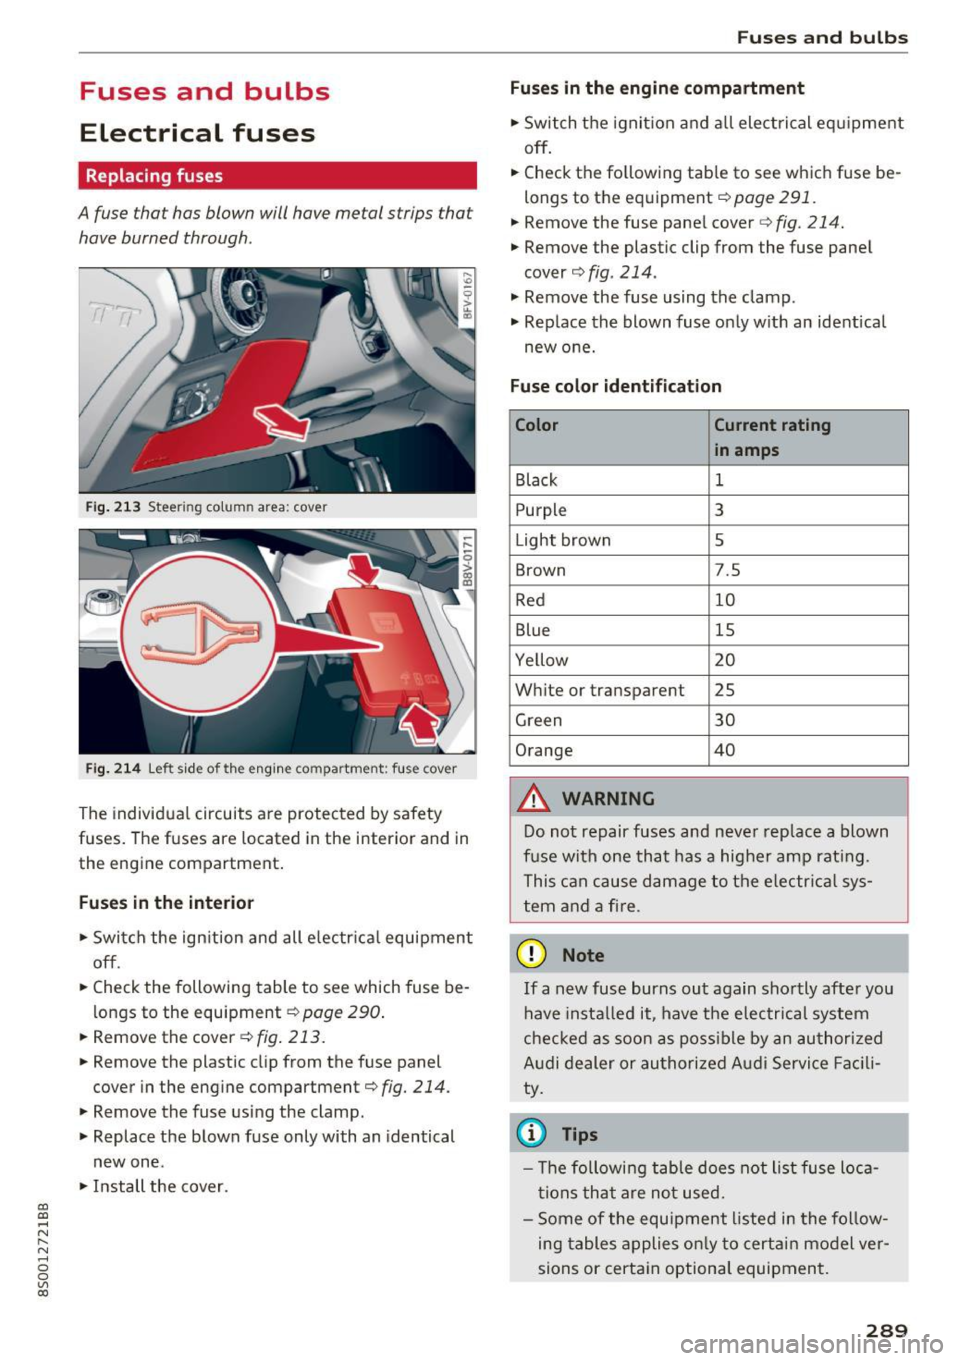
Fig. 213 Steer ing colu mn area : cove r
Fig. 214 Left side of the engin e com partment : fus e cover
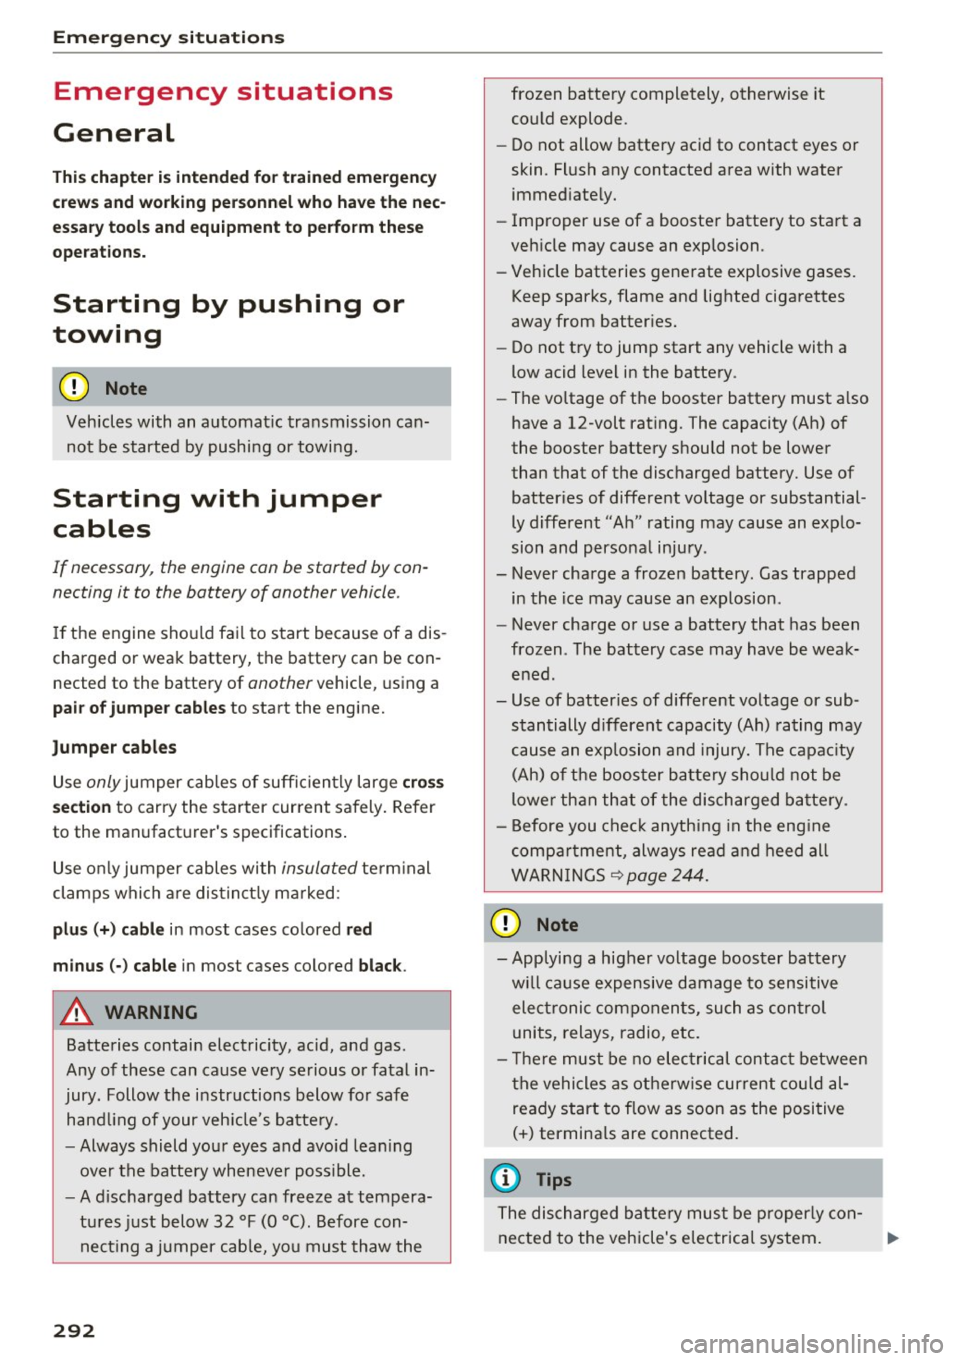
The individual circuits are protected by safety
fuses. The fuses are located in the interior and in
the engine compartment.
Fuses in the interior
"S witch the ignition and all electrical equipment
off .
"C heck the following table to see which fuse be
longs to the equipment ¢
page 290.
"R emove the cover ¢
fig. 213.
"Remove the plastic clip from the fuse panel
cover in the engine compartment¢
fig. 214.
"Remove the fuse using the clamp.
" Replace the blown fuse only with an identical
new one .
"Install the cover.
Fuses and bulbs
Fuses in the engine compartment
"S witch the ignition and all electrical equipment
off .
.. Check the following table to see which fuse be
longs to the equipment¢
page 291.
.. Remove the fuse panel cover¢ fig. 214.
" Remove the plastic clip from the fuse panel
cover
¢ fig. 214 .
" Remove the fuse using the clamp .
.. Rep lace the blown fuse only with an identical
new one.
Fuse color identification
Color Current rating
in amps
Black
1
Purpl e 3
Light brown 5
Brown 7.5
Red 10
Blue 15
Ye llow 20
White or transparent 25
Green 30
Orange 40
&, WARNING
-
Do not repair fuses and never replace a blown
fuse with one that has a higher amp rating.
This can cause damage to the electrica l sys
tem and a fire .
(D Note
If a new fuse burns out again shortly after you
have instal led it, have the electrical system
checked as soon as possible by an authorized
Audi dealer or authorized Audi Service Facili
ty.
© Tips
- Th e following table does not list fuse loca
tions that are not used.
- Some of the equipment listed in the follow
ing tables applies only to certain model ver
sions or certain optional equipment.
289
Page 292 of 322

Fuses and bulbs
Interior fuse assignment
Fig. 215 Vehicle inter ior: fuse assignme nt
No. Equipment
Fl Power top control modu
le (Roadster)
F2 Power top control module (Roadster)
F3 ESC control module
F4 Central computer processor (MIB-2)
FS Gateway
F6 Anti-theft alarm system Climate control system, selector lever (au-
F7 tomatic transmission), parking heater,
rear window heater relay coil
Diagnos is, electrical parking brake switch,
F8 light swi tch, rain/light sensor, interior
lighting
F9 Steering column switch module
Fl0 Display
F ll Haldex clutch
F12 MMI area
F 13 Adaptive dampers control module
F14 Climate control system blower
FlS Electronic steering co lumn lock
F16 MMI components, safety be
lt microphone
(Roadster)
290
No . Equipment
F17 Instrument cluster
F18 Rearview camera
F19 Convenience key system control module
F20 Power lumbar support adjustment
F22 Front passenger's side neck heating (Road-
ster)
F23 R
ig ht exterior lighting, on-board compute r
(right)
F 25 Driver's s
ide door (for example power win-
dows)
F26 Seat heating
F28 AMI H igh med ia port
F29 On-board computer
F31 Left on-board computer
F32 Driver assistance systems
F33 Airbag
Socket relay, interior sound, back-up light
F34 switch, temperature sensor, oil level sen-
sor
Diagnosis, headlight range control system,
F35 air quality sensor, automatic dimming
rearview mirror
F36 Right cornering light/ r ight LED-h eadlight
F37 Left cornering light/ left LED-headlight
F38 E
ng ine control module, ESC control mod-
ul e
F39 Front passenger's side door (for example
power windows)
F40 Cigarette lighter, sockets
F41 SCR relay and delivery unit
F42 Central locking area
F43 On-board computer
F45 Power adjustable driver's side seat
F46 Driver's side neck heat ing (Roadster)
F49 Starter, clutch sensor
FS0 ESC valves
F53 Rear window defogger
The power seats* are protected v ia
circuit break
ers
that automatically switch on after a few sec
onds after the overload has been reduced .
Page 293 of 322

CD
CD
.... N
" N .... 0
0
Ill co
Left engine compartment fuse assignment
Fig. 216 Engine compartment: fuse ass ignment
No. Equipment
Fl ESC control module
F2 ESC control module
F3 Engine control module
Engine cooling, engine components, auxili -
F4 ary heater coil re lay ( 1+2), secondary air
injection pump relay
FS E
ngine components, tank system
F6 Brake light sensor
F7 Engine components
F8 Oxygen sensor
F9 Engine components, exhaust door, glow
time control module
FlO Fuel injectors, fuel control module
Fll Auxiliary heater heating element 2
F 12 Auxiliary heater heating e
lement 3
F13 Automatic transmission cont rol module
FlS Horn
F16 Ignition coil
F17 ESC control module
, engine control mod-
ule
F18 Term inal 30 (reference voltage)
Fuses and bulbs
No . Equipment
Fl9 Windshield wipers
F20 Horn
F22 Terminal SO diagnos
is
F23 Starter
F24 Auxiliary heater heating element 1
F3 2 LED headlights
Bulbs
Message
Your vehicle is equ ipped with maintenance-free
headlights and tail lights . However, if a light bulb
needs to be replaced, p lease contact yo ur author
ized Audi dea ler or authorized Audi Service Facili
ty.
291
Page 294 of 322
Emergency situations
Emergency situations
General
This chapter is intended for trained emergency crews and working personnel who have the nec
essary tools and equipment to perform these
operations.
Starting by pushing or
towing
CD Note
Vehicles with an automatic transmission can
not be started by pushing or towing.
Starting with jumper
cables
If necessary, the engine con be started by con
necting it to the battery of another vehicle .
If the engine should fail to start because of a dis
charged or weak battery, the battery can be con
nected to the battery of
another vehicle, using a
pair of jumper cables to start the engine.
Jumper cables
Use only jumper cables of sufficiently large cross
section
to carry the starter current safely. Refer
to the manufacturer's specifications.
Use only jumper cables with
insulated terminal
clamps which are distinctly marked :
plus(+) cable in most cases colored red
minus(-) cable
in most cases colored black .
A WARNING
Batteries contain electricity, acid, and gas.
Any of these can cause very serious or fatal in
jury. Follow the instructions below for safe hand Ling of your vehicle's battery .
-Always shield your eyes and avoid leaning
over the battery whenever possible.
-A discharged battery can freeze at tempera
tures just below 32 °F (0 °C). Before con
necting a jumper cable, you must thaw the
292
frozen battery completely, otherwise it could explode .
- Do not allow battery acid to contact eyes or
skin. Flush any contacted area with water immediately.
- Improper use of a booster battery to start a
vehicle may cause an explosion.
- Vehicle batteries generate explosive gases.
Keep sparks, flame and lighted cigarettes
away from batteries.
- Do not try to jump start any vehicle with a
low acid level in the battery .
- The voltage of the booster battery must also
have a 12-volt rating. The capacity (Ah) of
the booster battery should not be lower
than that of the discharged battery. Use of
batteries of different voltage or substantial
ly different "Ah" rating may cause an explo
sion and personal injury .
- Never charge a frozen battery. Gas trapped in the ice may cause an explosion .
- Never charge or use a battery that has been
frozen . The battery case may have be weak
ened .
- Use of batteries of different voltage or sub stantially different capacity (Ah) rating may
cause an explosion and injury. The capacity
(Ah) of the booster battery should not be
lower than that of the discharged battery.
- Before you check anything in the engine
compartment, always read and heed all
WARNINGS
~page 244.
CD Note
-Applying a higher voltage booster battery
will cause expensive damage to sensitive
electronic components, such as control
units, relays, radio, etc.
- There must be no electrical contact between
the vehicles as otherwise current could al
ready start to flow as soon as the positive
(+) terminals are connected.
@ Tips
The discharged battery must be properly con-
nected to the vehicle's electrical system. .,..
Page 295 of 322
CD
CD
.... N
" N ...... 0
0
Ill co
When jump starting or charging the battery,
never connect the negative ground cable to
the battery negative post because the battery
manager system must be able to detect the
battery's state of charge. Always connect the
negative ground cable to the negat ive ground
post of the battery manager control unit .
Use of jumper cables
Make sure to connect the jumper cable clamps in
exactly the order described below!
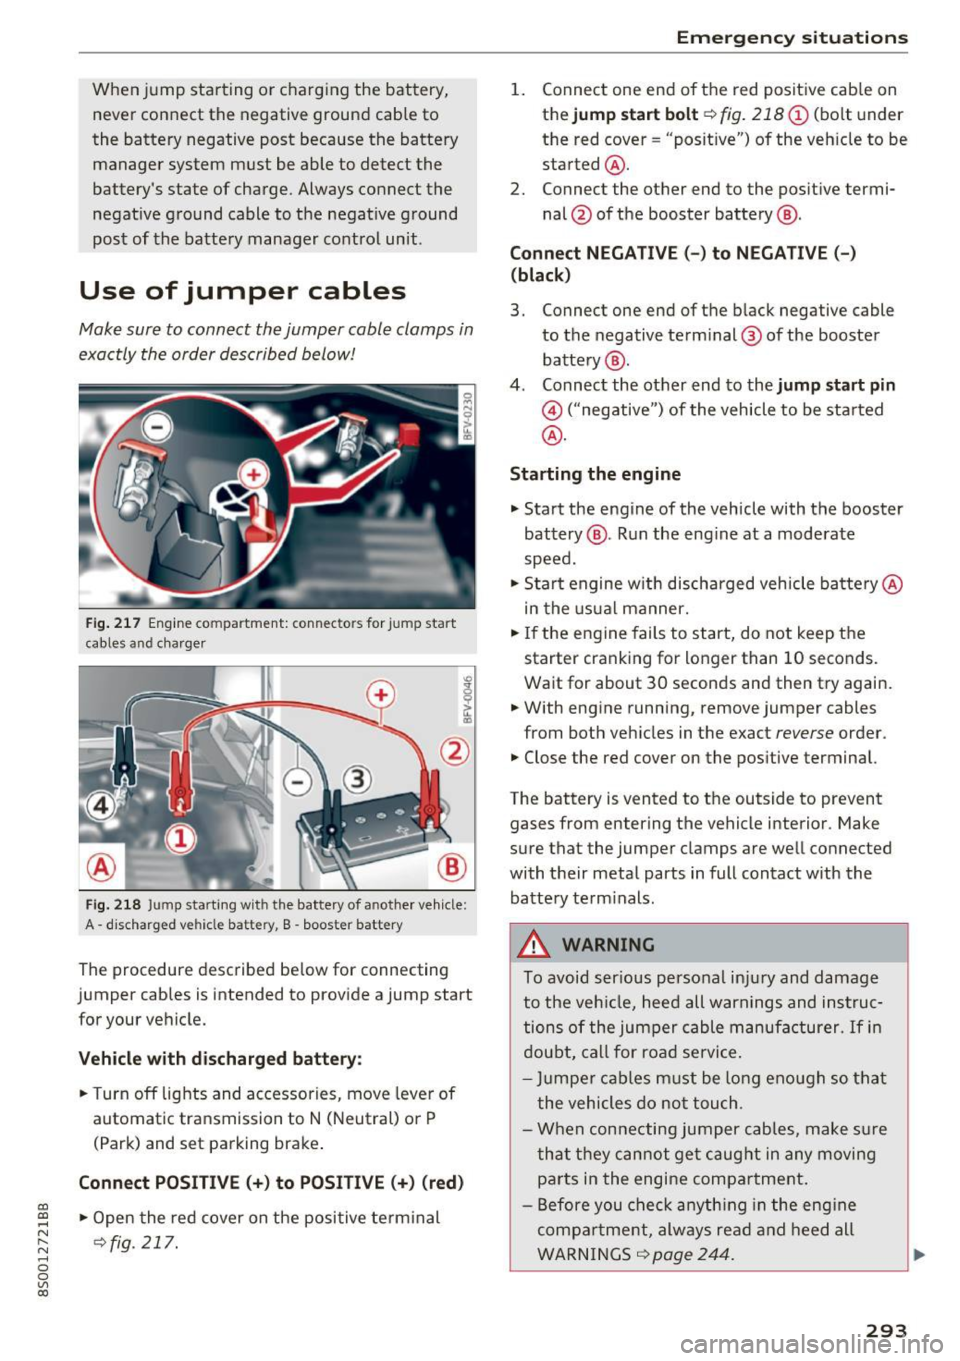
Fig. 217 Engine compartment: connectors for jump start
cables and c harger
Fig. 218 Jump starting w ith the battery of another vehicle :
A -discharged vehicle battery, B -booster battery
The proc edure desc ribed below for connecting
jumper cables is intended to provide a jump start
for your vehicle.
Vehicle with discharged battery:
.. Turn off lights and accessories, move lever of
automatic transmission to N (Neutral) or P
(Park) and set parking brake .
Connect POSITIVE(+) to POSITIVE(+) (red)
.,. Open the red cover on the positive terminal
~fig. 217.
Emergency situations
1. Connect one end of the red positive cab le on
the
jump start bolt~ fig. 218 (D (bolt und er
the red cover= "posit ive") of the veh icle to be
started @.
2. Connect the other end to the posit ive termi-
nal @of the booster battery @.
Connect NEGATIVE (-) to NEGATIVE (- )
(black)
3. Connect one end of the black negative cable
to the negative terminal @ of the booster
battery @.
4. Connect the other end to the
jump start pin
@ ("negative") of the vehicle to be started
@.
Starting the engine
.. Start the engine of the vehicle with the booster
battery @. Run the eng ine at a moderate
speed .
.,. Start engine w ith discharged veh icle battery @
in the usual manner.
.,. If the engine fails to start, do not keep the
starter cranking for longer than 10 seconds.
Wait for about 30 seconds and then try again .
.. With engine running, remove jumper cables
from both vehicles in the exact
reverse order .
.. Close the red cover on the positive terminal.
The battery is vented to the outside to prevent
gases from entering the vehicle interior . Make
sure that the jumper clamps are well connected
with their metal parts in full contact with the battery term inals .
A WARNING
To avoid ser ious personal injury and damage
to the vehicle, heed all warnings and instruc
tions of the jumper cable manufacturer.
If in
doubt, call for road service.
- Jumpe r cables must be long enough so that
the vehicles do not touch .
- When connecting jumper cables, make sur e
that they cannot get caug ht in any moving
parts in the engine compartment.
- Before you check anything in the engine
compa rtment, always read and heed all
WARNINGS ~
page 244 .
293
Page 296 of 322
Emergency situations
(D Note
Improper hook -up of ju mper cables can r uin
the generato r.
- Always con nect P OSITIVE( +) to POS ITI VE
( + ), and NEG ATI VE( -) to NEGATIVE( -)
ground post of t he battery manage r contro l
u nit .
- Check that a ll sc rew p lugs on the battery
cells are sc rewed in firmly . If not, t ighten
plugs p rior to connect ing clamp o n negat ive
b attery t erminal.
- Please note t hat the procedure fo r con nect
i ng a jumper cable as desc rib ed above ap
plies specifica lly to the case of yo ur vehicle
being jum p starte d. When you a re giv ing a
ju mp sta rt to anothe r vehicle, do
not con
n e ct t he neg ative( -) ca b le to the neg ative
(- ) termin al o n t he dis ch arged battery @
¢
fig . 21 8. In ste ad, securely connec t the
negative (-) cab le to either a so lid metal
compo nent that is f irm ly bolted to the e n
gine block o r to the engine bloc k itself. If
the battery that is bei ng cha rged does not
vent to the outside, escap ing battery gas
could ignite an d exp lode!
Towing with a tow truck
General hints
Your Audi requires special handling for towing.
The fo llow ing informa tion is to be used by com
mercial tow truck operators who know how to op
era te the ir equipmen t sa fe ly .
- Never tow your Audi. Towing will cause dam
age to the engine and transmi ssion.
- Never wrap the safety chains or winch cables
around the brake l ines .
- To prevent unnecessary damage, your Audi
must be transported with a flat bed truck.
- To load the vehicle on to the flat bed , use the
towing loop found in the vehicle tools and at
tach to the front or rear anchorage
¢ page 294 and ¢page 295.
294
A WARNING
A veh icle being towed is not safe for passe n
ge rs . Neve r allow a nyone to ride in a vehicle
be ing towed, fo r any reason .
Front towing loop
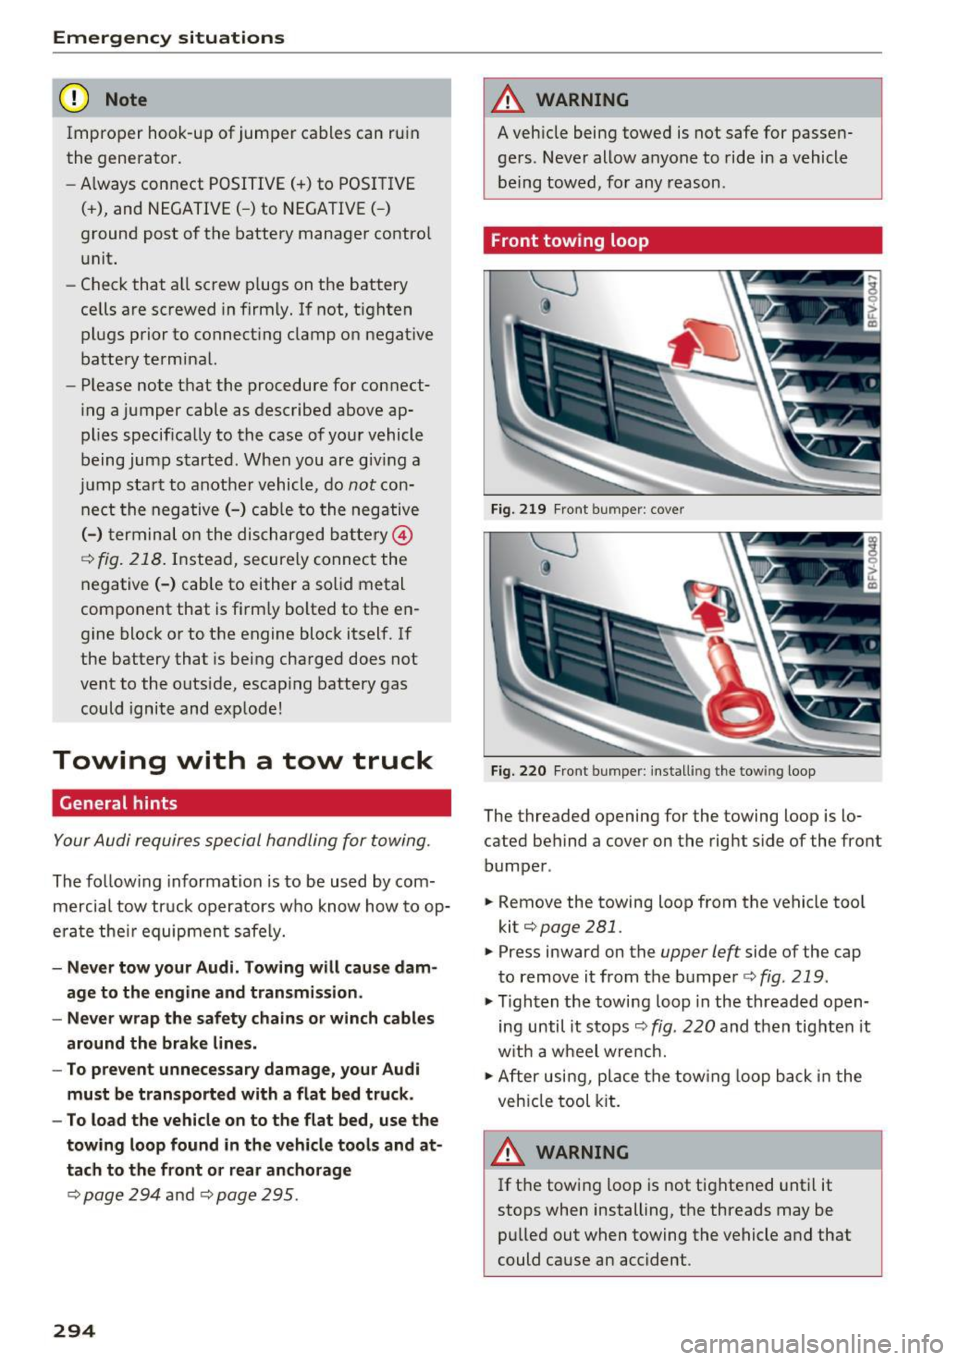
Fig. 219 Fron t bu mpe r: cover
Fig. 2 20 Fron t bumpe r: install ing the tow ing loop
The threaded opening for the towing loop is lo
cated behind a cover on the rig ht side of the front
bumper .
.. Remove the towing loop f rom the vehicle too l
kit¢
page 281 .
.. Press inward on the upper left side of the cap
to remove i t from the bumper ¢
fig. 219 .
.,. Tighten the towing loop in the threaded o pen
ing until it s tops ¢
fig. 220 and then tig hten it
w it h a wheel w re nch.
.,. After usi ng, p lace the tow ing loop b ack in the
veh icle tool kit.
A WARNING
If t he t ow ing l oop is not tig htened unt il it
stops when installing, the threads may be pu lled out when towing the vehicle and that
could cause an accident .
-
Page 297 of 322
CD
CD
.... N
" N .... 0
0
Ill co
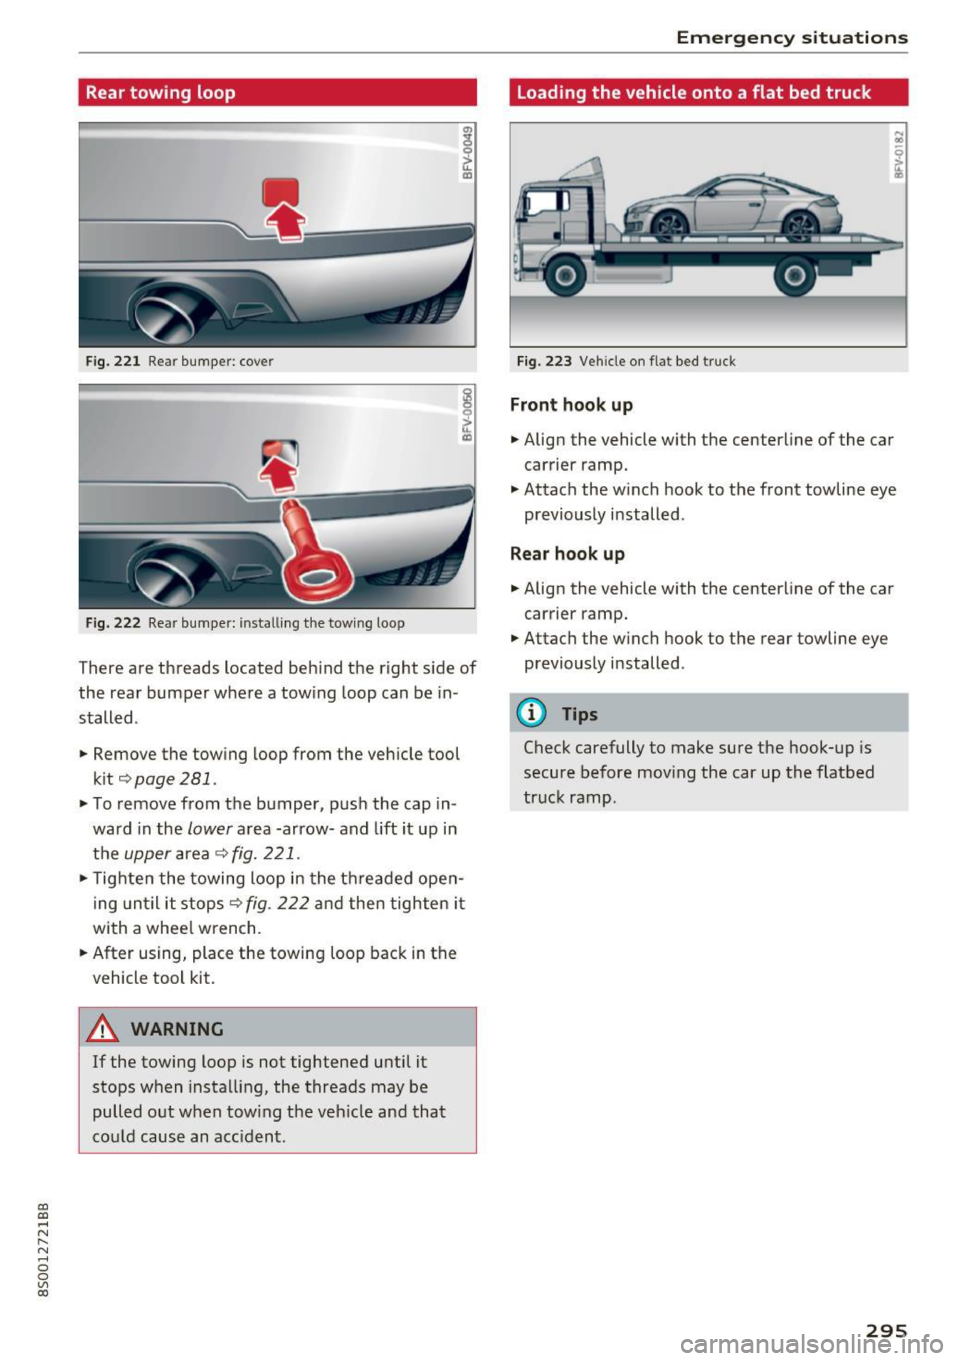
Rear towing loop
Fig. 221 Rea r bumper: cove r
Fig. 222 Rear bumper: installing the towing loop
There are threads located beh ind the right side of
the rear bumper where a towing loop can be in
stalled .
• Remove the towing loop from the vehicle tool
kit¢page281 .
• To remove from the bumper, push the cap in
ward in the
lower area -arrow- and lift it up in
the
upper area ~ fig. 221 .
• Tighten the towing loop in the threaded open
ing until it stops
~ fig . 222 and then tighten it
with a whee l wrench.
• After using, place the towing loop back in the
vehicle tool kit .
.&_ WARNING
If the towing loop is not tightened until it
stops when installing, the threads may be
pulled out when tow ing the veh icle and that
could cause an accident .
-
Emergency situations
Loading the vehicle onto a flat bed truck
N ..
~ m
Fig. 223 Vehicle on flat bed truck
Front hook up
• Align the vehicle with the centerline of the car
carrier ramp.
• Attach the w inch hook to the front towline eye
previously installed .
Rear hook up
• Align the vehicle with the centerline of the car
carrier ramp.
• Attach the winch hook to the rear towline eye
previously installed .
@ Tips
Check carefully to make sure the hook-up is
secure before moving the car up the flatbed
truck ramp .
295
Page 298 of 322
Emergency situations
Raising the vehicle
Lifting with workshop hoist and with floor
jack
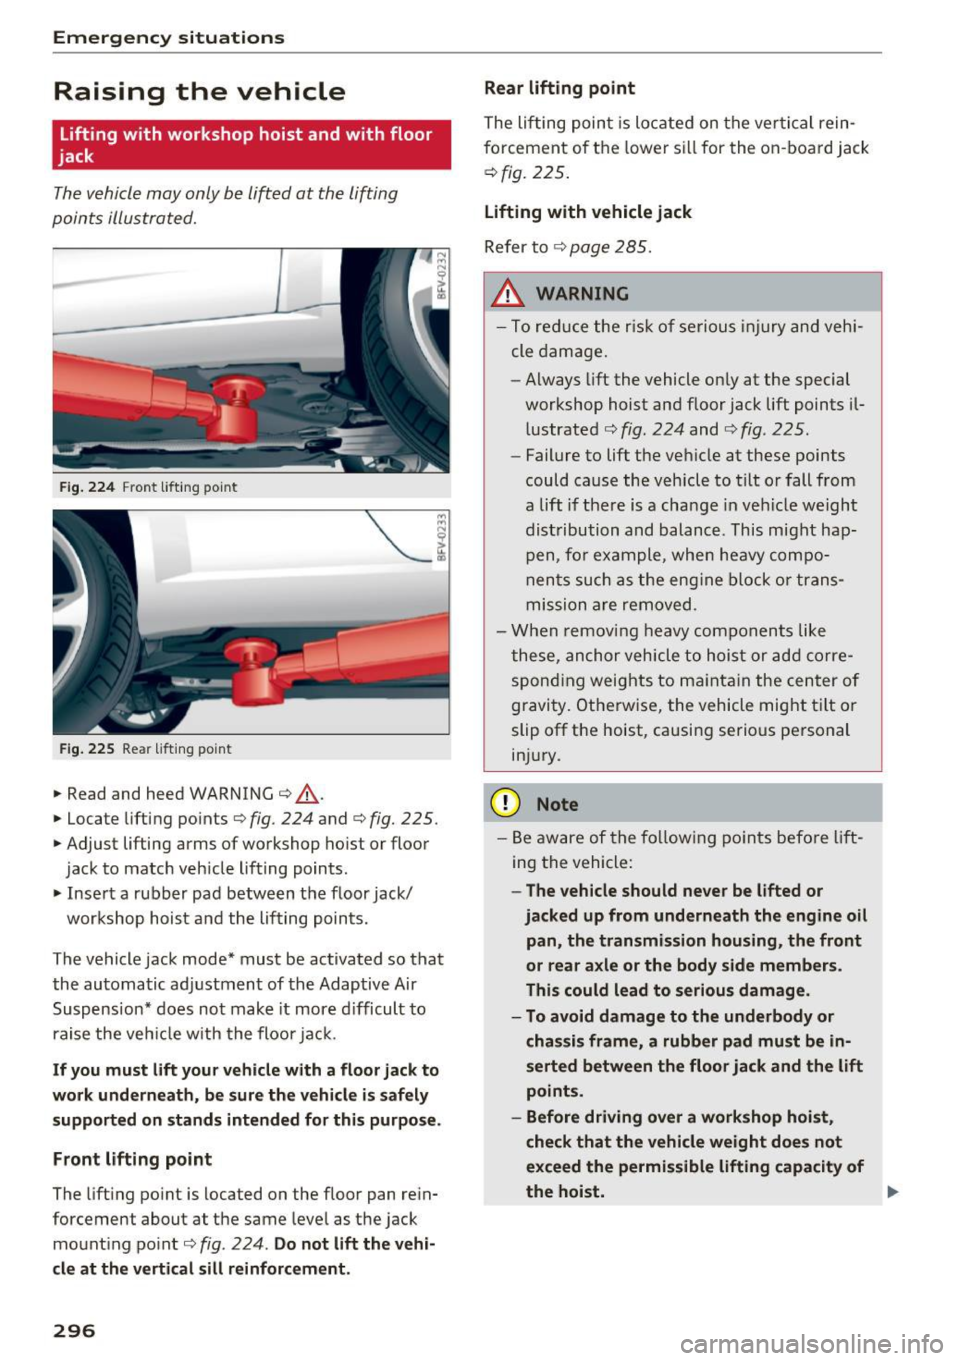
Th e vehicle may only b e lift ed at the lifting
poin ts illust rated.
F ig .. 224 Fro nt lift ing po int
F ig. 225 Rea r lifti ng po int
.,. Read and heed WARNING ¢ A-
.,. Locate lifti ng po ints ¢ fig. 224 and ¢ fig. 225 .
.,. Adjust lifting arms of wo rkshop hoist or floor
jack to match veh icle lifting points.
.,. In se rt a rubb er pad between t he floor jack/
wor kshop hoist a nd the lif ting poin ts .
The vehicle jack mode * must be activated so that
the au tomatic ad justment of the Adaptive Air
Suspens ion * d oes no t mak e it more difficult to
raise the ve hicl e with the floo r jack.
If you must lift your vehicle with a floor jack to
work underneath, be sure the vehicle is safely
supported on stands intended for this purpose .
F ront lifting point
The lift ing po int is located on the floor pan re in
forcement about at the same leve l as the jack
mo unt ing point ¢
fig. 224 . Do not lift the vehi
cle at the vertical sill reinforcement.
296
Rear lifting point
The li fting poin t is lo cated on the ve rtic al rein
f orcement o f th e lower s ill for the on -boar d ja ck
¢fig. 225 .
Lifting with vehicle jack
Refer to ¢ page 28 5.
Ln., WARNING
- To reduc e the r isk of s erious in ju ry and vehi
cle dam age.
- Always lift the vehicle on ly at the special
wor ksh op hoist an d flo or jack lift points il
l ustrated
¢ f ig. 224 and ¢ fig . 225.
- Failur e to lift t he ve hicle at these points
could cause th e veh icle to tilt o r fall from
a lift if t he re is a cha nge in vehi cle w eight
dist ribution and balanc e. This mi ght hap
p en, fo r exa mple , whe n he avy co mpo
n en ts s uch as the e ngine blo ck or tran s
mis sion a re removed .
- Wh en r em ov ing heavy com ponen ts like
t hese, an ch or veh icle t o hoi st or add corre
s p ond ing weights t o maintain the ce n ter of
gravi ty. Oth e rw ise, the vehicle mig ht til t o r
slip off t he hoist, causi ng serious pe rsona l
in jur y .
(D Note
- B e aw are of the fo llow ing poin ts bef ore lif t
ing the vehicle:
- The vehicle should never be lifted or
jacked up from underneath the engine oil
pan, the transmission housing, the front
or rear axle or the body side members .
This could lead to serious damage .
- To avoid damage to the underbody or
chassis frame, a rubber pad must be in
serted between the floor jack and the lift
points .
- Before driving over a workshop hoist ,
check that the vehicle weight does not
exceed the permissible lifting capacity of
the hoist. ..,.
Page 299 of 322
co
co
.... N
" N .... 0
0
Vl c:o
-Before driving over a workshop hoist, en
sure that there is sufficient clearance be
tween the hoist and low parts of the
vehicle.
Emergency situations
297
Page 300 of 322
Technical data
Technical data
Vehicle specifications
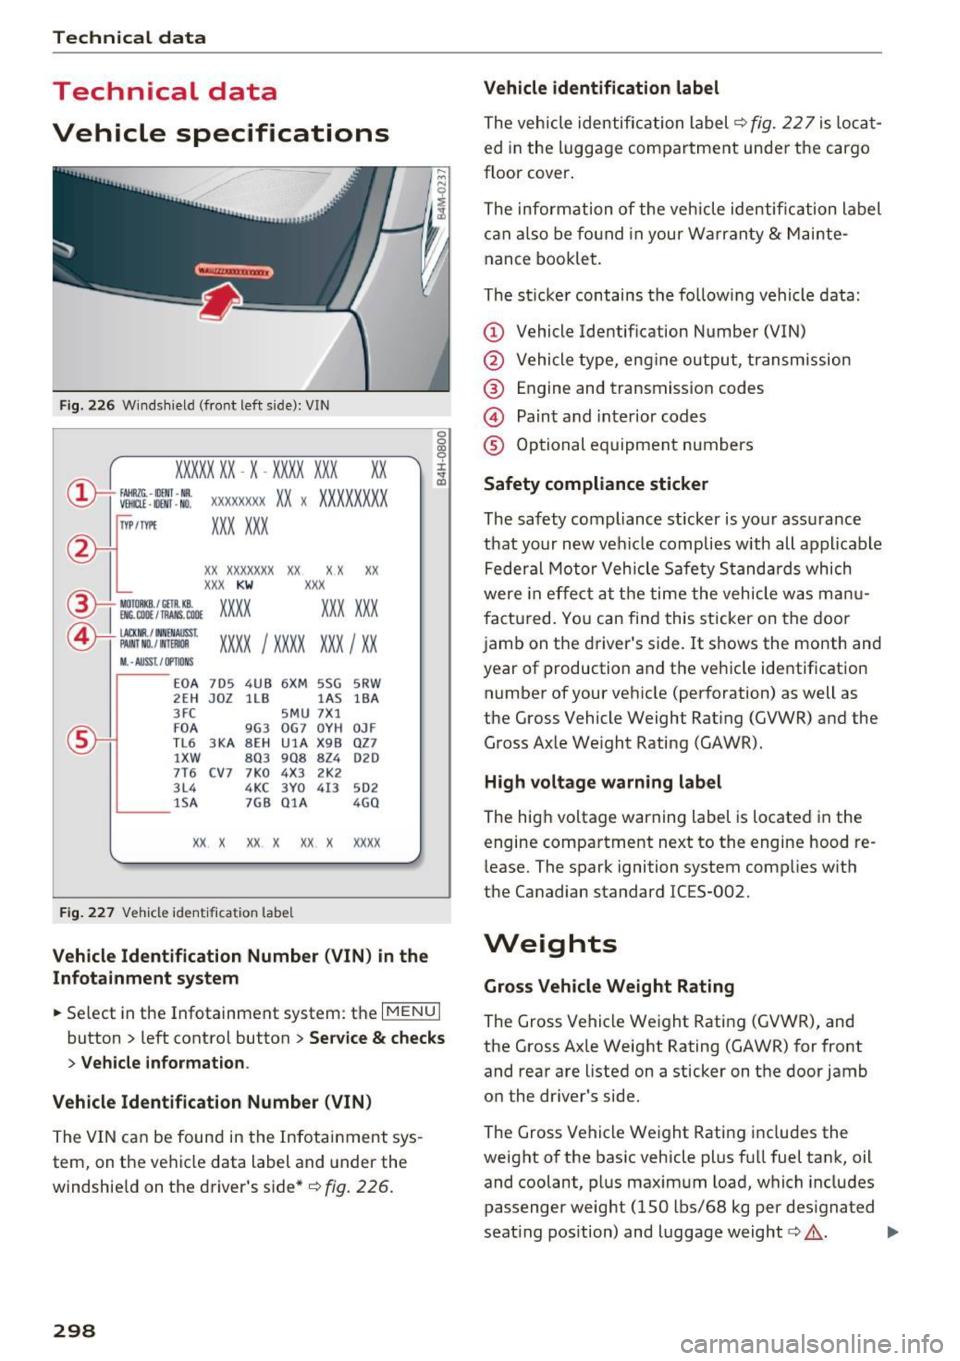
Fig. 226 Windsh iel d (fro nt left s ide): V IN
XXXXX XX -X -XXX X XX X xx
®--+ f AHRZC . - ll)[jj f -Nil . Vlll[l£ • OOIT • NO. XX XXXXXX XX X XX XX XXX X
1YP /rtl'! XXX XXX
xx xxxxxxx
xx xx xx
XXX KW XXX
OC. OOll / lll AMS . lllO! xxxx XXX XXX ®-t Ml) TORKB./ CETll kS.
©+ IACl( flR./ INNENAIJSS t
XXXX I XXXX XXX I XX PAI NT NO. / WlllllOfl
II. -AUSST . / OPTIO NS
E 0 A 7D 5 4U B 6XM 5SG 5RW
2 EH JO Z l lB lA S lBA
3 FC 5M U 7X1
F0A 9G3 0G7 0 YH 0JF
TL 6 3 KA 8EH UlA X 9B OZ 7
lXW 8 0 3 908 8Z4 020
7T6 C V7
7K0 4
X3 2 K2
3 L4 4 KC 3 Y0 413 5 02
1 SA 7GB 0 1A 4GO
XX X XX X X X X xxxx
F ig . 227 Vehicle id entifica tion labe l
Vehicle Identification Number (VIN) in the
Infotainment system
0
0
0:, 0 ' J: .. a:,
~ Select in the Infotainment system: the I MENU I
button > left control button > Service & checks
> Vehicle information .
Vehicle Identification Number (VIN)
The VIN can be found in the Infotainment sys
tem, on the vehicle data label and under the
windshield on the driver's side*
¢ fig. 226.
298
Vehicle identification label
The vehicle identification label¢
fig. 22 7 is locat
ed in the luggage compartment under the cargo
floor cover.
The information of the vehicle identification label
can also be found in your Warranty
& Mainte
nance booklet.
The st icker contains the follow ing vehicle data:
(D Vehicle Identifica tion Number (VIN)
@ Vehicle type, eng ine output, transmission
® Engine and transmission cod es
@ Paint and interior codes
® Optional equipment numbers
Safety compliance sticker
The safety compliance sticker is your assurance
that your new veh icle complies with all applicable
Federal Motor Vehicle Safety Standards which
were in effect at the time the vehicle was manu
factured. You can find this sticker on the door
jamb on the driver's side. It shows the month and
year of production and the vehicle identification
number of your vehicle (perforation) as well as
the Gross Vehicle Weight Rating (GVWR) and the Gro ss Axle We ight Rating (GAWR).
High voltage warning label
The high voltage warn ing label is located in the
engine compartment next to the engine hood re
lease. The spark ignition system complies w ith
the Canadian standard IC ES-002.
Weights
Gross Vehicle Weight Rating
The Gross Vehicle Weight Rating (GVWR), and
the Gross Axle Weight Rat ing (GAWR) for front
and rear are li sted on a sticker on the door jamb
on the driver 's side.
The Gross Vehicle Weight Rating includes the
weight of the basic vehicle plus full fuel tank, oil
and coolant, plus maximum load, which includes
passenger weigh t (150 lbs/68 kg per designated
seat ing position) and luggage weight
c::> ,&.. ..,.