AUDI TT ROADSTER 2018 Owners Manual
Manufacturer: AUDI, Model Year: 2018, Model line: TT ROADSTER, Model: AUDI TT ROADSTER 2018Pages: 310, PDF Size: 46.95 MB
Page 271 of 310
Cl 00 ... N r--N ... 0 r--Vl 00
Care and cleaning
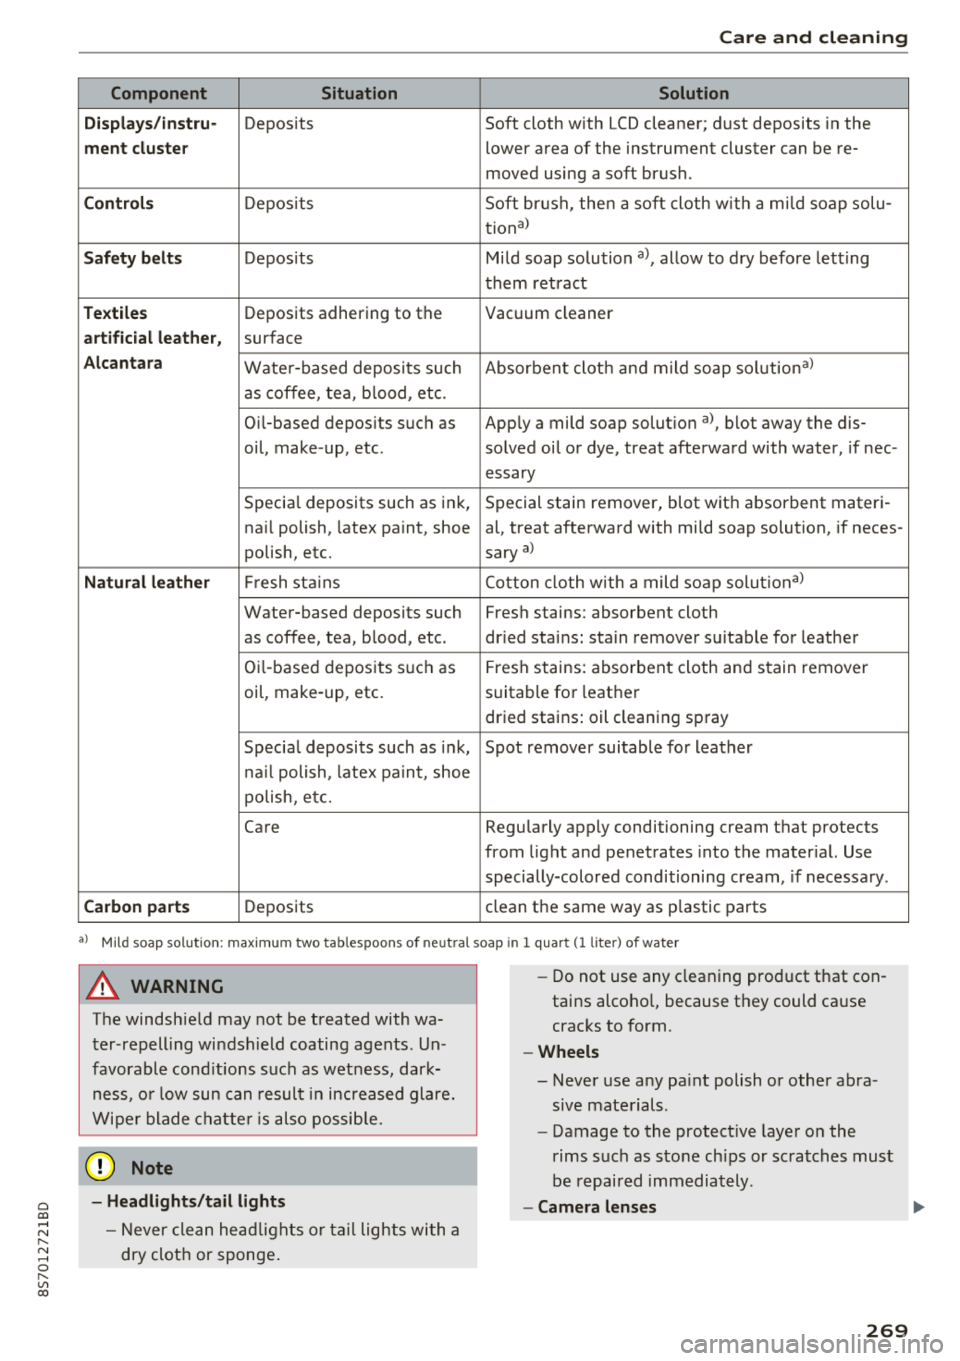
Component Situation Solution
Displays /instru·
Deposits Soft cloth with LCD cleaner; dust deposits in the
ment cluster lower area of the instrument cluster can be re-
moved using a soft brush.
Controls Deposits Soft
brush, then a soft cloth with a mild soap solu-
tiona)
Safety belts Deposits Mild soap solution a), allow to dry before letting
them retract
Textiles Deposits adhering to the
Vacuum cleaner
artificial leather, surface
Alcantara Water-based deposits such Absorbent clot
h and mild soap solutiona)
as coffee, tea, blood, etc.
O il-based deposits such as Apply a mild soap solut ion
a ), blot away the dis-
oil, make -up, etc. solved oil or dye, treat afterward with water, if nee-
essary
Specia l deposits such as ink, Special stain remover, blot wit h absorbent materi -
nail polish, latex paint, shoe al, treat afterward with mi ld soap solution, if neces -
polish, etc. sary
a)
Natural leather Fr
esh stains Cotton cloth
with a mild soap solutiona)
Water-based deposits such Fresh stains: absorbent cloth
as coffee, tea, blood, etc . dried sta ins: sta in remover suitable for leather
Oi l-based deposits such as
Fresh stains: absorbent cloth and stain remover
oil, make-up, etc. suitable for leather
dried stains: oil cleaning spray
Special deposits such as ink , Spot remover suitable for leather
nail polish, latex paint, shoe
polish, etc.
Care Regularly apply conditioning cream that protects
from light and penetrates into the mater ial. Use
specially-colored conditioning cream, if necessary .
Carbon parts Deposits clean
the same way as p lastic parts
a) Mild soap so lution: maximum two tablespoons of ne utra l soap in l quart (1 lite r) of wate r
A WARNING
The windsh ield may not be treated with wa
ter-repelling windshield coating agents. Un
favorable conditions such as wetness, dark
ness, or low sun can result in increased glare.
Wiper blade chatter is also possible.
0 Note
-Headlights/tail lights
-Never clean headlights or tail lights wi th a
dry cloth or sponge .
-
-Do not use any cleaning product that con
tains alcoho l, because they could ca use
cracks to form.
- Wheels
-Never use any paint polish or other abra-
sive materials.
-Damage to the protective layer o n the
rims such as stone chips or scratches must
be repaired immediately.
-Camera lenses
269
Page 272 of 310
Care and cleaning
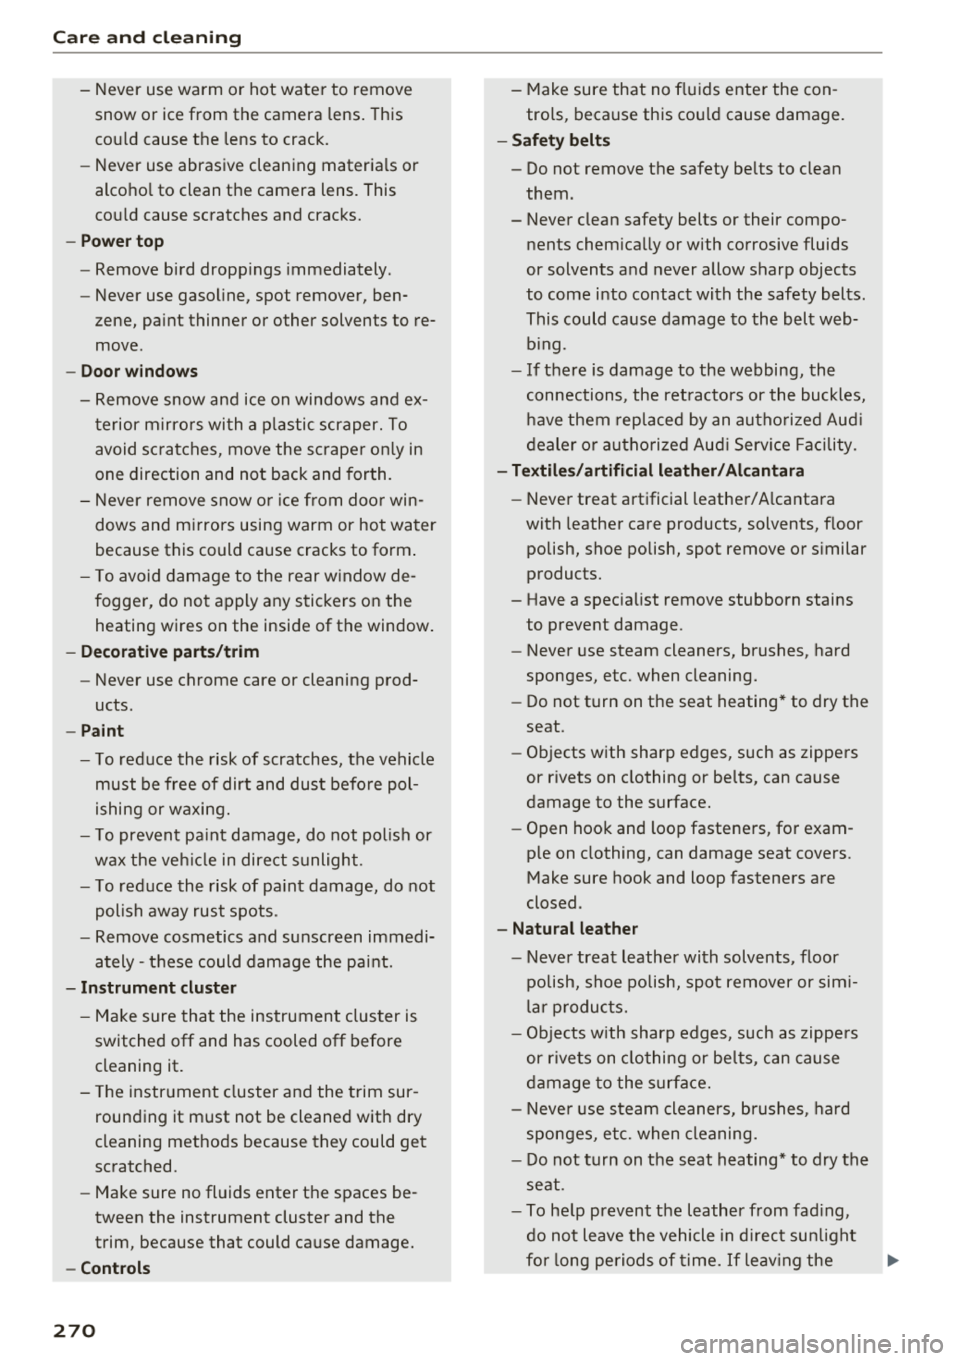
- Never use warm or hot water to remove
snow or ice from the camera lens. This
could cause the lens to crack.
- Never use abrasive cleaning materials or
alcohol to clean the camera lens. This
could cause scratches and cracks.
- Power top
- Remove bird droppings immediately.
- Never use gasoline, spot remover, ben-
zene, paint thinner or other solvents to re
move .
-Door windows
- Remove snow and ice on windows and ex-
terior mirrors with a plastic scraper. To
avoid scratches, move the scraper only in
one direction and not back and forth.
- Never remove snow or ice from door win
dows and mirrors using warm or hot water
because this could cause cracks to form.
- To avoid damage to the rear window de
fogger, do not apply any stickers on the heating wires on the inside of the window.
- Decorative parts/trim
- Never use chrome care or cleaning prod-
ucts .
-Paint
-To reduce the risk of scratches, the vehicle
must be free of dirt and dust before pol
ishing or waxing.
- To prevent paint damage, do not polish or
wax the vehicle in direct sunlight.
- To reduce the risk of paint damage, do not
polish away rust spots .
- Remove cosmetics and sunscreen immedi
ately - these could damage the paint.
- Instrument cluster
- Make sure that the instrument cluster is
switched off and has cooled off before
cleaning it.
- The instrument cluster and the trim sur
rounding it must not be cleaned with dry
cleaning methods because they could get
scratched.
- Make sure no fluids enter the spaces be
tween the instrument cluster and the
trim, because that could cause damage.
- Controls
270
- Make sure that no fluids enter the con
trols, because this could cause damage.
- Safety belts
- Do not remove the safety belts to clean
them.
- Never clean safety belts or their compo
nents chemically or with corrosive fluids
or solvents and never allow sharp objects
to come into contact with the safety belts.
This could cause damage to the belt web
bing.
- If there is damage to the webbing, the
connections, the retractors or the buckles, have them replaced by an authorized Audi
dealer or authorized Audi Service Facility .
-Textiles/artificial leather/ Alcantara
- Never treat artificial leather/ Alcantara
with leather care products, solvents, floor
polish, shoe polish, spot remove or similar
products.
- Have a specialist remove stubborn stains
to prevent damage .
- Never use steam cleaners, brushes, hard
sponges, etc. when cleaning.
-Do not turn on the seat heating* to dry the
seat.
- Objects with sharp edges, such as zippers
or rivets on clothing or belts, can cause
damage to the surface.
- Open hook and loop fasteners , for exam
ple on clothing, can damage seat covers .
Make sure hook and loop fasteners are
closed.
- Natural leather
- Never treat leather with solvents, floor
polish, shoe polish, spot remover or simi
lar products.
- Objects with sharp edges, such as zippers
or rivets on clothing or belts, can cause
damage to the surface.
- Never use steam cleaners, brushes, hard
sponges, etc. when cleaning.
- Do not turn on the seat heating* to dry the
seat .
- To help prevent the leather from fading,
do not leave the vehicle in direct sunlight
for long periods of time. If leaving the
Page 273 of 310
Cl 00 .-< N r-N .-< 0 r-Vl 00
vehicle parked for long periods of time,
you should cover the leather to protect it
from direct sunlight .
(D Tips
-Insects are easier to remove from paint that
has been fresh ly waxed.
- Regular waxing can prevent rust spots from
forming.
Placing your vehicle out
of service
If you would like to take your vehicle out of serv
ice for a longer period of time, contact an author
ized Audi dealer or authorized Audi Service Facili
ty . They w ill advise you of important measures,
such as corros ion protection, service and storage
procedures. Also follow the information about
the vehicle battery.
Care and cleaning
271
Page 274 of 310
Emergency assistance
Emergency assistance
Trunk escape latch
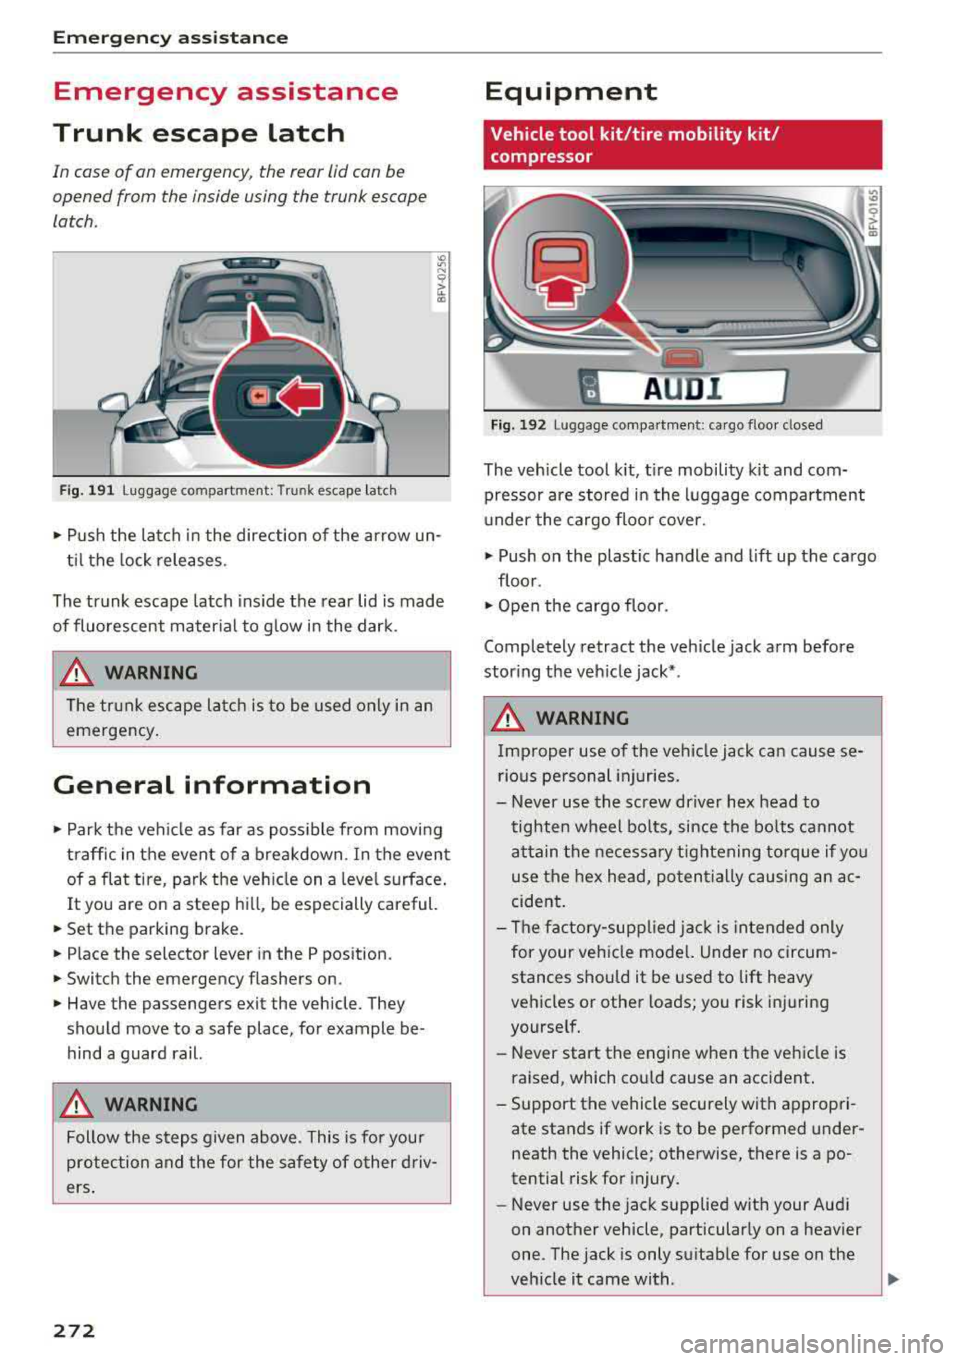
In case of an emergency , the rear lid can be
opened from the inside using the trunk escape
latch.
Fig. 191 L uggage compartment: Trunk escape latch
• Pu sh the latch in the direction of the arrow un
til the lock releases .
The trunk escape latch inside the rear lid is made
of fluorescent material to g low in the dark.
.&_ WARNING
The trunk escape latch is to be used only in an
emergency.
General information
• Park the vehicle as far as poss ible from moving
traffic in the event of a breakdown . In the event
of a flat tire , park the vehicle on a level surface .
It you are on a steep hill, be especially careful.
• Set the parking brake.
• Place the selector lever in the P position.
• Switch the emergency flashers on.
• Have the passengers exit the vehicle. They
should move to a safe place, for example be
hind a guard rail.
.&_ WARNING
Follow the steps given above . This is for your
protection and the for the safety of other driv
ers.
272
Equipment
Vehicle tool kit/tire mobility kit/
compressor
A UD i 1
Fig. 192 Lu ggage compartmen t: cargo floor closed
The vehicle tool kit, tire mobility kit and com·
pressor are stored in the luggage compartment
u nder the cargo floor cover.
• Push on the plastic handle and lift up the cargo
floor .
• Open the cargo floor.
Completely retract the vehicle jack arm before
storing the vehicle jack* .
.&_ WARNING
Improper use of the veh icle jack can cause se
rious personal injuries.
- Never use the screw driver hex head to
tighten wheel bolts, since the bolts cannot
attain the necessary tightening torque if you
use the hex head, potentially causing an ac
cident.
- The factory-supplied jack is intended only
for your vehicle mode l. Under no circum
stances should it be used to lift heavy
vehicles or other loads; you risk injuring
yourself.
- Never start the engine when the vehicle is
raised, which cou ld cause an accident .
- Support the vehicle securely with appropri
ate stands if work is to be performed under
neath the vehicle; otherwise, there is a
po
tential risk for injury.
- Never use the jack supplied with your Aud i
on another vehicle, particularly on a heavier
one. The jack is only suitable for use on the
vehicle it came with .
...
Page 275 of 310
Cl co .... N ,....
N ...... 0 ,....
Vl co
(D Tips
The vehicle jack* in your vehicle is maintena nee-free.
Ti re mobility kit
Preparation
A ppl ies to: ve hicles with tire mobility kit
~ Read and follow the important safety precau-
t ions ¢
page 2 72, General information.
~ Set the parking b rake.
~ Select the "P" selector lever position .
~ Check if a repair with the tire mobility kit is pos
sible c:>page 273.
Using the tire mobility kit
Appl ies to: ve hicles w ith tire mob ility kit
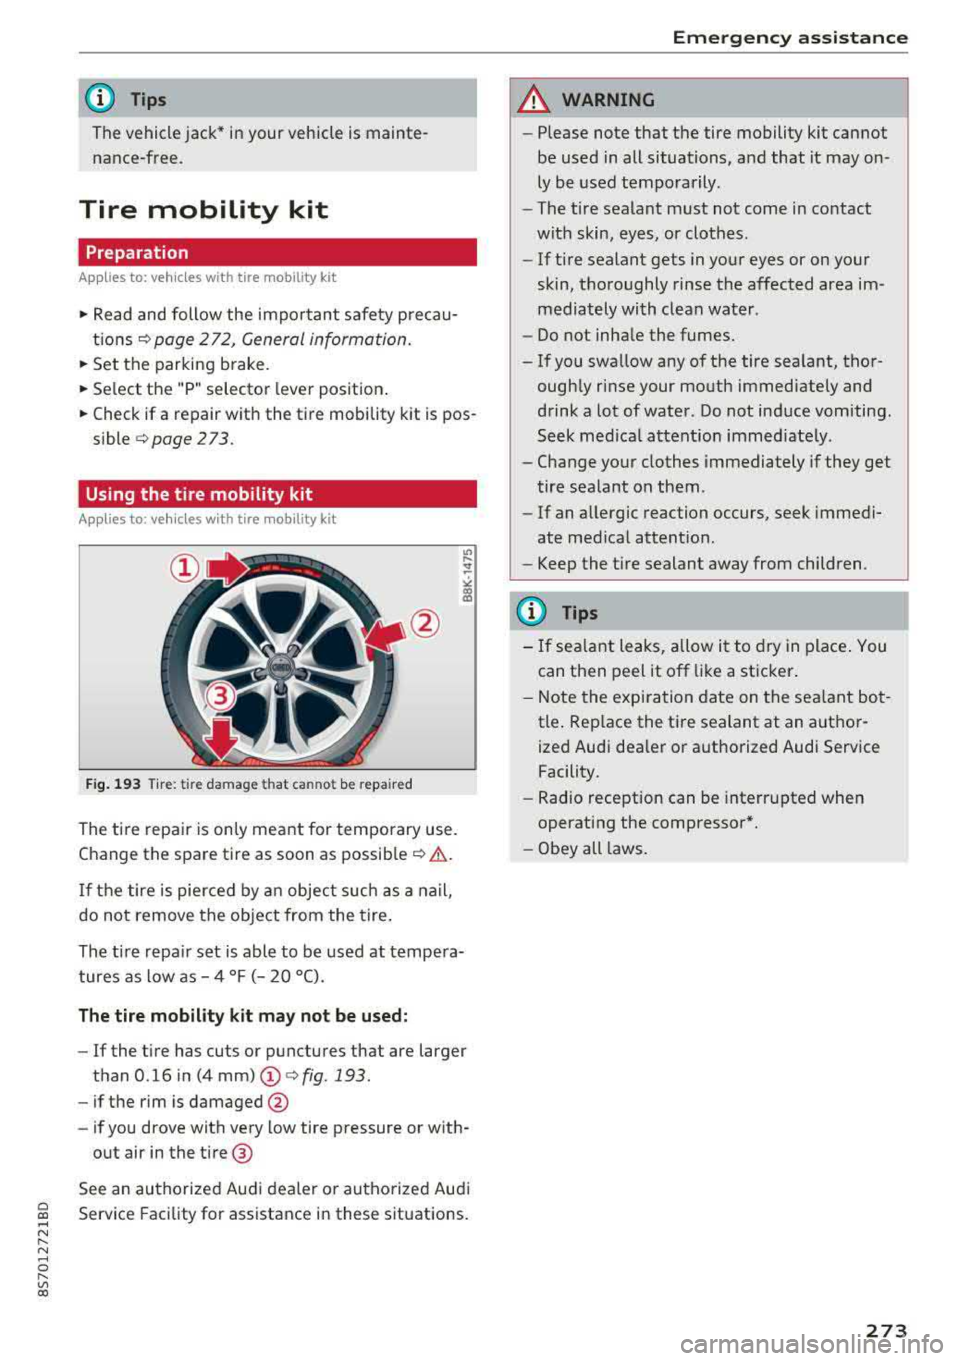
Fig . 193 Tire : tire da mage that canno t be repa ired
The tire repair is only meant for temporary use .
Change the spare tire as soon as
possib le ¢ .& .
If the tire is pierced by a n object such as a nail,
do not remove the object from the tire .
The tire repa ir set is able to be used at tempe ra
tures as low as
-4 °F (- 20 °C).
The tire mobility kit ma y not be u sed:
- If the t i re has cuts or punctures that are larger
than 0 .16 in (4
mm) (!)¢ fig. 193.
-if the rim is damaged @
- if you drove with very low tire pressure or with-
out air in the tire @
See an authorized Audi dealer or authorized Aud i
Service Facility for assistance in these situations.
Em ergen cy as sis tanc e
A WARNING
-Please note that the tire mobility kit cannot
be used in all situations, and that it may on
ly be used temporarily.
- The tire sealant must not come in contact
with skin, eyes , or clothes.
- If tire sealant gets in your eyes or on your
skin, thoroughly rinse the affected area im
mediately with clean water .
- Do not inha le the fumes.
-If you swa llow any of the tire sealant, thor-
ough ly rinse your mouth immediately and
drink a lot of water . Do not induce vomiting .
Seek med ica l attent ion immed iate ly.
-Change your clothes immediately if they get
tire sealant on them.
-If an allergic reaction occurs, seek immedi
ate med ical attention.
-Keep the tire sealant away from children.
(D Tips
- If sea lant leaks, allow it to dry in place . You
can then peel it off like a st icker .
- Note the expi ra tion date on the sea lant bot
tle . Rep lace the tire sealant at an autho r
ized Audi dealer or authorized Audi Service Facility.
- Radio reception can be interr upted when
operating the compressor*.
- Obey all laws .
273
Page 276 of 310
Emergency assistance
Repairing tires
Applies to: ve hicles w ith tire mobility kit
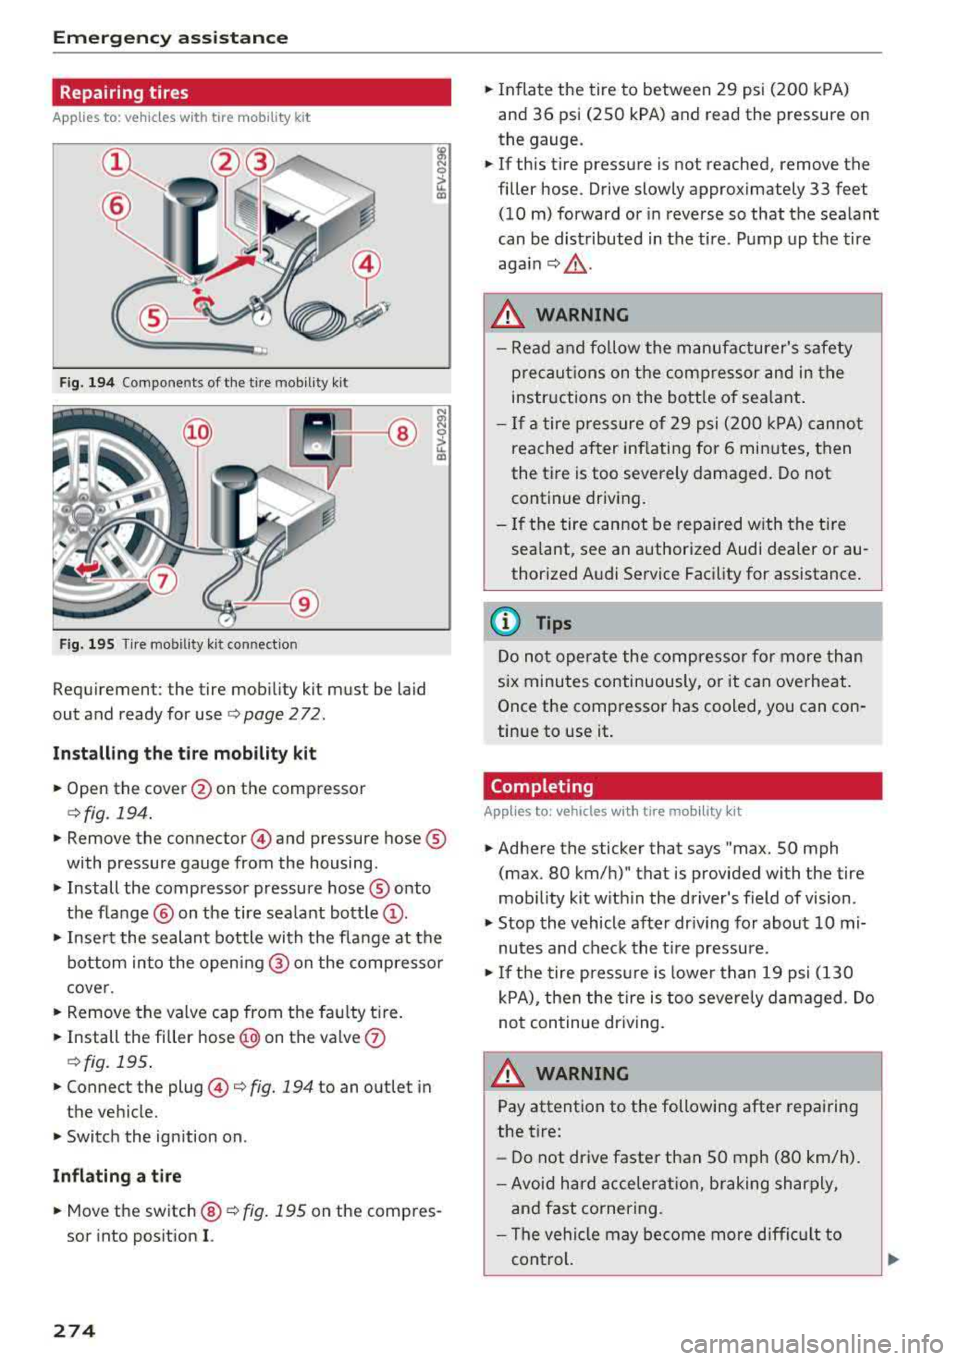
Fig. 194 Compo nents of the tire mobility kit
Fig. 195 Tire mo bility kit co nnection
Requirement: the tire mobility kit must be laid
out and ready for use
¢ page 2 72.
Installing the tire mobility kit
• Open the cover @on the compressor
¢fig . 194.
• Remove the connector @) and pressure hose ®
with pressure gauge from the housing.
• Install the compressor pressure hose ® onto
the f lange ® on the tire sealant bottle
(D.
• Inse rt the sealant bottle with the flange at the
bottom into the opening @ on the compressor
cover.
• Remove the valve cap from the faulty tire.
• Install the filler hose @on the valve (j)
¢fig. 195 .
• Connect the plug @¢ fig. 194 to an outlet in
the vehicle.
• Switch the ignition on .
Inflating a tire
• Move the switch@¢ fig. 195 on the compres
sor into position
I.
274
• Inflate the tire to between 29 psi (200 kPA)
and 36 psi (250 kPA) and read the pressure on
the gauge.
• If this tire pressure is not reached, remove the
filler hose. Drive slowly approximately 33 feet (10 m) forward or in reverse so that the sealant
can be distributed in the tire. Pump up the tire
aga in ¢ ,&. .
A WARNING
-Read and follow the manufacturer's safety
precautions on the compressor and in the
instructions on the bottle of sea lant.
- If a tire pressure of 29 psi (200 kPA) cannot
reached after inflating for 6 minutes, then
the tire is too severely damaged. Do not
continue driving.
- If the tire cannot be repaired with the tire
sealant, see an authorized Audi dealer or au
thorized Audi Service Facility for assistance.
(D Tips
Do not operate the compressor for more than
six minutes continuously, or it can overheat.
Once the compressor has cooled, you can con
tinue to use it.
Completing
App lies to: vehicles wit h tire mo bility kit
• Adhere the sticker that says "max. SO mph
(max . 80 km/h)" that is provided with the tire
mobility kit within the driver's field of vision.
• Stop the vehicle after driving for about 10 mi
nutes and check the tir e pressure .
• If the tire pressure is lower than 19 psi (130
kPA), then the tire is too severely damaged. Do
not continue driving.
A WARNING
Pay attention to the following after repairing
the tire:
- Do not drive faster than SO mph (80 km/h).
- Avoid hard acceleration, braking sharply,
and fast cornering .
- The vehicle may become more difficult to
control.
Page 277 of 310
Cl co .... N ,..._
N ...... 0 ,..._
Vl co
-If the tire is too severely damaged , see an
authorized Aud i dealer or authorized Aud i
Service Facility for assistance .
@ For the sake of the environment
You can give the used tire sealant bottle to an
author ized Audi dealer or authorized A udi
Service Facility for disposal.
@ Tips
Remember to obtain a new bottle of sea lant
from an authorized Audi dea ler or authorized
Audi Service Facility after repairing a tire.
Replacing wheels
Preparation
You must complete the preparation before
changing a tire .
"' Read and follow the important safety precau-
t ions
Q page 2 72, General information .
"' Set the parking brake .
"'Se lect the "P" selec to r l ever position.
"'Lay out the vehicle tool kit Q page 2 72 and the
spare tire
Q page 279 .
A WARNING ,-
You or your passenger could be injured while
changing a wheel if you do not follow these
safety precautions:
- If you have a flat tire, move a safe distance
off the road. Turn off the engine, turn the
emergency flashers on and use other warn
ing devices to alert other motorists.
- Make sure that passengers wait in a safe place away f rom the vehicle and well away
from the road and traffic .
- To help prevent the vehicle from moving suddenly and possibly slipping off the jack,
always fully set the parking brake and block
the front and back of the wheel diagonally
opposite the w heel be ing changed. Whe n
one front whee l is lifted off the ground,
pla cing the A utoma tic Transm ission in P
(Park) will
not prevent the ve hicle from
moving .
Emergen cy as sis tanc e
-Before you change a wheel, be sure the
ground is level and firm . If necessary, use a
sturdy board under the jack.
- Always store the vehicle too l kit, the jack
and the replaced tire in the luggage com
partment
<=) page 183.
(D Tips
Obey all laws .
Removing the cover
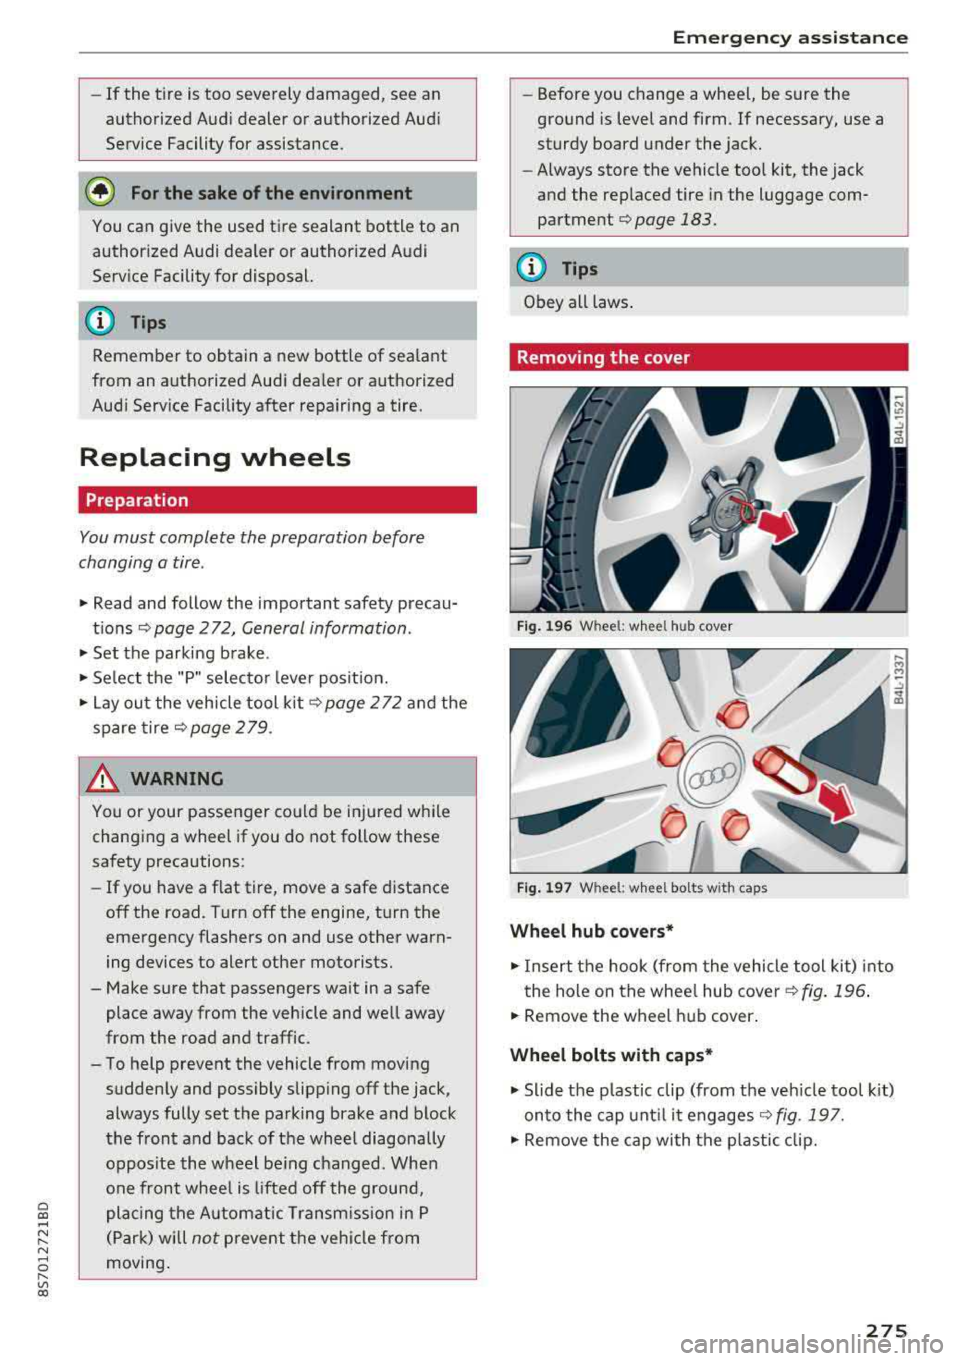
Fig. 196 W heel: wh eel hu b cov er
F ig. 1 97 Wheel: wh eel bol ts with cap s
Wheel hub covers*
"'Insert the hook (from the vehicle tool kit) into
the hole on the whee l hub cover
Q fig. 196 .
"'Remove the wheel h ub cover .
Wheel bolts with caps *
"'Slide the p lastic clip (from the veh icle too l kit)
onto the cap unt il it engages
Q fig . 197.
"' Remove the cap with the p lastic clip.
275
Page 278 of 310
Emerg enc y assis ta nce
Loosening the wheel bolts
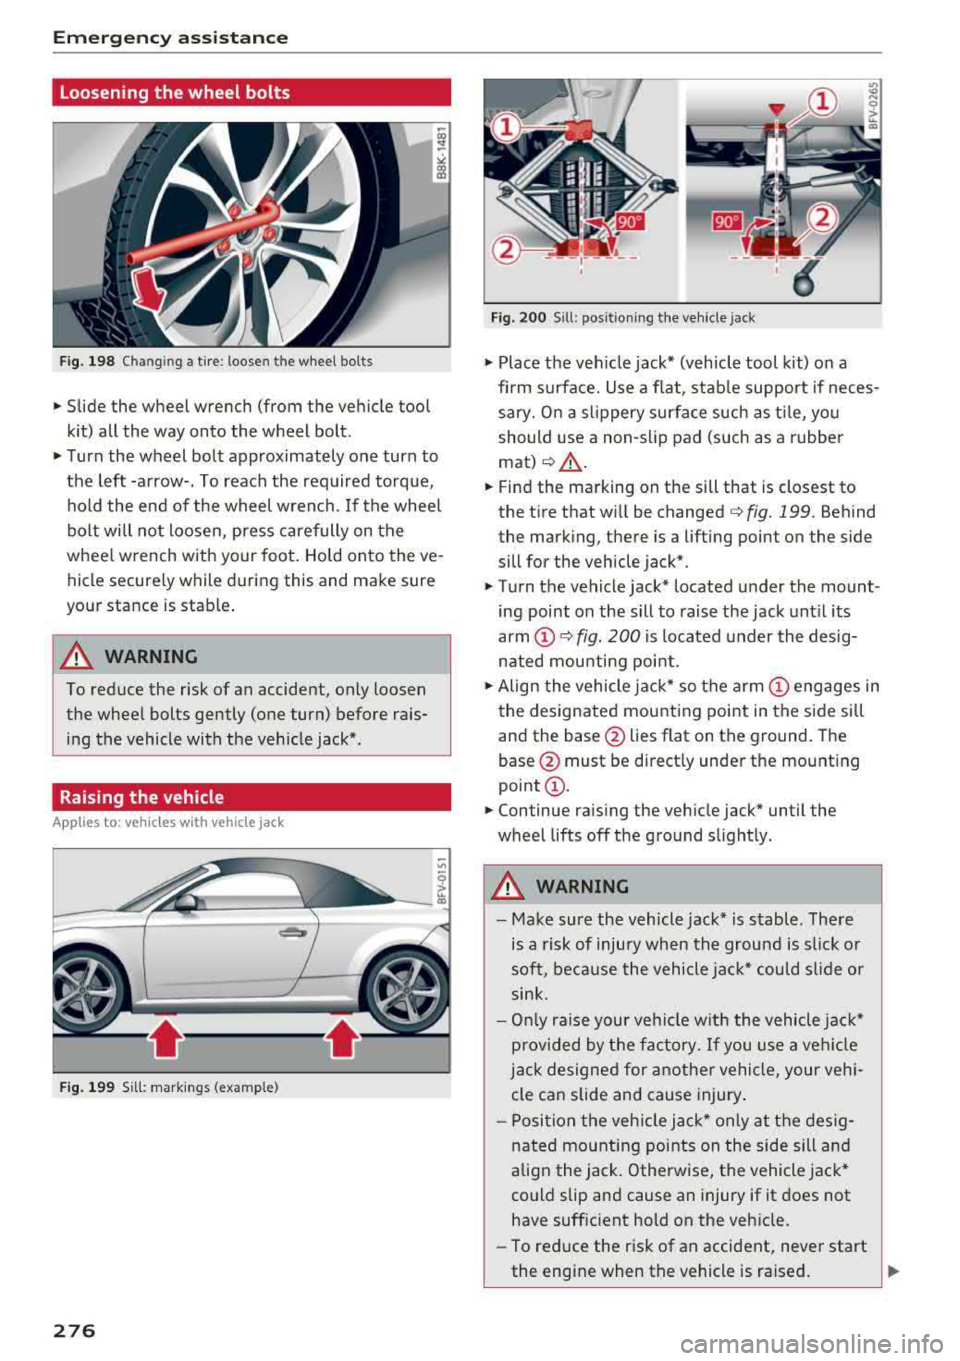
Fig. 198 Chan gin g a tire : loosen t he wheel bolts
.,. Slide the wheel wrench (from the vehicle tool
k it) all the way onto the wheel bolt.
.,. Turn the wheel bolt approximately one turn to
the left -arrow-. To reach the required torque, hold the end of the wheel wrench. If the wheel
bolt will not loosen, press carefully on the
whee l wrench with your foot. Hold onto the ve
hicle securely while during this and make sure
your stance is stable .
A WARNING
To reduce the risk of an accident, only loosen
the wheel bolts gently (one turn) before rais
ing the vehicle with the veh icle jack*.
Raising the vehicle
A ppl ies to: ve hicles w ith vehicle jack
- ,t.------,:
Fig. 199 Sill: markings (examp le)
276
Fig. 200 S ill : pos ition ing the vehicle jack
.,. Place the veh icle jack* (vehicle tool kit) on a
firm s urface. Use a f lat, stab le support if neces
sary. On a slippery surface such as ti le, you
should use a non-slip pad (such as a rubber
mat) <=>& .
.,. Find the marking on the sill that is closest to
the tire that will be changed
c> fig. 199. Behind
the marking, there is a lifting point on the side
sill for the vehicle jack* .
.,. Turn the vehicle jack* located u nder the mount
ing point on the sill to raise the jack until its
arm
(D c> fig. 200 i s located under the desig
nated mou nting point .
.,. Align the vehicle jack* so the a rm (!) engages in
the designated mounting point in the side sill
and the base @lies flat on the ground. The
base @ must be directly under the mounting
point @.
.,. Continue raising the vehicle jack* until the
wheel lifts off the ground slightly.
A WARNING
- Make sure the vehicle jack* is stable . There
is a risk of injury when the ground is s lick or
soft, because the vehicle jac k* could sl ide or
sink.
- On ly raise your vehicle w ith the vehicle jac k*
provided by the factory. If you use a ve hicle
j a ck designed for anothe r vehicle, your veh i
cle can slide and cause injury .
- Posi tion the veh icle jack* only at the des ig
nated mounting points on the side sill and
align the jack . Otherwise, the vehicle jack*
could slip and cause an injury if it does not
have sufficient hold on the vehicle.
- To reduce the risk of an accident, never start
the engine when the vehicle is ra ised.
Page 279 of 310
Cl co .... N ,....
N ...... 0 ,....
Vl co
-To reduce the risk of injury, support the ve
hicle securely with suitab le stands if work is
to be performed underneath the vehicle.
- To help prevent injury to yourself and your
passengers:
- Do not ra ise the vehicle until you are sure
the jack is securely engaged .
- Passengers must not remain in the vehicle
when it is jacked up.
- Make sure that passengers wait in a safe
p lace away from the vehicle a nd well away
from the road and t raffic.
- Make sure jack posit ion is correct, adjust
as necessary and then cont inue to raise
the jack.
- If work has to be done under the v ehicle,
ensure that it is safely s upported on su ita
b le stands
-risk of inju ry!
- Never start the engine when the vehicle is
on the jac k
-risk of accident!
(D Note
Do not lift the vehicle by the sill . Position the
veh icle jack* only at the des ignated mounting
points on the side s il l. Otherwise, yo ur vehicle
w ill be damaged.
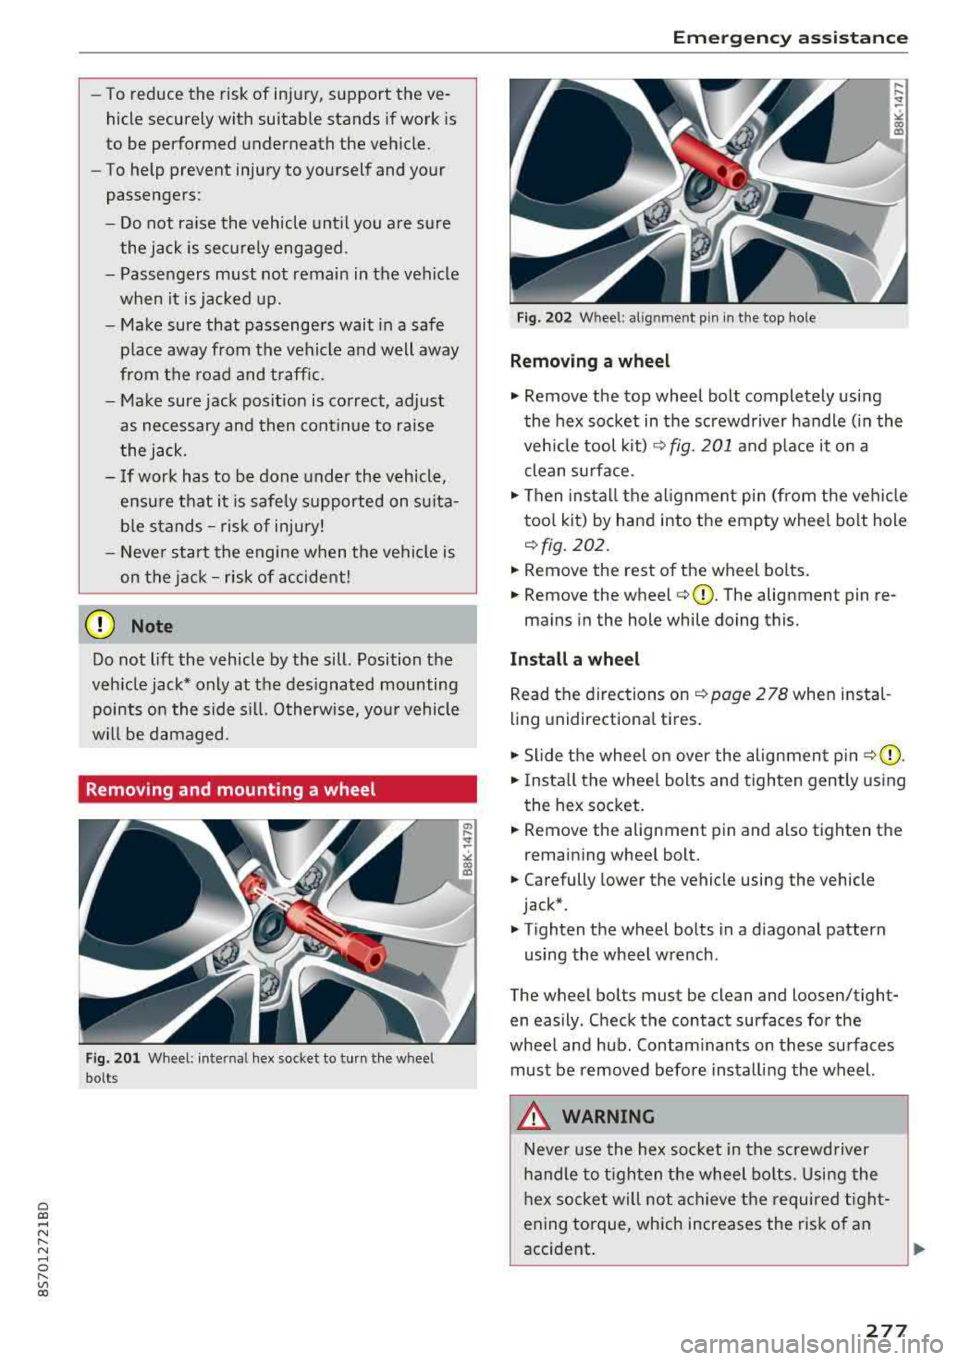
Removing and mounting a wheel
Fi g. 2 01 Wheel : internal hex socket to turn the wheel
bolts
Em ergen cy as sis tanc e
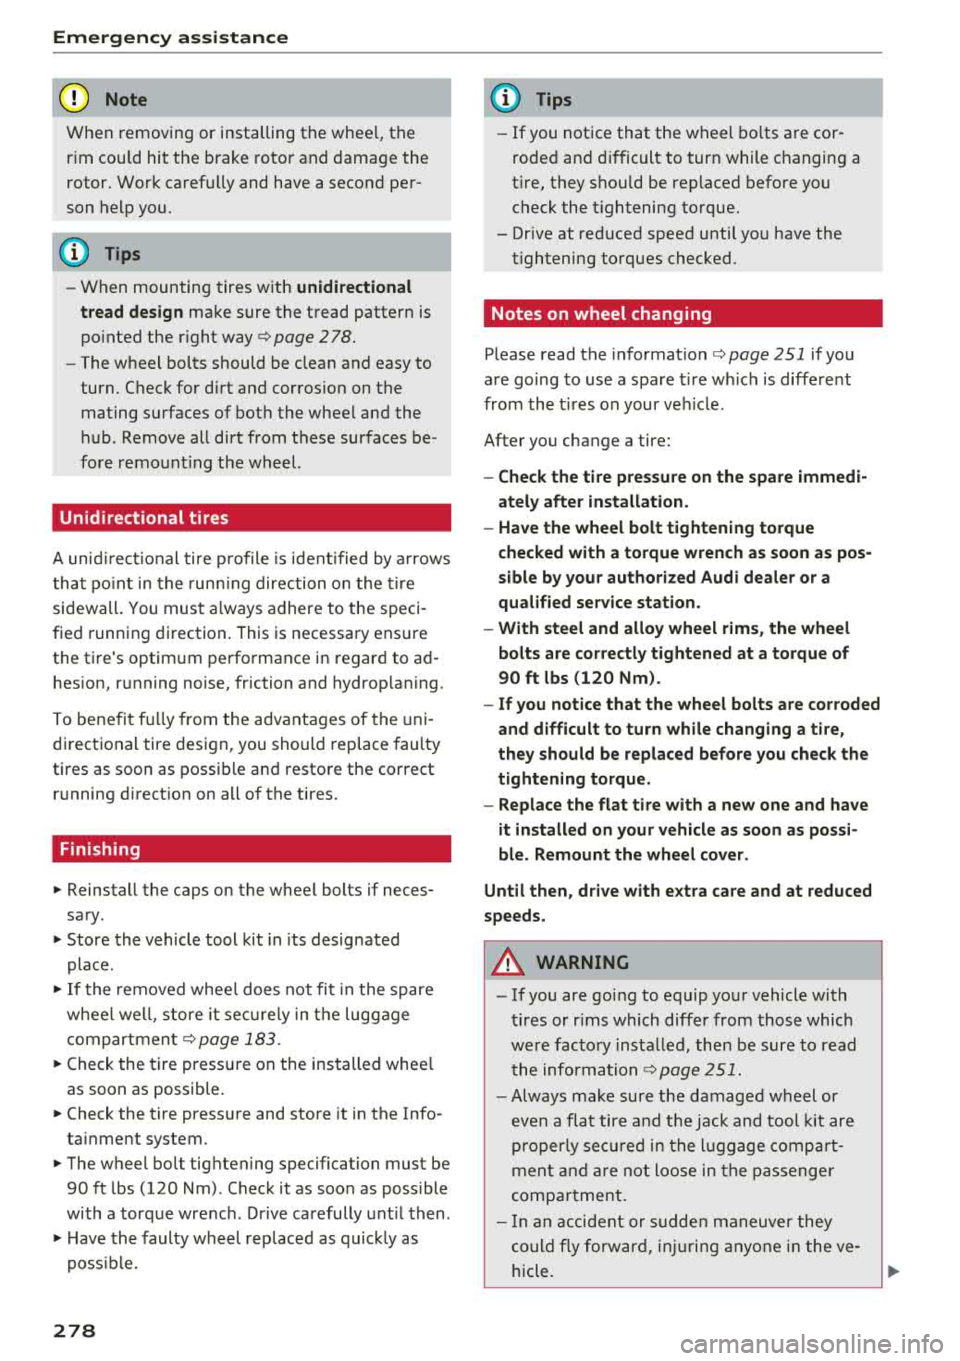
Fig. 202 Whee l: alignment pin in the top ho le
Removing a wheel
.,. Remove the top wheel bolt completely using
the hex socket in th e screwdriver handle (in the
ve hicle tool kit) ¢
fig. 201 and p lace it on a
clean s urface.
.,. Then insta ll the alignment pin (from the ve hicl e
too l kit) by hand into the empty wheel bolt hole
<=> fig . 202.
.,. Remove the rest of the wheel bo lts.
.,. Remove the wheel <=>CD. The alignment pin re-
mains in the hole while doing this.
Install a wheel
Read the directions on <=> page 2 78 when in stal
ling unidirectiona l tires.
.,. Slide the wheel on over the alignment pin ¢ (D .
.,. Insta ll the whee l bolts and tighten gently us ing
t he hex socket .
.,. Remove the alignment pin and also tighten the
remain ing whee l bolt .
.,. Carefully lower the vehicle using the vehicle
jack* .
.,. Tighten the wheel bolts in a d iagonal pattern
using the wheel wrench .
The wheel bolts must be clean and loosen/tight
en easily . Check the contact surfaces for the
whee l and hub. Contam inants on these su rfaces
must be removed before installing the wheel.
_&. WARNING
Neve r use the hex socke t in the screwd river
handle to t igh ten the wheel bo lts . Using the
h ex socket will not ac hieve the required t ight
ening torque, which increases the risk of an
accident .
..,.
277
Page 280 of 310
Emergency assistance
{QJ Note
When removing or installing the wheel, the
rim could hit the brake rotor and damage the
rotor. Work carefully and have a second per
son help you.
(D Tips
- When mounting tires with unidirectional
tread design
make sure the tread pattern is
pointed the right way
¢ page 278.
-The wheel bolts should be clean and easy to
turn. Check for dirt and corrosion on the mating surfaces of both the wheel and the
hub. Remove all dirt from these surfaces be
fore remounting the wheel.
Unidirectional tires
A unidirectional tire profile is identified by arrows
that point in the running direction on the tire
sidewall. You must always adhere to the speci
fied running direction. This is necessary ensure
the tire 's optimum performance in regard to ad
hesion, running noise, friction and hydroplaning .
To benefit fully from the advantages of the uni
directional tire design, you should replace faulty
tires as soon as possible and restore the correct
running direction on all of the tires.
Finishing
.,. Reinstall the caps on the wheel bolts if neces
sary .
.,. Store the vehicle tool kit in its designated
place .
.,. If the removed wheel does not fit in the spare
wheel well, store it securely in the luggage
compartment
¢ page 183.
.,. Check the tire pressure on the installed wheel
as soon as possible.
.,. Check the tire pressure and store it in the Info
tainment system.
.,. The wheel bol t tightening specification must be
90 ft lbs (120 Nm) . Check it as soon as possible
with a torque wrench. Drive carefully until then.
.,. Have the faulty wheel replaced as quickly as
possible.
278
(D Tips
- If you notice that the wheel bolts are cor
roded and difficult to turn while changing a
tire, they should be replaced before you check the tightening torque.
- Drive at reduced speed until you have the
tightening torques checked.
Notes on wheel changing
Please read the information ¢ page 251 if you
are going to use a spare tire which is different
from the tires on your vehicle .
After you change a tire:
- Check the tire pressure on the spare immedi
ately after installation.
- Have the wheel bolt tightening torque
checked with a torque wrench as soon as pos
sible by your authorized Audi dealer or a
qualified service station.
- With steel and alloy wheel rims, the wheel
bolts are correctly tightened at a torque of
90
ft lbs (120 Nm).
- If you notice that the wheel bolts are corroded
and difficult to turn while changing a tire,
they should be replaced before you check the
tightening torque.
- Replace the flat tire with a new one and have
it installed on your vehicle as soon as possi
ble. Remount the wheel cover .
Until then, drive with extra care and at reduced
speeds.
A WARNING
- If you are going to equip your vehicle with
tires or rims which differ from those which
were factory installed, then be sure to read
the information
¢page 251.
-Always make sure the damaged wheel or
even a flat tire and the jack and tool kit are
properly secured in the luggage compart
ment and are not loose in the passenger
compartment.
- In an accident or sudden maneuver they
could fly forward, injuring anyone in the ve
hicle.
-