turn BMW 540i 1999 E39 Repair Manual
[x] Cancel search | Manufacturer: BMW, Model Year: 1999, Model line: 540i, Model: BMW 540i 1999 E39Pages: 1002
Page 223 of 1002
Downloaded from www.Manualslib.com manuals search engine
1 Cvlinder Head and valvetrain1
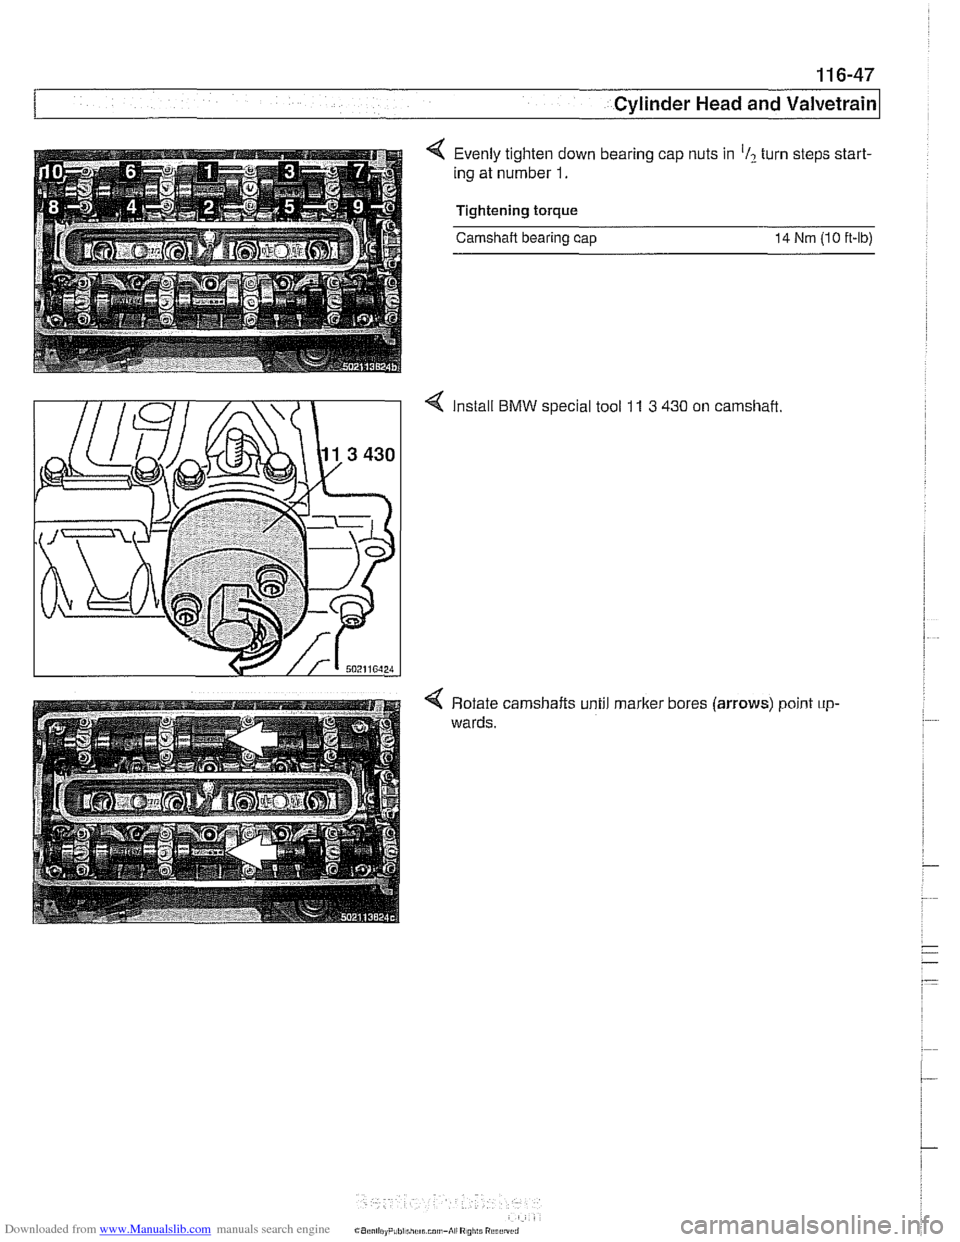
Evenly tighten down bearing cap nuts in 'I? turn steps start-
ing at number
1.
Tightening torque
Camshaft bearing cap 14 Nm (10 ft-lb)
BMW special tool 11 3 430 on camshaft.
4 Rotate camshafts until marker bores (arrows) point up-
wards.
Page 225 of 1002
Downloaded from www.Manualslib.com manuals search engine
- -
Cylinder Head and valvetrain1
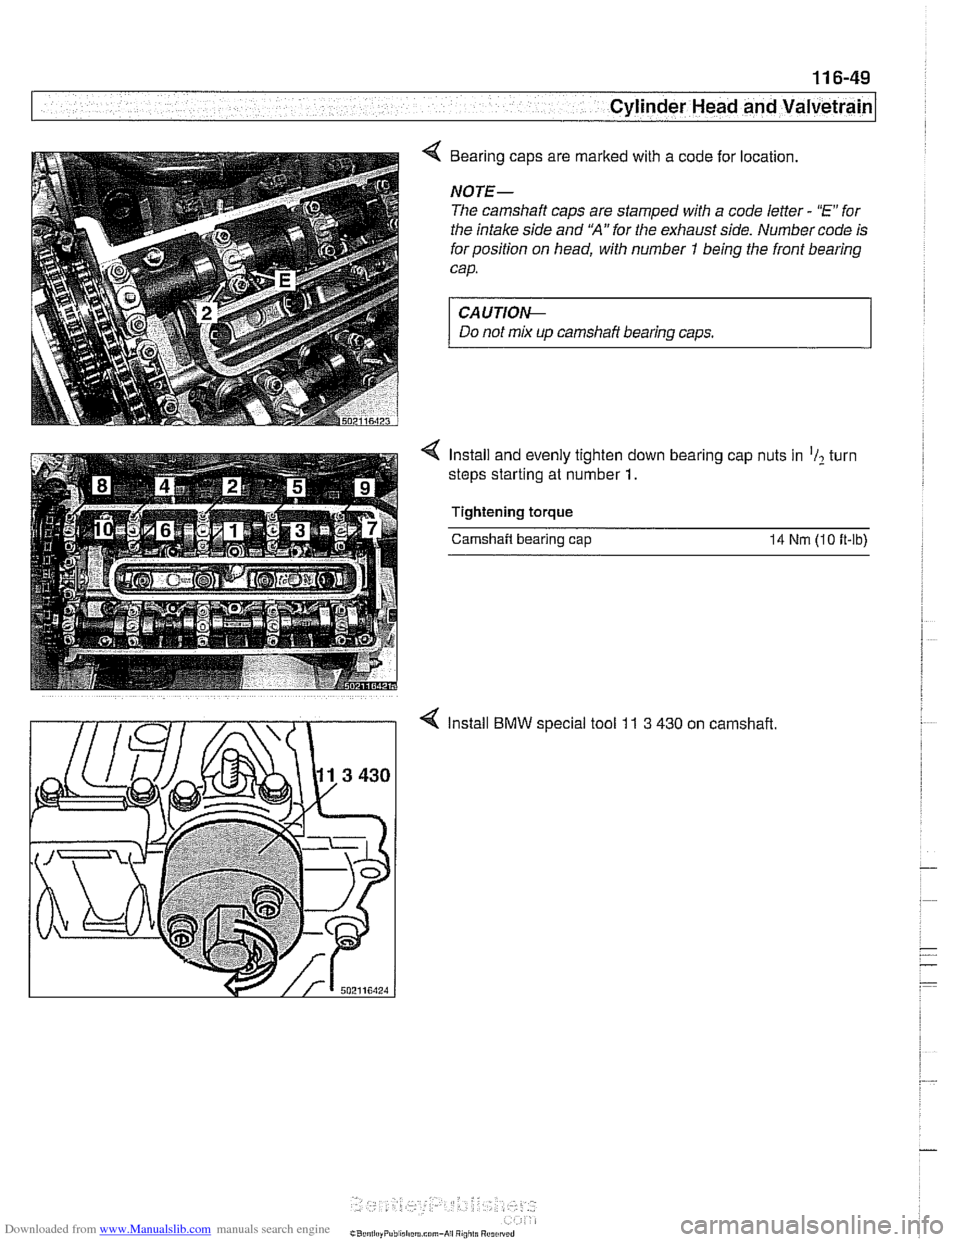
4 Bearing caps are marked with a code for location.
NOTE-
The camshaft caps are stamped with a code letter - "E for
the intake side and
'HA" for the exhaust side. Number code is
for position on head, with number
1 being the front bearing
cap.
CA UTIOI\C
Do not mix up camshaft bearing caps.
Install and evenly tighten down bearing cap nuts in
'I2 turn
steps starting at number
1.
Tightening torque
Camshaft bearing cap 14 Nrn (10 ft-lb)
4 Install BMW special tool 11 3 430 on camshaft.
Page 230 of 1002
Downloaded from www.Manualslib.com manuals search engine
11 6-54
Cylinder Head and Valvetrain
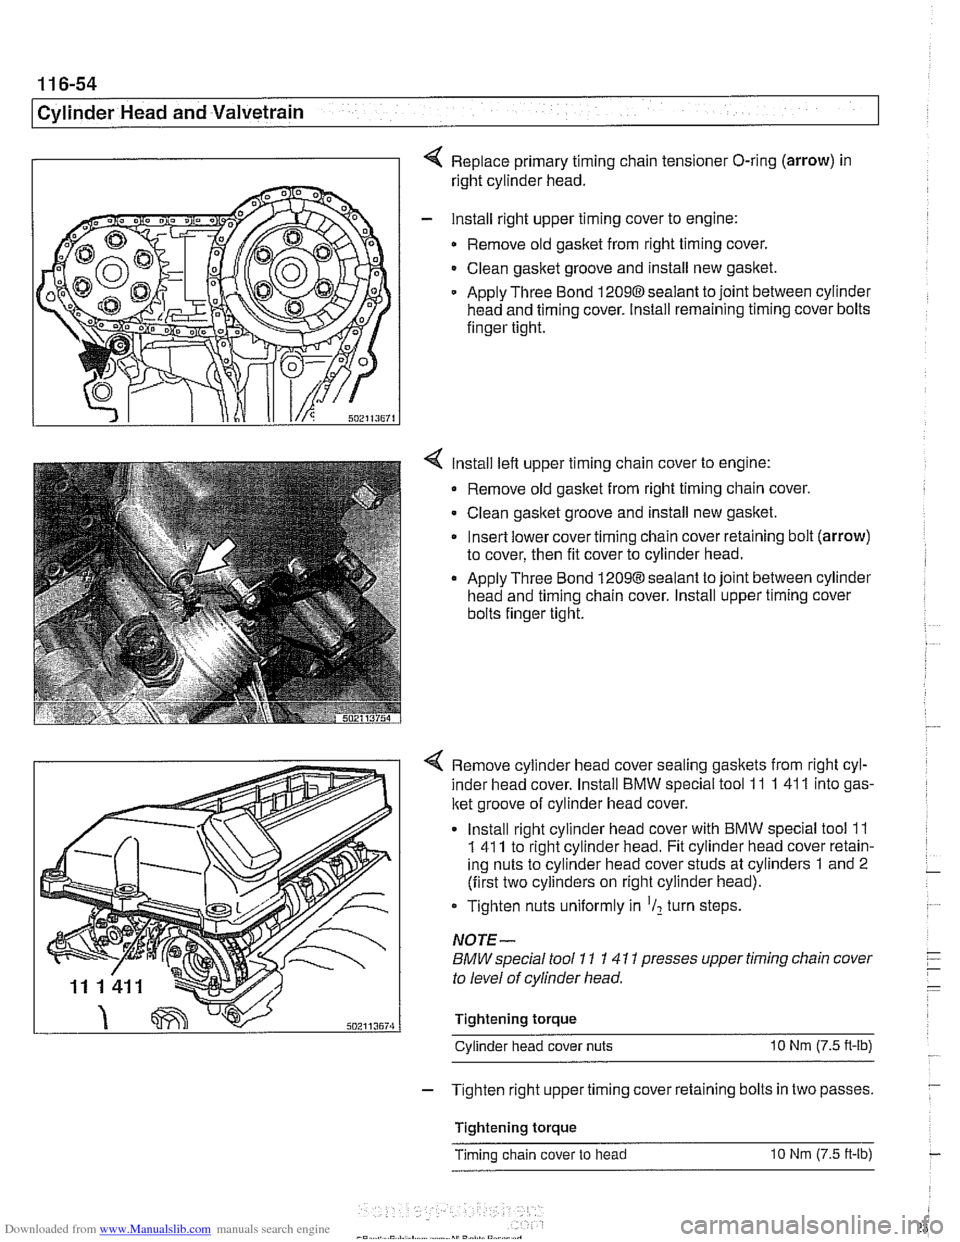
Replace primary timing chain tensioner O-ring (arrow) in
right cylinder head.
- lnstall right upper timing cover to engine:
Remove old gasket from right timing cover.
Clean gasket groove and install new gasket.
Apply Three Bond
12098sealant to joint between cylinder
head and timing cover. Install remaining timing cover bolts
finger tight.
lnstall left upper timing chain cover to engine:
Remove old gasket from right timing chain cover.
Clean gasket groove and install new gasket.
Insert lower cover timing chain cover retaining bolt (arrow)
to cover, then fit cover to cylinder head.
Apply Three Bond 12098 sealant to joint between cylinder
head and timing chain cover. lnstall upper timing cover
bolts finger tight.
4 Remove cylinder head cover sealing gaskets from right cyl-
inder head cover. lnstall BMW special tool 11
1 41 1 into gas-
ket groove of cylinder head cover.
lnstall right cylinder head cover with BMW special tool
11
1 41 1 to right cylinder head. Fit cylinder head cover retain-
ing nuts to cylinder head cover studs at cylinders
1 and 2
(first two cylinders on right cylinder head).
Tighten nuts uniformly in
'I2 turn steps.
NOTE-
BMW special tool 11 1 41 1 presses upper timing chain cover
to level of cylinder head.
Tightening torque Cylinder head cover nuts
10 Nm (7.5 n-lb)
- Tighten right upper timing cover retaining bolts in two passes.
Tightening torque
Timing chain cover to head
10 Nm (7.5 ft-lb)
Page 231 of 1002
Downloaded from www.Manualslib.com manuals search engine
11 6-55
Cvlinder Head and valvetrain1
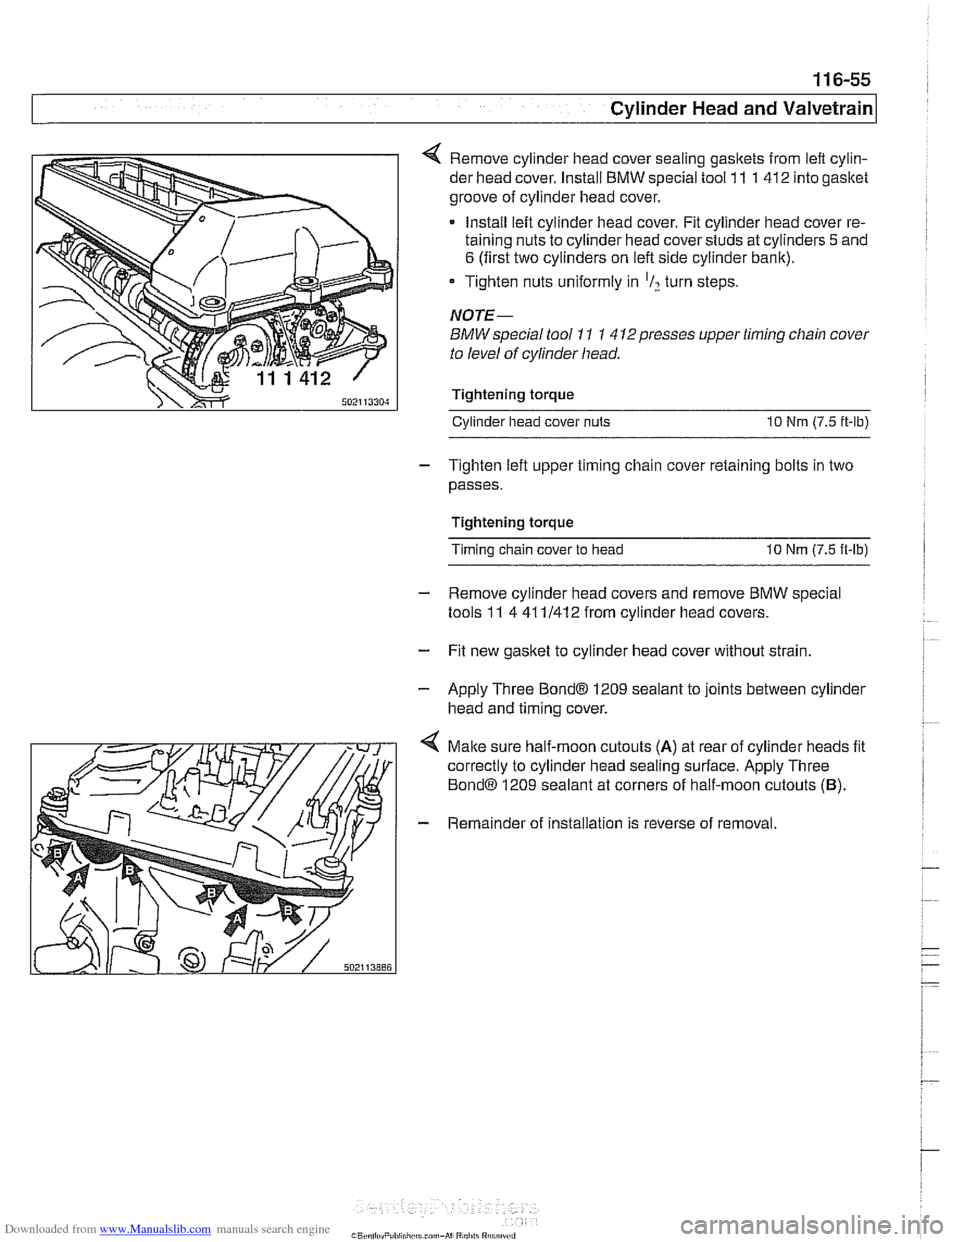
4 Remove cylinder head cover sealing gasltets from left cylin-
der head cover. Install BMW special tool 11 1 412 into gasket
groove of cylinder head cover.
Install left cylinder head cover. Fit cylinder head cover re-
taining nuts to cylinder head cover studs at cylinders
5 and
6 (first two cylinders on left side cylinder bank).
* Tighten nuts uniformly in 'I? turn steps.
NOTE-
BMW special tool 11 1 4 12presses upper timing chain cover
to level of cylinder head.
Tightening torque Cylinder head cover
nuts 10 Nm (7.5 it-lb)
- Tighten left upper timing chain cover retaining bolts in two
passes.
Tightening torque
Timing chain cover to head
10 Nm (7.5 ft-lb)
- Remove cylinder head covers and remove BMW special
tools 11 4 41 11412 from cylinder head covers.
- Fit new gasket to cylinder head cover without strain.
- Apply Three Bond@ 1209 sealant to joints between cylinder
head and timing cover.
4 Malte sure half-moon cutouts (A) at rear of cylinder heads fit
correctly to cylinder head sealing surface. Apply Three
Bond@ 1209 sealant at corners of half-moon cutouts (B).
- Remainder of installation is reverse of removal.
Page 256 of 1002
Downloaded from www.Manualslib.com manuals search engine
11 7-20
Camshaft Timing Chain
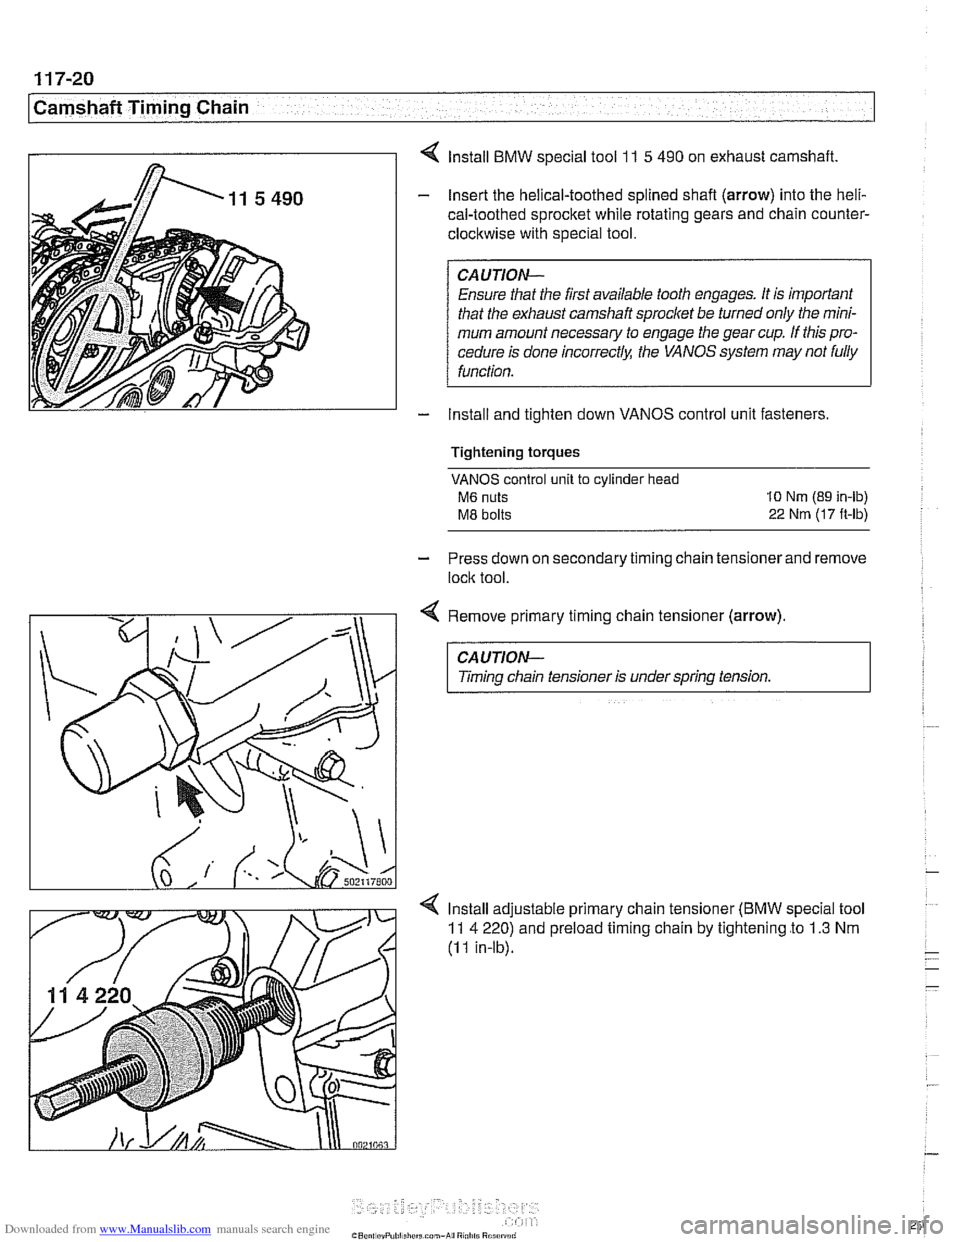
4 lnstall BMW special tool 1 I 5 490 on exhaust camshaft.
- Insert the helical-toothed splined shafl (arrow) into the heli-
cal-toothed sprocket while rotating gears and chain counter-
clockwise with special tool.
CAUTION- Ensure
that the first available tooth engages. It is important
that the exhaust camshaft sprocket be turned only the mini-
mum amount necessary to engage the gear cup. If this pro-
cedure is done
incorrectlq: the VANOS system may not fully
function.
- Install and tighten down VANOS control unit fasteners
Tightening torques
VANOS control unit to cylinder head
M6 nuts 10 Nm (89 in-lb)
M8 bolts 22 Nrn (17 ft-lbj
- Press down on secondary timing chain tensioner and remove
lock tool.
Remove primary timing chain tensioner
(arrow)
CAUTION-
Timing chain tensioner is under spring tension.
lnstall adjustable primary chain tensioner
(BMW special tool
11 4 220) and preload timing chain by tightening to 1.3 Nm
(I I in-lb).
Page 269 of 1002

Downloaded from www.Manualslib.com manuals search engine
-- Camshaft Timing Chain -- -
Tightening torque
Vibration damper hub to crankshaft
410 Nm (300 ft-lb)
4 Install cranltshaft hub and vibration damper while aligning
locating hole (arrow) in damper with dowel pin in hub.
Tightening torque
Vibration damper and
pulley to
cranltshaft hub
22 Nm (17 ft-lb)
- Turn engine over by hand in direction of rotation at least two
full rotations. Reinstall camshaft and crankshaft locking
toois
to recheck engine timing. Remove locking tools if no faults
are found.
- Remove BMW special tool 11 3 390 (dummy tensioner) from
side of cyiinder head.
- Install primary chain tensionerso that cutout in tensioner pis-
ton engages chain rail.
Tightening torque
Timing chain tensioner to tensioner sleeve
70 Nm (52 ft-ib)
- Install cylinder head cover mounting studs, camshaft cover,
and cylinder head cover.
Tightening torque Cylinder head cover to cyiinder head
M6 nut 10 Nm (89 in-lb)
MB bolt 22 Nm (17 ft-lb)
- installation of remaining parts is reverse of removal, noting
the following:
When installing thermostat, make sure arrow or vent hole
faces up, if applicable.
Refill cooling system as described in
170 Radiator and
Cooling System.
Fill engine with oil and install new
oil filter as described in
020 Maintenance.
Tightening torque Upper timing chain cover to cylinder head
M6 nut 10 Nm (89 in-lb)
MB bolt 22 Nm (17 ft-lb)
VANOS oil supply pipe to VANOS control
unit banjo bolt
32 Nm (24 ft-ib)
Page 275 of 1002
Downloaded from www.Manualslib.com manuals search engine
11 7-39
Camshaft Timing Chain
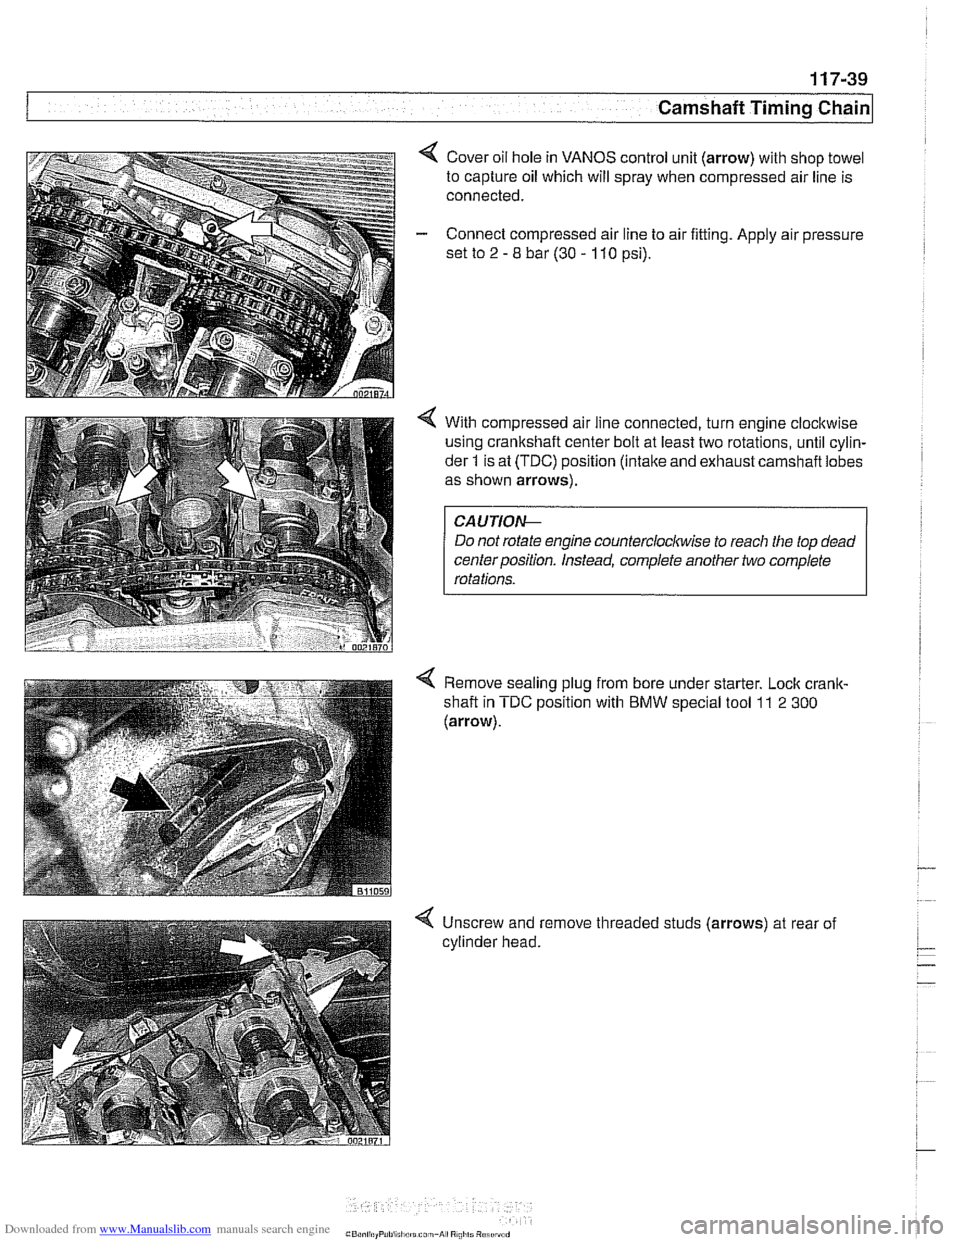
4 Cover oil hole in VANOS control unit (arrow) with shop towel
to capture oil which will spray when compressed air line is
connected.
- Connect compressed air line to air fitting. Apply air pressure
set to
2 - 8 bar (30 - 110 psi).
4 With compressed air line connected, turn engine clocltwise
using crankshaft center bolt at least two rotations, until cylin-
der
1 is at (TDC) position (intake and exhaust carnshafl lobes
as shown arrows).
Do not rotate engine
countercloclwise to reach the top dead
centerposition. Instead, complete another two complete
Remove sealing plug from bore under starter. Lock
crank-
shafl in TDC position with BMW special tool 11 2 300
(arrow).
-
4 Unscrew and remove threaded studs (arrows) at rear of
cylinder head.
Page 281 of 1002
Downloaded from www.Manualslib.com manuals search engine
Camshaft Timing chain1
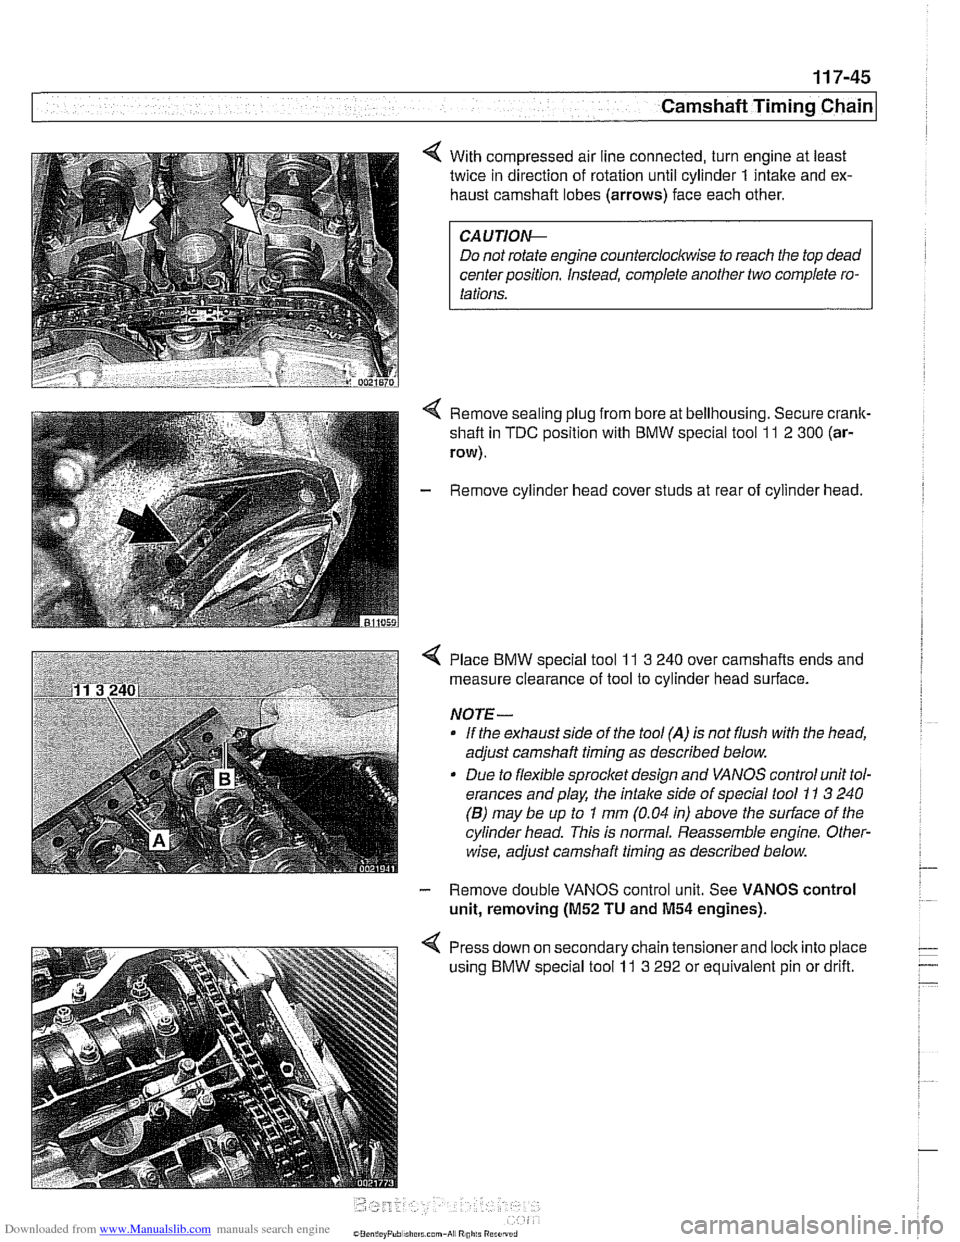
< With compressed air line connected, turn engine at least
twice in direction of rotation until cylinder
1 intake and ex-
haust camshaft lobes (arrows) face each other.
Do not rotate engine counterclockwise to reach the top dead
center position. Instead, complete another two complete ro-
Remove sealing plug from bore at bellhousing. Secure crank-
shaft in
TDC position with BMW special tool 11 2 300 (ar-
row).
- Remove cylinder head cover studs at rear of cylinder head.
< Place BMW special tool 11 3 240 over camshafts ends and
measure clearance of tool to cylinder head surface.
NOTE-
If the exhaust side of the tool (A) is not flush with the head,
adjust camshaft timing as described below.
Due to flexible sprocket design and VANOS control unit tol-
erances and play, the
intake side of special tool 11 3 240
(B) may be up to 1 mm (0.04 in) above the surface of the
cylinder head. This is normal. Reassemble engine. Other-
wise, adjust camshaft timing as described below.
- Remove double VANOS control unit. See VANOS control
unit, removing
(M52 TU and M54 engines).
< Press down on secondary chain tensionerand lock into place
using BMW special tool
11 3 292 or equivalent pin or drift.
Page 282 of 1002
Downloaded from www.Manualslib.com manuals search engine
1 17-46
Camshaft Timing Chain
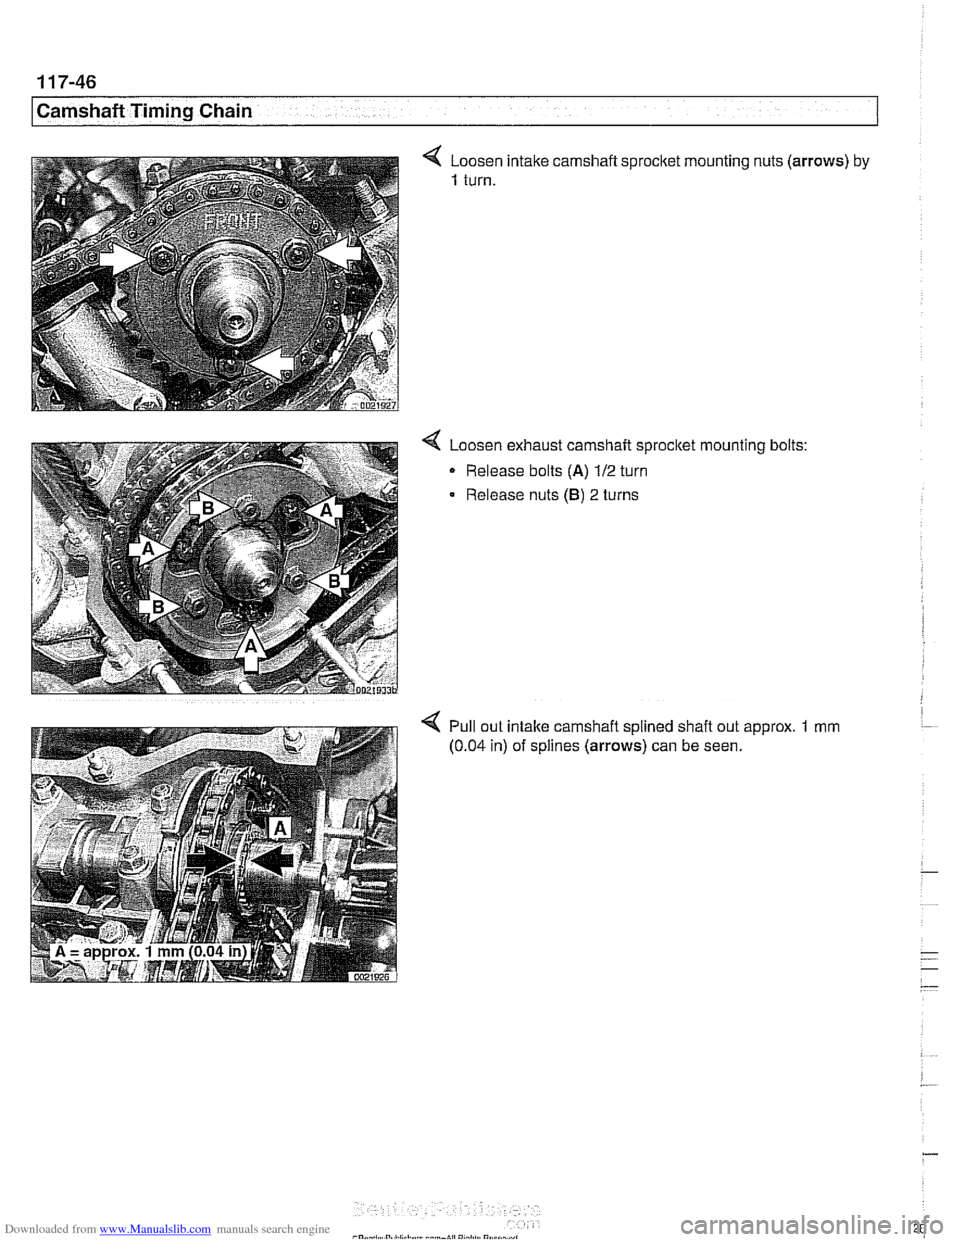
4 Loosen intake camshaft sprocket mounting nuts (arrows) by
1 turn.
Loosen exhaust camshaft sprocltet mounting bolts:
Release bolts
(A) 112 turn
Release nuts
(B) 2 turns
Pull out intake camshaft splined shaft out approx.
1 mm
(0.04 in) of splines (arrows) can be seen.
Page 298 of 1002
Downloaded from www.Manualslib.com manuals search engine
1 17-62
Camshaft Timing Chain
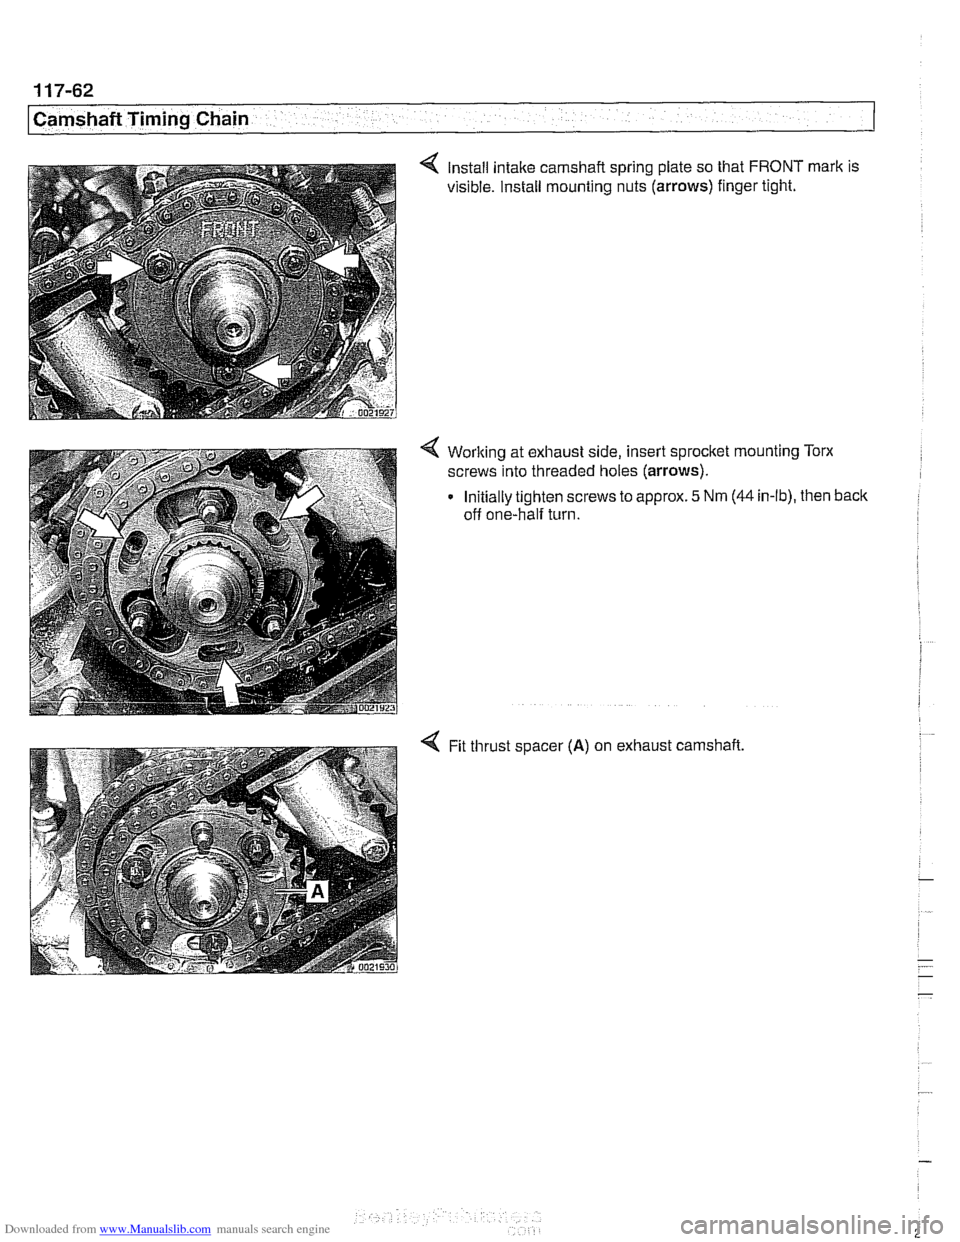
4 Install intake camshaft spring plate so that FRONT mark is
visible. Install mounting nuts (arrows) finger tight.
4 Worlting at exhaust side, insert sprocket mounting Torx
screws into threaded lioles (arrows).
Initially tighten screws to approx.
5 Nm (44 in-lb), then back
off one-half turn.
4 Fit thrust spacer (A) on exhaust camshaft.