jack points BMW 540i 2000 E39 User Guide
[x] Cancel search | Manufacturer: BMW, Model Year: 2000, Model line: 540i, Model: BMW 540i 2000 E39Pages: 1002
Page 686 of 1002
Downloaded from www.Manualslib.com manuals search engine
320-28
[steering and Wheel Alignment
Pitman arm, removing and installing
- Raise front of car. Remove splash shield from under engine.
Male sure the car is
firmly supported on jack stands de-
signed for the purpose. Place jack stands beneath structural
chassis points. Do not place
jaclc stands under suspension
parts.
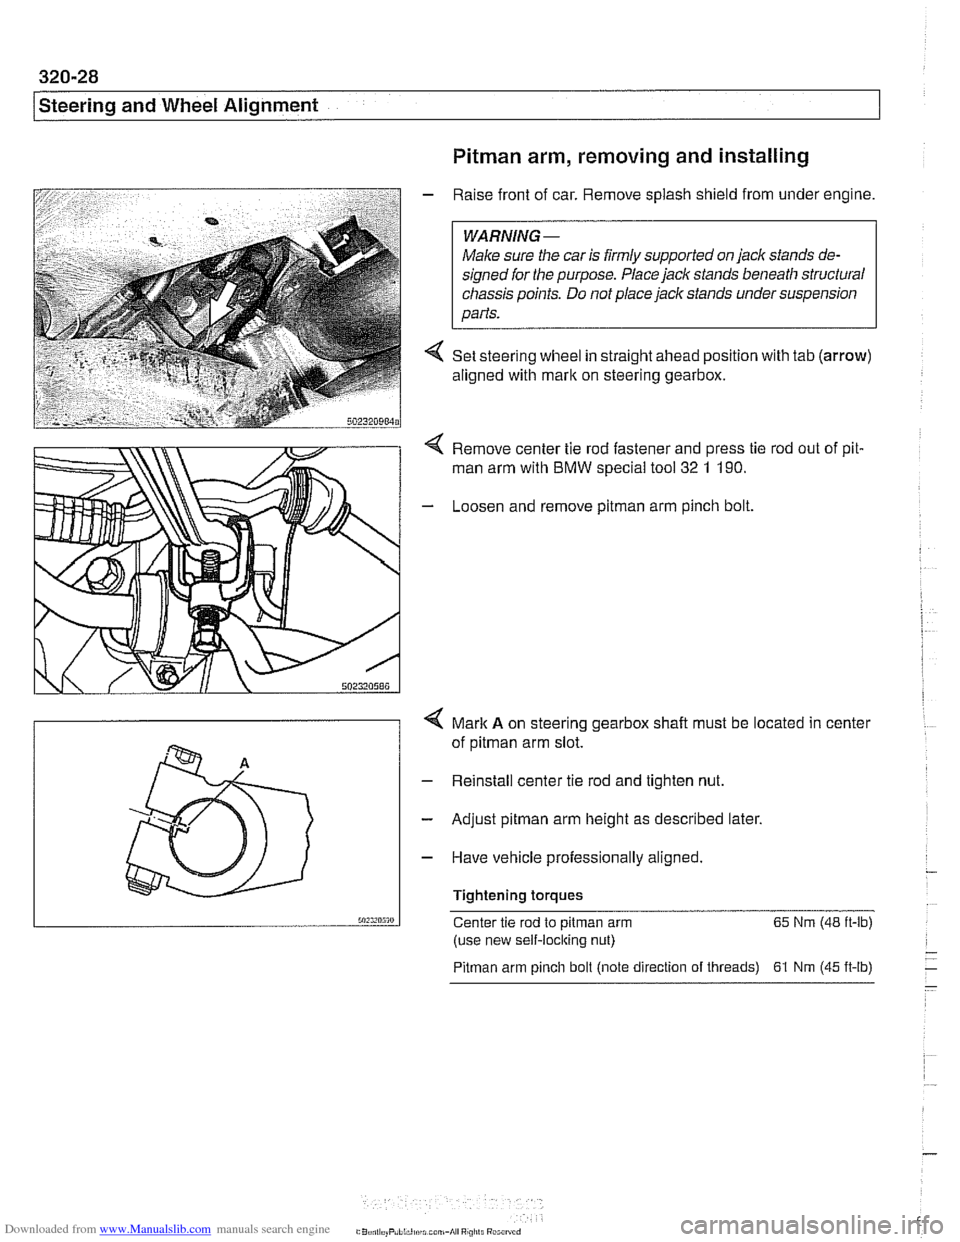
4 Set steering wheel in straight ahead position with tab (arrow)
aligned with mark on steering gearbox.
Remove center tie rod fastener and press tie rod out of pit.
man arm with BMW special
too1 32 1 190.
- Loosen and remove pitman arm pinch bolt
4 Mark A on steering gearbox shalt must be located in center
of
pitman arm slot.
- Reinstall center tie rod and tighten nut.
- Adjust pitman arm height as described later.
- Have vehicle professionally aligned.
Tightening torques
50:s,n5m Center tie rod to pitman arm 65
Nm (48 ft-lb)
(use new self-locking nut)
Pitman arm pinch bolt (note direction of threads) 61 Nrn (45 ft-lb)
Page 687 of 1002
Downloaded from www.Manualslib.com manuals search engine
Steering and Wheel Alignment
Pitman arm, adjusting
As the vehicle suspension settles down, the toe on the left
and right wheels must remain identical for proper handling.
By adjusting the height of the
pitman arm, the left and right tie
rods are moved to the same ride level setting. This will opti-
mize straight-ahead travel on uneven road surfaces.
- Raise front of car. Remove splash shield from under engine.
WARNING-
Male sure the car is iirmly supported on jack stands de-
signed ior the purpose. Place jack stands beneath structural
chassis points. Do not place
jaclc stands under suspension
parts.
- Remove bolts from left and right inner control arm mounts.
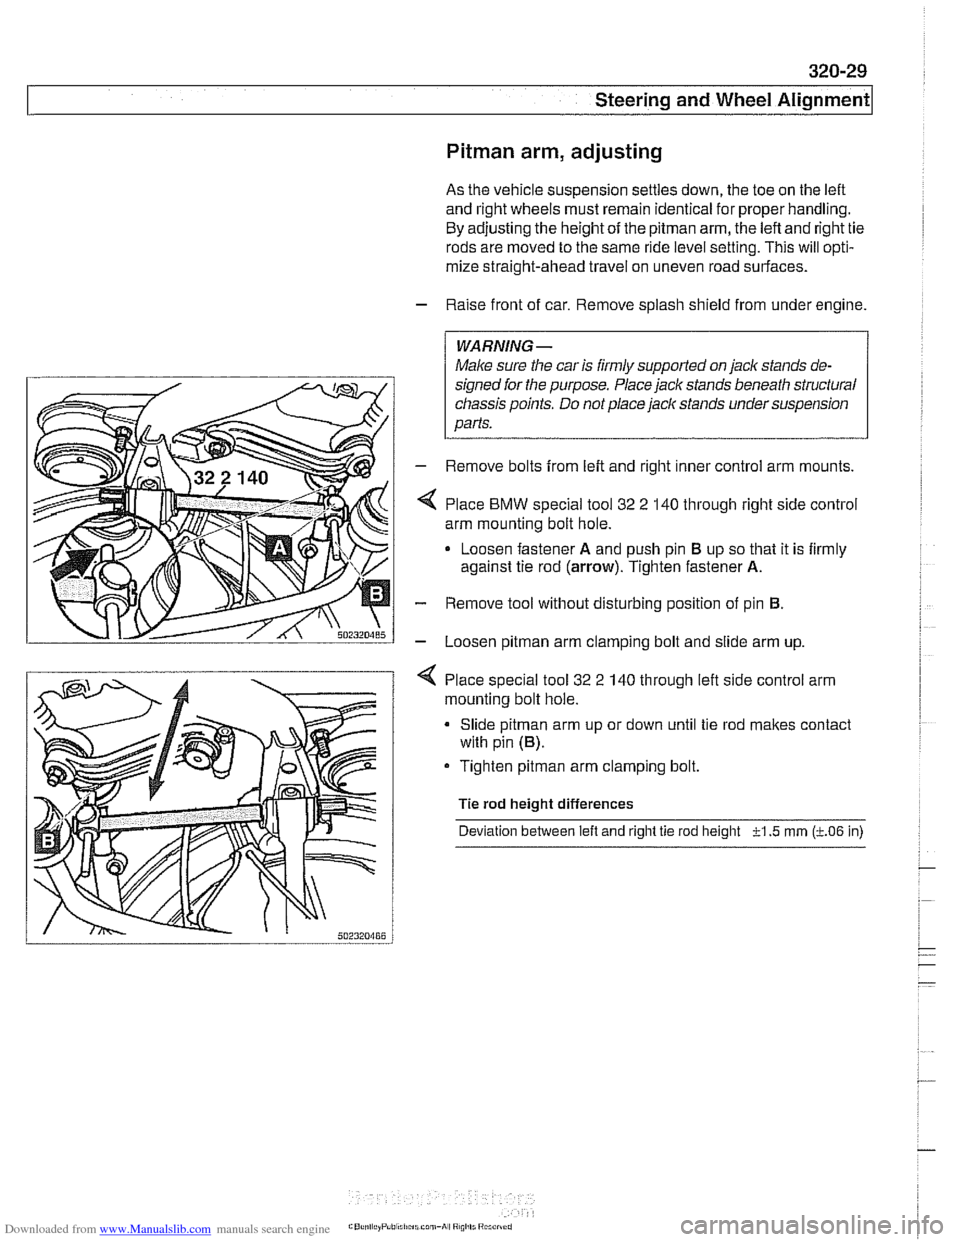
Place
BMW special tool 32 2 140 through right side control
arm mounting bolt hole.
Loosen fastener
A and push pin El up so that it is firmly
against tie rod
(arrow). Tighten fastener A.
- Remove tool without disturbing position of pin El.
- Loosen pitman arm clamping bolt and slide arm up.
4 Place special tool 32 2 140 through left side control arm
mounting bolt hole.
Slide
pitman arm up or down until tie rod makes contact
with pin
(El).
Tighten pitman arm clamping bolt.
Tie rod height differences
Deviation between
left and right tie rod height -?-I .5 rnrn (LO6 in)
Page 688 of 1002
Downloaded from www.Manualslib.com manuals search engine
I Steering and Wheel Alignment
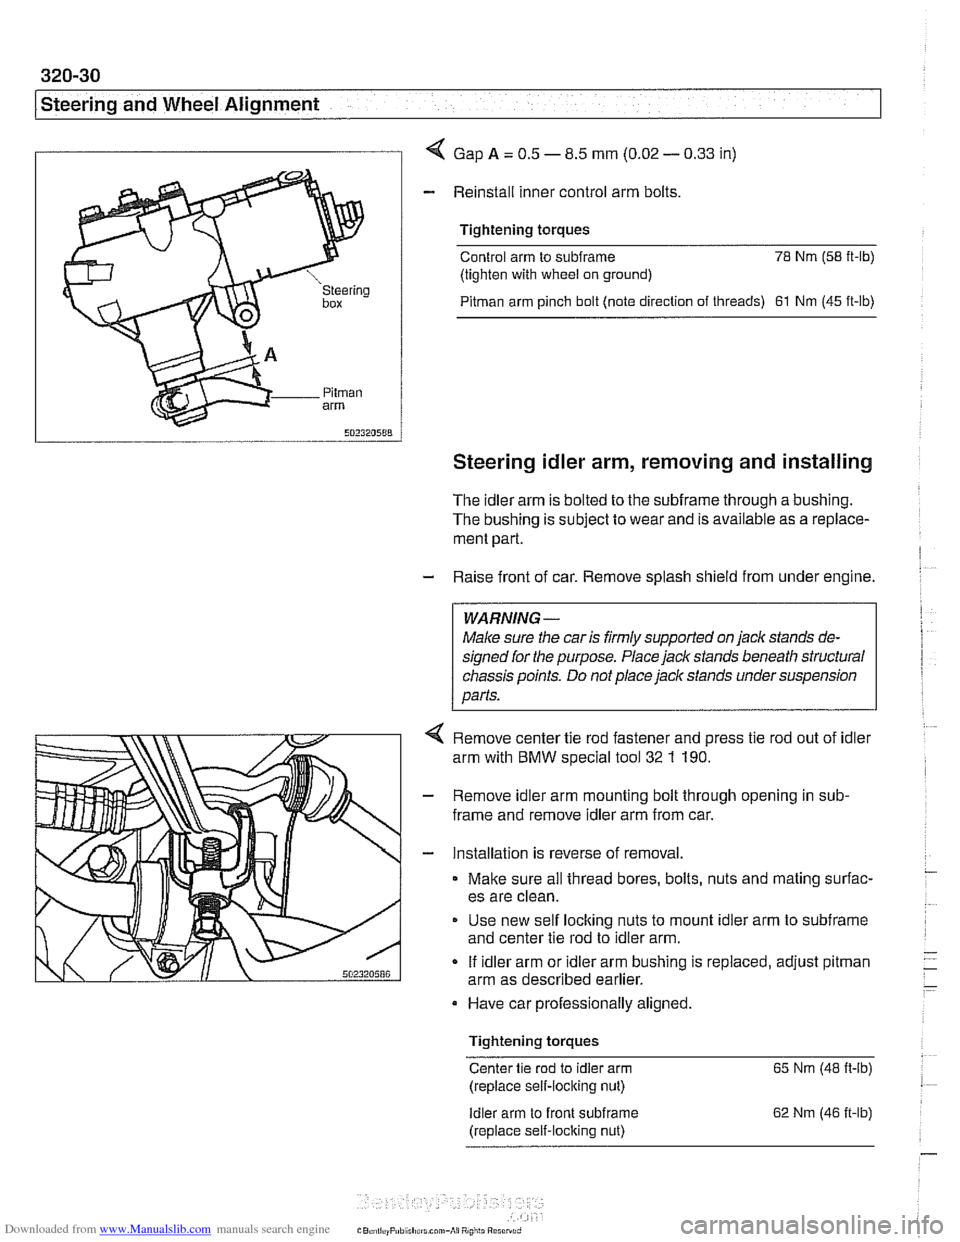
I I 4 Gap A = 0.5 - 8.5 mm (0.02 - 0.33 in)
- Reinstall inner control arm bolts
Tightening torques
Control arm to
subframe 78 Nm (58 it-lb)
(tighten with wheel on ground)
Pitman arm pinch bolt (note direction of threads) 61 Nm (45 ft-lb)
Steering idler arm, removing and installing
The idler arm is bolted to the subframe through a bushing.
The bushing is subject to wear and is available as a replace-
ment part.
- Raise front of car. Remove splash shield from under engine.
WARNING -
Male sure the car is firmly supported on jaclc stands de-
signed for the purpose. Place jack stands beneath structural
chassis points. Do not place jack stands under suspension
parts.
4 Remove center tie rod fastener and press tie rod out of idler
arm with
BMW special tool 32 1 190.
- Remove idler arm mounting bolt through opening in sub-
frame and remove idler arm from car.
- Installation is reverse of removal.
Make sure all thread bores, bolts, nuts and mating surfac-
es are clean.
Use new self
loclting nuts to mount idler arm to subframe
and center tie rod to idler arm.
If idler arm or idler arm bushing is replaced, adjust
pitman
arm as described earlier.
Have car professionally aligned.
Tightening torques
Center tie rod to idler arm 65 Nm (48 ft-ib)
(replace self-locking nut)
Idler arm to front subirame
(replace self-locking nut) 62
Nm (46 it-lb)
Page 690 of 1002
Downloaded from www.Manualslib.com manuals search engine
320-32
Steering and Wheel Alignment
Center tie
rod, replacing
- Raise front of car. Remove splash shield from under engine.
WARNING-
Make sure tlie car is firmly supported on jack stands de-
signed for the purpose. Place jack stands beneath structural
cliassis points. Do not place jack stands under suspension
parts.
- Measure length of left and right (outer) tie rods. Write down
measurements.
NOTE-
Accurate measurement of the tie rod end with reference to
the center tie rod will help approximate correct wheel align-
ment when new parts are installed.
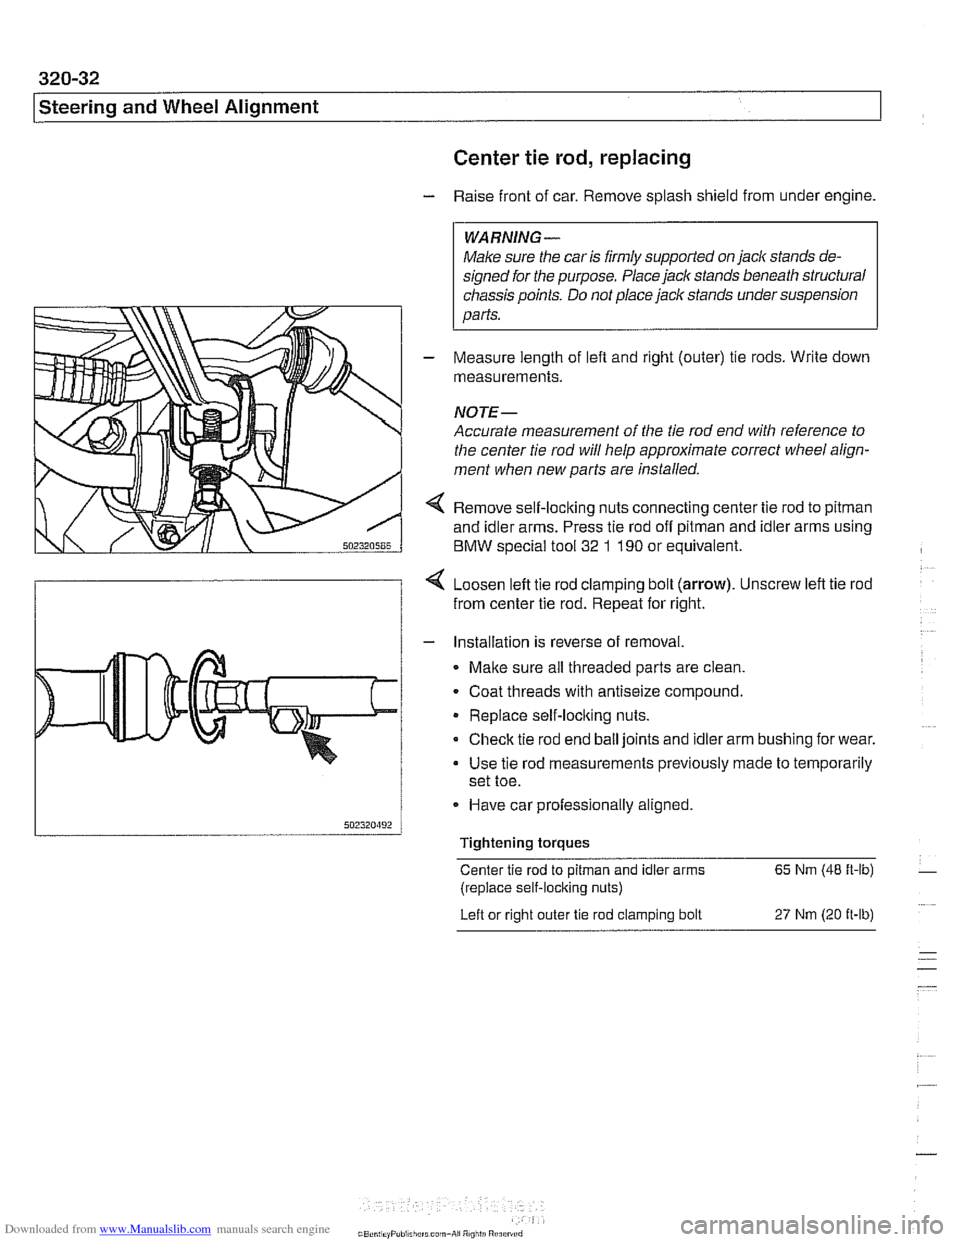
4 Remove self-loclting nuts connecting center tie rod to pitman
and idler arms. Press tie rod off pitman and idler arms using
BMW special tool
32 1 190 or equivalent.
4 Loosen left tie rod clamping bolt (arrow). Unscrew left tie rod
from center tie rod. Repeat for right.
- Installation is reverse of removal.
Malte sure all threaded parts are clean.
. Coat threads with antiseize compound.
Replace self-loclting nuts.
Check tie rod end ball joints and idler arm bushing for wear.
Use tie rod measurements previously made to temporarily
set toe.
- Have car professionally aligned.
Tightening torques
Center tie rod to
pitman and idler arms 65 Nm (48 ft-lb)
(replace self-locking nuts)
Left or right outer
tie rod clamping bolt 27 Nm (20 it-lb)
Page 701 of 1002
Downloaded from www.Manualslib.com manuals search engine
330-5
Rear Suspension
REAR STRUTS AND SPRINGS
(SEDAN MODELS)
Rear strut assembly, removing and
installing
Replace struts and coil springs in pairs only.
- Raise car and remove rear wheels.
WARNING -
Male sure the car is firmly supported on jack stands de-
signed for the purpose. Place jack stands underneath struc-
tural chassis points. Do not place jack stands under
suspension parts.
- Remove rear parcel shelf:
Remove rear seat headrests by pulling straight up.
Remove both rear roof pillar (C-pillar) trim panels.
Unbolt rear seat
belt anchors. See 720 Seat Belts.
Models with fixed rear seat: Remove rear seat backrest.
See 520 Seats.
* Models with fold-down rear seat: Remove rear seat back-
rest side sections. See 520 Seats. Fold down backrest.
* Working inside trunk, remove roller blind mounting nuts
and bolts, if applicable. Also disconnect roller blind har-
ness connector at right edge of rear seat backrest.
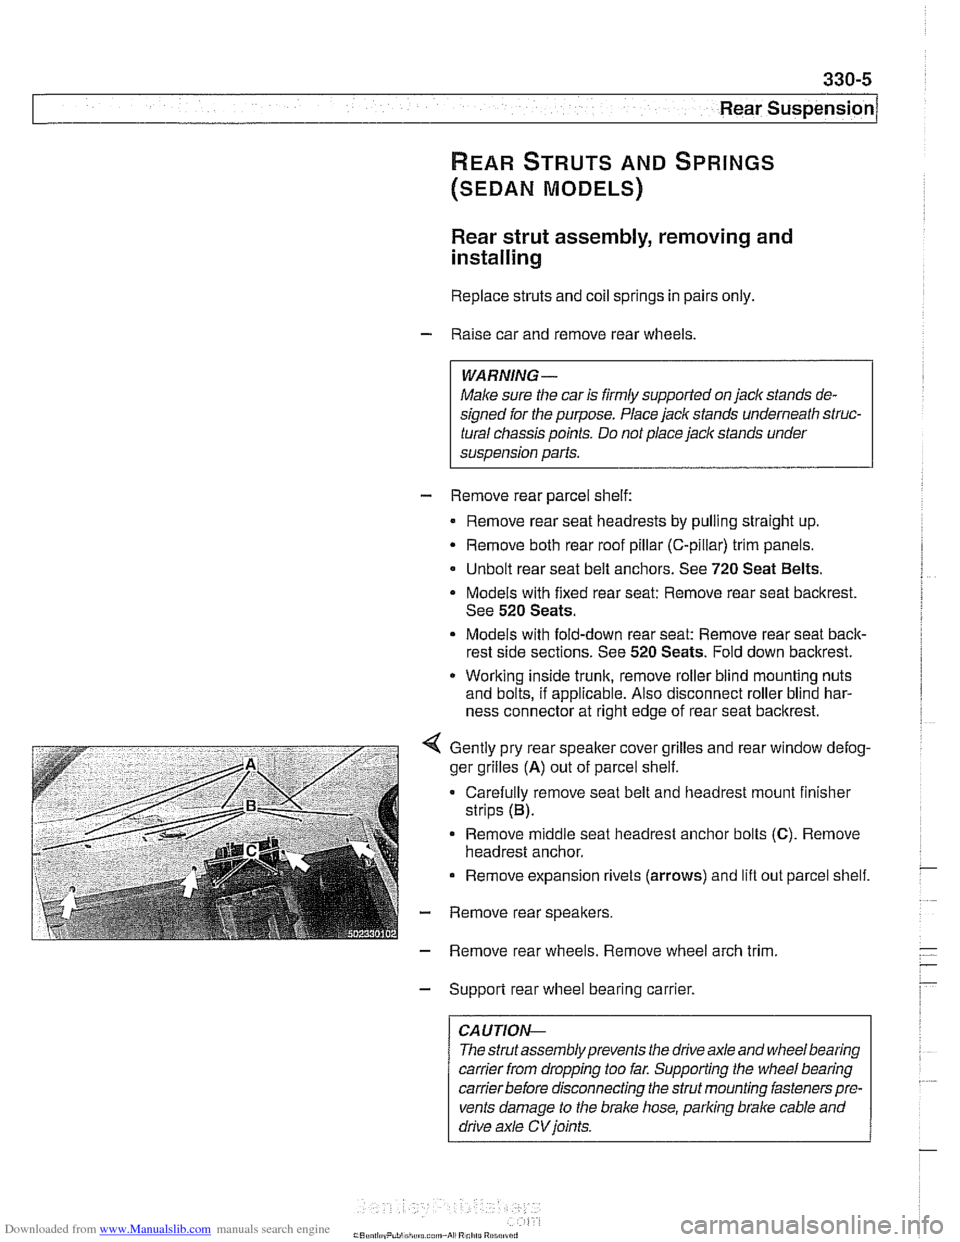
Gently pry rear speaker cover grilles and rear window defog-
ger grilles
(A) out of parcel shelf.
Carefully remove seat belt and headrest mount finisher
strips (B).
Remove
middle seat headrest anchor bolts (C). Remove
headrest anchor.
Remove expansion rivets (arrows) and lift out parcel shelf.
- Remove rear speakers.
- Remove rear wheels. Remove wheel arch trim
- Support rear wheel bearing carrier.
CAUTION-
The strutassembly prevents the drive axle and wheel bearing
carrier
from dropping too far. Supporting the wheel bearing
carrierbefore disconnecting the strut mounting fasteners pre-
vents damage to the brake hose, parking brake cable and
drive axle
CV joints.
Page 705 of 1002
Downloaded from www.Manualslib.com manuals search engine
--
C. -- -- - -- Rear ~us~ensionl
Depending on year and model applications, the Sport Wagon
rear suspension may be equipped with:
Conventional shock absorbers and coil springs
Electronic height control (EHC) system which incorporates
air springs
NOTE-
. Suspension and EHC troubleshooting is covered in 300
Suspension, Steering and Brakes-General.
EHC system repairs, other than air spring replacement,
are covered in Electronic height control
(EHC) compo-
nent replacement.
Replace shock absorbers and springs in pairs only.
Rear shock absorber, removing and
installing
- Raise car and remove rear wheels,
WARNING-
Male sure that the car is firmly supported on jack stands de-
signed for the purpose. Place jack stands underneath struc-
tural chassis points. Do not place
jack stands under
suspension parts.
CAUTION-
If working on a vehicle with compressedairshock absorbers,
disable air supply pump by disconnecting electrical plug be-
fore performing any repairs. Pump is located beneath a cover
under the spare tire in the floor of the cargo compartment.
- Support swing arm from below
CAUTIOG
The shock absorber prevents the drive axle and wlieel bear-
ing carrier from dropping too far. Supporting the wheel bear-
ing carrier before disconnecting the shock absorber
mounting fasteners prevents damage to the
brake hose,
parking
brake cable and drive axle CVjoints.
- Working in cargo compartment, remove carpet. Remove tri-
angular upper shock mount covers located beside spare tire
well.
- If applicable: Detach air supply line from shock absorber.
Plug ports and lines to keep out dirt.
Page 707 of 1002
Downloaded from www.Manualslib.com manuals search engine
330-1 1
Rear Suspension
Coil spring, removing and installing
Raise car and remove rear wheels.
WARNING-
Make sure the car is firmly supported on jack stands de-
signed for the purpose. Place jack stands underneath struc-
tural chassis points. Do not place jack stands under
suspension parts.
- Remove brake caliper and brake disc. Hang brake caliper
aside with stiff wire. Do not disconnect
bralte fluid hose. See
340 Brakes.
- Remove exhaust system. See 180 Exhaust System.
- Disconnect driveshafl from final drive. See 260 Driveshaft.
- Detach parking bralte cables from mounting bracltets on sub-
frame.
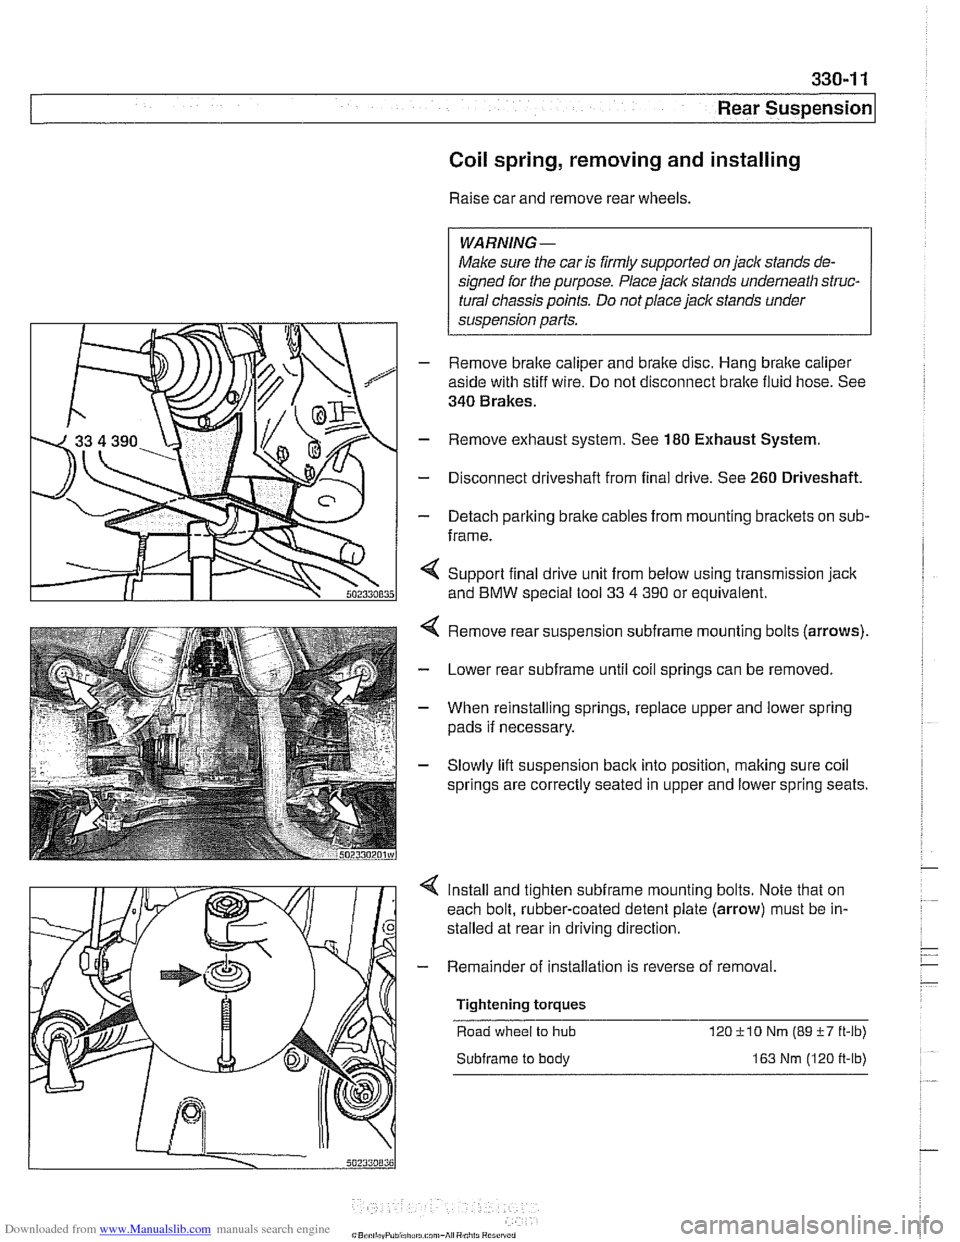
< Support final drive unit from below using transmission jack
and
BMW special tool 33 4 390 or equivalent.
Remove rear suspension
subframe mounting bolts (arrows).
Lower rear
subframe until coil springs can be removed.
When reinstalling springs, replace upper and lower spring
pads if necessary.
Slowly lift suspension
back into position, making sure coil
springs are correctly seated in upper and lower spring seats.
Install and tighten
subframe mounting bolts. Note that on
each bolt, rubber-coated detent plate (arrow) must be in-
stalled at rear in driving direction
- Remainder of installation is reverse of removal
Tightening torques Road wheel
to hub 12OilO Nm (89i-7 ft-lb)
Subframe to body 163 Nm (120 ft-lb)
Page 708 of 1002
Downloaded from www.Manualslib.com manuals search engine
Rear Suspension
Air spring, removing and installing
CAUTION-
If vehicle is driven with airspring depressurized, the airspring
will be permanently damaged and must be replaced.
An air spring is made from a flexible rubber material which
forms an airtight cavity. It is pressurized by an air supply
pump activated by an electronic control unit to provide a
vari- . . able spring rate depending on vehicle load
CAUTIOIG
Disable air supply pump by disconnecting electrical plug
before performing any repairs. Pump is located beneath a
cover under the spare tire in the floor of
the cargo compart-
ment.
When removing and installing air connections, extreme
cleanliness must be followed. Small dirt particles can
cause leakage in the system.
Remove luggage compartment floor mat.
- Working above air spring, loosen quick coupling screw con-
nection to allow
air pressure to escape.
- Once pressure has been reduced, retighten screw.
Tightening torque Quick coupling screw
to air pump 2 Nm (18 in-lb)
- Remove quick coupler. Plug openings to keep dirt out,
- Remove air spring mounting clips.
- Raise car and remove rear wheels.
Make sure the car is firmly supported on jack stands de-
signed for the purpose. Place jack stands underneath struc-
tural chassis points. Do not place
jaclc stands under
suspension parts.
- Working underneath rear suspension, lift wheel bearing car-
rier to relieve rear spring tension. Then unbolt air spring
mounting bolt from seat on wheel bearing carrier. Remove air
spring.
NOTE-
Left and right air springs are different. The left air spring is
marked with a red identification
marl. The right air spring is
marked with a blue identification mark.
Page 710 of 1002
Downloaded from www.Manualslib.com manuals search engine
[Rear Suspension Swing arm, removing and installing
(sedan models)
CAUTION-
If working on a vehicle with compressed airshock absorbers,
disable air supply pump by disconnecting electrical plug be-
fore performing any repairs.
- Raise rear end of car and remove wheel
WARNING-
Make sure the car is firmly supported on jack stands de-
signed for the purpose. Place jack stands underneath struc-
tural chassis points. Do not place jack stands under
sus~ension Darts.
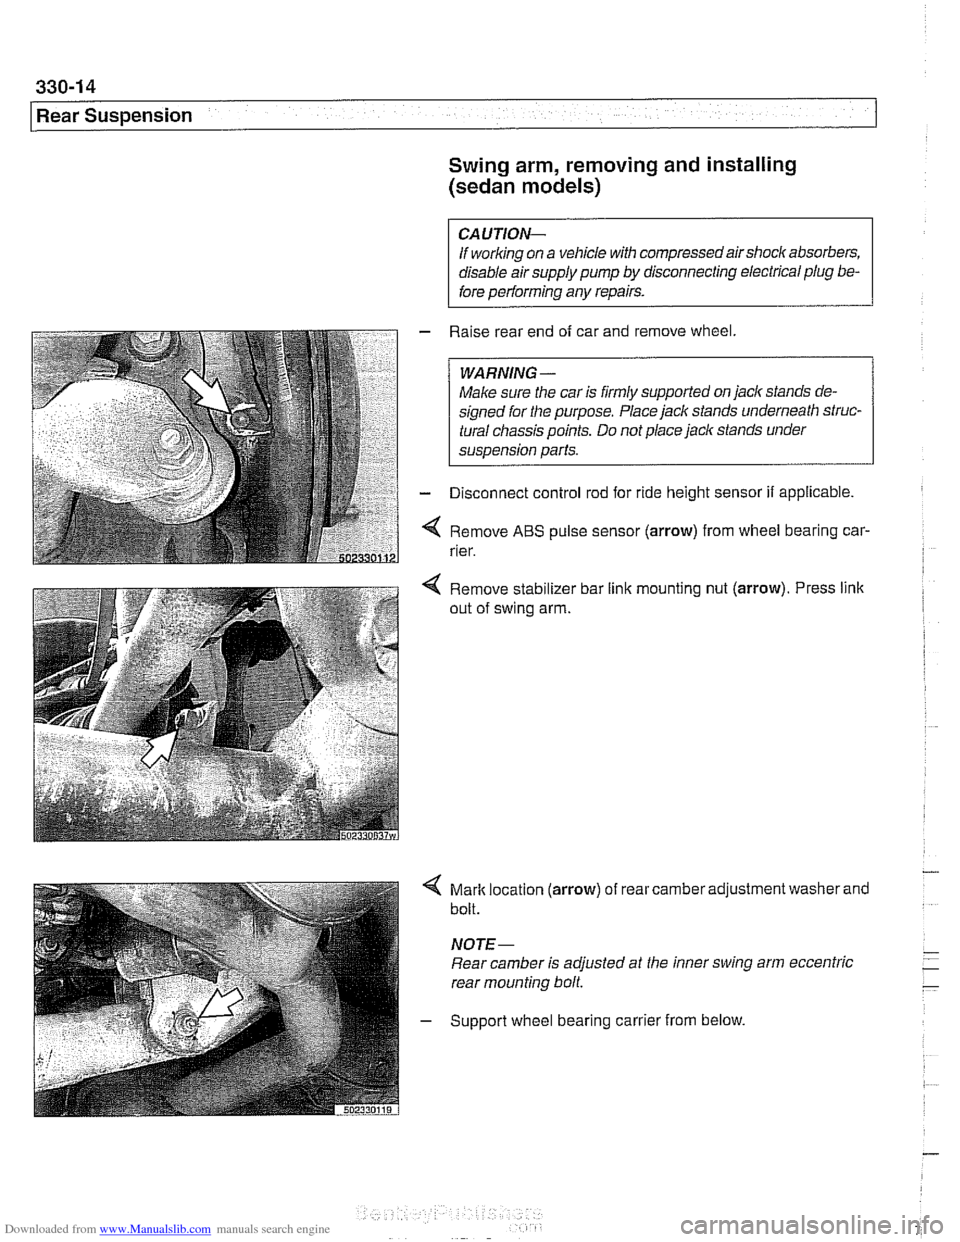
- Disconnect control rod for ride height sensor if applicable.
Remove
ABS pulse sensor (arrow) from wheel bearing car-
rier.
Remove stabilizer bar link mounting nut
(arrow). Press link
out of swing arm.
4 Mark location (arrow) of rear camber adjustment washer and
bolt.
NOTE-
Rear camber is adjusted at the inner swing arm eccentric
rear mounting bolt
- Support wheel bearing carrier from below.
Page 712 of 1002
Downloaded from www.Manualslib.com manuals search engine
Rear Suspension Swing arm, removing and installing
(Sport Wagon models)
- Raise rear end of car and remove wheel.
WARNING -
Make sure the car is firmly supported on jack stands de-
signed for the purpose. Place jack stands underneath struc-
tural chassis points. Do not place jack stands under
suspension parts.
CAUJION-
Model with air springs: Disable air supply pump by discon-
necting electricalplug
beforeperforminganyrepairs. Pump is
located beneath a cover under the spare tire in the floor of the
cargo compartment.
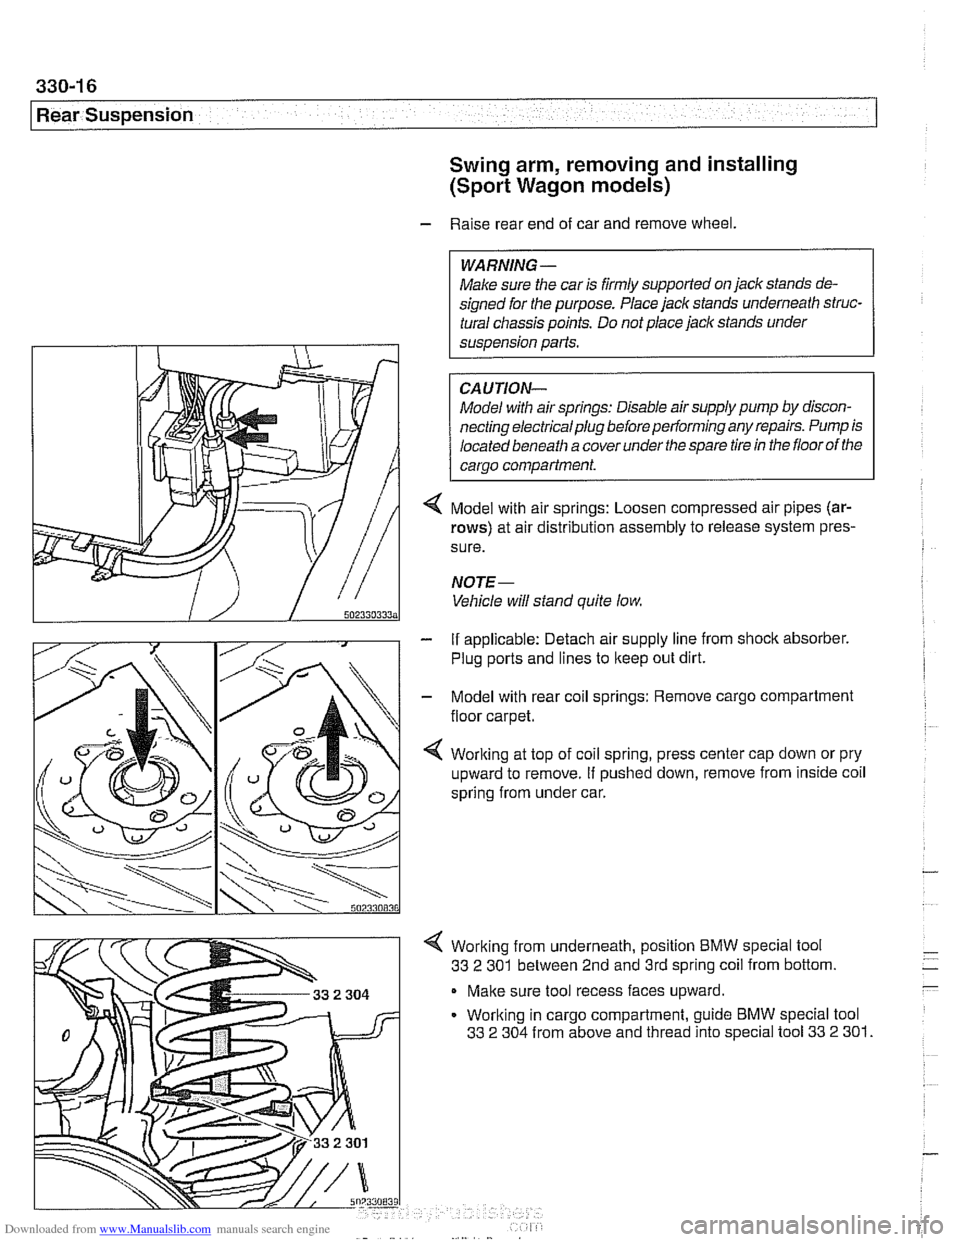
< Model with air springs: Loosen compressed air pipes (ar-
rows) at air distribution assembly to release system pres-
sure.
NOJE-
Vehicle will stand quite low
- If applicable: Detach air supply line from shock absorber.
Plug ports and lines to
lkeep out dirt.
- Model with rear coil springs: Remove cargo compartment
floor carpet.
4 Working at top of coil spring, press center cap down or pry
upward to remove. If pushed down, remove from inside coil
spring from under car.
4 Working from underneath, position BMW special tool
33
2 301 between 2nd and 3rd spring coil from bottom.
Make sure tool recess faces upward.
Working in cargo compartment, guide BMW special tool
33
2 304 from above and thread into special tool 33 2 301.