Mode CADILLAC ESCALADE 2020 Service Manual
[x] Cancel search | Manufacturer: CADILLAC, Model Year: 2020, Model line: ESCALADE, Model: CADILLAC ESCALADE 2020Pages: 392, PDF Size: 6.39 MB
Page 195 of 392

Cadillac Escalade Owner Manual (GMNA-Localizing-U.S./Canada/Mexico-
13566588) - 2020 - CRC - 4/24/19
194 DRIVING AND OPERATING
Normal Mode Grade Braking
This mode is enabled when the
vehicle is started, but is not enabled
in Range Selection Mode. It assists in
maintaining desired vehicle speeds
when driving on downhill grades by
using the engine and transmission to
slow the vehicle. The first time the
system engages for each ignition
cycle, a DIC message will be displayed.
To disable or enable Normal Mode
Grade Braking within the current
ignition cycle, press and hold the
Tow/Haul button for five seconds.
When the button is released, the
requested mode change is made.
A DIC message displays.
For other forms of grade braking, see
Tow/Haul Mode0195 and
Cruise Control 0207.
Kickdown Mode
The accelerator pedal provides an
additional downshift after pressing
through the kickdown feature.
It requires extra pedal pressure near
the end of its travel to engage.
Manual Mode
Range Selection Mode
If equipped, Range Selection Mode
helps control the vehicle's
transmission and vehicle speed while
driving downhill or towing a trailer by
letting you select a desired range of
gears.
To use this feature:
1. Move the shift lever to L (Manual Mode).
2. Press the plus/minus buttons on the shift lever to select the
desired range of gears for current
driving conditions. Or, hold the
plus/minus buttons to select the
highest or lowest range available
for the current vehicle speed. When the shift lever is moved from
D (Drive) to L (Manual Mode), a
number displays next to the L,
indicating the current transmission
range.
This number is the highest gear that
the transmission will command while
operating in L (Manual Mode). All
gears below that number are available.
As driving conditions change, the
transmission can automatically shift
to lower gears. For example, when
5 (Fifth) is selected, 1 (First) through
5 (Fifth) gears are automatically
shifted by the transmission, but
6 (Sixth) cannot be used until the
plus/minus button on the shift lever is
used to change to the range.
When the shift lever is moved from
D (Drive) to L (Manual Mode), a
downshift may occur. The gear that
the transmission is operating in when
the shift lever is moved from D (Drive)
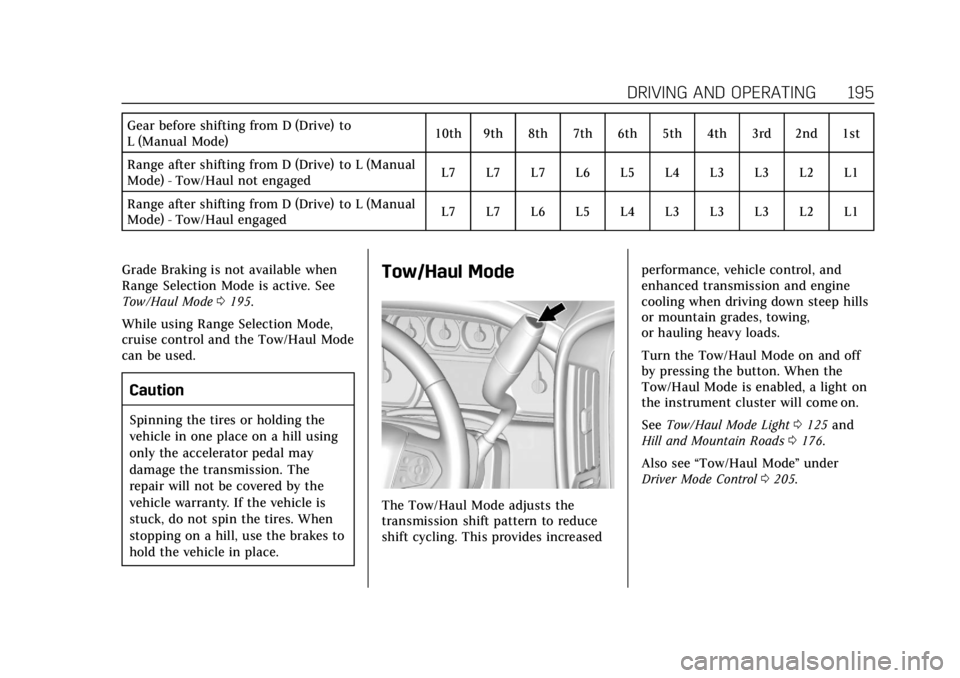
to L (Manual Mode) determines if a
downshift occurs. See the following
chart.
Page 196 of 392

Cadillac Escalade Owner Manual (GMNA-Localizing-U.S./Canada/Mexico-
13566588) - 2020 - CRC - 4/24/19
DRIVING AND OPERATING 195
Gear before shifting from D (Drive) to
L (Manual Mode)10th 9th 8th 7th 6th 5th 4th 3rd 2nd 1st
Range after shifting from D (Drive) to L (Manual
Mode) - Tow/Haul not engaged L7 L7 L7 L6 L5 L4 L3 L3 L2 L1
Range after shifting from D (Drive) to L (Manual
Mode) - Tow/Haul engaged L7 L7 L6 L5 L4 L3 L3 L3 L2 L1
Grade Braking is not available when
Range Selection Mode is active. See
Tow/Haul Mode 0195.
While using Range Selection Mode,
cruise control and the Tow/Haul Mode
can be used.
Caution
Spinning the tires or holding the
vehicle in one place on a hill using
only the accelerator pedal may
damage the transmission. The
repair will not be covered by the
vehicle warranty. If the vehicle is
stuck, do not spin the tires. When
stopping on a hill, use the brakes to
hold the vehicle in place.
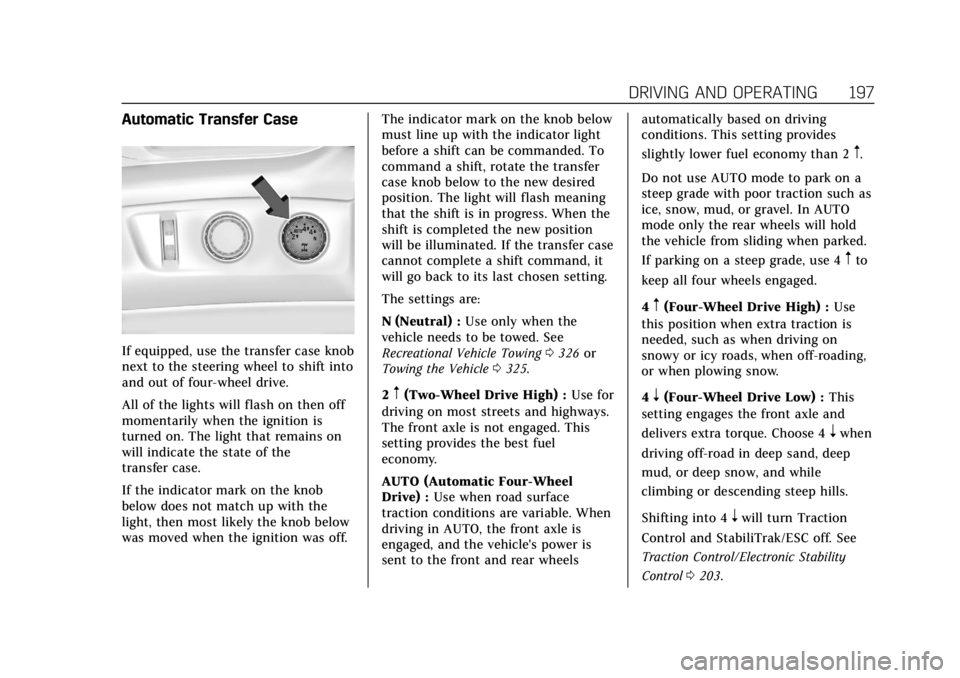
Tow/Haul Mode
The Tow/Haul Mode adjusts the
transmission shift pattern to reduce
shift cycling. This provides increased performance, vehicle control, and
enhanced transmission and engine
cooling when driving down steep hills
or mountain grades, towing,
or hauling heavy loads.
Turn the Tow/Haul Mode on and off
by pressing the button. When the
Tow/Haul Mode is enabled, a light on
the instrument cluster will come on.
See
Tow/Haul Mode Light 0125 and
Hill and Mountain Roads 0176.
Also see “Tow/Haul Mode ”under
Driver Mode Control 0205.
Page 197 of 392

Cadillac Escalade Owner Manual (GMNA-Localizing-U.S./Canada/Mexico-
13566588) - 2020 - CRC - 4/24/19
196 DRIVING AND OPERATING
Tow/Haul Mode Grade Braking
Tow/Haul Mode Grade Braking is only
enabled while the Tow/Haul Mode is
selected and the vehicle is not in the
Range Selection Mode. See“Tow/Haul
Mode ”listed previously and Manual
Mode 0194. Tow/Haul Mode Grade
Braking assists in maintaining desired
vehicle speeds when driving on
downhill grades by using the engine
and transmission to slow the vehicle.
To disable or enable Tow/Haul Grade
Braking within the current ignition
cycle, press and hold the Tow/Haul
button for five seconds. When the
button is released, the requested mode
change is made. A DIC message is
displayed.
See Towing Equipment 0247.
For other forms of grade braking, see
Automatic Transmission 0191 and
Cruise Control 0207.
Drive Systems
Four-Wheel Drive
If equipped, four-wheel drive engages
the front axle for extra traction.
Caution
Do not drive on clean, dry
pavement in 4
mand 4n(if
equipped) for an extended period of
time. These conditions may cause
premature wear on the vehicle’s
powertrain.
Driving on clean, dry pavement in 4
m
or 4nmay:
. Cause a vibration to be felt in the
steering system.
. Cause tires to wear faster.
. Make the transfer case harder to
shift, and cause it to run noisier.
{Warning
If equipped with four-wheel drive,
the vehicle will be free to roll if the
transfer case is in N (Neutral), even
when the shift lever is in P (Park).
Be sure the transfer case is in a
drive gear —2
m, 4m, or 4n—not
in N (Neutral). See Shifting Into Park
0 188.
Caution
Extended high-speed operation in
4
nmay damage or shorten the life
of the drivetrain.
Engagement noise and bump when
shifting between 4
nand 4mor from
N (Neutral), with the engine running,
is normal.
Shifting into 4
nwill turn Traction
Control and StabiliTrak/ESC off. See
Traction Control/Electronic Stability
Control 0203.
Page 198 of 392

Cadillac Escalade Owner Manual (GMNA-Localizing-U.S./Canada/Mexico-
13566588) - 2020 - CRC - 4/24/19
DRIVING AND OPERATING 197
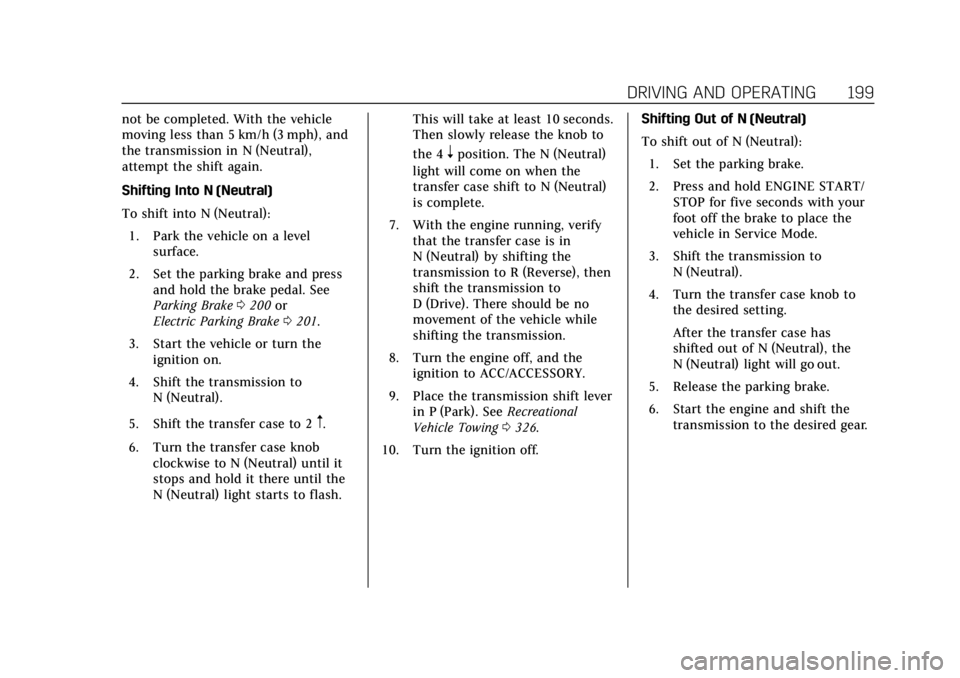
Automatic Transfer Case
If equipped, use the transfer case knob
next to the steering wheel to shift into
and out of four-wheel drive.
All of the lights will flash on then off
momentarily when the ignition is
turned on. The light that remains on
will indicate the state of the
transfer case.
If the indicator mark on the knob
below does not match up with the
light, then most likely the knob below
was moved when the ignition was off.The indicator mark on the knob below
must line up with the indicator light
before a shift can be commanded. To
command a shift, rotate the transfer
case knob below to the new desired
position. The light will flash meaning
that the shift is in progress. When the
shift is completed the new position
will be illuminated. If the transfer case
cannot complete a shift command, it
will go back to its last chosen setting.
The settings are:
N (Neutral) :
Use only when the
vehicle needs to be towed. See
Recreational Vehicle Towing 0326 or
Towing the Vehicle 0325.
2
m(Two-Wheel Drive High) : Use for
driving on most streets and highways.
The front axle is not engaged. This
setting provides the best fuel
economy.
AUTO (Automatic Four-Wheel
Drive) : Use when road surface
traction conditions are variable. When
driving in AUTO, the front axle is
engaged, and the vehicle's power is
sent to the front and rear wheels automatically based on driving
conditions. This setting provides
slightly lower fuel economy than 2
m.
Do not use AUTO mode to park on a
steep grade with poor traction such as
ice, snow, mud, or gravel. In AUTO
mode only the rear wheels will hold
the vehicle from sliding when parked.
If parking on a steep grade, use 4
mto
keep all four wheels engaged.
4
m(Four-Wheel Drive High) : Use
this position when extra traction is
needed, such as when driving on
snowy or icy roads, when off-roading,
or when plowing snow.
4
n(Four-Wheel Drive Low) : This
setting engages the front axle and
delivers extra torque. Choose 4
nwhen
driving off-road in deep sand, deep
mud, or deep snow, and while
climbing or descending steep hills.
Shifting into 4
nwill turn Traction
Control and StabiliTrak/ESC off. See
Traction Control/Electronic Stability
Control 0203.
Page 199 of 392

Cadillac Escalade Owner Manual (GMNA-Localizing-U.S./Canada/Mexico-
13566588) - 2020 - CRC - 4/24/19
198 DRIVING AND OPERATING
Shifting Into 4mor AUTO
Turn the knob to the 4
mor AUTO
position at any speed, except from 4
n.
The indicator light will flash while
shifting and will remain on when the
shift is completed.
Shifting Into 2
m
Turn the knob to 2mat any speed,
except when shifting from 4
n. The
indicator light will flash while shifting
and will remain on when the shift is
completed.
Shifting Into 4
n
When 4nis engaged, keep vehicle
speed below 72 km/h (45 mph).
To shift:
1. The ignition must be on and the vehicle must be stopped or
moving less than 5 km/h (3 mph)
with the transmission in
N (Neutral). It is best for the
vehicle to be moving
1.6 to 3.2 km/h (1 to 2 mph). 2. Turn the knob to 4
n. Wait for
the 4
nindicator light to stop
flashing before shifting the
transmission into gear.
Caution
Shifting the transmission into gear
before the requested mode indicator
light has stopped flashing could
damage the transfer case.
If the transmission is in gear and/or
moving more than 5 km/h (3 mph), the
4
nindicator light will flash for
30 seconds and the shift will not be
completed. After 30 seconds the
transfer case will shift to 4
m. Turn the
knob to 4
mto display the indicator.
With the vehicle moving less than
5 km/h (3 mph), and the transmission
in N (Neutral), attempt the shift again. Shifting Out of 4
n
To shift:
1. The vehicle must be stopped or moving less than 5 km/h (3 mph)
with the transmission in
N (Neutral) and the ignition on.
It is best for the vehicle to be
moving 1.6 to 3.2 km/h
(1 to 2 mph).
2. Turn the knob to 4
m, AUTO, or
2
m. Wait for the 4m, AUTO, or
2
mindicator light to stop
flashing before shifting the
transmission into gear.
Caution
Shifting the transmission into gear
before the requested mode indicator
light has stopped flashing could
damage the transfer case.
If the transmission is in gear and/or
moving more than 5 km/h (3 mph), the
4
m, AUTO, or 2mindicator light will
flash for 30 seconds but the shift will
Page 200 of 392

Cadillac Escalade Owner Manual (GMNA-Localizing-U.S./Canada/Mexico-
13566588) - 2020 - CRC - 4/24/19
DRIVING AND OPERATING 199
not be completed. With the vehicle
moving less than 5 km/h (3 mph), and
the transmission in N (Neutral),
attempt the shift again.
Shifting Into N (Neutral)
To shift into N (Neutral):1. Park the vehicle on a level surface.
2. Set the parking brake and press and hold the brake pedal. See
Parking Brake 0200 or
Electric Parking Brake 0201.
3. Start the vehicle or turn the ignition on.
4. Shift the transmission to N (Neutral).
5. Shift the transfer case to 2
m.
6. Turn the transfer case knob clockwise to N (Neutral) until it
stops and hold it there until the
N (Neutral) light starts to flash. This will take at least 10 seconds.
Then slowly release the knob to
the 4
nposition. The N (Neutral)
light will come on when the
transfer case shift to N (Neutral)
is complete.
7. With the engine running, verify that the transfer case is in
N (Neutral) by shifting the
transmission to R (Reverse), then
shift the transmission to
D (Drive). There should be no
movement of the vehicle while
shifting the transmission.
8. Turn the engine off, and the ignition to ACC/ACCESSORY.
9. Place the transmission shift lever in P (Park). See Recreational
Vehicle Towing 0326.
10. Turn the ignition off. Shifting Out of N (Neutral)
To shift out of N (Neutral):
1. Set the parking brake.
2. Press and hold ENGINE START/ STOP for five seconds with your
foot off the brake to place the
vehicle in Service Mode.
3. Shift the transmission to N (Neutral).
4. Turn the transfer case knob to the desired setting.
After the transfer case has
shifted out of N (Neutral), the
N (Neutral) light will go out.
5. Release the parking brake.
6. Start the engine and shift the transmission to the desired gear.
Page 206 of 392

Cadillac Escalade Owner Manual (GMNA-Localizing-U.S./Canada/Mexico-
13566588) - 2020 - CRC - 4/24/19
DRIVING AND OPERATING 205
StabiliTrak will automatically turn on
if the vehicle exceeds 56 km/h
(35 mph). Traction control will
remain off.
The vehicle has a Trailer Sway
Control (TSC) feature and a Hill Start
Assist (HSA) feature. SeeTrailer Sway
Control (TSC) 0251 or
Hill Start Assist (HSA) 0202.
Adding accessories can affect the
vehicle performance. See Accessories
and Modifications 0257.
Driver Mode Control
This feature adds a sportier feel,
provides a more comfortable ride,
or assists in different weather
conditions or terrains. This system
simultaneously changes the software
settings of various sub-systems.
Depending on the option package,
available features, and mode selected:
The suspension, steering, and
powertrain will change settings to
achieve the desired mode
characteristics. If the vehicle is
equipped with Magnetic Ride Control,
selecting the various Driver Modes adjusts the ride of the vehicle to
enhance the ride performance for the
road conditions and the
selected mode.
The Driver Mode Control has four
modes: Tour, Sport, Snow/Ice, and
Tow/Haul.
To activate and deactivate Tow/Haul,
press the Tow/Haul button at the end
of the shift lever.
Press the MODE switch on the center
console to select Tour, Sport, or Snow/
Ice. Pressing the switch will display a
mode menu selection screen in the
instrument cluster with all available
modes. First switch press will display
and highlight current active mode and
any subsequent switch press (while
the mode menu is still up) will display
and activate the next available mode.
The Tour and Sport Modes will feel
similar on a smooth road. Select a
new setting whenever driving
conditions change.
Page 207 of 392

Cadillac Escalade Owner Manual (GMNA-Localizing-U.S./Canada/Mexico-
13566588) - 2020 - CRC - 4/24/19
206 DRIVING AND OPERATING
Tour Mode
Use for normal city and highway
driving to provide a smooth, soft ride.
When selected, there will be no
indication in the DIC.
8Sport Mode
Use where road conditions or personal
preference demand a more controlled
response.
The steering will change to provide
more precise control. The Magnetic
Ride Control will change to provide
better cornering performance.
When selected, the Sport Mode
indicator will display in the DIC.
6Snow/Ice Mode
Use when more traction is needed
during slippery conditions.
The vehicle will upshift normally
when the vehicle is moving. The
acceleration will adjust to help provide
a smoother launch.
When selected, the Snow/Ice Mode
indicator will display in the DIC.
_Tow/Haul Mode
Tow/Haul is a feature that assists
when pulling a heavy trailer or a large
or heavy load. See Tow/Haul Mode
0 195.
Tow/Haul is designed to be most
effective when the vehicle and trailer
combined weight is at least 75 percent
of the vehicle’s Gross Combined
Weight Rating (GCWR). See “Weight
of the Trailer” underTrailer Towing
0 242.
Tow/Haul is most useful under the
following conditions:
. When pulling a heavy trailer or a
large or heavy load through rolling
terrain
. When pulling a heavy trailer or a
large or heavy load in stop-and-go
traffic
. When pulling a heavy trailer or a
large or heavy load in busy
parking lots where improved low
speed control of the vehicle is
desired Operating the vehicle in Tow/Haul
when lightly loaded or with no trailer
at all will not cause damage. However,
there is no benefit to the selection of
Tow/Haul when the vehicle is
unloaded. Such a selection when
unloaded may result in unpleasant
engine and transmission driving
characteristics and reduced fuel
economy. Tow/Haul is recommended
only when pulling a heavy trailer or a
large or heavy load.
When selected, the Tow/Haul
indicator will display in the
instrument cluster.
Magnetic Ride Control
This vehicle may have a semi-active
damping system called Magnetic Ride
Control. With this feature, improved
vehicle ride and handling is provided
under a variety of passenger and
loading conditions.
Locking Rear Axle
Vehicles with a locking rear axle can
give more traction on snow, mud, ice,
sand, or gravel. It works like a
Page 210 of 392

Cadillac Escalade Owner Manual (GMNA-Localizing-U.S./Canada/Mexico-
13566588) - 2020 - CRC - 4/24/19
DRIVING AND OPERATING 209
Increasing Speed While Cruise
Control is at a Set Speed
If the cruise control system is already
activated:
.Press and hold +RES up until the
vehicle accelerates to the desired
speed, then release it.
. To increase vehicle speed in small
increments, press +RES up briefly.
For each press, the vehicle goes
about 1 km/h (1 mph) faster.
The speedometer reading can be
displayed in either English or metric
units. See Instrument Cluster 0115.
The increment value used depends on
the units displayed.
Reducing Speed While Cruise
Control is at a Set Speed
If the cruise control system is already
activated:
. Press and hold SET− down until
the desired lower speed is reached,
then release it. .
To decrease the vehicle speed in
small increments, press SET−
down briefly. For each press, the
vehicle goes about 1 km/h (1 mph)
slower.
The speedometer reading can be
displayed in either English or metric
units. See Instrument Cluster 0115.
The increment value used depends on
the units displayed.
Passing Another Vehicle While
Using Cruise Control
Use the accelerator pedal to increase
the vehicle speed. When you take your
foot off the pedal, the vehicle will slow
down to the previous set cruise speed.
While pressing the accelerator pedal
or shortly following the release to
override cruise, briefly applying the
SET− control will result in cruise set
to the current vehicle speed.
Using Cruise Control on Hills
How well the cruise control works on
hills depends on the vehicle speed, the
load, and the steepness of the hills.
When going up steep hills, pressing
the accelerator pedal may be necessary to maintain vehicle speed.
When going downhill, Cruise Grade
Braking helps maintain the driver
selected speed.
Cruise Grade Braking is enabled when
the vehicle is started and cruise
control is active. It is not enabled in
Range Selection Mode. It assists in
maintaining driver selected speed
when driving on downhill grades by
using the engine and transmission to
slow the vehicle.
To disable and enable Cruise Grade
Braking for the current ignition cycle,
press and hold the Tow/Haul button
for five seconds. A Driver Information
Center (DIC) message displays.
For other forms of Grade Braking, see
Automatic Transmission
0191 and
Tow/Haul Mode 0195.
Ending Cruise Control
There are four ways to end cruise
control:
. Step lightly on the brake pedal.
. Press
*.
Page 211 of 392

Cadillac Escalade Owner Manual (GMNA-Localizing-U.S./Canada/Mexico-
13566588) - 2020 - CRC - 4/24/19
210 DRIVING AND OPERATING
.Shift the transmission to
N (Neutral).
. To turn off cruise control,
press
J.
Erasing Speed Memory
The cruise control set speed is erased
from memory if
Jis pressed or if
the ignition is turned off.
Adaptive Cruise Control
If equipped with Adaptive Cruise
Control (ACC), it allows for selecting
the cruise control set speed and
following gap. Read this entire section
before using this system. ACC uses a
camera and radar sensors to detect
other vehicles. See Radio Frequency
Statement 0366.
The following gap is the following
time (or distance) between your
vehicle and a vehicle detected directly
ahead in your path, moving in the
same direction. If no vehicle is
detected in your path, ACC works like
regular cruise control. If a vehicle is detected in your path,
ACC can speed up the vehicle or apply
limited, moderate braking to maintain
the selected following gap. To
disengage ACC, apply the brake. If the
Traction Control System (TCS) or
electronic stability control system
activates while ACC is engaged, ACC
may automatically disengage. See
Traction Control/Electronic Stability
Control
0203. When road conditions
allow ACC to be safely used, the ACC
can be turned back on.
ACC will not engage if the TCS or
StabiliTrak electronic stability control
system is disabled.
{Warning
ACC has limited braking ability and
may not have time to slow the
vehicle down enough to avoid a
collision with another vehicle you
are following. This can occur when
vehicles suddenly slow or stop
ahead, or enter your lane. Also see
“Alerting the Driver” in this section.
(Continued)
Warning (Continued)
Complete attention is always
required while driving and you
should be ready to take action and
apply the brakes. See Defensive
Driving 0168.
{Warning
ACC will not detect or brake for
children, pedestrians, animals,
or other objects.
Do not use ACC when:
. On winding and hilly roads or
when the sensors are blocked
by snow, ice, or dirt. The
system may not detect a
vehicle ahead. Keep the entire
front of the vehicle clean.
. Visibility is low, such as in
fog, rain, or snow conditions.
ACC performance is limited
under these conditions.
(Continued)