CADILLAC XLR 2009 1.G Owners Manual
Manufacturer: CADILLAC, Model Year: 2009, Model line: XLR, Model: CADILLAC XLR 2009 1.GPages: 462, PDF Size: 3.72 MB
Page 211 of 462
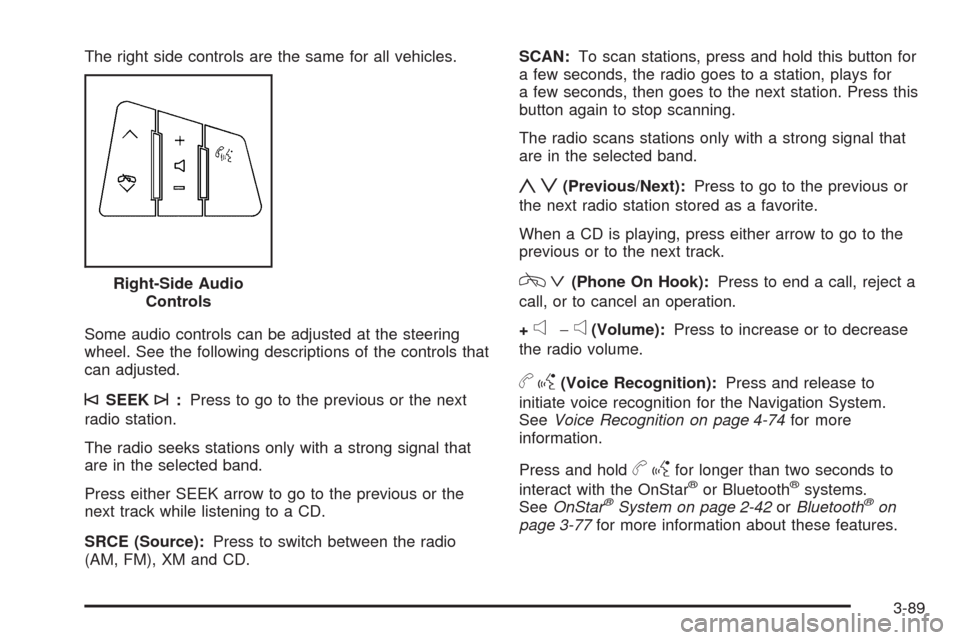
The right side controls are the same for all vehicles.
Some audio controls can be adjusted at the steering
wheel. See the following descriptions of the controls that
can adjusted.
©SEEK¨:Press to go to the previous or the next
radio station.
The radio seeks stations only with a strong signal that
are in the selected band.
Press either SEEK arrow to go to the previous or the
next track while listening to a CD.
SRCE (Source):Press to switch between the radio
(AM, FM), XM and CD.SCAN:To scan stations, press and hold this button for
a few seconds, the radio goes to a station, plays for
a few seconds, then goes to the next station. Press this
button again to stop scanning.
The radio scans stations only with a strong signal that
are in the selected band.
yz(Previous/Next):Press to go to the previous or
the next radio station stored as a favorite.
When a CD is playing, press either arrow to go to the
previous or to the next track.
cª(Phone On Hook):Press to end a call, reject a
call, or to cancel an operation.
+
e−e(Volume):Press to increase or to decrease
the radio volume.
bg(Voice Recognition):Press and release to
initiate voice recognition for the Navigation System.
SeeVoice Recognition on page 4-74for more
information.
Press and hold
bgfor longer than two seconds to
interact with the OnStar®or Bluetooth®systems.
SeeOnStar®System on page 2-42orBluetooth®on
page 3-77for more information about these features. Right-Side Audio
Controls
3-89
Page 212 of 462
Radio Reception
Frequency interference and static can occur during
normal radio reception if items such as cell phone
chargers, vehicle convenience accessories, and external
electronic devices are plugged into the accessory
power outlet. If there is interference or static, unplug
the item from the accessory power outlet.
AM
The range for most AM stations is greater than for
FM, especially at night. The longer range can cause
station frequencies to interfere with each other.
For better radio reception, most AM radio stations
boost the power levels during the day, and then reduce
these levels during the night. Static can also occur
when things like storms and power lines interfere with
radio reception. When this happens, try reducing
the treble on the radio.
FM Stereo
FM signals only reach about 10 to 40 miles
(16 to 65 km). Although the radio has a built-in electronic
circuit that automatically works to reduce interference,
some static can occur, especially around tall buildings or
hills, causing the sound to fade in and out.
XM Satellite Radio Service
XM Satellite Radio Service gives digital radio reception
from coast-to-coast in the 48 contiguous United States,
and in Canada. Just as with FM, tall buildings or
hills can interfere with satellite radio signals, causing
the sound to fade in and out. In addition, traveling
or standing under heavy foliage, bridges, garages, or
tunnels may cause loss of the XM signal for a period
of time.
Cellular Phone Usage
Cellular phone usage may cause interference with the
vehicle’s radio. This interference may occur when
making or receiving phone calls, charging the phone’s
battery, or simply having the phone on. This interference
causes an increased level of static while listening to
the radio. If static is received while listening to the radio,
unplug the cellular phone and turn it off.
3-90
Page 213 of 462
Care of Your CDs
Handle CDs carefully. Store them in their original cases
or other protective cases and away from direct sunlight
and dust. The CD player scans the bottom surface of the
disc. If the surface of a CD is damaged, such as cracked,
broken, or scratched, the CD does not play properly or
not at all. If the surface of a CD is soiled, take a soft, lint
free cloth or dampen a clean, soft cloth in a mild, neutral
detergent solution mixed with water, and clean it. Make
sure the wiping process starts from the center to
the edge.
Do not touch the bottom side of a CD while handling it;
this could damage the surface. Pick up CDs by
grasping the outer edges or the edge of the hole and
the outer edge.
Care of the CD Player
Do not use CD lens cleaners for CD players because
the lens of the CD optics can become contaminated
by lubricants.
Diversity Antenna System
The AM-FM antenna is a hidden self tuning system.
It optimizes the AM and FM signals relative to the
vehicle’s position and radio station source.
No maintenance or adjustments are needed.
XM™ Satellite Radio Antenna
System
The vehicle may have the XM™ Satellite Radio
antennas that are located in the outside rear view
mirrors. These antennas are hidden from view and
are not accessible.
3-91
Page 214 of 462

✍NOTES
3-92
Page 215 of 462
Overview.........................................................4-2
Navigation System Overview............................4-2
Getting Started...............................................4-4
Features and Controls....................................4-10
Using the Navigation System..........................4-10
Setup Menu.................................................4-12
Plan Route..................................................4-18
Edit Memory Point........................................4-19
Edit Waypoint...............................................4-23
Edit Avoid Point/Area....................................4-25
Enter Destination..........................................4-27
Route Preference..........................................4-36
Maps ..........................................................4-38
Symbols......................................................4-43Keyless Access System.................................4-48
OnStar®System...........................................4-48
Global Positioning System (GPS)....................4-49
Vehicle Positioning........................................4-50
Problems with Route Guidance.......................4-51
If the System Needs Service..........................4-51
Ordering Map DVDs......................................4-52
Database Coverage Explanations....................4-52
Navigation Audio System................................4-52
Six-Disc CD Changer....................................4-65
CD/DVD Player............................................4-68
Radio Personalization with Home and
Away Feature...........................................4-73
Voice Recognition..........................................4-74
Section 4 Navigation System
4-1
Page 216 of 462

Overview
Navigation System Overview
4-2
Page 217 of 462
A. BAND Key. See “Finding a Station” underNavigation
Audio System on page 4-52.
B. CD Key. SeeNavigation Audio System on page 4-52
orCD/DVD Player on page 4-68.
C. DVD Key. See “Playing a DVD” underCD/DVD
Player on page 4-68.
D. TUNE/SEEK Key. See “Playing the Radio” under
Navigation Audio System on page 4-52.
E. Audio/Adjust Key. See “Main Audio Menu” under
Navigation Audio System on page 4-52.
F. Power-Volume Knob. See “Hard Keys” underUsing
the Navigation System on page 4-10.G. Navigation System Screen
H. RPT (Repeat) Key. See “Hard Keys” underUsing
the Navigation System on page 4-10.
I. MAP Key. See “Hard Keys” underUsing the
Navigation System on page 4-10.
J. ROUTE Key. See “Hard Keys” underUsing the
Navigation System on page 4-10.
K. MENU Key. See “Hard Keys” underUsing the
Navigation System on page 4-10.
L. TILT Key. See “Hard Keys” underUsing the
Navigation System on page 4-10.
4-3
Page 218 of 462
Getting Started
Read this manual thoroughly to become familiar with
how the navigation system operates.
The navigation system includes navigation and audio
functions.
Keeping your eyes on the road and your mind on the
drive is important for safe driving. The navigation
system has built-in features intended to help you do this.
Some features may be disabled while driving. Note, these
functions are grayed-out. A grayed-out function indicates
it is not available when the vehicle is moving.
All functions are available when the vehicle is parked.
Do the following before driving:
Become familiar with the navigation system
operation, hard keys on the faceplate, and
touch-sensitive screen buttons of the navigation
system.
Set up the audio by presetting favorite stations,
setting the tone, and adjusting the speakers.
Set up the navigation features before beginning
driving, such as entering an address or a preset
destination.
Set up the phone numbers in advance so they can be
called easily with the press of a single button or a
single voice command (for navigation systems
equipped with phone capability).
{CAUTION:
Taking your eyes off the road too long or too often
while using the navigation system could cause a
crash resulting in injury or death to you or others.
Focus your attention on driving.
{CAUTION:
Avoid looking too long or too often at the moving
map on the navigation screen. This could cause a
crash and you or others can be injured or killed.
Use the turn-by-turn voice guidance directions
whenever possible.
4-4
Page 219 of 462
Use the navigation system to:
Plan a route.
Select a destination using various methods and
choices.
Follow turn-by-turn route and map guidance with
voice prompts, only if permitted by traffic laws,
controls, and conditions.
Always be alert, obey traffic and roadway laws, and
instructions, regardless of the guidance from the
navigation system. Because the navigation system uses
street map information that does not include all traffic
restrictions or the latest road changes, it may suggest
using a road that is now closed for construction or a turn
that is prohibited by signs at the intersection. Because
the system uses limited information, you must always
evaluate whether following the system’s directions
is safe and legal for the current conditions.
When the navigation system is turned on, a screen may
appear with the information below, and you must
read and acknowledge the information it contains.
After you acknowledge the start up information you will
be able to access the NAV (navigation) and DEST
(destination) functions. Once accessed, you can enter
or delete information in the navigation system or access
other functions. See instructions later in this section.
Deleting Personal Information
This navigation system can record and store
destinations. At times, such as when you are disposing
of the vehicle, you may want to delete these
destinations. Refer to the following sections to delete
the destination information that has been stored.
See “Deleting Single Memory Points”, “Deleting All
Memory Points”, “Preset Dests.” (Destinations), “Home”
and “Previous Dest.” (Destination) underEdit Memory
Point on page 4-19for deleting stored destinations.
Storing Radio Station Presets
To set preset radio stations:
1. Press the PWR/VOL knob to turn the system on.
2. Press the audio source screen button (AM, FM1,
FM2, etc.) and select the desired band (AM, FM1,
FM2, XM1, or XM2 (if equipped), or WX (weather)
(if equipped)).
3. Use the TUNE/SEEK arrows to tune to the desired
station.
4. Press and hold one of the six preset screen buttons,
at the bottom of the screen, until a beep is heard
or see the station displayed on the selected preset
button.
5. Repeat the steps for each preset.
See “Preset Station Menu” underNavigation Audio
System on page 4-52for more information.
4-5
Page 220 of 462
Setting the Clock
To set the time:
1. Press the PWR/VOL knob to turn the system on.
2. Press the
e/z(Audio/Adjust) hard key.
3. Press the
8clock symbol screen button.
4. Select the 12H or 24H screen button to display the
time in standard or military time.
5. Press and hold the HOUR and MIN. (minute) arrow
buttons to increase or to decrease the time.
6. Select the appropriate time zone screen button.
7. Select the Daylight Saving Time screen button,
if necessary.
The radio uses the GPS satellite to set the time.
The vehicle needs to be in an open area to receive the
signal. See “Clock Adjust Menu” underNavigation
Audio System on page 4-52for more information.
Setting the Search Area, Entering an
Address and Point of Interest, Storing a
Home Destination, and Using The
Home or Previous Destinations
Before entering an Address, Point of Interest, Home, or
Preset Destination, select the appropriate region that
contains the �nal destination. The vehicle must be
stopped to perform this operation.
Setting the Search Area
To set the search area:
1. If the radio is already on with a map disc inserted,
skip to Step 5.
2. Press the PWR/VOL knob to turn the system on.
3. Insert the DVD map disc. See “Regional Maps”
underMaps on page 4-38for more information.
4. A notice may appear. Touch the I AGREE screen
button to proceed.
5. Press the ROUTE hard key.
6. Press the Enter Destination screen button.
7. Press the Change screen button.
8. Select the appropriate region numbered screen
button that contains your �nal destination.
The system returns to the Destination menu. SeeEnter
Destination on page 4-27for more information.
4-6