CADILLAC XLR V 2007 1.G Owners Manual
Manufacturer: CADILLAC, Model Year: 2007, Model line: XLR V, Model: CADILLAC XLR V 2007 1.GPages: 512, PDF Size: 3.84 MB
Page 281 of 512
OnStar®System
When using the OnStar®system, the audio
system will be muted and the navigation voice
prompts will be disabled during the call. The
volume of the OnStar
®call can be adjusted by
using the steering wheel volume controls.
SeeOnStar
®System on page 107for more
information.
Global Positioning System (GPS)
The Navigation System determines the position of
your vehicle by using satellite signals, various
vehicle signals, and map data.
At times, other interferences such as the satellite
condition, road con�guration, the condition of
the vehicle and/or other circumstances can
interfere with the Navigation’s ability to determine
the accurate position of the vehicle.
The GPS shows the current position of your
vehicle using signals sent by the GPS Satellites of
the United States Department of Defense.
When your vehicle is not receiving signals from
the satellites, a symbol will appear on the
map screen. Refer toSymbols on page 275.This system may not be available or interference
may occur if the following happens:
Signal obstructions caused by tall buildings,
large trucks, tunnels,
objects located on top of the instrument panel,
satellites will not send signals if they are
being repaired or improved,
after-market glass tinting has been applied to
the vehicle’s windows.
Notice:Do not apply after-market glass tinting
to the vehicle’s windows. Glass tinting will
interfere with the system’s ability to receive
GPS signals and cause the system to
malfunction. You might have to replace the
window to correct the problem. This would not
be covered by your warranty.
For more information if you are experiencing a
problem, seeIf the System Needs Service
on page 283andProblems with Route Guidance
on page 283.
281
Page 282 of 512
Vehicle Positioning
At times, the position of the vehicle on the map
may be inaccurate due to one or more of the
following reasons:
The road system has changed.
The vehicle is driving on slippery road
surfaces such as in sand, gravel, and/or snow.
The vehicle is traveling on winding roads.
The vehicle is on a long straight road.
The vehicle is approaching a tall building or a
large vehicle.
The surface streets run parallel to a freeway.
The vehicle has just been transferred by a
vehicle carrier or a ferry.
The current position calibration is set
incorrectly.
The vehicle is traveling at high speed.
The vehicle changes directions more than
once, or when the vehicle is turning on a
turn table in a parking lot.
The vehicle is entering and/or exiting a
parking lot, garage, or a lot with a roof.
The GPS signal is not received.
A roof carrier is installed on your vehicle.
The vehicle is being driven with tire chains.
The tires are replaced.
The tire pressure for your tires is incorrect.
The tires are worn.
The �rst time the map DVD is inserted.
The battery is disconnected for several days.
The vehicle is driving in heavy traffic where
driving is at low speeds, and the vehicle is
stopped and started repeatedly.
If you experience problems with your system, see
your dealer.
282
Page 283 of 512
Problems with Route Guidance
Inappropriate route guidance may occur under one
or more of the following conditions:
You have not turned onto the road indicated.
Route guidance may not be available
when using automatic rerouting for the next
right or left turn.
The route may not be changed when using
automatic rerouting.
There is no route guidance when turning at an
intersection.
Plural names of places may be announced
occasionally.
It may take a long time to operate automatic
rerouting during high-speed driving.
Automatic rerouting may display a route
returning to the set waypoint if you are heading
for a destination without passing through a
set waypoint.
The route prohibits the entry of a vehicle due
to a regulation by time or season or any
other regulation which may be given.
Some routes may not be searched.
The route to the destination may not be
shown if there are new roads, if roads
have recently changed, or if certain roads are
not listed on the map DVD. SeeOrdering
Map DVDs on page 284.
To recalibrate the vehicle’s position on the map,
see your dealer.
If the System Needs Service
If your system needs service and you have
followed the steps listed here and still are
experiencing problems, see your dealer for
assistance.
283
Page 284 of 512
Ordering Map DVDs
You will receive two free DVD map disc updates
with the purchase of your new vehicle. Updates
are necessary to make sure that your vehicle’s
navigation system has the most accurate
information available about streets/roads, points of
interest, and business locations.
The updates are provided by the GM Nav Disc
Center at the �rst and second anniversary dates of
your vehicle’s delivery date. About four to six weeks
before those anniversary dates, you will receive a
post card from the GM Nav Disc Center reminding
you that a free update is available. The center will
request con�rmation of your mailing address either
by having you contact the toll-free number,
1–877–NAV–DISC (1–877–628–3472), or the
center’s website, www.gmnavdisc.com. After
verifying your address you should receive the
updated disc in about two weeks. After receiving
the updated disc, replace the old disc in the
navigation system. See “Installing the DVD Map
Disc” and “Ejecting the DVD Map Disc” underMaps
on page 271. Dispose of the old disc to avoid
confusion about which disc is the most current.If you have any questions about the operation of
the navigation system or the update process,
call the GM Nav Disc Center or go to the center’s
website. If you need any future updates or a
replacement disc, because the current disc is lost,
damaged, or needs to be updated, call the GM
Nav Disc Center or order a new disc online.
To order a disc, have your Vehicle Identi�cation
Number (VIN) available. This helps the center
make sure you receive the correct and most up to
date DVD map disc for your vehicle. See
Vehicle Identi�cation Number (VIN) on page 451
for more information.
Database Coverage Explanations
Coverage areas vary with respect to the level of
map detail available for any given area. Some
areas will feature greater levels of detail than
others. If this happens, it does not mean there is a
problem with the system. As the map DVD is
updated, more detail may become available for
areas which previously had limited detail. See
Ordering Map DVDs on page 284.
284
Page 285 of 512
Navigation Audio System
Notice:Before adding any sound equipment
to your vehicle, such as an audio system,
CD player, CB radio, mobile telephone,
or two-way radio, make sure that it can be
added by checking with your dealer. Also,
check federal rules covering mobile radio and
telephone units. If sound equipment can be
added, it is very important to do it properly.
Added sound equipment may interfere with the
operation of your vehicle’s engine, radio, or
other systems, and even damage them.
Your vehicle’s systems may interfere with the
operation of sound equipment that has
been added.
Your vehicle has a feature called Retained
Accessory Power (RAP). With RAP, the audio
system can be played even after the ignition
is turned off. SeeRetained Accessory Power
(RAP) on page 89for more information.
The audio system is operated using navigation
system menus. The audio menus are explained in
this section.
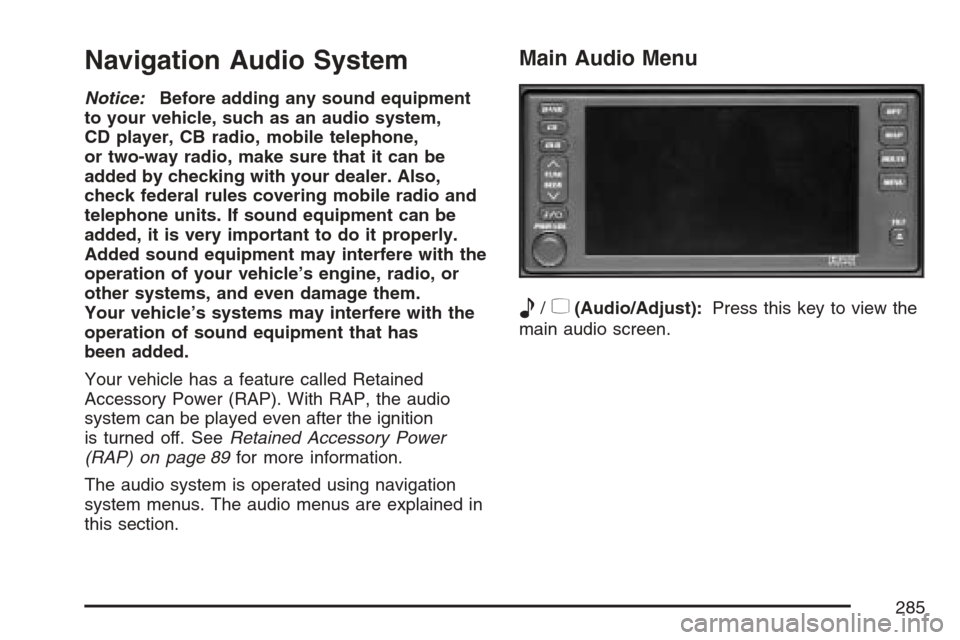
Main Audio Menu
e
/z(Audio/Adjust):Press this key to view the
main audio screen.
285
Page 286 of 512
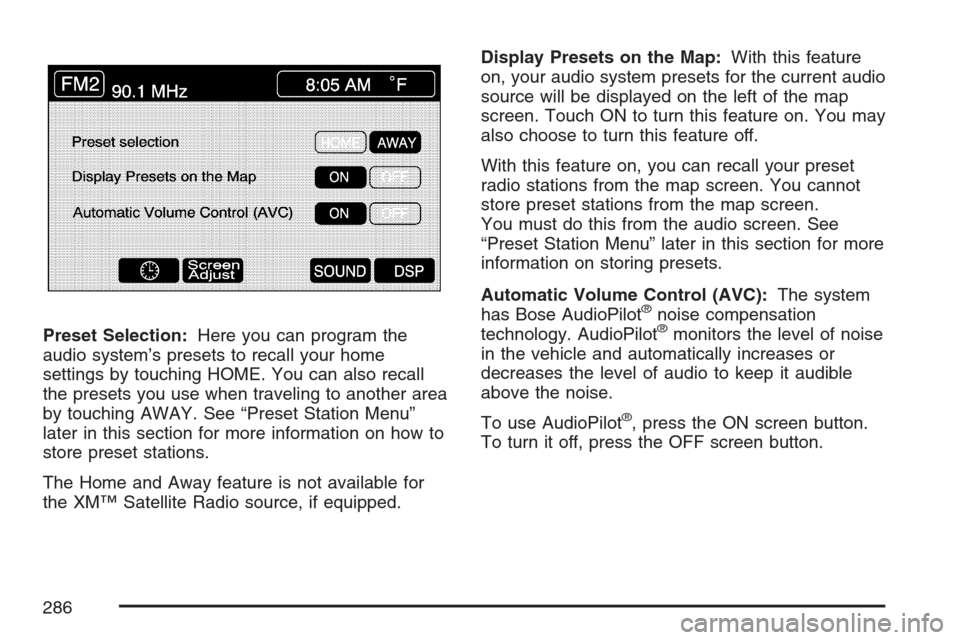
Preset Selection:Here you can program the
audio system’s presets to recall your home
settings by touching HOME. You can also recall
the presets you use when traveling to another area
by touching AWAY. See “Preset Station Menu”
later in this section for more information on how to
store preset stations.
The Home and Away feature is not available for
the XM™ Satellite Radio source, if equipped.Display Presets on the Map:With this feature
on, your audio system presets for the current audio
source will be displayed on the left of the map
screen. Touch ON to turn this feature on. You may
also choose to turn this feature off.
With this feature on, you can recall your preset
radio stations from the map screen. You cannot
store preset stations from the map screen.
You must do this from the audio screen. See
“Preset Station Menu” later in this section for more
information on storing presets.
Automatic Volume Control (AVC):The system
has Bose AudioPilot
®noise compensation
technology. AudioPilot®monitors the level of noise
in the vehicle and automatically increases or
decreases the level of audio to keep it audible
above the noise.
To use AudioPilot
®, press the ON screen button.
To turn it off, press the OFF screen button.
286
Page 287 of 512
This feature is most effective at lower volume
settings where background noise can affect how
well you hear the music being played through your
vehicle’s audio system. At higher volume
settings, where the music is much louder than the
background noise, there may be little or no
adjustments by AudioPilot
®. For additional
information on AudioPilot®, please visit
www.bose.com.
8(Clock):Touch this screen button to get to the
CLOCK ADJUST menu. See “Clock Adjust
Menu” later in this section for more information.
SCREEN ADJUST:To adjust the brightness
or contrast of the screen, touch SCREEN ADJUST
to display the screen adjust menu. See “Screen
Adjust Menu” later in this section for more
information.
SOUND:Touch this screen button to access the
Sound menu. See “Sound Menu” later in this
section for more information.
DSP (Digital Signal Processing):Touch this
screen button to access the DSP menu. See
“Adjusting the Speakers” later in this section for
more information.
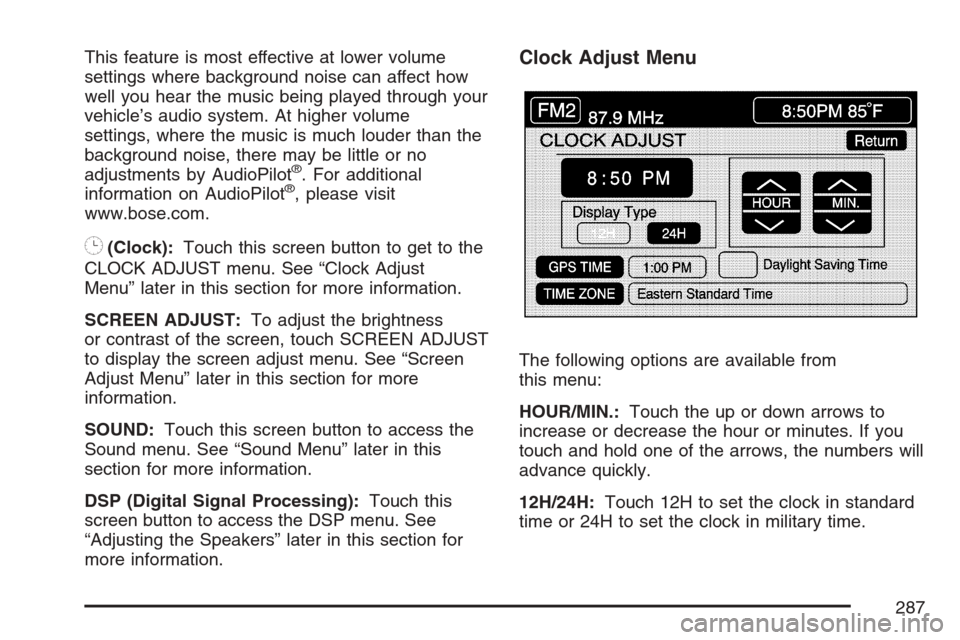
Clock Adjust Menu
The following options are available from
this menu:
HOUR/MIN.:Touch the up or down arrows to
increase or decrease the hour or minutes. If you
touch and hold one of the arrows, the numbers will
advance quickly.
12H/24H:Touch 12H to set the clock in standard
time or 24H to set the clock in military time.
287
Page 288 of 512
GPS TIME:The current GPS time will be
displayed to the right of this screen button. Touch
GPS TIME to set the navigation system time to
match current GPS time. If the seconds for
the present minute are greater than thirty when
GPS TIME is selected, the clock will round
up to the next minute.
Daylight Saving Time:Touch this screen button
to increase the time setting by one hour. Then
touch GPS TIME to save the new setting. If
the screen button is light blue, the daylight savings
time feature is on. If the button is dark blue, the
daylight savings time feature is off.
TIME ZONE:The selected time zone will appear
to the right of this screen button. Touch this
screen button to toggle between time zones and
select the desired one. The time of the selected
zone will be displayed to the right of the GPS TIME
screen button. To set the clock to the new
setting, touch GPS TIME.
If the system is not receiving GPS information,
you can still set the time manually as described
above but the GPS time and Daylight Saving Time
features will not be available.
Touch Return to go back to the previous menu.Screen Adjust Menu
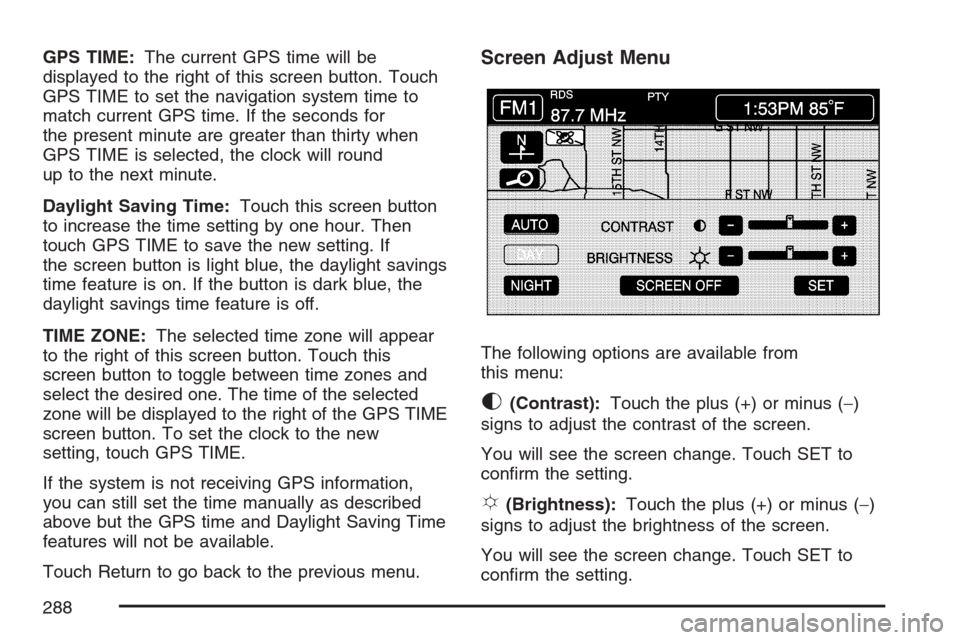
The following options are available from
this menu:
K(Contrast):Touch the plus (+) or minus (−)
signs to adjust the contrast of the screen.
You will see the screen change. Touch SET to
con�rm the setting.
!(Brightness):Touch the plus (+) or minus (−)
signs to adjust the brightness of the screen.
You will see the screen change. Touch SET to
con�rm the setting.
288
Page 289 of 512
AUTO:This setting automatically adjusts the
contrast and brightness of the screen depending
on exterior lighting conditions.
DAY:This setting leaves the screen in day mode.
Day mode is best suited for daylight conditions.
NIGHT:This setting leaves the screen in
night mode. Night mode is best suited for nighttime
conditions.
SCREEN OFF:Touch SCREEN OFF to turn off
the screen. Press any hard key to turn the
screen back on.
SET:Touch SET to save your choices and exit
the CLOCK ADJUST menu.
Language
Your vehicle has been set for the English
language. If you wish to change the language, you
must do so through the Driver Information
Center (DIC). SeeDriver Information Center (DIC)
on page 203for more information.If the language is changed from English, a
majority of the voice guidance prompts and screen
text will change to the selected language.
Remember, the menu screens will not match
word-for-word as they appear in this manual.
Playing the Radio
PWR-VOL (Power-Volume):Press this knob to
turn the audio and navigation systems on and
off. Turn the knob to increase or decrease
the volume to the audio system.
«TUNE/SEEKª:Press the up or down arrow
to go to the next or previous station and stay
there.
BAND:Press this key to switch between AM,
FM1, FM2, XM1, XM 2, or WX, if equipped. If you
are on a map screen and press this key, the
screen will not change but the audio source will.
289
Page 290 of 512
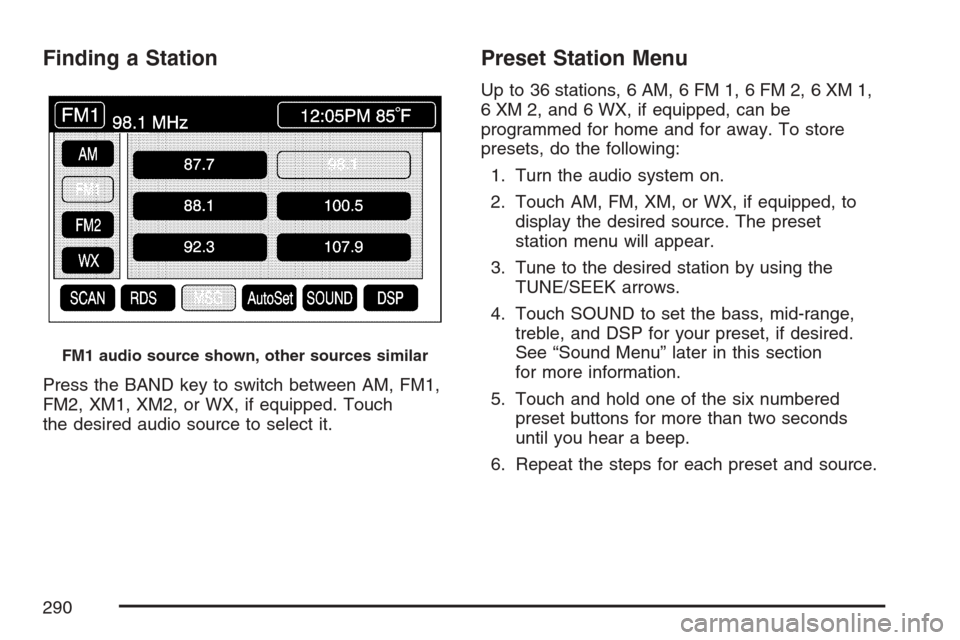
Finding a Station
Press the BAND key to switch between AM, FM1,
FM2, XM1, XM2, or WX, if equipped. Touch
the desired audio source to select it.
Preset Station Menu
Up to 36 stations, 6 AM, 6 FM 1, 6 FM 2, 6 XM 1,
6 XM 2, and 6 WX, if equipped, can be
programmed for home and for away. To store
presets, do the following:
1. Turn the audio system on.
2. Touch AM, FM, XM, or WX, if equipped, to
display the desired source. The preset
station menu will appear.
3. Tune to the desired station by using the
TUNE/SEEK arrows.
4. Touch SOUND to set the bass, mid-range,
treble, and DSP for your preset, if desired.
See “Sound Menu” later in this section
for more information.
5. Touch and hold one of the six numbered
preset buttons for more than two seconds
until you hear a beep.
6. Repeat the steps for each preset and source.
FM1 audio source shown, other sources similar
290