CHEVROLET CAMARO 1982 Repair Guide
Manufacturer: CHEVROLET, Model Year: 1982, Model line: CAMARO, Model: CHEVROLET CAMARO 1982Pages: 875, PDF Size: 88.64 MB
Page 21 of 875
GM – CAMARO 1982-1992 – Repair Guide (Checked by WxMax) 21
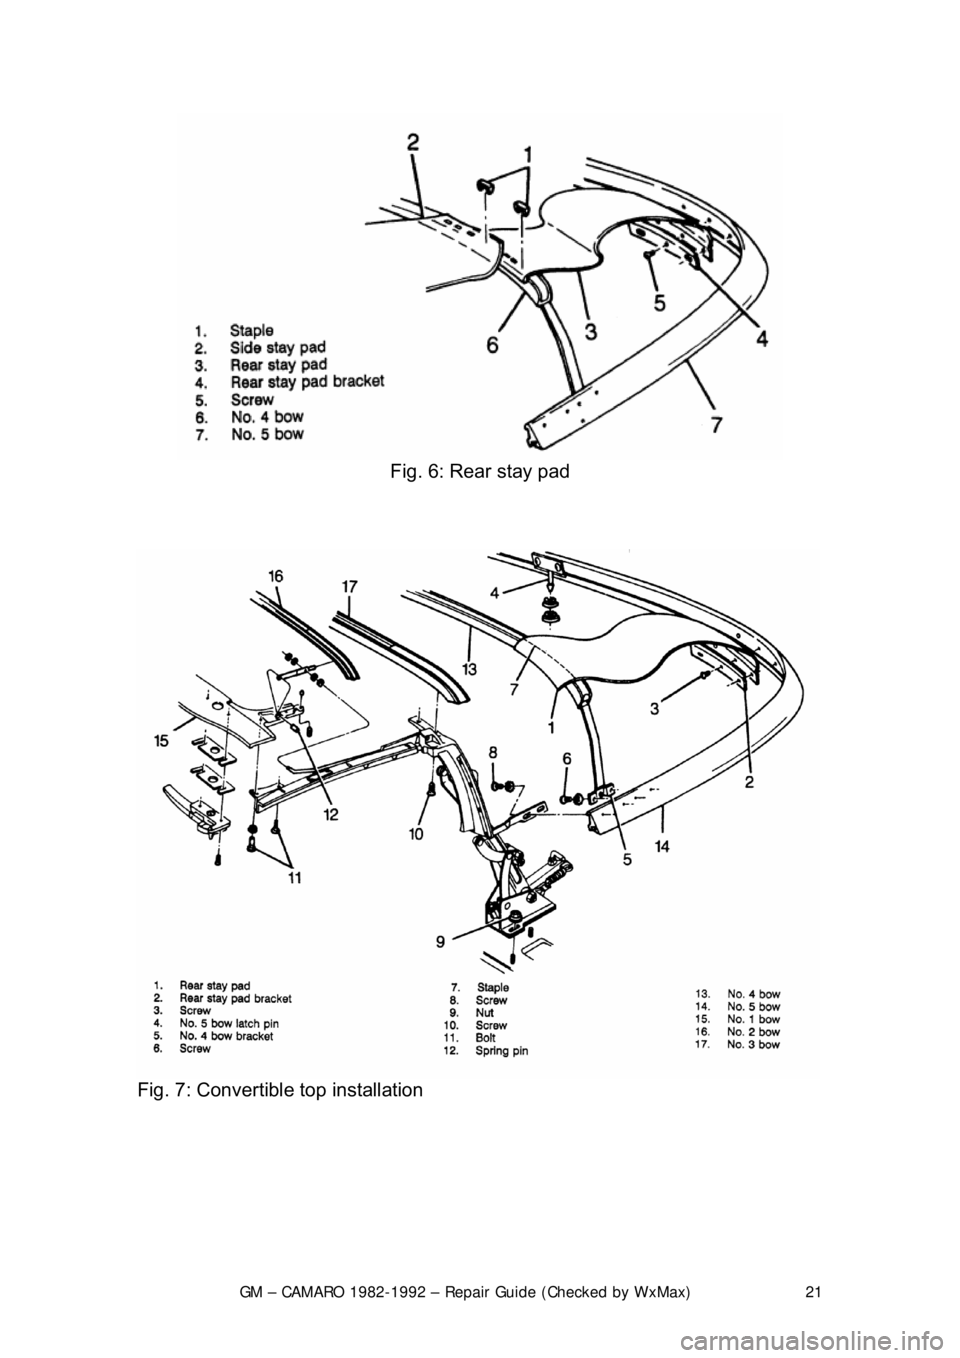
Fig. 6: Rear stay pad
Fig. 7: Convertible top installation
Page 22 of 875
GM – CAMARO 1982-1992 – Repair Guide (Checked by WxMax) 22
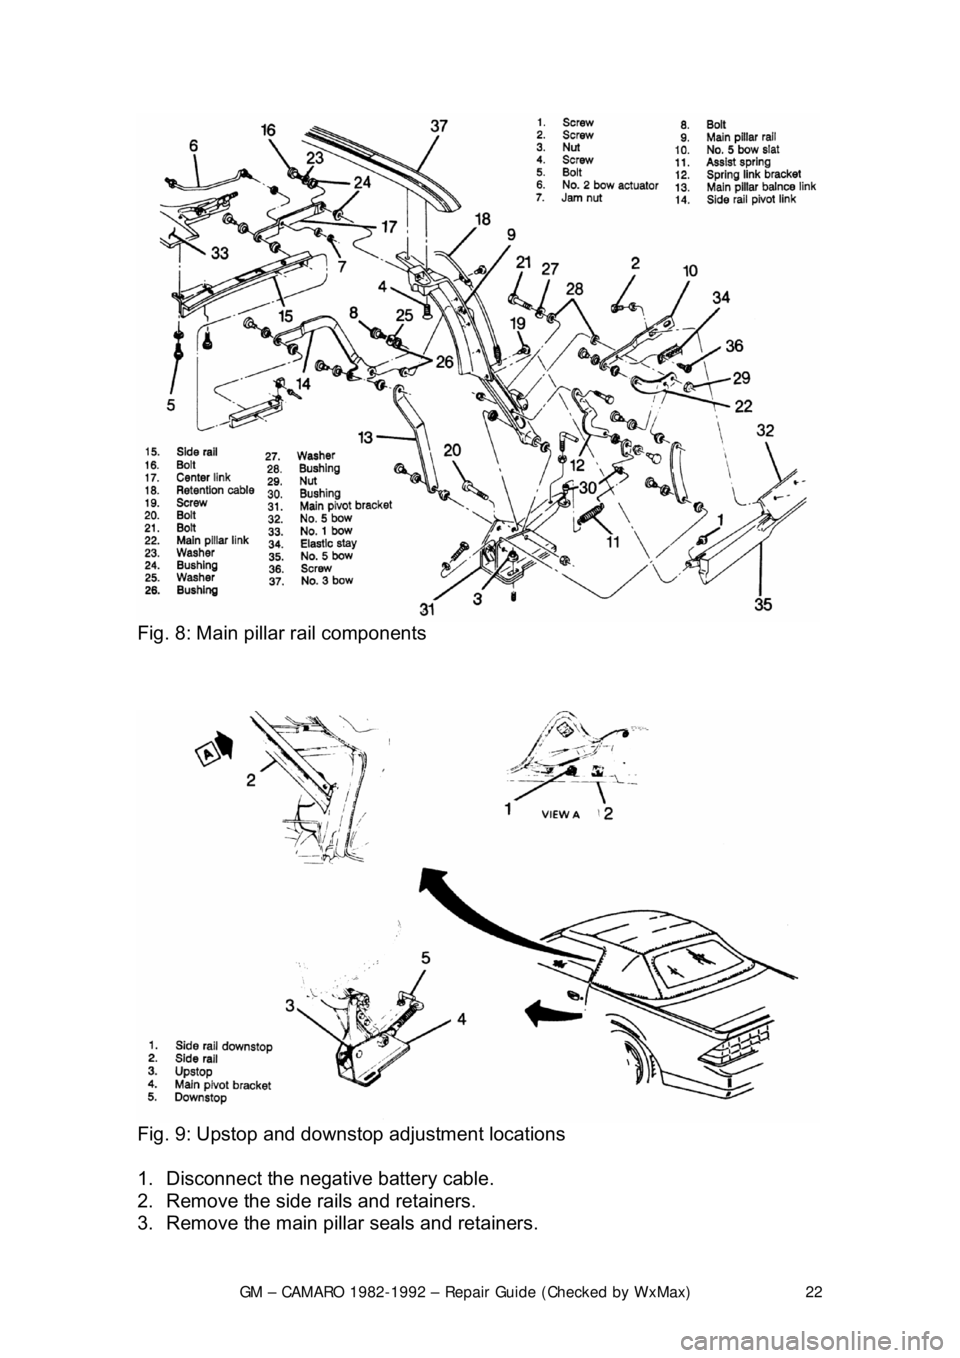
Fig. 8: Main pillar rail components
Fig. 9: Upstop and downst op adjustment locations
1. Disconnect the negative battery cable.
2. Remove the side rails and retainers.
3. Remove the main pillar seals and retainers.
Page 23 of 875

GM – CAMARO 1982-1992 – Repair Guide (Checked by WxMax) 23
4. Remove the No. 1 bow garni
sh molding and retainer.
5. Remove the top from the No. 1 bow by applying heat with a heat gun to the
approximately 1 in. (25mm) fr om the adhesive backed bow.
6. Remove the cable screws.
7. Remove the headliner from the No. 2 and 3 bows.
It is not necessary to remove the headliner from the No. 1 bow with the top
folded enough to allow access to the retainer screws.
8. Remove the screws from the under side of the Nos. 2 and 3 top cover
retainers.
9. Remove the No. 2 and 3 bow top cover from the pockets in the top cover.
10. Separate the outer quarter flaps fr om the main pillar post, once again using
the heat gun as necessary to loosen the adhesive.
11. Remove the side retention cables.
12. Remove screws.
13. Remove the elastic stays, folding the top rearward.
14. Remove the No. 5 bow seal.
15. Remove the black covered rive ts from the No. 5 bow using an
1/8 in. (3mm)
drill bit.
16. Remove the top cover from No. 5 bow, using heat as required to loosen th\
e adhesive.
17. Remove the convertible t op cover from the vehicle.
To install:
Use 3M® adhesive No. 8046 or equivalent on cover attaching surfaces where
noted.
18. Install the cover on the v ehicle. Slide the retention cables through the listing
pockets and check cable ends for proper locations.
19. Square the top to the frame; check fo r evenness of quarter flap positions to
the main pillar rail. Fold the t op cover to the windshield header.
20. Apply adhesive to the No . 5 bow and top, raise the No. 5 bow to the full
vertical position.
Glue
1/2 of the top cover to the No. 5 bow first, then lower the bow and check for
evenness. The length of the material ov erhanging should be uniform. Repeat
the procedure, if necessary. Trim the exce ss fabric from the No. 5 bow evenly at
the seal channel to allow atta chment of the seal later.
21. Install new
1/8 in. (3mm) by 3/16 in. (5mm) black aluminum rivets as shown in
illustration.
22. Lower and latch the tonneau cover and No. 5 bow. Raise the No. 1 bow off
the header and install the cable screws.
23. Install the No. 5 bow seal.
24. Connect the elastic stays inside of No . 5 bow seal-to-link arms. Install the
screws.
25. Lower the No. 5 bow. Fold the inner quarter flaps inside of main pillar rails.
Fold the outer quarter flaps around the outs ide of the main pillar rails to the
Page 24 of 875

GM – CAMARO 1982-1992 – Repair Guide (Checked by WxMax) 24
forward edge using adhesive on the flaps and rails. Ensure seams are
aligned evenly on both rails. Trim excess material.
26. Raise No. 5 bow. Raise the tonneau panel and lower No. 5 bow. Slide the
No. 2 and 3 bow top cover retainers into listing pockets and align screw
holes. Install the screws to the underside of No. 2 and 3 bows.
27. Install the headliner to No. 2 and 3 bows.
28. Latch the top to the wi ndshield header and pull the to p cover straight forward
at the seams over the No. 1 bow to desired fullness. While maintaining
tension on the top cover over the No. 1 bow, make a pencil mark on the
outer surface along the forwar d edge of the No. 1 bow.
29. Unlatch the top from the windshield header and lowe r the top halfway. Pull
the top cover
1/4 in. (6mm) past the reference mark over the No. 1 bow and
attach it to the No. 1 bow, first attach ing cover side flaps. Fold the side flaps
around the bow using adhesive on both the cover and bow surfaces. Fold
the top cover over the No. 1 bow al ong the edge and over the cover side
flap, once again using adhesive. Lower t he top and check for proper tension,
if more is needed, repeat the procedur e. Trim off excess material.
30. Install all moldings, pillar seals, side seals and retainers. Replace dried out,
deteriorated or cracked seals to prevent air and water leaks.
31. Adjust the top upstops and downstops, as required.
ADJUSTMENT
UPSTOP
The upstops may be adjusted to obtain pr oper alignment between the top latch
guide pins and the windshield header receivers.
1. Lower the top. Loosen the upstop ja m nut and turn screw clockwise.
2. Raise and latch the top.
3. Raise No. 5 bow to the full vertical position.
4. Turn the upstops counterclockwis e until they contact the linkage.
5. Unlatch and lower the top. Tight en the upstop jam nut while holding the
upstop from turning.
6. Raise the top and inspect the alignment of the top latch guide pins to the
header receivers.
DOWNSTOP
The downstops can be adjusted for proper clearance between the main rail and
No. 4 bow when the top is lowered comple tely. The downstops have right angle
bends and face outward.
1. Raise and latch the top.
2. Loosen the downstops nuts and adjust as required.
3. Tighten the downstop nuts while holding downstops in position.
4. Lower the top and inspec t the clearance between the main rail and the No. 4
bow. Also inspect the clear ance of the tonneau panel.
Page 25 of 875
GM – CAMARO 1982-1992 – Repair Guide (Checked by WxMax) 25
INTERIOR
INSTRUMENT PANEL AND PAD
REMOVAL & INSTALLATION
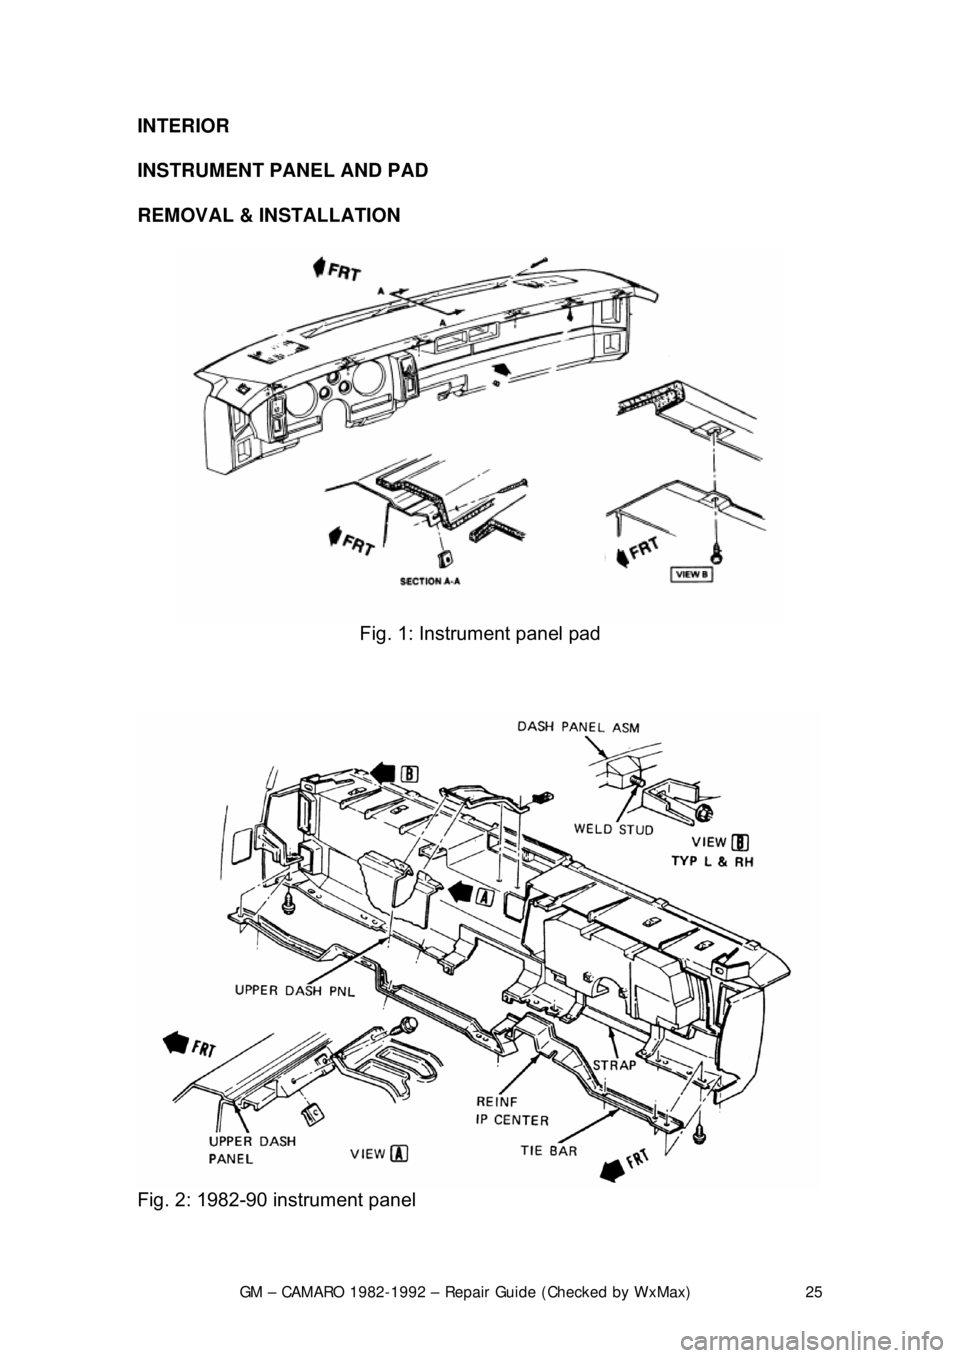
Fig. 1: Instrument panel pad
Fig. 2: 1982-90 instrument panel
Page 26 of 875
GM – CAMARO 1982-1992 – Repair Guide (Checked by WxMax) 26
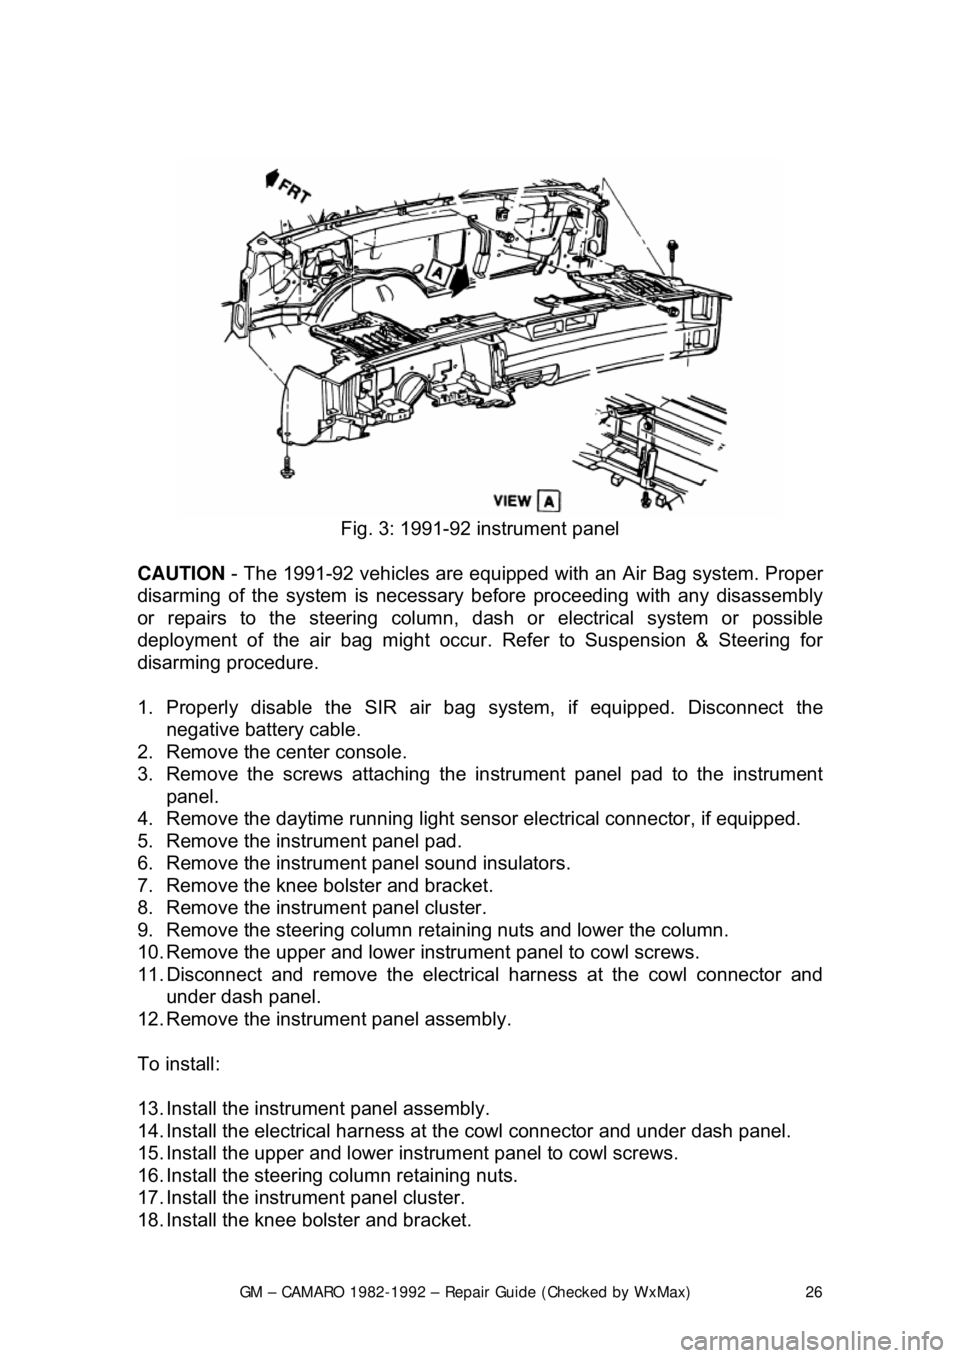
Fig. 3: 1991-92 instrument panel
CAUTION - The 1991-92 vehicles are equipped with an Air Bag system. Proper
disarming of the system is necessary before proceeding with any disassembly
or repairs to the steering column, das h or electrical system or possible
deployment of the air bag might occur. Refer to Suspension & Steering for
disarming procedure.
1. Properly disable t he SIR air bag system, if equipped. Disconnect the
negative battery cable.
2. Remove the center console.
3. Remove the screws attaching the in strument panel pad to the instrument
panel.
4. Remove the daytime running light sens or electrical connector, if equipped.
5. Remove the instrument panel pad.
6. Remove the instrument panel sound insulators.
7. Remove the knee bolster and bracket.
8. Remove the instrument panel cluster.
9. Remove the steering column retaining nuts and lower the column.
10. Remove the upper and lower instrument panel to cowl screws.
11. Disconnect and remove the electric al harness at the cowl connector and
under dash panel.
12. Remove the instrument panel assembly.
To install:
13. Install the instru ment panel assembly.
14. Install the electrical harness at the cowl connector and under dash panel.
15. Install the upper and lower inst rument panel to cowl screws.
16. Install the steering column retaining nuts.
17. Install the instru ment panel cluster.
18. Install the knee bolster and bracket.
Page 27 of 875
GM – CAMARO 1982-1992 – Repair Guide (Checked by WxMax) 27
19. Install the instrument panel sound insulators.
20. Install the inst
rument panel pad.
21. Install the daytime running light sensor electrical connector, if equipped.
22. Install the screws attaching the in strument panel pad to the instrument
panel.
23. Install the center console.
24. Properly arm the SIR air bag syste m, if equipped. Disconnect the negative
battery cable.
DOOR PANELS
REMOVAL & INSTALLATION
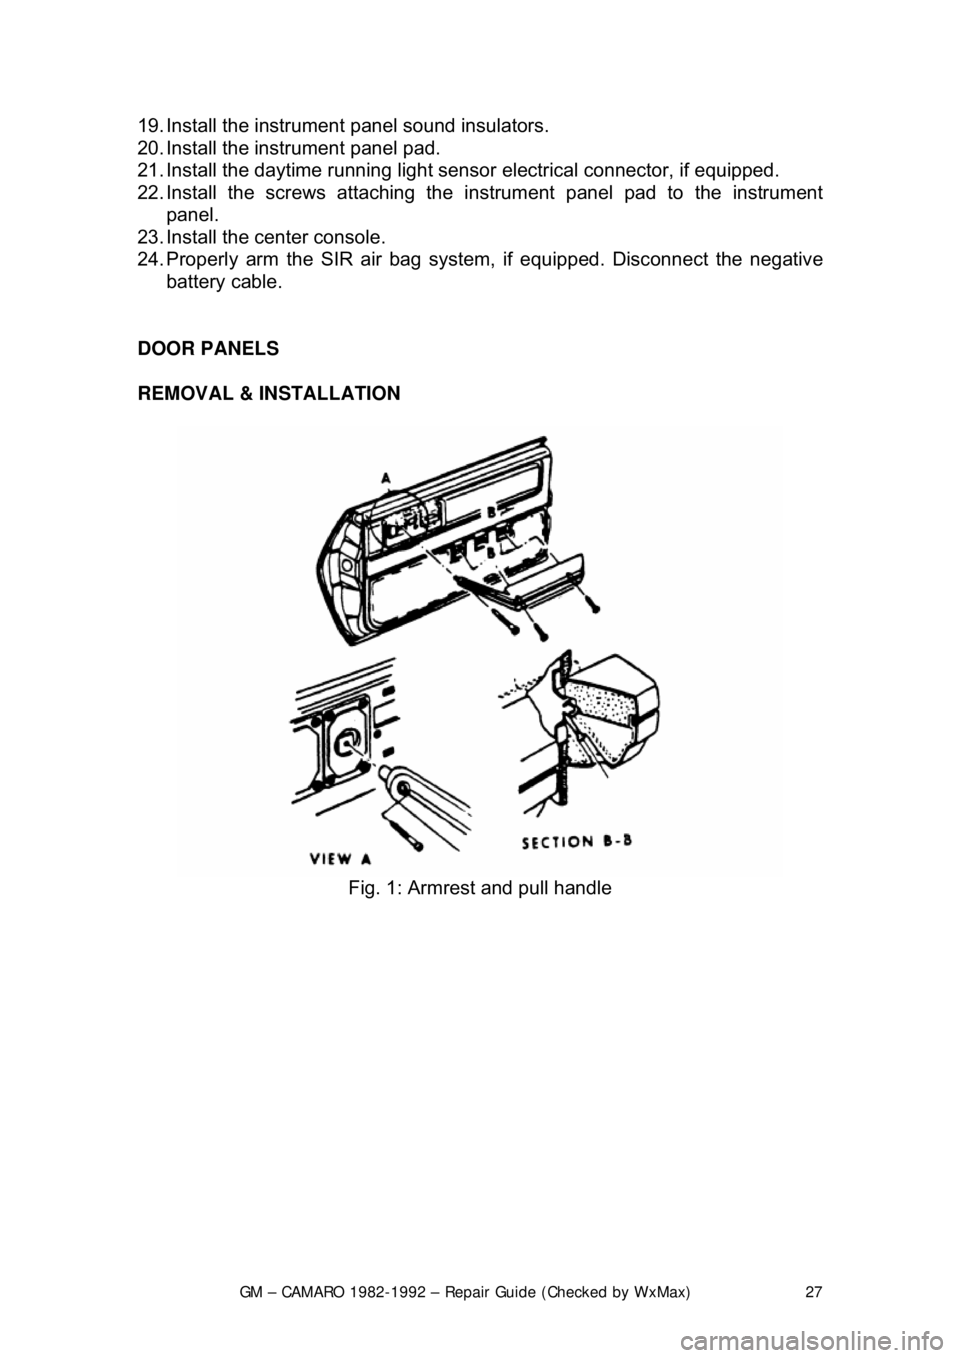
Fig. 1: Armrest and pull handle
Page 28 of 875
GM – CAMARO 1982-1992 – Repair Guide (Checked by WxMax) 28
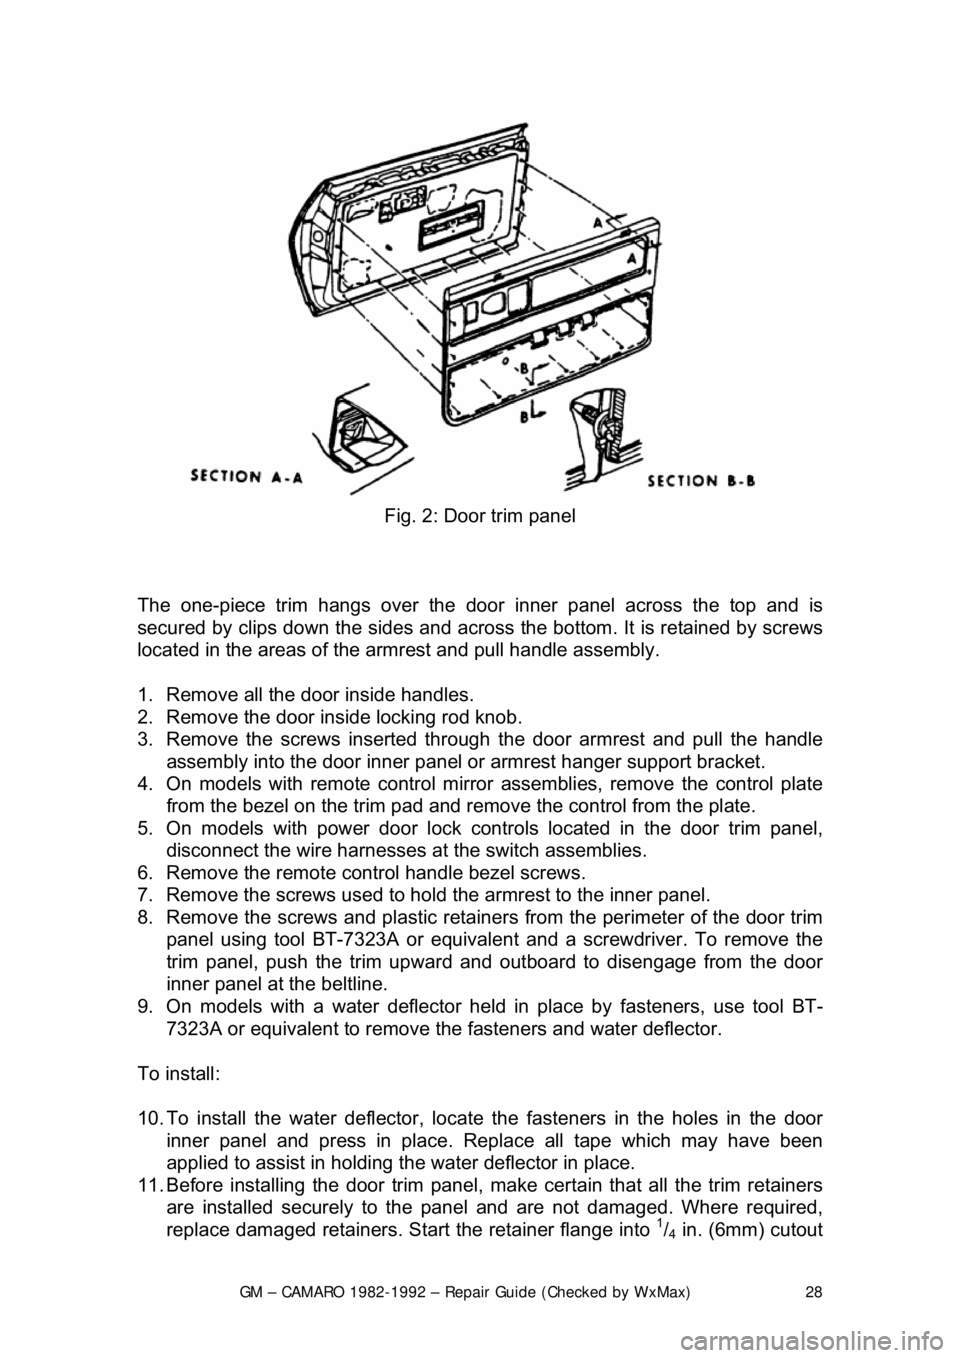
Fig. 2: Door trim panel
The one-piece trim hangs over the door inner panel across the top and is
secured by clips down the sides and across the bottom. It is retained by screws
located in the areas of the armrest and pull handle assembly.
1. Remove all the door inside handles.
2. Remove the door inside locking rod knob.
3. Remove the screws inserted through the door armrest and pull the handle
assembly into the door inner panel or armrest hanger support bracket.
4. On models with remote control mirror assemblies, remove the control plate
from the bezel on the trim pad and remo ve the control from the plate.
5. On models with power door lock contro ls located in the door trim panel,
disconnect the wire harnesses at the switch assemblies.
6. Remove the remote control handle bezel screws.
7. Remove the screws used to hold the armrest to the inner panel.
8. Remove the screws and plastic retainer s from the perimeter of the door trim
panel using tool BT-7323A or equivalent and a screwdriver. To remove the
trim panel, push the trim upward and out board to disengage from the door
inner panel at the beltline.
9. On models with a water deflector held in place by fasteners, use tool BT-
7323A or equivalent to remove th e fasteners and water deflector.
To install:
10. To install the water deflector, locate the fasteners in the holes in the door
inner panel and press in place. R eplace all tape which may have been
applied to assist in holding t he water deflector in place.
11. Before installing the door trim panel, make certain that all the trim retainers
are installed securely to the panel and are not damaged. Where required,
replace damaged retainers. St art the retainer flange into
1/4 in. (6mm) cutout
Page 29 of 875
GM – CAMARO 1982-1992 – Repair Guide (Checked by WxMax) 29
attachment hole in the trim panel, rotate the retainer until the flange is
engaged fully.
12. Connect all electrical components where present.
13. To install the door trim panel, locate the top of the assembly over the upper
flange of the door inner panel, inserting the door handle through the handle
slot in the panel and press down on the trim panel to engage the upper
retaining clips.
14. Position the trim panel to the door inner panel so the trim retainers are
aligned with the attaching holes in t he panel and tap the retainers into the
holes with the palm of hand or a clean rubber mallet.
15. Install the screws used to hold the armrest to the inner panel.
16. Install the remote control handle bezel screws.
17. On models with power door lock contro ls located in the door trim panel,
connect the wire harnesses at the switch assemblies.
18. On models with remote control mirror assemblies, install the control to the
plate. Install the control plate to the bezel on the trim pad.
19. Install the handle assemb ly and install the screws inserted through the door
armrest.
20. Install the door inside locking rod knob.
21. Install all the door inside handles.
HEADLINER
REMOVAL & INSTALLATION
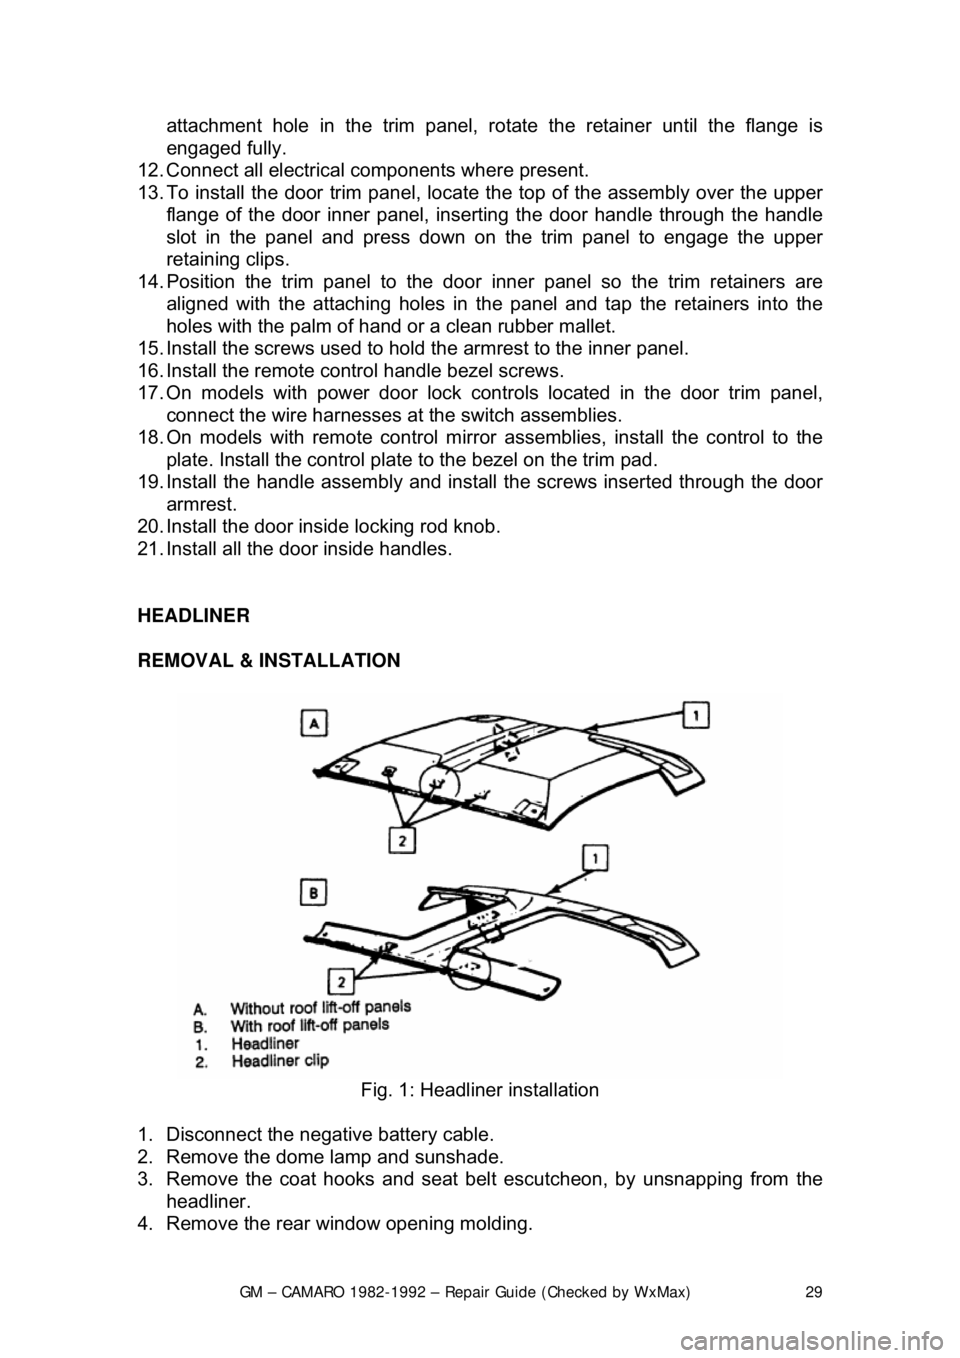
Fig. 1: Headliner installation
1. Disconnect the negative battery cable.
2. Remove the dome lamp and sunshade.
3. Remove the coat hooks and seat bel t escutcheon, by unsnapping from the
headliner.
4. Remove the rear window opening molding.
Page 30 of 875
GM – CAMARO 1982-1992 – Repair Guide (Checked by WxMax) 30
5. Remove the rear quarter interior
trim panels, body lock pillar panels and
windshield side upper moldings.
6. Remove the headliner retaining clips and remove the headliner.
7. Installation is the revers e of the removal procedure.
DOOR LOCKS
REMOVAL & INSTALLATION
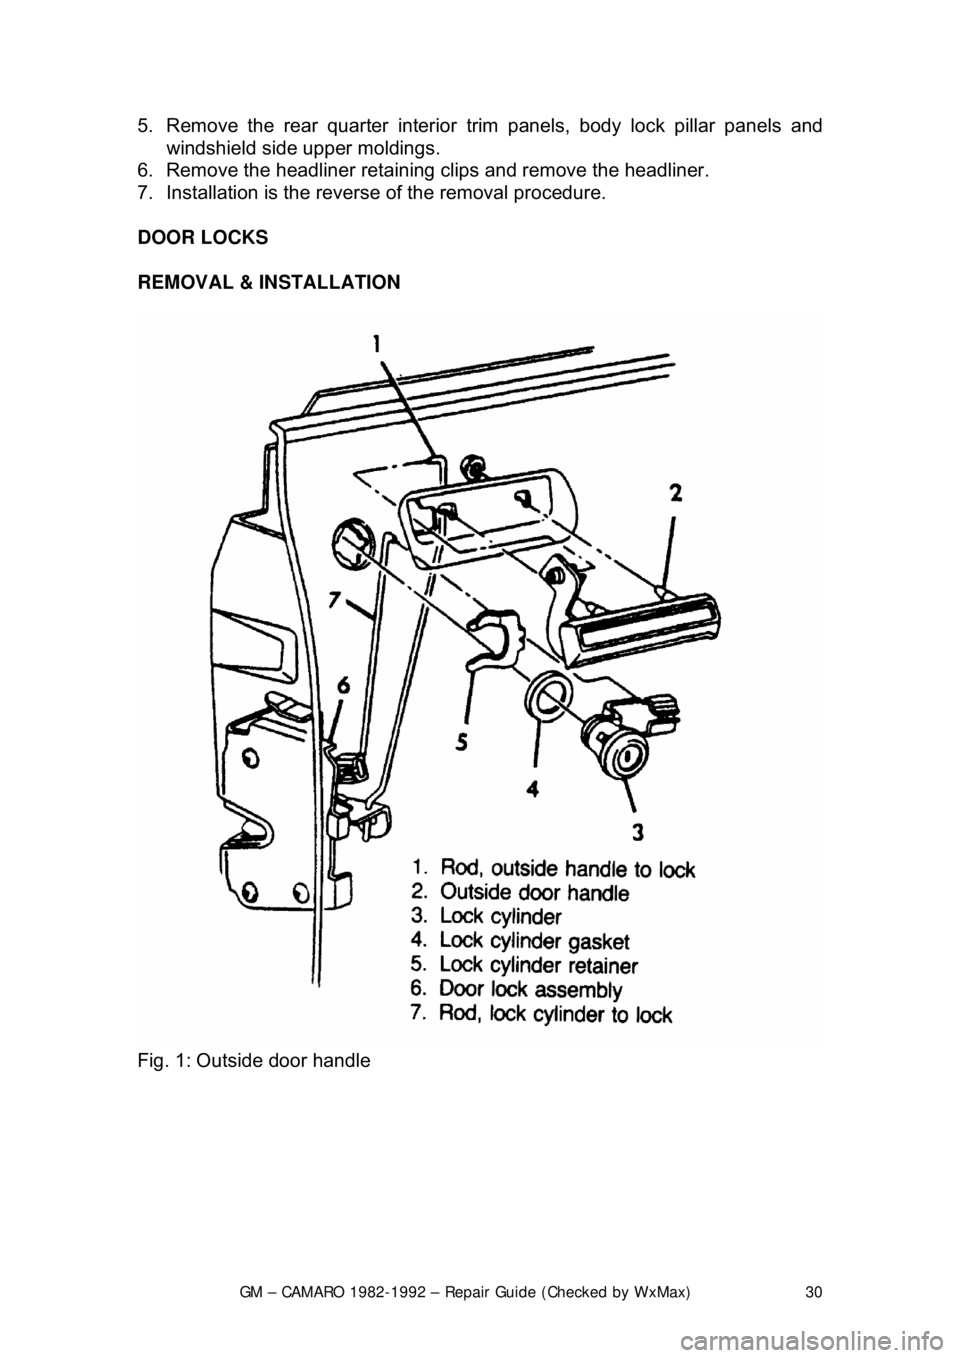
Fig. 1: Outside door handle