CHEVROLET CAMARO 1982 Repair Guide
Manufacturer: CHEVROLET, Model Year: 1982, Model line: CAMARO, Model: CHEVROLET CAMARO 1982Pages: 875, PDF Size: 88.64 MB
Page 31 of 875
GM – CAMARO 1982-1992 – Repair Guide (Checked by WxMax) 31
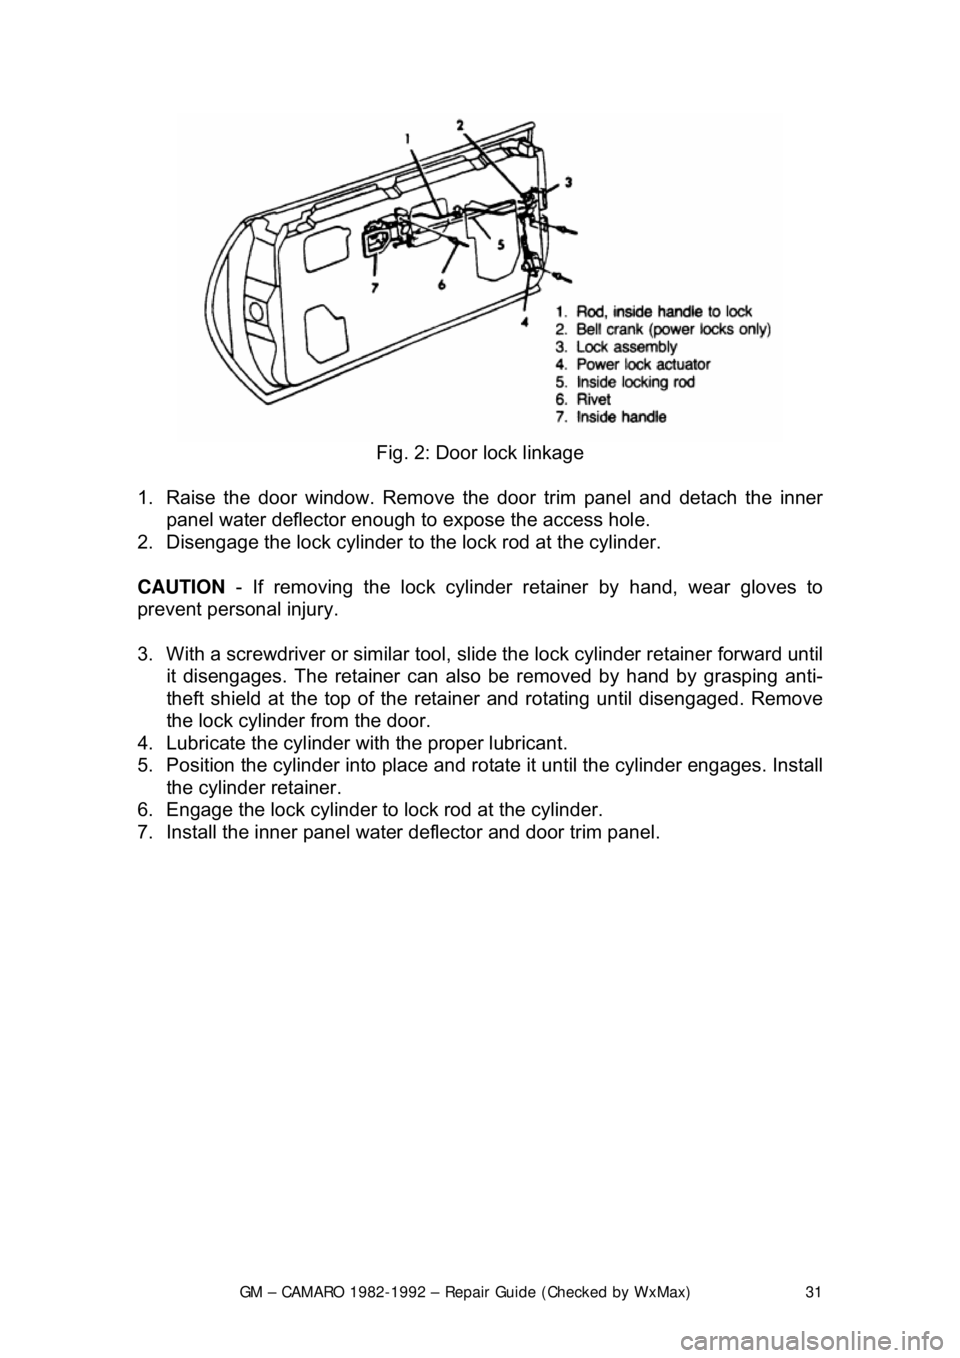
Fig. 2: Door lock linkage
1. Raise the door window. Remove the door tr im panel and detach the inner
panel water deflector enough to expose the access hole.
2. Disengage the lock cylinder to t he lock rod at the cylinder.
CAUTION - If removing the lock cylinder reta iner by hand, wear gloves to
prevent personal injury.
3. With a screwdriver or similar tool, s lide the lock cylinder retainer forward until
it disengages. The retainer can also be removed by hand by grasping anti\
-
theft shield at the top of the retainer and rotating until disengaged. Remove
the lock cylinder from the door.
4. Lubricate the cylinder wit h the proper lubricant.
5. Position the cylinder into place and ro tate it until the cylinder engages. Install
the cylinder retainer.
6. Engage the lock cylinder to lock rod at the cylinder.
7. Install the inner panel wate r deflector and door trim panel.
Page 32 of 875
GM – CAMARO 1982-1992 – Repair Guide (Checked by WxMax) 32
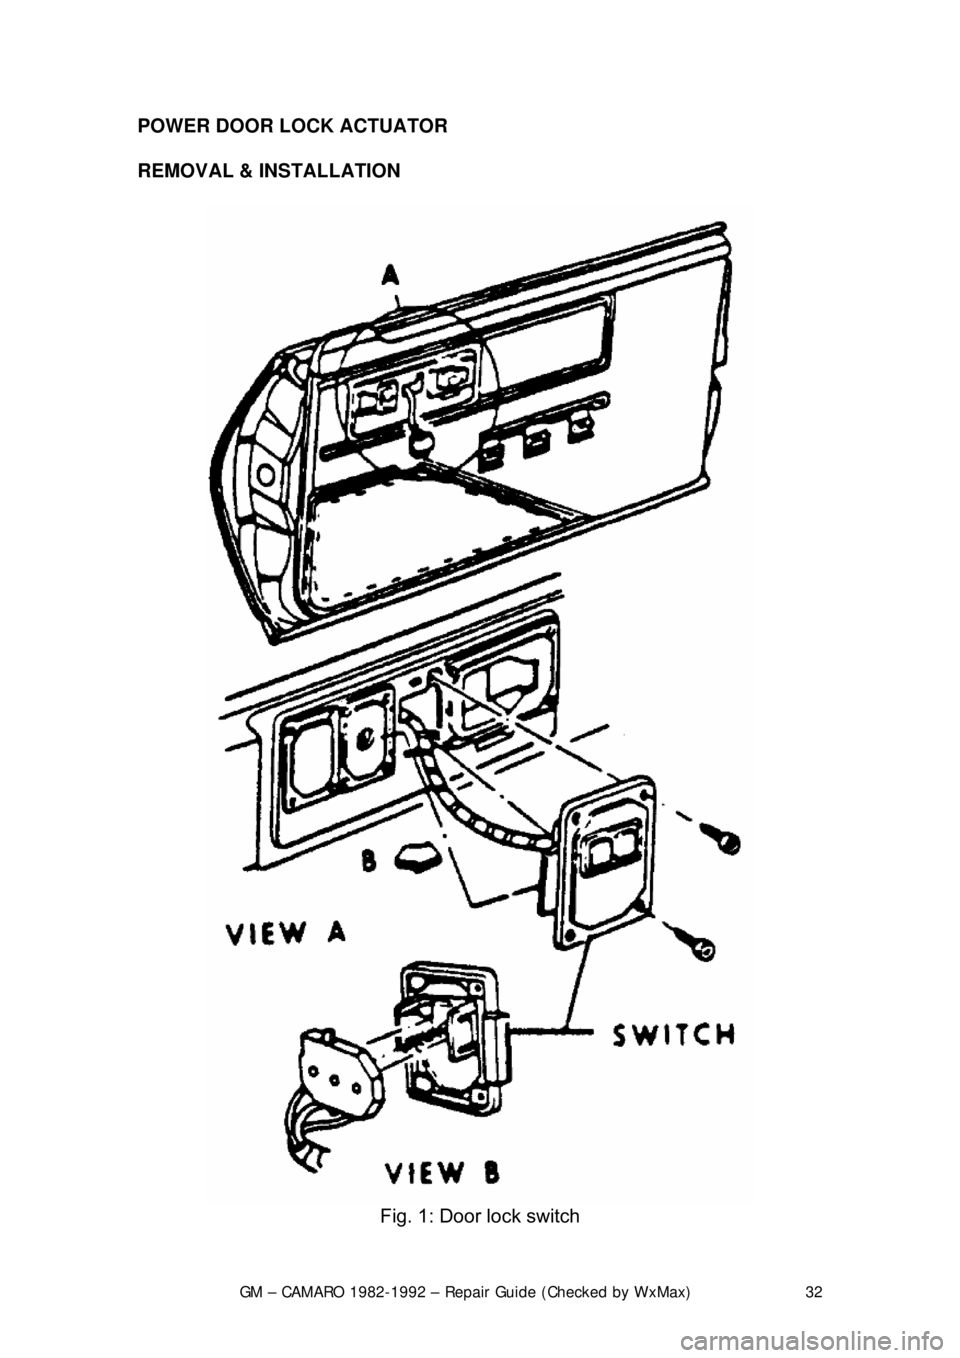
POWER DOOR LOCK ACTUATOR
REMOVAL & INSTALLATION
Fig. 1: Door lock switch
Page 33 of 875
GM – CAMARO 1982-1992 – Repair Guide (Checked by WxMax) 33
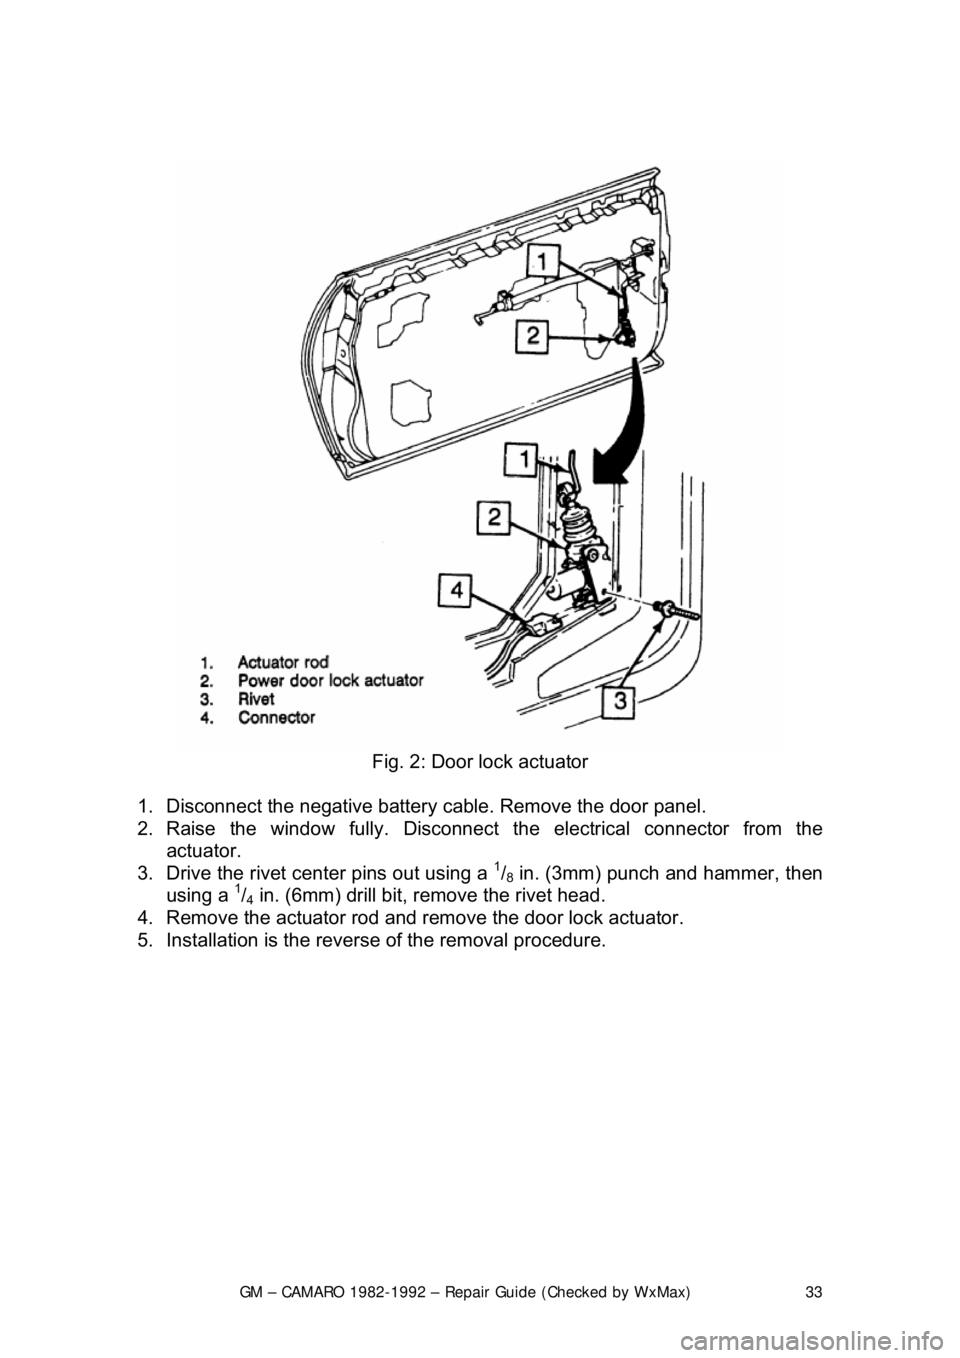
Fig. 2: Door lock actuator
1. Disconnect the negative battery c able. Remove the door panel.
2. Raise the window fully. Disconnect t he electrical connector from the
actuator.
3. Drive the rivet cent er pins out using a
1/8 in. (3mm) punch and hammer, then
using a 1/4 in. (6mm) drill bit, remove the rivet head.
4. Remove the actuator rod and remove the door lock actuator.
5. Installation is the revers e of the removal procedure.
Page 34 of 875
GM – CAMARO 1982-1992 – Repair Guide (Checked by WxMax) 34
REAR LIFTGATE PULL-DOWN UNIT
REMOVAL & INSTALLATION
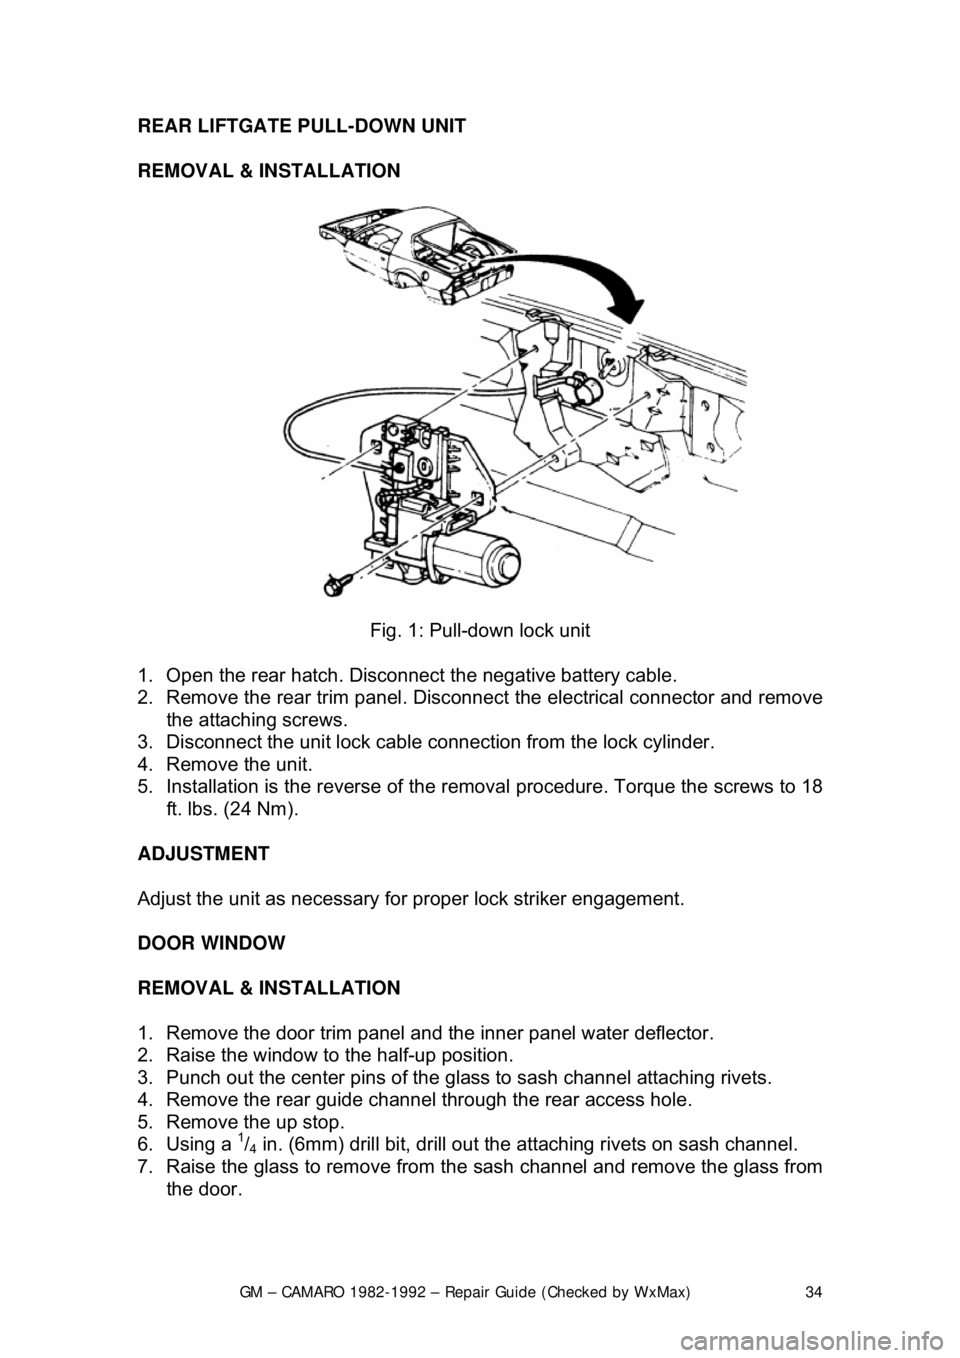
Fig. 1: Pull-down lock unit
1. Open the rear hatch. Disconnec t the negative battery cable.
2. Remove the rear trim panel. Disconnec t the electrical connector and remove
the attaching screws.
3. Disconnect the unit lock cable co nnection from the lock cylinder.
4. Remove the unit.
5. Installation is the reverse of the re moval procedure. Torque the screws to 18
ft. lbs. (24 Nm).
ADJUSTMENT
Adjust the unit as necessary fo r proper lock striker engagement.
DOOR WINDOW
REMOVAL & INSTALLATION
1. Remove the door trim panel and the inner panel water deflector.
2. Raise the window to the half-up position.
3. Punch out the center pins of the gl ass to sash channel attaching rivets.
4. Remove the rear guide channel through the rear access hole.
5. Remove the up stop.
6. Using a
1/4 in. (6mm) drill bit, drill out the atta ching rivets on sash channel.
7. Raise the glass to remove from the sash channel and remove the glass from
the door.
Page 35 of 875
GM – CAMARO 1982-1992 – Repair Guide (Checked by WxMax) 35
To install:
8. Remove the drilled out rivets and shavings from the door.
9. Check the rivet bushings and re
tainers on the glass for damage. If
necessary, remove the bushings using a flat-bladed tool covered with a cloth
body tape. Install by snapping rivet retainer into the bushing.
10. Lower the glass into the door and position on the sash channel so the holes
in the sash line up with the holes in the bushings and retainers.
11. Using rivet tool J-29022 or equivalent, install
1/4 in. (6mm) peel type rivet
(part No. 20184399 or equivalent) to re tain the glass to sash channel.
12. Install the rear guide channel.
13. Install the front up stop to support on the inner panel.
14. Before installing the trim parts, c heck the window operation for performance
and fit to roof rail weatherstrip.
15. Install the inner panel water deflector and the door trim panel.
WINDOW REGULATOR AND REGULATOR MOTOR
REMOVAL & INSTALLATION
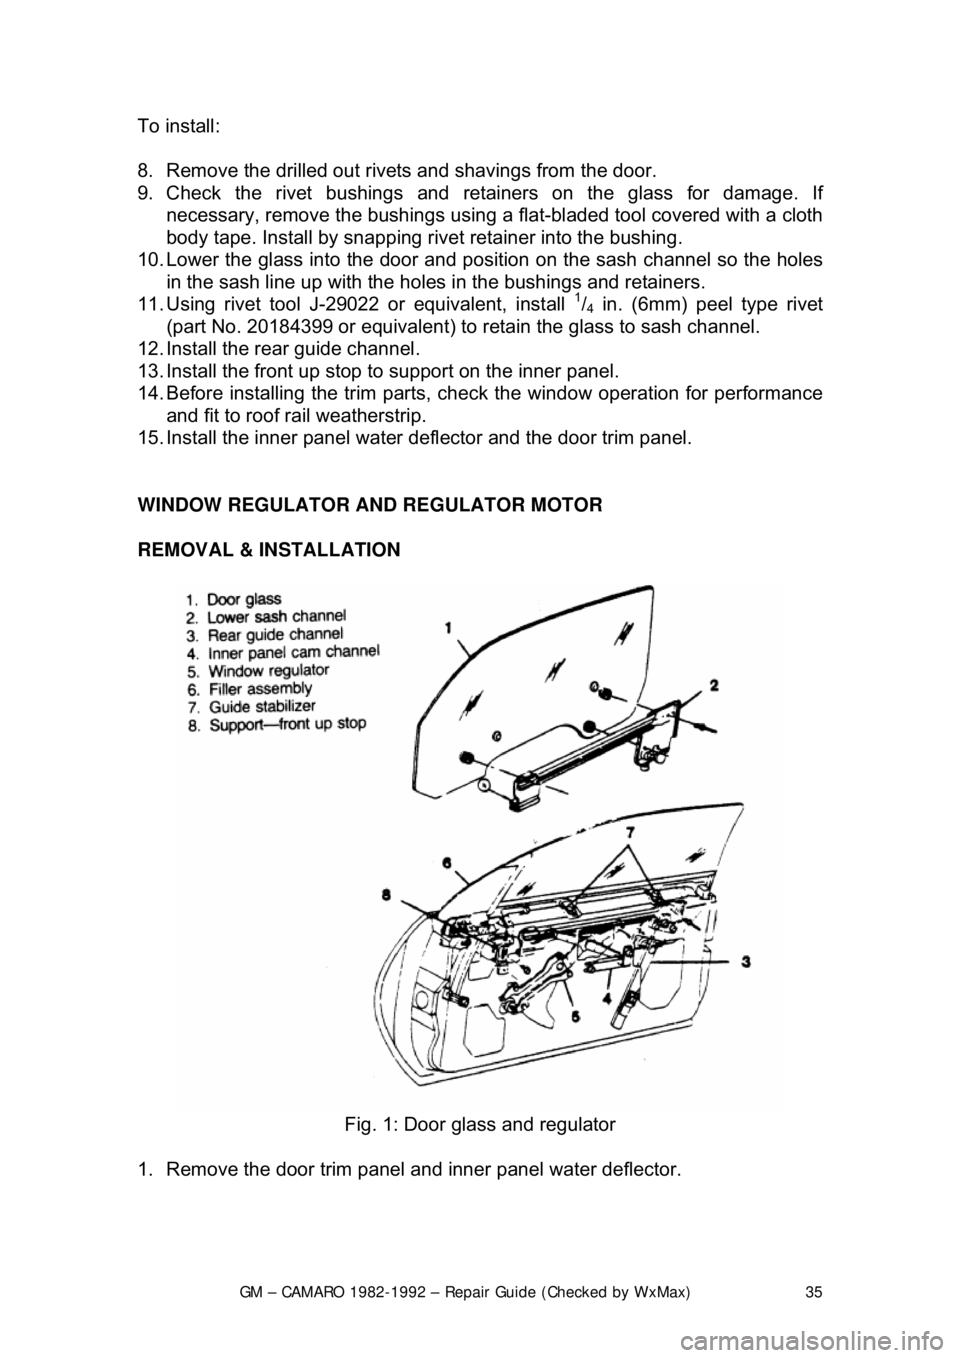
Fig. 1: Door glass and regulator
1. Remove the door trim panel an d inner panel water deflector.
Page 36 of 875

GM – CAMARO 1982-1992 – Repair Guide (Checked by WxMax) 36
2. Raise the window to half-
up position and hold in place by inserting a rubber
wedge door stops at the front and r ear of the window between window and
inner panel.
3. Remove the rear guide channel and inner panel cam channel.
4. Punch out the center pins of the r egulator rivets; then drill out the rivets
using a
1/4 in. (6mm) drill bit.
5. Move the regulator rear ward and disconnect wire harness from the motor (if
equipped). Disengage the roller on the re gulator lift arm from glass sash
channel.
6. Remove the regulator thr ough the rear access hole.
CAUTION - If electric motor removal from t he regulator is required, the sector
gear must be locked in positi on. The regulator lift arm is under tension from the
counterbalance spring and could cause personal injury if the sector gear is not
locked in position.
7. Drill a hole through the r egulator sector gear and backplate and install a bolt
and nut to lock the sector gear in position.
8. Using a
3/16 in. (5mm) drill bit, drill out the motor attaching rivets and remove
the motor from the regulator.
To install:
9. To install the motor to the regulator, use a rivet tool J-29022 or equivalent,
and install
3/16 in. (5mm) rivets or 3/16 in. (5mm) nuts and bolts. Remove bolt
and nut used to secure the sector gear in position.
10. Place the regulator th rough the rear access hole into the door inner panel. If
electric regulator is being installed, connect the wire connector to motor prior
to installing the regulat or to the inner panel.
11. Locate the lift arm roller in to the glass sash channel.
12. Using rivet tool J-29022 or equivalent, rivet the regulator to the inner panel
of the door using
1/4 in. (6mm) 1/2 in. (13mm) aluminum peel type rivets (part
No. 9436175 or equivalent). If rivet tool is not available, use the following nut
and bolt method:
a. Install U-clips on the regulator at the attaching locations. Be sure to
install the clips with clinch nuts on the outboard side of the regulator.
b. Locate the regulator in the door inner panel. If the electric regulator is
being installed, connect the wire connec tor to the regulator motor.
c. Locate the lift arm roller in the glass sash channel.
d. Align the regulator with clinch nuts to holes in the inner panel.
e. Attach the regulator (and mo tor) to the door inner panel with
1/4-20 x 1/2
in. screws (part No. 9 419723 or equivalent) into 1/4 in. (6mm) nuts with
integral washers. Tighten the screw to 90-125 inch lbs. (10-14 Nm)
torque.
13. Install the inner panel cam channel and rear guide channel.
14. Remove the rubber wedge door stops at the front and rear of the window
between window and inner panel.
15. Install the inner panel water deflector and the door trim panel.
Page 37 of 875

GM – CAMARO 1982-1992 – Repair Guide (Checked by WxMax) 37
WINDSHIELD AND FIXED GLASS
REMOVAL & INSTALLATION
If your windshield, or other fixed window,
is cracked or chipped, you may decide
to replace it with a new one yourself. Ho wever, there are two main reasons why
replacement windshields and other windo w glass should be installed only by a
professional automotive glass technician: safety and cost.
The most important reason a professional should install automotive glass is for
safety. The glass in the vehicle, espec ially the windshield, is designed with
safety in mind in case of a collision. The windshield is specially manufactured
from two panes of specia lly-tempered glass with a th in layer of transparent
plastic between them. This construction allows the glass to "give" in the event
that a part of your body hits the windshiel d during the collision, and prevents the
glass from shattering, which could caus e lacerations, blinding and other harm to
passengers of the vehicle. The other fixed windows are designed to be
tempered so that if they break during a coll ision, they shatter in such a way that
there are no large pointed glass piec es. The professional automotive glass
technician knows how to install the glass in a vehicle so that it will function
optimally during a collision. Without the proper experience, knowledge and
tools, installing a piece of automotive glass yourself could lead to additional
harm if an accident should ever occur.
Cost is also a factor when deciding to install automotive glass yourself.
Performing this could cost you much more than a professional may charge \
for
the same job. Since the windshield is designed to break under stress, an often
life saving characteristic, windshields tend to break VERY easily when an
inexperienced person attempts to install one. Do-it-yourselfers buying two, three
or even four windshields from a salvage yard because they have broken them
during installation are common stories. Also, since the automotive glass is
designed to prevent the out side elements from entering your vehicle, improper
installation can lead to water and air lea ks. Annoying whining noises at highway
speeds from air leaks or inside body pane l rusting from water leaks can add to
your stress level and subtract from y our wallet. After buying two or three
windshields, installing them and ending up with a leak that produces a noise
while driving and water damage during ra instorms, the cost of having a
professional do it correctly the first time may be much more alluring. The editors
of this repair guide, therefore, advise that you have a professional automotive
glass technician service any broken glass on your vehicle.
WINDSHIELD CHIP REPAIR
Check with your state and local authori ties on the laws for state safety
inspection. Some states or municipalities may not allow chip repair as a viable
option for correcting stone damage to your windshield.
Although severely cracked or damaged winds hields must be replaced, there is
something that you can do to prolong or even prevent the need for replacement
of a chipped windshield. T here are many companies wh ich offer windshield chip
Page 38 of 875
GM – CAMARO 1982-1992 – Repair Guide (Checked by WxMax) 38
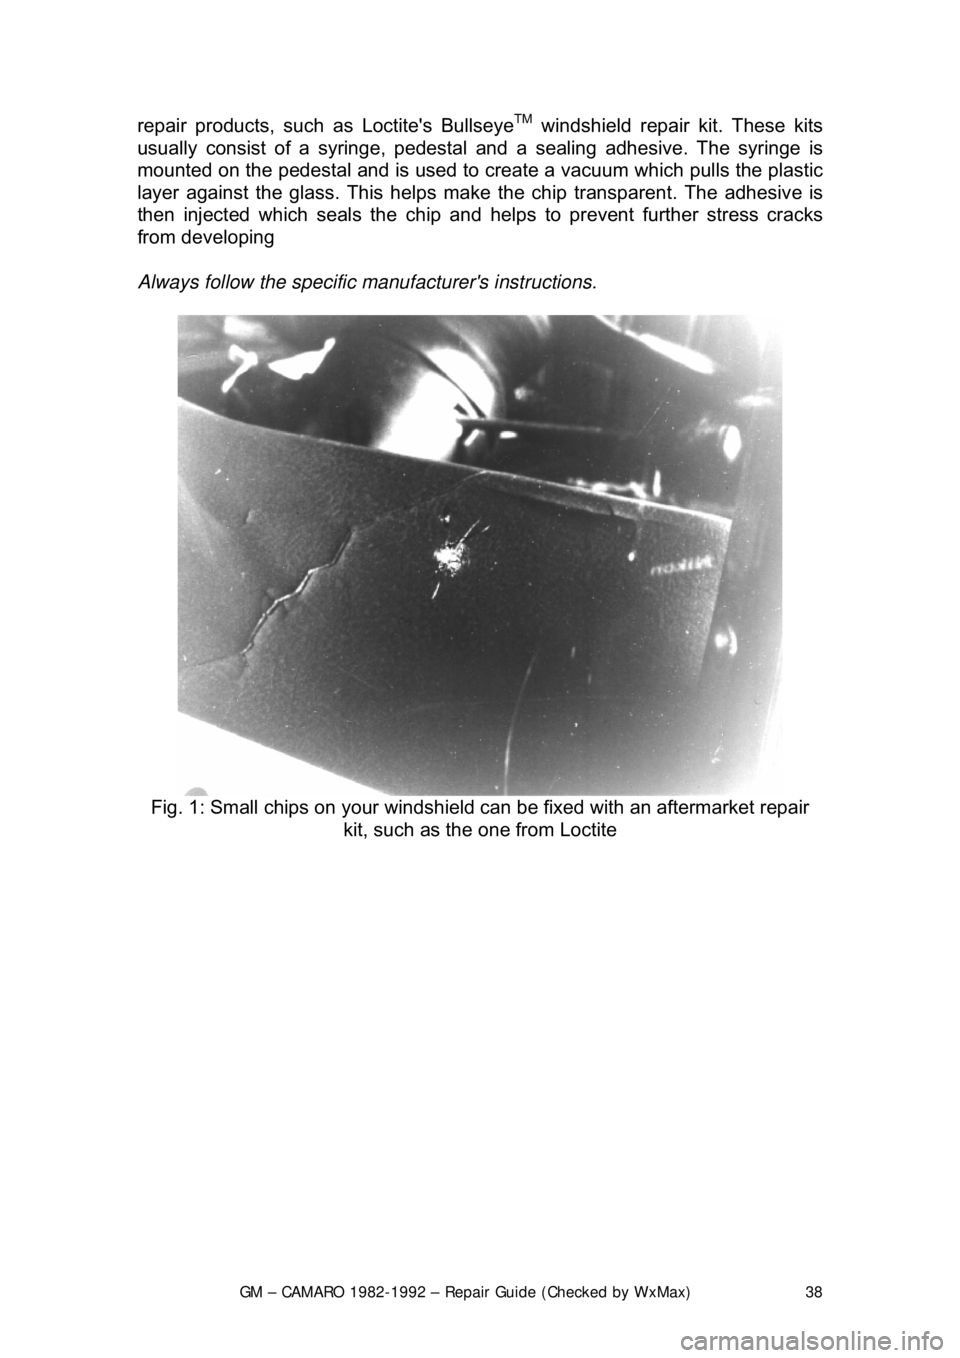
repair products, such as Loctite's BullseyeTM windshield repair kit. These kits
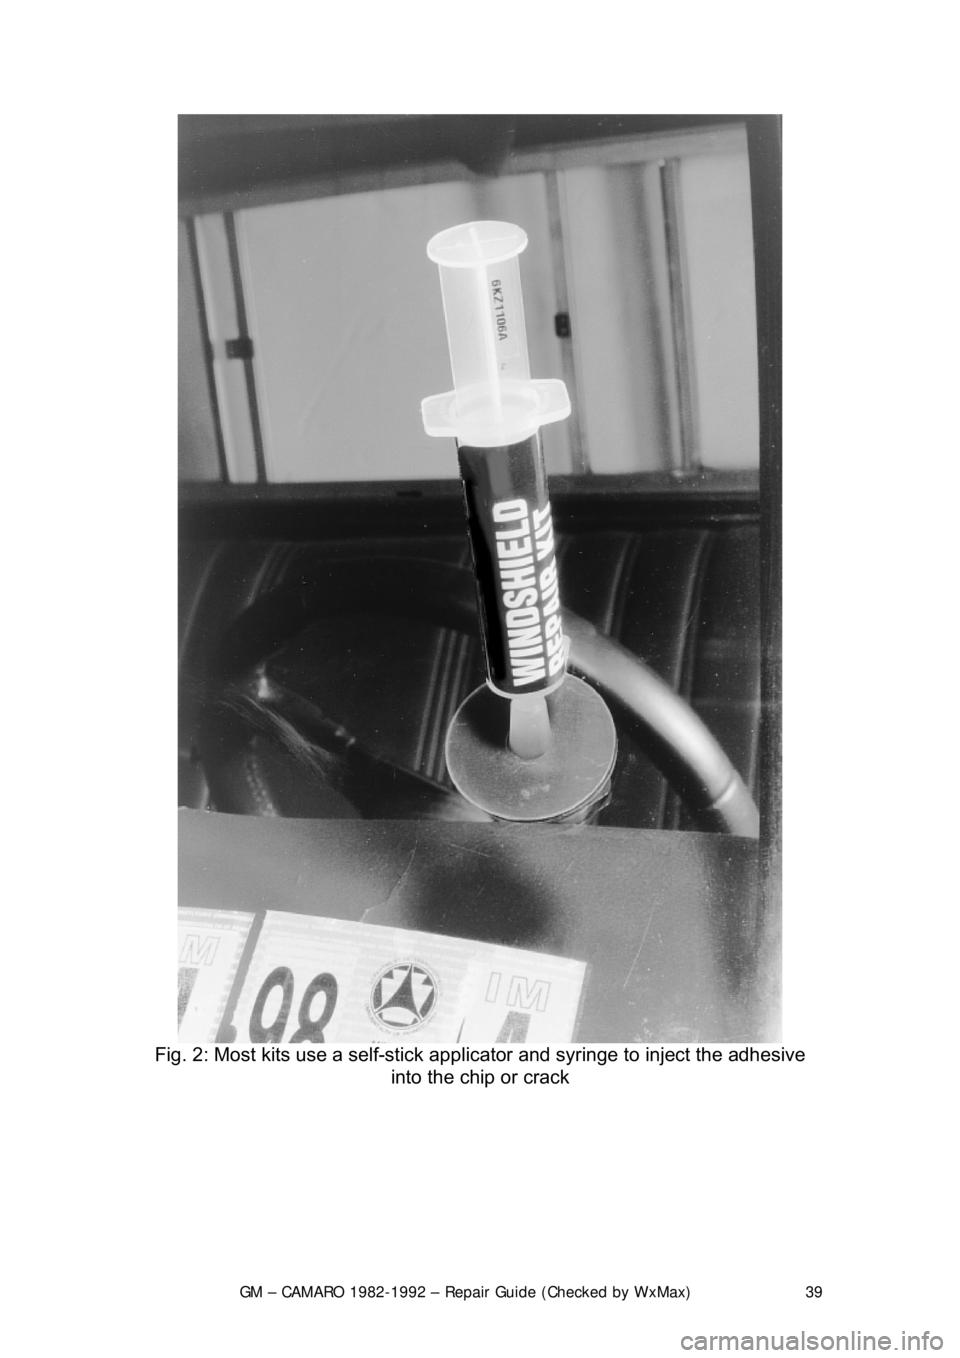
usually consist of a syringe, pedestal and a sealing adhesive. The syringe is
mounted on the pedestal and is used to create a vacuum which pulls the plastic
layer against the glass. This helps make the chip transparent. The adhes\
ive is
then injected which seals the chip and helps to prevent further stress cracks
from developing
Always follow the specific manufacturer's instructions.
Fig. 1: Small chips on your windshield can be fixed with an aftermarket repair
kit, such as the one from Loctite
Page 39 of 875
GM – CAMARO 1982-1992 – Repair Guide (Checked by WxMax) 39
Fig. 2: Most kits use a self-stick app licator and syringe to inject the adhesive
into the chip or crack
Page 40 of 875
GM – CAMARO 1982-1992 – Repair Guide (Checked by WxMax) 40
INSIDE REAR VIEW MIRROR
INSTALLATION
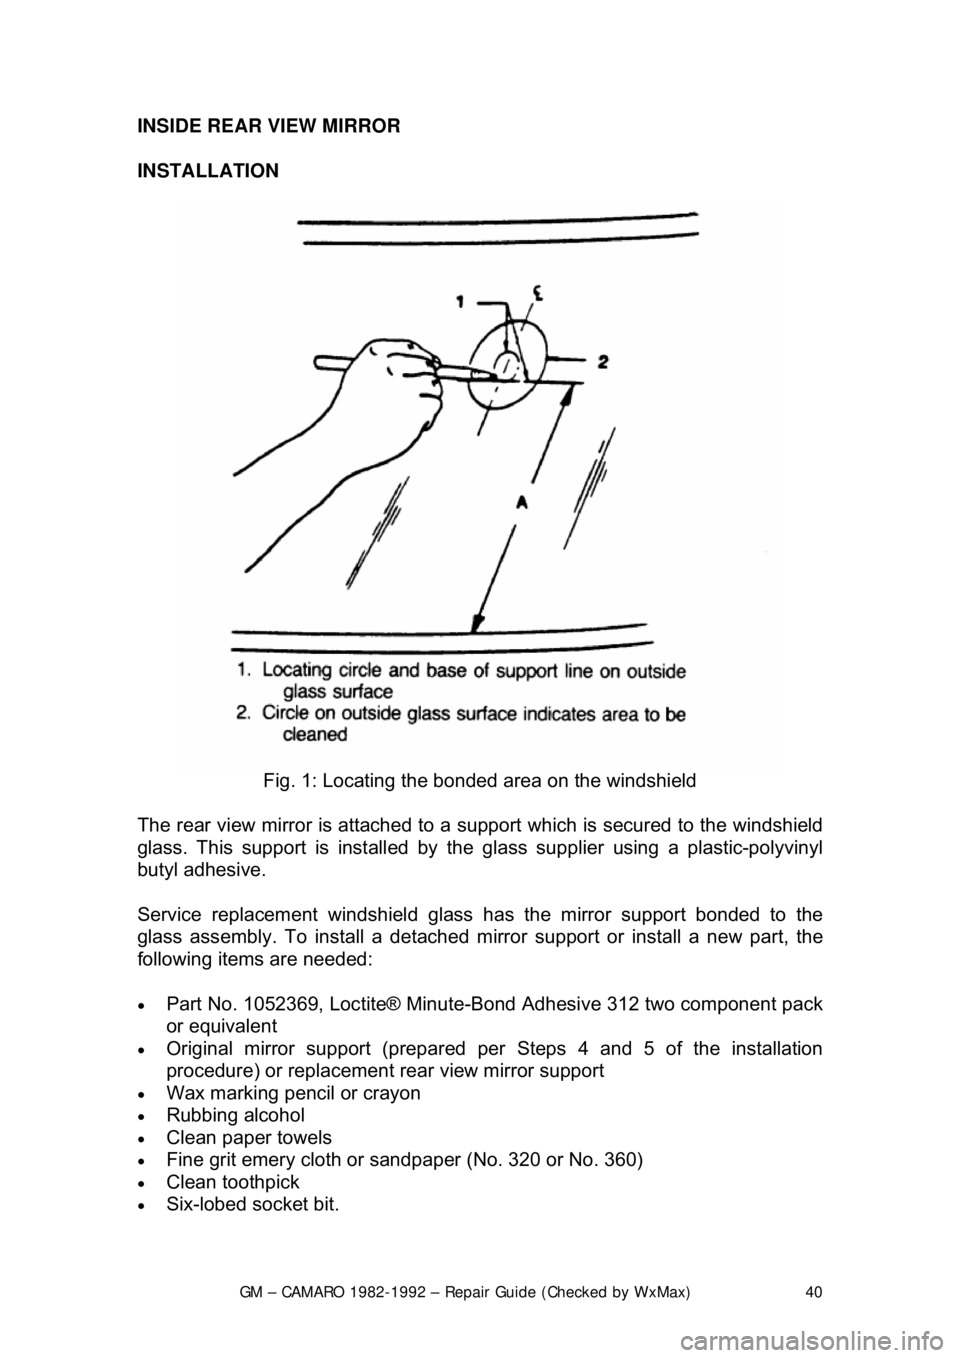
Fig. 1: Locating the bonded area on the windshield
The rear view mirror is attached to a s upport which is secured to the windshield
glass. This support is inst alled by the glass supplier using a plastic-polyvinyl
butyl adhesive.
Service replacement windshield glass has the mirror support bonded to the
glass assembly. To install a detached mi rror support or install a new part, the
following items are needed:
• Part No. 1052369, Loctite® Minute-B ond Adhesive 312 two component pack
or equivalent
• Original mirror support (prepared per Steps 4 and 5 of the installation
procedure) or replacement rear view mirror support
• Wax marking pencil or crayon
• Rubbing alcohol
• Clean paper towels
• Fine grit emery cloth or sandpap er (No. 320 or No. 360)
• Clean toothpick
• Six-lobed socket bit.